tabla de contenido - fordservicecontent.com · sustancias químicas conocidas en el estado de...
TRANSCRIPT
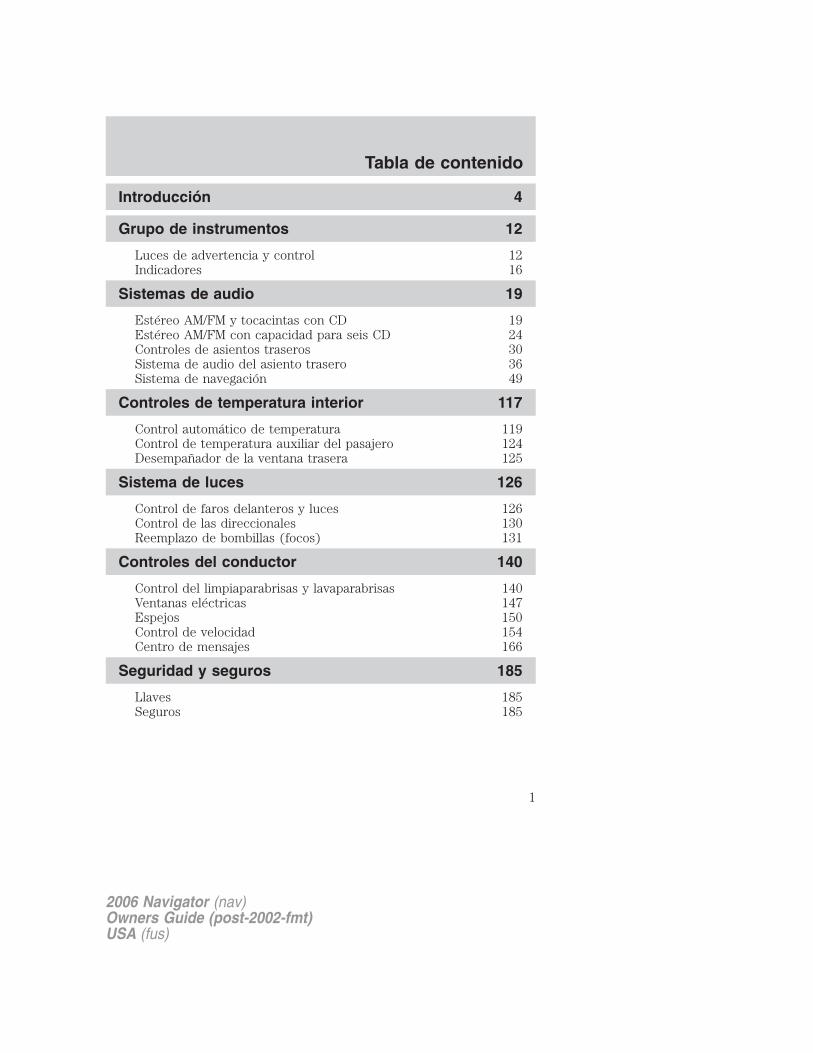
Introducción 4
Grupo de instrumentos 12
Luces de advertencia y control 12Indicadores 16
Sistemas de audio 19
Estéreo AM/FM y tocacintas con CD 19Estéreo AM/FM con capacidad para seis CD 24Controles de asientos traseros 30Sistema de audio del asiento trasero 36Sistema de navegación 49
Controles de temperatura interior 117
Control automático de temperatura 119Control de temperatura auxiliar del pasajero 124Desempañador de la ventana trasera 125
Sistema de luces 126
Control de faros delanteros y luces 126Control de las direccionales 130Reemplazo de bombillas (focos) 131
Controles del conductor 140
Control del limpiaparabrisas y lavaparabrisas 140Ventanas eléctricas 147Espejos 150Control de velocidad 154Centro de mensajes 166
Seguridad y seguros 185
Llaves 185Seguros 185
Tabla de contenido
1
2006 Navigator (nav)Owners Guide (post-2002-fmt)USA (fus)
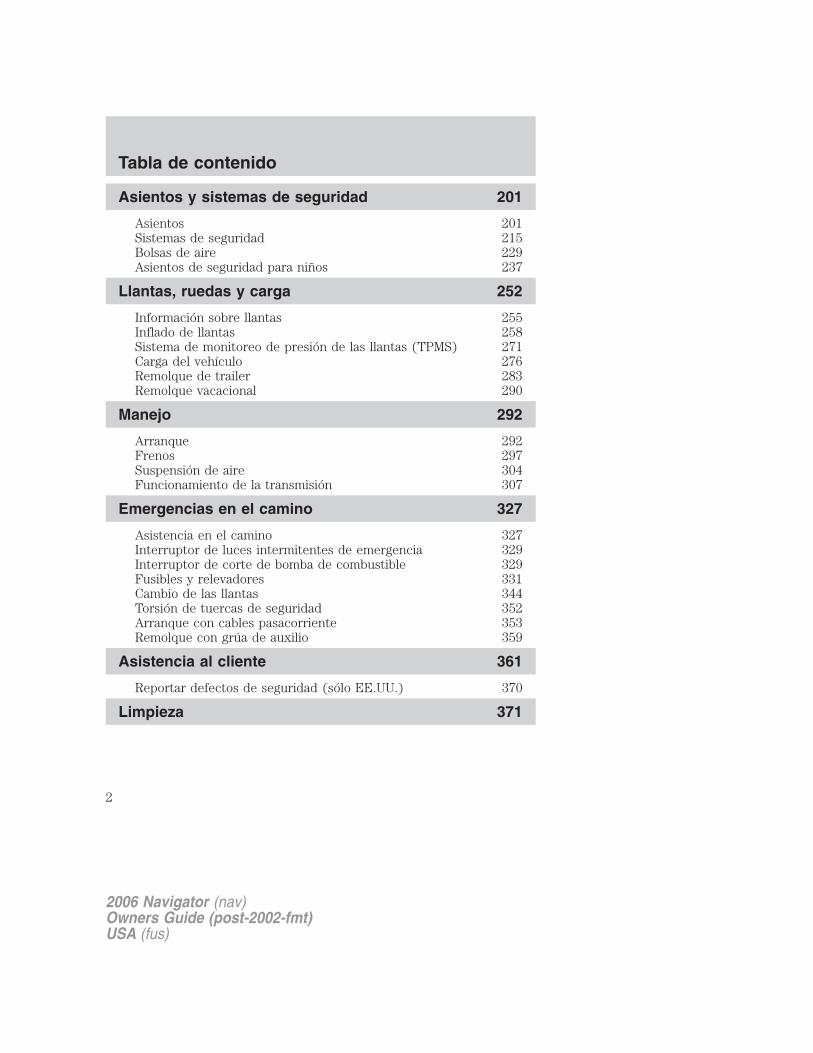
Asientos y sistemas de seguridad 201
Asientos 201Sistemas de seguridad 215Bolsas de aire 229Asientos de seguridad para niños 237
Llantas, ruedas y carga 252
Información sobre llantas 255Inflado de llantas 258Sistema de monitoreo de presión de las llantas (TPMS) 271Carga del vehículo 276Remolque de trailer 283Remolque vacacional 290
Manejo 292
Arranque 292Frenos 297Suspensión de aire 304Funcionamiento de la transmisión 307
Emergencias en el camino 327
Asistencia en el camino 327Interruptor de luces intermitentes de emergencia 329Interruptor de corte de bomba de combustible 329Fusibles y relevadores 331Cambio de las llantas 344Torsión de tuercas de seguridad 352Arranque con cables pasacorriente 353Remolque con grúa de auxilio 359
Asistencia al cliente 361
Reportar defectos de seguridad (sólo EE.UU.) 370
Limpieza 371
Tabla de contenido
2
2006 Navigator (nav)Owners Guide (post-2002-fmt)USA (fus)
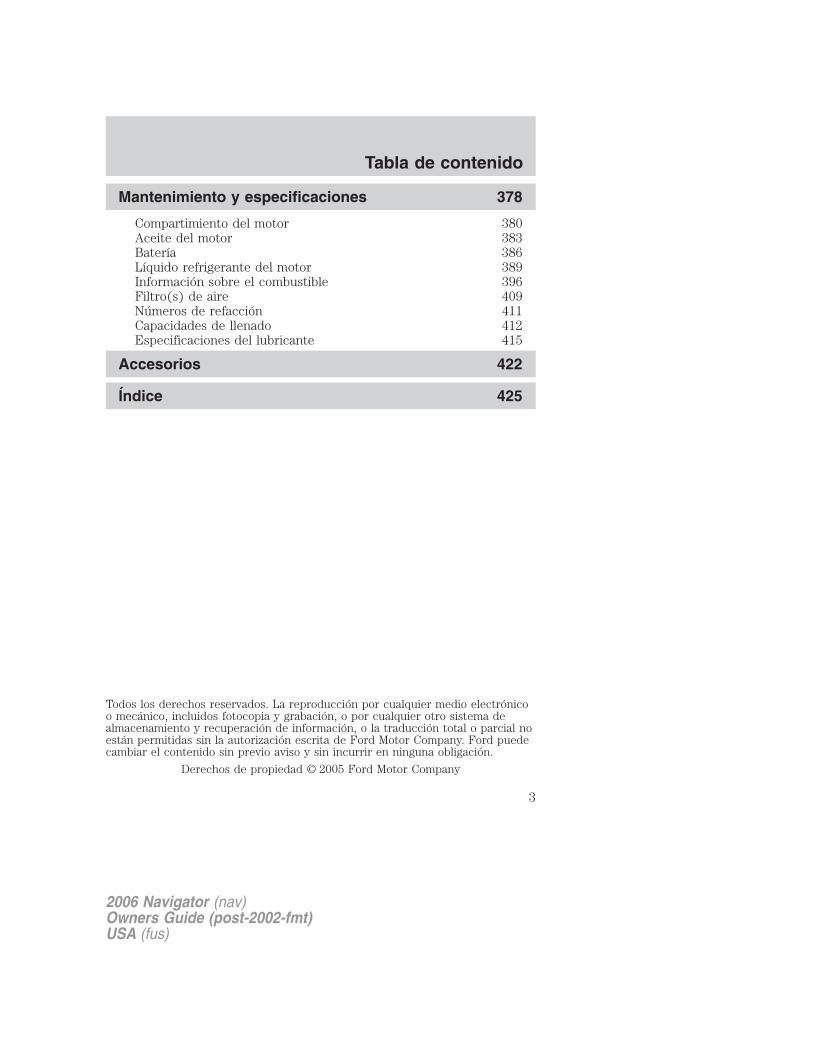
Mantenimiento y especificaciones 378
Compartimiento del motor 380Aceite del motor 383Batería 386Líquido refrigerante del motor 389Información sobre el combustible 396Filtro(s) de aire 409Números de refacción 411Capacidades de llenado 412Especificaciones del lubricante 415
Accesorios 422
Índice 425
Todos los derechos reservados. La reproducción por cualquier medio electrónicoo mecánico, incluidos fotocopia y grabación, o por cualquier otro sistema dealmacenamiento y recuperación de información, o la traducción total o parcial noestán permitidas sin la autorización escrita de Ford Motor Company. Ford puedecambiar el contenido sin previo aviso y sin incurrir en ninguna obligación.
Derechos de propiedad © 2005 Ford Motor Company
Tabla de contenido
3
2006 Navigator (nav)Owners Guide (post-2002-fmt)USA (fus)
Advertencia DISPOSICIÓN CALIFORNIA 65
ADVERTENCIA: el escape del motor, algunos de sus elementosy determinados componentes del vehículo contienen o emiten
sustancias químicas conocidas en el Estado de California comocausantes de cáncer y defectos de nacimiento u otros dañosreproductivos. Además, algunos líquidos que contienen los vehículos ydeterminados productos para el uso de los componentes contienen oemiten sustancias químicas conocidas en el Estado de California comocausantes de cáncer y defectos de nacimiento u otros dañosreproductivos.
FELICITACIONESFelicitaciones por comprar su nuevo Lincoln. Lea este manual parafamiliarizarse con su vehículo. Mientras más sepa y entienda de él,mayores serán la seguridad y el placer al manejarlo.
Para obtener más información acerca de Ford Motor Company y susproductos, visite los siguientes sitios Web:
• En los Estados Unidos: www.ford.com
• En Canadá: www.ford.ca
• En México: www.ford.com.mx
• En Australia: www.ford.com.au
La información adicional para el propietario se entrega en otraspublicaciones.
Este Manual del propietario describe cada opción y variedad demodelo disponible y, por consiguiente, algunos de los puntos tratadospueden no ser aplicables a su vehículo en particular. Más aún, debido alos ciclos de impresión, puede describir opciones antes de que esténdisponibles en forma masiva.
Recuerde entregar el Manual del propietario cuando revenda elvehículo. Es una parte integral del vehículo.
2006 Navigator (nav)Owners Guide (post-2002-fmt)USA (fus)
Introducción
4
Interruptor de corte de la bomba de combustible: en casode accidente, el interruptor de seguridad cortará
automáticamente el suministro de combustible hacia el motor. Elinterruptor también se puede activar ante una vibración repentina (porejemplo, un choque mientras se estaciona). Para restablecer elinterruptor, consulte Interruptor de corte de bomba de combustibleen el capítulo Emergencias en el camino.
SEGURIDAD Y PROTECCIÓN DEL MEDIO AMBIENTE
Símbolos de advertencia en este manual
¿Cómo puede reducir el riesgo de lesiones personales para usted u otraspersonas? En este manual, las respuestas a dichas preguntas aparecen encomentarios destacados por el símbolo del triángulo de advertencia.Estos comentarios se deberán leer y aplicar.
Símbolos de advertencia en su vehículo
Cuando vea este símbolo, esimperativo que consulte la secciónpertinente de este manual antes detocar o intentar realizar ajustes decualquier tipo.
Protección del medio ambienteTodos debemos poner de nuestraparte en la protección del medioambiente. El uso correcto delvehículo y el desecho autorizado demateriales de lubricación y limpiezason pasos importantes para lograr este objetivo. La información sobreprotección medioambiental se destaca en este manual con el símbolo delárbol.
2006 Navigator (nav)Owners Guide (post-2002-fmt)USA (fus)
Introducción
5

ASENTAMIENTO DE SU VEHÍCULOSu vehículo no necesita un asentamiento extensivo. Intente no conducircontinuamente a la misma velocidad durante los primeros 1,600 km(1,000 millas) de funcionamiento del vehículo nuevo. Varíefrecuentemente su velocidad para que las partes móviles se puedanasentar.
Conduzca su nuevo vehículo por lo menos 800 km (500 millas) antes dearrastrar un remolque. Además, durante los primeros 800 km (500 millas)que arrastre un remolque, no maneje a más de 112 km/h (70 mph) y noarranque con el acelerador a fondo. Este estilo de manejo ayudará al motor ya las otras partes del vehículo a asentarse en las cargas pesadas. Paraobtener información más detallada sobre el arrastre de un remolque,consulte Arrastre de remolque en el capítulo Llantas, ruedas y carga.
No agregue compuestos modificadores de fricción ni aceites especialesde asentamiento durante los primeros miles de kilómetros (millas) defuncionamiento, ya que estos aditivos pueden impedir el asentamiento delos anillos de los pistones. Consulte Aceite del motor en el capítuloMantenimiento y especificaciones para obtener más información acercadel uso del aceite.
AVISOS ESPECIALES
Garantía Limitada para Vehículos NuevosPara obtener una descripción detallada de los aspectos que contempla yno contempla la Garantía limitada para vehículos nuevos de su vehículo,consulte el Manual de garantías que se entrega junto con el Manualdel propietario.
Grabación de datos de servicioLos grabadores de datos de servicio de su vehículo son capaces derecopilar y almacenar información de diagnóstico sobre su vehículo.Estos incluyen información sobre el rendimiento o estado de los diversossistemas y módulos en el vehículo, como el motor, acelerador, sistemasde frenos o dirección. Para diagnosticar y revisar su vehículo en formaadecuada, Ford Motor Company, Ford de Canadá y los talleres deservicio y reparación pueden acceder a información de diagnóstico delvehículo a través de una conexión directa al vehículo cuando se le realizaun diagnóstico o revisión.
2006 Navigator (nav)Owners Guide (post-2002-fmt)USA (fus)
Introducción
6
Grabación de datos de eventosOtros módulos del vehículo, como los grabadores de datos de eventos,son capaces de recopilar y almacenar datos durante un accidente o uncuasi accidente. La información registrada puede ayudar en lainvestigación de dicho evento. Los módulos pueden registrar informacióntanto del vehículo como de los ocupantes, incluida la siguienteinformación:
• cómo estaban funcionando los diversos sistemas de su vehículo;
• si el conductor y el pasajero llevaban abrochados los cinturones deseguridad;
• con cuánta intensidad (si es que la hay) el conductor pisaba el pedaldel acelerador y/o del freno;
• a qué velocidad se desplazaba el vehículo; y
• en qué posición llevaba el conductor el volante de la dirección.
Para acceder a esta información, equipos especiales deben estarconectados directamente a los módulos de grabación. Ford MotorCompany y Ford of Canada no tienen acceso a la información de lagrabadora de datos de eventos sin tener su consentimiento, a menos quese cumpla con una orden judicial o si lo requiere la ley, las autoridadesgubernamentales u otras terceras partes que actúen como autoridadlegal. Terceras partes pueden solicitar acceso a la información en formaindependiente de Ford Motor Company y Ford of Canada.
Instrucciones especialesPara su seguridad, su vehículo cuenta con controles electrónicossofisticados.
Consulte la sección Sistema de sujeción suplementario (SRS)en el capítulo Asientos y sistemas de seguridad. Si no se
siguen las advertencias e instrucciones específicas se podrían producirlesiones personales.
Los asientos de niños o de bebés orientados hacia atrás ymontados en el asiento delantero no se deben colocar NUNCA
frente a una bolsa de aire para pasajero activa.
2006 Navigator (nav)Owners Guide (post-2002-fmt)USA (fus)
Introducción
7
Uso del vehículo con un barredor de nieveNo utilice este vehículo para quitar la nieve.
Su vehículo no está equipado con un paquete para quitar nieve.
Aviso a los propietarios de camionetas pickup y vehículosutilitarios
Los vehículos utilitarios tienen un índice de volcadurasignificativamente mayor que otros tipos de vehículos.
Antes de manejar el vehículo, lea atentamente este Manual delpropietario. Su vehículo no es un automóvil de pasajeros. Al igual quecon otros vehículos de este tipo, si no se hace funcionar correctamente,se puede producir la pérdida del control del vehículo, la volcadura deéste, lesiones personales o la muerte.
No deje de leer Manejo a campo traviesa en el capítulo Manejo.
Uso del teléfono celularEl uso de equipos móviles de comunicación es cada vez más importanteen la realización de negocios y asuntos personales. Sin embargo, losconductores no deben arriesgar su seguridad ni la de otros al usar dichosequipos. La comunicación móvil puede mejorar la seguridad personalcuando se emplea en forma correcta, especialmente en situaciones deemergencia. La seguridad debe ser máxima cuando se utilizan losequipos de comunicaciones móviles para evitar anular estos beneficios.
Los equipos de comunicaciones móviles incluyen, pero no se limitan ateléfonos celulares, buscapersonas, dispositivos de correo electrónicoportátiles, sistemas de comunicaciones para vehículos, dispositivostelemáticos y radios de dos bandas portátiles.
La primera responsabilidad del conductor es el funcionamientoseguro del vehículo. Lo más importante que puede hacer para
prevenir un choque es evitar las distracciones y estar atento al camino.Espere hasta que sea seguro operar el equipo de comunicacionesmóviles.
2006 Navigator (nav)Owners Guide (post-2002-fmt)USA (fus)
Introducción
8
Información específica para los vehículos del Medio Oriente yNorte de África.En el caso de su región mundial en particular, su vehículo puede estarequipado con funciones y opciones diferentes de aquellas descritas eneste Manual del propietario; por lo tanto, se entrega un textosuplementario que complementa este libro. Al consultar las páginas delsuplemento, puede identificar correctamente las características,recomendaciones y especificaciones únicas para su vehículo. Consulteel Manual del propietario para ver toda la información yadvertencias requeridas.
2006 Navigator (nav)Owners Guide (post-2002-fmt)USA (fus)
Introducción
9
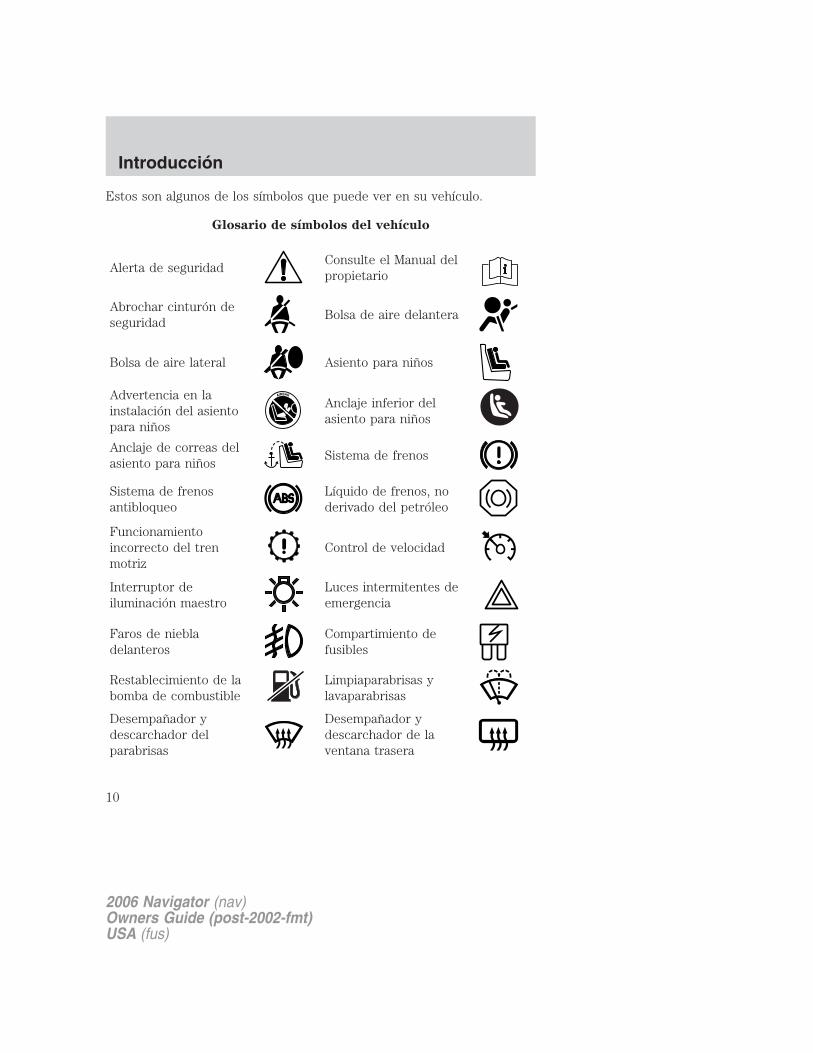
Estos son algunos de los símbolos que puede ver en su vehículo.
Glosario de símbolos del vehículo
Alerta de seguridadConsulte el Manual delpropietario
Abrochar cinturón deseguridad
Bolsa de aire delantera
Bolsa de aire lateral Asiento para niños
Advertencia en lainstalación del asientopara niños
Anclaje inferior delasiento para niños
Anclaje de correas delasiento para niños
Sistema de frenos
Sistema de frenosantibloqueo
Líquido de frenos, noderivado del petróleo
Funcionamientoincorrecto del trenmotriz
Control de velocidad
Interruptor deiluminación maestro
Luces intermitentes deemergencia
Faros de niebladelanteros
Compartimiento defusibles
Restablecimiento de labomba de combustible
Limpiaparabrisas ylavaparabrisas
Desempañador ydescarchador delparabrisas
Desempañador ydescarchador de laventana trasera
2006 Navigator (nav)Owners Guide (post-2002-fmt)USA (fus)
Introducción
10

Glosario de símbolos del vehículo
Ventanas eléctricasdelanteras y traseras
Bloqueo de las ventanaseléctricas
Cierre y apertura de laspuertas de seguridadpara niños
Símbolo de aperturainterior de la cajuela
Alarma de emergencia Aceite del motor
Líquido refrigerante delmotor
Temperatura del líquidorefrigerante del motor
No abrir cuando estécaliente
Batería
Evitar fumar, producirllamas o chispas
Ácido de la batería
Gas explosivoAdvertencia delventilador
Líquido de la direcciónhidráulica
Mantener el nivel delíquido correcto
MAX
MIN
Sistema de emisión degases
Filtro de aire del motor
Filtro de aire delcompartimiento depasajeros
Gato
Check fuel cap (Revisarel tapón delcombustible)
Advertencia de presiónde llanta desinflada
2006 Navigator (nav)Owners Guide (post-2002-fmt)USA (fus)
Introducción
11
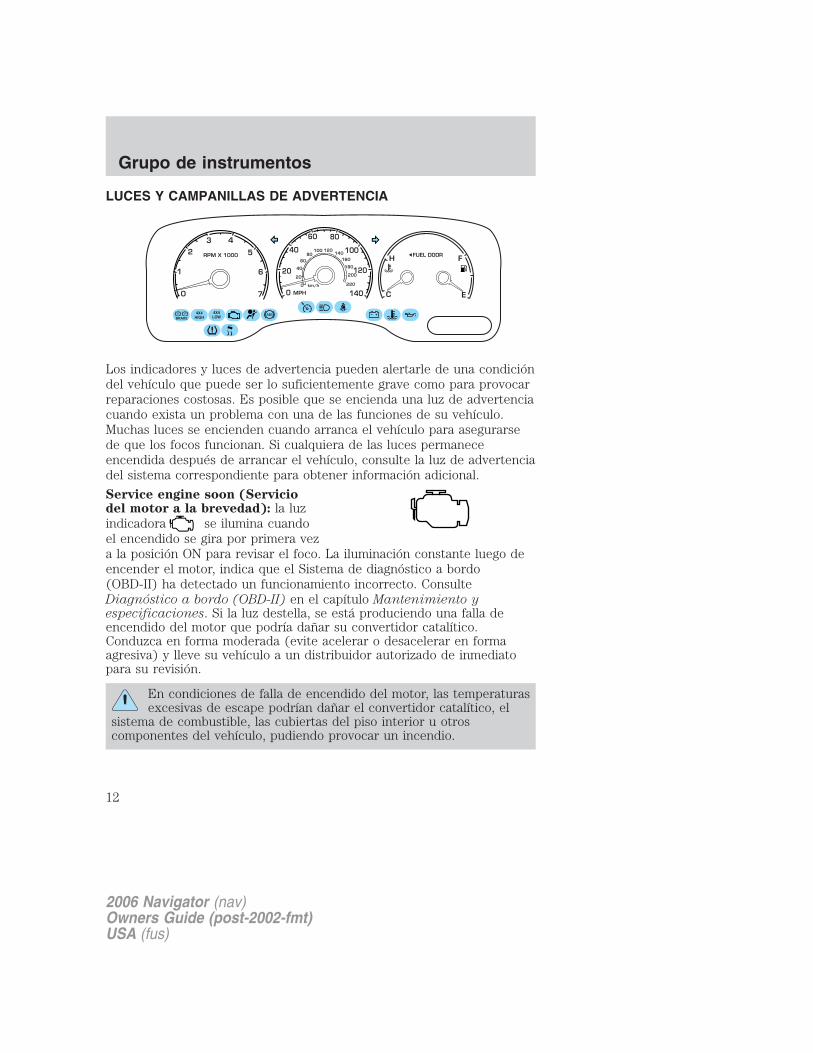
LUCES Y CAMPANILLAS DE ADVERTENCIA
Los indicadores y luces de advertencia pueden alertarle de una condicióndel vehículo que puede ser lo suficientemente grave como para provocarreparaciones costosas. Es posible que se encienda una luz de advertenciacuando exista un problema con una de las funciones de su vehículo.Muchas luces se encienden cuando arranca el vehículo para asegurarsede que los focos funcionan. Si cualquiera de las luces permaneceencendida después de arrancar el vehículo, consulte la luz de advertenciadel sistema correspondiente para obtener información adicional.
Service engine soon (Serviciodel motor a la brevedad): la luzindicadora se ilumina cuandoel encendido se gira por primera veza la posición ON para revisar el foco. La iluminación constante luego deencender el motor, indica que el Sistema de diagnóstico a bordo(OBD-II) ha detectado un funcionamiento incorrecto. ConsulteDiagnóstico a bordo (OBD-II) en el capítulo Mantenimiento yespecificaciones. Si la luz destella, se está produciendo una falla deencendido del motor que podría dañar su convertidor catalítico.Conduzca en forma moderada (evite acelerar o desacelerar en formaagresiva) y lleve su vehículo a un distribuidor autorizado de inmediatopara su revisión.
En condiciones de falla de encendido del motor, las temperaturasexcesivas de escape podrían dañar el convertidor catalítico, el
sistema de combustible, las cubiertas del piso interior u otroscomponentes del vehículo, pudiendo provocar un incendio.
2006 Navigator (nav)Owners Guide (post-2002-fmt)USA (fus)
Grupo de instrumentos
12
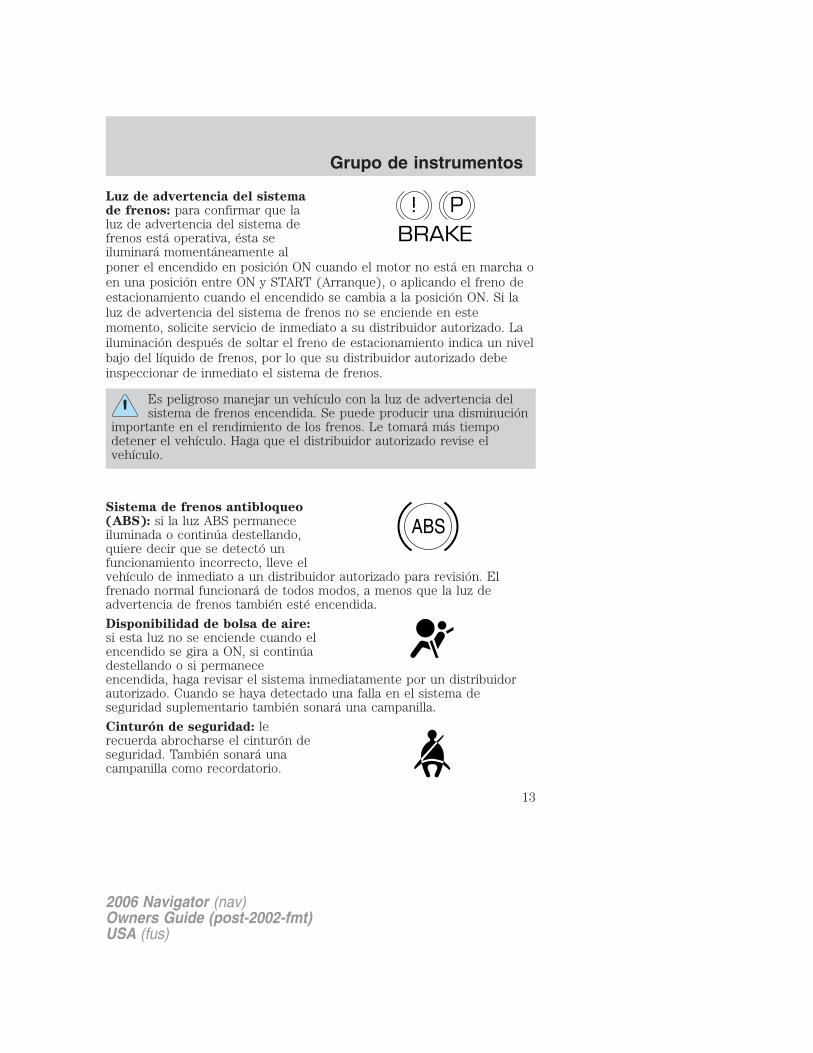
Luz de advertencia del sistemade frenos: para confirmar que laluz de advertencia del sistema defrenos está operativa, ésta seiluminará momentáneamente alponer el encendido en posición ON cuando el motor no está en marcha oen una posición entre ON y START (Arranque), o aplicando el freno deestacionamiento cuando el encendido se cambia a la posición ON. Si laluz de advertencia del sistema de frenos no se enciende en estemomento, solicite servicio de inmediato a su distribuidor autorizado. Lailuminación después de soltar el freno de estacionamiento indica un nivelbajo del líquido de frenos, por lo que su distribuidor autorizado debeinspeccionar de inmediato el sistema de frenos.
Es peligroso manejar un vehículo con la luz de advertencia delsistema de frenos encendida. Se puede producir una disminución
importante en el rendimiento de los frenos. Le tomará más tiempodetener el vehículo. Haga que el distribuidor autorizado revise elvehículo.
Sistema de frenos antibloqueo(ABS): si la luz ABS permaneceiluminada o continúa destellando,quiere decir que se detectó unfuncionamiento incorrecto, lleve elvehículo de inmediato a un distribuidor autorizado para revisión. Elfrenado normal funcionará de todos modos, a menos que la luz deadvertencia de frenos también esté encendida.
Disponibilidad de bolsa de aire:si esta luz no se enciende cuando elencendido se gira a ON, si continúadestellando o si permaneceencendida, haga revisar el sistema inmediatamente por un distribuidorautorizado. Cuando se haya detectado una falla en el sistema deseguridad suplementario también sonará una campanilla.
Cinturón de seguridad: lerecuerda abrocharse el cinturón deseguridad. También sonará unacampanilla como recordatorio.
P!BRAKE
ABS
2006 Navigator (nav)Owners Guide (post-2002-fmt)USA (fus)
Grupo de instrumentos
13

Sistema de carga: se enciendecuando la batería no cargacorrectamente.
Presión del aceite del motor: seilumina cuando la presión del aceiteestá bajo el rango normal. ConsulteAceite del motor en el capítuloMantenimiento y especificaciones.
Temperatura del líquidorefrigerante del motor: se iluminacuando la temperatura del líquidorefrigerante es alta. Detenga el vehículo sin peligro a la brevedad posible,apague el motor y deje que se enfríe. Consulte la sección Líquidorefrigerante del motor en el capítulo Mantenimiento yespecificaciones.
Nunca quite el tapón del depósito del líquido refrigerantemientras el motor esté caliente o en funcionamiento.
Advertencia de presión de llantadesinflada (si está instalado conel Sistema de control de presiónde las llantas): se ilumina cuandola presión de la llanta es baja. Si laluz permanece encendida al arrancar o durante el manejo, se deberevisar la presión de las llantas. Consulte Inspección e inflado de lasllantas en el capítulo Llantas, ruedas y carga. Cuando el encendido sepone en ON, la luz se encenderá durante 3 segundos para asegurar queel foco esté funcionando. Si la luz no se Enciende, solicite a sudistribuidor autorizado que revise el sistema. Para obtener másinformación acerca de este sistema, consulte Conocimiento del sistemade monitoreo de presión de las llantas en el capítulo Llantas, ruedasy carga.
AdvanceTrac� (si estáinstalado): se ilumina cuando elsistema AdvanceTrac� con RSC estáactivo. Si la luz permaneceencendida, lleve a revisar el sistemainmediatamente a su distribuidorautorizado.
2006 Navigator (nav)Owners Guide (post-2002-fmt)USA (fus)
Grupo de instrumentos
14
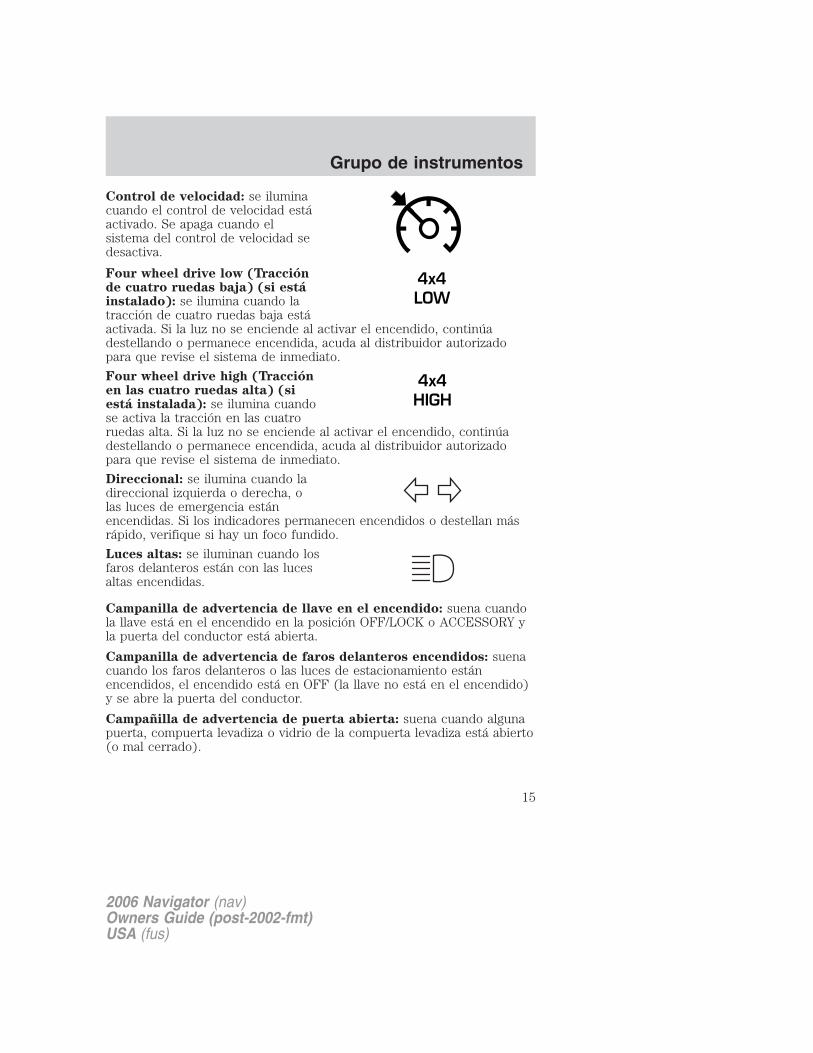
Control de velocidad: se iluminacuando el control de velocidad estáactivado. Se apaga cuando elsistema del control de velocidad sedesactiva.
Four wheel drive low (Tracciónde cuatro ruedas baja) (si estáinstalado): se ilumina cuando latracción de cuatro ruedas baja estáactivada. Si la luz no se enciende al activar el encendido, continúadestellando o permanece encendida, acuda al distribuidor autorizadopara que revise el sistema de inmediato.
Four wheel drive high (Tracciónen las cuatro ruedas alta) (siestá instalada): se ilumina cuandose activa la tracción en las cuatroruedas alta. Si la luz no se enciende al activar el encendido, continúadestellando o permanece encendida, acuda al distribuidor autorizadopara que revise el sistema de inmediato.
Direccional: se ilumina cuando ladireccional izquierda o derecha, olas luces de emergencia estánencendidas. Si los indicadores permanecen encendidos o destellan másrápido, verifique si hay un foco fundido.
Luces altas: se iluminan cuando losfaros delanteros están con las lucesaltas encendidas.
Campanilla de advertencia de llave en el encendido: suena cuandola llave está en el encendido en la posición OFF/LOCK o ACCESSORY yla puerta del conductor está abierta.
Campanilla de advertencia de faros delanteros encendidos: suenacuando los faros delanteros o las luces de estacionamiento estánencendidos, el encendido está en OFF (la llave no está en el encendido)y se abre la puerta del conductor.
Campañilla de advertencia de puerta abierta: suena cuando algunapuerta, compuerta levadiza o vidrio de la compuerta levadiza está abierto(o mal cerrado).
4x4LOW
4x4HIGH
2006 Navigator (nav)Owners Guide (post-2002-fmt)USA (fus)
Grupo de instrumentos
15
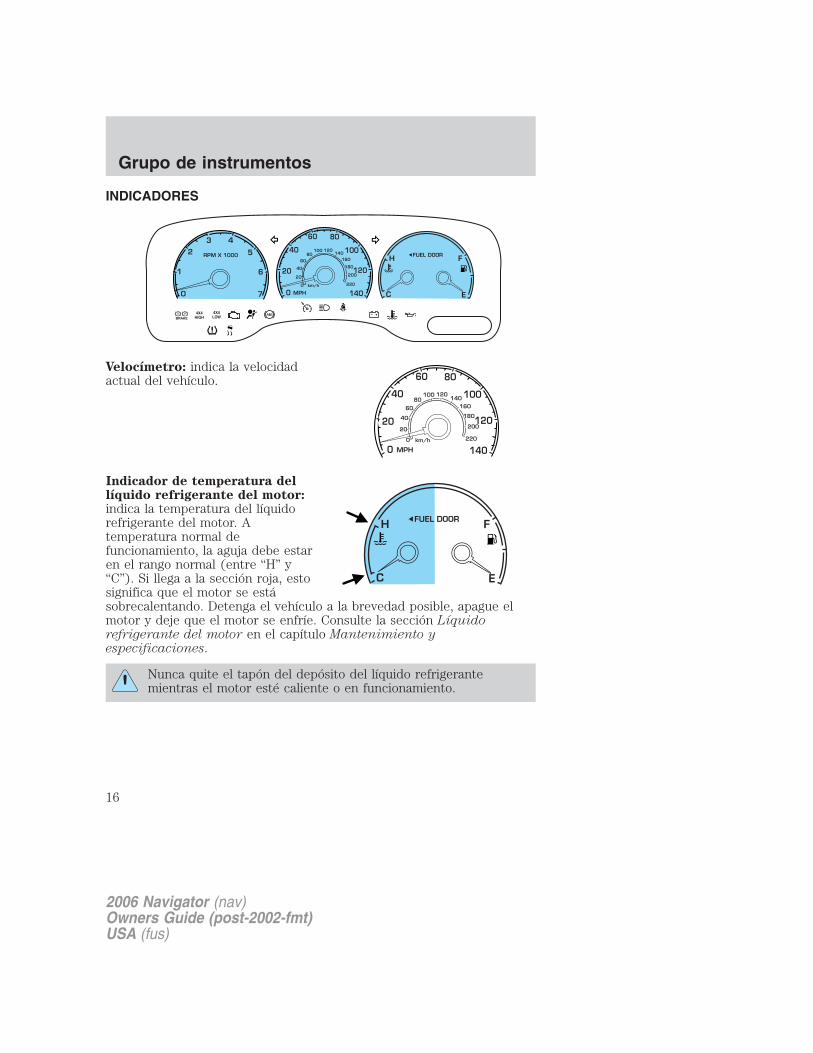
INDICADORES
Velocímetro: indica la velocidadactual del vehículo.
Indicador de temperatura dellíquido refrigerante del motor:indica la temperatura del líquidorefrigerante del motor. Atemperatura normal defuncionamiento, la aguja debe estaren el rango normal (entre “H” y“C”). Si llega a la sección roja, estosignifica que el motor se estásobrecalentando. Detenga el vehículo a la brevedad posible, apague elmotor y deje que el motor se enfríe. Consulte la sección Líquidorefrigerante del motor en el capítulo Mantenimiento yespecificaciones.
Nunca quite el tapón del depósito del líquido refrigerantemientras el motor esté caliente o en funcionamiento.
2006 Navigator (nav)Owners Guide (post-2002-fmt)USA (fus)
Grupo de instrumentos
16

Odómetro: registra el total dekilómetros (millas) recorridos por elvehículo.
Consulte Centro de mensajes en elcapítulo Controles del conductorpara obtener información acerca de cómo cambiar la visualización demétrico a inglés.
Odómetro de viaje: registra loskilómetros (millas) de viajesindividuales. Presione y suelte elbotón INFO (Información) delcentro de mensajes hasta queaparezca “TRIP” (Viaje) en lavisualización (esto representa el modo de viaje). Presione nuevamente elcontrol para seleccionar las características Viaje 1 y Viaje 2. Mantengapresionado el botón RESET (Restablecer) durante dos segundos pararestablecer.
Tacómetro: indica la velocidad delmotor en revoluciones por minuto.Si maneja con la aguja del tacómetrocontinuamente en la parte superiorde la escala, puede dañar el motor.
Indicador de combustible: indicaaproximadamente la cantidad decombustible que queda en el tanquede combustible (cuando elencendido está en la posición ON).El indicador de combustible puedevariar ligeramente cuando elvehículo está en movimiento o enuna pendiente. El encendido debeestar en la posición OFF mientras seabastece el vehículo de combustible. Cuando el indicador señala porprimera vez que el tanque está vacío, hay una pequeña cantidad decombustible de reserva en el tanque. Al abastecer de combustible elvehículo después de la indicación de vacío, la cantidad de combustibleque se puede añadir será menor a la capacidad anunciada, debido alcombustible de reserva.
2006 Navigator (nav)Owners Guide (post-2002-fmt)USA (fus)
Grupo de instrumentos
17

El icono FUEL (combustible) y la flecha indican a qué lado del vehículoestá ubicada la puerta de llenado de combustible.
Para obtener más información, consulte Llenado del tanque en elcapítulo Mantenimiento y especificaciones.
2006 Navigator (nav)Owners Guide (post-2002-fmt)USA (fus)
Grupo de instrumentos
18
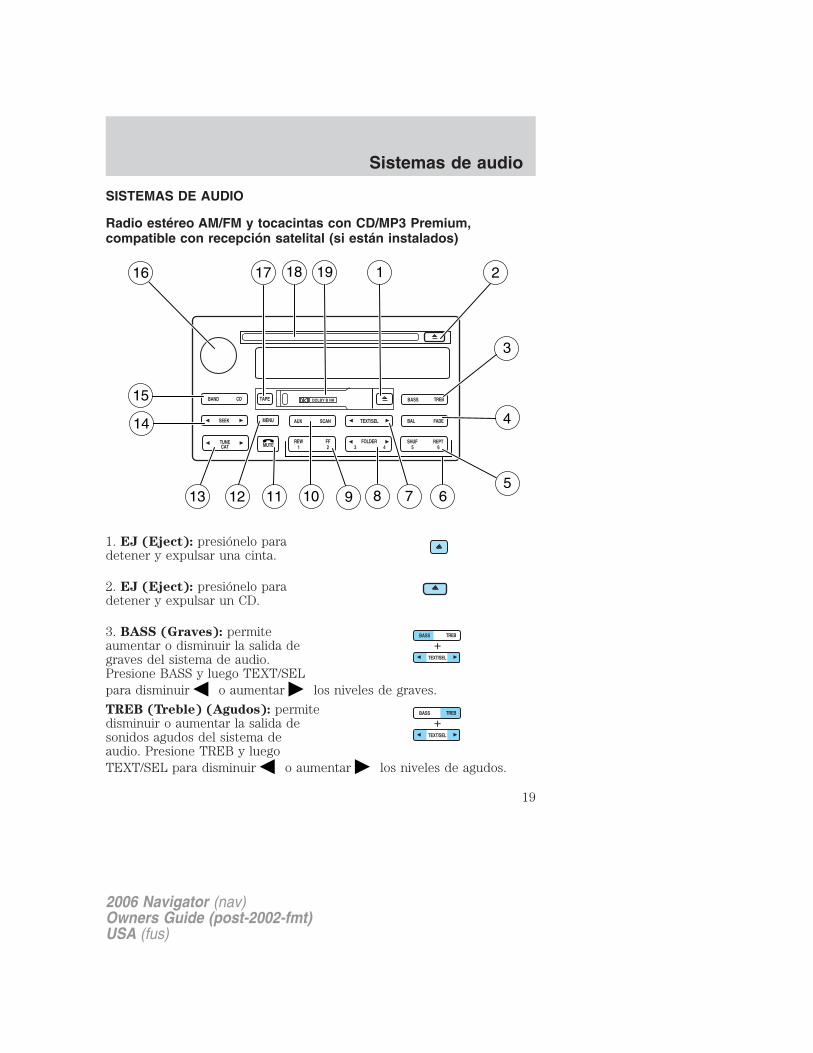
SISTEMAS DE AUDIO
Radio estéreo AM/FM y tocacintas con CD/MP3 Premium,compatible con recepción satelital (si están instalados)
1. EJ (Eject): presiónelo paradetener y expulsar una cinta.
2. EJ (Eject): presiónelo paradetener y expulsar un CD.
3. BASS (Graves): permiteaumentar o disminuir la salida degraves del sistema de audio.Presione BASS y luego TEXT/SELpara disminuir o aumentar los niveles de graves.
TREB (Treble) (Agudos): permitedisminuir o aumentar la salida desonidos agudos del sistema deaudio. Presione TREB y luegoTEXT/SEL para disminuir o aumentar los niveles de agudos.
2006 Navigator (nav)Owners Guide (post-2002-fmt)USA (fus)
Sistemas de audio
19
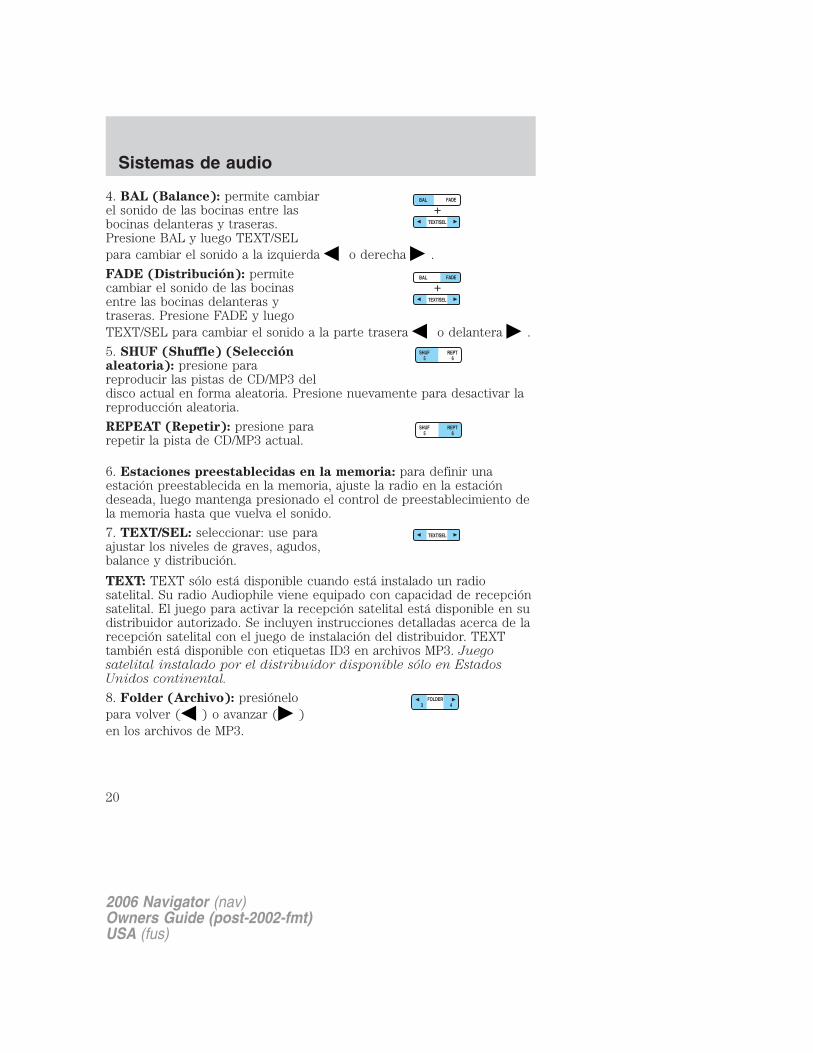
4. BAL (Balance): permite cambiarel sonido de las bocinas entre lasbocinas delanteras y traseras.Presione BAL y luego TEXT/SELpara cambiar el sonido a la izquierda o derecha .
FADE (Distribución): permitecambiar el sonido de las bocinasentre las bocinas delanteras ytraseras. Presione FADE y luegoTEXT/SEL para cambiar el sonido a la parte trasera o delantera .
5. SHUF (Shuffle) (Selecciónaleatoria): presione parareproducir las pistas de CD/MP3 deldisco actual en forma aleatoria. Presione nuevamente para desactivar lareproducción aleatoria.
REPEAT (Repetir): presione pararepetir la pista de CD/MP3 actual.
6. Estaciones preestablecidas en la memoria: para definir unaestación preestablecida en la memoria, ajuste la radio en la estacióndeseada, luego mantenga presionado el control de preestablecimiento dela memoria hasta que vuelva el sonido.
7. TEXT/SEL: seleccionar: use paraajustar los niveles de graves, agudos,balance y distribución.
TEXT: TEXT sólo está disponible cuando está instalado un radiosatelital. Su radio Audiophile viene equipado con capacidad de recepciónsatelital. El juego para activar la recepción satelital está disponible en sudistribuidor autorizado. Se incluyen instrucciones detalladas acerca de larecepción satelital con el juego de instalación del distribuidor. TEXTtambién está disponible con etiquetas ID3 en archivos MP3. Juegosatelital instalado por el distribuidor disponible sólo en EstadosUnidos continental.
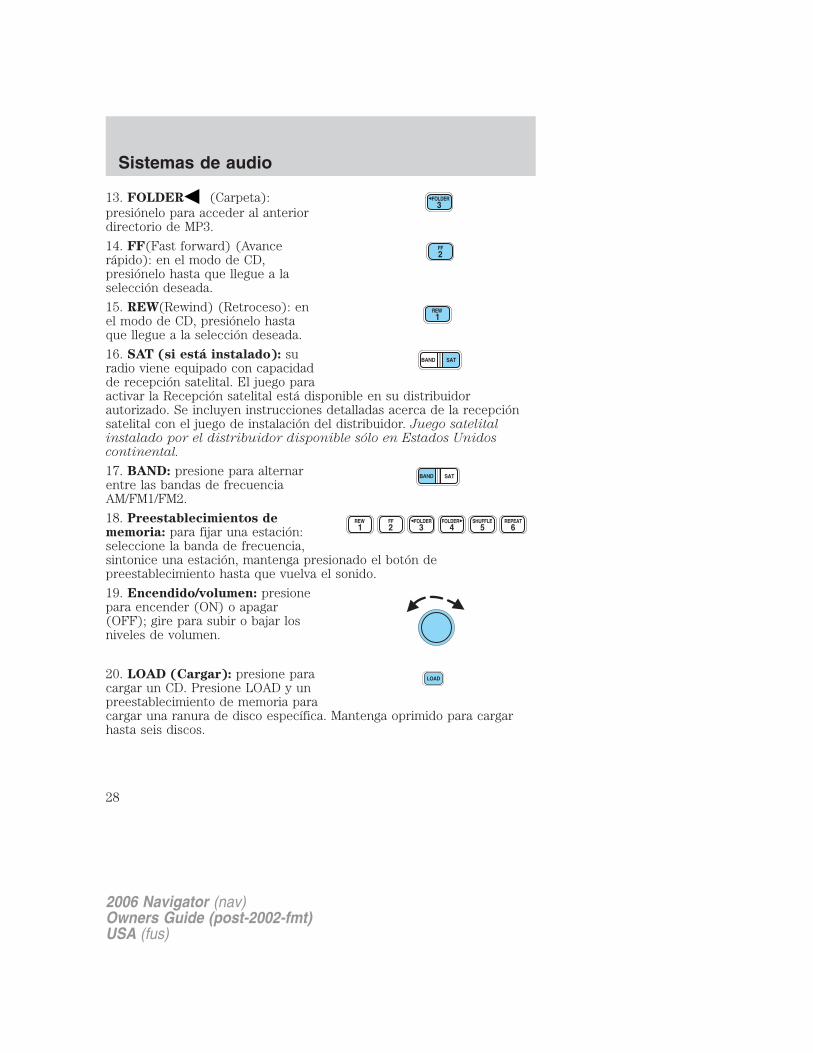
8. Folder (Archivo): presiónelopara volver ( ) o avanzar ( )en los archivos de MP3.
2006 Navigator (nav)Owners Guide (post-2002-fmt)USA (fus)
Sistemas de audio
20
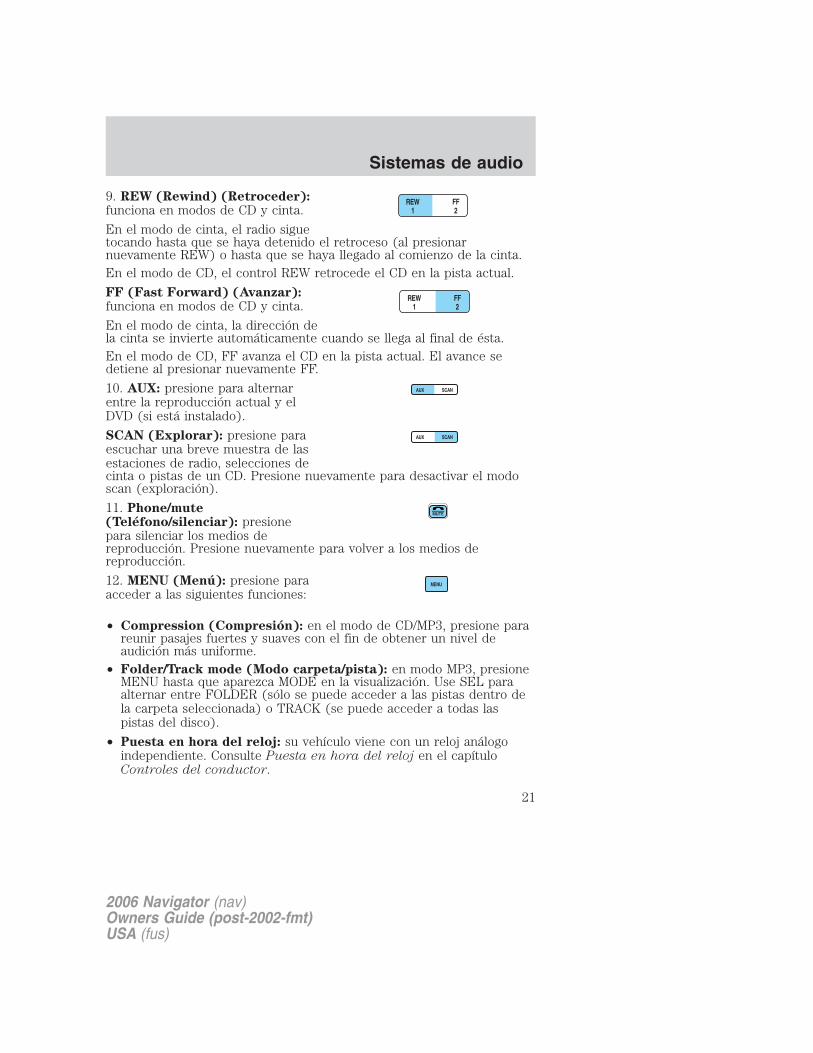
9. REW (Rewind) (Retroceder):funciona en modos de CD y cinta.
En el modo de cinta, el radio siguetocando hasta que se haya detenido el retroceso (al presionarnuevamente REW) o hasta que se haya llegado al comienzo de la cinta.En el modo de CD, el control REW retrocede el CD en la pista actual.
FF (Fast Forward) (Avanzar):funciona en modos de CD y cinta.
En el modo de cinta, la dirección dela cinta se invierte automáticamente cuando se llega al final de ésta.En el modo de CD, FF avanza el CD en la pista actual. El avance sedetiene al presionar nuevamente FF.
10. AUX: presione para alternarentre la reproducción actual y elDVD (si está instalado).
SCAN (Explorar): presione paraescuchar una breve muestra de lasestaciones de radio, selecciones decinta o pistas de un CD. Presione nuevamente para desactivar el modoscan (exploración).
11. Phone/mute(Teléfono/silenciar): presionepara silenciar los medios dereproducción. Presione nuevamente para volver a los medios dereproducción.
12. MENU (Menú): presione paraacceder a las siguientes funciones:
• Compression (Compresión): en el modo de CD/MP3, presione parareunir pasajes fuertes y suaves con el fin de obtener un nivel deaudición más uniforme.
• Folder/Track mode (Modo carpeta/pista): en modo MP3, presioneMENU hasta que aparezca MODE en la visualización. Use SEL paraalternar entre FOLDER (sólo se puede acceder a las pistas dentro dela carpeta seleccionada) o TRACK (se puede acceder a todas laspistas del disco).
• Puesta en hora del reloj: su vehículo viene con un reloj análogoindependiente. Consulte Puesta en hora del reloj en el capítuloControles del conductor.
2006 Navigator (nav)Owners Guide (post-2002-fmt)USA (fus)
Sistemas de audio
21

• AUTOSET: presione para establecer las seis primeras estacionespotentes en los botones de memoria AM, FM1 o FM2; vuelva apresionarlo para volver a las estaciones originales preestablecidas. Sihay menos de seis estaciones potentes disponibles en la banda defrecuencias, todos los controles de preestablecimiento de memoriarestantes almacenarán la última estación potente disponible.
• Volumen sensible a la velocidad (si está instalado): el volumen delradio cambia automáticamente de acuerdo con la velocidad delvehículo para compensar el ruido del camino y del viento. El nivelrecomendado es 1–3. El nivel 0 desactiva el volumen sensible a lavelocidad y el nivel 7 es el ajuste máximo.Para activar la característica de volumen sensible a la velocidad,presione MENU hasta que aparezca SPEED VOL X en la visualización.Presione TEXT/SEL para aumentar /disminuir los niveles devolumen de compensación. El nivel seleccionado aparecerá en lavisualización.
13. TUNE/CAT(SINTONIZAR/CAT): en modo deradio, presiónelo para avanzarmanualmente por las bandas de frecuencia. En el modo de radio satelital,presione CAT para obtener una lista de categorías de música disponible.
CAT: CAT sólo está disponible cuando el radio satelital está instalado. Suradio Audiophile viene equipado con capacidad de recepción satelital. Eljuego para activar la recepción satelital está disponible en su distribuidorautorizado. Se incluyen instrucciones detalladas acerca de la recepciónsatelital con el juego de instalación del distribuidor. Juego satelitalinstalado por el distribuidor disponible sólo en Estados Unidoscontinental.
Para obtener más información acerca del radio satelital SIRIUS, llame sincosto al 888-539-SIRIUS (888-539-7474) o visite el sitio Web de SIRIUSwww.siriusradio.com
14. SEEK (Buscar): funciona enmodo de radio, cinta y CD. Presionepara acceder a la estación de radio,selección de cinta o pista de CD anterior o siguiente .
15. BAND (Banda): presione paraalternar entre las bandas defrecuencia AM/FM1/FM2. Presiónelomientras está en el modo de cinta o CD para volver al modo de radio.
2006 Navigator (nav)Owners Guide (post-2002-fmt)USA (fus)
Sistemas de audio
22
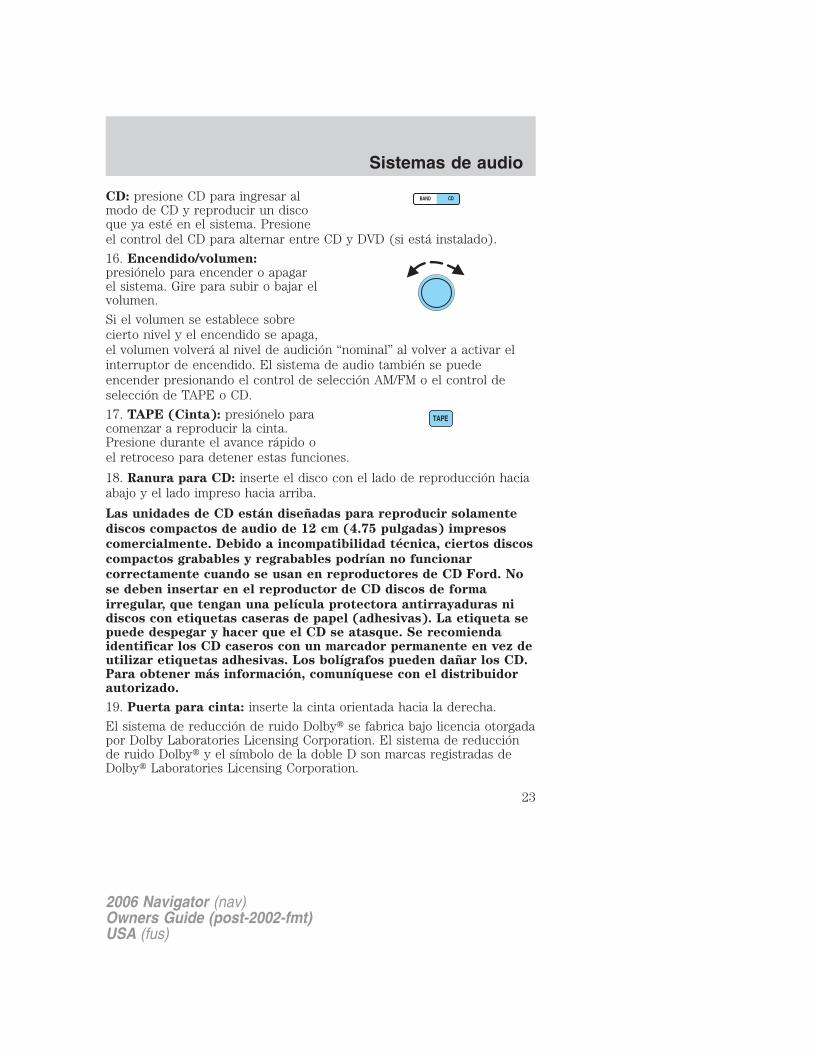
CD: presione CD para ingresar almodo de CD y reproducir un discoque ya esté en el sistema. Presioneel control del CD para alternar entre CD y DVD (si está instalado).
16. Encendido/volumen:presiónelo para encender o apagarel sistema. Gire para subir o bajar elvolumen.
Si el volumen se establece sobrecierto nivel y el encendido se apaga,el volumen volverá al nivel de audición “nominal” al volver a activar elinterruptor de encendido. El sistema de audio también se puedeencender presionando el control de selección AM/FM o el control deselección de TAPE o CD.
17. TAPE (Cinta): presiónelo paracomenzar a reproducir la cinta.Presione durante el avance rápido oel retroceso para detener estas funciones.
18. Ranura para CD: inserte el disco con el lado de reproducción haciaabajo y el lado impreso hacia arriba.
Las unidades de CD están diseñadas para reproducir solamente
discos compactos de audio de 12 cm (4.75 pulgadas) impresos
comercialmente. Debido a incompatibilidad técnica, ciertos discos
compactos grabables y regrabables podrían no funcionar
correctamente cuando se usan en reproductores de CD Ford. No
se deben insertar en el reproductor de CD discos de forma
irregular, que tengan una película protectora antirrayaduras nidiscos con etiquetas caseras de papel (adhesivas). La etiqueta sepuede despegar y hacer que el CD se atasque. Se recomiendaidentificar los CD caseros con un marcador permanente en vez deutilizar etiquetas adhesivas. Los bolígrafos pueden dañar los CD.Para obtener más información, comuníquese con el distribuidorautorizado.
19. Puerta para cinta: inserte la cinta orientada hacia la derecha.
El sistema de reducción de ruido Dolby� se fabrica bajo licencia otorgadapor Dolby Laboratories Licensing Corporation. El sistema de reducciónde ruido Dolby� y el símbolo de la doble D son marcas registradas deDolby� Laboratories Licensing Corporation.
2006 Navigator (nav)Owners Guide (post-2002-fmt)USA (fus)
Sistemas de audio
23
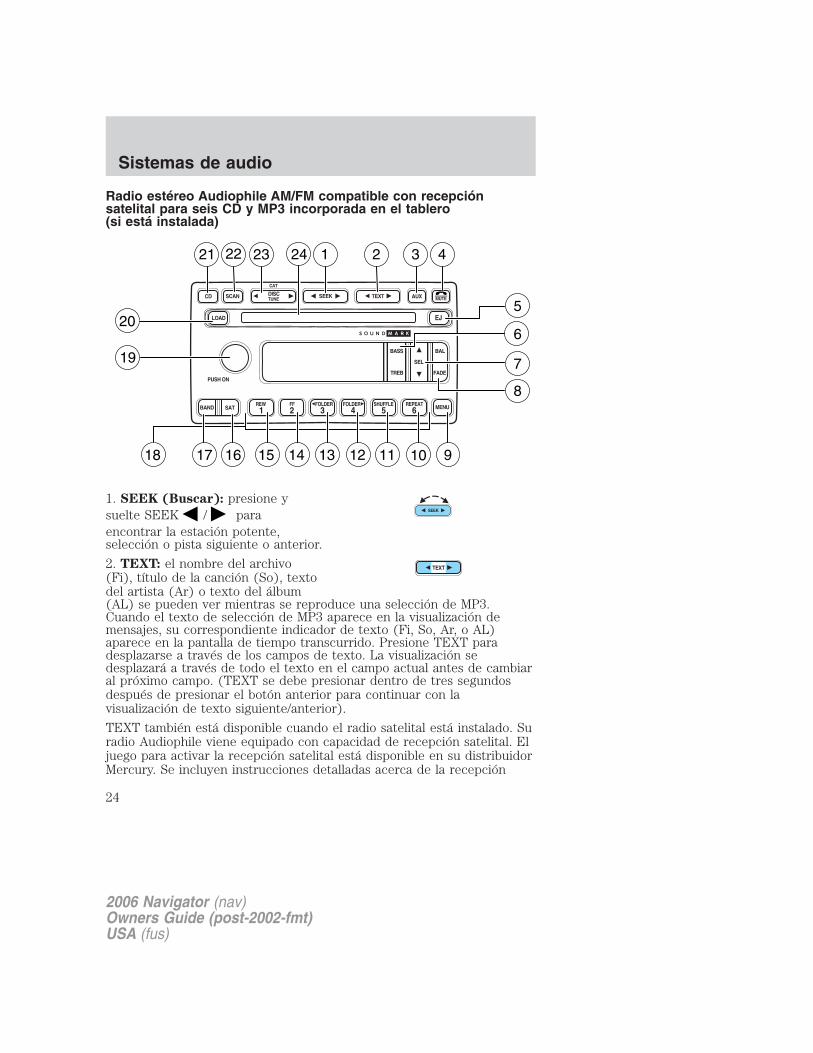
Radio estéreo Audiophile AM/FM compatible con recepciónsatelital para seis CD y MP3 incorporada en el tablero(si está instalada)
1. SEEK (Buscar): presione ysuelte SEEK / paraencontrar la estación potente,selección o pista siguiente o anterior.
2. TEXT: el nombre del archivo(Fi), título de la canción (So), textodel artista (Ar) o texto del álbum(AL) se pueden ver mientras se reproduce una selección de MP3.Cuando el texto de selección de MP3 aparece en la visualización demensajes, su correspondiente indicador de texto (Fi, So, Ar, o AL)aparece en la pantalla de tiempo transcurrido. Presione TEXT paradesplazarse a través de los campos de texto. La visualización sedesplazará a través de todo el texto en el campo actual antes de cambiaral próximo campo. (TEXT se debe presionar dentro de tres segundosdespués de presionar el botón anterior para continuar con lavisualización de texto siguiente/anterior).
TEXT también está disponible cuando el radio satelital está instalado. Suradio Audiophile viene equipado con capacidad de recepción satelital. Eljuego para activar la recepción satelital está disponible en su distribuidorMercury. Se incluyen instrucciones detalladas acerca de la recepción
2006 Navigator (nav)Owners Guide (post-2002-fmt)USA (fus)
Sistemas de audio
24

satelital con el juego de instalación del distribuidor. Juego satelitalinstalado por el distribuidor disponible sólo en Estados Unidoscontinental.
3. AUX: presione para alternarentre la reproducción actual y elDVD (si está instalado).
4. Mute (Silenciar): presiónelopara silenciar los medios enreproducción; vuelva a presionarlopara reanudar su reproducción.
5. EJ (Expulsar): presione paraexpulsar un CD. Presione EJ y unpreestablecimiento de la memoriapara expulsar un disco específico. Mantenga oprimido para expulsartodos los discos cargados.
6. Bass (Graves): presione BASS;luego SEL / para disminuir oaumentar la salida de sonidosgraves.
Treble (Agudos): presione TREB yluego SEL / para disminuir oaumentar la salida de sonidosagudos.
7. Select (Seleccionar): utilícelocon graves, agudos, balance,distribución y otras selecciones demenú.
8. Balance: presione BAL y luegoSEL / para cambiar el sonidoentre las bocinas izquierdas yderechas.
Fade (Distribución): presioneFADE; luego presione SEL /para cambiar el sonido a las bocinasdelanteras/traseras.
2006 Navigator (nav)Owners Guide (post-2002-fmt)USA (fus)
Sistemas de audio
25
9. Menu: mantenga presionadoMENU para acceder al encendido yapagado de RDS, modo de anunciode tráfico y modo de tipo deprograma y use SEL para activar o desactivar las funciones.La Comisión Federal de Comunicaciones de Estados Unidos (FederalCommunications Commission, FCC) y la Comisión de Radio yTelecomunicaciones de Canadá (Canadian Radio and TelecommunicationsCommission, CRTC) recomiendan que los transmisores de radio FM usentecnología RDS para transmitir información. Las estaciones de radio FMse manejan en forma independiente y eligen en forma particular usartecnología RDS para transmitir la ID de estación y el tipo de programasegún lo deseen.
Traffic (Tráfico) (si está instalado): permite oír el pronóstico deltráfico. Con la característica activada, presione SEEK o SCAN parabuscar una estación que esté transmitiendo un informe de tráfico (si estátransmitiendo datos RDS). La información de tráfico no estádisponible en la mayor parte de los mercados de EE.UU.
FIND Program type (Buscar tipo de programa) (si estáinstalado): le permite buscar estaciones equipadas con RDS parasintonizar una cierta categoría de formato de música: clásica, country,info, jazz, música de todos los tiempos, R&B, religiosa, rock, suave, top40.Presione MENU hasta que aparezca FIND en la visualización. Use SELpara desplazarse por los tipos de música. Presione SEEK o SCAN parallegar a la estación que reproduce la categoría de música solicitada.
Show TYPE (Mostrar TIPO) (si está instalado): muestra las letras oformato de música de la llamada de la estación.Presione MENU hasta que aparezca SHOW en la visualización. Use SELpara seleccionar NONE (Ninguno), NAME (Nombre) o TYPE (Tipo).
COMP (Compresión): en el modo de CD, presiónelo para reunirpasajes suaves y fuertes con el fin de obtener un nivel de audición másuniforme. Presione MENU (Menú) hasta que aparezca el estado decompresión. Presione el control SEL (Seleccionar) para activar lacaracterística de compresión cuando aparezca COMPRESS OFF(Compresión apagada). Presione nuevamente el control SEL paradesactivar la característica cuando aparezca COMPRESS ON(Compresión encendida).
Modo Occupancy (Utilización) (si está instalado): presione MENUhasta que aparezca el modo de utilización en la visualización. Presione
2006 Navigator (nav)Owners Guide (post-2002-fmt)USA (fus)
Sistemas de audio
26
SEL para seleccionar el modo de utilización ALL (Todos), DRIVER(Conductor) o REAR SEAT (Asiento trasero).
Autoset (Ajuste automático): le permite seleccionar las estacioneslocales de radio más potentes sin perder sus estaciones originalespreestablecidas manualmente para AM/FM1/FM2. Presione MENU hastaque aparezca la palabra AUTOSET en la visualización. Presione SEL paraactivar o desactivar la función. Cuando se haya completado la selecciónde las seis estaciones más potentes, la estación almacenada en elpreestablecimiento 1 se comenzará a reproducir. Si hay menos de seisestaciones potentes, el sistema almacenará la última en lospreestablecimientos restantes.
Volumen sensible a la velocidad: el volumen del radio cambiaautomática y ligeramente de acuerdo con la velocidad del vehículo paracompensar el ruido del camino y del viento. El nivel recomendado es1–3. El nivel 0 desactiva la función y el nivel 7 es el ajuste máximo.Presione MENU hasta que aparezca en la visualización SPEED VOL X.Luego, presione SEL para aumentar ( ) o disminuir ( ) el ajuste devolumen. El nivel aparece en la visualización.
Puesta en hora del reloj: su vehículo viene con un reloj análogoindependiente. Consulte Puesta en hora del reloj en el capítuloControles del conductor.
Modo Folder/Track (Carpeta/pista): en el modo MP3, presione MENUhasta que aparezca MODE en la visualización. Use SEL para alternarentre MODO FOLDER (sólo se puede acceder a las pistas dentro de lacarpeta seleccionada) o TRACK (se puede acceder a todas las pistas deldisco).
10. REPEAT (Repetir): presiónelopara repetir la pista de CD actual.Presione nuevamente paradesactivar.
11. SHUFFLE (Selecciónaleatoria): presiónelo parareproducir pistas de CD/MP3 deldisco actual en forma aleatoria. Presione nuevamente para desactivar.
12. FOLDER (Carpeta):presiónelo para acceder al próximodirectorio de MP3.
2006 Navigator (nav)Owners Guide (post-2002-fmt)USA (fus)
Sistemas de audio
27
13. FOLDER (Carpeta):presiónelo para acceder al anteriordirectorio de MP3.
14. FF(Fast forward) (Avancerápido): en el modo de CD,presiónelo hasta que llegue a laselección deseada.
15. REW(Rewind) (Retroceso): enel modo de CD, presiónelo hastaque llegue a la selección deseada.
16. SAT (si está instalado): suradio viene equipado con capacidadde recepción satelital. El juego paraactivar la Recepción satelital está disponible en su distribuidorautorizado. Se incluyen instrucciones detalladas acerca de la recepciónsatelital con el juego de instalación del distribuidor. Juego satelitalinstalado por el distribuidor disponible sólo en Estados Unidoscontinental.
17. BAND: presione para alternarentre las bandas de frecuenciaAM/FM1/FM2.
18. Preestablecimientos dememoria: para fijar una estación:seleccione la banda de frecuencia,sintonice una estación, mantenga presionado el botón depreestablecimiento hasta que vuelva el sonido.
19. Encendido/volumen: presionepara encender (ON) o apagar(OFF); gire para subir o bajar losniveles de volumen.
20. LOAD (Cargar): presione paracargar un CD. Presione LOAD y unpreestablecimiento de memoria paracargar una ranura de disco específica. Mantenga oprimido para cargarhasta seis discos.
2006 Navigator (nav)Owners Guide (post-2002-fmt)USA (fus)
Sistemas de audio
28

21. CD: presione para ingresar almodo CD.
Las unidades de CD están diseñadas para reproducir solamentediscos compactos de audio de 12 cm (4.75 pulgadas) impresoscomercialmente. Debido a incompatibilidad técnica, ciertos discoscompactos grabables y regrabables podrían no funcionarcorrectamente cuando se usan en reproductores de CD Ford. Nose deben insertar en el reproductor de CD discos de formairregular, que tengan una película protectora antirrayaduras nidiscos con etiquetas caseras de papel (adhesivas). La etiqueta sepuede despegar y hacer que el CD se atasque. Se recomiendaidentificar los CD caseros con un marcador permanente en vez deutilizar etiquetas adhesivas. Los bolígrafos pueden dañar los CD.Para obtener más información, comuníquese con el distribuidorautorizado.
22. Scan (Explorar): presiónelopara oír una breve muestra de lasestaciones de radio o pistas deCD/MP3. Presione nuevamente para detener.
23. Disc/Tune (Disco/Sintonizar):
presione o para sintonizarmanualmente la banda de frecuencia de radio o para escuchar la pistaanterior o siguiente del CD.
CAT: CAT sólo está disponible cuando el radio satelital está instalado. Suradio Audiophile viene equipado con capacidad de recepción satelital. Eljuego para habilitar la recepción satelital está disponible en sudistribuidor. Se incluyen instrucciones detalladas acerca de la recepciónsatelital con el juego de instalación del distribuidor. Juego satelitalinstalado por el distribuidor disponible sólo en Estados Unidoscontinental.
Para obtener más información acerca del radio satelital SIRIUS, llame sincosto al 888-539-SIRIUS (888-539-7474) o visite el sitio Web de SIRIUSwww.siriusradio.com
24. Ranura para CD: inserte un CD con la etiqueta hacia arriba.
2006 Navigator (nav)Owners Guide (post-2002-fmt)USA (fus)
Sistemas de audio
29

Controles de radio del asiento trasero (si están instalados)Si su vehículo está equipado conuna consola de fila delantera,entonces también lo está concontroles de radio del asientotrasero. Esta característica permitea los pasajeros delanteros y delasiento del medio escuchardiferentes fuentes de medios (radio,cinta, CD o DVD) en formasimultánea. (Sin embargo, lospasajeros delanteros y del asientodel medio no pueden escuchar dos estaciones de radio distintas al mismotiempo).
Cuando se activan los controles del asiento trasero, los pasajeros delasiento trasero pueden usar los controles para cambiar los medios dereproducción para todos los pasajeros (modo de reproducción simple).En este modo, todas las bocinas reproducirán el audio desde la mismafuente de medios para que todos los pasajeros escuchen. Para activar loscontroles de radio de los asientos traseros:
• Presione al mismo tiempo loscontroles de preestablecimientode memoria 3 y 5. Un icono deaudífono se enciende en la visualización del radio, indicando quelos controles del radio de los asientos traseros están activados.
• Presione por segunda vez los controles de preestablecimiento dememoria 3 y 5 para desactivar los controles del asiento trasero. Elicono de audífono se apagará en la visualización del radio.
Si hay una discrepancia entre los controles del sistema de audio delasiento trasero y delantero (es decir, ambos tratan de escuchar el mismomedio de reproducción), el sistema de audio delantero recibe laselección deseada.
- VOLUME + MODE
SEEK MEMORY
2006 Navigator (nav)Owners Guide (post-2002-fmt)USA (fus)
Sistemas de audio
30
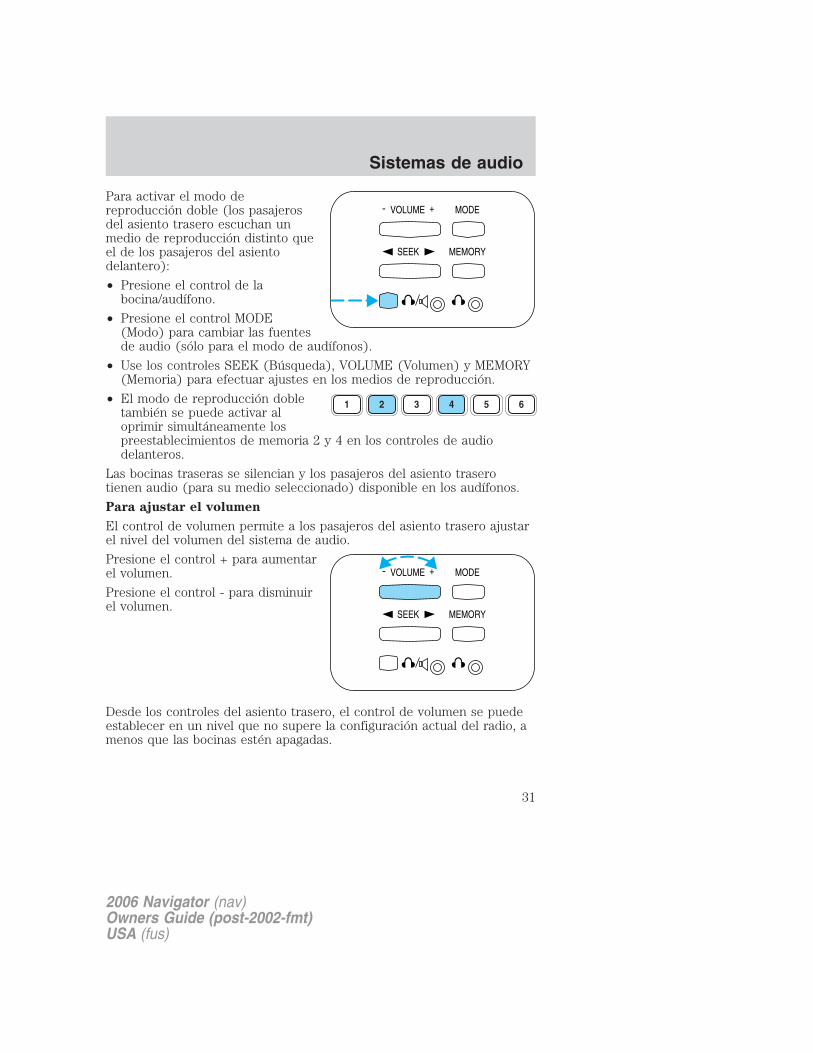
Para activar el modo dereproducción doble (los pasajerosdel asiento trasero escuchan unmedio de reproducción distinto queel de los pasajeros del asientodelantero):
• Presione el control de labocina/audífono.
• Presione el control MODE(Modo) para cambiar las fuentesde audio (sólo para el modo de audífonos).
• Use los controles SEEK (Búsqueda), VOLUME (Volumen) y MEMORY(Memoria) para efectuar ajustes en los medios de reproducción.
• El modo de reproducción dobletambién se puede activar aloprimir simultáneamente lospreestablecimientos de memoria 2 y 4 en los controles de audiodelanteros.
Las bocinas traseras se silencian y los pasajeros del asiento traserotienen audio (para su medio seleccionado) disponible en los audífonos.
Para ajustar el volumen
El control de volumen permite a los pasajeros del asiento trasero ajustarel nivel del volumen del sistema de audio.
Presione el control + para aumentarel volumen.
Presione el control - para disminuirel volumen.
Desde los controles del asiento trasero, el control de volumen se puedeestablecer en un nivel que no supere la configuración actual del radio, amenos que las bocinas estén apagadas.
- VOLUME + MODE
SEEK MEMORY
1 2 3 4 5 6
- VOLUME + MODE
SEEK MEMORY
2006 Navigator (nav)Owners Guide (post-2002-fmt)USA (fus)
Sistemas de audio
31

Encendido y apagado de bocinas traseras
Presione el control delaudífono/bocina para encender lasbocinas traseras (modo dereproducción simple) o apagarlas(modo de reproducción doble).
Uso de los audífonos/modo de reproducción doble
Enchufe un audífono de 3.5 mm (no incluido) en la conexión .Presione el control de encendido y apagado de las bocinas para hacerfuncionar los audífonos. DUAL PLAY se enciende en la visualización delradio y se desactiva el control de volumen, que indica que se ha activadola reproducción doble.
Las bocinas traseras se desconectan una vez que se presiona el controlde encendido y apagado de la bocina. La bocina delantera siguereproduciendo para los pasajeros delanteros. Presione el controlnuevamente para desactivar los audífonos. SINGLE PLAY se enciende enla visualización del radio y el control de volumen se activa, señalandoque la reproducción doble se ha desactivado.
Para activar la reproducción doble, los controles del asiento trasero sedeben activar e iluminar en la visualización del radio.
Selección de modo
Presione el control MODE paraalternar entre AM, FM1, FM2, cinta(si está instalada), CD, cambiadorde CD (si está instalado) o DVD (siestá instalado). Si está en modo dereproducción doble, SHARED(Compartido) se enciende en lavisualización del radio cuando losmodos delantero y trasero se ajustana los mismos medios dereproducción.
- VOLUME + MODE
SEEK MEMORY
- VOLUME + MODE
SEEK MEMORY
2006 Navigator (nav)Owners Guide (post-2002-fmt)USA (fus)
Sistemas de audio
32
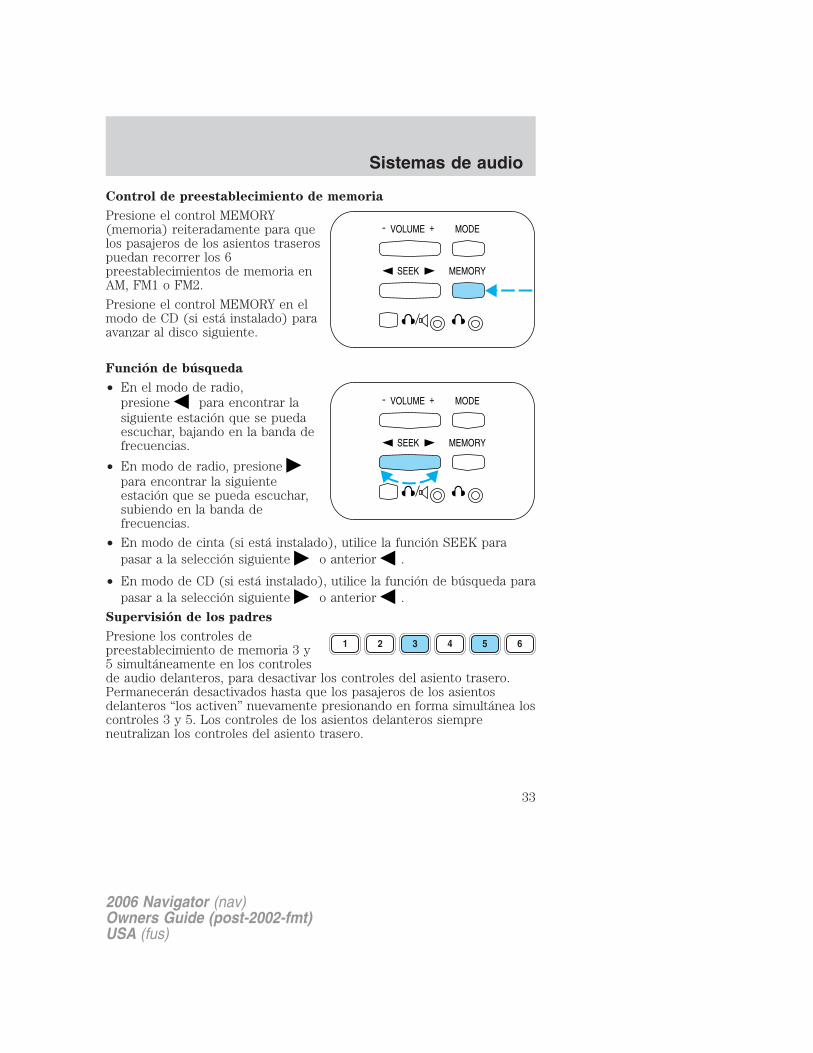
Control de preestablecimiento de memoria
Presione el control MEMORY(memoria) reiteradamente para quelos pasajeros de los asientos traserospuedan recorrer los 6preestablecimientos de memoria enAM, FM1 o FM2.
Presione el control MEMORY en elmodo de CD (si está instalado) paraavanzar al disco siguiente.
Función de búsqueda
• En el modo de radio,presione para encontrar lasiguiente estación que se puedaescuchar, bajando en la banda defrecuencias.
• En modo de radio, presionepara encontrar la siguienteestación que se pueda escuchar,subiendo en la banda defrecuencias.
• En modo de cinta (si está instalado), utilice la función SEEK parapasar a la selección siguiente o anterior .
• En modo de CD (si está instalado), utilice la función de búsqueda parapasar a la selección siguiente o anterior .
Supervisión de los padres
Presione los controles depreestablecimiento de memoria 3 y5 simultáneamente en los controlesde audio delanteros, para desactivar los controles del asiento trasero.Permanecerán desactivados hasta que los pasajeros de los asientosdelanteros “los activen” nuevamente presionando en forma simultánea loscontroles 3 y 5. Los controles de los asientos delanteros siempreneutralizan los controles del asiento trasero.
- VOLUME + MODE
SEEK MEMORY
- VOLUME + MODE
SEEK MEMORY
2006 Navigator (nav)Owners Guide (post-2002-fmt)USA (fus)
Sistemas de audio
33
INFORMACIÓN GENERAL DE AUDIOFrecuencias de radio: la Comisión Federal de Comunicaciones deEstados Unidos (Federal Communications Commission [FCC]) y laComisión de Radio y Telecomunicaciones de Canadá (Canadian Radioand Telecommunications Commission [CRTC]) establecen las frecuenciasAM y FM. Estas frecuencias son:
AM: 530, 540 a 1700, 1710 kHz
FM - 87.7, 87.9 a 107.7, 107.9 MHz
Factores de la recepción radiofónica: existen tres factores quepueden afectar la recepción radiofónica:
• Distancia/potencia: mientras más se aleja de una estación, más débil esla señal y la recepción.
• Terreno: cerros, montañas, edificios altos, líneas eléctricas,protecciones eléctricas, semáforos y tormentas eléctricas puedeninterferir en la recepción.
• Sobrecarga de estación: al pasar por una torre de radiodifusión, unaseñal más potente puede rebasar a otra más débil y escucharsemientras aparece en el radio la frecuencia de la estación débil.
Cuidado de cintas y del tocacintas:
Correcto:
• Utilice sólo cintas de 90 minutos de duración o menos.
• Apriete las cintas que estén muy sueltas insertando un dedo o un lápizen el orificio y girando el eje.
• Saque las etiquetas sueltas antes de insertar las cintas.
• Deje que las cintas sometidas a calor, humedad o frío extremoalcancen una temperatura moderada antes de reproducirlas.
• Limpie los cabezales del tocacintas con un cartucho de limpieza paracintas después de 10 a 12 horas de reproducción para mantener unsonido y un funcionamiento correctos.
Incorrecto:
• Dejar a la vista las cintas a la luz directa del sol, a la humedad, al caloro al frío extremos.
• Dejar las cintas durante mucho tiempo en el tocacintas cuando no lasesté reproduciendo.
2006 Navigator (nav)Owners Guide (post-2002-fmt)USA (fus)
Sistemas de audio
34
Cuidado de CD y del reproductor de CD:
Correcto:
• Tome los discos únicamente por los bordes. Por ningún motivo toquela superficie de reproducción.
• Inspeccione los discos antes de reproducirlos. Límpielos sólo con unlimpiador aprobado para CD y hágalo desde el centro hacia afuera.
Incorrecto:
• Exponer los discos a la luz solar directa o a fuentes de calor duranteperíodos prolongados.
• Insertar más de un disco en cada una de las ranuras del cartucho delcambiador de CD.
• Limpiarlos empleando un movimiento circular.
Las unidades de CD están diseñadas para reproducir solamentediscos compactos de audio de 12 cm (4.75 pulgadas) impresoscomercialmente. Debido a incompatibilidad técnica, ciertos discoscompactos grabables y regrabables podrían no funcionarcorrectamente cuando se usan en reproductores de CD Ford. Nose deben insertar en el reproductor de CD discos de formairregular, que tengan una película protectora antirrayaduras nidiscos con etiquetas caseras de papel (adhesivas). La etiqueta sepuede despegar y hacer que el CD se atasque. Se recomiendaidentificar los CD caseros con un marcador permanente en vez deutilizar etiquetas adhesivas. Los bolígrafos pueden dañar los CD.Para obtener más información, comuníquese con el distribuidorautorizado.
Garantía y servicio del sistema de audio: consulte el Manual degarantía para obtener información sobre la garantía del sistema deaudio. Si es necesario realizar servicio, consulte a su distribuidor o a untécnico calificado.
Siempre que se recibe una advertencia, el volumen del radiodisminuirá a un nivel que permita escuchar los tonos. El volumendel radio volverá al nivel anterior después que termine laadvertencia.
2006 Navigator (nav)Owners Guide (post-2002-fmt)USA (fus)
Sistemas de audio
35
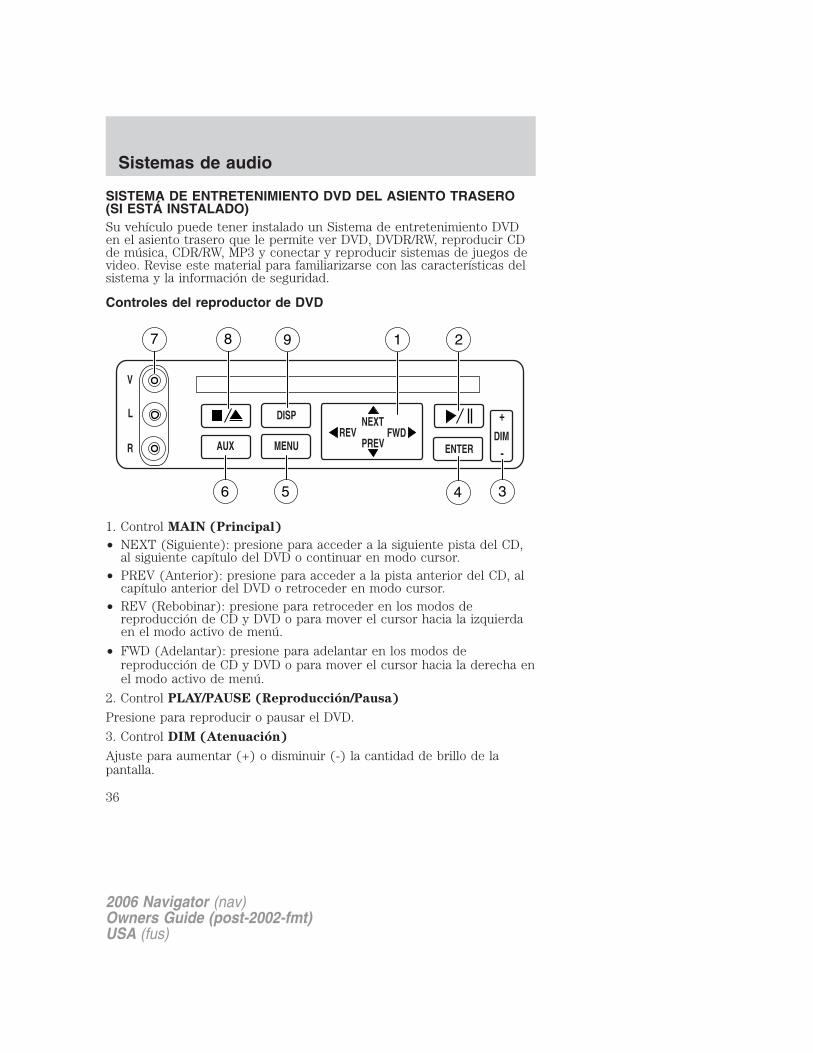
SISTEMA DE ENTRETENIMIENTO DVD DEL ASIENTO TRASERO(SI ESTÁ INSTALADO)Su vehículo puede tener instalado un Sistema de entretenimiento DVDen el asiento trasero que le permite ver DVD, DVDR/RW, reproducir CDde música, CDR/RW, MP3 y conectar y reproducir sistemas de juegos devideo. Revise este material para familiarizarse con las características delsistema y la información de seguridad.
Controles del reproductor de DVD
1. Control MAIN (Principal)
• NEXT (Siguiente): presione para acceder a la siguiente pista del CD,al siguiente capítulo del DVD o continuar en modo cursor.
• PREV (Anterior): presione para acceder a la pista anterior del CD, alcapítulo anterior del DVD o retroceder en modo cursor.
• REV (Rebobinar): presione para retroceder en los modos dereproducción de CD y DVD o para mover el cursor hacia la izquierdaen el modo activo de menú.
• FWD (Adelantar): presione para adelantar en los modos dereproducción de CD y DVD o para mover el cursor hacia la derecha enel modo activo de menú.
2. Control PLAY/PAUSE (Reproducción/Pausa)
Presione para reproducir o pausar el DVD.
3. Control DIM (Atenuación)
Ajuste para aumentar (+) o disminuir (-) la cantidad de brillo de lapantalla.
2006 Navigator (nav)Owners Guide (post-2002-fmt)USA (fus)
Sistemas de audio
36

4. Control ENTER (Entrada)
Presione para seleccionar la función señalada en el menú activo. Tambiénse pueden usar algunos discos interactivos de usuarios durante lareproducción de película.
5. Control MENU (Menú)
Presione para que aparezca el menú de disco.
6. Control AUX (Auxiliar)
Presione para cambiar el reproductor de DVD de modo de reproduccióna modo auxiliar.
7. Conexiones auxiliares
Inserte las líneas para jugadores de video juegos estándar
8. Control STOP/EJECT (Detención/Expulsión)
Presione una vez para parar la reproducción de DVD. Oprímalonuevamente para expulsar el DVD.
9. Control DISPLAY (DISP) (Visualización)
Presione para accionar la visualización del menú del jugador y los ajustesde reproducción del usuario.
Características del control de DVD
Control Menu (Menú)Presione el control MENU paraingresar al modo MENU. Estopermite moverse y elegir dentro dela estructura de menú generada deDVD. En modo de MENU:
• Presione el control NEXT paramover el cursor una posiciónhacia adelante
• Presione el control PREV paramover el cursor una posiciónhacia atrás
NEXT
PREVREV FWD
NEXT
PREVREV FWD
2006 Navigator (nav)Owners Guide (post-2002-fmt)USA (fus)
Sistemas de audio
37
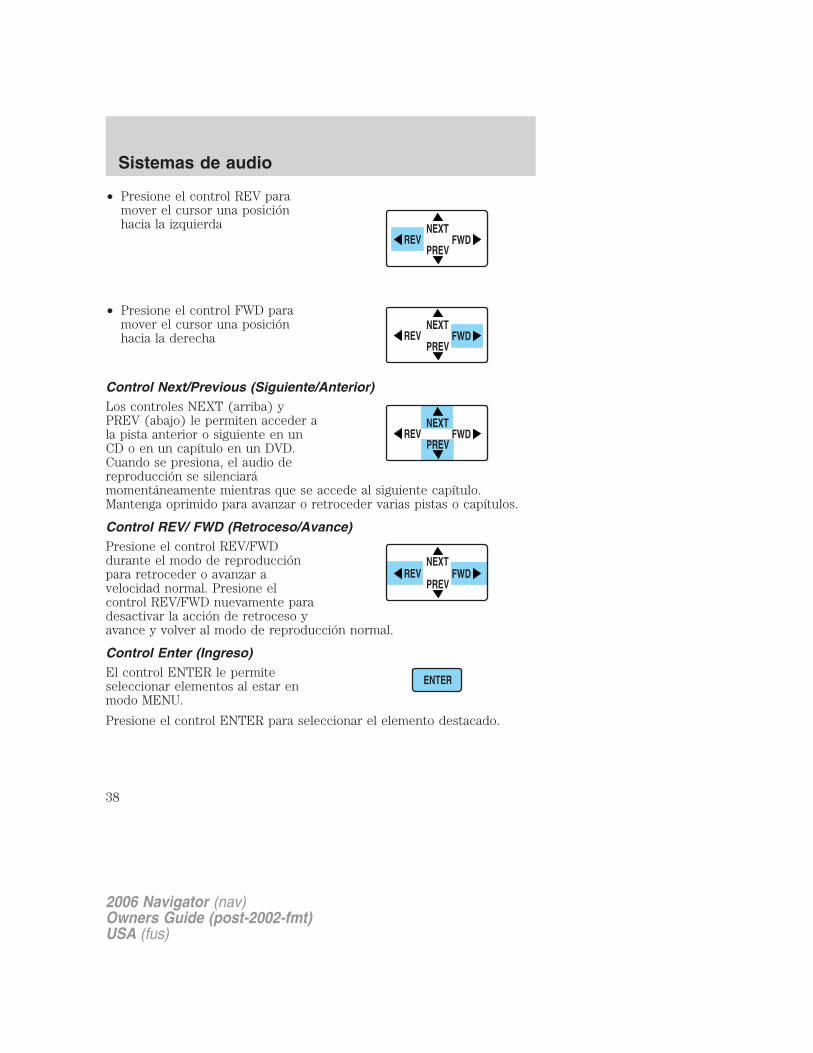
• Presione el control REV paramover el cursor una posiciónhacia la izquierda
• Presione el control FWD paramover el cursor una posiciónhacia la derecha
Control Next/Previous (Siguiente/Anterior)Los controles NEXT (arriba) yPREV (abajo) le permiten acceder ala pista anterior o siguiente en unCD o en un capítulo en un DVD.Cuando se presiona, el audio dereproducción se silenciarámomentáneamente mientras que se accede al siguiente capítulo.Mantenga oprimido para avanzar o retroceder varias pistas o capítulos.
Control REV/ FWD (Retroceso/Avance)Presione el control REV/FWDdurante el modo de reproducciónpara retroceder o avanzar avelocidad normal. Presione elcontrol REV/FWD nuevamente paradesactivar la acción de retroceso yavance y volver al modo de reproducción normal.
Control Enter (Ingreso)El control ENTER le permiteseleccionar elementos al estar enmodo MENU.
Presione el control ENTER para seleccionar el elemento destacado.
NEXT
PREVREV FWD
NEXT
PREVREV FWD
NEXT
PREVREV FWD
NEXT
PREVREV FWD
ENTER
2006 Navigator (nav)Owners Guide (post-2002-fmt)USA (fus)
Sistemas de audio
38
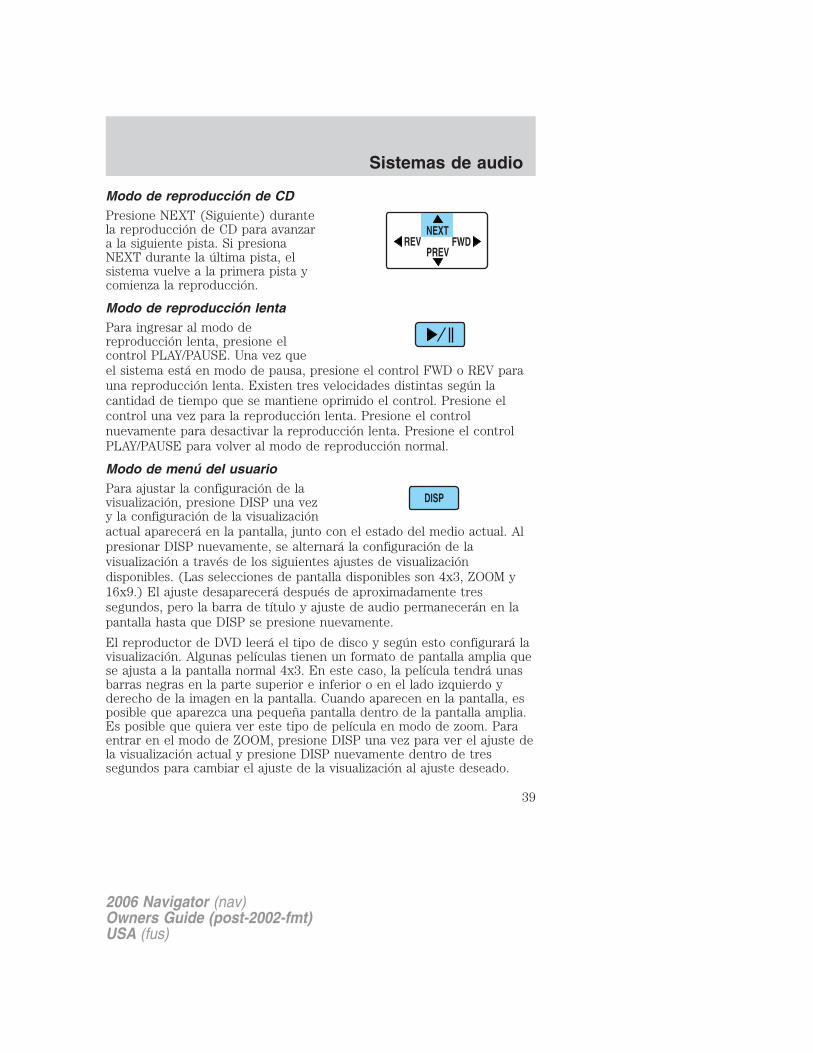
Modo de reproducción de CDPresione NEXT (Siguiente) durantela reproducción de CD para avanzara la siguiente pista. Si presionaNEXT durante la última pista, elsistema vuelve a la primera pista ycomienza la reproducción.
Modo de reproducción lentaPara ingresar al modo dereproducción lenta, presione elcontrol PLAY/PAUSE. Una vez queel sistema está en modo de pausa, presione el control FWD o REV parauna reproducción lenta. Existen tres velocidades distintas según lacantidad de tiempo que se mantiene oprimido el control. Presione elcontrol una vez para la reproducción lenta. Presione el controlnuevamente para desactivar la reproducción lenta. Presione el controlPLAY/PAUSE para volver al modo de reproducción normal.
Modo de menú del usuarioPara ajustar la configuración de lavisualización, presione DISP una vezy la configuración de la visualizaciónactual aparecerá en la pantalla, junto con el estado del medio actual. Alpresionar DISP nuevamente, se alternará la configuración de lavisualización a través de los siguientes ajustes de visualizacióndisponibles. (Las selecciones de pantalla disponibles son 4x3, ZOOM y16x9.) El ajuste desaparecerá después de aproximadamente tressegundos, pero la barra de título y ajuste de audio permanecerán en lapantalla hasta que DISP se presione nuevamente.
El reproductor de DVD leerá el tipo de disco y según esto configurará lavisualización. Algunas películas tienen un formato de pantalla amplia quese ajusta a la pantalla normal 4x3. En este caso, la película tendrá unasbarras negras en la parte superior e inferior o en el lado izquierdo yderecho de la imagen en la pantalla. Cuando aparecen en la pantalla, esposible que aparezca una pequeña pantalla dentro de la pantalla amplia.Es posible que quiera ver este tipo de película en modo de zoom. Paraentrar en el modo de ZOOM, presione DISP una vez para ver el ajuste dela visualización actual y presione DISP nuevamente dentro de tressegundos para cambiar el ajuste de la visualización al ajuste deseado.
NEXT
PREVREV FWD
DISP
2006 Navigator (nav)Owners Guide (post-2002-fmt)USA (fus)
Sistemas de audio
39
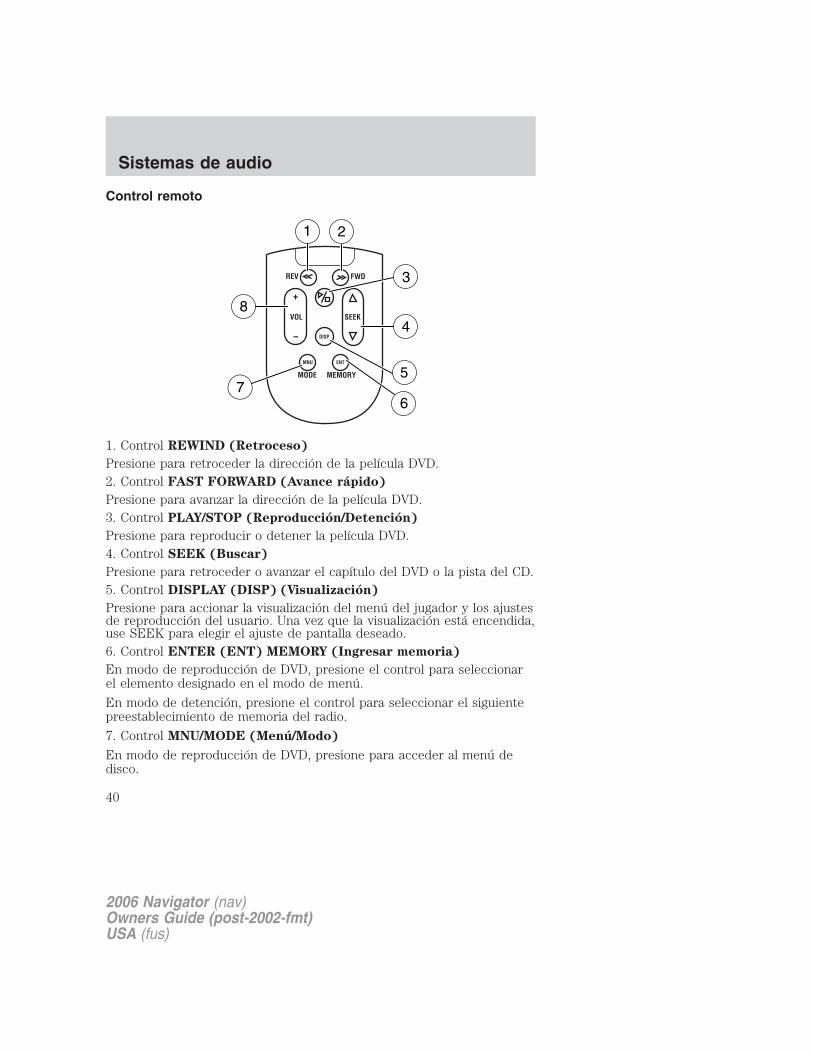
Control remoto
1. Control REWIND (Retroceso)
Presione para retroceder la dirección de la película DVD.2. Control FAST FORWARD (Avance rápido)
Presione para avanzar la dirección de la película DVD.3. Control PLAY/STOP (Reproducción/Detención)
Presione para reproducir o detener la película DVD.4. Control SEEK (Buscar)
Presione para retroceder o avanzar el capítulo del DVD o la pista del CD.5. Control DISPLAY (DISP) (Visualización)
Presione para accionar la visualización del menú del jugador y los ajustesde reproducción del usuario. Una vez que la visualización está encendida,use SEEK para elegir el ajuste de pantalla deseado.6. Control ENTER (ENT) MEMORY (Ingresar memoria)
En modo de reproducción de DVD, presione el control para seleccionarel elemento designado en el modo de menú.
En modo de detención, presione el control para seleccionar el siguientepreestablecimiento de memoria del radio.
7. Control MNU/MODE (Menú/Modo)
En modo de reproducción de DVD, presione para acceder al menú dedisco.
REV FWD
SEEKVOL
MODE MEMORY
+
DISP
MNU ENT
-
1 2
3
4
5
67
8
2006 Navigator (nav)Owners Guide (post-2002-fmt)USA (fus)
Sistemas de audio
40
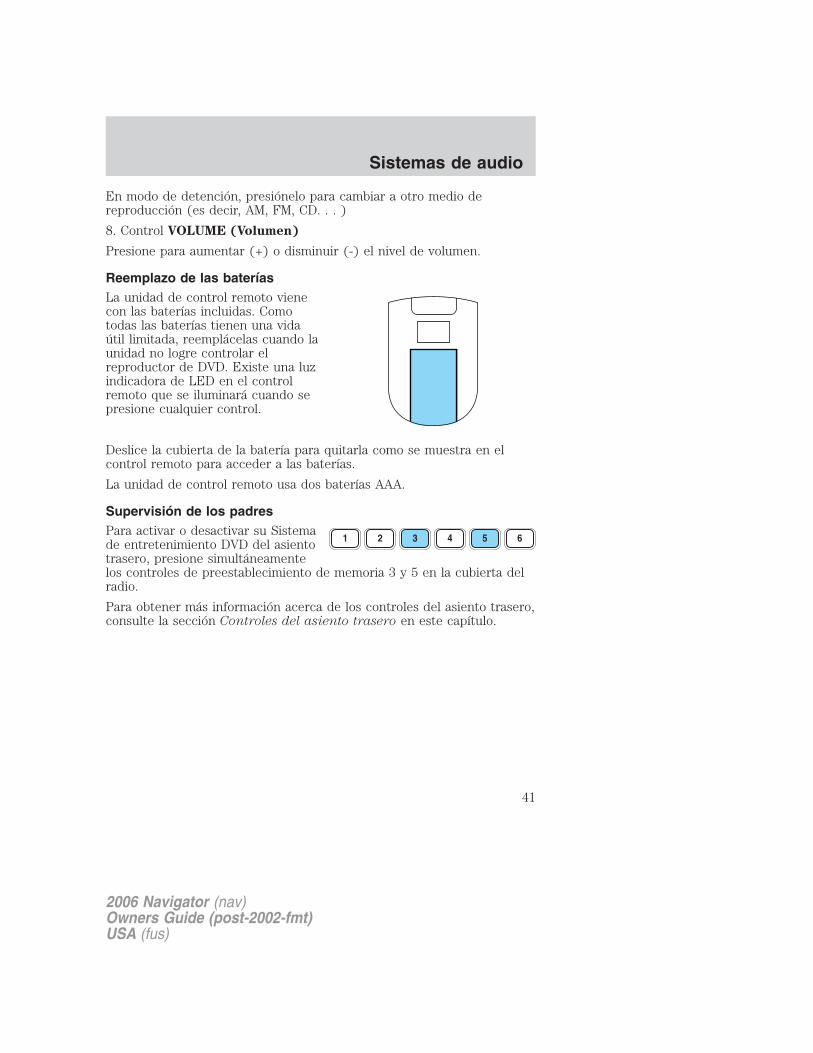
En modo de detención, presiónelo para cambiar a otro medio dereproducción (es decir, AM, FM, CD. . . )
8. Control VOLUME (Volumen)
Presione para aumentar (+) o disminuir (-) el nivel de volumen.
Reemplazo de las bateríasLa unidad de control remoto vienecon las baterías incluidas. Comotodas las baterías tienen una vidaútil limitada, reemplácelas cuando launidad no logre controlar elreproductor de DVD. Existe una luzindicadora de LED en el controlremoto que se iluminará cuando sepresione cualquier control.
Deslice la cubierta de la batería para quitarla como se muestra en elcontrol remoto para acceder a las baterías.
La unidad de control remoto usa dos baterías AAA.
Supervisión de los padresPara activar o desactivar su Sistemade entretenimiento DVD del asientotrasero, presione simultáneamentelos controles de preestablecimiento de memoria 3 y 5 en la cubierta delradio.
Para obtener más información acerca de los controles del asiento trasero,consulte la sección Controles del asiento trasero en este capítulo.
2006 Navigator (nav)Owners Guide (post-2002-fmt)USA (fus)
Sistemas de audio
41
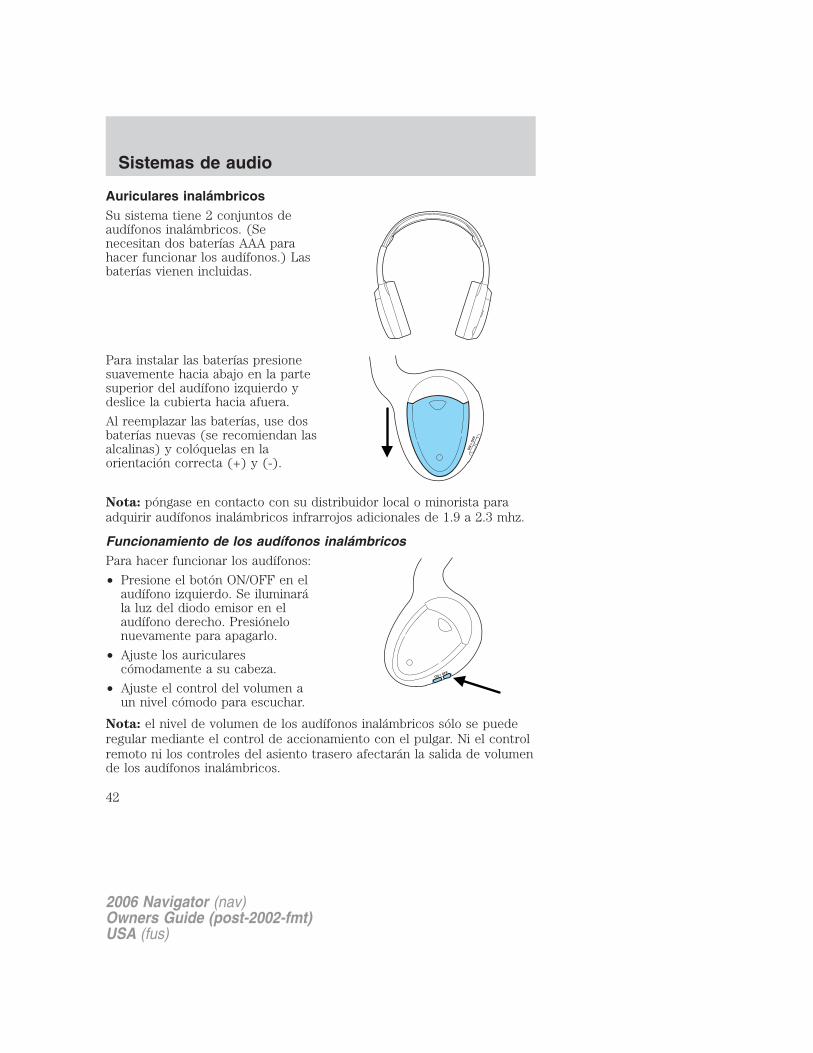
Auriculares inalámbricosSu sistema tiene 2 conjuntos deaudífonos inalámbricos. (Senecesitan dos baterías AAA parahacer funcionar los audífonos.) Lasbaterías vienen incluidas.
Para instalar las baterías presionesuavemente hacia abajo en la partesuperior del audífono izquierdo ydeslice la cubierta hacia afuera.
Al reemplazar las baterías, use dosbaterías nuevas (se recomiendan lasalcalinas) y colóquelas en laorientación correcta (+) y (-).
Nota: póngase en contacto con su distribuidor local o minorista paraadquirir audífonos inalámbricos infrarrojos adicionales de 1.9 a 2.3 mhz.
Funcionamiento de los audífonos inalámbricosPara hacer funcionar los audífonos:
• Presione el botón ON/OFF en elaudífono izquierdo. Se iluminarála luz del diodo emisor en elaudífono derecho. Presiónelonuevamente para apagarlo.
• Ajuste los auricularescómodamente a su cabeza.
• Ajuste el control del volumen aun nivel cómodo para escuchar.
Nota: el nivel de volumen de los audífonos inalámbricos sólo se puederegular mediante el control de accionamiento con el pulgar. Ni el controlremoto ni los controles del asiento trasero afectarán la salida de volumende los audífonos inalámbricos.
ON
O
FF
ON OFF
2006 Navigator (nav)Owners Guide (post-2002-fmt)USA (fus)
Sistemas de audio
42

Cuando no esté utilizando losaudífonos, apáguelos para ahorrar laenergía de la batería. Los audífonosse apagarán automáticamente luegode cinco minutos si no han recibidouna señal de audio infrarroja delreceptáculo superior.
Asegúrese que la ruta entre losaudífonos y el transmisor infrarrojo(montado en la cubierta del DVD)no esté obstruida.
Visualización de cristal líquido (LCD) plegable
La pantalla se despliega hacia abajo para ver el video y hacia arriba paraalmacenarse en el alojamiento cuando no está en uso. Asegúrese de quela pantalla esté enganchada al alojamiento cuando esté guardada.
1. Visualización de cristal líquido (LCD) de matriz activa 7.0” (diagonal).2. Alojamiento de la pantalla.3. Interruptor del atenuador. Presione +/- para aumentar o disminuir elbrillo de la pantalla.
VOL
PO
WE
R
2006 Navigator (nav)Owners Guide (post-2002-fmt)USA (fus)
Sistemas de audio
43

Reproducción y formato• El reproductor de DVD de su sistema de entretenimiento DVD del
asiento trasero sólo se puede usar en el modo “reproducción”. (Elreproductor de DVD no ofrece una función de grabación.)
• El sistema reproduce CD o DVD estándar.• El reproductor de DVD tiene la capacidad de reproducir DVD,
DVDR/RW, CD, CDR/RW y MP3.
Circuitos de protección del sistema de entretenimiento DVD delasiento trasero
Circuito del sensor de temperatura alta• Las temperaturas extremadamente altas pueden dañar al reproductor
de DVD.• Cuando el reproductor de DVD se calienta demasiado, el circuito
sensor de temperatura alta detiene el funcionamiento de la máquina.DVD/CD HOT se ilumina en la visualización del radio.
• El reproductor de DVD permanecerá inactivo hasta que se enfríe auna temperatura normal de funcionamiento. La duración del tiempo deenfriamiento variará dependiendo de las condiciones.
Consejos generales de funcionamiento• Cuando el motor no está funcionando, use el sistema por períodos
cortos. De otro modo, descargará la batería.
• Cuando el encendido se coloca en la posición OFF (Apagado), elsistema de entretenimiento DVD del asiento trasero también se colocaen OFF. Cuando el encendido se coloca en ON, el sistema comenzará areproducir desde la última fuente de medios seleccionada cuando sepresiona el control de reproducción.
• Para desactivar el reproductor DVD, presione simultáneamente loscontroles de preestablecimiento de memoria 3 y 5 en la pantalla delradio. Para activar nuevamente el reproductor DVD, presione loscontroles preestablecidos 3 y 5 en forma simultánea.
• El reproductor de DVD sólo es capaz de leer la parte inferior de undisco. Cuando se inserta un disco de un solo lado, la etiqueta debeestar hacia arriba. Para un disco de múltiples lados, el lado dereproducción deseado debe ir hacia abajo cuando se inserte el discoen el reproductor.
• El reproductor de DVD tiene la capacidad de reproducir DVD,DVDR/RW, CD, CDR/RW y MP3.
2006 Navigator (nav)Owners Guide (post-2002-fmt)USA (fus)
Sistemas de audio
44

• Los DVD se formatean según la zona. Este sistema se DVD sólo puedereproducir DVD de la zona 1 (DVD fabricados en los Estados Unidos yCanadá).
Esta unidad está diseñada sólo para reproducir discos compactosde audio y DVD de 12 cm (4.75 pulg.) impresos comercialmente.Debido a incompatibilidad técnica, algunos discos compactosgrabables y regrabables podrían no funcionar correctamentecuando se usan en reproductores de DVD/CD Ford. No se debeninsertar en el reproductor discos de forma irregular, que tenganuna película protectora antirrayaduras ni discos con etiquetascaseras de papel (adhesivas). La etiqueta se puede despegar yhacer que el disco se atasque. Se recomienda identificar losdiscos caseros con un marcador permanente en vez de utilizaretiquetas adhesivas. Los bolígrafos pueden dañar los discos. Paraobtener más información, contáctese con su distribuidor.
Inserción de un CD/DVDInserte parcialmente el CD/DVD en la ranura y el sistema introducirácompletamente el disco. Insertar el disco demasiado alejado podría hacerque éste se atore en el sistema.La inserción de un CD/DVD en el reproductor de DVD automáticamenteenciende el sistema, debiendo comenzar la reproducción.
El contador se restablece en forma automática a 0:00:00.
Extracción de un CD/DVD1. Presione el control STOP/EJECT para detener la reproducción.
2. Presione nuevamente el control STOP/EJECT para expulsar elCD/DVD.
Si no se saca el CD/DVD en el tiempo asignado, el sistema jalará devuelta el CD/DVD al sistema por motivos de seguridad. Si el CD/DVD nose expulsa del sistema, mantenga oprimido el control EJECT durantecerca de dos segundos. El disco debería expulsarse sin importar si elencendido del vehículo está en ON u OFF.
Reproducción de un videojuego o dispositivo auxiliar1. Conecte la línea de video del dispositivo del videojuego al enchufeAMARILLO.
2. Conecte los cables de audio izquierdo y derecho a los enchufesBLANCO y ROJO respectivamente.
3. Presione el control MODE (Modo) hasta que DVD/CD AUX (no haydisco en el reproductor) o DVD/CD (disco en el reproductor) se ilumine
2006 Navigator (nav)Owners Guide (post-2002-fmt)USA (fus)
Sistemas de audio
45

en la visualización del radio. Si hay un disco en el sistema, deberíacomenzar la reproducción. Para activar las entradas auxiliares, presioneel control STOP u oprima el control AUX en el reproductor de DVD.
Indicadores en pantalla
Cada vez que se presiona el control, el estado operacional delreproductor de DVD aparece en la pantalla. A continuación, algunos delos posibles indicadores:1. DVD/ CD STATUS (Estado de DVD/CD) (PLAY/FWD/REV/PAUSE)(Reproducción/Avance/Retroceso/Pausa)
2. Número de pista del CD / Título del DVD
3. Número de capítulo del DVD
4. MEDIA COUNTER (Contador del sistema): despliega el tiempo actualde visualización de los medios deseados. (HORAS:MINUTOS:SEGUNDOS)
5. Ángulo de la cámara (de imagen): se ajusta con los controles delcursor y el control ENTER.
6. Subtítulos (tipo de idioma específico: Inglés, Español o Francés,dependiendo de la capacidad de disco y de la selección de Encendido yapagado.)
7. SALIDA DE AUDIO (no modificable)
8. AUDIO VERSION (Versión de audio): (01 Inglés., etc.)
9. DISPLAY SETTING (Ajuste de pantalla) (4x3, Zoom, 16x9)
10. STATUS ICON (Icono de estado) (Avance, x4, x8, x32, Retroceso, x4,x8, x32, etc.)
2006 Navigator (nav)Owners Guide (post-2002-fmt)USA (fus)
Sistemas de audio
46
Información de seguridadLea todas las instrucciones de seguridad y funcionamiento antes dehacer funcionar el sistema y guárdelas para futuras referencias.No intente reparar ni modificar el sistema de entretenimiento DVD delasiento trasero. Consulte a su distribuidor Ford o Lincoln Mercury.No inserte objetos extraños en el compartimiento para DVD.
El vidrio delantero de la visualización plegable de cristal líquido(LCD) se puede quebrar si se golpea con una superficie dura. Si
el cristal se rompe, no toque el material líquido cristalino. En caso deque entre en contacto con la piel, lave inmediatamente con agua yjabón.
No deje a la vista la visualización plegable de cristal líquido(LCD) a los rayos directos del sol o a rayos ultravioleta intensosdurante lapsos prolongados. Los rayos ultravioleta deterioran elcristal líquido.
Asegúrese de revisar los manuales del usuario de los videojuegos yequipo de videojuegos cuando se usan como entradas auxiliares de susistema de entretenimiento DVD del asiento trasero.
No haga funcionar los videojuegos ni el equipo de videojuegos si loscables de corriente están rotos, separados o dañados. Coloque concuidado los cables de corriente donde no se pisen o interfieran con elfuncionamiento de los asientos ni de los compartimentos.
Desconecte los cables eléctricos y/o cables de los videojuegos y equiposde video cuando no se usen.
Evite tocar con los dedos los enchufes de dispositivos auxiliares. No lossople ni permita que se mojen o ensucien.
No limpie ninguna pieza del reproductor de DVD con benceno, diluyentede pintura o cualquier otro solvente.
Siempre que se recibe una advertencia, el volumen del radiodisminuirá a un nivel que permita escuchar los tonos. El volumendel radio volverá al nivel anterior después que termine laadvertencia.
En cumplimiento con la Comisión federal de comunicaciones deEstados Unidos (Federal Communication Commission, FCC)Los cambios o modificaciones no aprobados por Ford Lincoln Mercurypueden anular la autorización del usuario para hacer funcionar el equipo.
2006 Navigator (nav)Owners Guide (post-2002-fmt)USA (fus)
Sistemas de audio
47
Este equipo ha sido probado y se considera que cumple con los límitespara dispositivos digitales Clase B, de acuerdo con la Parte 15 de lasNormas FCC. Estos requisitos están diseñados para proporcionar unaprotección razonable contra las interferencias perjudiciales en unainstalación residencial. Este equipo genera, usa y puede irradiar energíade radiofrecuencia y, si no se instala ni se usa según las instrucciones,puede causar una interferencia perjudicial en las comunicaciones deradio.Sin embargo, no existe garantía de que no se producirá interferencia enuna instalación específica. Si este equipo causa una interferenciaperjudicial en la recepción de radio o televisión, lo cual se puededeterminar encendiendo y apagando el equipo, se recomienda al usuarioque consulte con su distribuidor o con un técnico experto en radio y TVpara obtener ayuda.
Cuidado y servicio del reproductor de DVD
Condiciones ambientales extremasLos reproductores de DVD que están sujetos a condiciones ambientalesrigurosas pueden dañarse o rendir a menos de su capacidad máxima.Para evitar que esto suceda, evite siempre exponer el reproductor deDVD a:• temperaturas de frío o calor extremas.• luz solar directa.• gran humedad.• ambiente polvoriento.• ubicaciones donde se generen campos magnéticos fuertes.
Temperaturas extremasCuando un vehículo está estacionado bajo el sol directo o en un lugar defrío extremo durante un largo período, espere hasta que la temperaturade la cabina sea normal antes de hacer funcionar el sistema.Condensación de la humedadLa humedad del aire se condensa en el reproductor de DVD bajocondiciones de humedad extrema o cuando se cambia desde un lugar fríoa uno caliente. Si hay condensación de humedad, no inserte un CD oDVD en el reproductor. Si ya hay uno en el reproductor, sáquelo.Encienda el DVD para secar la humedad antes de insertar un DVD. Estopuede demorar una hora o más.Limpieza de la visualización plegable de cristal líquido (LCD)Limpie la visualización aplicando directamente una pequeña cantidad deagua o cualquier limpiador de vidrio casero con amoniaco en un paño
2006 Navigator (nav)Owners Guide (post-2002-fmt)USA (fus)
Sistemas de audio
48
suave. Frote la pantalla con cuidado hasta que el polvo, la suciedad o lashuellas digitales desaparezcan. No rocíe la pantalla directamente conagua o solventes para limpiar vidrios. El exceso de rociado de estoslíquidos podría hacer que goteen en los sistemas electrónicos de lapantalla y provocar daños. No aplique exceso de presión mientras limpiala pantalla.
Elementos extrañosIntente evitar que entre suciedad y objetos extraños al compartimientodel reproductor de DVD. Si se derrama líquido accidentalmente sobre elsistema, apáguelo inmediatamente y consulte a un técnico de serviciocalificado.
Limpieza de CD y DVDRevise todos los discos para cerciorarse de que estén libres decontaminación antes de reproducirlos. Si es necesario, limpie los discosúnicamente con un limpiador de CD aprobado, avanzando desde elcentro hacia el borde. No use movimientos circulares.
Limpieza de la parte exterior del reproductor de DVDLimpie el interior del reproductor de DVD con un paño húmedo. No useproductos de limpieza de CD o un CD para limpiar el interior de sureproductor de DVD. El uso de estos productos puede dañar su sistema.
SISTEMA DE NAVEGACIÓN LINCOLN (SI ESTÁ INSTALADO)El vehículo puede estar equipado con un sistema de navegación Lincolnque permite escuchar radio, los CD y también navegar el vehículomediante un DVD de navegación.
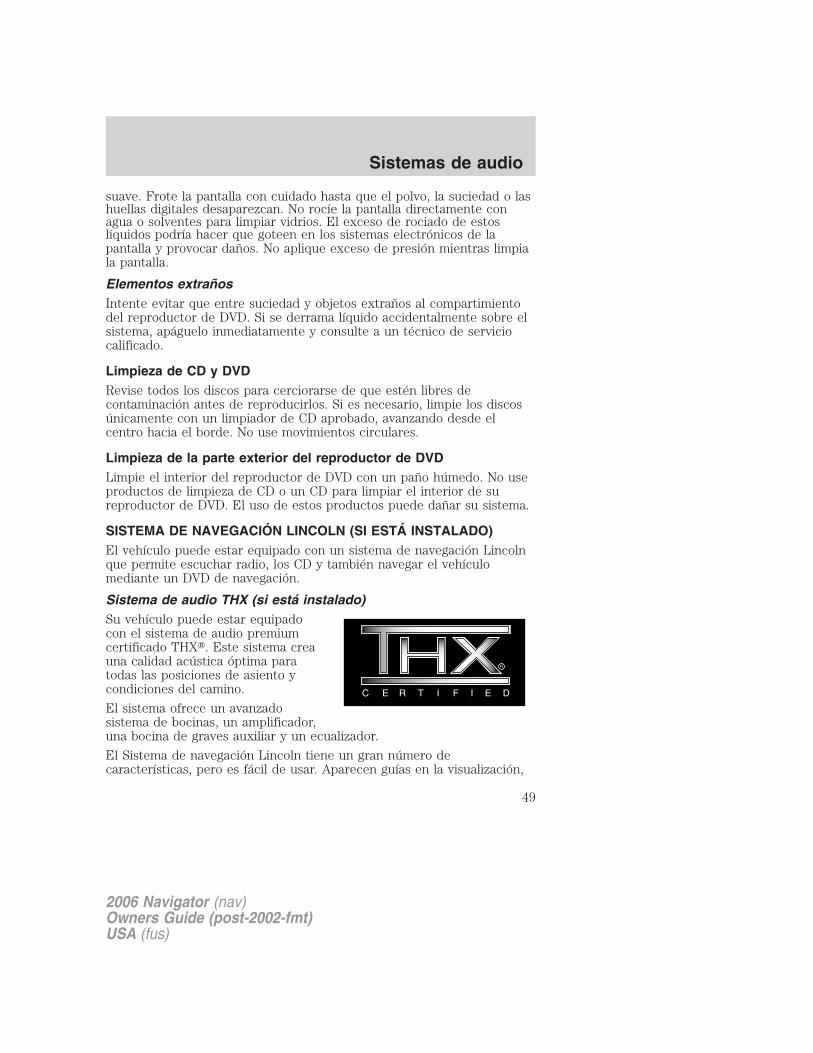
Sistema de audio THX (si está instalado)Su vehículo puede estar equipadocon el sistema de audio premiumcertificado THX�. Este sistema creauna calidad acústica óptima paratodas las posiciones de asiento ycondiciones del camino.
El sistema ofrece un avanzadosistema de bocinas, un amplificador,una bocina de graves auxiliar y un ecualizador.
El Sistema de navegación Lincoln tiene un gran número decaracterísticas, pero es fácil de usar. Aparecen guías en la visualización,
2006 Navigator (nav)Owners Guide (post-2002-fmt)USA (fus)
Sistemas de audio
49
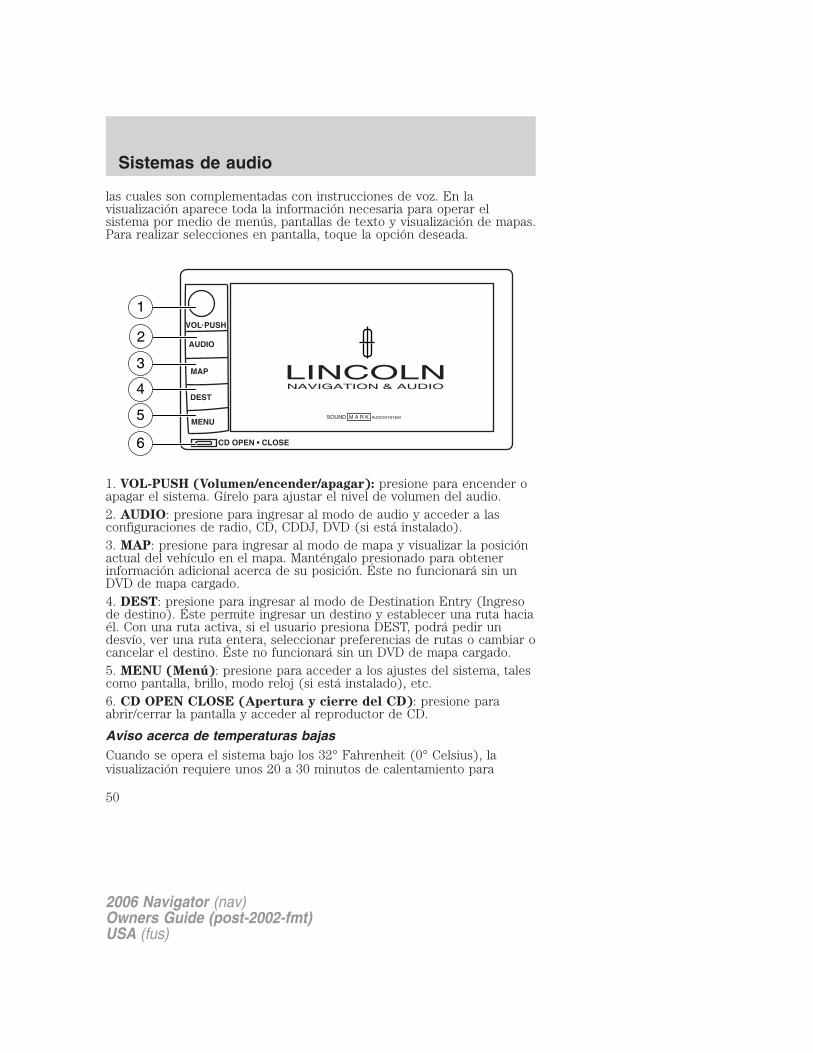
las cuales son complementadas con instrucciones de voz. En lavisualización aparece toda la información necesaria para operar elsistema por medio de menús, pantallas de texto y visualización de mapas.Para realizar selecciones en pantalla, toque la opción deseada.
1. VOL-PUSH (Volumen/encender/apagar): presione para encender oapagar el sistema. Gírelo para ajustar el nivel de volumen del audio.2. AUDIO: presione para ingresar al modo de audio y acceder a lasconfiguraciones de radio, CD, CDDJ, DVD (si está instalado).3. MAP: presione para ingresar al modo de mapa y visualizar la posiciónactual del vehículo en el mapa. Manténgalo presionado para obtenerinformación adicional acerca de su posición. Éste no funcionará sin unDVD de mapa cargado.4. DEST: presione para ingresar al modo de Destination Entry (Ingresode destino). Éste permite ingresar un destino y establecer una ruta haciaél. Con una ruta activa, si el usuario presiona DEST, podrá pedir undesvío, ver una ruta entera, seleccionar preferencias de rutas o cambiar ocancelar el destino. Éste no funcionará sin un DVD de mapa cargado.5. MENU (Menú): presione para acceder a los ajustes del sistema, talescomo pantalla, brillo, modo reloj (si está instalado), etc.6. CD OPEN CLOSE (Apertura y cierre del CD): presione paraabrir/cerrar la pantalla y acceder al reproductor de CD.
Aviso acerca de temperaturas bajasCuando se opera el sistema bajo los 32° Fahrenheit (0° Celsius), lavisualización requiere unos 20 a 30 minutos de calentamiento para
2006 Navigator (nav)Owners Guide (post-2002-fmt)USA (fus)
Sistemas de audio
50

alcanzar su brillo máximo. Asegúrese de que la configuración de lavisualización del sistema esté definida en el modo DAY (Día) hasta quese alcance el brillo máximo (consulte la sección Modo de menú). Unavez que se ha alcanzado el brillo máximo, vuelva a la configuración devisualización en modo AUTO.
Visualización de mapa inicialDespués de presionar AGREE(Aceptar) en la pantalla inicialWARNING (Advertencia), aparecerála pantalla de mapa inicial quemostrará la ubicación actual delvehículo.Al presionar el icono de globo,aparecerán las configuraciones delusuario: información sonora,unidades de navegación, idioma yreloj (si está instalado).
Inicio rápido: cómo comenzarPara escuchar una estación de radio:
1. Asegúrese de que el encendido del vehículo esté activado.2. Presione AUDIO.
3. Seleccione AM, FM1 o FM2.
4. Presione TUNE para ajustar manualmente la banda de frecuenciashacia arriba ( ) o hacia abajo ( ).
2006 Navigator (nav)Owners Guide (post-2002-fmt)USA (fus)
Sistemas de audio
51

5. Presione SEEK para encontrar la próxima estación potente haciaarriba ( ) o hacia abajo ( ).
Nota: si está seleccionado PTY (tipo de programa), la selección deestaciones será limitada. Consulte Tipo de programa (PTY) paraobtener más información.Para reproducir un CD cargado previamente:
1. Asegúrese de que el encendido del vehículo esté activado.2. Presione AUDIO.3. Presione CD para seleccionar un CD que ya esté cargado. (NO CDaparecerá en la visualización si no hay ningún CD cargado en el sistema.)Use los controles (1–6) para seleccionar los CD deseados.4. Comenzará la reproducción del CD.Para cargar los CD:
1. Presione CD OPEN CLOSE en la parte inferior de la pantalla paracargar un CD. (Se abrirá la pantalla.)2. Presione LOAD y seleccione la ranura deseada. O bien, mantengapresionado LOAD para que las ranuras disponibles se carguenautomáticamente. La velocidad de parpadeo de las luces indicadoras dela ranura aumentará cuando el sistema esté listo para aceptar un disco.Presione CD OPEN CLOSE para cerrar la pantalla. Una vez cerrada,comenzará la reproducción del CD.
3. Utilice los controles al tacto para avanzar pistas, explorar, poner enpausa, etc.
2006 Navigator (nav)Owners Guide (post-2002-fmt)USA (fus)
Sistemas de audio
52
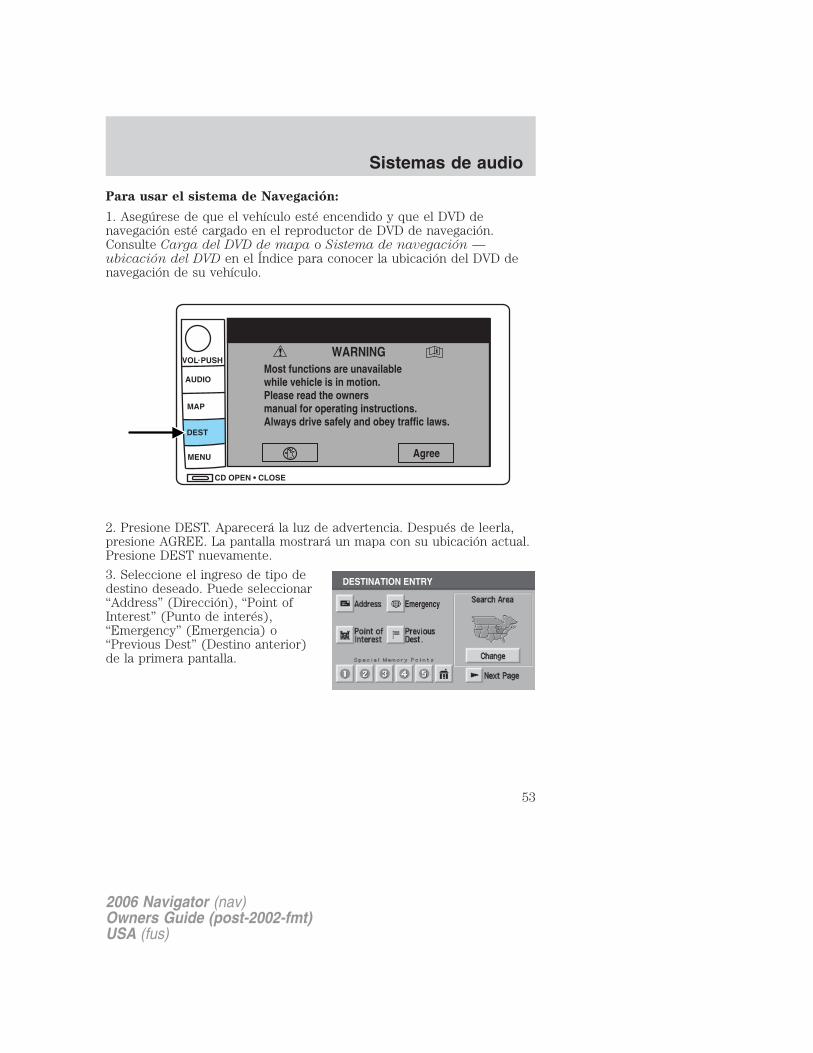
Para usar el sistema de Navegación:
1. Asegúrese de que el vehículo esté encendido y que el DVD denavegación esté cargado en el reproductor de DVD de navegación.Consulte Carga del DVD de mapa o Sistema de navegación —ubicación del DVD en el Índice para conocer la ubicación del DVD denavegación de su vehículo.
2. Presione DEST. Aparecerá la luz de advertencia. Después de leerla,presione AGREE. La pantalla mostrará un mapa con su ubicación actual.Presione DEST nuevamente.
3. Seleccione el ingreso de tipo dedestino deseado. Puede seleccionar“Address” (Dirección), “Point ofInterest” (Punto de interés),“Emergency” (Emergencia) o“Previous Dest” (Destino anterior)de la primera pantalla.
2006 Navigator (nav)Owners Guide (post-2002-fmt)USA (fus)
Sistemas de audio
53
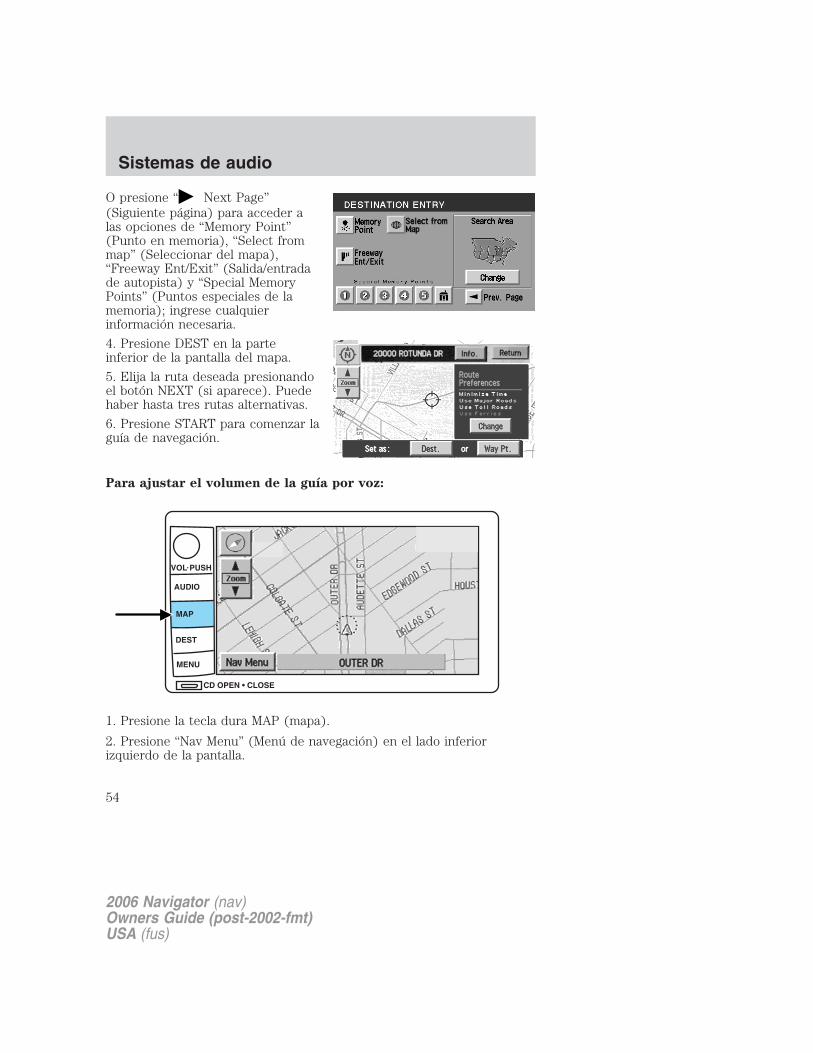
O presione “ Next Page”(Siguiente página) para acceder alas opciones de “Memory Point”(Punto en memoria), “Select frommap” (Seleccionar del mapa),“Freeway Ent/Exit” (Salida/entradade autopista) y “Special MemoryPoints” (Puntos especiales de lamemoria); ingrese cualquierinformación necesaria.
4. Presione DEST en la parteinferior de la pantalla del mapa.
5. Elija la ruta deseada presionandoel botón NEXT (si aparece). Puedehaber hasta tres rutas alternativas.
6. Presione START para comenzar laguía de navegación.
Para ajustar el volumen de la guía por voz:
1. Presione la tecla dura MAP (mapa).
2. Presione “Nav Menu” (Menú de navegación) en el lado inferiorizquierdo de la pantalla.
2006 Navigator (nav)Owners Guide (post-2002-fmt)USA (fus)
Sistemas de audio
54
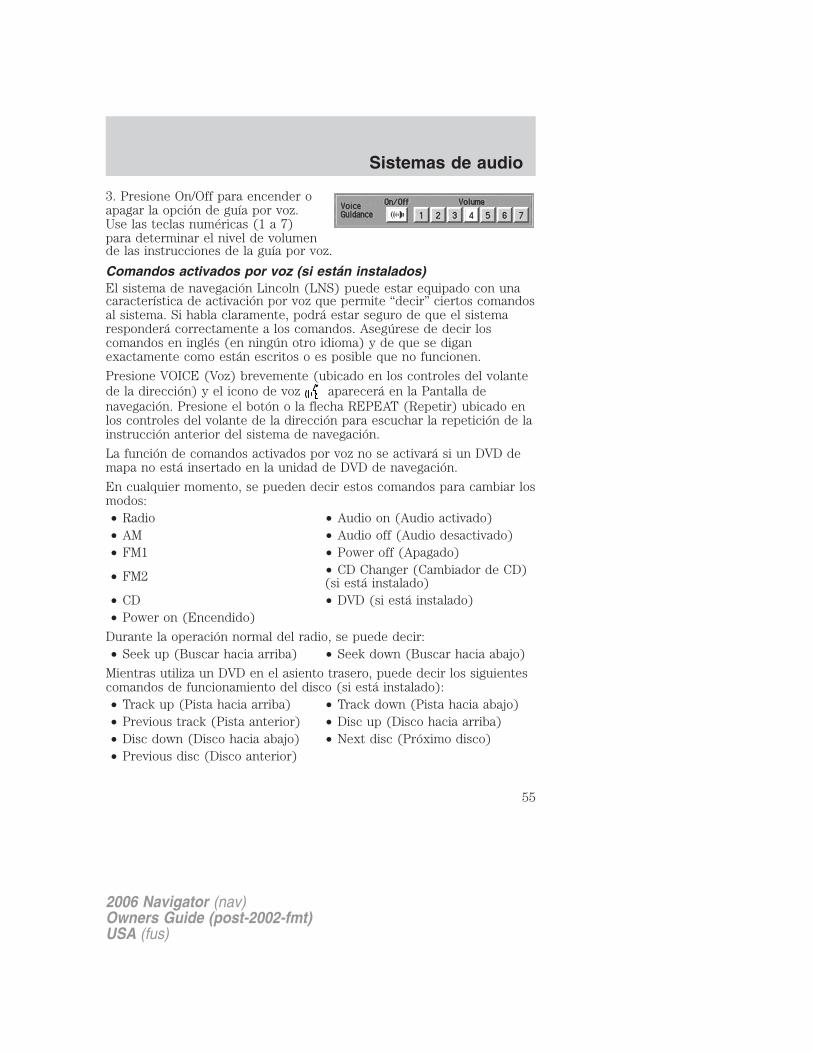
3. Presione On/Off para encender oapagar la opción de guía por voz.Use las teclas numéricas (1 a 7)para determinar el nivel de volumende las instrucciones de la guía por voz.
Comandos activados por voz (si están instalados)El sistema de navegación Lincoln (LNS) puede estar equipado con unacaracterística de activación por voz que permite “decir” ciertos comandosal sistema. Si habla claramente, podrá estar seguro de que el sistemaresponderá correctamente a los comandos. Asegúrese de decir loscomandos en inglés (en ningún otro idioma) y de que se diganexactamente como están escritos o es posible que no funcionen.
Presione VOICE (Voz) brevemente (ubicado en los controles del volantede la dirección) y el icono de voz aparecerá en la Pantalla denavegación. Presione el botón o la flecha REPEAT (Repetir) ubicado enlos controles del volante de la dirección para escuchar la repetición de lainstrucción anterior del sistema de navegación.
La función de comandos activados por voz no se activará si un DVD demapa no está insertado en la unidad de DVD de navegación.
En cualquier momento, se pueden decir estos comandos para cambiar losmodos:• Radio • Audio on (Audio activado)• AM • Audio off (Audio desactivado)• FM1 • Power off (Apagado)
• FM2 • CD Changer (Cambiador de CD)(si está instalado)
• CD • DVD (si está instalado)• Power on (Encendido)
Durante la operación normal del radio, se puede decir:• Seek up (Buscar hacia arriba) • Seek down (Buscar hacia abajo)
Mientras utiliza un DVD en el asiento trasero, puede decir los siguientescomandos de funcionamiento del disco (si está instalado):• Track up (Pista hacia arriba) • Track down (Pista hacia abajo)• Previous track (Pista anterior) • Disc up (Disco hacia arriba)• Disc down (Disco hacia abajo) • Next disc (Próximo disco)• Previous disc (Disco anterior)
2006 Navigator (nav)Owners Guide (post-2002-fmt)USA (fus)
Sistemas de audio
55
Durante la reproducción de CDDJ o CD, puede decir:
• Track up (Pista hacia arriba) • Track down (Pista hacia abajo)• Previous track (Pista anterior) • Disc up (Disco hacia arriba)• Next disc (Próximo disco) • Disc down (Disco hacia abajo)• Previous disc (Disco anterior)
Para cambiar la visualización de la pantalla, puede decir los siguientescomandos:
• Screen off (pantalla desactivada)• Screen day mode (Modo de díaen pantalla)
• Day mode on (Modo de díaactivado)
• Screen night mode (Modo denoche en pantalla)
• Night mode on (Modo de nocheactivado)
• Screen auto mode (Modoautomático en pantalla)
• Auto mode on (Modo automáticoactivado)
Nota: si dice “Apagar la pantalla”, debe tocar la pantalla para volver aactivarla. La pantalla no se volverá a encender con un comando de voz.
Comandos que pasan sobre las pantallas:
• Current position (Posiciónactual)
• Current location (Ubicaciónactual)
• Map (Mapa)
Dentro del modo de mapa de navegación, los siguientes comandos seencuentran disponibles:
• Zoom in (Acercar) • Zoom out (Alejar)• Minimum scale (Escala mínima) • Maximum scale (Escala máxima)
• North up (Norte arriba)• Cambiar a North up (Nortearriba)
• Heading up (Hacia arriba)• Change to heading up (Cambiara dirección hacia arriba)
• Map direction (Dirección demapa)
• Change map direction (Cambiardirección de mapa)
• Mark this point (Marcar estepunto)
• Mark (Marcar)
2006 Navigator (nav)Owners Guide (post-2002-fmt)USA (fus)
Sistemas de audio
56
Dentro del modo de POI de navegación, los siguientes comandos estándisponibles mediante la activación por voz:
• Automobile club (Club deautomóviles) • AAA (Triple A)
• Auto service & maintenance(Servicio y mantenimiento deautos)
• Auto service (Servicio de autos)
• Gas station (Estación deservicio) • Gas (Gasolina)
• Parking garage (Garaje deestacionamiento) • Parking lot (Estacionamiento)
• ATM • Bank (Banco)• City hall (Municipalidad) • Civic center (Centro cívico)• Community center (Centrocomunitario)
• Convention center (Centro deconvenciones)
• Exhibition center (Centro deexposiciones) • Court house (Tribunal)
• Higher education (Educaciónsuperior) • University (Universidad)
• College (Escuela) • Hospital
• Library (Biblioteca) • Police station (Estación depolicía)
• School (Colegio) • Amusement park (Parque deentretenciones)
• Casino • Golf course (Pista de golf)• Marina (Centro de deportesacuáticos) • Museum (Museo)
• Park & recreation (Parque yrecreación)
• Park & recreation (Parque yrecreación)
• Performing arts (Artes teatrales) • Ski resort (Centro de esquí)
• Skiing (Esquí) • Sports complex (Complejodeportivo)
• Stadium (Estadio) • Tourist attraction (Centro deatracciones turísticas)
• Winery (Viñería) • Restaurant (Restaurante)
2006 Navigator (nav)Owners Guide (post-2002-fmt)USA (fus)
Sistemas de audio
57

• I’m hungry (Tengo hambre) • American restaurant(Restaurante americano)
• American food (Comidaamericana)
• Chinese restaurant (Restaurantechino)
• Chinese food (Comida china) • Continental restaurant(Restaurante continental)
• Continental food (Comidacontinental)
• French restaurant (Restaurantefrancés)
• French food (Comida francesa) • Italian restaurant (Restauranteitaliano)
• Italian food (Comida italiana) • Japanese restaurant(Restaurante japonés)
• Japanese food (Comidajaponesa)
• Mexican restaurant (Restaurantemexicano)
• Mexican food (Comidamexicana)
• Seafood restaurant (Restaurantede mariscos)
• Seafood (Mariscos) • Other restaurant (Otrorestaurante)
• Other food (Otra comida) • Shopping (Compras)• Shopping mall (Centrocomercial)
• Grocery store (Tienda deabarrotes)
• Airport (Aeropuerto) • Bus station (Estación de buses)• Ferry terminal (Terminal detransbordadores)
• Historical monument(Monumento histórico)
• Hotel• Park and ride (Estacionamientoen estaciones de locomocióncolectiva)
• Rental car agency (Agencia dearriendo de automóviles) • Rest area (Área de descanso)
• Rest stop (Parada de descanso) • Tourist information (Informaciónturística)
• Train station (Estación detrenes)
• Business facility (Instalacióncomercial)
• City center (Centro urbano) • POI off (POI desactivado)• Commuter rail station (Estaciónde trenes de viajes diarios)
2006 Navigator (nav)Owners Guide (post-2002-fmt)USA (fus)
Sistemas de audio
58
Dentro del modo (DEST) de destino de navegación, los siguientescomandos se encuentran disponibles:• Home (Inicio) • Go home (Ir a casa)• Previous starting point (Puntode inicio anterior) • Ir a punto de inicio
• Next way point map (Mapa depróximo punto de paso)
• First way point map (Mapa deprimer punto de paso)
• Second way point map (Mapa desegundo punto de paso)
• Third way point map (Mapa detercer punto de paso)
• Fourth way point map (Mapa decuarto punto de paso)
• Fifth way point map (Mapa dequinto punto de paso)
• Destination map (Mapa dedestino)
• Delete destination (Eliminardestino)
• Cancel destination (Cancelardestino)
Dentro del modo de guía de navegación, los siguientes comandos estándisponibles mediante la activación por voz:• Repeat guidance (Repetir guía) • Repeat voice (Repetir voz)• Louder (Mayor volumen) • Softer (Menor volumen)• Voice guidance off (Guía por vozdesactivada)
• Voice guidance on (Guía por vozactivada)
• Open guidance screen (Abrirpantalla de guía)
• Close guidance screen (Cerrarpantalla de guía)
• Arrow guidance (Guía conflecha) • Arrow guide (Guía con flecha)
• Change to arrow guidance(Cambiar a guía con flecha)
• Change to arrow guide (Cambiara guía con flecha)
• Turn list guidance (Guía de listade curvas)
• Turn list guide (Guía de lista decurvas)
• Change to turn list guidance(Cambiar a guía de lista de curvas)
• Change to turn list guide(Cambiar a guía de lista de curvas)
• Entire route map (Mapa de rutacompleta) • Entire route (Ruta completa)
• Route overview (Visión generalde ruta) • Reroute (Otra ruta)
• Detour (Desvío) • Detour entire route (Desvío detoda la ruta)
2006 Navigator (nav)Owners Guide (post-2002-fmt)USA (fus)
Sistemas de audio
59

Comandos de ayuda de navegación que se pueden “decir” en cualquiermomento:
• Help (Ayuda) • Map (Mapa)• Destination (Destino) • Guidance (Guía)• Radio • Disc (Disco)
• Map help (Ayuda de mapa)• Destination help (Ayuda dedestino)
• Guidance help (Ayuda de guía) • Radio help (Ayuda de radio)• Disc help (Ayuda de disco)
Modo de audio
El sistema de audio y navegación Lincoln posee muchas características,incluida una gama completa de funciones de audio. Para acceder a estasfunciones, presione AUDIO en el marco principal. Con esto, empezará afuncionar en modo de audio.Control de volumen y encendidoPresione la perilla para encender oapagar el sistema de audio. Girepara subir o bajar el volumen. Losniveles aparecerán en la pantalla.
Para activar el modo de navegación,presione MAP o DEST.Para ajustar el nivel de salida de voz de navegación, seleccione el botónde NAV MENU por medio de la pantalla del mapa.
2006 Navigator (nav)Owners Guide (post-2002-fmt)USA (fus)
Sistemas de audio
60
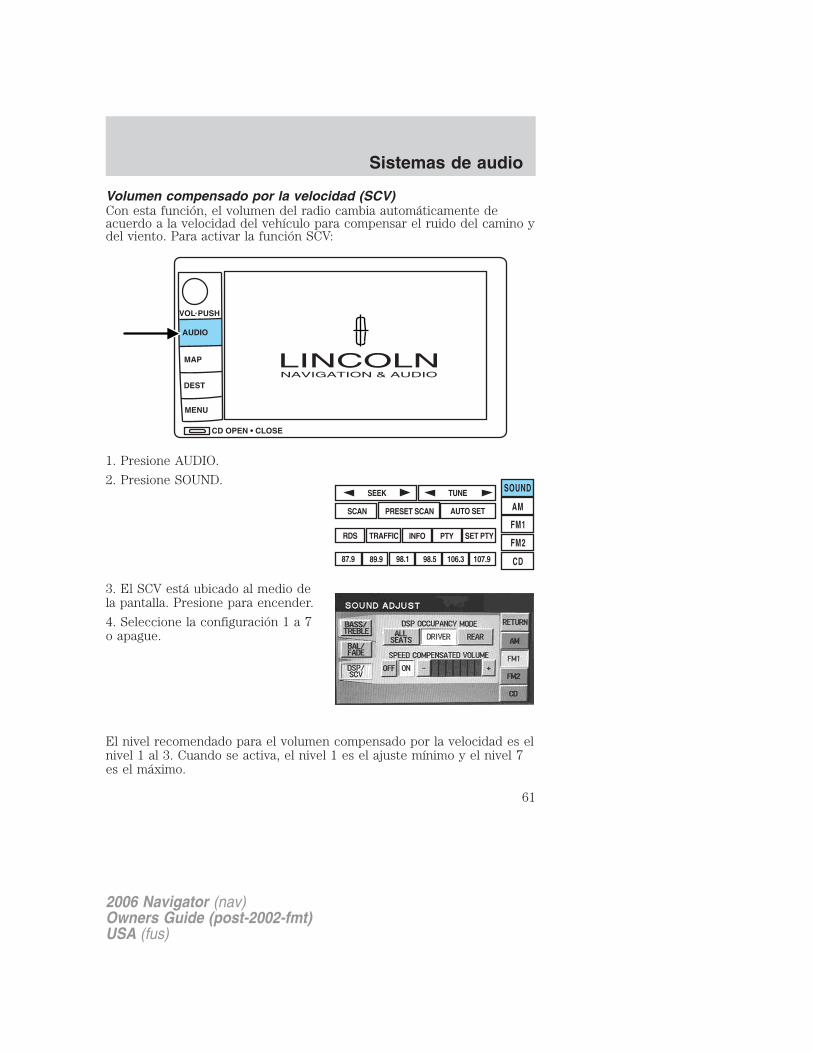
Volumen compensado por la velocidad (SCV)Con esta función, el volumen del radio cambia automáticamente deacuerdo a la velocidad del vehículo para compensar el ruido del camino ydel viento. Para activar la función SCV:
1. Presione AUDIO.
2. Presione SOUND.
3. El SCV está ubicado al medio dela pantalla. Presione para encender.
4. Seleccione la configuración 1 a 7o apague.
El nivel recomendado para el volumen compensado por la velocidad es elnivel 1 al 3. Cuando se activa, el nivel 1 es el ajuste mínimo y el nivel 7es el máximo.
SOUND
AM
FM1
FM2
CD
SEEK TUNE
PRESET SCAN AUTO SET SCAN
RDS TRAFFIC INFO PTY SET PTY
87.9 89.9 98.1 98.5 106.3 107.9
2006 Navigator (nav)Owners Guide (post-2002-fmt)USA (fus)
Sistemas de audio
61
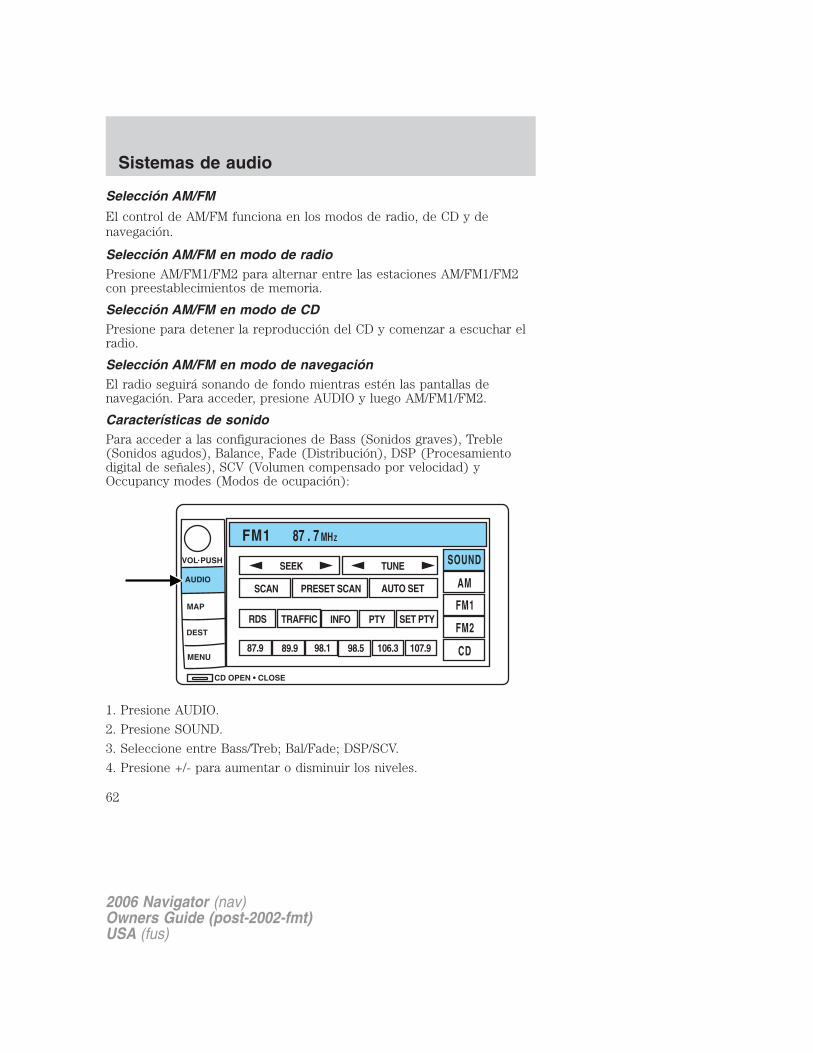
Selección AM/FM
El control de AM/FM funciona en los modos de radio, de CD y denavegación.
Selección AM/FM en modo de radioPresione AM/FM1/FM2 para alternar entre las estaciones AM/FM1/FM2con preestablecimientos de memoria.
Selección AM/FM en modo de CDPresione para detener la reproducción del CD y comenzar a escuchar elradio.
Selección AM/FM en modo de navegaciónEl radio seguirá sonando de fondo mientras estén las pantallas denavegación. Para acceder, presione AUDIO y luego AM/FM1/FM2.
Características de sonidoPara acceder a las configuraciones de Bass (Sonidos graves), Treble(Sonidos agudos), Balance, Fade (Distribución), DSP (Procesamientodigital de señales), SCV (Volumen compensado por velocidad) yOccupancy modes (Modos de ocupación):
1. Presione AUDIO.
2. Presione SOUND.
3. Seleccione entre Bass/Treb; Bal/Fade; DSP/SCV.
4. Presione +/- para aumentar o disminuir los niveles.
2006 Navigator (nav)Owners Guide (post-2002-fmt)USA (fus)
Sistemas de audio
62
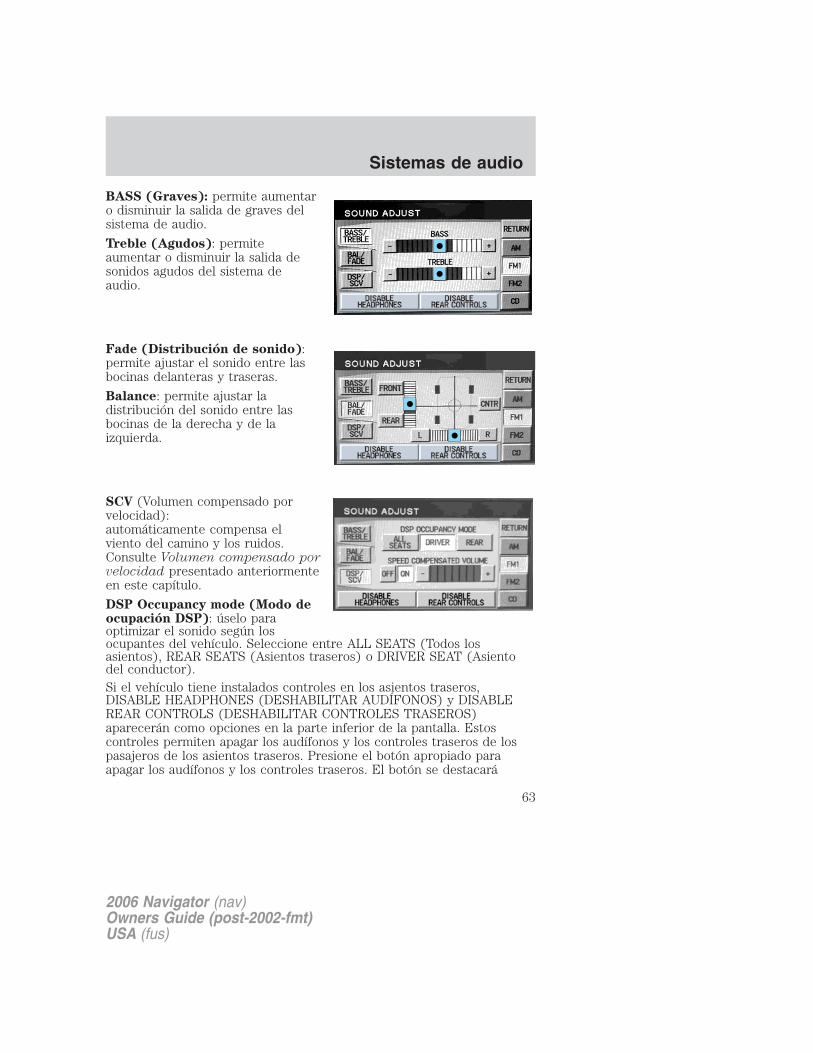
BASS (Graves): permite aumentaro disminuir la salida de graves delsistema de audio.
Treble (Agudos): permiteaumentar o disminuir la salida desonidos agudos del sistema deaudio.
Fade (Distribución de sonido):permite ajustar el sonido entre lasbocinas delanteras y traseras.
Balance: permite ajustar ladistribución del sonido entre lasbocinas de la derecha y de laizquierda.
SCV (Volumen compensado porvelocidad):automáticamente compensa elviento del camino y los ruidos.Consulte Volumen compensado porvelocidad presentado anteriormenteen este capítulo.
DSP Occupancy mode (Modo deocupación DSP): úselo paraoptimizar el sonido según losocupantes del vehículo. Seleccione entre ALL SEATS (Todos losasientos), REAR SEATS (Asientos traseros) o DRIVER SEAT (Asientodel conductor).Si el vehículo tiene instalados controles en los asientos traseros,DISABLE HEADPHONES (DESHABILITAR AUDÍFONOS) y DISABLEREAR CONTROLS (DESHABILITAR CONTROLES TRASEROS)aparecerán como opciones en la parte inferior de la pantalla. Estoscontroles permiten apagar los audífonos y los controles traseros de lospasajeros de los asientos traseros. Presione el botón apropiado paraapagar los audífonos y los controles traseros. El botón se destacará
2006 Navigator (nav)Owners Guide (post-2002-fmt)USA (fus)
Sistemas de audio
63
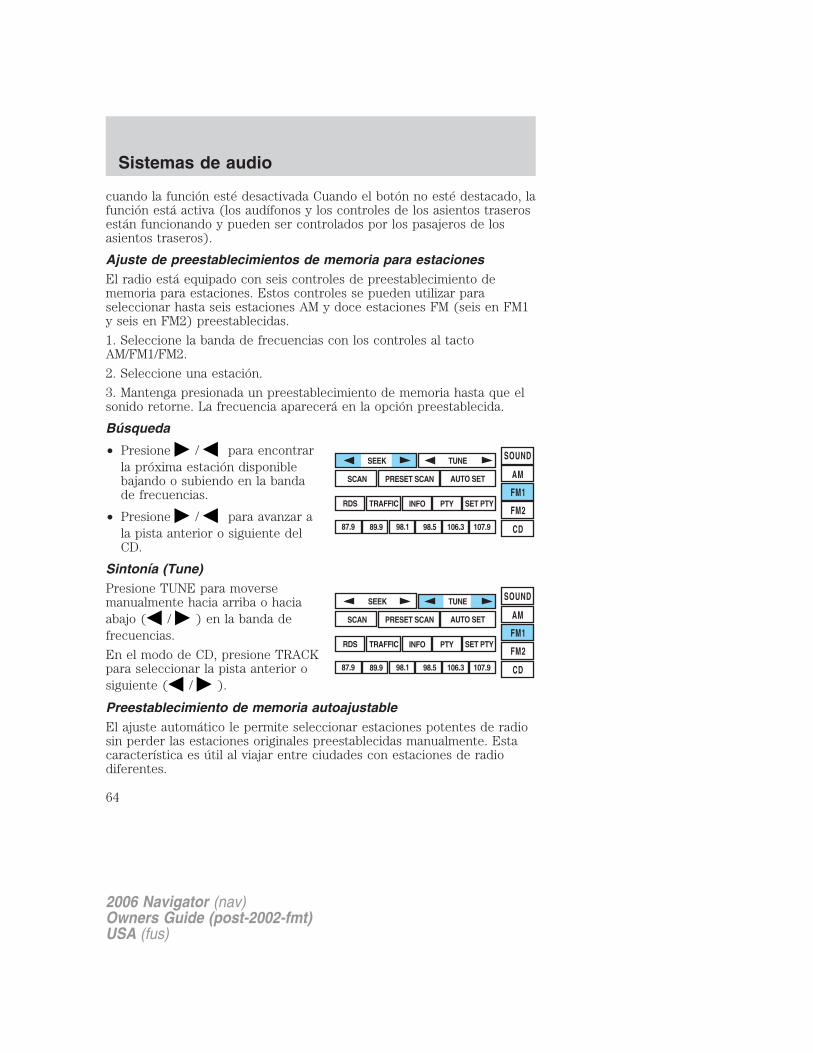
cuando la función esté desactivada Cuando el botón no esté destacado, lafunción está activa (los audífonos y los controles de los asientos traserosestán funcionando y pueden ser controlados por los pasajeros de losasientos traseros).
Ajuste de preestablecimientos de memoria para estacionesEl radio está equipado con seis controles de preestablecimiento dememoria para estaciones. Estos controles se pueden utilizar paraseleccionar hasta seis estaciones AM y doce estaciones FM (seis en FM1y seis en FM2) preestablecidas.
1. Seleccione la banda de frecuencias con los controles al tactoAM/FM1/FM2.
2. Seleccione una estación.
3. Mantenga presionada un preestablecimiento de memoria hasta que elsonido retorne. La frecuencia aparecerá en la opción preestablecida.
Búsqueda
• Presione / para encontrarla próxima estación disponiblebajando o subiendo en la bandade frecuencias.
• Presione / para avanzar ala pista anterior o siguiente delCD.
Sintonía (Tune)Presione TUNE para moversemanualmente hacia arriba o haciaabajo ( / ) en la banda defrecuencias.
En el modo de CD, presione TRACKpara seleccionar la pista anterior osiguiente ( / ).
Preestablecimiento de memoria autoajustableEl ajuste automático le permite seleccionar estaciones potentes de radiosin perder las estaciones originales preestablecidas manualmente. Estacaracterística es útil al viajar entre ciudades con estaciones de radiodiferentes.
2006 Navigator (nav)Owners Guide (post-2002-fmt)USA (fus)
Sistemas de audio
64
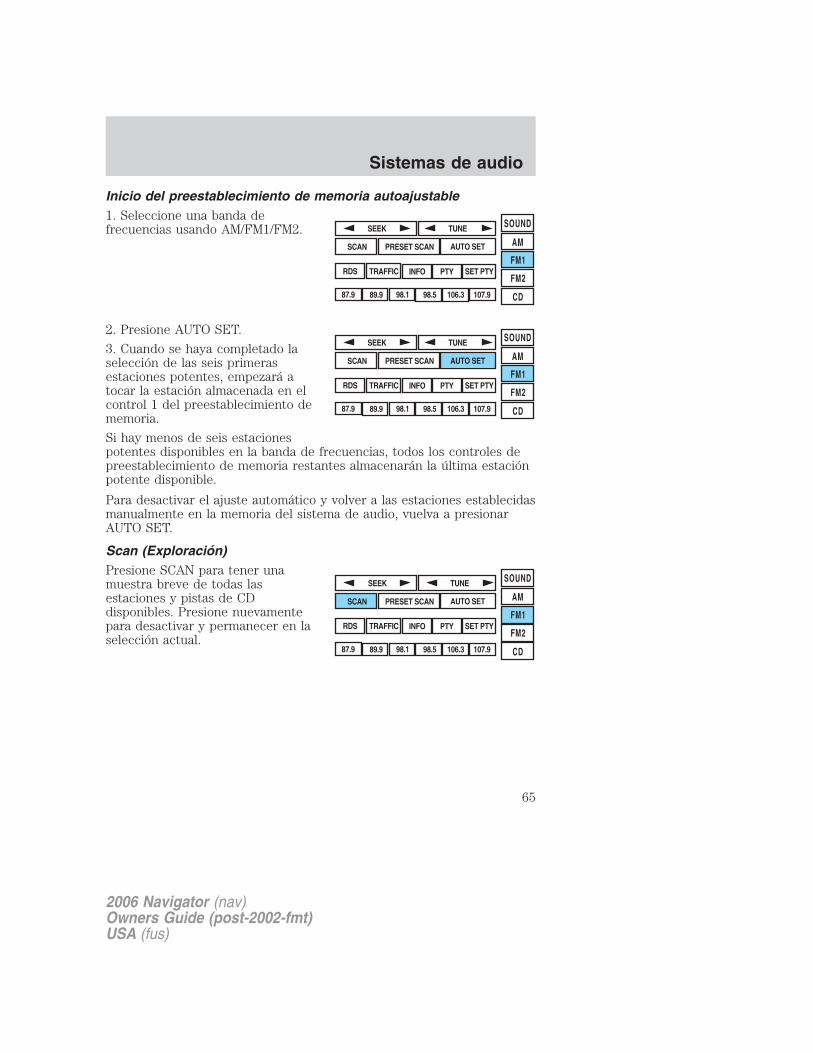
Inicio del preestablecimiento de memoria autoajustable1. Seleccione una banda defrecuencias usando AM/FM1/FM2.
2. Presione AUTO SET.
3. Cuando se haya completado laselección de las seis primerasestaciones potentes, empezará atocar la estación almacenada en elcontrol 1 del preestablecimiento dememoria.
Si hay menos de seis estacionespotentes disponibles en la banda de frecuencias, todos los controles depreestablecimiento de memoria restantes almacenarán la última estaciónpotente disponible.
Para desactivar el ajuste automático y volver a las estaciones establecidasmanualmente en la memoria del sistema de audio, vuelva a presionarAUTO SET.
Scan (Exploración)Presione SCAN para tener unamuestra breve de todas lasestaciones y pistas de CDdisponibles. Presione nuevamentepara desactivar y permanecer en laselección actual.
SOUND
AM
FM1
FM2
CD
SEEK TUNE
PRESET SCAN AUTO SET SCAN
RDS TRAFFIC INFO PTY SET PTY
87.9 89.9 98.1 98.5 106.3 107.9
SOUND
AM
FM1
FM2
CD
SEEK TUNE
PRESET SCAN AUTO SET SCAN
RDS TRAFFIC INFO PTY SET PTY
87.9 89.9 98.1 98.5 106.3 107.9
2006 Navigator (nav)Owners Guide (post-2002-fmt)USA (fus)
Sistemas de audio
65
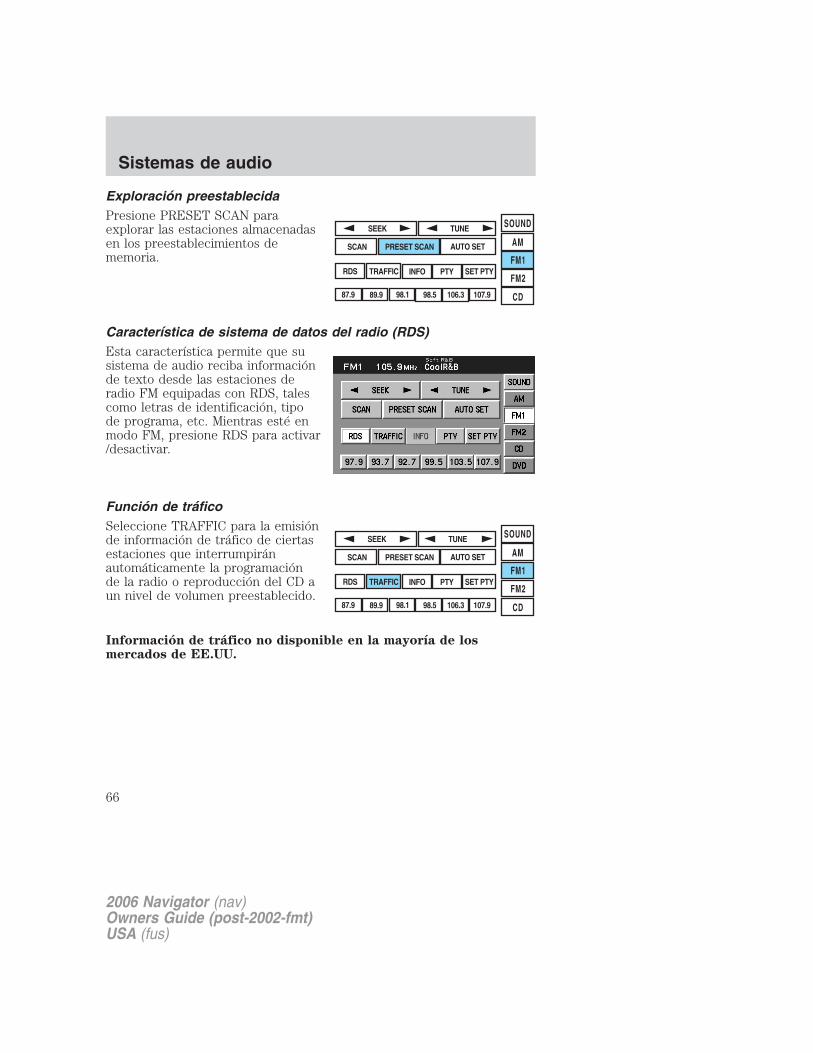
Exploración preestablecidaPresione PRESET SCAN paraexplorar las estaciones almacenadasen los preestablecimientos dememoria.
Característica de sistema de datos del radio (RDS)Esta característica permite que susistema de audio reciba informaciónde texto desde las estaciones deradio FM equipadas con RDS, talescomo letras de identificación, tipode programa, etc. Mientras esté enmodo FM, presione RDS para activar/desactivar.
Función de tráficoSeleccione TRAFFIC para la emisiónde información de tráfico de ciertasestaciones que interrumpiránautomáticamente la programaciónde la radio o reproducción del CD aun nivel de volumen preestablecido.
Información de tráfico no disponible en la mayoría de losmercados de EE.UU.
SOUND
AM
FM1
FM2
CD
SEEK TUNE
PRESET SCAN AUTO SET SCAN
RDS TRAFFIC INFO PTY SET PTY
87.9 89.9 98.1 98.5 106.3 107.9
SOUND
AM
FM1
FM2
CD
SEEK TUNE
PRESET SCAN AUTO SET SCAN
RDS TRAFFIC INFO PTY SET PTY
87.9 89.9 98.1 98.5 106.3 107.9
2006 Navigator (nav)Owners Guide (post-2002-fmt)USA (fus)
Sistemas de audio
66
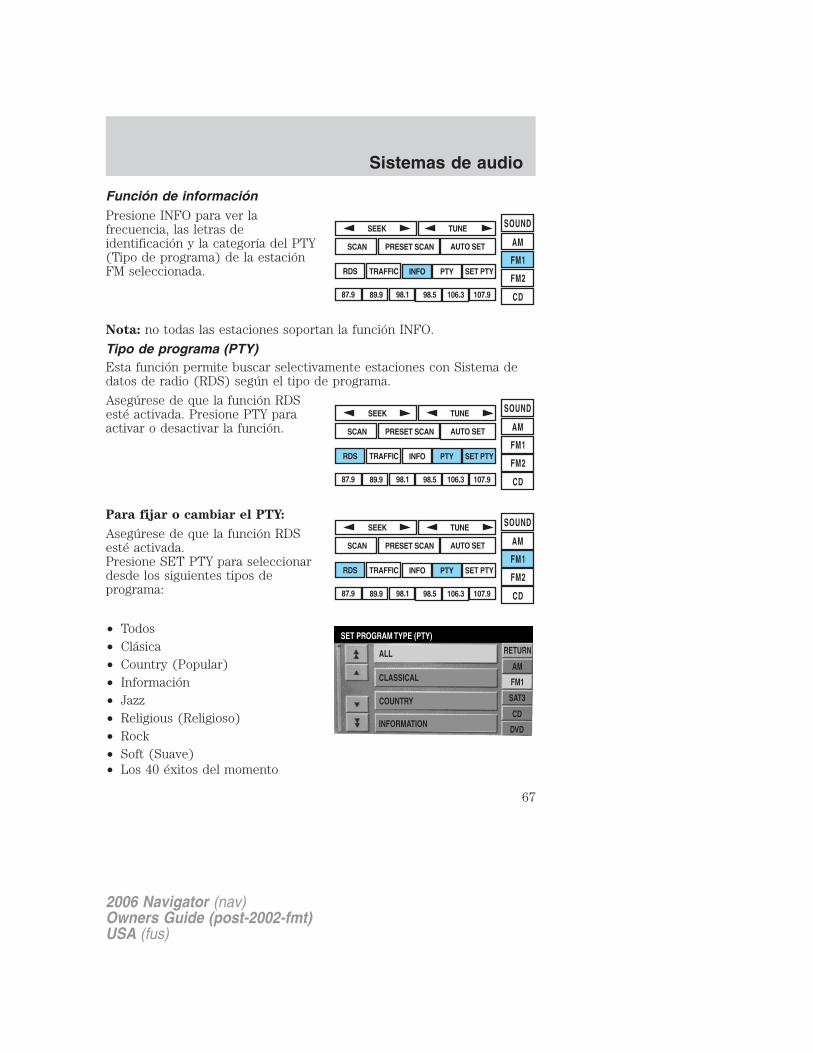
Función de informaciónPresione INFO para ver lafrecuencia, las letras deidentificación y la categoría del PTY(Tipo de programa) de la estaciónFM seleccionada.
Nota: no todas las estaciones soportan la función INFO.
Tipo de programa (PTY)Esta función permite buscar selectivamente estaciones con Sistema dedatos de radio (RDS) según el tipo de programa.
Asegúrese de que la función RDSesté activada. Presione PTY paraactivar o desactivar la función.
Para fijar o cambiar el PTY:
Asegúrese de que la función RDSesté activada.Presione SET PTY para seleccionardesde los siguientes tipos deprograma:
• Todos• Clásica• Country (Popular)• Información• Jazz• Religious (Religioso)• Rock• Soft (Suave)• Los 40 éxitos del momento
SOUND
AM
FM1
FM2
CD
SEEK TUNE
PRESET SCAN AUTO SET SCAN
RDS TRAFFIC INFO PTY SET PTY
87.9 89.9 98.1 98.5 106.3 107.9
SOUND
AM
FM1
FM2
CD
SEEK TUNE
PRESET SCAN AUTO SET SCAN
RDS TRAFFIC INFO PTY SET PTY
87.9 89.9 98.1 98.5 106.3 107.9
2006 Navigator (nav)Owners Guide (post-2002-fmt)USA (fus)
Sistemas de audio
67
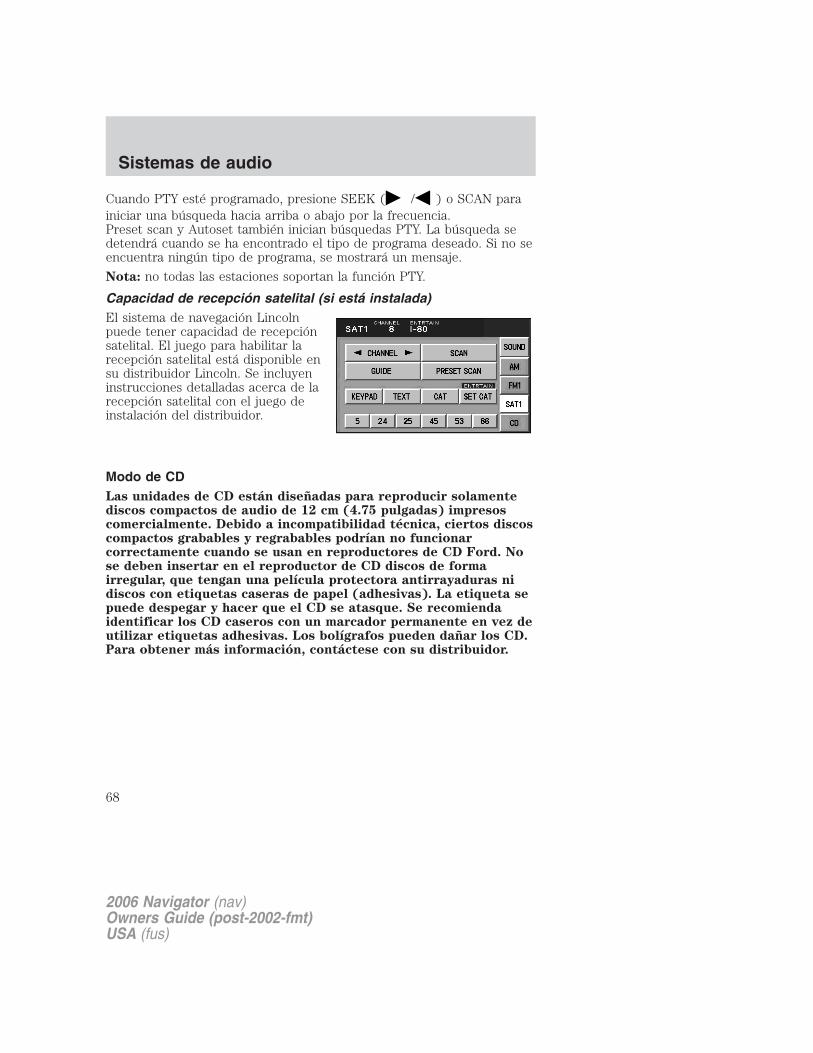
Cuando PTY esté programado, presione SEEK ( / ) o SCAN parainiciar una búsqueda hacia arriba o abajo por la frecuencia.Preset scan y Autoset también inician búsquedas PTY. La búsqueda sedetendrá cuando se ha encontrado el tipo de programa deseado. Si no seencuentra ningún tipo de programa, se mostrará un mensaje.
Nota: no todas las estaciones soportan la función PTY.
Capacidad de recepción satelital (si está instalada)El sistema de navegación Lincolnpuede tener capacidad de recepciónsatelital. El juego para habilitar larecepción satelital está disponible ensu distribuidor Lincoln. Se incluyeninstrucciones detalladas acerca de larecepción satelital con el juego deinstalación del distribuidor.
Modo de CDLas unidades de CD están diseñadas para reproducir solamentediscos compactos de audio de 12 cm (4.75 pulgadas) impresoscomercialmente. Debido a incompatibilidad técnica, ciertos discoscompactos grabables y regrabables podrían no funcionarcorrectamente cuando se usan en reproductores de CD Ford. Nose deben insertar en el reproductor de CD discos de formairregular, que tengan una película protectora antirrayaduras nidiscos con etiquetas caseras de papel (adhesivas). La etiqueta sepuede despegar y hacer que el CD se atasque. Se recomiendaidentificar los CD caseros con un marcador permanente en vez deutilizar etiquetas adhesivas. Los bolígrafos pueden dañar los CD.Para obtener más información, contáctese con su distribuidor.
2006 Navigator (nav)Owners Guide (post-2002-fmt)USA (fus)
Sistemas de audio
68
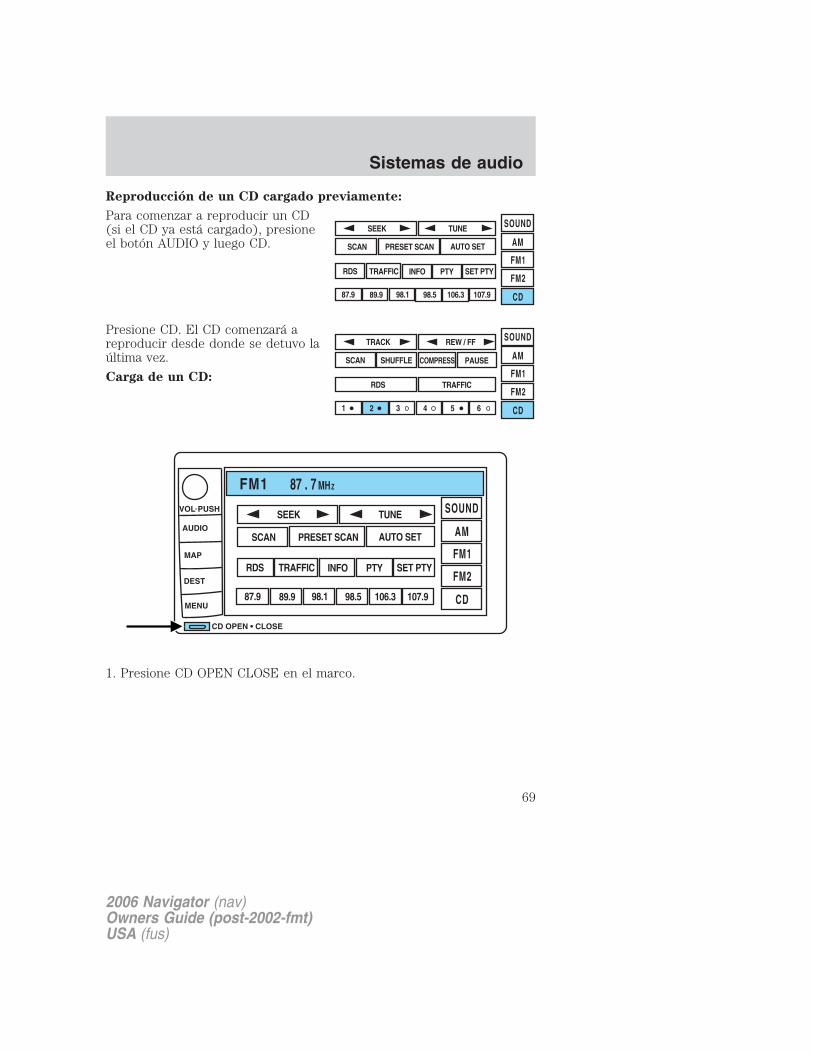
Reproducción de un CD cargado previamente:
Para comenzar a reproducir un CD(si el CD ya está cargado), presioneel botón AUDIO y luego CD.
Presione CD. El CD comenzará areproducir desde donde se detuvo laúltima vez.
Carga de un CD:
1. Presione CD OPEN CLOSE en el marco.
SOUND
AM
FM1
FM2
CD
SEEK TUNE
PRESET SCAN AUTO SET SCAN
RDS TRAFFIC INFO PTY SET PTY
87.9 89.9 98.1 98.5 106.3 107.9
2006 Navigator (nav)Owners Guide (post-2002-fmt)USA (fus)
Sistemas de audio
69

2. La pantalla de navegación se desplegará hacia abajo, permitiendoacceder al sistema de CD de 6 discos.
3. Presione LOAD y el número de ranura de CD deseado. La luzindicadora parpadeará lentamente al principio, luego rápidamente,señalando que el sistema está listo.
4. Inserte un disco.
5. Para cargar más de un disco, mantenga presionado LOAD. Estoiniciará la carga automática y permitirá cargar todas las ranuras de CDabiertas.Transcurrido un cierto tiempo , la pantalla se cerrará automáticamente opuede presione nuevamente CD OPEN CLOSE en el marco.
6. Una vez que la pantalla se cierra, el sistema comenzará a reproducir elúltimo CD cargado.
Pistas
Presione / para avanzar a lapista anterior o siguiente.
2006 Navigator (nav)Owners Guide (post-2002-fmt)USA (fus)
Sistemas de audio
70
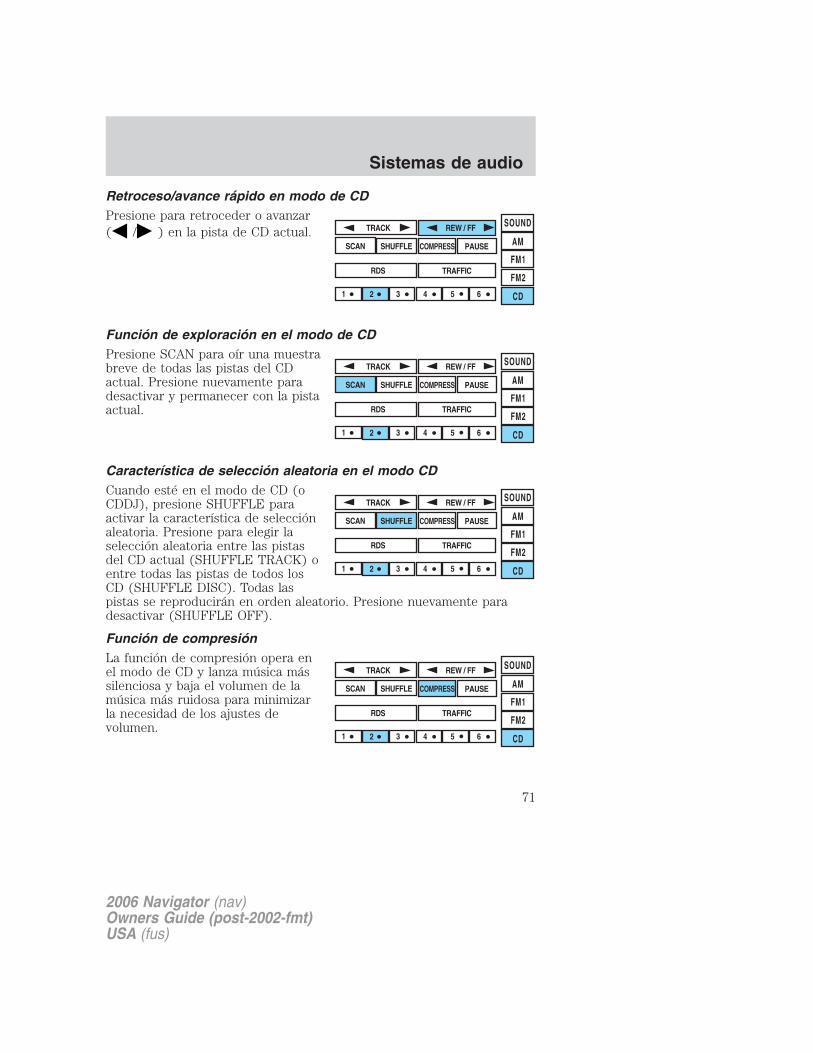
Retroceso/avance rápido en modo de CDPresione para retroceder o avanzar( / ) en la pista de CD actual.
Función de exploración en el modo de CDPresione SCAN para oír una muestrabreve de todas las pistas del CDactual. Presione nuevamente paradesactivar y permanecer con la pistaactual.
Característica de selección aleatoria en el modo CDCuando esté en el modo de CD (oCDDJ), presione SHUFFLE paraactivar la característica de selecciónaleatoria. Presione para elegir laselección aleatoria entre las pistasdel CD actual (SHUFFLE TRACK) oentre todas las pistas de todos losCD (SHUFFLE DISC). Todas laspistas se reproducirán en orden aleatorio. Presione nuevamente paradesactivar (SHUFFLE OFF).
Función de compresiónLa función de compresión opera enel modo de CD y lanza música mássilenciosa y baja el volumen de lamúsica más ruidosa para minimizarla necesidad de los ajustes devolumen.
2006 Navigator (nav)Owners Guide (post-2002-fmt)USA (fus)
Sistemas de audio
71
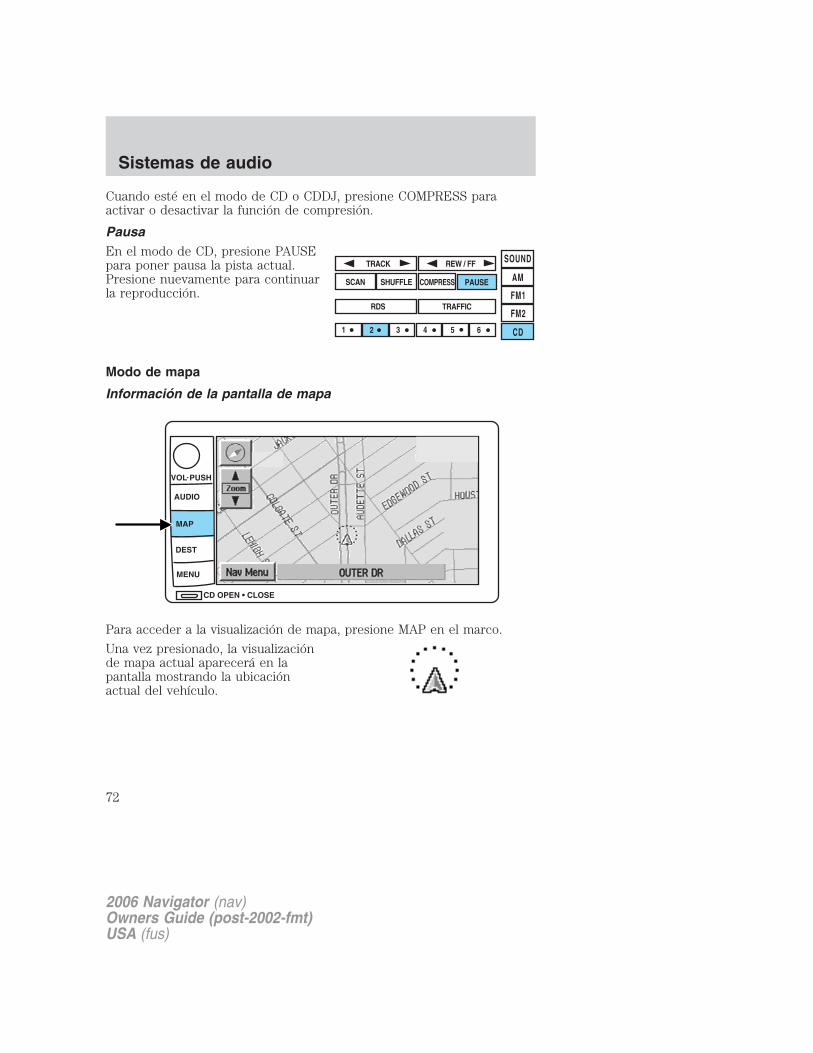
Cuando esté en el modo de CD o CDDJ, presione COMPRESS paraactivar o desactivar la función de compresión.
PausaEn el modo de CD, presione PAUSEpara poner pausa la pista actual.Presione nuevamente para continuarla reproducción.
Modo de mapa
Información de la pantalla de mapa
Para acceder a la visualización de mapa, presione MAP en el marco.
Una vez presionado, la visualizaciónde mapa actual aparecerá en lapantalla mostrando la ubicaciónactual del vehículo.
2006 Navigator (nav)Owners Guide (post-2002-fmt)USA (fus)
Sistemas de audio
72
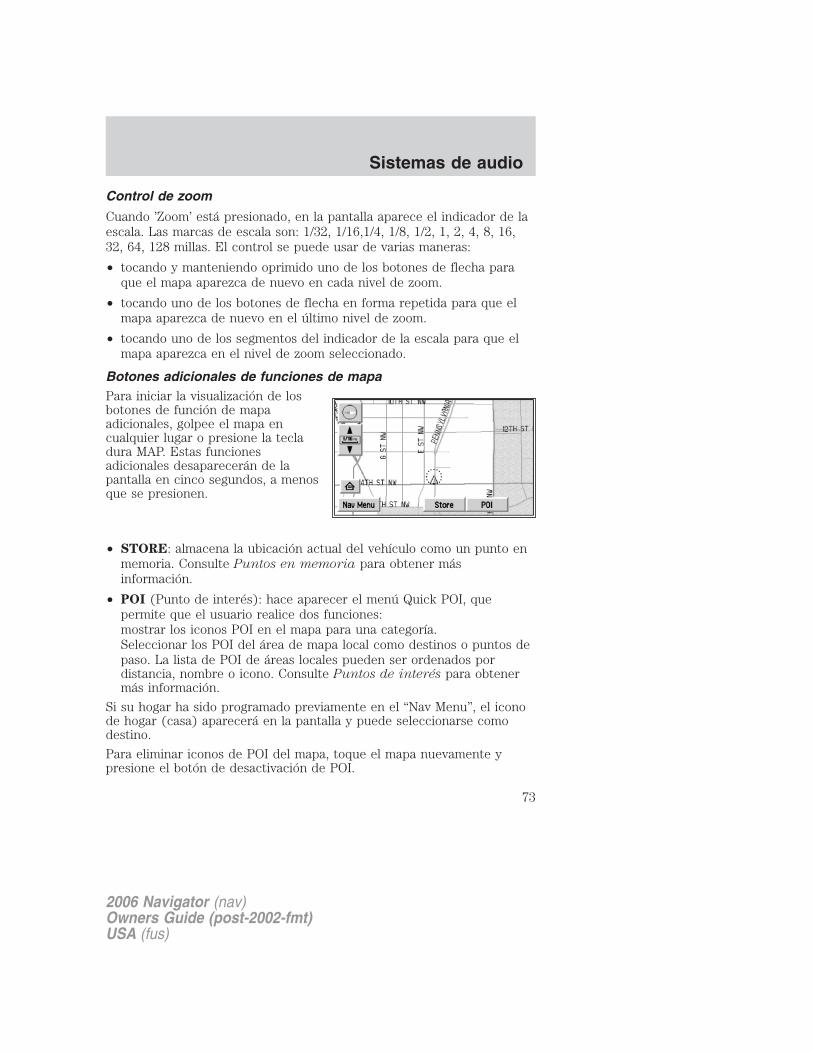
Control de zoom
Cuando ’Zoom’ está presionado, en la pantalla aparece el indicador de laescala. Las marcas de escala son: 1/32, 1/16,1/4, 1/8, 1/2, 1, 2, 4, 8, 16,32, 64, 128 millas. El control se puede usar de varias maneras:
• tocando y manteniendo oprimido uno de los botones de flecha paraque el mapa aparezca de nuevo en cada nivel de zoom.
• tocando uno de los botones de flecha en forma repetida para que elmapa aparezca de nuevo en el último nivel de zoom.
• tocando uno de los segmentos del indicador de la escala para que elmapa aparezca en el nivel de zoom seleccionado.
Botones adicionales de funciones de mapaPara iniciar la visualización de losbotones de función de mapaadicionales, golpee el mapa encualquier lugar o presione la tecladura MAP. Estas funcionesadicionales desaparecerán de lapantalla en cinco segundos, a menosque se presionen.
• STORE: almacena la ubicación actual del vehículo como un punto enmemoria. Consulte Puntos en memoria para obtener másinformación.
• POI (Punto de interés): hace aparecer el menú Quick POI, quepermite que el usuario realice dos funciones:mostrar los iconos POI en el mapa para una categoría.Seleccionar los POI del área de mapa local como destinos o puntos depaso. La lista de POI de áreas locales pueden ser ordenados pordistancia, nombre o icono. Consulte Puntos de interés para obtenermás información.
Si su hogar ha sido programado previamente en el “Nav Menu”, el iconode hogar (casa) aparecerá en la pantalla y puede seleccionarse comodestino.
Para eliminar iconos de POI del mapa, toque el mapa nuevamente ypresione el botón de desactivación de POI.
2006 Navigator (nav)Owners Guide (post-2002-fmt)USA (fus)
Sistemas de audio
73
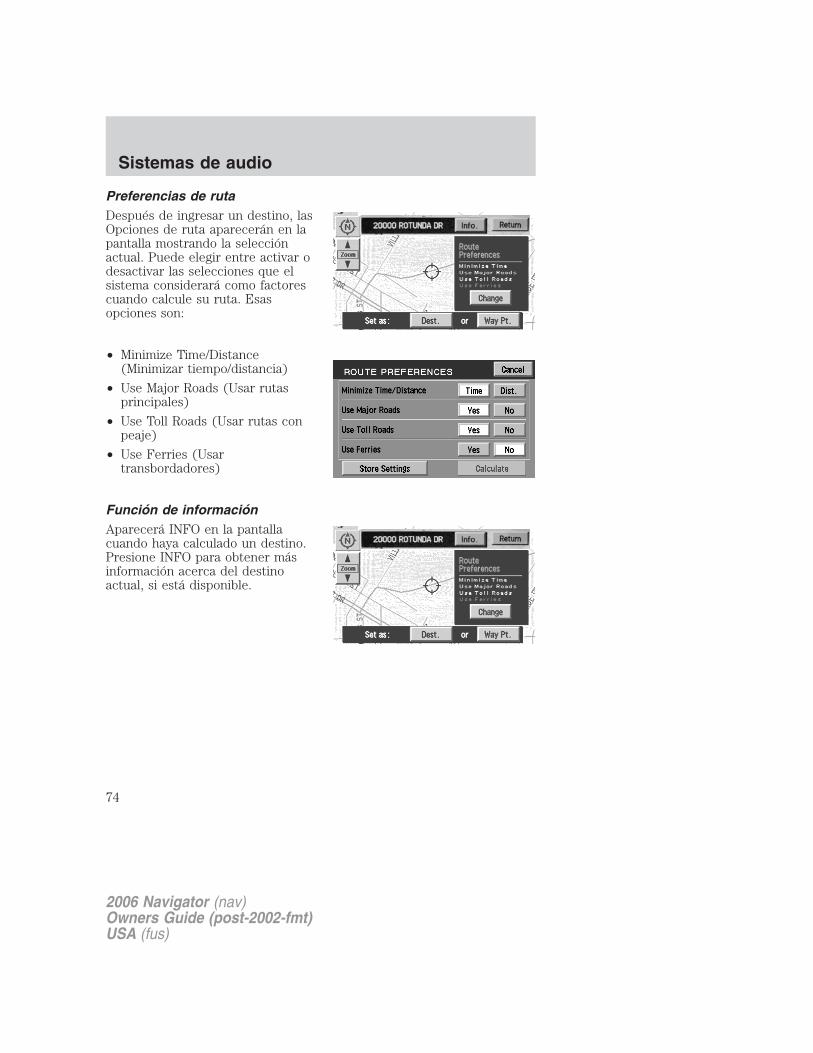
Preferencias de rutaDespués de ingresar un destino, lasOpciones de ruta aparecerán en lapantalla mostrando la selecciónactual. Puede elegir entre activar odesactivar las selecciones que elsistema considerará como factorescuando calcule su ruta. Esasopciones son:
• Minimize Time/Distance(Minimizar tiempo/distancia)
• Use Major Roads (Usar rutasprincipales)
• Use Toll Roads (Usar rutas conpeaje)
• Use Ferries (Usartransbordadores)
Función de informaciónAparecerá INFO en la pantallacuando haya calculado un destino.Presione INFO para obtener másinformación acerca del destinoactual, si está disponible.
2006 Navigator (nav)Owners Guide (post-2002-fmt)USA (fus)
Sistemas de audio
74

Podrá ver la información (si estádisponible), así como elegiralmacenar el destino como punto dememoria, presionando OK.
Símbolos de pantallaSímbolo de navegación: indica laposición actual del vehículo yapunta hacia la dirección donde elvehículo está viajando en estemomento.
Símbolo de destino: indica eldestino de la ruta actual.
Símbolo de próxima curva:muestra la próxima maniobra queserá necesaria tomar en la rutaactual.
Botón de norte arriba: indica queel mapa está mostrado con el nortehacia la parte superior de lapantalla. Presione para alternarentre los estados de visualizacióndel mapa “North up” y “Headingup”.
Botón de dirección hacia arriba:indica que el mapa está mostradocon el vehículo en dirección hacia laparte superior de la pantalla. Laposición de la aguja indicadoraindica la dirección del norte en el mapa. Presione para alternar entre losestados de visualización del mapa “North up” y “Heading up”.
2006 Navigator (nav)Owners Guide (post-2002-fmt)USA (fus)
Sistemas de audio
75
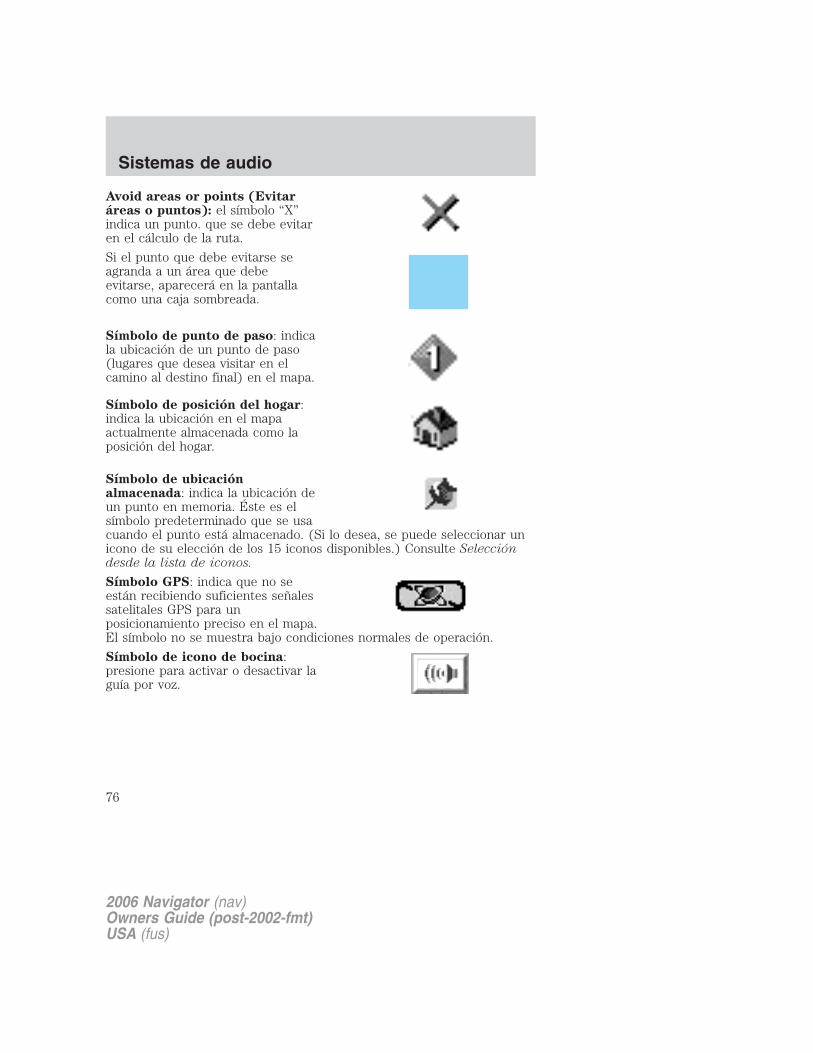
Avoid areas or points (Evitaráreas o puntos): el símbolo “X”indica un punto. que se debe evitaren el cálculo de la ruta.
Si el punto que debe evitarse seagranda a un área que debeevitarse, aparecerá en la pantallacomo una caja sombreada.
Símbolo de punto de paso: indicala ubicación de un punto de paso(lugares que desea visitar en elcamino al destino final) en el mapa.
Símbolo de posición del hogar:indica la ubicación en el mapaactualmente almacenada como laposición del hogar.
Símbolo de ubicaciónalmacenada: indica la ubicación deun punto en memoria. Éste es elsímbolo predeterminado que se usacuando el punto está almacenado. (Si lo desea, se puede seleccionar unicono de su elección de los 15 iconos disponibles.) Consulte Seleccióndesde la lista de iconos.
Símbolo GPS: indica que no seestán recibiendo suficientes señalessatelitales GPS para unposicionamiento preciso en el mapa.El símbolo no se muestra bajo condiciones normales de operación.
Símbolo de icono de bocina:presione para activar o desactivar laguía por voz.
2006 Navigator (nav)Owners Guide (post-2002-fmt)USA (fus)
Sistemas de audio
76
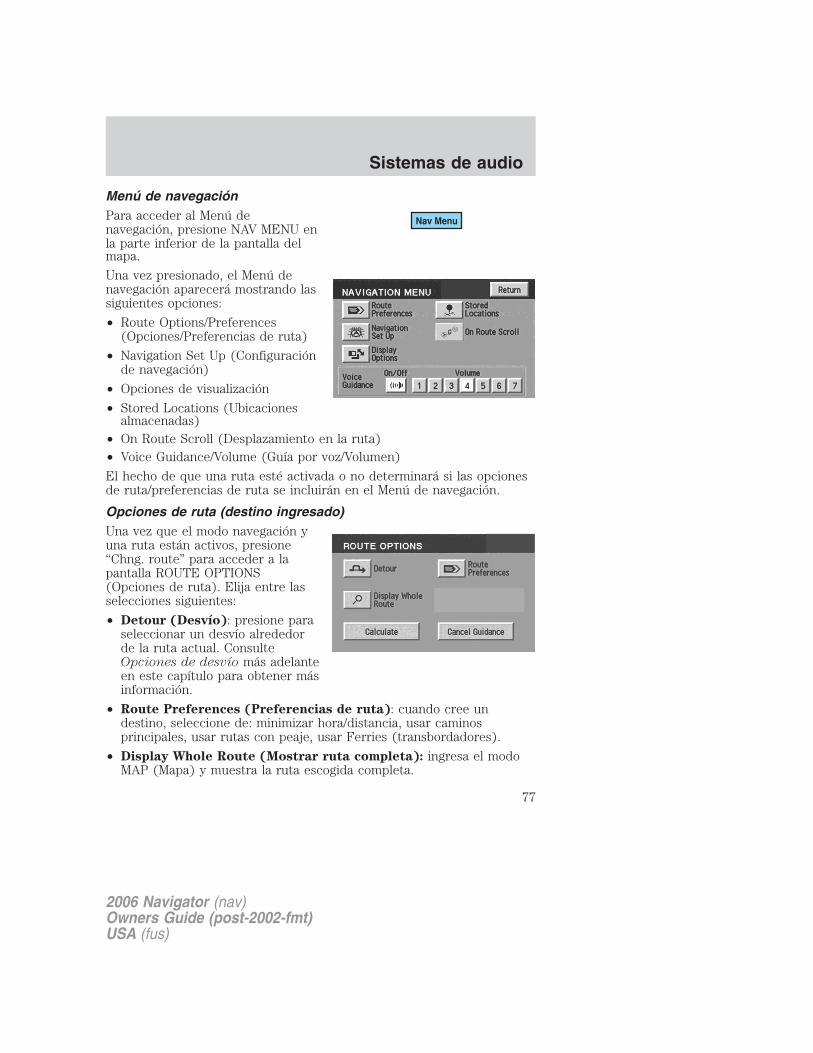
Menú de navegaciónPara acceder al Menú denavegación, presione NAV MENU enla parte inferior de la pantalla delmapa.
Una vez presionado, el Menú denavegación aparecerá mostrando lassiguientes opciones:
• Route Options/Preferences(Opciones/Preferencias de ruta)
• Navigation Set Up (Configuraciónde navegación)
• Opciones de visualización
• Stored Locations (Ubicacionesalmacenadas)
• On Route Scroll (Desplazamiento en la ruta)• Voice Guidance/Volume (Guía por voz/Volumen)
El hecho de que una ruta esté activada o no determinará si las opcionesde ruta/preferencias de ruta se incluirán en el Menú de navegación.
Opciones de ruta (destino ingresado)Una vez que el modo navegación yuna ruta están activos, presione“Chng. route” para acceder a lapantalla ROUTE OPTIONS(Opciones de ruta). Elija entre lasselecciones siguientes:
• Detour (Desvío): presione paraseleccionar un desvío alrededorde la ruta actual. ConsulteOpciones de desvío más adelanteen este capítulo para obtener másinformación.
• Route Preferences (Preferencias de ruta): cuando cree undestino, seleccione de: minimizar hora/distancia, usar caminosprincipales, usar rutas con peaje, usar Ferries (transbordadores).
• Display Whole Route (Mostrar ruta completa): ingresa el modoMAP (Mapa) y muestra la ruta escogida completa.
2006 Navigator (nav)Owners Guide (post-2002-fmt)USA (fus)
Sistemas de audio
77
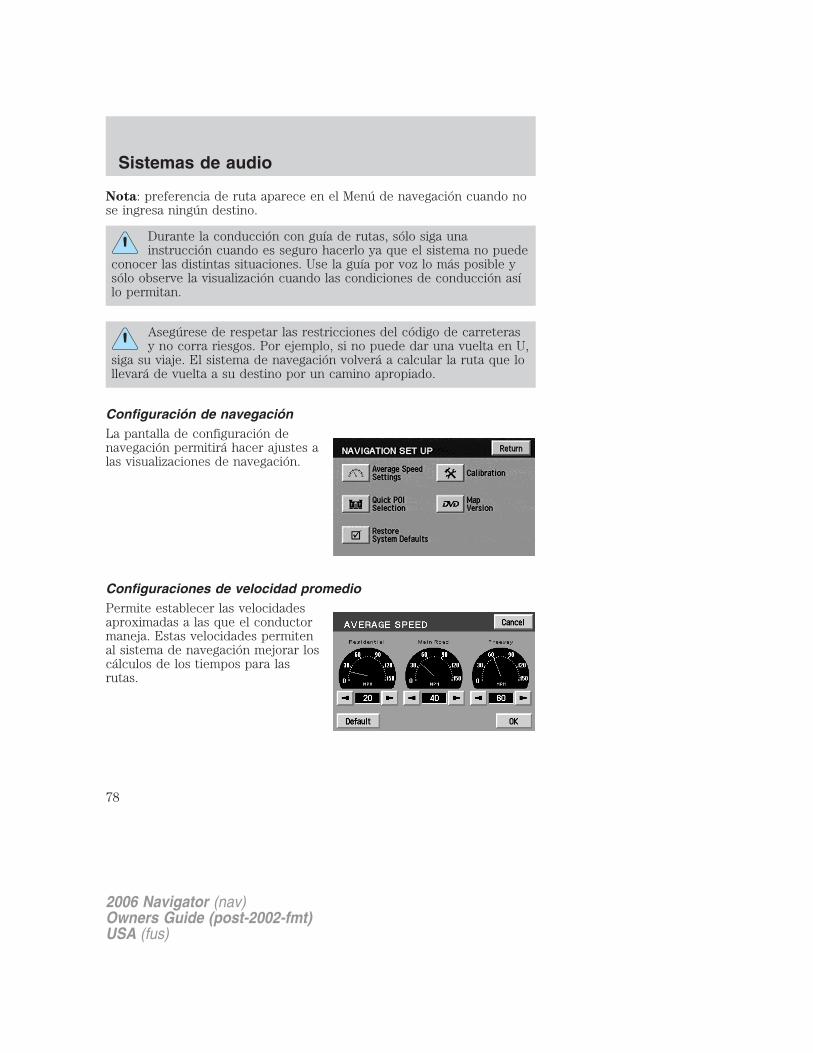
Nota: preferencia de ruta aparece en el Menú de navegación cuando nose ingresa ningún destino.
Durante la conducción con guía de rutas, sólo siga unainstrucción cuando es seguro hacerlo ya que el sistema no puede
conocer las distintas situaciones. Use la guía por voz lo más posible ysólo observe la visualización cuando las condiciones de conducción asílo permitan.
Asegúrese de respetar las restricciones del código de carreterasy no corra riesgos. Por ejemplo, si no puede dar una vuelta en U,
siga su viaje. El sistema de navegación volverá a calcular la ruta que lollevará de vuelta a su destino por un camino apropiado.
Configuración de navegaciónLa pantalla de configuración denavegación permitirá hacer ajustes alas visualizaciones de navegación.
Configuraciones de velocidad promedioPermite establecer las velocidadesaproximadas a las que el conductormaneja. Estas velocidades permitenal sistema de navegación mejorar loscálculos de los tiempos para lasrutas.
2006 Navigator (nav)Owners Guide (post-2002-fmt)USA (fus)
Sistemas de audio
78
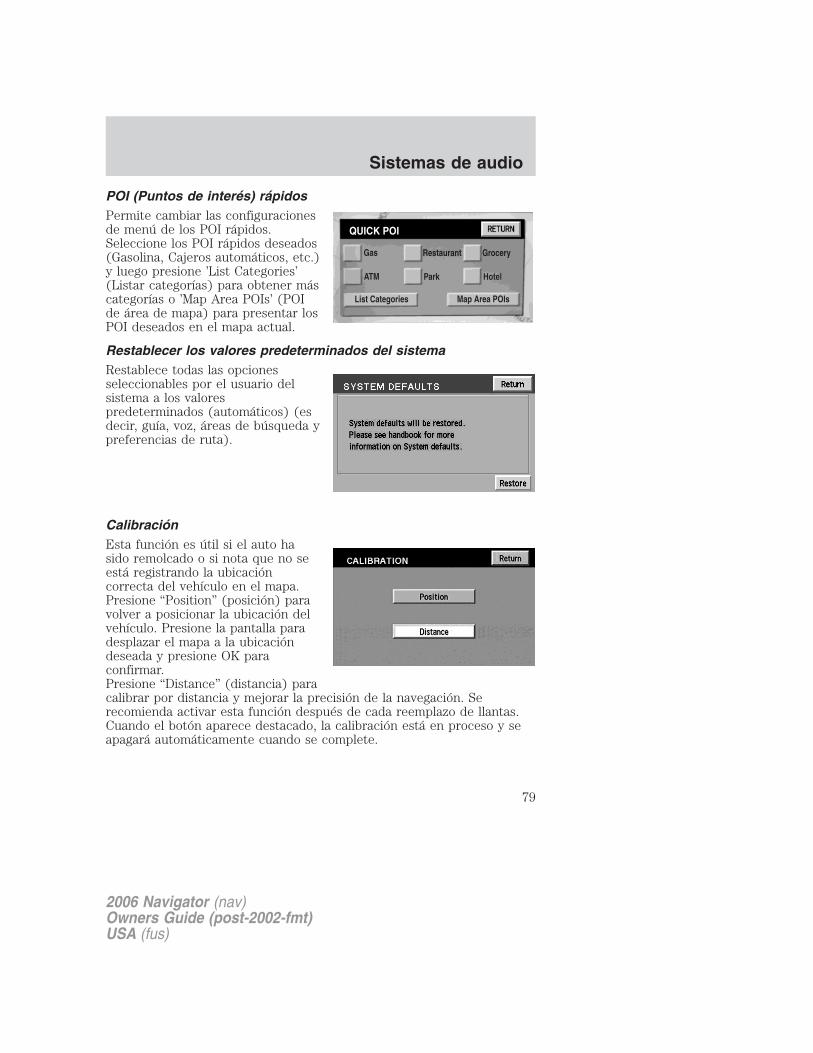
POI (Puntos de interés) rápidosPermite cambiar las configuracionesde menú de los POI rápidos.Seleccione los POI rápidos deseados(Gasolina, Cajeros automáticos, etc.)y luego presione ’List Categories’(Listar categorías) para obtener máscategorías o ’Map Area POIs’ (POIde área de mapa) para presentar losPOI deseados en el mapa actual.
Restablecer los valores predeterminados del sistemaRestablece todas las opcionesseleccionables por el usuario delsistema a los valorespredeterminados (automáticos) (esdecir, guía, voz, áreas de búsqueda ypreferencias de ruta).
CalibraciónEsta función es útil si el auto hasido remolcado o si nota que no seestá registrando la ubicacióncorrecta del vehículo en el mapa.Presione “Position” (posición) paravolver a posicionar la ubicación delvehículo. Presione la pantalla paradesplazar el mapa a la ubicacióndeseada y presione OK paraconfirmar.Presione “Distance” (distancia) paracalibrar por distancia y mejorar la precisión de la navegación. Serecomienda activar esta función después de cada reemplazo de llantas.Cuando el botón aparece destacado, la calibración está en proceso y seapagará automáticamente cuando se complete.
2006 Navigator (nav)Owners Guide (post-2002-fmt)USA (fus)
Sistemas de audio
79
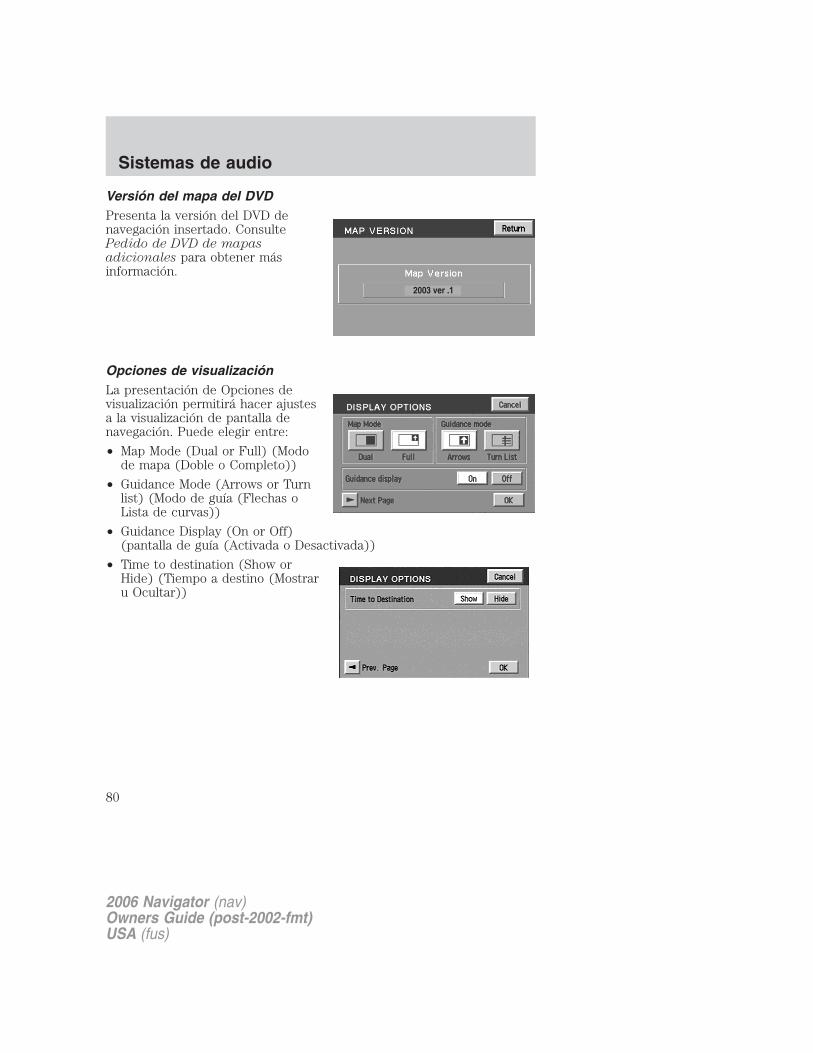
Versión del mapa del DVDPresenta la versión del DVD denavegación insertado. ConsultePedido de DVD de mapasadicionales para obtener másinformación.
Opciones de visualizaciónLa presentación de Opciones devisualización permitirá hacer ajustesa la visualización de pantalla denavegación. Puede elegir entre:
• Map Mode (Dual or Full) (Modode mapa (Doble o Completo))
• Guidance Mode (Arrows or Turnlist) (Modo de guía (Flechas oLista de curvas))
• Guidance Display (On or Off)(pantalla de guía (Activada o Desactivada))
• Time to destination (Show orHide) (Tiempo a destino (Mostraru Ocultar))
2006 Navigator (nav)Owners Guide (post-2002-fmt)USA (fus)
Sistemas de audio
80
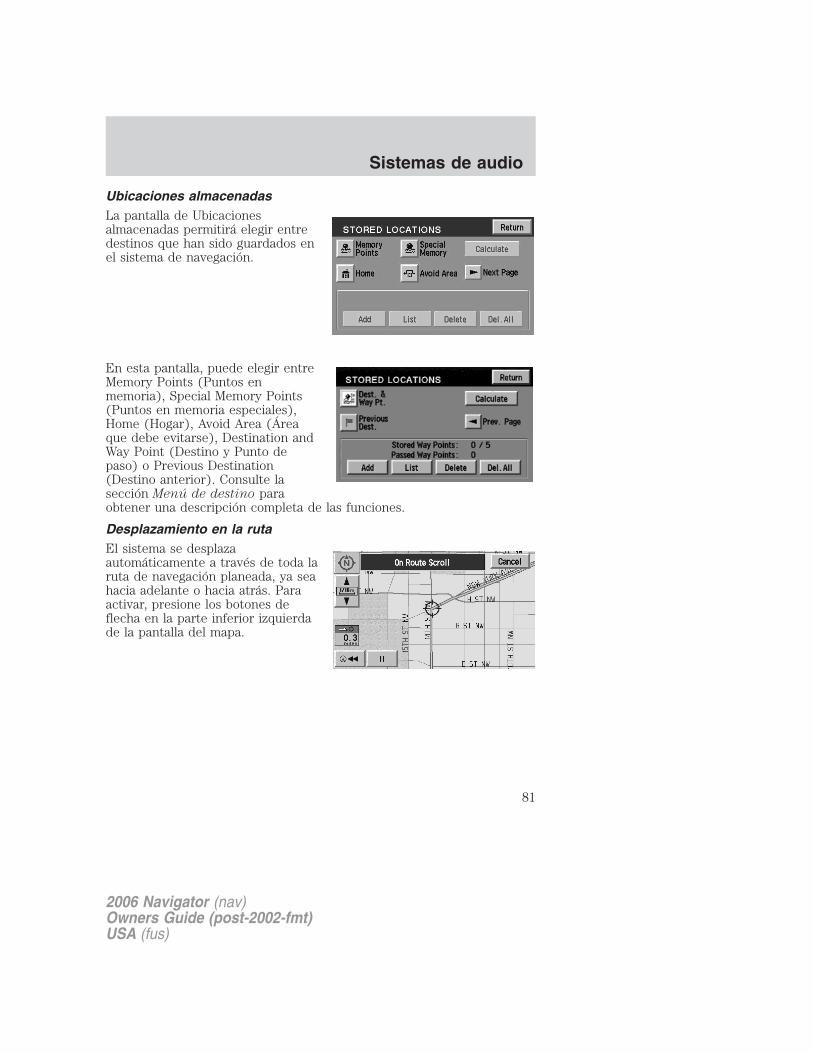
Ubicaciones almacenadasLa pantalla de Ubicacionesalmacenadas permitirá elegir entredestinos que han sido guardados enel sistema de navegación.
En esta pantalla, puede elegir entreMemory Points (Puntos enmemoria), Special Memory Points(Puntos en memoria especiales),Home (Hogar), Avoid Area (Áreaque debe evitarse), Destination andWay Point (Destino y Punto depaso) o Previous Destination(Destino anterior). Consulte lasección Menú de destino paraobtener una descripción completa de las funciones.
Desplazamiento en la rutaEl sistema se desplazaautomáticamente a través de toda laruta de navegación planeada, ya seahacia adelante o hacia atrás. Paraactivar, presione los botones deflecha en la parte inferior izquierdade la pantalla del mapa.
2006 Navigator (nav)Owners Guide (post-2002-fmt)USA (fus)
Sistemas de audio
81
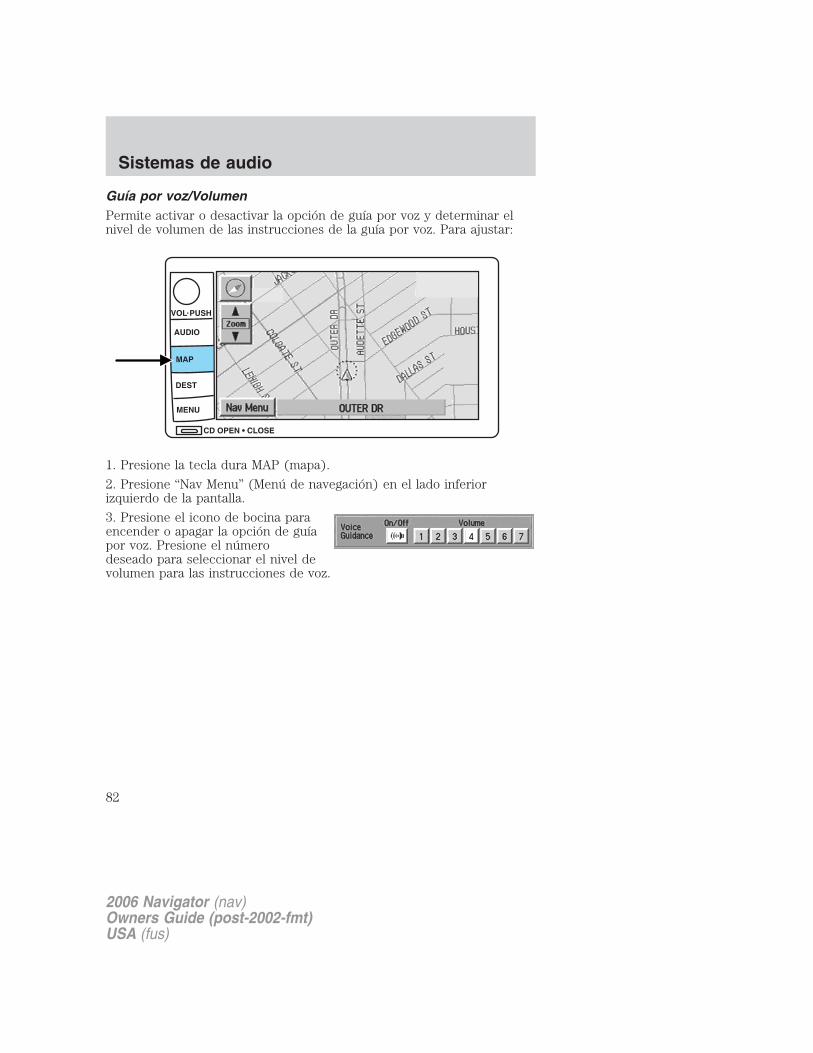
Guía por voz/VolumenPermite activar o desactivar la opción de guía por voz y determinar elnivel de volumen de las instrucciones de la guía por voz. Para ajustar:
1. Presione la tecla dura MAP (mapa).
2. Presione “Nav Menu” (Menú de navegación) en el lado inferiorizquierdo de la pantalla.
3. Presione el icono de bocina paraencender o apagar la opción de guíapor voz. Presione el númerodeseado para seleccionar el nivel devolumen para las instrucciones de voz.
2006 Navigator (nav)Owners Guide (post-2002-fmt)USA (fus)
Sistemas de audio
82
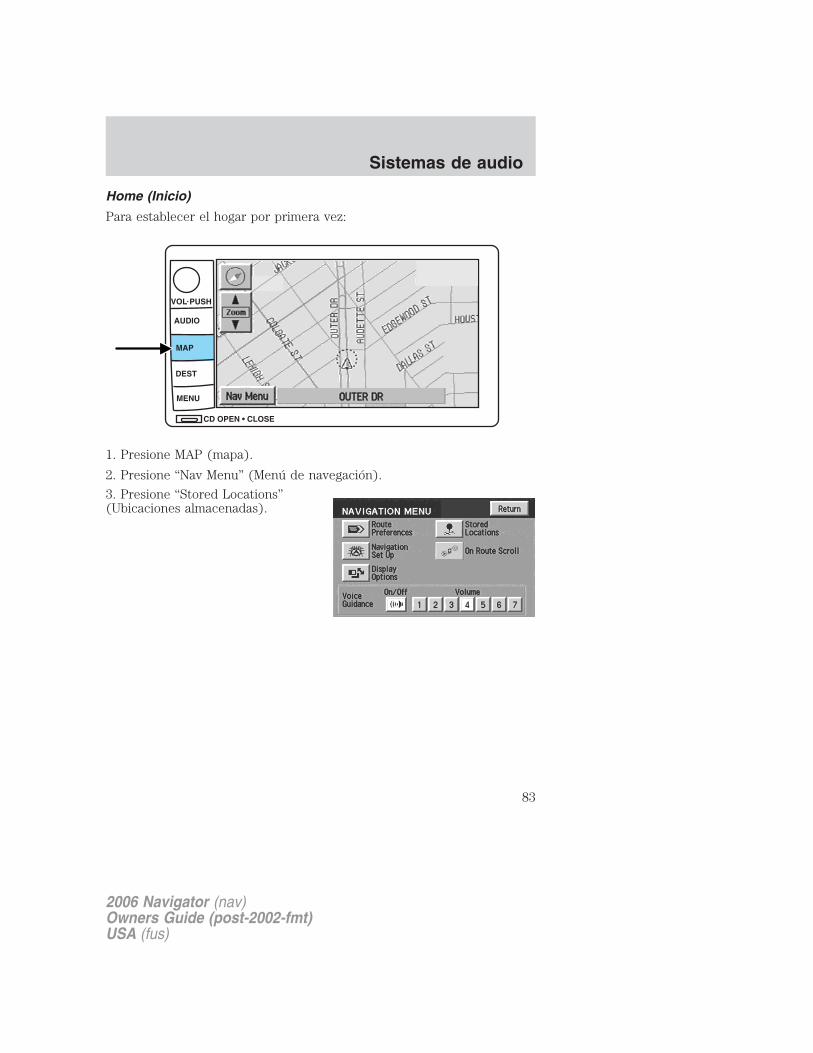
Home (Inicio)
Para establecer el hogar por primera vez:
1. Presione MAP (mapa).
2. Presione “Nav Menu” (Menú de navegación).
3. Presione “Stored Locations”(Ubicaciones almacenadas).
2006 Navigator (nav)Owners Guide (post-2002-fmt)USA (fus)
Sistemas de audio
83

4. Presione “Home” (Inicio).
5. Presione “Add” (Agregar).
6. Seleccione el elemento del menúdeseado que desee fijar como Hogar(Address (Dirección), Memory Point(Punto en memoria), Point ofInterest (Punto de interés),Previous Destination (Destinoanterior)).
7. Ingrese los detalles requeridos.
8. Presione OK para establecer laposición del hogar.
Para ver el hogar, presione el iconode hogar (casa) en la pantalla deEntrada de destino.
2006 Navigator (nav)Owners Guide (post-2002-fmt)USA (fus)
Sistemas de audio
84
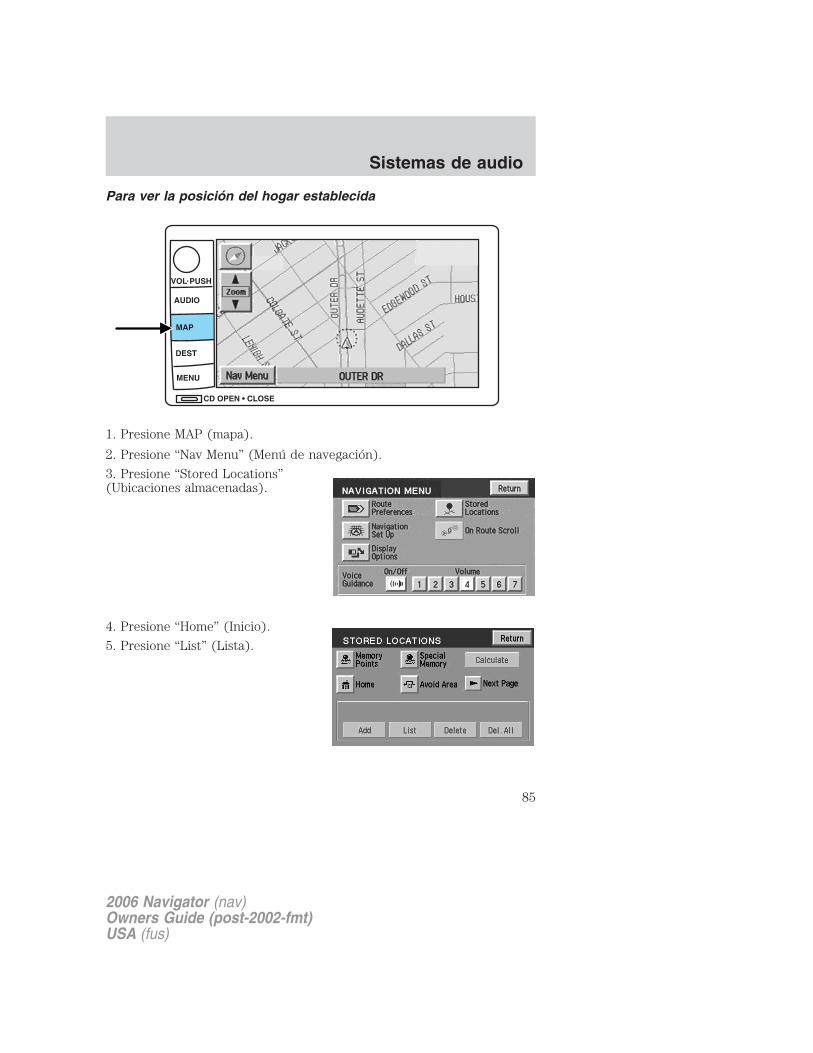
Para ver la posición del hogar establecida
1. Presione MAP (mapa).
2. Presione “Nav Menu” (Menú de navegación).
3. Presione “Stored Locations”(Ubicaciones almacenadas).
4. Presione “Home” (Inicio).
5. Presione “List” (Lista).
2006 Navigator (nav)Owners Guide (post-2002-fmt)USA (fus)
Sistemas de audio
85
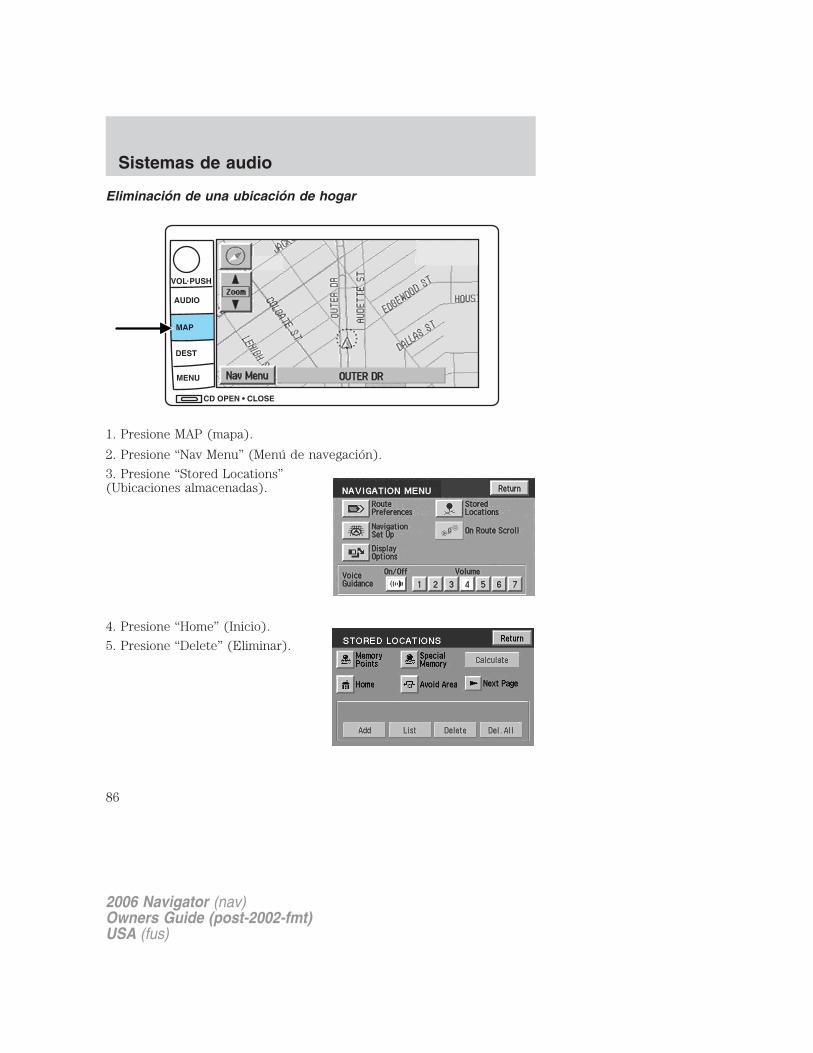
Eliminación de una ubicación de hogar
1. Presione MAP (mapa).
2. Presione “Nav Menu” (Menú de navegación).
3. Presione “Stored Locations”(Ubicaciones almacenadas).
4. Presione “Home” (Inicio).
5. Presione “Delete” (Eliminar).
2006 Navigator (nav)Owners Guide (post-2002-fmt)USA (fus)
Sistemas de audio
86
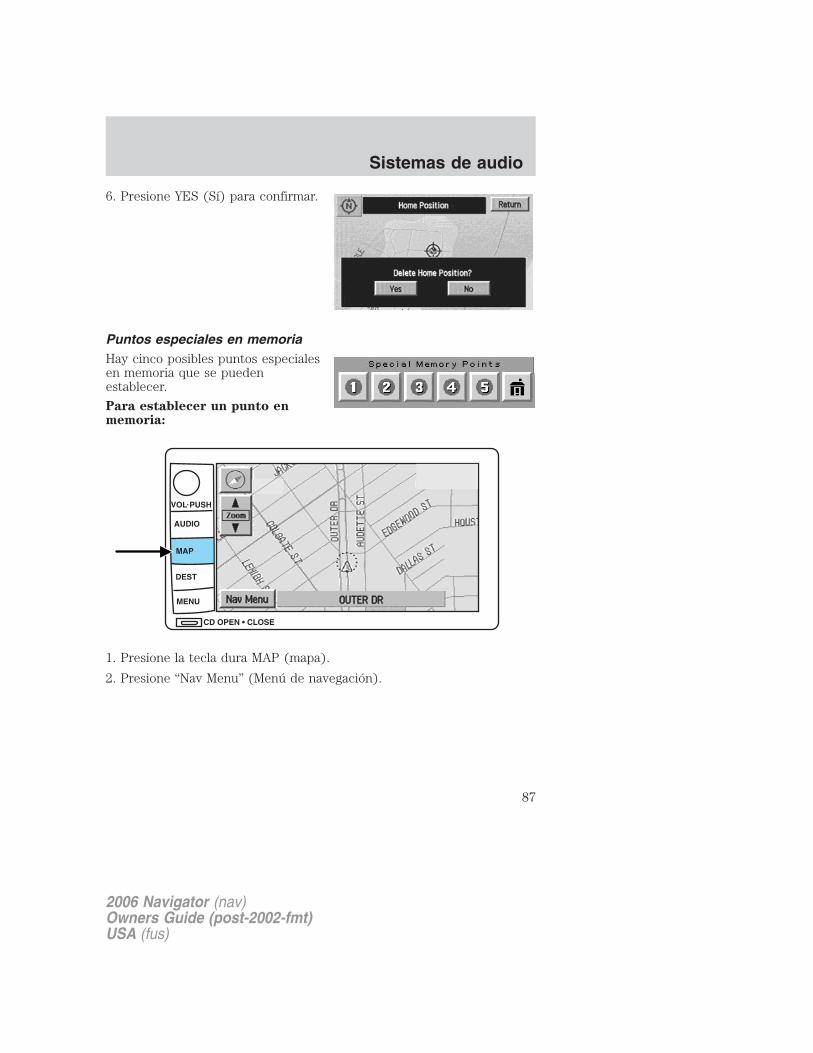
6. Presione YES (Sí) para confirmar.
Puntos especiales en memoriaHay cinco posibles puntos especialesen memoria que se puedenestablecer.
Para establecer un punto enmemoria:
1. Presione la tecla dura MAP (mapa).
2. Presione “Nav Menu” (Menú de navegación).
2006 Navigator (nav)Owners Guide (post-2002-fmt)USA (fus)
Sistemas de audio
87
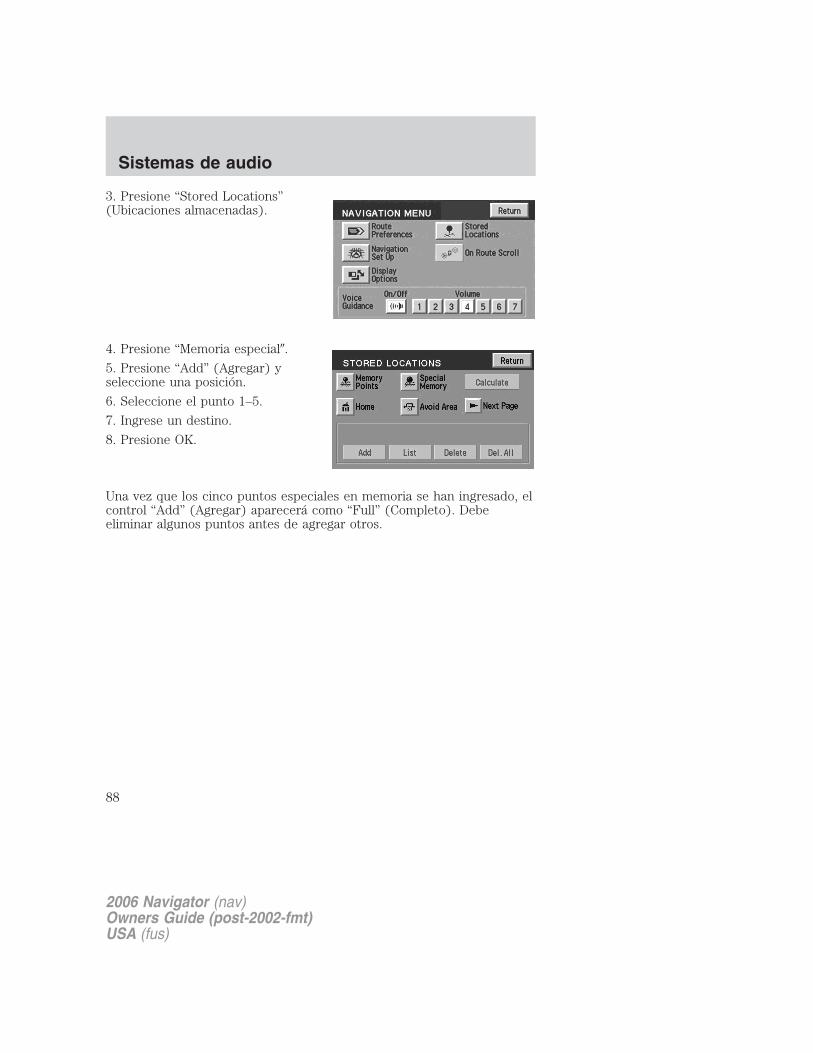
3. Presione “Stored Locations”(Ubicaciones almacenadas).
4. Presione “Memoria especial�.
5. Presione “Add” (Agregar) yseleccione una posición.
6. Seleccione el punto 1–5.
7. Ingrese un destino.
8. Presione OK.
Una vez que los cinco puntos especiales en memoria se han ingresado, elcontrol “Add” (Agregar) aparecerá como “Full” (Completo). Debeeliminar algunos puntos antes de agregar otros.
2006 Navigator (nav)Owners Guide (post-2002-fmt)USA (fus)
Sistemas de audio
88

Para eliminar un punto en memoria:
1. Presione la tecla dura MAP (mapa).
2. Presione “Nav Menu” (Menú de navegación).
3. Presione “Stored Locations”(Ubicaciones almacenadas).
4. Presione “Memoria especial�.
5. Presione “Delete” (Eliminar).Aparecerá la lista.
6. Seleccione el punto especial enmemoria que eliminará.
7. Presione “Del. all” (eliminar todo)para eliminar todos los puntosespeciales en memoria ingresados.
8. Presione “Yes” (Sí) paraconfirmar.
2006 Navigator (nav)Owners Guide (post-2002-fmt)USA (fus)
Sistemas de audio
89
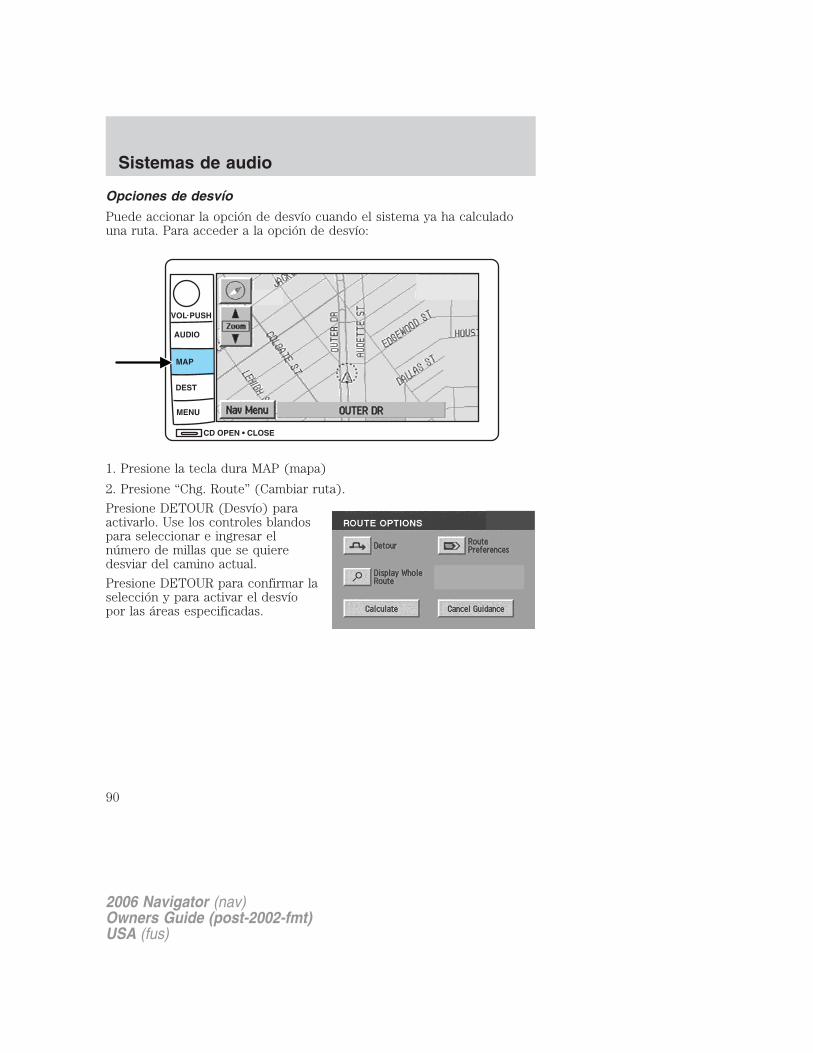
Opciones de desvío
Puede accionar la opción de desvío cuando el sistema ya ha calculadouna ruta. Para acceder a la opción de desvío:
1. Presione la tecla dura MAP (mapa)
2. Presione “Chg. Route” (Cambiar ruta).
Presione DETOUR (Desvío) paraactivarlo. Use los controles blandospara seleccionar e ingresar elnúmero de millas que se quieredesviar del camino actual.
Presione DETOUR para confirmar laselección y para activar el desvíopor las áreas especificadas.
2006 Navigator (nav)Owners Guide (post-2002-fmt)USA (fus)
Sistemas de audio
90
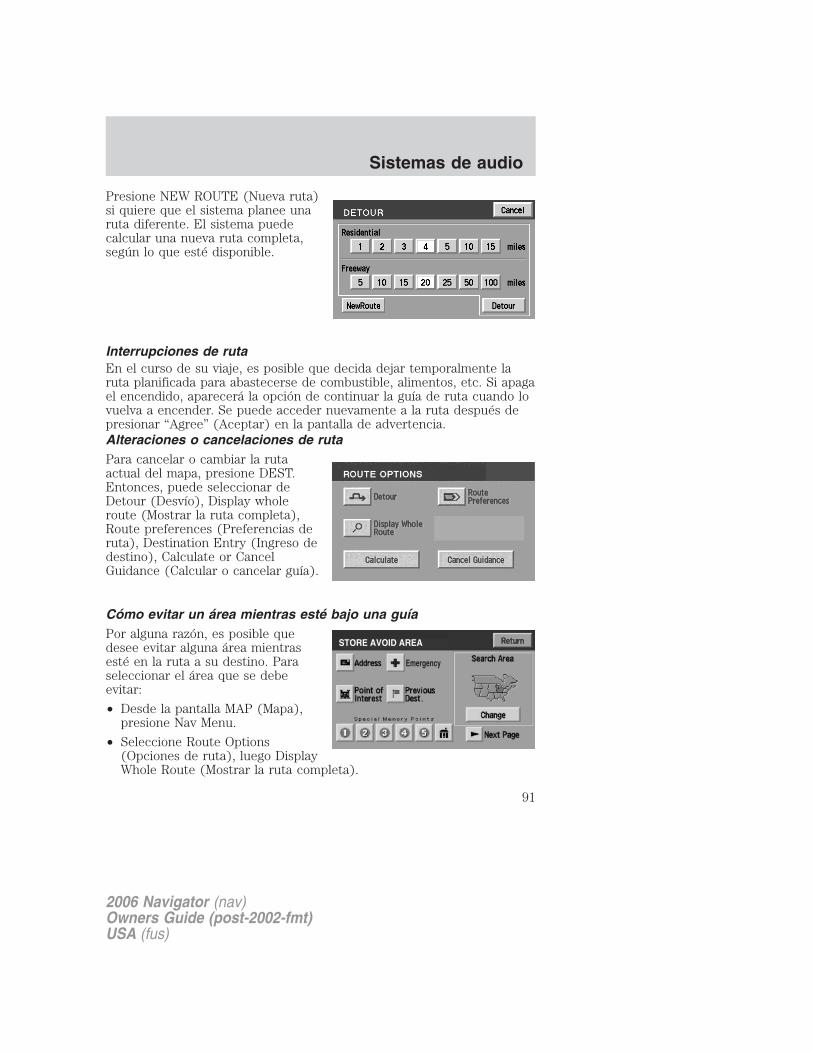
Presione NEW ROUTE (Nueva ruta)si quiere que el sistema planee unaruta diferente. El sistema puedecalcular una nueva ruta completa,según lo que esté disponible.
Interrupciones de rutaEn el curso de su viaje, es posible que decida dejar temporalmente laruta planificada para abastecerse de combustible, alimentos, etc. Si apagael encendido, aparecerá la opción de continuar la guía de ruta cuando lovuelva a encender. Se puede acceder nuevamente a la ruta después depresionar “Agree” (Aceptar) en la pantalla de advertencia.Alteraciones o cancelaciones de rutaPara cancelar o cambiar la rutaactual del mapa, presione DEST.Entonces, puede seleccionar deDetour (Desvío), Display wholeroute (Mostrar la ruta completa),Route preferences (Preferencias deruta), Destination Entry (Ingreso dedestino), Calculate or CancelGuidance (Calcular o cancelar guía).
Cómo evitar un área mientras esté bajo una guíaPor alguna razón, es posible quedesee evitar alguna área mientrasesté en la ruta a su destino. Paraseleccionar el área que se debeevitar:
• Desde la pantalla MAP (Mapa),presione Nav Menu.
• Seleccione Route Options(Opciones de ruta), luego DisplayWhole Route (Mostrar la ruta completa).
2006 Navigator (nav)Owners Guide (post-2002-fmt)USA (fus)
Sistemas de audio
91
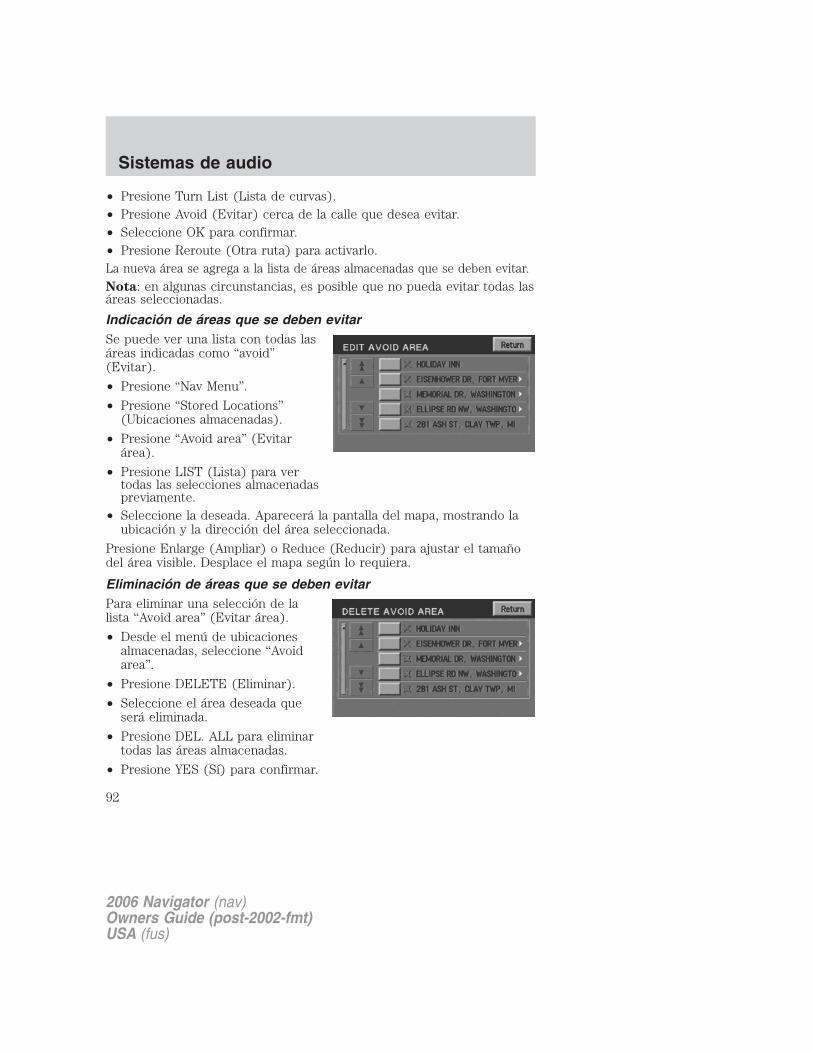
• Presione Turn List (Lista de curvas).• Presione Avoid (Evitar) cerca de la calle que desea evitar.• Seleccione OK para confirmar.• Presione Reroute (Otra ruta) para activarlo.La nueva área se agrega a la lista de áreas almacenadas que se deben evitar.Nota: en algunas circunstancias, es posible que no pueda evitar todas lasáreas seleccionadas.
Indicación de áreas que se deben evitarSe puede ver una lista con todas lasáreas indicadas como “avoid”(Evitar).
• Presione “Nav Menu”.
• Presione “Stored Locations”(Ubicaciones almacenadas).
• Presione “Avoid area” (Evitarárea).
• Presione LIST (Lista) para vertodas las selecciones almacenadaspreviamente.
• Seleccione la deseada. Aparecerá la pantalla del mapa, mostrando laubicación y la dirección del área seleccionada.
Presione Enlarge (Ampliar) o Reduce (Reducir) para ajustar el tamañodel área visible. Desplace el mapa según lo requiera.
Eliminación de áreas que se deben evitarPara eliminar una selección de lalista “Avoid area” (Evitar área).
• Desde el menú de ubicacionesalmacenadas, seleccione “Avoidarea”.
• Presione DELETE (Eliminar).
• Seleccione el área deseada queserá eliminada.
• Presione DEL. ALL para eliminartodas las áreas almacenadas.
• Presione YES (Sí) para confirmar.
2006 Navigator (nav)Owners Guide (post-2002-fmt)USA (fus)
Sistemas de audio
92
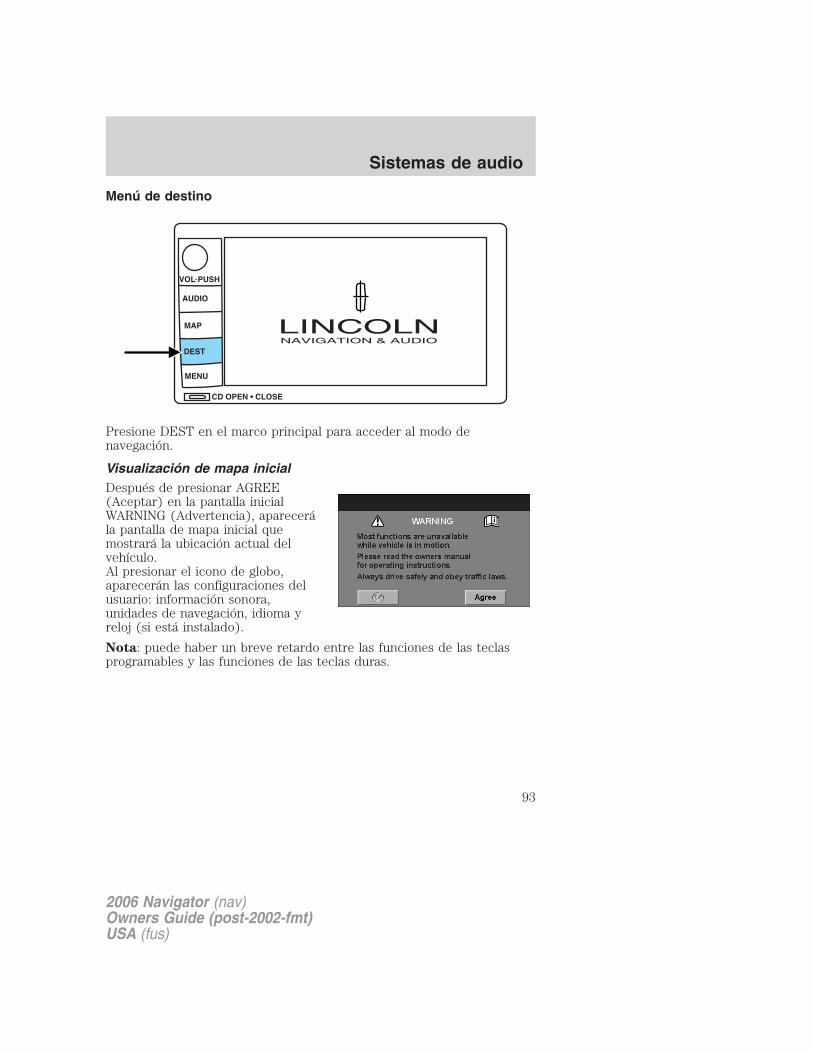
Menú de destino
Presione DEST en el marco principal para acceder al modo denavegación.
Visualización de mapa inicialDespués de presionar AGREE(Aceptar) en la pantalla inicialWARNING (Advertencia), aparecerála pantalla de mapa inicial quemostrará la ubicación actual delvehículo.Al presionar el icono de globo,aparecerán las configuraciones delusuario: información sonora,unidades de navegación, idioma yreloj (si está instalado).
Nota: puede haber un breve retardo entre las funciones de las teclasprogramables y las funciones de las teclas duras.
2006 Navigator (nav)Owners Guide (post-2002-fmt)USA (fus)
Sistemas de audio
93
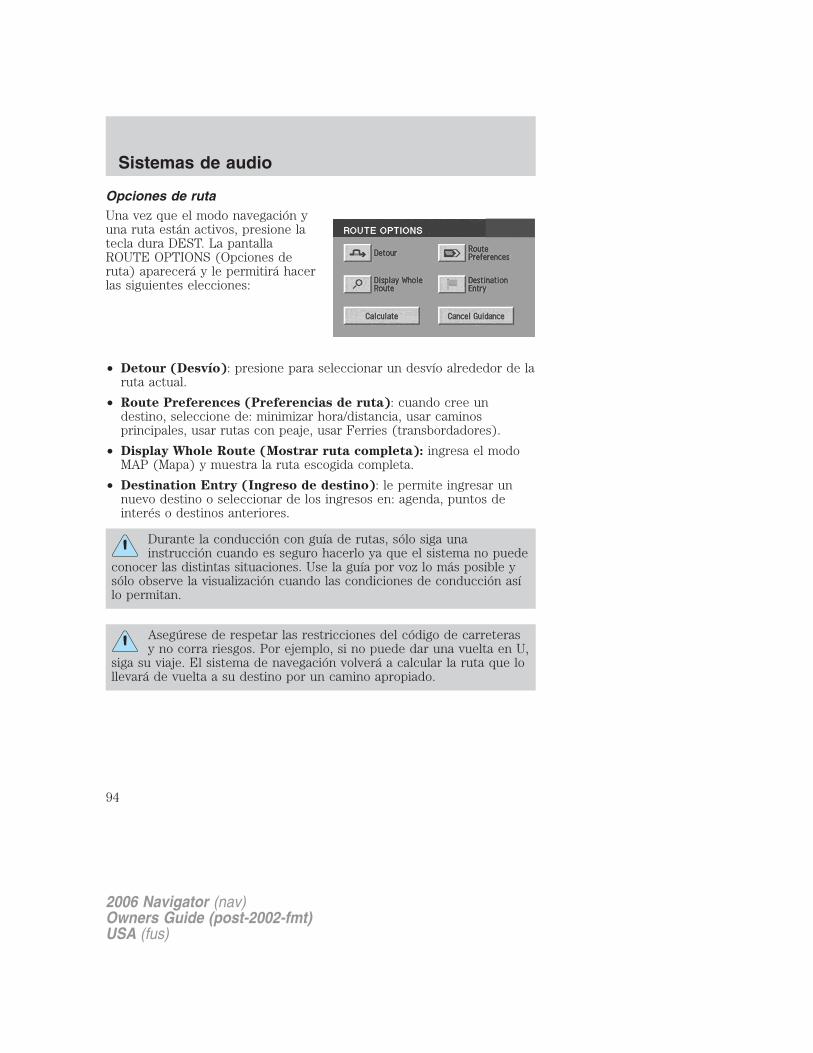
Opciones de rutaUna vez que el modo navegación yuna ruta están activos, presione latecla dura DEST. La pantallaROUTE OPTIONS (Opciones deruta) aparecerá y le permitirá hacerlas siguientes elecciones:
• Detour (Desvío): presione para seleccionar un desvío alrededor de laruta actual.
• Route Preferences (Preferencias de ruta): cuando cree undestino, seleccione de: minimizar hora/distancia, usar caminosprincipales, usar rutas con peaje, usar Ferries (transbordadores).
• Display Whole Route (Mostrar ruta completa): ingresa el modoMAP (Mapa) y muestra la ruta escogida completa.
• Destination Entry (Ingreso de destino): le permite ingresar unnuevo destino o seleccionar de los ingresos en: agenda, puntos deinterés o destinos anteriores.
Durante la conducción con guía de rutas, sólo siga unainstrucción cuando es seguro hacerlo ya que el sistema no puede
conocer las distintas situaciones. Use la guía por voz lo más posible ysólo observe la visualización cuando las condiciones de conducción asílo permitan.
Asegúrese de respetar las restricciones del código de carreterasy no corra riesgos. Por ejemplo, si no puede dar una vuelta en U,
siga su viaje. El sistema de navegación volverá a calcular la ruta que lollevará de vuelta a su destino por un camino apropiado.
2006 Navigator (nav)Owners Guide (post-2002-fmt)USA (fus)
Sistemas de audio
94
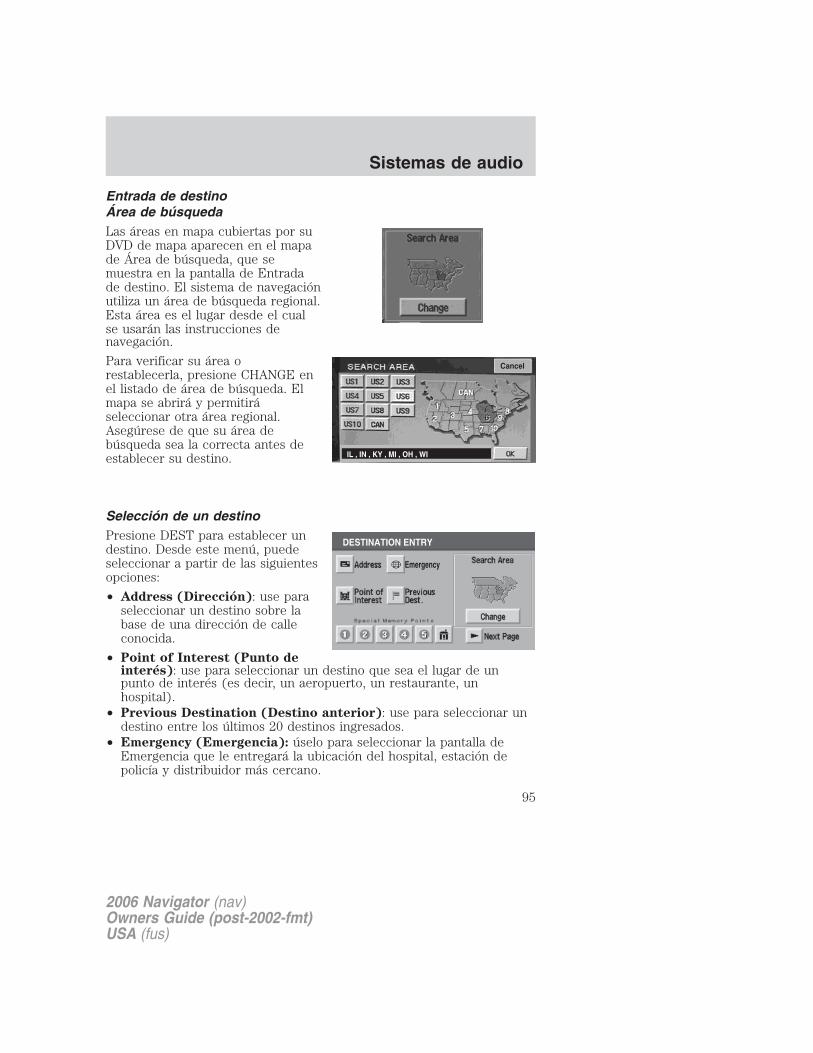
Entrada de destinoÁrea de búsquedaLas áreas en mapa cubiertas por suDVD de mapa aparecen en el mapade Área de búsqueda, que semuestra en la pantalla de Entradade destino. El sistema de navegaciónutiliza un área de búsqueda regional.Esta área es el lugar desde el cualse usarán las instrucciones denavegación.
Para verificar su área orestablecerla, presione CHANGE enel listado de área de búsqueda. Elmapa se abrirá y permitiráseleccionar otra área regional.Asegúrese de que su área debúsqueda sea la correcta antes deestablecer su destino.
Selección de un destinoPresione DEST para establecer undestino. Desde este menú, puedeseleccionar a partir de las siguientesopciones:
• Address (Dirección): use paraseleccionar un destino sobre labase de una dirección de calleconocida.
• Point of Interest (Punto deinterés): use para seleccionar un destino que sea el lugar de unpunto de interés (es decir, un aeropuerto, un restaurante, unhospital).
• Previous Destination (Destino anterior): use para seleccionar undestino entre los últimos 20 destinos ingresados.
• Emergency (Emergencia): úselo para seleccionar la pantalla deEmergencia que le entregará la ubicación del hospital, estación depolicía y distribuidor más cercano.
Cancel
IL , IN , KY , MI , OH , WI
2006 Navigator (nav)Owners Guide (post-2002-fmt)USA (fus)
Sistemas de audio
95
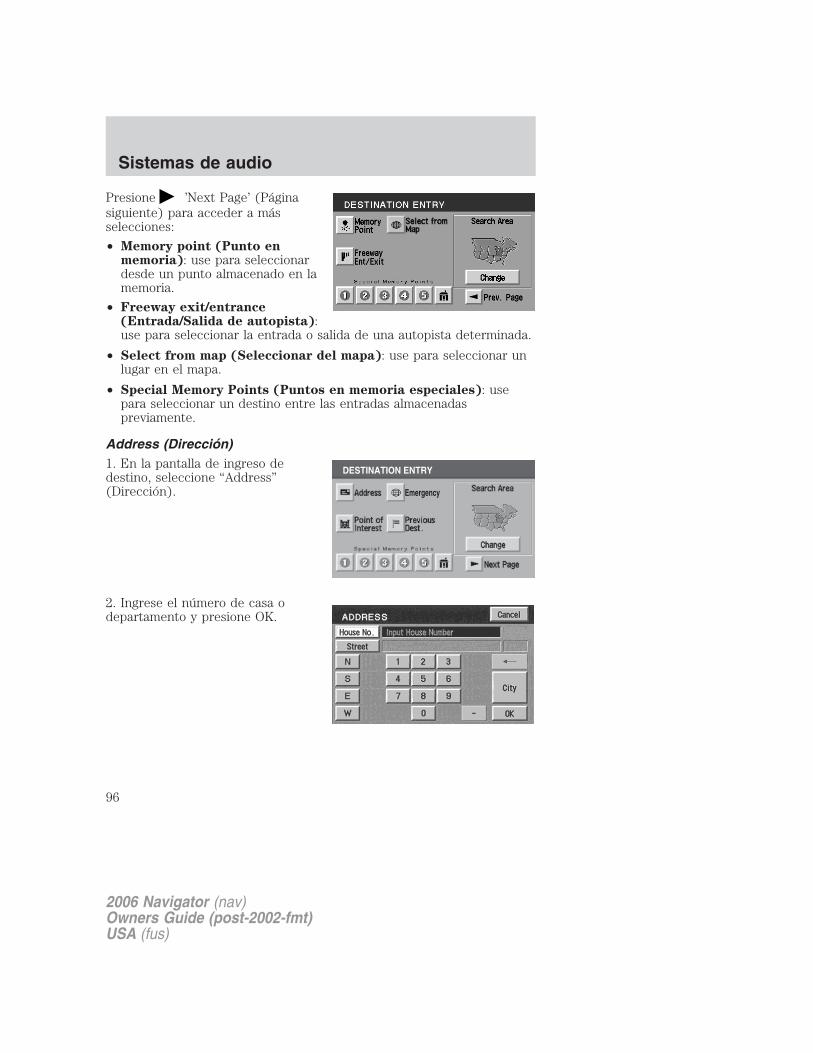
Presione ’Next Page’ (Páginasiguiente) para acceder a másselecciones:
• Memory point (Punto enmemoria): use para seleccionardesde un punto almacenado en lamemoria.
• Freeway exit/entrance(Entrada/Salida de autopista):use para seleccionar la entrada o salida de una autopista determinada.
• Select from map (Seleccionar del mapa): use para seleccionar unlugar en el mapa.
• Special Memory Points (Puntos en memoria especiales): usepara seleccionar un destino entre las entradas almacenadaspreviamente.
Address (Dirección)1. En la pantalla de ingreso dedestino, seleccione “Address”(Dirección).
2. Ingrese el número de casa odepartamento y presione OK.
2006 Navigator (nav)Owners Guide (post-2002-fmt)USA (fus)
Sistemas de audio
96
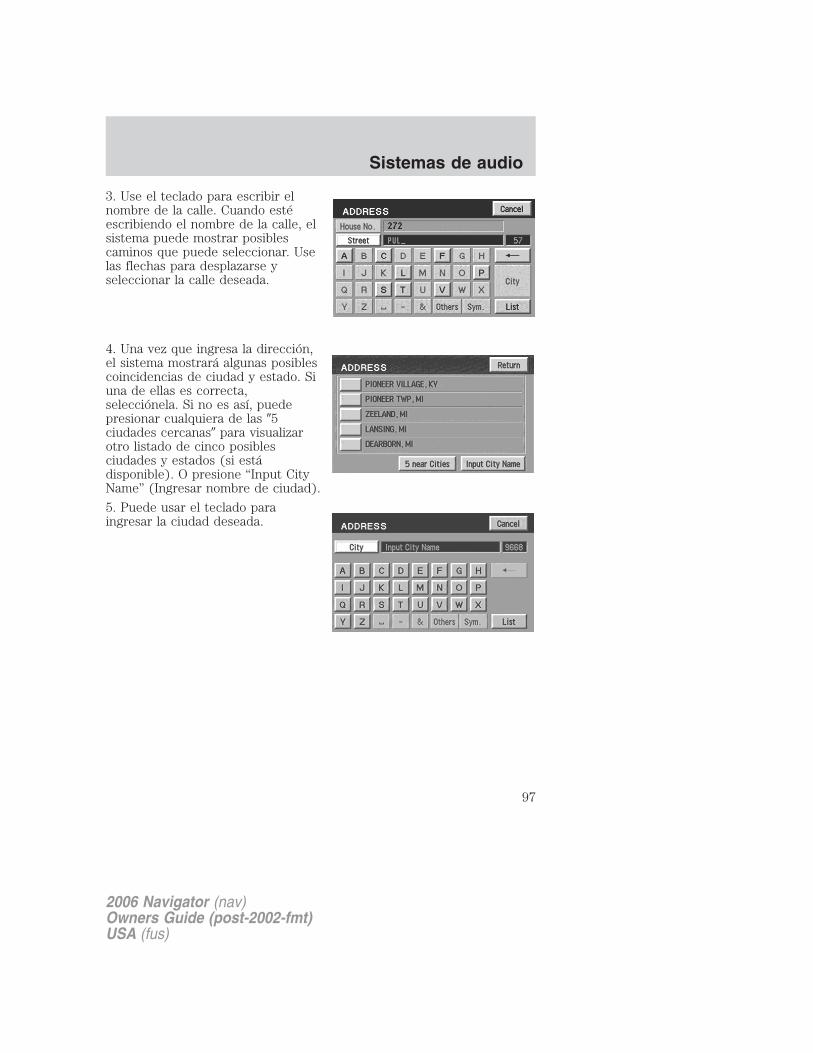
3. Use el teclado para escribir elnombre de la calle. Cuando estéescribiendo el nombre de la calle, elsistema puede mostrar posiblescaminos que puede seleccionar. Uselas flechas para desplazarse yseleccionar la calle deseada.
4. Una vez que ingresa la dirección,el sistema mostrará algunas posiblescoincidencias de ciudad y estado. Siuna de ellas es correcta,selecciónela. Si no es así, puedepresionar cualquiera de las �5ciudades cercanas� para visualizarotro listado de cinco posiblesciudades y estados (si estádisponible). O presione “Input CityName” (Ingresar nombre de ciudad).
5. Puede usar el teclado paraingresar la ciudad deseada.
2006 Navigator (nav)Owners Guide (post-2002-fmt)USA (fus)
Sistemas de audio
97
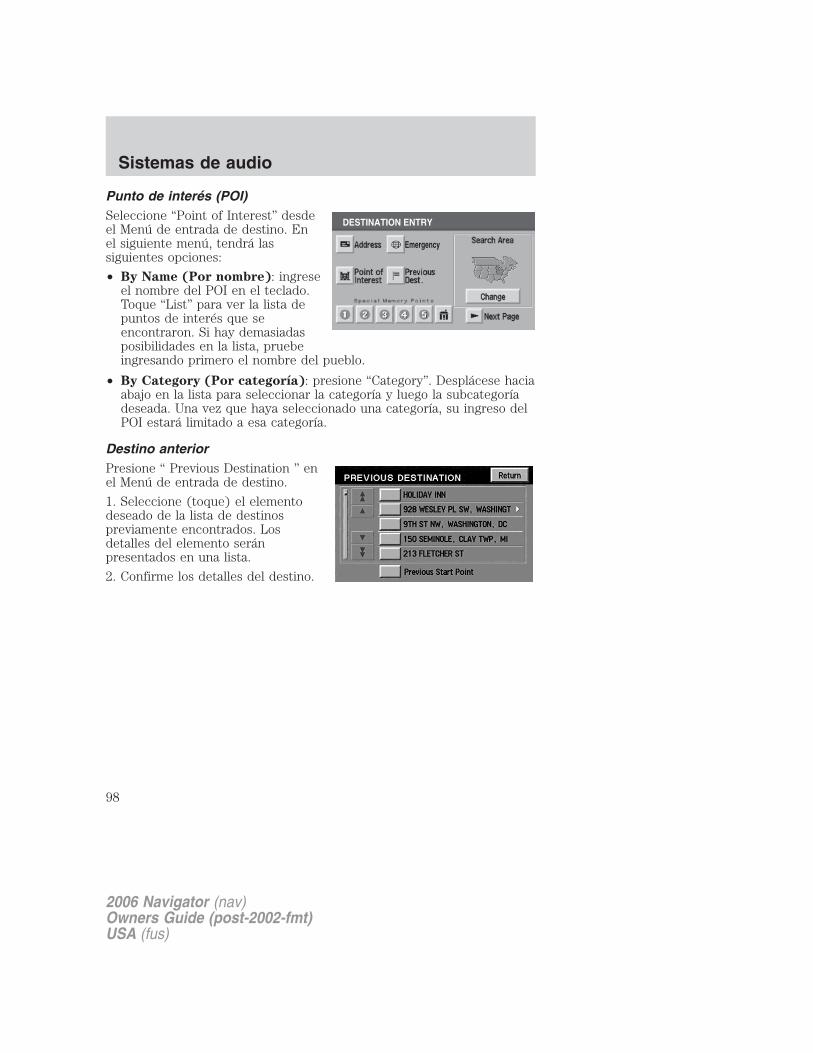
Punto de interés (POI)Seleccione “Point of Interest” desdeel Menú de entrada de destino. Enel siguiente menú, tendrá lassiguientes opciones:
• By Name (Por nombre): ingreseel nombre del POI en el teclado.Toque “List” para ver la lista depuntos de interés que seencontraron. Si hay demasiadasposibilidades en la lista, pruebeingresando primero el nombre del pueblo.
• By Category (Por categoría): presione “Category”. Desplácese haciaabajo en la lista para seleccionar la categoría y luego la subcategoríadeseada. Una vez que haya seleccionado una categoría, su ingreso delPOI estará limitado a esa categoría.
Destino anteriorPresione “ Previous Destination ” enel Menú de entrada de destino.
1. Seleccione (toque) el elementodeseado de la lista de destinospreviamente encontrados. Losdetalles del elemento seránpresentados en una lista.
2. Confirme los detalles del destino.
2006 Navigator (nav)Owners Guide (post-2002-fmt)USA (fus)
Sistemas de audio
98
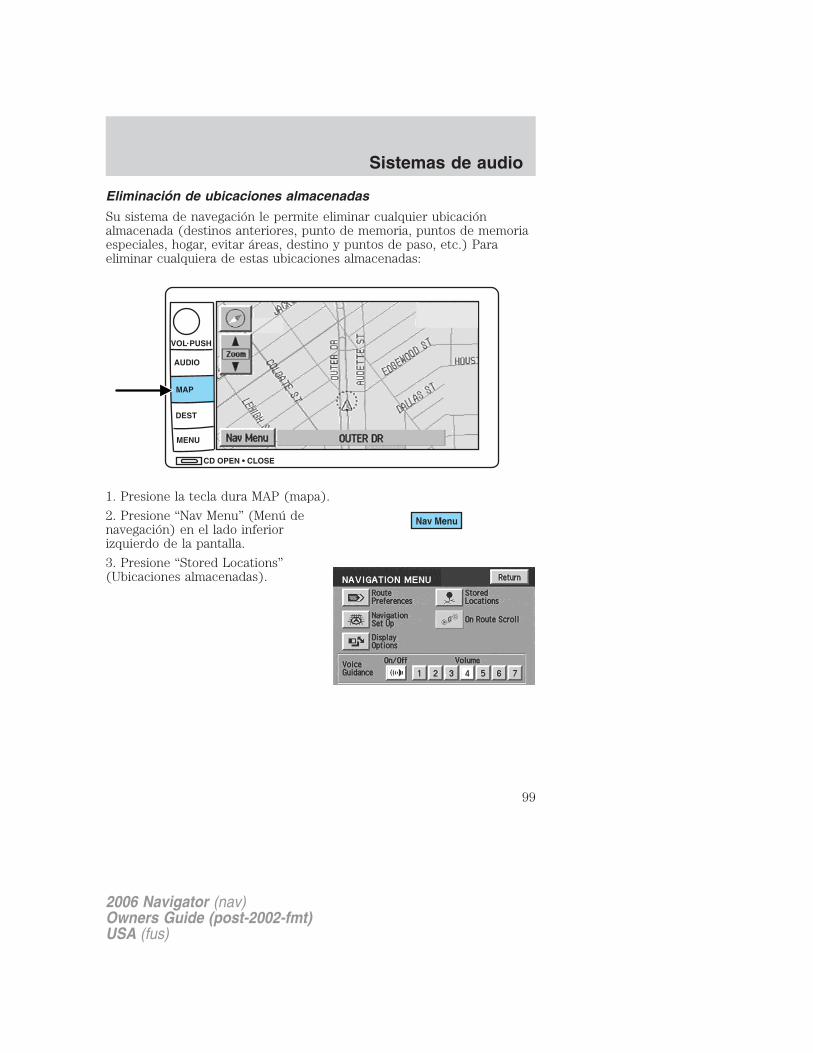
Eliminación de ubicaciones almacenadas
Su sistema de navegación le permite eliminar cualquier ubicaciónalmacenada (destinos anteriores, punto de memoria, puntos de memoriaespeciales, hogar, evitar áreas, destino y puntos de paso, etc.) Paraeliminar cualquiera de estas ubicaciones almacenadas:
1. Presione la tecla dura MAP (mapa).
2. Presione “Nav Menu” (Menú denavegación) en el lado inferiorizquierdo de la pantalla.
3. Presione “Stored Locations”(Ubicaciones almacenadas).
2006 Navigator (nav)Owners Guide (post-2002-fmt)USA (fus)
Sistemas de audio
99

4. Seleccione el elemento deseadoque desea eliminar (destino anterior,punto de memoria, etc.).
5. Presione “Delete” en la parteinferior de la pantalla.
6. Aparecerá la lista de ubicacionesalmacenadas.
7. Seleccione (toque) la entrada queserá eliminada. Los detalles delelemento serán presentados en unalista.
8. Presione YES (Sí) para confirmarla eliminación.
9. Presione DELETE ALL (Eliminartodo) para eliminar todas lasubicaciones almacenadas.
EmergenciaEl sistema de navegación estáequipado con una pantalla deEmergencia separada. Para accedera la pantalla de Emergencia,presione “Emergency”.
2006 Navigator (nav)Owners Guide (post-2002-fmt)USA (fus)
Sistemas de audio
100
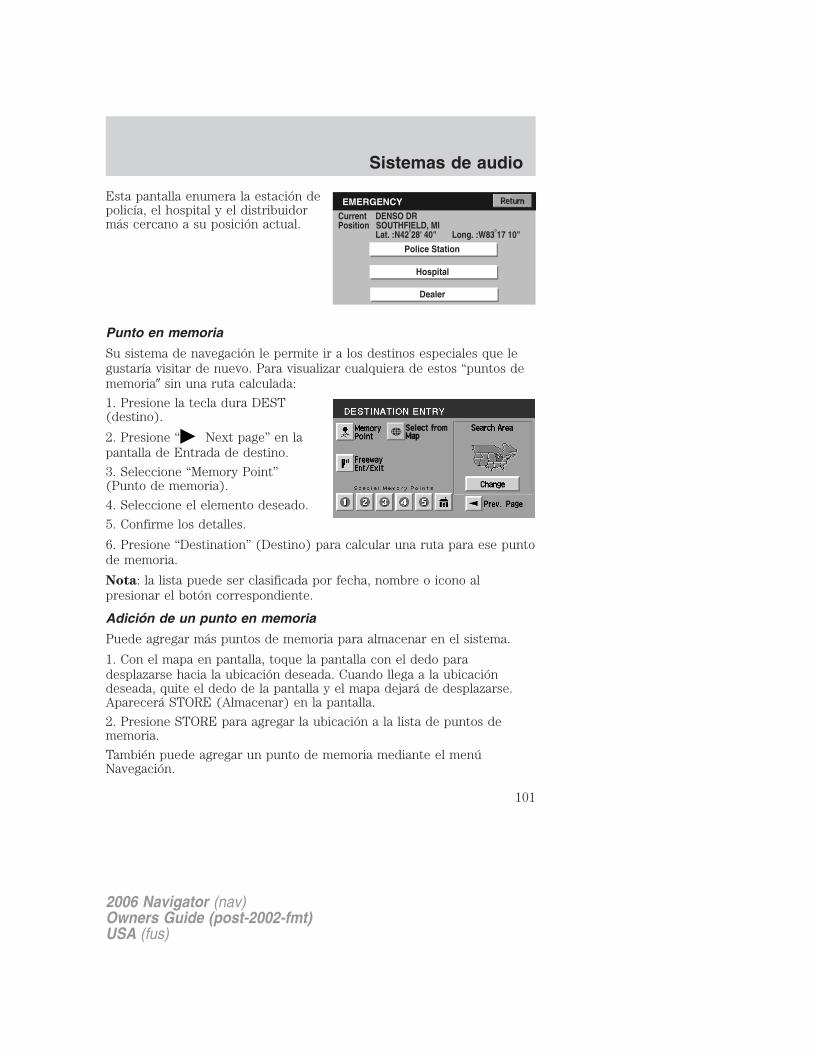
Esta pantalla enumera la estación depolicía, el hospital y el distribuidormás cercano a su posición actual.
Punto en memoria
Su sistema de navegación le permite ir a los destinos especiales que legustaría visitar de nuevo. Para visualizar cualquiera de estos “puntos dememoria� sin una ruta calculada:
1. Presione la tecla dura DEST(destino).
2. Presione “ Next page” en lapantalla de Entrada de destino.
3. Seleccione “Memory Point”(Punto de memoria).
4. Seleccione el elemento deseado.
5. Confirme los detalles.
6. Presione “Destination” (Destino) para calcular una ruta para ese puntode memoria.
Nota: la lista puede ser clasificada por fecha, nombre o icono alpresionar el botón correspondiente.
Adición de un punto en memoria
Puede agregar más puntos de memoria para almacenar en el sistema.
1. Con el mapa en pantalla, toque la pantalla con el dedo paradesplazarse hacia la ubicación deseada. Cuando llega a la ubicacióndeseada, quite el dedo de la pantalla y el mapa dejará de desplazarse.Aparecerá STORE (Almacenar) en la pantalla.
2. Presione STORE para agregar la ubicación a la lista de puntos dememoria.
También puede agregar un punto de memoria mediante el menúNavegación.
2006 Navigator (nav)Owners Guide (post-2002-fmt)USA (fus)
Sistemas de audio
101

1. Presione la tecla dura MAP (mapa).
2. Presione “Nav Menu” (Menú denavegación) en el lado inferiorizquierdo de la pantalla.
3. Presione “Stored Locations”(Ubicaciones almacenadas).
4. Seleccione “Memory Point”(Punto de memoria).
5. Presione “Delete” (Eliminar) en laparte inferior de la pantalla.
6. Seleccione el elemento deseadodel menú.
7. Ingrese/seleccione los detallesrequeridos. El nuevo punto seráagregado a la lista almacenada depuntos en memoria.
2006 Navigator (nav)Owners Guide (post-2002-fmt)USA (fus)
Sistemas de audio
102
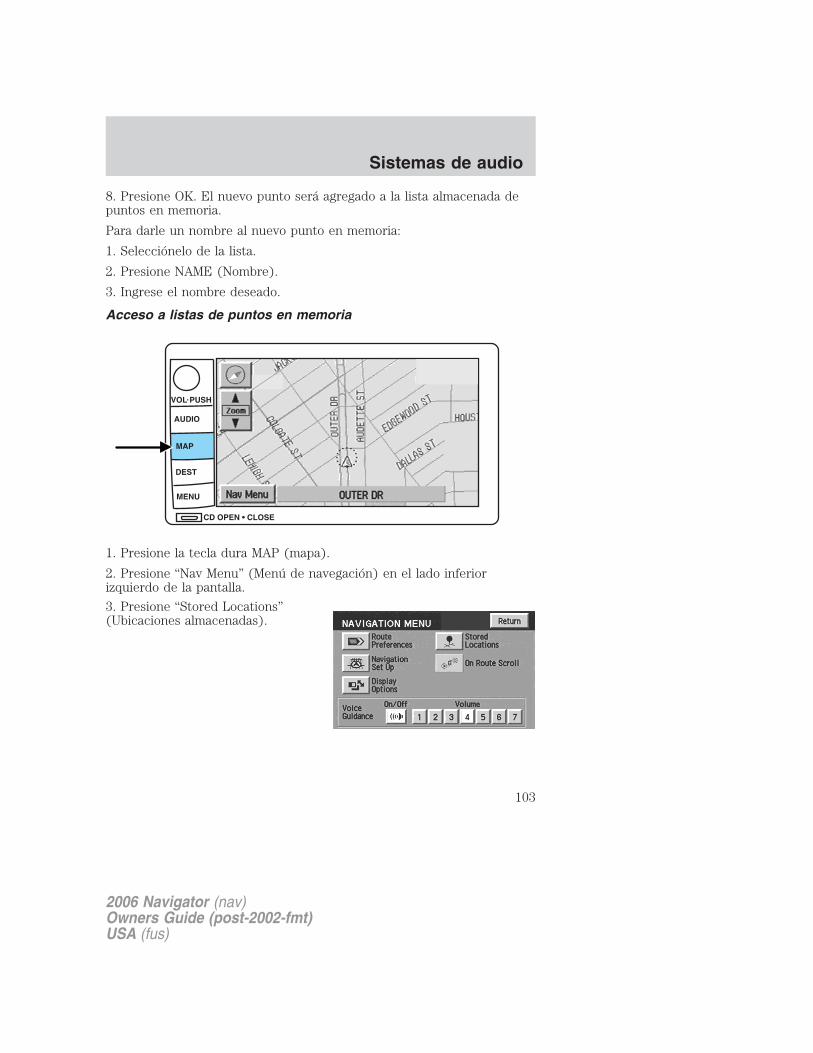
8. Presione OK. El nuevo punto será agregado a la lista almacenada depuntos en memoria.
Para darle un nombre al nuevo punto en memoria:
1. Selecciónelo de la lista.
2. Presione NAME (Nombre).
3. Ingrese el nombre deseado.
Acceso a listas de puntos en memoria
1. Presione la tecla dura MAP (mapa).
2. Presione “Nav Menu” (Menú de navegación) en el lado inferiorizquierdo de la pantalla.
3. Presione “Stored Locations”(Ubicaciones almacenadas).
2006 Navigator (nav)Owners Guide (post-2002-fmt)USA (fus)
Sistemas de audio
103
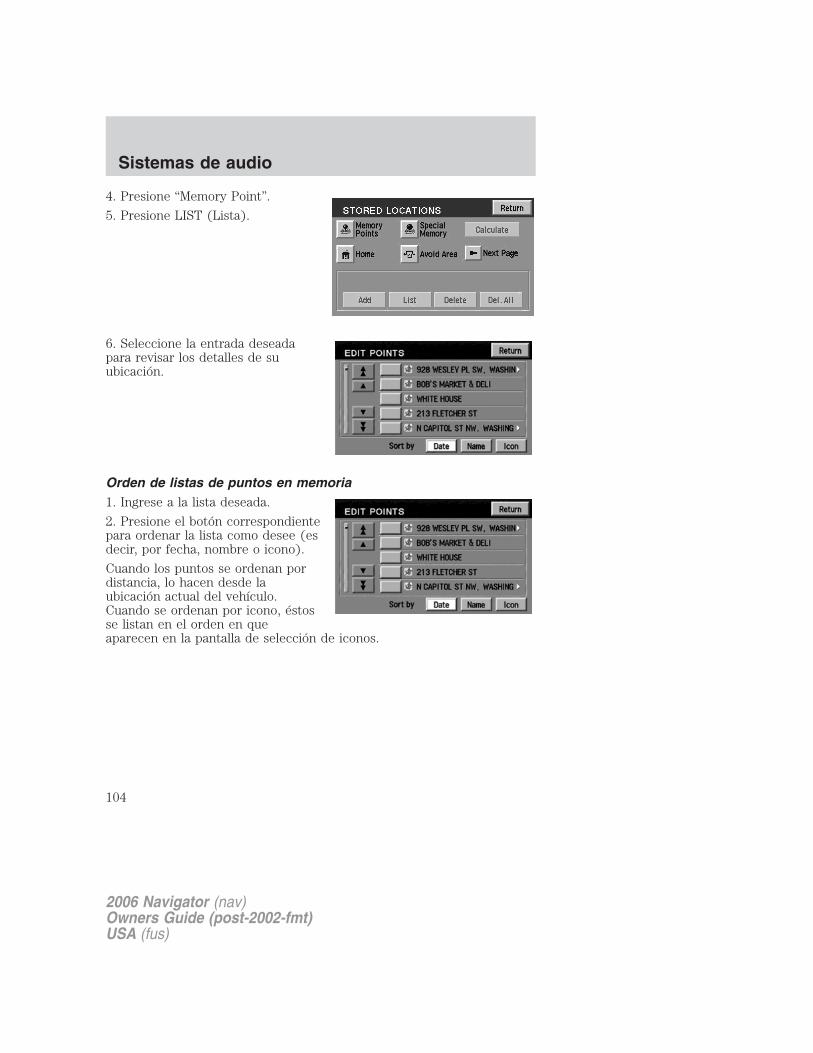
4. Presione “Memory Point”.
5. Presione LIST (Lista).
6. Seleccione la entrada deseadapara revisar los detalles de suubicación.
Orden de listas de puntos en memoria1. Ingrese a la lista deseada.
2. Presione el botón correspondientepara ordenar la lista como desee (esdecir, por fecha, nombre o icono).
Cuando los puntos se ordenan pordistancia, lo hacen desde laubicación actual del vehículo.Cuando se ordenan por icono, éstosse listan en el orden en queaparecen en la pantalla de selección de iconos.
2006 Navigator (nav)Owners Guide (post-2002-fmt)USA (fus)
Sistemas de audio
104
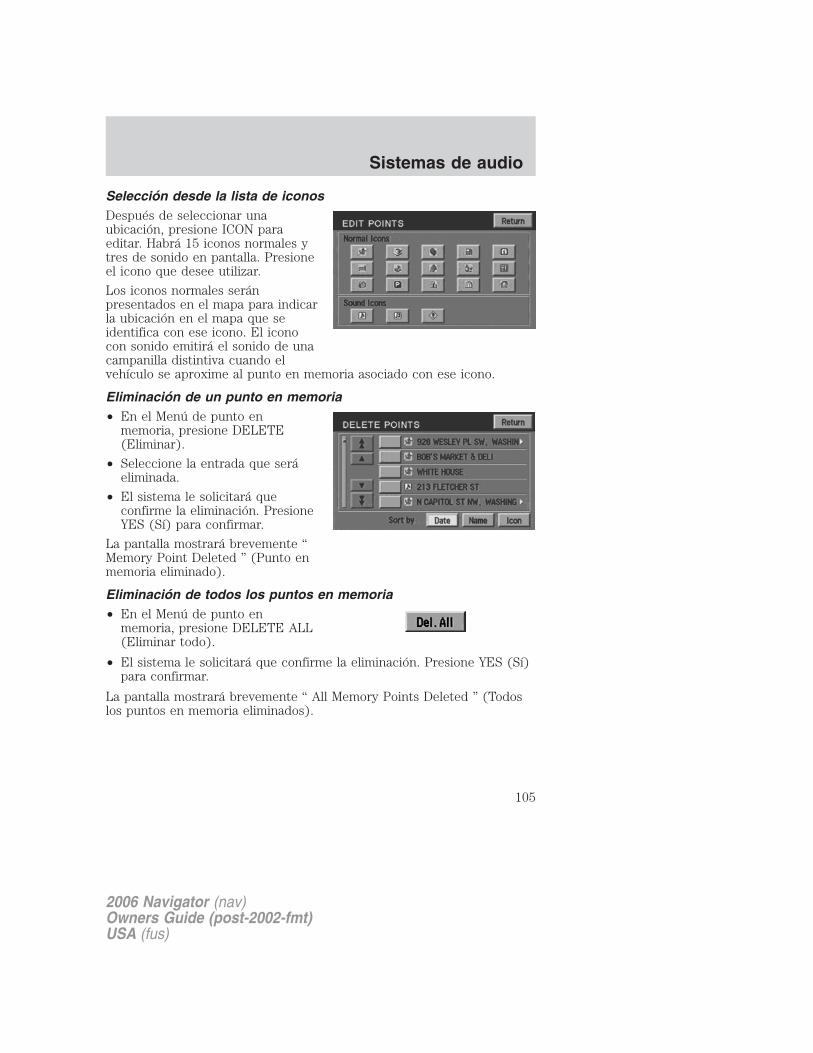
Selección desde la lista de iconosDespués de seleccionar unaubicación, presione ICON paraeditar. Habrá 15 iconos normales ytres de sonido en pantalla. Presioneel icono que desee utilizar.
Los iconos normales seránpresentados en el mapa para indicarla ubicación en el mapa que seidentifica con ese icono. El iconocon sonido emitirá el sonido de unacampanilla distintiva cuando elvehículo se aproxime al punto en memoria asociado con ese icono.
Eliminación de un punto en memoria• En el Menú de punto en
memoria, presione DELETE(Eliminar).
• Seleccione la entrada que seráeliminada.
• El sistema le solicitará queconfirme la eliminación. PresioneYES (Sí) para confirmar.
La pantalla mostrará brevemente “Memory Point Deleted ” (Punto enmemoria eliminado).
Eliminación de todos los puntos en memoria• En el Menú de punto en
memoria, presione DELETE ALL(Eliminar todo).
• El sistema le solicitará que confirme la eliminación. Presione YES (Sí)para confirmar.
La pantalla mostrará brevemente “ All Memory Points Deleted ” (Todoslos puntos en memoria eliminados).
2006 Navigator (nav)Owners Guide (post-2002-fmt)USA (fus)
Sistemas de audio
105

Entrada/Salida de autopista
Para establecer una entrada o salida de la autopista como destino:
1. Presione la tecla dura DEST(destino).
2. Presione “ Next page”(Siguiente página) para acceder a lasegunda página del menú Ingreso dedestino.
3. Seleccione “FreewayEntrance/Exit”.
1. Enter freeway name (Ingresarnombre de autopista): ingrese elnombre de autopista usando elteclado. Presione “List” (Lista) paraseleccionar una autopista de la listapresentada.
Para ingresar números en elnombre de autopista, presione“Sym”.
2. Select entrance/exit(Seleccionar entrada/salida):presione “Entrance” (Entrada) sidesea ingresar a la autopista en estecruce. Presione “Exit” (Salida) sidesea abandonar la autopista eneste cruce.
3. Select Junction (Seleccionarcruce): la visualización mostraráuna lista de cruces de la autopista.Se pueden presentar por distancia(a partir de la ubicación actual del vehículo), presionando el botón “Dist”o alfabéticamente presionando el botón “A-Z”. Seleccione la entrada osalida deseada.
Los detalles del destino se presentan para su confirmación.
2006 Navigator (nav)Owners Guide (post-2002-fmt)USA (fus)
Sistemas de audio
106
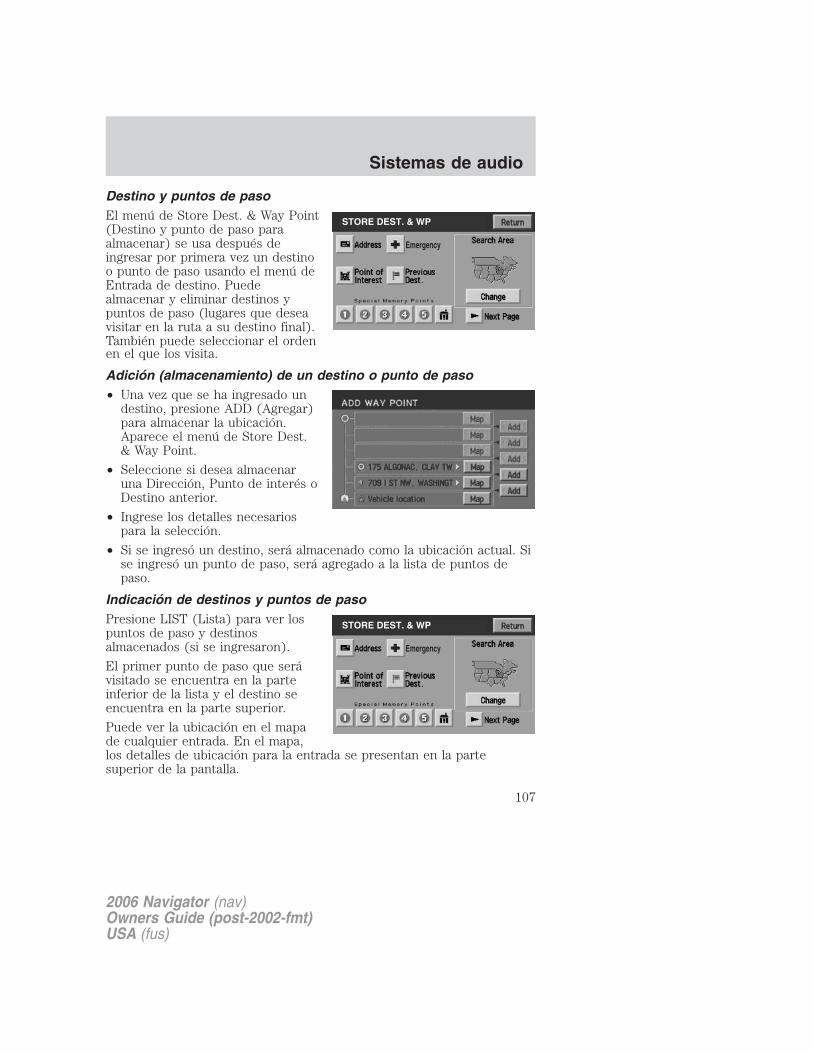
Destino y puntos de pasoEl menú de Store Dest. & Way Point(Destino y punto de paso paraalmacenar) se usa después deingresar por primera vez un destinoo punto de paso usando el menú deEntrada de destino. Puedealmacenar y eliminar destinos ypuntos de paso (lugares que deseavisitar en la ruta a su destino final).También puede seleccionar el ordenen el que los visita.
Adición (almacenamiento) de un destino o punto de paso• Una vez que se ha ingresado un
destino, presione ADD (Agregar)para almacenar la ubicación.Aparece el menú de Store Dest.& Way Point.
• Seleccione si desea almacenaruna Dirección, Punto de interés oDestino anterior.
• Ingrese los detalles necesariospara la selección.
• Si se ingresó un destino, será almacenado como la ubicación actual. Sise ingresó un punto de paso, será agregado a la lista de puntos depaso.
Indicación de destinos y puntos de pasoPresione LIST (Lista) para ver lospuntos de paso y destinosalmacenados (si se ingresaron).
El primer punto de paso que serávisitado se encuentra en la parteinferior de la lista y el destino seencuentra en la parte superior.
Puede ver la ubicación en el mapade cualquier entrada. En el mapa,los detalles de ubicación para la entrada se presentan en la partesuperior de la pantalla.
2006 Navigator (nav)Owners Guide (post-2002-fmt)USA (fus)
Sistemas de audio
107
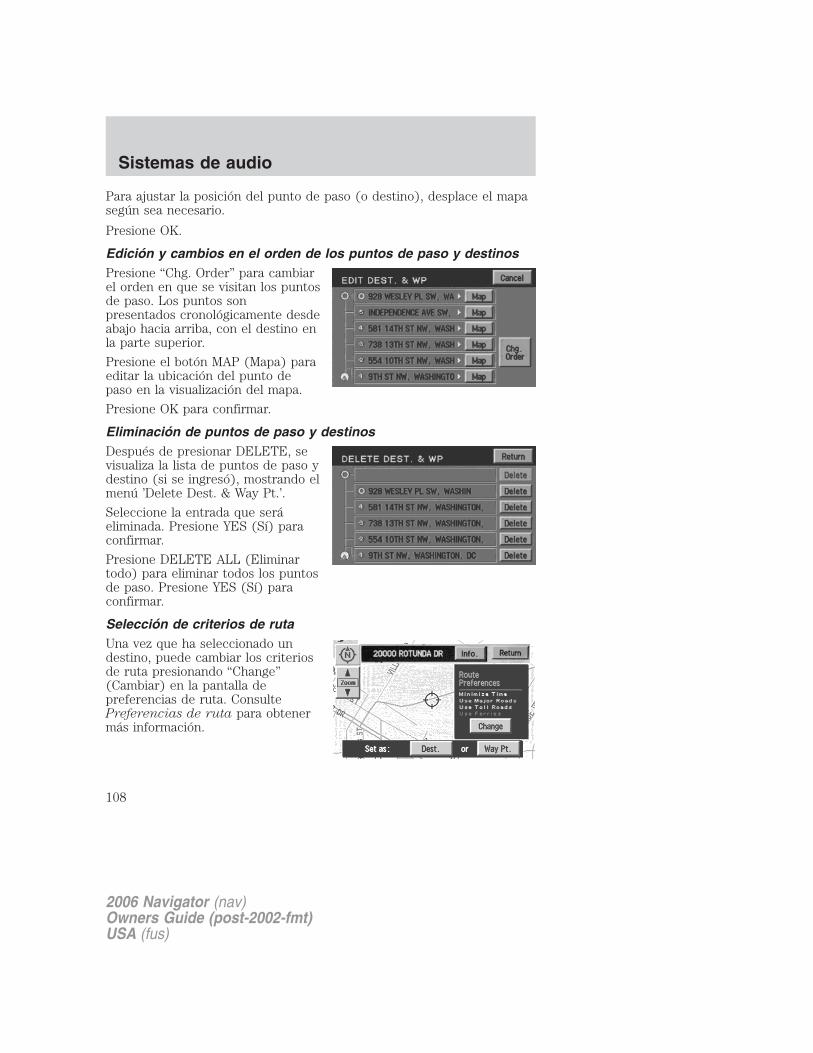
Para ajustar la posición del punto de paso (o destino), desplace el mapasegún sea necesario.
Presione OK.
Edición y cambios en el orden de los puntos de paso y destinosPresione “Chg. Order” para cambiarel orden en que se visitan los puntosde paso. Los puntos sonpresentados cronológicamente desdeabajo hacia arriba, con el destino enla parte superior.
Presione el botón MAP (Mapa) paraeditar la ubicación del punto depaso en la visualización del mapa.
Presione OK para confirmar.
Eliminación de puntos de paso y destinosDespués de presionar DELETE, sevisualiza la lista de puntos de paso ydestino (si se ingresó), mostrando elmenú ’Delete Dest. & Way Pt.’.
Seleccione la entrada que seráeliminada. Presione YES (Sí) paraconfirmar.
Presione DELETE ALL (Eliminartodo) para eliminar todos los puntosde paso. Presione YES (Sí) paraconfirmar.
Selección de criterios de rutaUna vez que ha seleccionado undestino, puede cambiar los criteriosde ruta presionando “Change”(Cambiar) en la pantalla depreferencias de ruta. ConsultePreferencias de ruta para obtenermás información.
2006 Navigator (nav)Owners Guide (post-2002-fmt)USA (fus)
Sistemas de audio
108

Cálculo de rutaUna vez que se seleccionan loscriterios de ruta, el sistema denavegación calcula automáticamenteuna ruta al destino seleccionado. Laruta aparece en la visualización yuna voz da las instrucciones.
El sistema puede calcular hastacuatro rutas para el destino deseadoPresione “Next” (Siguiente) paradesplazarse a través de las diversasrutas planeadas. Presione “Start”(Inicio) para confirmar la selección de la ruta y comenzar la guía de ruta.
Siguiente rutaSu sistema de navegación puedemostrar más de una ruta para elmismo destino. Una vez calculado eldestino, aparecerá en la pantalla demapa. Presione NEXT (Siguiente)en el lado superior derecho de lapantalla para desplazarse por otrasposibles rutas al mismo destino.
2006 Navigator (nav)Owners Guide (post-2002-fmt)USA (fus)
Sistemas de audio
109
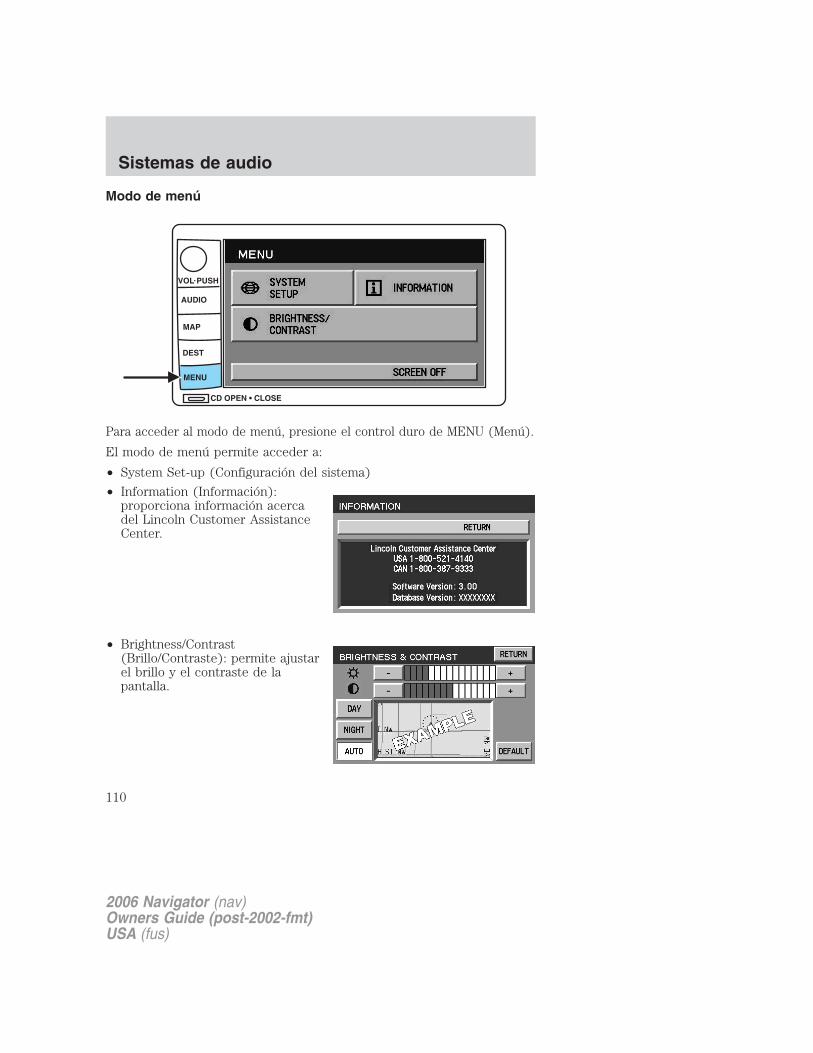
Modo de menú
Para acceder al modo de menú, presione el control duro de MENU (Menú).
El modo de menú permite acceder a:
• System Set-up (Configuración del sistema)
• Information (Información):proporciona información acercadel Lincoln Customer AssistanceCenter.
• Brightness/Contrast(Brillo/Contraste): permite ajustarel brillo y el contraste de lapantalla.
2006 Navigator (nav)Owners Guide (post-2002-fmt)USA (fus)
Sistemas de audio
110

• Screen off (Apagar pantalla):permite apagar la pantalla denavegación.
Configuración del sistemaEl menú de configuración del sistema contiene las siguientesconfiguraciones del usuario:
• Audible Feedback (Informaciónaudible): presione para activar loscomandos audibles de navegaciónpor voz. Presione nuevamentepara desactivar.
• Navigation Units (Unidades denavegación): presione paraalternar entre unidades métricaso inglesas.
• Language (Idioma): presione paraalternar entre inglés, francés o español.
Interacción con el DVD (si está instalado)Su vehículo puede tener instalado un reproductor de DVD. El sistema denavegación Lincoln (LNS) interactuará con el reproductor de DVD,proporcionando acceso y mensajes acerca del estado del sistema.
• Presione AUDIO.
• Presione DVD para ingresar a lapantalla de DVD.
Puede seleccionar entre distintos capítulos, retroceder o avanzarrápidamente en el mismo capítulo, detener, reproducir, o poner en pausa
2006 Navigator (nav)Owners Guide (post-2002-fmt)USA (fus)
Sistemas de audio
111
el DVD. También puede seleccionar el modo DVD AUX (el cual podríapermitirle hacer conexiones para jugar) para activar/desactivar losaudífonos o activar/desactivar los controles de los asientos traseros. Paraobtener más información, consulte Controles de audio del asientotrasero (si están instalados) y Sistema de DVD de entretenimientofamiliar (si está instalado) presentado anteriormente en este capítulo.
Información general
Información de seguridadLea y siga todas las precauciones de seguridad estipuladas. Deotro modo, puede aumentar el riesgo de colisión y sufrir lesiones.Ford Motor Company no se hará responsable de daños de ningúntipo que surjan por no cumplir con estas pautas.
No intente modificar o reparar el sistema ni darle servicio. Consulte a sudistribuidor Ford o Lincoln Mercury.
El conductor no debe intentar operar ninguna función detalladadel sistema de navegación mientras el vehículo esté en
movimiento. Ponga toda su atención en el manejo y en la carretera.Salga del camino y estacione en un lugar seguro antes de realizar lasoperaciones detalladas.
Si el sistema se usa por un período prolongado de tiempo con elvehículo detenido, asegúrese de que el motor esté funcionandopara evitar que la batería se drene.
No ejerza presión sobre la pantalla de visualización.El sistema de navegación no es un sustituto de su propio criterio.Las sugerencias de ruta no deben sustituir la reglamentación de tránsitolocal ni las prácticas de manejo segura.No siga las sugerencias de ruta si éstas le indican que realice unamaniobra insegura o ilegal que lo pondrían en una situación arriesgada oque lo encaminarían a un área que considere peligrosa.
Los conductores no deben confiar en las visualizaciones de pantallamientras el vehículo está en movimiento. Deje que la voz lo guíe. Si esnecesario ver la pantalla, salga del camino y estacione en un lugarseguro.
No utilice el sistema de navegación para ubicar servicios de emergencia.
Por motivos de seguridad en el camino, el conductor debe programar elsistema sólo cuando el vehículo esté detenido. Por lo tanto, ciertasfunciones no operan mientras el vehículo está en movimiento.
2006 Navigator (nav)Owners Guide (post-2002-fmt)USA (fus)
Sistemas de audio
112

La base de datos del mapa del DVD no refleja los desvíos, cierres oconstrucción de caminos, ni las características del camino comosuperficie irregular, colinas o pendientes, restricciones de peso o altura,congestión de tráfico, clima o condiciones similares.Para usar el sistema de la forma más segura y eficaz posible, obtenga losDVD con mapas y bases de datos actualizados cada vez que salgan almercado.Ajuste el nivel del volumen de tal forma que pueda escuchar claramentelas instrucciones.
No desarme ni modifique el sistema, ya que puede causar daños y anularla garantía. Si ocurre algún problema, deje de usar inmediatamente elsistema y comuníquese con su distribuidor Ford o Lincoln.
En cumplimiento con la Comisión federal de comunicaciones deEstados Unidos (Federal Communication Commission, FCC)Los cambios o modificaciones no aprobados por Ford Lincoln Mercurypueden anular la autorización del usuario para hacer funcionar el equipo.Este equipo ha sido probado y se considera que cumple con los límitespara dispositivos digitales Clase B, de acuerdo con la Parte 15 de lasNormas FCC. Estos requisitos están diseñados para proporcionar unaprotección razonable contra las interferencias perjudiciales en unainstalación residencial. Este equipo genera, usa y puede irradiar energíade radiofrecuencia y, si no se instala ni se usa según las instrucciones,puede causar una interferencia perjudicial en las comunicaciones deradio.
Sin embargo, no existe garantía de que no se producirá interferencia enuna instalación específica. Si este equipo causa una interferenciaperjudicial en la recepción de radio o televisión, lo cual se puededeterminar encendiendo y apagando el equipo, se recomienda al usuarioque consulte con su distribuidor o con un técnico experto en radio y TVpara obtener ayuda.
La base de datos refleja la realidad tal como existía antes de querecibiera la base de datos y agrupa datos e información defuentes gubernamentales y otras que pueden contener errores yomisiones. Del mismo modo, la base de datos puede contenerinformación inexacta o incompleta debido al paso del tiempo ycircunstancias que han cambiado y por la naturaleza de lasfuentes utilizadas. La base de datos no incluye o no reflejainformación sobre la seguridad de la localidad, el cumplimientode la ley, la asistencia de emergencia, los trabajos enconstrucción, los cierres de caminos o de carriles, las
2006 Navigator (nav)Owners Guide (post-2002-fmt)USA (fus)
Sistemas de audio
113
restricciones vehiculares o de velocidad, los caminos de colinas ocon pendientes, las restricciones de altura en puentes, peso o deotro tipo, las condiciones de camino o tráfico, los eventosespeciales, la congestión del tráfico o el tiempo dedesplazamiento.
Factores de la recepción de radioExisten ciertos factores que pueden afectar la recepción del radio.
• Distancia y potencia. Mientras mayor es la distancia que recorre laseñal FM, más se debilita. El alcance audible de la estación de FMpromedio es de aproximadamente 40 km. (24 millas). Este rango sepuede ver afectado mediante la “modulación de señales”. Lamodulación de señales es un proceso que usan las estaciones de radiopara aumentar la potencia y el volumen con relación a otrasestaciones.
• Terreno. Los cerros, montañas y edificios altos que se interponenentre la antena del vehículo y la señal de la estación de radio puedenprovocar problemas en la recepción de la estación de FM. En lasestaciones de AM se puede producir estática debido a los cables deenergía, cercos eléctricos, semáforos y tormentas eléctricas. Al alejarsede la estructura que interfiere (fuera de su “sombra”) la recepción senormaliza.
• Sobrecarga de estaciones. A veces, las señales débiles soncapturadas por señales más potentes al pasar por una torre deradiodifusión. Una señal más potente puede superarmomentáneamente a una señal más débil y tocar aun cuando se sigavisualizando la frecuencia de la estación más débil.
Principios de la operación del GPS (Sistema de ubicación global)Su sistema lo dirige según la información que se deriva de los satélitesde posicionamiento global, de los mapas de camino almacenados en elDVD, de los sensores del vehículo y del destino deseado. El sistemareúne toda la información necesaria para guiarlo hacia el destinodeseado. Los satélites espaciales determinan la ubicación actual delvehículo y transmiten las señales de posición y de hora a su automóvil.
Si el vehículo ha estado estacionado por mucho tiempo, puede que lafunción de navegación no responda temporalmente. El sistema denavegación volverá a funcionar de manera confiable una vez que larecepción del GPS esté disponible en unos minutos.
2006 Navigator (nav)Owners Guide (post-2002-fmt)USA (fus)
Sistemas de audio
114
Recepción GPS limitadaEl rendimiento del sistema se puede ver adversamente afectado si seinterrumpe la recepción del GPS o si se produce interferencia en unadistancia de varias millas. Las siguientes son algunas de las posiblescausas de la interrupción de la recepción del GPS. Si el vehículo seencuentra:
• en garajes de estacionamiento de varios pisos
• en túneles o bajo puentes
• dentro o entremedio de edificios
• en el bosque o en avenidas rodeadas por árboles
• bajo lluvias fuertes o tormentas
• en valles y en regiones montañosas
• en caminos bajo precipicios
Asegúrese de que no tiene ningún objeto metálico en la plataforma depaquetes trasera. Si las ventanas están polarizadas, asegúrese de usarpolarizado no metálico en lugar de polarizado de óxido metálico. Estosdos factores pueden interrumpir la recepción del GPS.
Limpieza de la visualizaciónNo rocíe líquido de limpieza directamente sobre la unidad. En su lugar,rocíelo sobre un paño suave y limpie cuidadosamente la unidad. Sólo sedeben usar los productos recomendados.
• Productos recomendados: limpiador a base de alcohol para frotar (porejemplo, alcohol metilo) o un paño limpio y húmedo.
• No dañinos pero no recomendados: limpiador de amoníaco, detergenteneutro.
• Dañino para el sistema y no recomendado: limpiador ácido, limpiadoralcalino, limpiador de benceno.
No limpie ninguna pieza del sistema con benceno, diluyente de pintura ocualquier otro solvente.
No salpique líquidos de ningún tipo sobre la unidad.
2006 Navigator (nav)Owners Guide (post-2002-fmt)USA (fus)
Sistemas de audio
115

Carga del DVD de mapa• La unidad de DVD de navegación está ubicada en el área de bloque
central inferior delantero, cerca de los pies de los pasajeros (puerta deacceso).
• Asegúrese de que el encendido del vehículo esté en la posición ON.
• Si hay un DVD ya cargado en la unidad de navegación, presione elbotón de expulsión.
• Cargue el DVD con la parte impresa hacia arriba. No permita que lahumedad u objetos extraños ingresen a la ranura.
El sistema de navegación utiliza una base de datos almacenada en unformato especial en un DVD. Siempre se recomienda usar la más recienteactualización de este DVD de mapa.
• El sistema de navegación sólo funcionará con los DVD destinadosespecialmente para su sistema de navegación.
• Siempre almacene los DVD de mapa en sus cajas protectoras cuandono los use.
Pedido de DVD de mapa adicionalesSi desea adquirir un mapa de reemplazo o adicional, llame al1–888–NAV-MAPS (1–888–628–6277) o conéctese a www.navtech.com.
DVD de mapa más recientesEl contenido del mapa está cambiando constantemente debido a nuevoscaminos, restricciones de tráfico, etc. Por ello, no es siempre posiblehacer coincidir exactamente el mapa del DVD con los caminos actuales.Para obtener mejores resultados, use siempre la versión más reciente delDVD de mapa. La información de mapas es actualizada regularmente,pero no todas las áreas son cubiertas necesariamente con el mismo nivelde detalle. Algunas áreas, en particular los caminos privados, pueden noestar incluidos en la base de datos. Para ayudar a la precisión, siempreuse la última versión del DVD para la navegación.
Servicio al clienteSi necesita ayuda para operar su sistema de navegación y audio, deseainformar sobre un error en la base de datos de un mapa o desea obtenerun DVD de mapa, llame al 1 (888) 628–6277 (NAV-MAPS) o conéctese awww.navtech.com.
2006 Navigator (nav)Owners Guide (post-2002-fmt)USA (fus)
Sistemas de audio
116
SISTEMA DE CONTROL DOBLE DE TEMPERATURA AUTOMÁTICO(DATC) (SI ESTÁ INSTALADO)
1. A/C (A/A): usa el aire exteriorpara enfriar el vehículo. Presiónelopara encender y apagar en todos losmodos, excepto o .
2. Control de recirculación: seusa para activar o desactivar enforma manual la operación de airerecirculado en todos los modos, salvo (desempañador). Enfría elvehículo más rápidamente haciendo recircular el aire de la cabina, enlugar de usar aire exterior, y ayuda a evitar que penetren olores y gasesexternos desagradables al vehículo. En funcionamiento automático, elaire recirculado funciona en forma automática al ritmo necesario paralograr la temperatura seleccionada.
3. Control de temperatura dellado del pasajero: controla latemperatura en el lado del pasajerodel vehículo cuando está en mododoble zona. Para ingresar a la zona doble, presione el control detemperatura del pasajero o DUAL. La temperatura del pasajero apareceráen la visualización.
4. Control de desempañadortrasero: quita el hielo y la niebla dela ventana trasera. Presione paraencendido y apagado.
1 213 14
56789101112 4
315 16
AUTO OFF
DUAL
A/C
R
F F
EXT
F C
A/C
R
2006 Navigator (nav)Owners Guide (post-2002-fmt)USA (fus)
Controles de temperatura interior
117
5. DUAL (DOBLE) (Control detemperatura eléctrica simple ydoble): permite que el conductortenga el control total de los ajustes de la temperatura de la cabina (unazona) o permite que el pasajero tenga el control de sus ajustes detemperatura individuales (control de zona doble). Presione para activarel modo de zona doble; presione otra vez para volver a zona simple.
6. : Distribuye el aire exterior a través de los orificios de ventilacióndel desempañador del parabrisas.
7. : distribuye el aire exterior a través de los respiraderos deldesempañador del parabrisas y del piso.
8. : Distribuye el aire exterior a través de los respiraderos del piso.
9. : Distribuye el aire exterior a través de los respiraderos deltablero de instrumentos y del piso.
10. : Distribuye el aire exterior a través de los respiraderos deltablero de instrumentos.
11. OFF (Apagado): la entrada deaire exterior se bloquea y elventilador no funciona.
12. AUTO (Automático): presioneAUTO y luego seleccione latemperatura deseada. El sistemadeterminará automáticamente la velocidad del ventilador, la ubicación delflujo de aire y si se usa aire exterior o recirculado para calefaccionar oenfriar el vehículo a la temperatura seleccionada.
13. Control de temperatura dellado del conductor: controla latemperatura del conductor y delpasajero. Controla sólo el lado delconductor del vehículo si se acciona en modo DUAL (DOBLE).
14. Velocidad del ventilador: seusa para activar o desactivar enforma manual la velocidad delventilador.
15. EXT: muestra la temperaturaambiente del exterior. Se mantieneen pantalla hasta que se vuelva a
DUAL
OFF
AUTO
2006 Navigator (nav)Owners Guide (post-2002-fmt)USA (fus)
Controles de temperatura interior
118
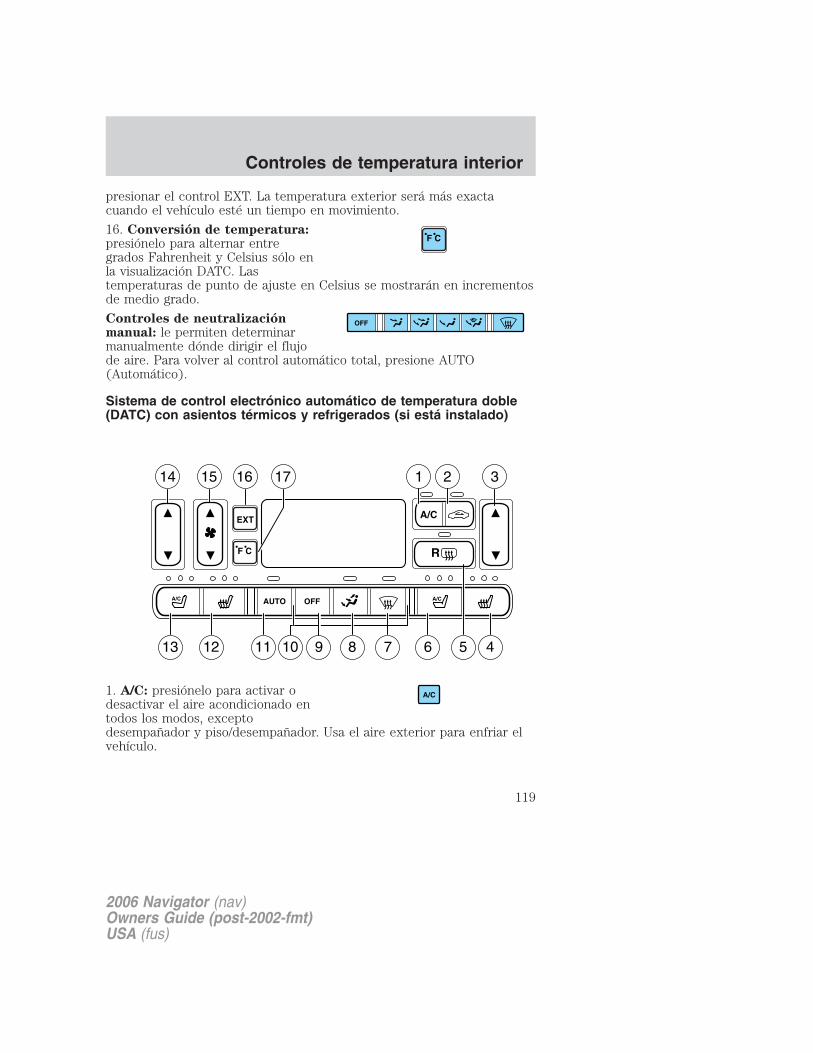
presionar el control EXT. La temperatura exterior será más exactacuando el vehículo esté un tiempo en movimiento.
16. Conversión de temperatura:presiónelo para alternar entregrados Fahrenheit y Celsius sólo enla visualización DATC. Lastemperaturas de punto de ajuste en Celsius se mostrarán en incrementosde medio grado.
Controles de neutralizaciónmanual: le permiten determinarmanualmente dónde dirigir el flujode aire. Para volver al control automático total, presione AUTO(Automático).
Sistema de control electrónico automático de temperatura doble(DATC) con asientos térmicos y refrigerados (si está instalado)
1. A/C: presiónelo para activar odesactivar el aire acondicionado entodos los modos, exceptodesempañador y piso/desempañador. Usa el aire exterior para enfriar elvehículo.
OFF
AUTO OFF
A/C
14 15 16 17 2 31
11 9 8 7 6 5 413 12
R
10
A/C A/C
EXT
F C
A/C
2006 Navigator (nav)Owners Guide (post-2002-fmt)USA (fus)
Controles de temperatura interior
119
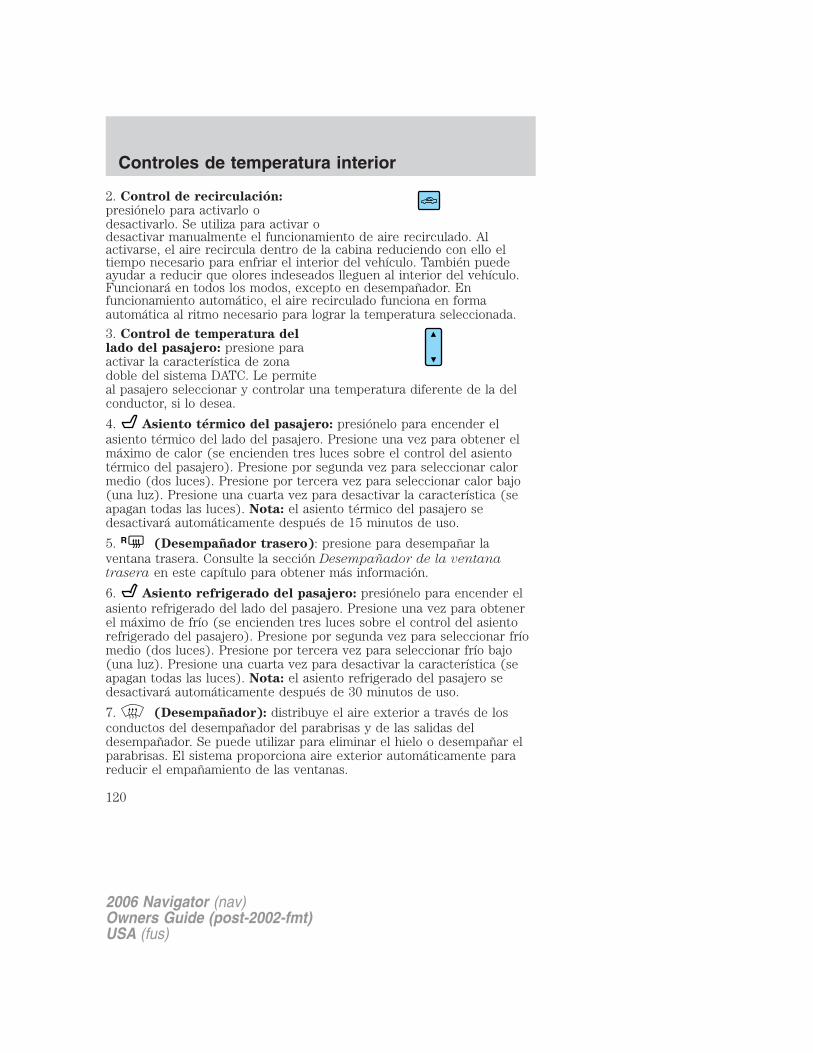
2. Control de recirculación:presiónelo para activarlo odesactivarlo. Se utiliza para activar odesactivar manualmente el funcionamiento de aire recirculado. Alactivarse, el aire recircula dentro de la cabina reduciendo con ello eltiempo necesario para enfriar el interior del vehículo. También puedeayudar a reducir que olores indeseados lleguen al interior del vehículo.Funcionará en todos los modos, excepto en desempañador. Enfuncionamiento automático, el aire recirculado funciona en formaautomática al ritmo necesario para lograr la temperatura seleccionada.
3. Control de temperatura dellado del pasajero: presione paraactivar la característica de zonadoble del sistema DATC. Le permiteal pasajero seleccionar y controlar una temperatura diferente de la delconductor, si lo desea.
4. Asiento térmico del pasajero: presiónelo para encender elasiento térmico del lado del pasajero. Presione una vez para obtener elmáximo de calor (se encienden tres luces sobre el control del asientotérmico del pasajero). Presione por segunda vez para seleccionar calormedio (dos luces). Presione por tercera vez para seleccionar calor bajo(una luz). Presione una cuarta vez para desactivar la característica (seapagan todas las luces). Nota: el asiento térmico del pasajero sedesactivará automáticamente después de 15 minutos de uso.
5. R (Desempañador trasero): presione para desempañar laventana trasera. Consulte la sección Desempañador de la ventanatrasera en este capítulo para obtener más información.
6. Asiento refrigerado del pasajero: presiónelo para encender elasiento refrigerado del lado del pasajero. Presione una vez para obtenerel máximo de frío (se encienden tres luces sobre el control del asientorefrigerado del pasajero). Presione por segunda vez para seleccionar fríomedio (dos luces). Presione por tercera vez para seleccionar frío bajo(una luz). Presione una cuarta vez para desactivar la característica (seapagan todas las luces). Nota: el asiento refrigerado del pasajero sedesactivará automáticamente después de 30 minutos de uso.
7. (Desempañador): distribuye el aire exterior a través de losconductos del desempañador del parabrisas y de las salidas deldesempañador. Se puede utilizar para eliminar el hielo o desempañar elparabrisas. El sistema proporciona aire exterior automáticamente parareducir el empañamiento de las ventanas.
2006 Navigator (nav)Owners Guide (post-2002-fmt)USA (fus)
Controles de temperatura interior
120
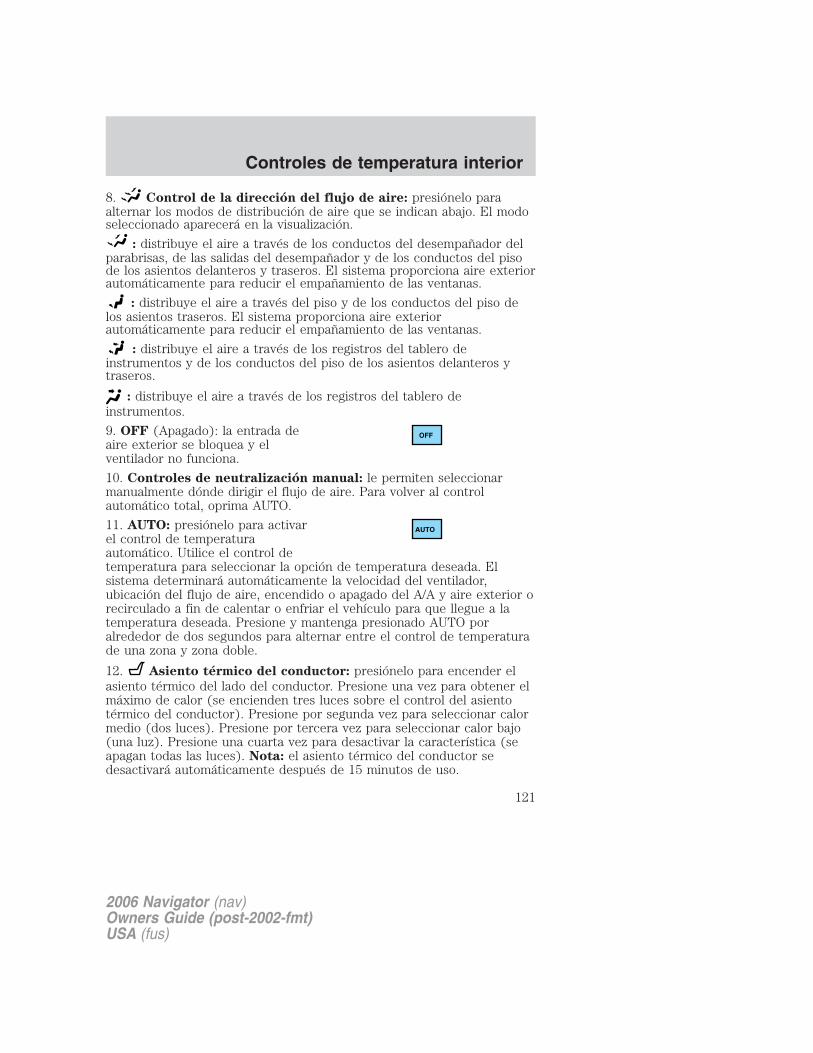
8. Control de la dirección del flujo de aire: presiónelo paraalternar los modos de distribución de aire que se indican abajo. El modoseleccionado aparecerá en la visualización.
: distribuye el aire a través de los conductos del desempañador delparabrisas, de las salidas del desempañador y de los conductos del pisode los asientos delanteros y traseros. El sistema proporciona aire exteriorautomáticamente para reducir el empañamiento de las ventanas.
: distribuye el aire a través del piso y de los conductos del piso delos asientos traseros. El sistema proporciona aire exteriorautomáticamente para reducir el empañamiento de las ventanas.
: distribuye el aire a través de los registros del tablero deinstrumentos y de los conductos del piso de los asientos delanteros ytraseros.
: distribuye el aire a través de los registros del tablero deinstrumentos.
9. OFF (Apagado): la entrada deaire exterior se bloquea y elventilador no funciona.
10. Controles de neutralización manual: le permiten seleccionarmanualmente dónde dirigir el flujo de aire. Para volver al controlautomático total, oprima AUTO.
11. AUTO: presiónelo para activarel control de temperaturaautomático. Utilice el control detemperatura para seleccionar la opción de temperatura deseada. Elsistema determinará automáticamente la velocidad del ventilador,ubicación del flujo de aire, encendido o apagado del A/A y aire exterior orecirculado a fin de calentar o enfriar el vehículo para que llegue a latemperatura deseada. Presione y mantenga presionado AUTO poralrededor de dos segundos para alternar entre el control de temperaturade una zona y zona doble.
12. Asiento térmico del conductor: presiónelo para encender elasiento térmico del lado del conductor. Presione una vez para obtener elmáximo de calor (se encienden tres luces sobre el control del asientotérmico del conductor). Presione por segunda vez para seleccionar calormedio (dos luces). Presione por tercera vez para seleccionar calor bajo(una luz). Presione una cuarta vez para desactivar la característica (seapagan todas las luces). Nota: el asiento térmico del conductor sedesactivará automáticamente después de 15 minutos de uso.
OFF
AUTO
2006 Navigator (nav)Owners Guide (post-2002-fmt)USA (fus)
Controles de temperatura interior
121
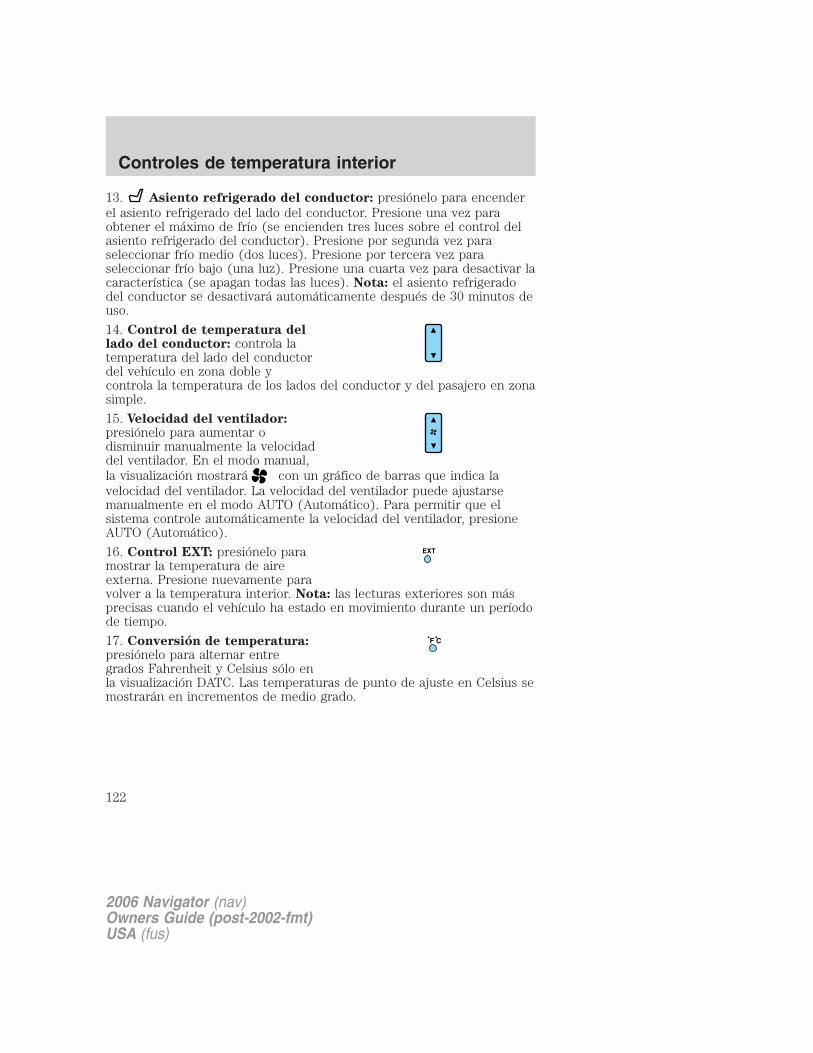
13. Asiento refrigerado del conductor: presiónelo para encenderel asiento refrigerado del lado del conductor. Presione una vez paraobtener el máximo de frío (se encienden tres luces sobre el control delasiento refrigerado del conductor). Presione por segunda vez paraseleccionar frío medio (dos luces). Presione por tercera vez paraseleccionar frío bajo (una luz). Presione una cuarta vez para desactivar lacaracterística (se apagan todas las luces). Nota: el asiento refrigeradodel conductor se desactivará automáticamente después de 30 minutos deuso.
14. Control de temperatura dellado del conductor: controla latemperatura del lado del conductordel vehículo en zona doble ycontrola la temperatura de los lados del conductor y del pasajero en zonasimple.
15. Velocidad del ventilador:presiónelo para aumentar odisminuir manualmente la velocidaddel ventilador. En el modo manual,la visualización mostrará con un gráfico de barras que indica lavelocidad del ventilador. La velocidad del ventilador puede ajustarsemanualmente en el modo AUTO (Automático). Para permitir que elsistema controle automáticamente la velocidad del ventilador, presioneAUTO (Automático).
16. Control EXT: presiónelo paramostrar la temperatura de aireexterna. Presione nuevamente paravolver a la temperatura interior. Nota: las lecturas exteriores son másprecisas cuando el vehículo ha estado en movimiento durante un períodode tiempo.
17. Conversión de temperatura:presiónelo para alternar entregrados Fahrenheit y Celsius sólo enla visualización DATC. Las temperaturas de punto de ajuste en Celsius semostrarán en incrementos de medio grado.
EXT
F C
2006 Navigator (nav)Owners Guide (post-2002-fmt)USA (fus)
Controles de temperatura interior
122
Consejos de funcionamiento
• Para reducir la niebla del parabrisas en un clima húmedo, ponga elselector de flujo de aire en la posición .
• Para reducir la humedad acumulada en el interior del vehículo: nomaneje con el selector de flujo de aire en la posición O (OFF) o (contiempo frío) en la posición MAX A/C.
• En condiciones climáticas normales, no deje el selector de flujo de aireen la posición MAX A/C u O (OFF) cuando el vehículo estéestacionado. Esto permite que el vehículo “respire” usando lasentradas de admisión de aire exterior.
• No coloque objetos bajo los asientos delanteros, ya que interferiráncon el flujo de aire hacia los asientos traseros.
• Retire toda la nieve, hielo u hojas del área de admisión de aire en laparte inferior del parabrisas.
Para ayudar a desempañar la ventana lateral en condiciones de climafrío:
1. Seleccione .
2. Seleccione A/C (A/A).
3. Ajuste el control de temperatura para mantener el confort.
4. Ajuste la velocidad del ventilador al máximo.
5. Dirija los respiraderos exteriores del tablero de instrumentos hacia lasventanas laterales.
Para aumentar el flujo de aire a los respiraderos exteriores del tablero deinstrumentos, cierre los respiraderos ubicados en el centro del tablero.
No coloque objetos encima del tablero de instrumentos, ya quese pueden transformar en proyectiles en un choque o una parada
repentina.
2006 Navigator (nav)Owners Guide (post-2002-fmt)USA (fus)
Controles de temperatura interior
123
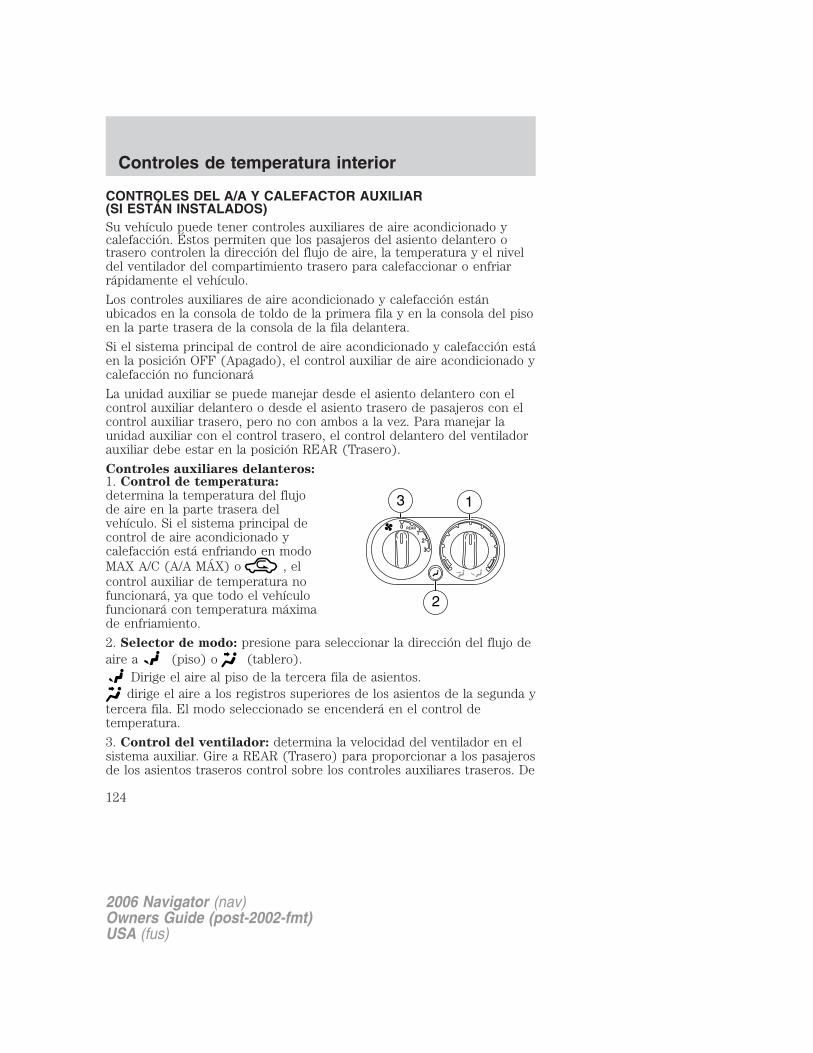
CONTROLES DEL A/A Y CALEFACTOR AUXILIAR(SI ESTÁN INSTALADOS)Su vehículo puede tener controles auxiliares de aire acondicionado ycalefacción. Éstos permiten que los pasajeros del asiento delantero otrasero controlen la dirección del flujo de aire, la temperatura y el niveldel ventilador del compartimiento trasero para calefaccionar o enfriarrápidamente el vehículo.
Los controles auxiliares de aire acondicionado y calefacción estánubicados en la consola de toldo de la primera fila y en la consola del pisoen la parte trasera de la consola de la fila delantera.
Si el sistema principal de control de aire acondicionado y calefacción estáen la posición OFF (Apagado), el control auxiliar de aire acondicionado ycalefacción no funcionará
La unidad auxiliar se puede manejar desde el asiento delantero con elcontrol auxiliar delantero o desde el asiento trasero de pasajeros con elcontrol auxiliar trasero, pero no con ambos a la vez. Para manejar launidad auxiliar con el control trasero, el control delantero del ventiladorauxiliar debe estar en la posición REAR (Trasero).
Controles auxiliares delanteros:1. Control de temperatura:determina la temperatura del flujode aire en la parte trasera delvehículo. Si el sistema principal decontrol de aire acondicionado ycalefacción está enfriando en modoMAX A/C (A/A MÁX) o , elcontrol auxiliar de temperatura nofuncionará, ya que todo el vehículofuncionará con temperatura máximade enfriamiento.
2. Selector de modo: presione para seleccionar la dirección del flujo deaire a (piso) o (tablero).
Dirige el aire al piso de la tercera fila de asientos.dirige el aire a los registros superiores de los asientos de la segunda y
tercera fila. El modo seleccionado se encenderá en el control detemperatura.
3. Control del ventilador: determina la velocidad del ventilador en elsistema auxiliar. Gire a REAR (Trasero) para proporcionar a los pasajerosde los asientos traseros control sobre los controles auxiliares traseros. De
2006 Navigator (nav)Owners Guide (post-2002-fmt)USA (fus)
Controles de temperatura interior
124
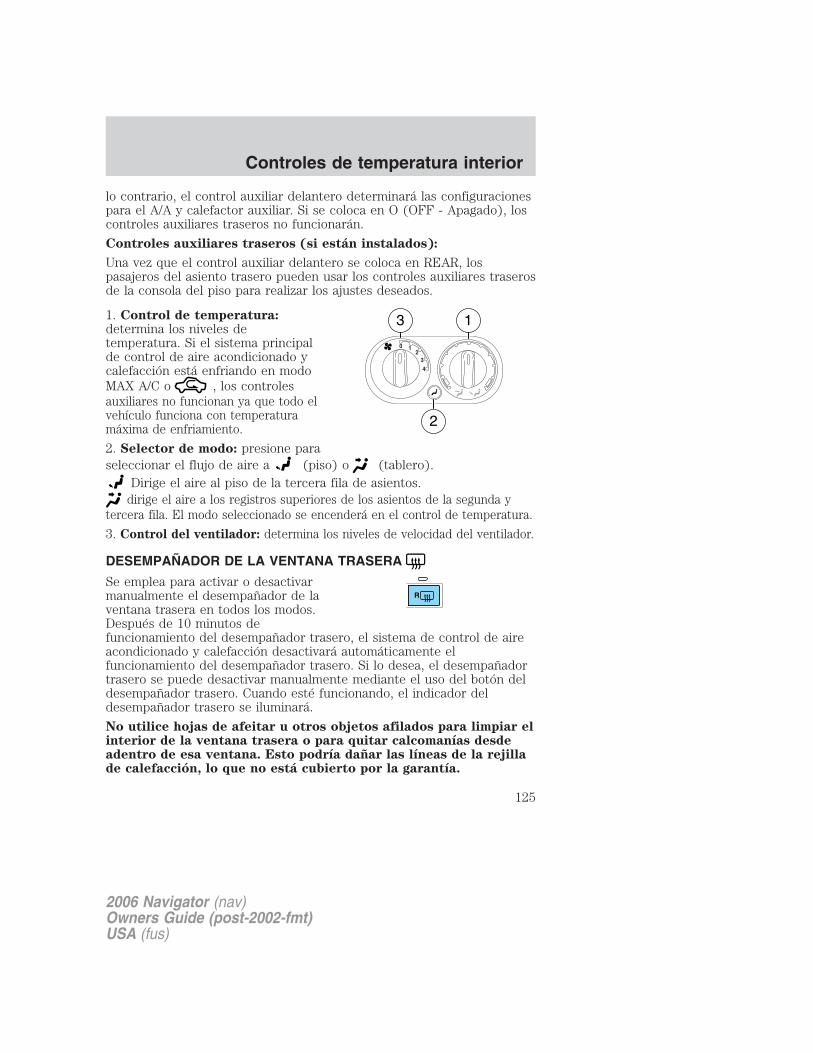
lo contrario, el control auxiliar delantero determinará las configuracionespara el A/A y calefactor auxiliar. Si se coloca en O (OFF - Apagado), loscontroles auxiliares traseros no funcionarán.
Controles auxiliares traseros (si están instalados):
Una vez que el control auxiliar delantero se coloca en REAR, lospasajeros del asiento trasero pueden usar los controles auxiliares traserosde la consola del piso para realizar los ajustes deseados.
1. Control de temperatura:determina los niveles detemperatura. Si el sistema principalde control de aire acondicionado ycalefacción está enfriando en modoMAX A/C o , los controlesauxiliares no funcionan ya que todo elvehículo funciona con temperaturamáxima de enfriamiento.
2. Selector de modo: presione paraseleccionar el flujo de aire a (piso) o (tablero).
Dirige el aire al piso de la tercera fila de asientos.dirige el aire a los registros superiores de los asientos de la segunda y
tercera fila. El modo seleccionado se encenderá en el control de temperatura.
3. Control del ventilador: determina los niveles de velocidad del ventilador.
DESEMPAÑADOR DE LA VENTANA TRASERA
Se emplea para activar o desactivarmanualmente el desempañador de laventana trasera en todos los modos.Después de 10 minutos defuncionamiento del desempañador trasero, el sistema de control de aireacondicionado y calefacción desactivará automáticamente elfuncionamiento del desempañador trasero. Si lo desea, el desempañadortrasero se puede desactivar manualmente mediante el uso del botón deldesempañador trasero. Cuando esté funcionando, el indicador deldesempañador trasero se iluminará.
No utilice hojas de afeitar u otros objetos afilados para limpiar elinterior de la ventana trasera o para quitar calcomanías desdeadentro de esa ventana. Esto podría dañar las líneas de la rejillade calefacción, lo que no está cubierto por la garantía.
4
32
10
3 1
2
R
2006 Navigator (nav)Owners Guide (post-2002-fmt)USA (fus)
Controles de temperatura interior
125

CONTROL DE FAROS DELANTEROS
Gire el control de faros delanteroshasta la primera posición paraencender las luces deestacionamiento. Gire hasta lasegunda posición paraencender los faros delanteros.
Control de encendido automático de luces
El sistema de encendido automáticode luces proporciona un controlsensible a la luz de encendido yapagado automático de las lucesexteriores normalmente controladaspor el control de faros delanteros.
El sistema de encendido automáticode luces también mantiene las lucesencendidas duranteaproximadamente 20 segundos o envehículos equipados con centro de mensajes, usted puede seleccionar unretardo de 0 a 180 segundos, luego de apagar el interruptor deencendido.
• Para activar el encendido automático de luces, gire el control hacia laizquierda.
• Para desactivar el encendido automático de luces, gire el control haciala derecha hasta OFF (Apagado).
A
A
2006 Navigator (nav)Owners Guide (post-2002-fmt)USA (fus)
Sistema de luces
126
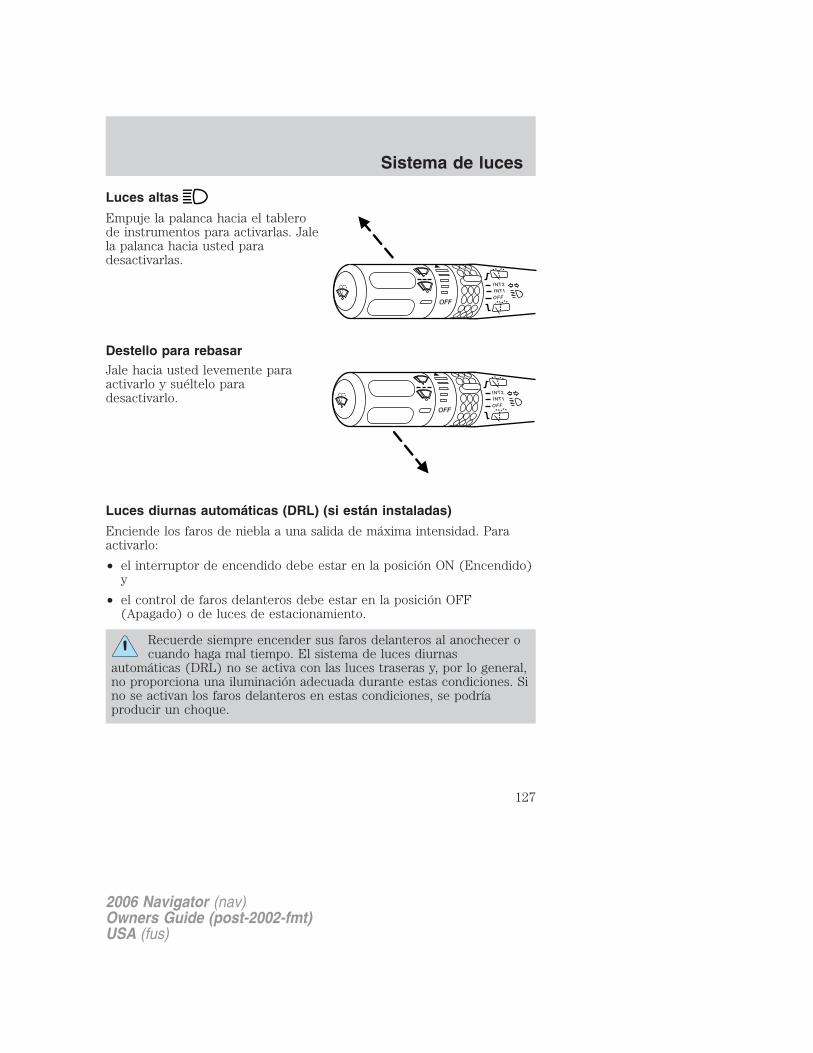
Luces altas
Empuje la palanca hacia el tablerode instrumentos para activarlas. Jalela palanca hacia usted paradesactivarlas.
Destello para rebasarJale hacia usted levemente paraactivarlo y suéltelo paradesactivarlo.
Luces diurnas automáticas (DRL) (si están instaladas)
Enciende los faros de niebla a una salida de máxima intensidad. Paraactivarlo:
• el interruptor de encendido debe estar en la posición ON (Encendido)y
• el control de faros delanteros debe estar en la posición OFF(Apagado) o de luces de estacionamiento.
Recuerde siempre encender sus faros delanteros al anochecer ocuando haga mal tiempo. El sistema de luces diurnas
automáticas (DRL) no se activa con las luces traseras y, por lo general,no proporciona una iluminación adecuada durante estas condiciones. Sino se activan los faros delanteros en estas condiciones, se podríaproducir un choque.
INT2
OFFOFF
INT1
INT2
OFFOFF
INT1
2006 Navigator (nav)Owners Guide (post-2002-fmt)USA (fus)
Sistema de luces
127

Control de los faros de niebla
El control de faros de nieblatambién activa los faros de niebla.Éstos sólo se pueden encendercuando el control de faros de niebladelanteros está en lasposiciones , o y lasluces altas están apagadas.
Para encender los faros de nieblajale hacia usted el control de farosdelanteros. La luz indicadora de losfaros de niebla se enciende.
CONTROL DEL ATENUADOR DE LUZ DEL TABLEROSe usa para ajustar la brillantez deltablero de instrumentos y de todoslos interruptores correspondientesen el vehículo durante elfuncionamiento de los farosdelanteros y de la luz deestacionamiento.
Mueva el control completamentehacia arriba, más allá del retén, paraencender las luces interiores.
Mueva el control completamentehacia abajo, más allá del tope, para evitar que las luces interiores seenciendan cuando las puertas estén abiertas.
Al amanecer y anochecer, los diodos emisores de luz brindan iluminaciónque es seis veces su intensidad normal para aumentar el contraste y lavisibilidad. El sistema automáticamente “atenúa el brillo” a medida que laluz ambiente alcanza al sensor instalado en el tablero.
Las luces de control interiores se atenúan progresivamente en cuatropasos hasta que alcanzan los niveles de operación nocturna. En todos losniveles de iluminación, las luces de pueden atenuar mediante un controlde accionamiento con el pulgar en el tablero de instrumentos.
2006 Navigator (nav)Owners Guide (post-2002-fmt)USA (fus)
Sistema de luces
128
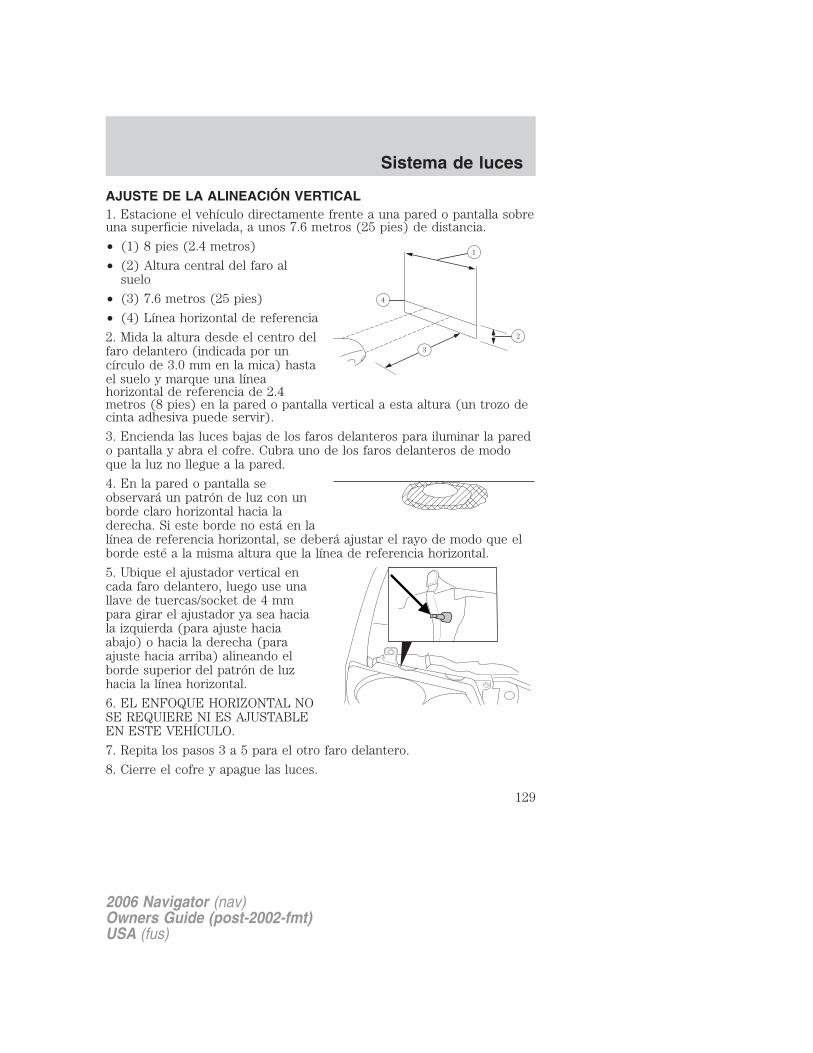
AJUSTE DE LA ALINEACIÓN VERTICAL1. Estacione el vehículo directamente frente a una pared o pantalla sobreuna superficie nivelada, a unos 7.6 metros (25 pies) de distancia.
• (1) 8 pies (2.4 metros)
• (2) Altura central del faro alsuelo
• (3) 7.6 metros (25 pies)
• (4) Línea horizontal de referencia
2. Mida la altura desde el centro delfaro delantero (indicada por uncírculo de 3.0 mm en la mica) hastael suelo y marque una líneahorizontal de referencia de 2.4metros (8 pies) en la pared o pantalla vertical a esta altura (un trozo decinta adhesiva puede servir).
3. Encienda las luces bajas de los faros delanteros para iluminar la paredo pantalla y abra el cofre. Cubra uno de los faros delanteros de modoque la luz no llegue a la pared.
4. En la pared o pantalla seobservará un patrón de luz con unborde claro horizontal hacia laderecha. Si este borde no está en lalínea de referencia horizontal, se deberá ajustar el rayo de modo que elborde esté a la misma altura que la línea de referencia horizontal.
5. Ubique el ajustador vertical encada faro delantero, luego use unallave de tuercas/socket de 4 mmpara girar el ajustador ya sea haciala izquierda (para ajuste haciaabajo) o hacia la derecha (paraajuste hacia arriba) alineando elborde superior del patrón de luzhacia la línea horizontal.
6. EL ENFOQUE HORIZONTAL NOSE REQUIERE NI ES AJUSTABLEEN ESTE VEHÍCULO.
7. Repita los pasos 3 a 5 para el otro faro delantero.
8. Cierre el cofre y apague las luces.
2006 Navigator (nav)Owners Guide (post-2002-fmt)USA (fus)
Sistema de luces
129
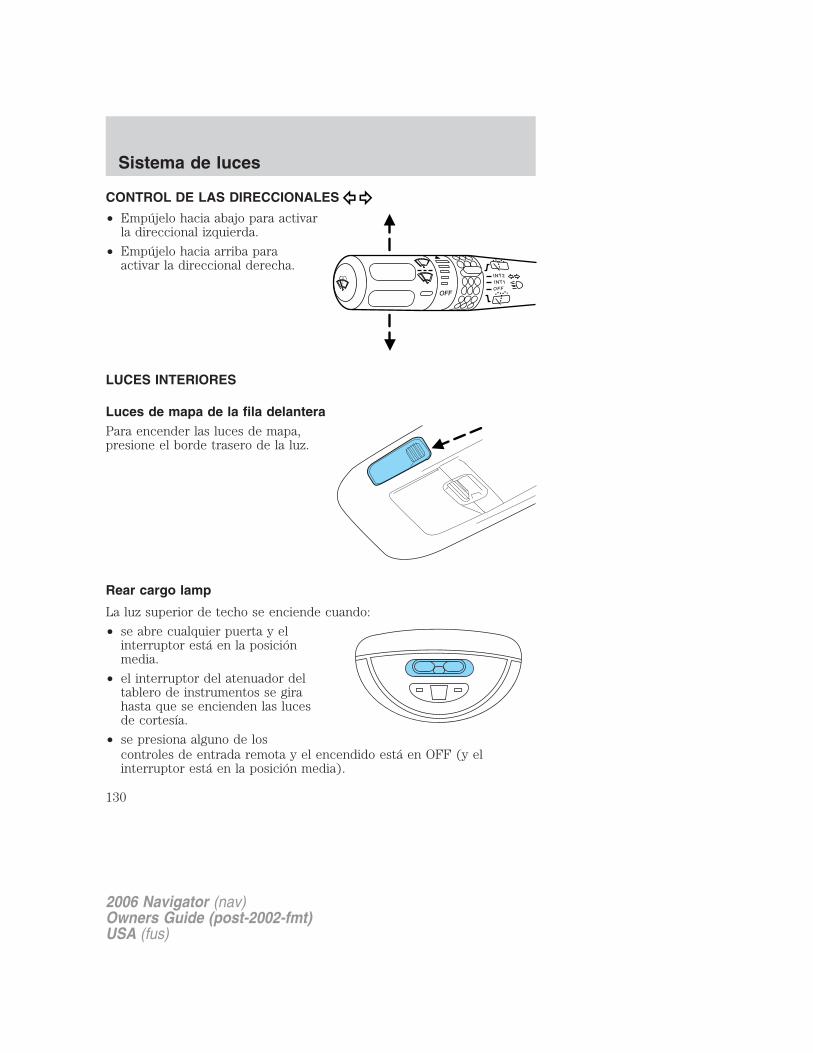
CONTROL DE LAS DIRECCIONALES
• Empújelo hacia abajo para activarla direccional izquierda.
• Empújelo hacia arriba paraactivar la direccional derecha.
LUCES INTERIORES
Luces de mapa de la fila delanteraPara encender las luces de mapa,presione el borde trasero de la luz.
Rear cargo lamp
La luz superior de techo se enciende cuando:
• se abre cualquier puerta y elinterruptor está en la posiciónmedia.
• el interruptor del atenuador deltablero de instrumentos se girahasta que se encienden las lucesde cortesía.
• se presiona alguno de loscontroles de entrada remota y el encendido está en OFF (y elinterruptor está en la posición media).
INT2
OFFOFF
INT1
2006 Navigator (nav)Owners Guide (post-2002-fmt)USA (fus)
Sistema de luces
130
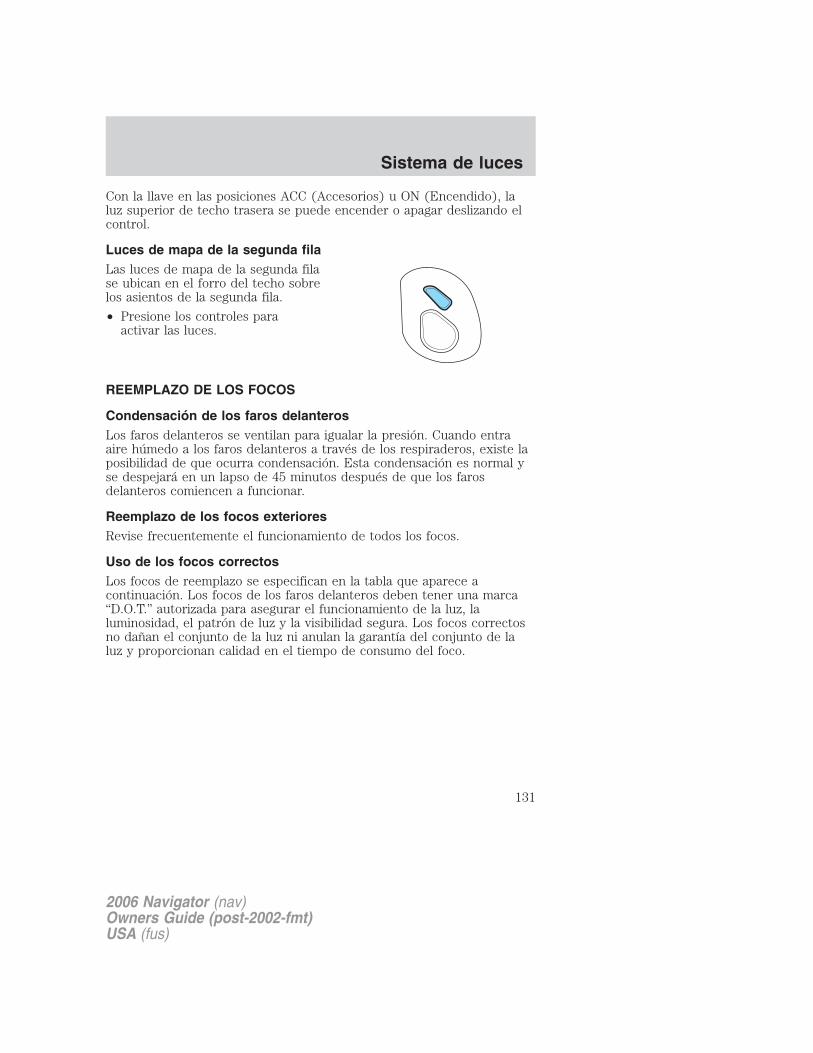
Con la llave en las posiciones ACC (Accesorios) u ON (Encendido), laluz superior de techo trasera se puede encender o apagar deslizando elcontrol.
Luces de mapa de la segunda filaLas luces de mapa de la segunda filase ubican en el forro del techo sobrelos asientos de la segunda fila.
• Presione los controles paraactivar las luces.
REEMPLAZO DE LOS FOCOS
Condensación de los faros delanterosLos faros delanteros se ventilan para igualar la presión. Cuando entraaire húmedo a los faros delanteros a través de los respiraderos, existe laposibilidad de que ocurra condensación. Esta condensación es normal yse despejará en un lapso de 45 minutos después de que los farosdelanteros comiencen a funcionar.
Reemplazo de los focos exterioresRevise frecuentemente el funcionamiento de todos los focos.
Uso de los focos correctosLos focos de reemplazo se especifican en la tabla que aparece acontinuación. Los focos de los faros delanteros deben tener una marca“D.O.T.” autorizada para asegurar el funcionamiento de la luz, laluminosidad, el patrón de luz y la visibilidad segura. Los focos correctosno dañan el conjunto de la luz ni anulan la garantía del conjunto de laluz y proporcionan calidad en el tiempo de consumo del foco.
2006 Navigator (nav)Owners Guide (post-2002-fmt)USA (fus)
Sistema de luces
131
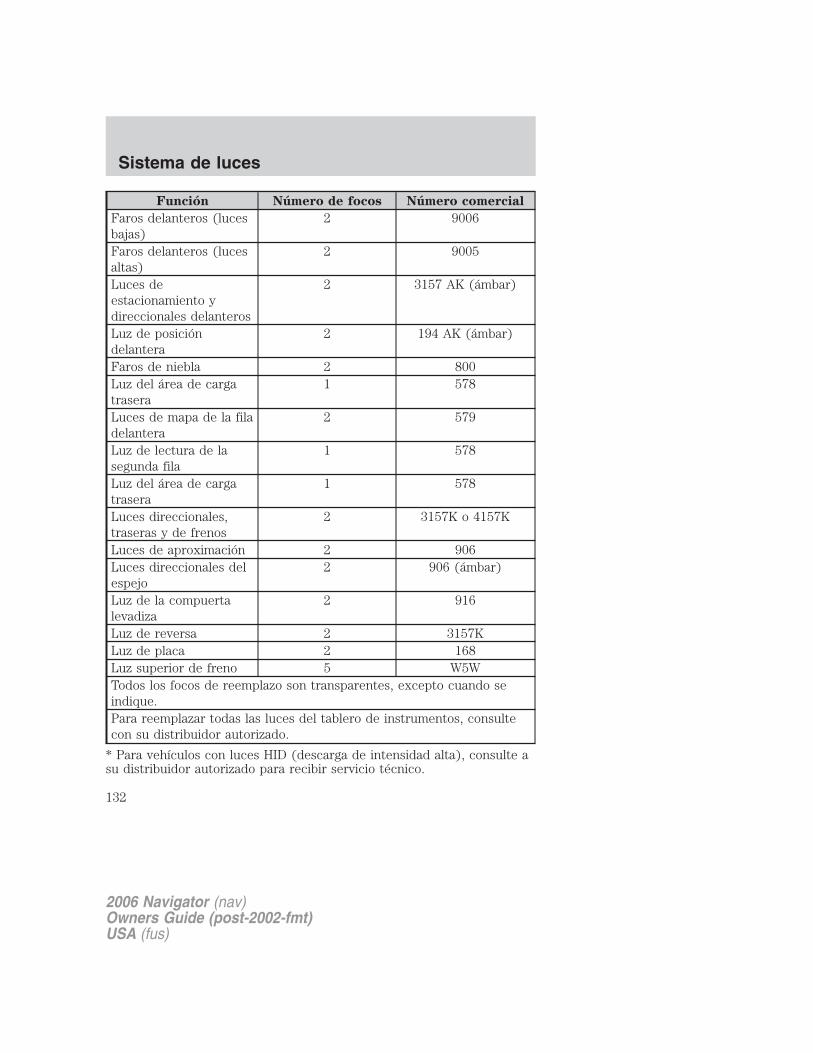
Función Número de focos Número comercial
Faros delanteros (lucesbajas)
2 9006
Faros delanteros (lucesaltas)
2 9005
Luces deestacionamiento ydireccionales delanteros
2 3157 AK (ámbar)
Luz de posicióndelantera
2 194 AK (ámbar)
Faros de niebla 2 800Luz del área de cargatrasera
1 578
Luces de mapa de la filadelantera
2 579
Luz de lectura de lasegunda fila
1 578
Luz del área de cargatrasera
1 578
Luces direccionales,traseras y de frenos
2 3157K o 4157K
Luces de aproximación 2 906Luces direccionales delespejo
2 906 (ámbar)
Luz de la compuertalevadiza
2 916
Luz de reversa 2 3157KLuz de placa 2 168Luz superior de freno 5 W5WTodos los focos de reemplazo son transparentes, excepto cuando seindique.Para reemplazar todas las luces del tablero de instrumentos, consultecon su distribuidor autorizado.
* Para vehículos con luces HID (descarga de intensidad alta), consulte asu distribuidor autorizado para recibir servicio técnico.
2006 Navigator (nav)Owners Guide (post-2002-fmt)USA (fus)
Sistema de luces
132
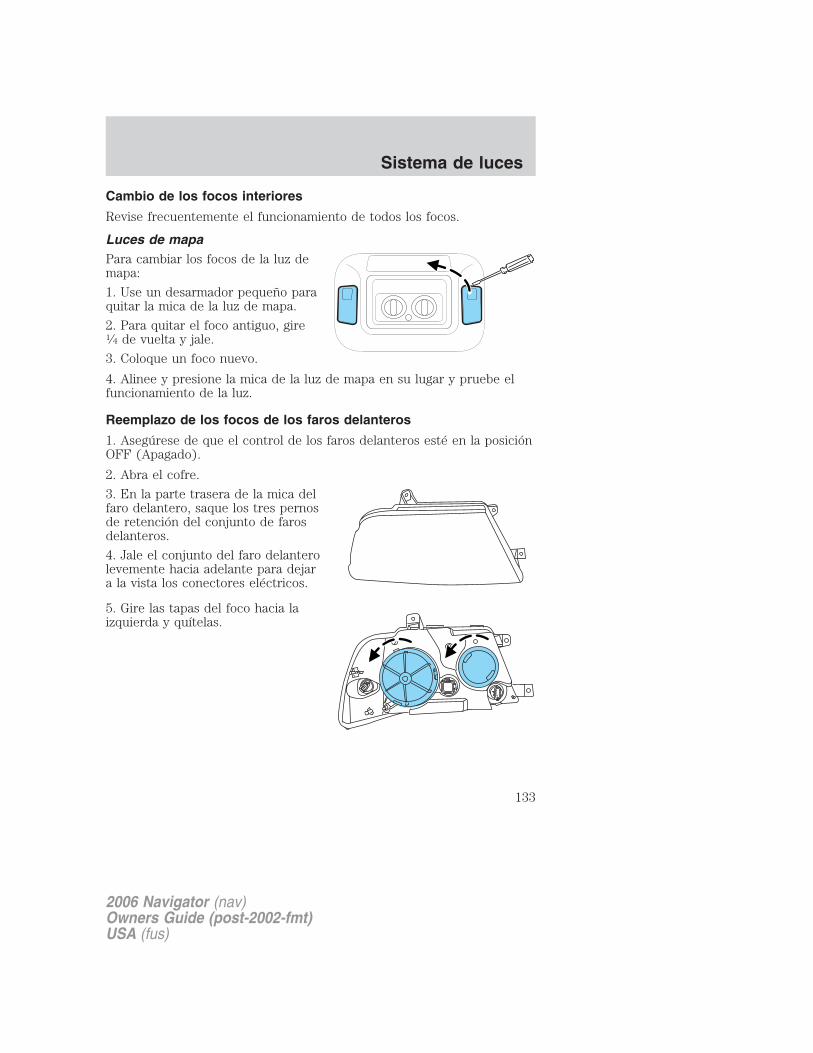
Cambio de los focos interiores
Revise frecuentemente el funcionamiento de todos los focos.
Luces de mapaPara cambiar los focos de la luz demapa:
1. Use un desarmador pequeño paraquitar la mica de la luz de mapa.
2. Para quitar el foco antiguo, gire1⁄4 de vuelta y jale.
3. Coloque un foco nuevo.
4. Alinee y presione la mica de la luz de mapa en su lugar y pruebe elfuncionamiento de la luz.
Reemplazo de los focos de los faros delanteros
1. Asegúrese de que el control de los faros delanteros esté en la posiciónOFF (Apagado).
2. Abra el cofre.
3. En la parte trasera de la mica delfaro delantero, saque los tres pernosde retención del conjunto de farosdelanteros.
4. Jale el conjunto del faro delanterolevemente hacia adelante para dejara la vista los conectores eléctricos.
5. Gire las tapas del foco hacia laizquierda y quítelas.
2006 Navigator (nav)Owners Guide (post-2002-fmt)USA (fus)
Sistema de luces
133

6. Una vez que las cubiertas de losfocos se quiten, se pueden sacar losfocos girándolos hacia la izquierda yjalando los focos recto hacia afuera.
Manipule los focos de halógeno cuidadosamente y manténgalosfuera del alcance de los niños. Tome el foco únicamente de la
base plástica y no toque el cristal. El aceite de las manos puede hacerque el foco se quiebre la próxima vez que se usen los faros delanteros.
7. Inserte el extremo del vidrio del foco nuevo en el conjunto del farodelantero. Cuando las ranuras de la base plástica estén alineadas, empujeel foco dentro del conjunto de la luz hasta que la base plástica entre encontacto con la parte posterior del conjunto. Gire el foco a la izquierdapara instalarlo.
8. Vuelva a instalar la tapa del foco en su lugar y asegúrela girándola a laizquierda.
Reemplazo de los focos de los faros HID (si están instalados)
Los focos delanteros de luz baja de su vehículo utilizan una fuente de“descarga de gran intensidad”. Estas luces funcionan a alto voltaje. Estefoco NO se puede reemplazar. Cuando el foco se funde, su distribuidorautorizado debe reemplazar el conjunto de la luz.
Reemplazo de los focos de las luces de estacionamiento y de lasdireccionales
1. Asegúrese de que el control de los faros delanteros esté en la posiciónOFF (Apagado).
2. Abra el cofre.
3. En la parte trasera de la mica delfaro delantero, saque los tres pernosdel conjunto de faros delanteros.
4. Jale el conjunto del faro delanterolevemente hacia adelante para dejara la vista los conectores eléctricos.
2006 Navigator (nav)Owners Guide (post-2002-fmt)USA (fus)
Sistema de luces
134
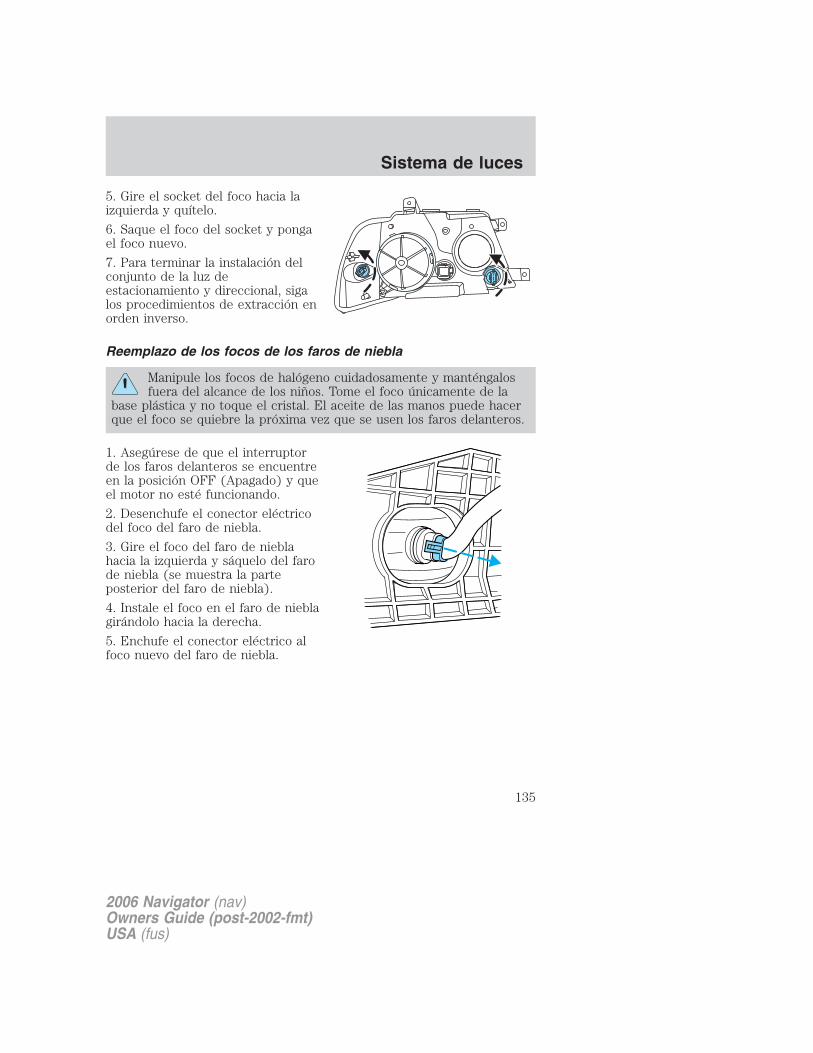
5. Gire el socket del foco hacia laizquierda y quítelo.
6. Saque el foco del socket y pongael foco nuevo.
7. Para terminar la instalación delconjunto de la luz deestacionamiento y direccional, sigalos procedimientos de extracción enorden inverso.
Reemplazo de los focos de los faros de niebla
Manipule los focos de halógeno cuidadosamente y manténgalosfuera del alcance de los niños. Tome el foco únicamente de la
base plástica y no toque el cristal. El aceite de las manos puede hacerque el foco se quiebre la próxima vez que se usen los faros delanteros.
1. Asegúrese de que el interruptorde los faros delanteros se encuentreen la posición OFF (Apagado) y queel motor no esté funcionando.
2. Desenchufe el conector eléctricodel foco del faro de niebla.
3. Gire el foco del faro de nieblahacia la izquierda y sáquelo del farode niebla (se muestra la parteposterior del faro de niebla).
4. Instale el foco en el faro de nieblagirándolo hacia la derecha.
5. Enchufe el conector eléctrico alfoco nuevo del faro de niebla.
2006 Navigator (nav)Owners Guide (post-2002-fmt)USA (fus)
Sistema de luces
135
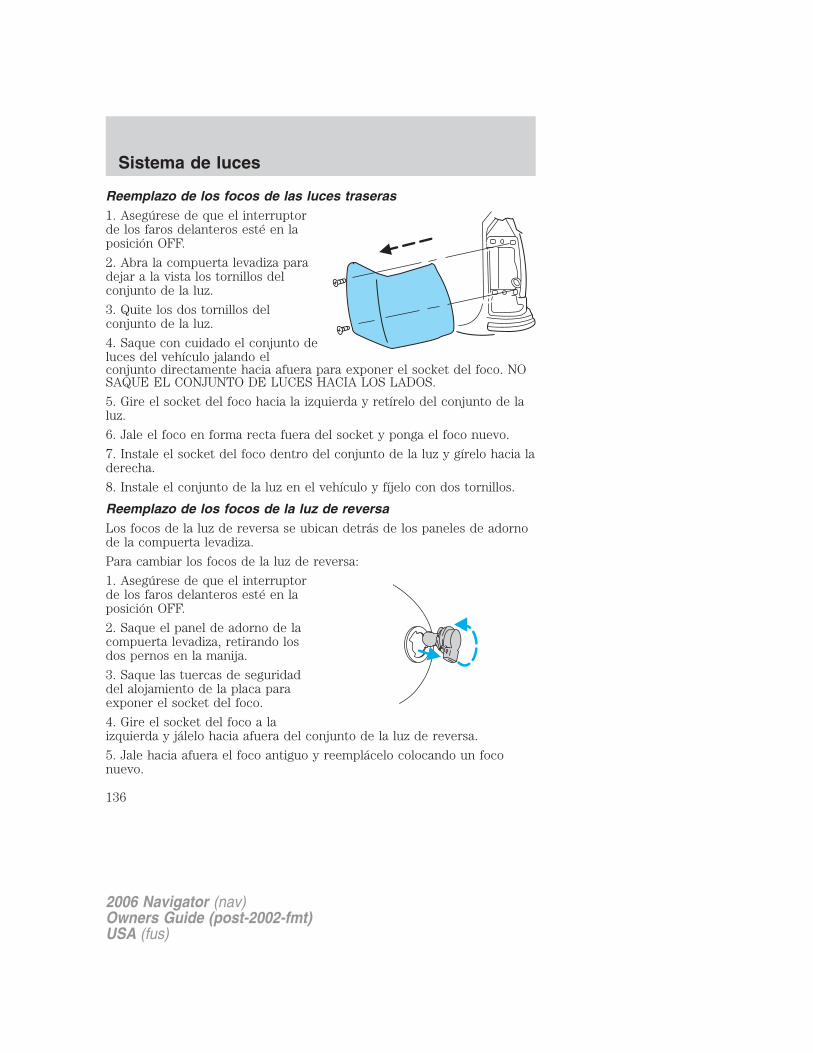
Reemplazo de los focos de las luces traseras1. Asegúrese de que el interruptorde los faros delanteros esté en laposición OFF.
2. Abra la compuerta levadiza paradejar a la vista los tornillos delconjunto de la luz.
3. Quite los dos tornillos delconjunto de la luz.
4. Saque con cuidado el conjunto deluces del vehículo jalando elconjunto directamente hacia afuera para exponer el socket del foco. NOSAQUE EL CONJUNTO DE LUCES HACIA LOS LADOS.
5. Gire el socket del foco hacia la izquierda y retírelo del conjunto de laluz.
6. Jale el foco en forma recta fuera del socket y ponga el foco nuevo.
7. Instale el socket del foco dentro del conjunto de la luz y gírelo hacia laderecha.
8. Instale el conjunto de la luz en el vehículo y fíjelo con dos tornillos.
Reemplazo de los focos de la luz de reversaLos focos de la luz de reversa se ubican detrás de los paneles de adornode la compuerta levadiza.
Para cambiar los focos de la luz de reversa:
1. Asegúrese de que el interruptorde los faros delanteros esté en laposición OFF.
2. Saque el panel de adorno de lacompuerta levadiza, retirando losdos pernos en la manija.
3. Saque las tuercas de seguridaddel alojamiento de la placa paraexponer el socket del foco.
4. Gire el socket del foco a laizquierda y jálelo hacia afuera del conjunto de la luz de reversa.
5. Jale hacia afuera el foco antiguo y reemplácelo colocando un foconuevo.
2006 Navigator (nav)Owners Guide (post-2002-fmt)USA (fus)
Sistema de luces
136

6. Vuelva a colocar el conector en el conjunto de la luz de reversa ygírelo a la derecha para que quede firme en su lugar.
7. Vuelva a instalar el panel de adorno de la compuerta levadiza.
Reemplazo del foco de la luz trasera de la compuerta levadiza1. Asegúrese de que el interruptorde los faros delanteros esté en laposición OFF.
2. Levante la compuerta levadiza ysaque las dos tuercas de retenciónen la parte de abajo de la compuertalevadiza.
3. Jale el conjunto de la luz rectohacia afuera (se desencajará de laarandela aislante de retención deplástico).
2006 Navigator (nav)Owners Guide (post-2002-fmt)USA (fus)
Sistema de luces
137
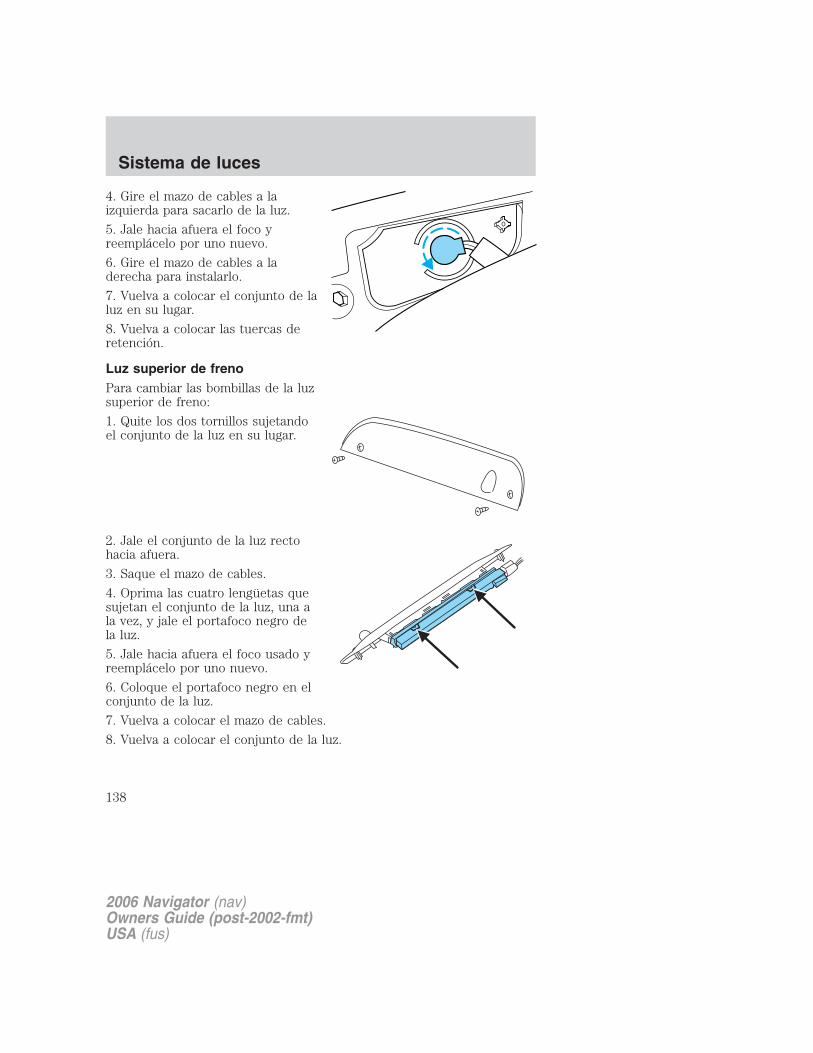
4. Gire el mazo de cables a laizquierda para sacarlo de la luz.
5. Jale hacia afuera el foco yreemplácelo por uno nuevo.
6. Gire el mazo de cables a laderecha para instalarlo.
7. Vuelva a colocar el conjunto de laluz en su lugar.
8. Vuelva a colocar las tuercas deretención.
Luz superior de frenoPara cambiar las bombillas de la luzsuperior de freno:
1. Quite los dos tornillos sujetandoel conjunto de la luz en su lugar.
2. Jale el conjunto de la luz rectohacia afuera.
3. Saque el mazo de cables.
4. Oprima las cuatro lengüetas quesujetan el conjunto de la luz, una ala vez, y jale el portafoco negro dela luz.
5. Jale hacia afuera el foco usado yreemplácelo por uno nuevo.
6. Coloque el portafoco negro en elconjunto de la luz.
7. Vuelva a colocar el mazo de cables.
8. Vuelva a colocar el conjunto de la luz.
2006 Navigator (nav)Owners Guide (post-2002-fmt)USA (fus)
Sistema de luces
138
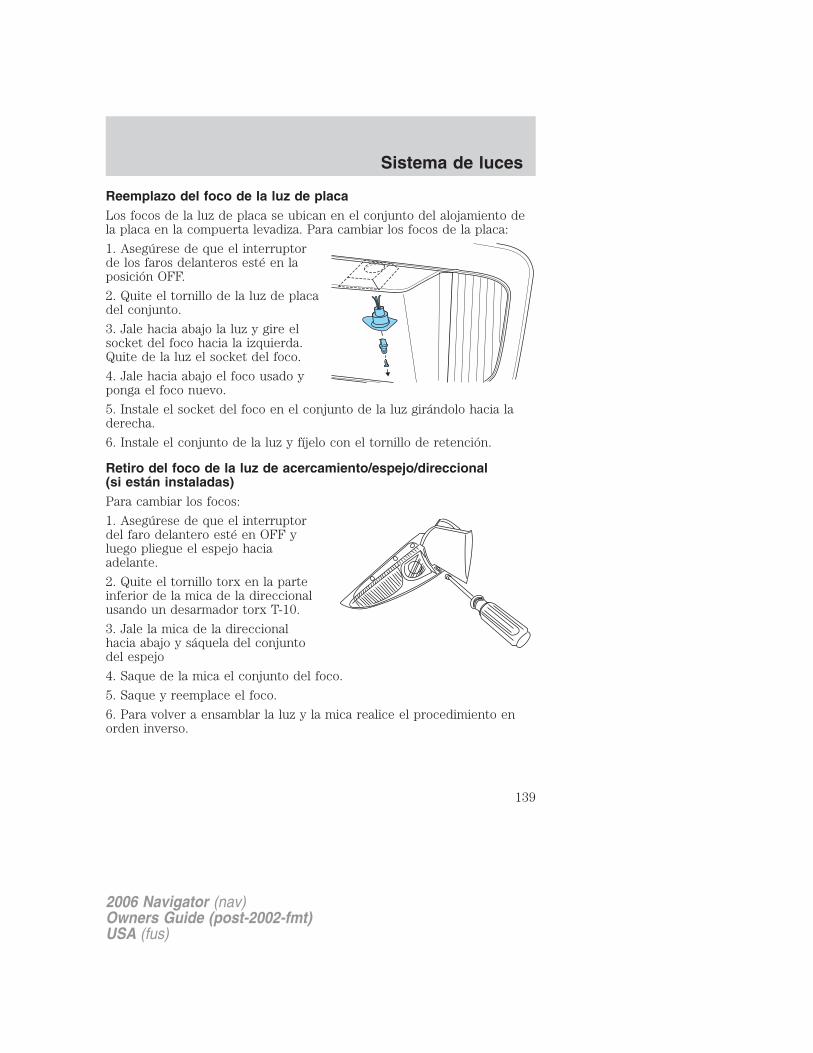
Reemplazo del foco de la luz de placaLos focos de la luz de placa se ubican en el conjunto del alojamiento dela placa en la compuerta levadiza. Para cambiar los focos de la placa:
1. Asegúrese de que el interruptorde los faros delanteros esté en laposición OFF.
2. Quite el tornillo de la luz de placadel conjunto.
3. Jale hacia abajo la luz y gire elsocket del foco hacia la izquierda.Quite de la luz el socket del foco.
4. Jale hacia abajo el foco usado yponga el foco nuevo.
5. Instale el socket del foco en el conjunto de la luz girándolo hacia laderecha.
6. Instale el conjunto de la luz y fíjelo con el tornillo de retención.
Retiro del foco de la luz de acercamiento/espejo/direccional(si están instaladas)Para cambiar los focos:
1. Asegúrese de que el interruptordel faro delantero esté en OFF yluego pliegue el espejo haciaadelante.
2. Quite el tornillo torx en la parteinferior de la mica de la direccionalusando un desarmador torx T-10.
3. Jale la mica de la direccionalhacia abajo y sáquela del conjuntodel espejo
4. Saque de la mica el conjunto del foco.
5. Saque y reemplace el foco.
6. Para volver a ensamblar la luz y la mica realice el procedimiento enorden inverso.
2006 Navigator (nav)Owners Guide (post-2002-fmt)USA (fus)
Sistema de luces
139
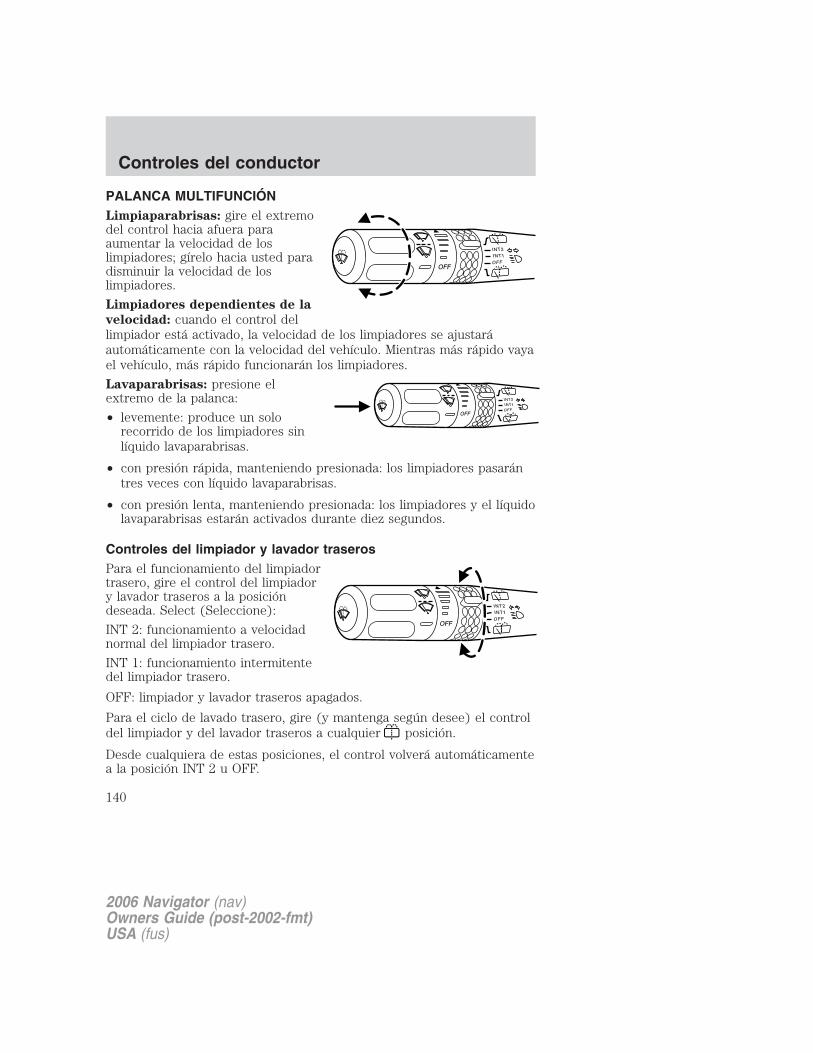
PALANCA MULTIFUNCIÓNLimpiaparabrisas: gire el extremodel control hacia afuera paraaumentar la velocidad de loslimpiadores; gírelo hacia usted paradisminuir la velocidad de loslimpiadores.
Limpiadores dependientes de la
velocidad: cuando el control dellimpiador está activado, la velocidad de los limpiadores se ajustaráautomáticamente con la velocidad del vehículo. Mientras más rápido vayael vehículo, más rápido funcionarán los limpiadores.
Lavaparabrisas: presione elextremo de la palanca:
• levemente: produce un solorecorrido de los limpiadores sinlíquido lavaparabrisas.
• con presión rápida, manteniendo presionada: los limpiadores pasarántres veces con líquido lavaparabrisas.
• con presión lenta, manteniendo presionada: los limpiadores y el líquidolavaparabrisas estarán activados durante diez segundos.
Controles del limpiador y lavador traserosPara el funcionamiento del limpiadortrasero, gire el control del limpiadory lavador traseros a la posicióndeseada. Select (Seleccione):
INT 2: funcionamiento a velocidadnormal del limpiador trasero.
INT 1: funcionamiento intermitentedel limpiador trasero.
OFF: limpiador y lavador traseros apagados.
Para el ciclo de lavado trasero, gire (y mantenga según desee) el controldel limpiador y del lavador traseros a cualquier posición.
Desde cualquiera de estas posiciones, el control volverá automáticamentea la posición INT 2 u OFF.
INT2
OFFOFF
INT1
INT1INT2
OFFOFF
INT2
OFFOFF
INT1
2006 Navigator (nav)Owners Guide (post-2002-fmt)USA (fus)
Controles del conductor
140
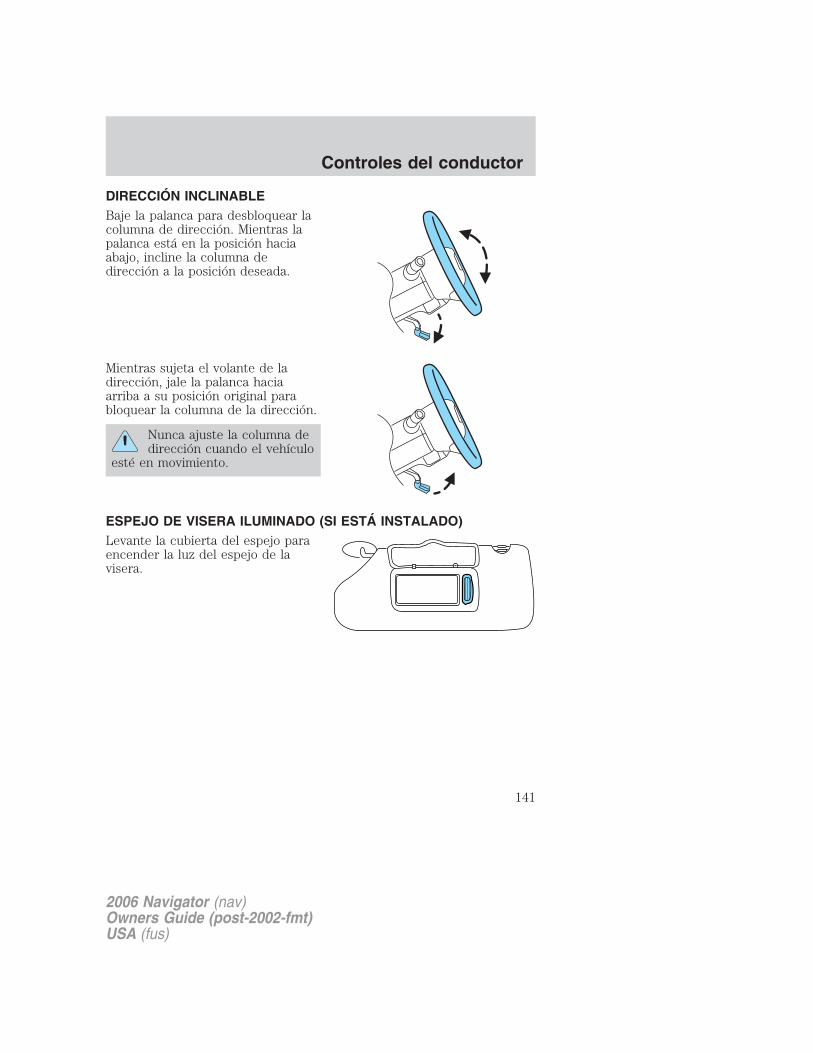
DIRECCIÓN INCLINABLEBaje la palanca para desbloquear lacolumna de dirección. Mientras lapalanca está en la posición haciaabajo, incline la columna dedirección a la posición deseada.
Mientras sujeta el volante de ladirección, jale la palanca haciaarriba a su posición original parabloquear la columna de la dirección.
Nunca ajuste la columna dedirección cuando el vehículo
esté en movimiento.
ESPEJO DE VISERA ILUMINADO (SI ESTÁ INSTALADO)Levante la cubierta del espejo paraencender la luz del espejo de lavisera.
2006 Navigator (nav)Owners Guide (post-2002-fmt)USA (fus)
Controles del conductor
141
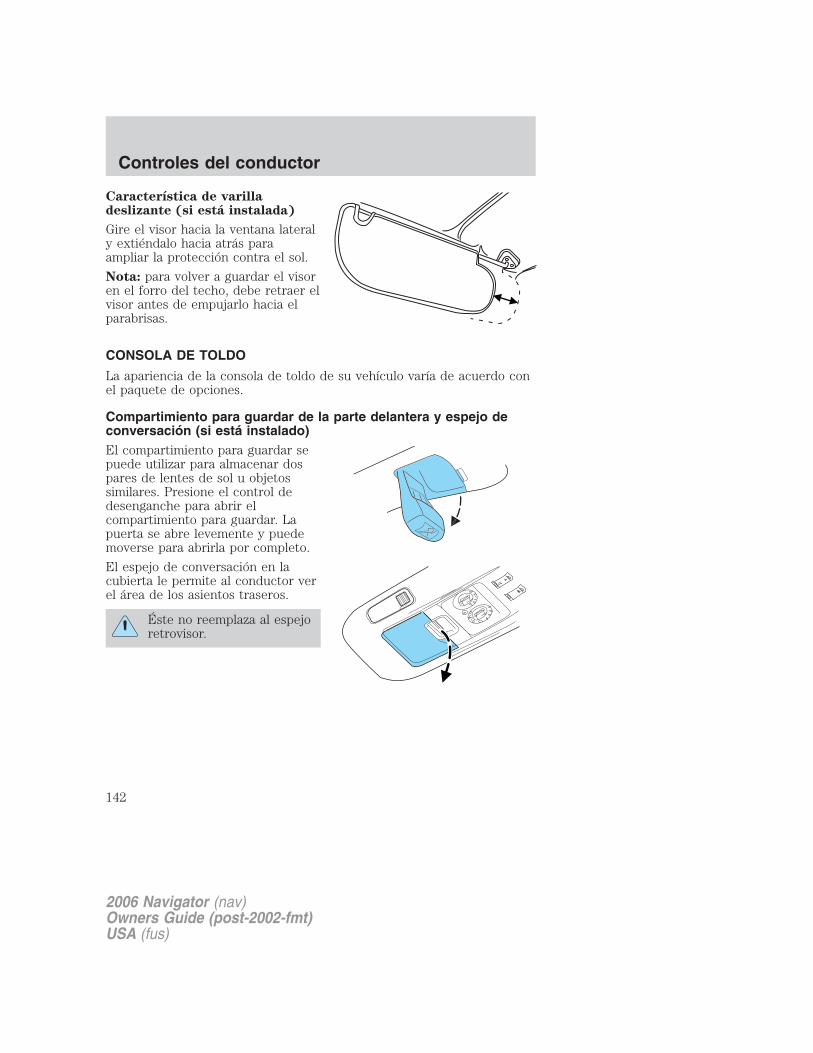
Característica de varilladeslizante (si está instalada)
Gire el visor hacia la ventana lateraly extiéndalo hacia atrás paraampliar la protección contra el sol.
Nota: para volver a guardar el visoren el forro del techo, debe retraer elvisor antes de empujarlo hacia elparabrisas.
CONSOLA DE TOLDO
La apariencia de la consola de toldo de su vehículo varía de acuerdo conel paquete de opciones.
Compartimiento para guardar de la parte delantera y espejo deconversación (si está instalado)El compartimiento para guardar sepuede utilizar para almacenar dospares de lentes de sol u objetossimilares. Presione el control dedesenganche para abrir elcompartimiento para guardar. Lapuerta se abre levemente y puedemoverse para abrirla por completo.
El espejo de conversación en lacubierta le permite al conductor verel área de los asientos traseros.
Éste no reemplaza al espejoretrovisor.
2006 Navigator (nav)Owners Guide (post-2002-fmt)USA (fus)
Controles del conductor
142
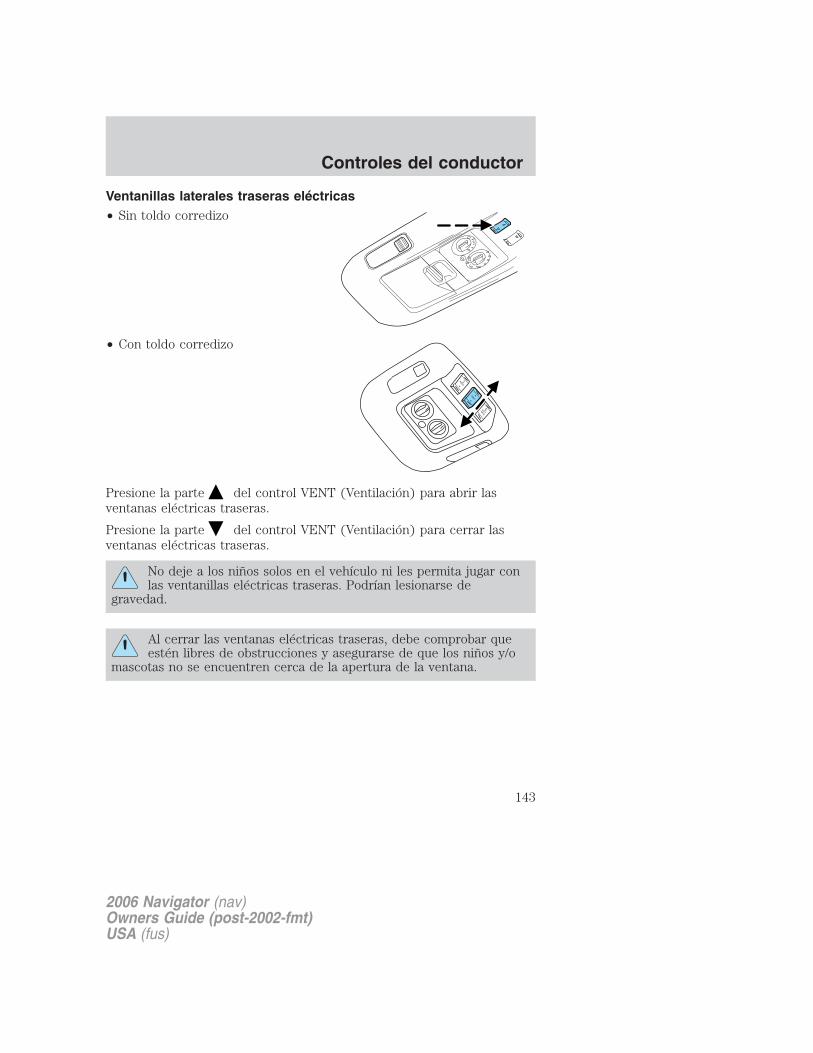
Ventanillas laterales traseras eléctricas• Sin toldo corredizo
• Con toldo corredizo
Presione la parte del control VENT (Ventilación) para abrir lasventanas eléctricas traseras.
Presione la parte del control VENT (Ventilación) para cerrar lasventanas eléctricas traseras.
No deje a los niños solos en el vehículo ni les permita jugar conlas ventanillas eléctricas traseras. Podrían lesionarse de
gravedad.
Al cerrar las ventanas eléctricas traseras, debe comprobar queestén libres de obstrucciones y asegurarse de que los niños y/o
mascotas no se encuentren cerca de la apertura de la ventana.
ROOF
VENT
LIFTGATE
2006 Navigator (nav)Owners Guide (post-2002-fmt)USA (fus)
Controles del conductor
143

Control de compuerta levadiza eléctrica (si está instalada)Sin toldo corredizo
Con toldo corredizo
Presione y suelte la parte superiordel control para abrir la compuertalevadiza eléctrica.
Presione y suelte nuevamente laparte superior del control paracerrar la compuerta levadizaeléctrica.
Asegúrese de que no haya nadie en el área de la compuertalevadiza eléctrica antes de utilizar el control de la compuerta
levadiza eléctrica.
RELOJPresione el control de la derechapara adelantar la hora de la pantalla.
Presione el control de la izquierdapara disminuir la hora de la pantalla.
ROOF
VENT
LIFTGATE
2006 Navigator (nav)Owners Guide (post-2002-fmt)USA (fus)
Controles del conductor
144
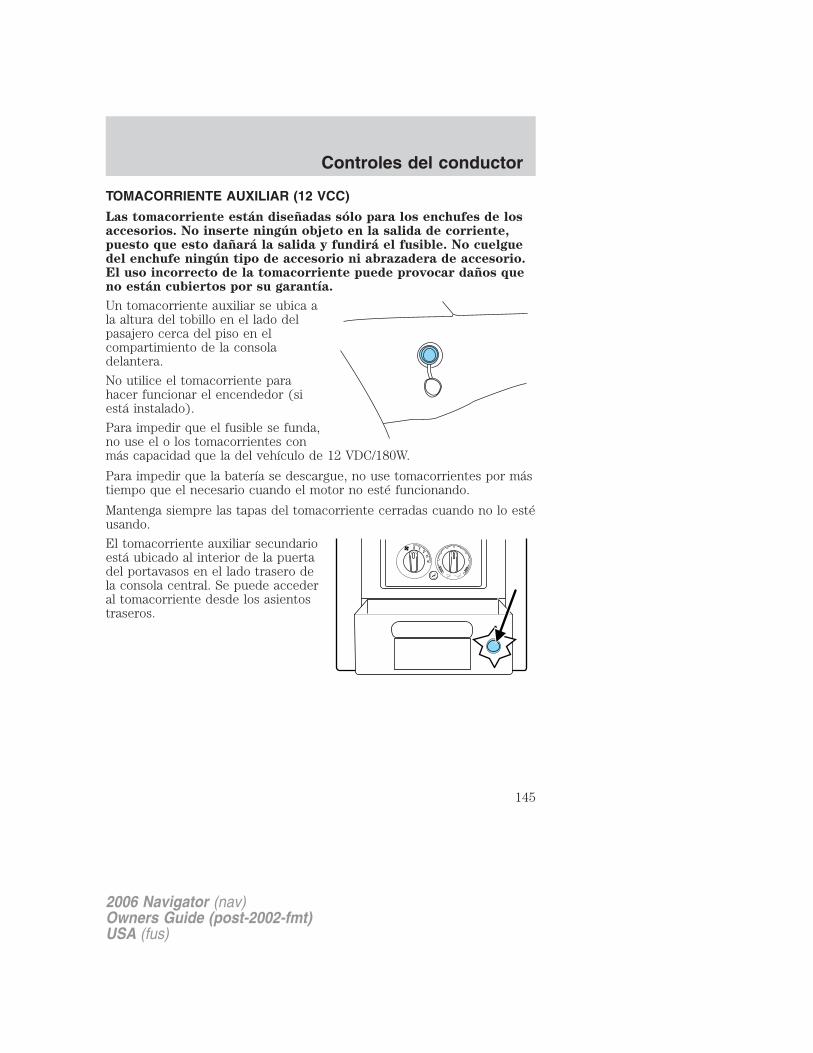
TOMACORRIENTE AUXILIAR (12 VCC)
Las tomacorriente están diseñadas sólo para los enchufes de losaccesorios. No inserte ningún objeto en la salida de corriente,puesto que esto dañará la salida y fundirá el fusible. No cuelguedel enchufe ningún tipo de accesorio ni abrazadera de accesorio.El uso incorrecto de la tomacorriente puede provocar daños queno están cubiertos por su garantía.
Un tomacorriente auxiliar se ubica ala altura del tobillo en el lado delpasajero cerca del piso en elcompartimiento de la consoladelantera.
No utilice el tomacorriente parahacer funcionar el encendedor (siestá instalado).
Para impedir que el fusible se funda,no use el o los tomacorrientes conmás capacidad que la del vehículo de 12 VDC/180W.
Para impedir que la batería se descargue, no use tomacorrientes por mástiempo que el necesario cuando el motor no esté funcionando.
Mantenga siempre las tapas del tomacorriente cerradas cuando no lo estéusando.
El tomacorriente auxiliar secundarioestá ubicado al interior de la puertadel portavasos en el lado trasero dela consola central. Se puede accederal tomacorriente desde los asientostraseros.
4
32
10
2006 Navigator (nav)Owners Guide (post-2002-fmt)USA (fus)
Controles del conductor
145

Un tercer tomacorriente auxiliar seubica en el tablero lateral traseroderecho. Se puede acceder altomacorriente desde la compuertalevadiza.
Encendedor (si está instalado)
No conecte accesorios eléctricos opcionales en el socket del encendedor.
No mantenga presionado el encendedor mientras esté calentándose, estodañará el encendedor y el enchufe. El encendedor saldrá de su posiciónde calentamiento cuando esté listo para su utilización.
El uso incorrecto del encendedor puede provocar daños que no los cubrela garantía.
CONSOLA CENTRAL
Es posible que la consola de su vehículo venga equipada con unavariedad de características. Éstas incluyen:
1. Tomacorriente
2. Portavasos
3. Compartimiento utilitario, ranuraspara portamonedas, porta cajas depañuelos tisú
4. Controles traseros de audio
Utilice sólo vasos blandos enel portavasos. Los objetos
duros pueden producirle daños enun choque.
2006 Navigator (nav)Owners Guide (post-2002-fmt)USA (fus)
Controles del conductor
146
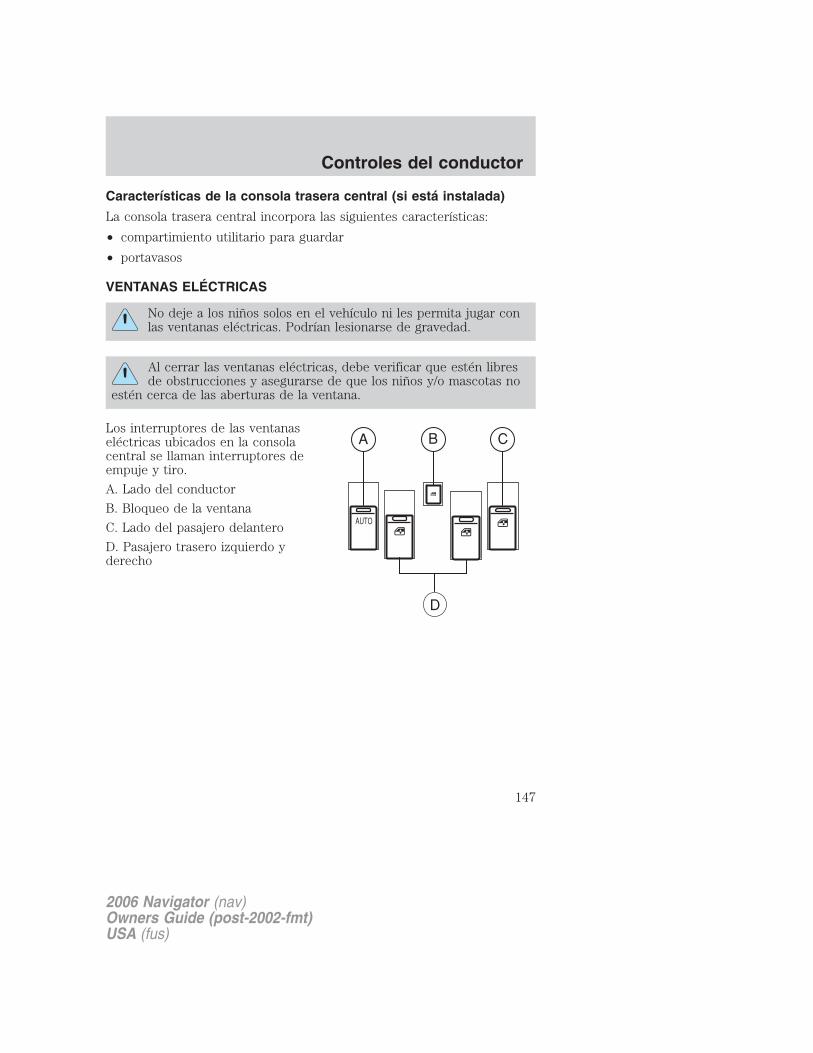
Características de la consola trasera central (si está instalada)
La consola trasera central incorpora las siguientes características:
• compartimiento utilitario para guardar
• portavasos
VENTANAS ELÉCTRICAS
No deje a los niños solos en el vehículo ni les permita jugar conlas ventanas eléctricas. Podrían lesionarse de gravedad.
Al cerrar las ventanas eléctricas, debe verificar que estén libresde obstrucciones y asegurarse de que los niños y/o mascotas no
estén cerca de las aberturas de la ventana.
Los interruptores de las ventanaseléctricas ubicados en la consolacentral se llaman interruptores deempuje y tiro.
A. Lado del conductor
B. Bloqueo de la ventana
C. Lado del pasajero delantero
D. Pasajero trasero izquierdo yderecho
2006 Navigator (nav)Owners Guide (post-2002-fmt)USA (fus)
Controles del conductor
147
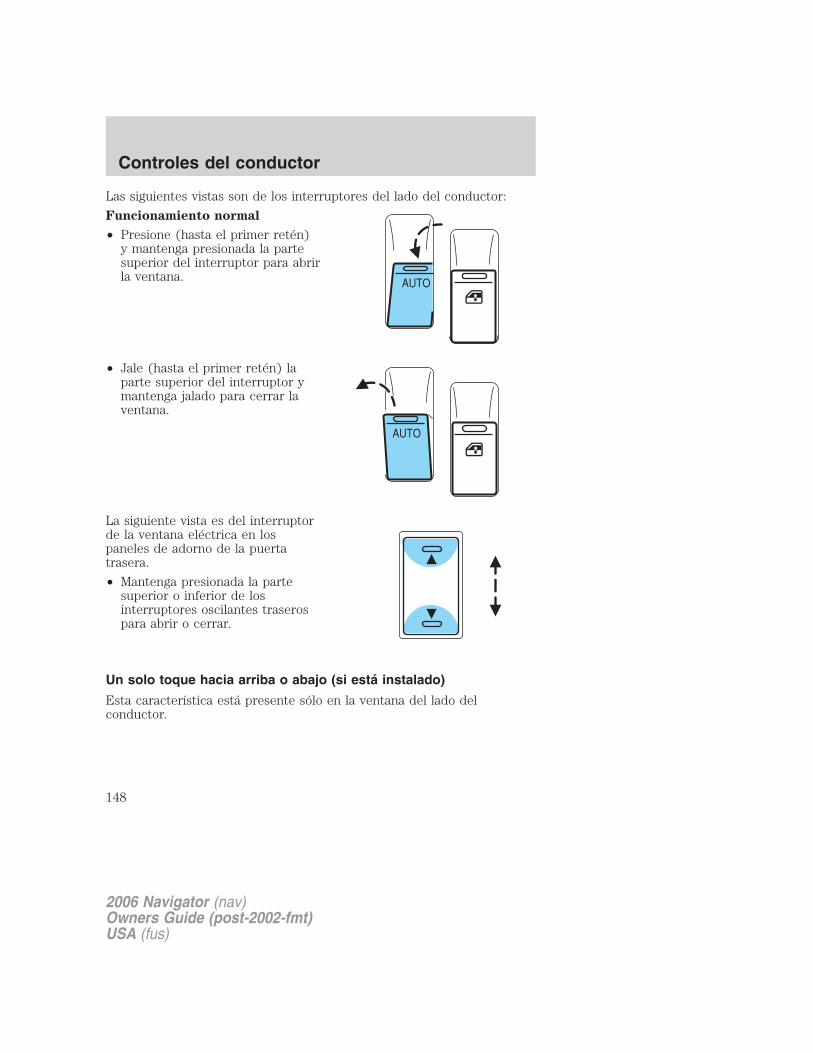
Las siguientes vistas son de los interruptores del lado del conductor:
Funcionamiento normal
• Presione (hasta el primer retén)y mantenga presionada la partesuperior del interruptor para abrirla ventana.
• Jale (hasta el primer retén) laparte superior del interruptor ymantenga jalado para cerrar laventana.
La siguiente vista es del interruptorde la ventana eléctrica en lospaneles de adorno de la puertatrasera.
• Mantenga presionada la partesuperior o inferior de losinterruptores oscilantes traserospara abrir o cerrar.
Un solo toque hacia arriba o abajo (si está instalado)
Esta característica está presente sólo en la ventana del lado delconductor.
2006 Navigator (nav)Owners Guide (post-2002-fmt)USA (fus)
Controles del conductor
148

Para hacer funcionar UN SOLOTOQUE HACIA ABAJO:
• Presione el interruptorcompletamente hacia abajo hastael segundo retén y suéltelorápidamente. La ventana delconductor se abrirácompletamente. Presionemomentáneamente el interruptoren cualquier posición paradetener el funcionamiento de laventana.
Si se mantiene presionado el interruptor hasta su posición de cerradonormal o hasta su posición UN SOLO TOQUE HACIA ARRIBA duranteun caso de UN SOLO TOQUE HACIA ABAJO, la ventana se detendrá. Si,después de 1⁄2 segundo el interruptor se mantiene presionado, la ventanarealizará un cierre normal o de UN SOLO TOQUE HACIA ARRIBA.
Para hacer funcionar UN SOLOTOQUE HACIA ARRIBA:
• Presione el interruptorcompletamente hacia arriba hastael segundo retén y suéltelorápidamente. La ventana delconductor se cerrarácompletamente. Presionemomentáneamente el interruptoren cualquier posición paradetener el funcionamiento de unsolo toque hacia arriba.
Si se mantiene presionado el interruptor hasta su posición de aperturanormal o de UN SOLO TOQUE HACIA ABAJO durante un caso de UNSOLO TOQUE HACIA ARRIBA, la ventana se detendrá. Si, después de 1⁄2segundo el interruptor se mantiene presionado, la ventana realizará unaapertura normal o de UN SOLO TOQUE HACIA ABAJO.
ReboteCuando se ha detectado un obstáculo en la abertura de la ventanamientras ésta se está cerrando, la ventana revertirá en forma automáticala dirección y se abrirá. Esto se conoce como “rebote”. Si se apaga elencendido (sin que se active el retardo de accesorios) durante un rebote,la ventana se abrirá hasta alcanzar la posición de rebote.
2006 Navigator (nav)Owners Guide (post-2002-fmt)USA (fus)
Controles del conductor
149
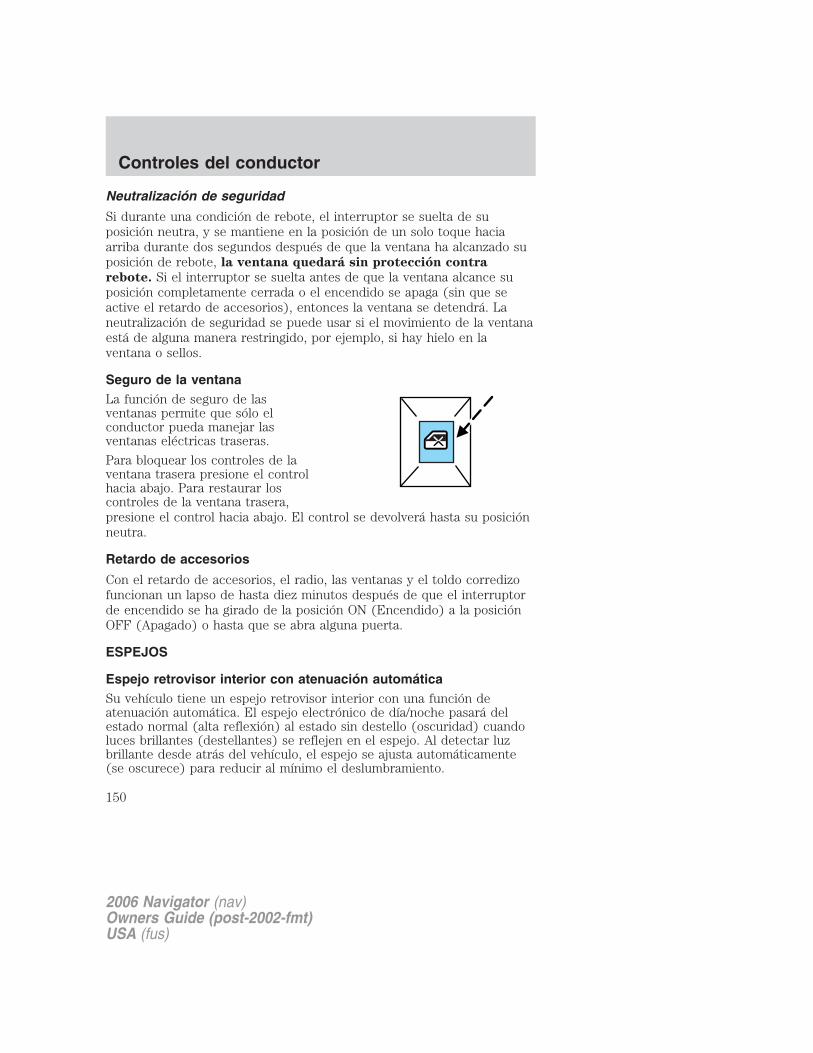
Neutralización de seguridad
Si durante una condición de rebote, el interruptor se suelta de suposición neutra, y se mantiene en la posición de un solo toque haciaarriba durante dos segundos después de que la ventana ha alcanzado suposición de rebote, la ventana quedará sin protección contra
rebote. Si el interruptor se suelta antes de que la ventana alcance suposición completamente cerrada o el encendido se apaga (sin que seactive el retardo de accesorios), entonces la ventana se detendrá. Laneutralización de seguridad se puede usar si el movimiento de la ventanaestá de alguna manera restringido, por ejemplo, si hay hielo en laventana o sellos.
Seguro de la ventanaLa función de seguro de lasventanas permite que sólo elconductor pueda manejar lasventanas eléctricas traseras.
Para bloquear los controles de laventana trasera presione el controlhacia abajo. Para restaurar loscontroles de la ventana trasera,presione el control hacia abajo. El control se devolverá hasta su posiciónneutra.
Retardo de accesorios
Con el retardo de accesorios, el radio, las ventanas y el toldo corredizofuncionan un lapso de hasta diez minutos después de que el interruptorde encendido se ha girado de la posición ON (Encendido) a la posiciónOFF (Apagado) o hasta que se abra alguna puerta.
ESPEJOS
Espejo retrovisor interior con atenuación automáticaSu vehículo tiene un espejo retrovisor interior con una función deatenuación automática. El espejo electrónico de día/noche pasará delestado normal (alta reflexión) al estado sin destello (oscuridad) cuandoluces brillantes (destellantes) se reflejen en el espejo. Al detectar luzbrillante desde atrás del vehículo, el espejo se ajusta automáticamente(se oscurece) para reducir al mínimo el deslumbramiento.
2006 Navigator (nav)Owners Guide (post-2002-fmt)USA (fus)
Controles del conductor
150

Sin sistema de navegación
Con sistema de navegación
El espejo vuelve automáticamente al estado normal cada vez que elvehículo se pone en R (Reversa) para asegurar una vista brillante claracuando retrocede.
No bloquee el sensor en el lado posterior del espejo ya que esto puedeimpedir un rendimiento correcto del espejo.
ESPEJOS LATERALES ELÉCTRICOS
El encendido puede estar en cualquier posición para ajustar los espejoslaterales eléctricos.
Ajuste de los espejos:
1. Seleccione para ajustar elespejo izquierdo o para ajustarel espejo derecho.
2. Mueva el control central en ladirección en que desea inclinar elespejo.
3. Vuelva a la posición central paradesactivar la función de ajuste.
2006 Navigator (nav)Owners Guide (post-2002-fmt)USA (fus)
Controles del conductor
151
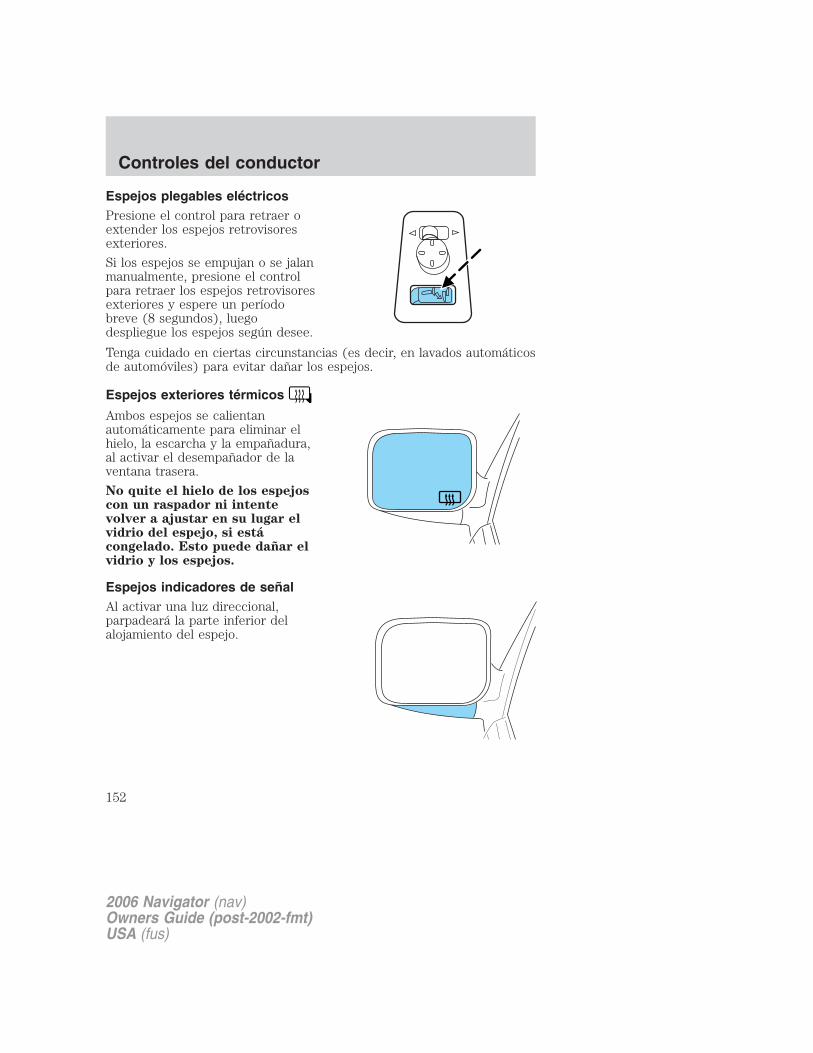
Espejos plegables eléctricosPresione el control para retraer oextender los espejos retrovisoresexteriores.
Si los espejos se empujan o se jalanmanualmente, presione el controlpara retraer los espejos retrovisoresexteriores y espere un períodobreve (8 segundos), luegodespliegue los espejos según desee.
Tenga cuidado en ciertas circunstancias (es decir, en lavados automáticosde automóviles) para evitar dañar los espejos.
Espejos exteriores térmicos
Ambos espejos se calientanautomáticamente para eliminar elhielo, la escarcha y la empañadura,al activar el desempañador de laventana trasera.
No quite el hielo de los espejoscon un raspador ni intentevolver a ajustar en su lugar elvidrio del espejo, si estácongelado. Esto puede dañar elvidrio y los espejos.
Espejos indicadores de señalAl activar una luz direccional,parpadeará la parte inferior delalojamiento del espejo.
2006 Navigator (nav)Owners Guide (post-2002-fmt)USA (fus)
Controles del conductor
152
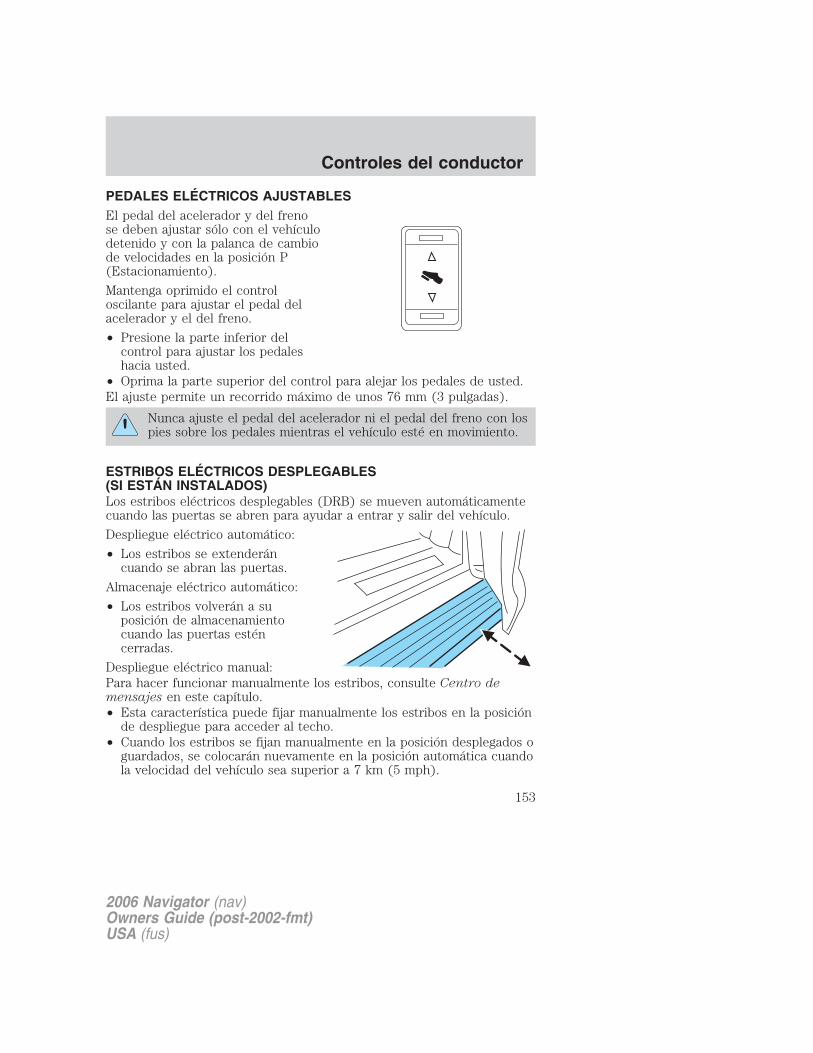
PEDALES ELÉCTRICOS AJUSTABLESEl pedal del acelerador y del frenose deben ajustar sólo con el vehículodetenido y con la palanca de cambiode velocidades en la posición P(Estacionamiento).
Mantenga oprimido el controloscilante para ajustar el pedal delacelerador y el del freno.
• Presione la parte inferior delcontrol para ajustar los pedaleshacia usted.
• Oprima la parte superior del control para alejar los pedales de usted.El ajuste permite un recorrido máximo de unos 76 mm (3 pulgadas).
Nunca ajuste el pedal del acelerador ni el pedal del freno con lospies sobre los pedales mientras el vehículo esté en movimiento.
ESTRIBOS ELÉCTRICOS DESPLEGABLES(SI ESTÁN INSTALADOS)Los estribos eléctricos desplegables (DRB) se mueven automáticamentecuando las puertas se abren para ayudar a entrar y salir del vehículo.
Despliegue eléctrico automático:
• Los estribos se extenderáncuando se abran las puertas.
Almacenaje eléctrico automático:
• Los estribos volverán a suposición de almacenamientocuando las puertas esténcerradas.
Despliegue eléctrico manual:Para hacer funcionar manualmente los estribos, consulte Centro demensajes en este capítulo.• Esta característica puede fijar manualmente los estribos en la posición
de despliegue para acceder al techo.• Cuando los estribos se fijan manualmente en la posición desplegados o
guardados, se colocarán nuevamente en la posición automática cuandola velocidad del vehículo sea superior a 7 km (5 mph).
2006 Navigator (nav)Owners Guide (post-2002-fmt)USA (fus)
Controles del conductor
153

Activar/desactivar:Para activar/desactivar la característica de estribos eléctricos, consulteCentro de mensajes en este capítulo.
• Cuando esta característica esté desactivada, los estribos se colocaráninmediatamente en la posición de almacenamiento sin importar laposición de las puertas.
• Cuando esta característica esté activada, los estribos se colocaráninmediatamente en la posición correcta según la posición de laspuertas.
Rebote:
• Si hay un objeto que obstaculice el desplazamiento del estribo, ésterebotará automáticamente en la dirección inversa hasta el final.
Nota: los estribos pueden funcionar más lento en temperaturas másfrías. En condiciones adversas, el lodo, el aguanieve, la sal y otrosdesechos del camino pueden quedar atrapados en el mecanismo delestribo, lo que posiblemente ocasione ruidos no deseados. En tal caso,lave por debajo del estribo con un lavador de automóvil de alta presión.
En climas extremos, puede haber acumulación excesiva de hielo,lo que impide que los estribos se desplieguen. Asegúrese de que
los estribos se hayan desplegado y que hayan terminado de moverseantes de pisarlos. Nota: los estribos reanudarán su función normal unavez que se elimine el bloqueo.
Apague los estribos antes de colocar un gato o cualquier objetodebajo del vehículo. No coloque nunca su mano entre el estribo
extendido y el vehículo. Un estribo en movimiento puede causarlesiones.
CONTROL DE VELOCIDADCon el control de velocidad establecido, puede mantener una velocidadde 48 km/h (30 mph) o más sin mantener su pie sobre el acelerador. Elcontrol de velocidad no funciona a velocidades inferiores a 48 km/h(30 mph).
No use el control de velocidad cuando haya mucho tráfico o encaminos con curvas, resbalosos o no pavimentados.
2006 Navigator (nav)Owners Guide (post-2002-fmt)USA (fus)
Controles del conductor
154

Fijación del control de velocidadPara mayor comodidad, los controlespara usar el control de velocidad seubican en el volante de la dirección.
1. Presione el control ON (Activado)y suéltelo.
2. Acelere a la velocidad deseada.
3. Presione el control SET + ysuéltelo.
4. Suelte el pedal del acelerador.
5. Se encenderá la luzindicadora en el grupo deinstrumentos.
Nota:
• La velocidad del vehículo puede variar momentáneamente al subir ybajar una colina empinada.
• Si la velocidad del vehículo supera la velocidad establecida en unapendiente, puede aplicar los frenos para reducir la velocidad.
• Si la velocidad del vehículo desciende más de 16 km/h (10 mph) pordebajo de la velocidad establecida al manejar cuesta arriba, el controlde velocidad se desactivará.
2006 Navigator (nav)Owners Guide (post-2002-fmt)USA (fus)
Controles del conductor
155

Para reasumir una velocidad establecidaPresione el control RES (Reasumir)y suéltelo. Éste devuelveautomáticamente el vehículo a lavelocidad previamente establecida.El control RES (reasumir) nofunciona si la velocidad del vehículono supera los 48 km/h (30 mph).
Aumento de la velocidad mientras se usa el control velocidadExisten dos formas de estableceruna velocidad mayor:
• Mantenga presionado el controlSET + hasta alcanzar la velocidaddeseada y luego suelte el control.También puede usar el controlSET + (Establecer +) para usar lafunción Aumento al toque.Presione y suelte este controlpara aumentar la velocidadestablecida del vehículo enpequeños niveles de 1.6 km/h (1 mph).
• Use el pedal del acelerador para conseguir la velocidad deseada.Cuando el vehículo alcance dicha velocidad, presione y suelte elcontrol SET +.
2006 Navigator (nav)Owners Guide (post-2002-fmt)USA (fus)
Controles del conductor
156
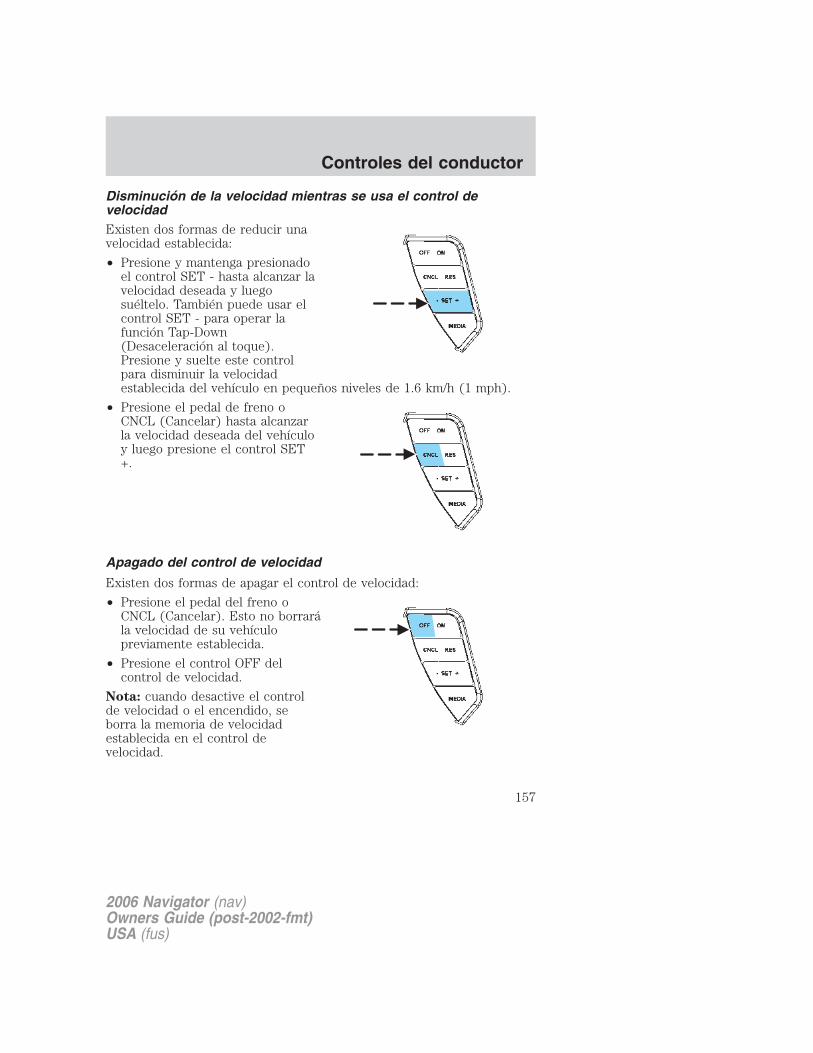
Disminución de la velocidad mientras se usa el control develocidadExisten dos formas de reducir unavelocidad establecida:
• Presione y mantenga presionadoel control SET - hasta alcanzar lavelocidad deseada y luegosuéltelo. También puede usar elcontrol SET - para operar lafunción Tap-Down(Desaceleración al toque).Presione y suelte este controlpara disminuir la velocidadestablecida del vehículo en pequeños niveles de 1.6 km/h (1 mph).
• Presione el pedal de freno oCNCL (Cancelar) hasta alcanzarla velocidad deseada del vehículoy luego presione el control SET+.
Apagado del control de velocidad
Existen dos formas de apagar el control de velocidad:
• Presione el pedal del freno oCNCL (Cancelar). Esto no borrarála velocidad de su vehículopreviamente establecida.
• Presione el control OFF delcontrol de velocidad.
Nota: cuando desactive el controlde velocidad o el encendido, seborra la memoria de velocidadestablecida en el control develocidad.
2006 Navigator (nav)Owners Guide (post-2002-fmt)USA (fus)
Controles del conductor
157

CONTROLES DEL VOLANTE DE DIRECCIÓN
Estos controles le permiten usar algunas características de control deradio y de aire acondicionado y calefacción.
Funciones de control de audioPresione MEDIA para seleccionar:
• AM, FM1, FM2,
• TAPE (Cinta) o
• CD.
En el modo AM, FM1 o FM2:
• Presione MEM para seleccionarlas estaciones preestablecidasdentro de la banda seleccionadadel radio.
En modo de Tape:
• Presione MEM para seleccionar lasiguiente selección en la cinta.
En modo de CD:
• Presione MEM para seleccionar la siguiente selección en el CD.
En cualquier modo:
• Presione VOL + o − para ajustarel volumen.
2006 Navigator (nav)Owners Guide (post-2002-fmt)USA (fus)
Controles del conductor
158

Características de control de aire acondicionado y calefacciónPresione TEMP + o - para ajustar latemperatura.
Presione FAN + o - para ajustar lavelocidad del ventilador.
Controles del volante de navegación (si están instalados)Estos controles le permiten operar algunas características de control deaudio y navegación cuando el vehículo está equipado con la característicade navegación.
Funciones de control de audio
Presione para seleccionar:
• AM, FM1, FM2, o
• CD.
En el modo AM, FM1 o FM2:
• Presione NEXT (Siguiente) paraseleccionar las estacionespreestablecidas en la banda deradio seleccionada.
2006 Navigator (nav)Owners Guide (post-2002-fmt)USA (fus)
Controles del conductor
159
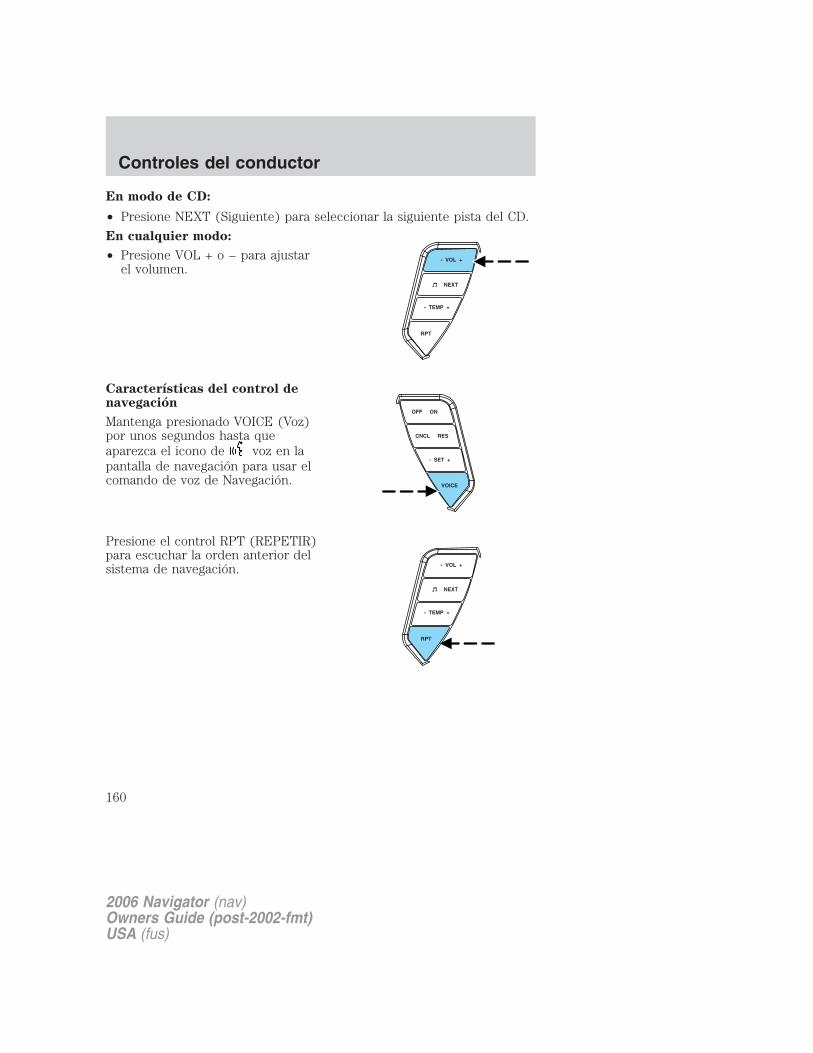
En modo de CD:
• Presione NEXT (Siguiente) para seleccionar la siguiente pista del CD.
En cualquier modo:
• Presione VOL + o − para ajustarel volumen.
Características del control denavegación
Mantenga presionado VOICE (Voz)por unos segundos hasta queaparezca el icono de voz en lapantalla de navegación para usar elcomando de voz de Navegación.
Presione el control RPT (REPETIR)para escuchar la orden anterior delsistema de navegación.
2006 Navigator (nav)Owners Guide (post-2002-fmt)USA (fus)
Controles del conductor
160
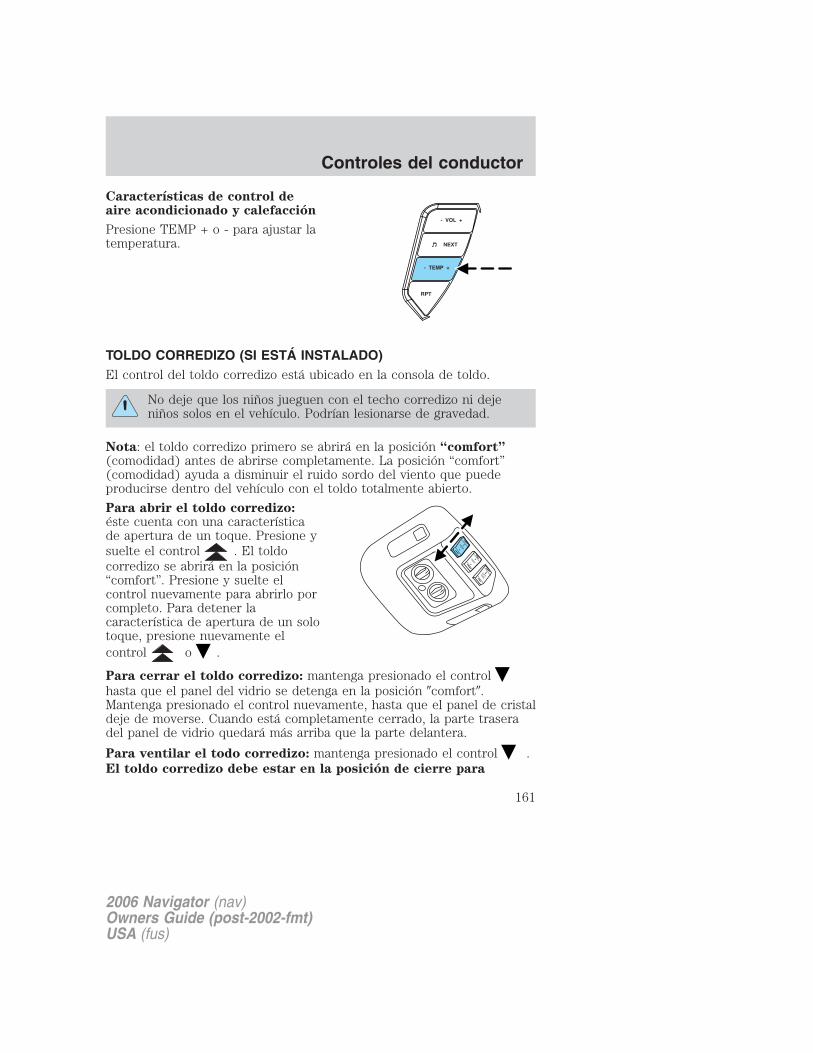
Características de control deaire acondicionado y calefacción
Presione TEMP + o - para ajustar latemperatura.
TOLDO CORREDIZO (SI ESTÁ INSTALADO)El control del toldo corredizo está ubicado en la consola de toldo.
No deje que los niños jueguen con el techo corredizo ni dejeniños solos en el vehículo. Podrían lesionarse de gravedad.
Nota: el toldo corredizo primero se abrirá en la posición “comfort”(comodidad) antes de abrirse completamente. La posición “comfort”(comodidad) ayuda a disminuir el ruido sordo del viento que puedeproducirse dentro del vehículo con el toldo totalmente abierto.
Para abrir el toldo corredizo:éste cuenta con una característicade apertura de un toque. Presione ysuelte el control . El toldocorredizo se abrirá en la posición“comfort”. Presione y suelte elcontrol nuevamente para abrirlo porcompleto. Para detener lacaracterística de apertura de un solotoque, presione nuevamente elcontrol o .
Para cerrar el toldo corredizo: mantenga presionado el controlhasta que el panel del vidrio se detenga en la posición �comfort�.Mantenga presionado el control nuevamente, hasta que el panel de cristaldeje de moverse. Cuando está completamente cerrado, la parte traseradel panel de vidrio quedará más arriba que la parte delantera.
Para ventilar el todo corredizo: mantenga presionado el control .El toldo corredizo debe estar en la posición de cierre para
ROOF
VENT
LIFTGATE
2006 Navigator (nav)Owners Guide (post-2002-fmt)USA (fus)
Controles del conductor
161
moverlo a la posición de ventilación. Para cerrarlo, mantengapresionado el control hasta que el panel de vidrio deje de moverse.
El toldo corredizo tiene una cubierta deslizable incorporada que sepuede abrir o cerrar manualmente cuando el panel de vidrio estácerrado. Para cerrar la cubierta, jálela hacia la parte delantera delvehículo.
Al cerrar el toldo corredizo, debe verificar que esté libre deobstrucciones y asegurarse de que los niños y/o mascotas no
estén cerca de la abertura del toldo.
SISTEMA DE CONTROL INALÁMBRICO HOMELINK�
El Sistema de control inalámbrico HomeLink� ubicado debajo de la viseradel conductor, proporciona una manera cómoda de reemplazar hasta trestransmisores manuales por un solo dispositivo integrado. Estacaracterística registrará los códigos de radiofrecuencia de la mayoría delos transmisores para hacer funcionar puertas de garajes, operadores deportones de entrada, sistemas de seguridad, seguros de la puerta deentrada y luces de hogares o de oficinas.
Al programar el Sistema de control inalámbrico HomeLink� parala puerta o el portón del garaje, asegúrese de que no haya
personas ni objetos cerca para evitar posibles lesiones o daños.
No use el Sistema de control inalámbrico HomeLink� con un sistemapara abrir puertas de garajes que carezca de las características dedetención y de retracción de seguridad según las exigencias de lasnormas federales de seguridad de Estados Unidos (esto incluye todomodelo de sistema para abrir puertas de garajes fabricado antes del 1 deabril de 1982). Un sistema para abrir puertas de garajes que no puedadetectar un objeto y enviar una señal a la puerta para que se detenga ydé marcha atrás, no cumple con las actuales normas federales deseguridad de Estados Unidos. Para obtener mayor información,contáctese con HomeLink� en: www.homelink.com o bien, llame al1–800–355–3515.
Conserve el transmisor original para usarlo en otros vehículos y tambiénpara futuros procedimientos de programación (por ejemplo, si compra unnuevo vehículo equipado con HomeLink�). Además se recomienda que alvender el vehículo, se borren los botones programados del Homelink�con fines de seguridad, consulte Programación en esta sección.
2006 Navigator (nav)Owners Guide (post-2002-fmt)USA (fus)
Controles del conductor
162
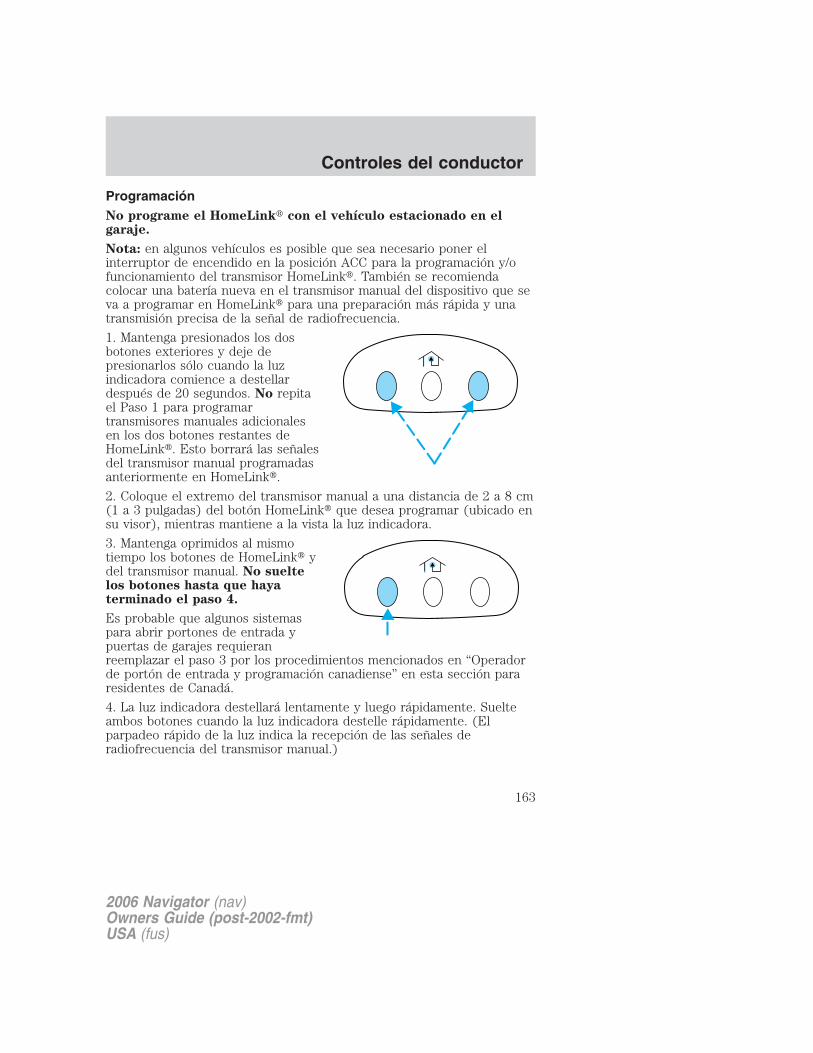
ProgramaciónNo programe el HomeLink� con el vehículo estacionado en elgaraje.
Nota: en algunos vehículos es posible que sea necesario poner elinterruptor de encendido en la posición ACC para la programación y/ofuncionamiento del transmisor HomeLink�. También se recomiendacolocar una batería nueva en el transmisor manual del dispositivo que seva a programar en HomeLink� para una preparación más rápida y unatransmisión precisa de la señal de radiofrecuencia.
1. Mantenga presionados los dosbotones exteriores y deje depresionarlos sólo cuando la luzindicadora comience a destellardespués de 20 segundos. No repitael Paso 1 para programartransmisores manuales adicionalesen los dos botones restantes deHomeLink�. Esto borrará las señalesdel transmisor manual programadasanteriormente en HomeLink�.
2. Coloque el extremo del transmisor manual a una distancia de 2 a 8 cm(1 a 3 pulgadas) del botón HomeLink� que desea programar (ubicado ensu visor), mientras mantiene a la vista la luz indicadora.
3. Mantenga oprimidos al mismotiempo los botones de HomeLink� ydel transmisor manual. No sueltelos botones hasta que hayaterminado el paso 4.
Es probable que algunos sistemaspara abrir portones de entrada ypuertas de garajes requieranreemplazar el paso 3 por los procedimientos mencionados en “Operadorde portón de entrada y programación canadiense” en esta sección pararesidentes de Canadá.
4. La luz indicadora destellará lentamente y luego rápidamente. Suelteambos botones cuando la luz indicadora destelle rápidamente. (Elparpadeo rápido de la luz indica la recepción de las señales deradiofrecuencia del transmisor manual.)
2006 Navigator (nav)Owners Guide (post-2002-fmt)USA (fus)
Controles del conductor
163
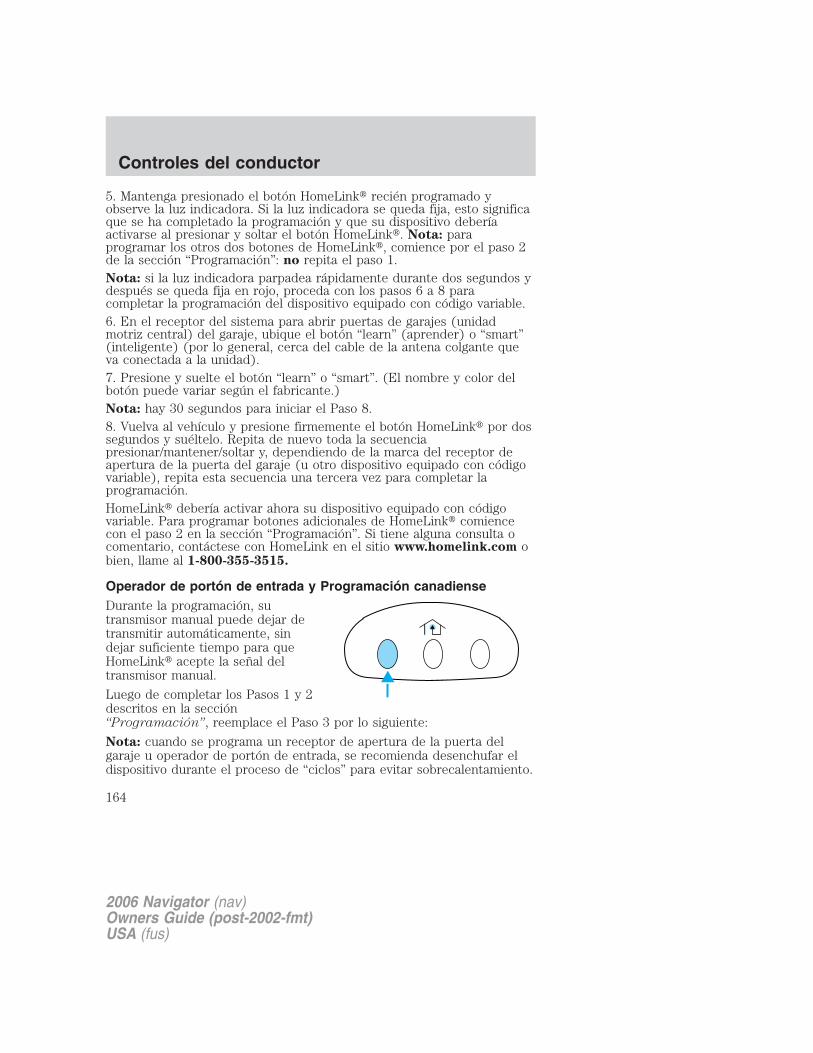
5. Mantenga presionado el botón HomeLink� recién programado yobserve la luz indicadora. Si la luz indicadora se queda fija, esto significaque se ha completado la programación y que su dispositivo deberíaactivarse al presionar y soltar el botón HomeLink�. Nota: paraprogramar los otros dos botones de HomeLink�, comience por el paso 2de la sección “Programación”: no repita el paso 1.Nota: si la luz indicadora parpadea rápidamente durante dos segundos ydespués se queda fija en rojo, proceda con los pasos 6 a 8 paracompletar la programación del dispositivo equipado con código variable.6. En el receptor del sistema para abrir puertas de garajes (unidadmotriz central) del garaje, ubique el botón “learn” (aprender) o “smart”(inteligente) (por lo general, cerca del cable de la antena colgante queva conectada a la unidad).7. Presione y suelte el botón “learn” o “smart”. (El nombre y color delbotón puede variar según el fabricante.)Nota: hay 30 segundos para iniciar el Paso 8.8. Vuelva al vehículo y presione firmemente el botón HomeLink� por dossegundos y suéltelo. Repita de nuevo toda la secuenciapresionar/mantener/soltar y, dependiendo de la marca del receptor deapertura de la puerta del garaje (u otro dispositivo equipado con códigovariable), repita esta secuencia una tercera vez para completar laprogramación.HomeLink� debería activar ahora su dispositivo equipado con códigovariable. Para programar botones adicionales de HomeLink� comiencecon el paso 2 en la sección “Programación”. Si tiene alguna consulta ocomentario, contáctese con HomeLink en el sitio www.homelink.com obien, llame al 1-800-355-3515.
Operador de portón de entrada y Programación canadienseDurante la programación, sutransmisor manual puede dejar detransmitir automáticamente, sindejar suficiente tiempo para queHomeLink� acepte la señal deltransmisor manual.
Luego de completar los Pasos 1 y 2descritos en la sección“Programación”, reemplace el Paso 3 por lo siguiente:
Nota: cuando se programa un receptor de apertura de la puerta delgaraje u operador de portón de entrada, se recomienda desenchufar eldispositivo durante el proceso de “ciclos” para evitar sobrecalentamiento.
2006 Navigator (nav)Owners Guide (post-2002-fmt)USA (fus)
Controles del conductor
164
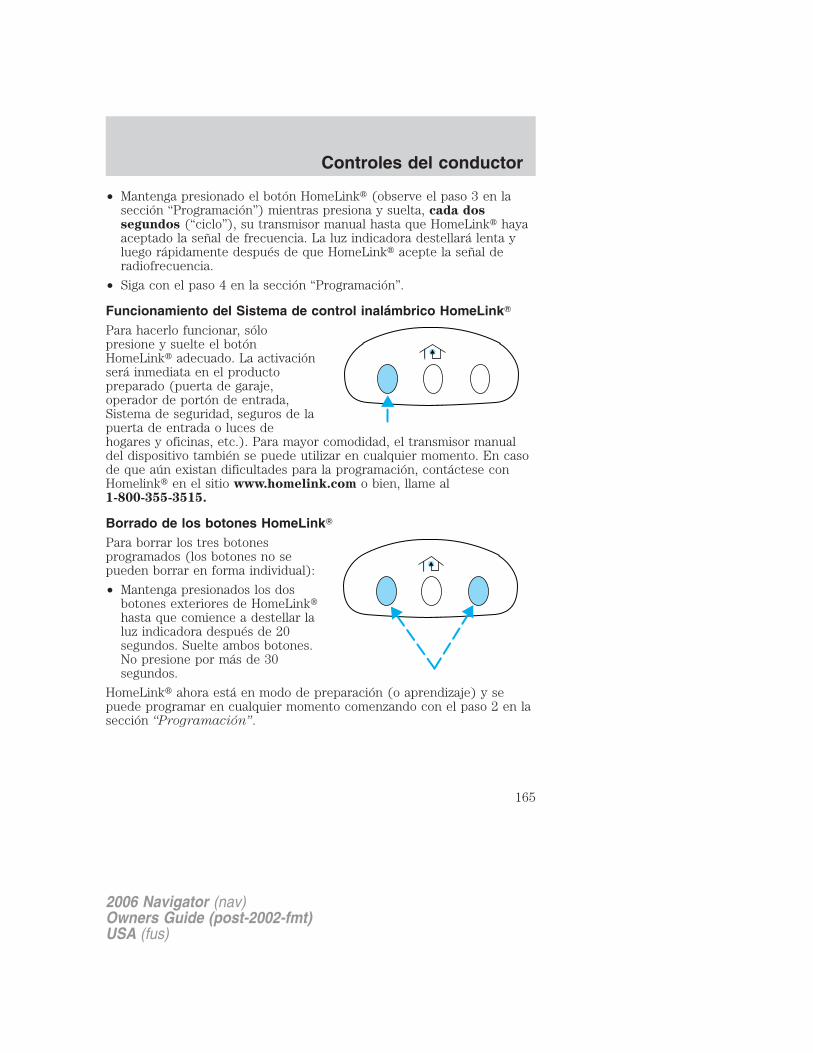
• Mantenga presionado el botón HomeLink� (observe el paso 3 en lasección “Programación”) mientras presiona y suelta, cada dossegundos (“ciclo”), su transmisor manual hasta que HomeLink� hayaaceptado la señal de frecuencia. La luz indicadora destellará lenta yluego rápidamente después de que HomeLink� acepte la señal deradiofrecuencia.
• Siga con el paso 4 en la sección “Programación”.
Funcionamiento del Sistema de control inalámbrico HomeLink�
Para hacerlo funcionar, sólopresione y suelte el botónHomeLink� adecuado. La activaciónserá inmediata en el productopreparado (puerta de garaje,operador de portón de entrada,Sistema de seguridad, seguros de lapuerta de entrada o luces dehogares y oficinas, etc.). Para mayor comodidad, el transmisor manualdel dispositivo también se puede utilizar en cualquier momento. En casode que aún existan dificultades para la programación, contáctese conHomelink� en el sitio www.homelink.com o bien, llame al1-800-355-3515.
Borrado de los botones HomeLink�
Para borrar los tres botonesprogramados (los botones no sepueden borrar en forma individual):
• Mantenga presionados los dosbotones exteriores de HomeLink�hasta que comience a destellar laluz indicadora después de 20segundos. Suelte ambos botones.No presione por más de 30segundos.
HomeLink� ahora está en modo de preparación (o aprendizaje) y sepuede programar en cualquier momento comenzando con el paso 2 en lasección “Programación”.
2006 Navigator (nav)Owners Guide (post-2002-fmt)USA (fus)
Controles del conductor
165

Reprogramación de un botón de HomeLink�
Para programar un dispositivo al HomeLink� empleando un botónHomeLink� preparado anteriormente, siga estos pasos:
1. Mantenga presionado el botón Homelink� deseado. NO suelte elbotón.
2. La luz indicadora comenzará a destellar después de 20 segundos. Sinsoltar el botón de HomeLink�, siga el paso 2 en la sección“Programación”.
Si tiene alguna consulta o comentario, contáctese con HomeLink en elsitio www.homelink.com o bien, llame al 1-800-355-3515.
CENTRO DE MENSAJESCon el encendido en la posición ON,el centro de mensajes que se ubicaen el grupo de instrumentos,muestra información importante delvehículo mediante un monitoreoconstante de los sistemas delvehículo. Puede seleccionar características de visualización en el centrode mensajes para obtener una visualización del estado, precedida por unabreve campanilla indicadora. El sistema también lo informará deprobables problemas del vehículo mediante una visualización deadvertencias del sistema, seguida por una campanilla de indicación larga.
Características para seleccionar
Reset (Restablecer)Presione este control paraseleccionar y restablecer lasfunciones señaladas en el menúINFO (Información) y en el menúSETUP (Configuración).
2006 Navigator (nav)Owners Guide (post-2002-fmt)USA (fus)
Controles del conductor
166

Menú Info (Información)Este control muestra las siguientesvisualizaciones de control:
• Odómetro de viaje, odómetro ybrújula
• Distancia antes de quedar eltanque vacío (DTE)
• Ahorro promedio de combustible
• Tiempo transcurrido de viaje
Odómetro y odómetro de viaje
Consulte Indicadores en el capítulo Grupo de instrumentos.
Visualización de la brújula
La lectura de la brújula se puede ver afectada al manejar cerca deedificios de gran tamaño, puentes, cables del tendido eléctrico y antenasde transmisión potentes. Si se colocan objetos magnéticos o metálicosdentro, sobre o cerca del vehículo también se puede afectar la precisiónde la brújula.
Normalmente, cuando algo afecta las lecturas de la brújula, ésta secorrige sola, después de que el vehículo funcione por unos días encondiciones normales. Si la brújula continúa siendo imprecisa, puede sernecesario calibrarla manualmente. Consulte Ajuste de zona ycalibración de la brújula.
La mayoría de las áreas geográficas (zonas) poseen un punto de brújulanorte magnético que varía levemente según la dirección norte de losmapas. Esta variación es de cuatro grados entre zonas adyacentes y sehará perceptible a medida que el vehículo pase por varias zonas. Unajuste de zona correcto elimina este error. Consulte Ajuste de zona ycalibración de la brújula.
2006 Navigator (nav)Owners Guide (post-2002-fmt)USA (fus)
Controles del conductor
167
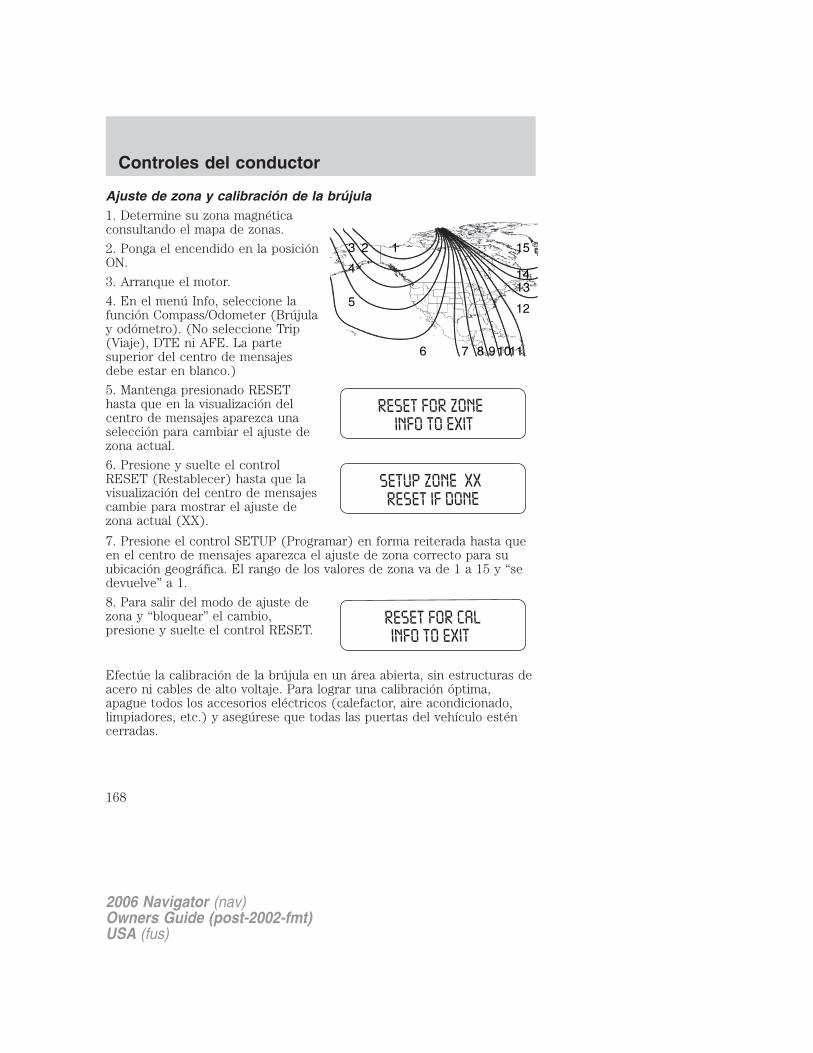
Ajuste de zona y calibración de la brújula1. Determine su zona magnéticaconsultando el mapa de zonas.
2. Ponga el encendido en la posiciónON.
3. Arranque el motor.
4. En el menú Info, seleccione lafunción Compass/Odometer (Brújulay odómetro). (No seleccione Trip(Viaje), DTE ni AFE. La partesuperior del centro de mensajesdebe estar en blanco.)
5. Mantenga presionado RESEThasta que en la visualización delcentro de mensajes aparezca unaselección para cambiar el ajuste dezona actual.
6. Presione y suelte el controlRESET (Restablecer) hasta que lavisualización del centro de mensajescambie para mostrar el ajuste dezona actual (XX).
7. Presione el control SETUP (Programar) en forma reiterada hasta queen el centro de mensajes aparezca el ajuste de zona correcto para suubicación geográfica. El rango de los valores de zona va de 1 a 15 y “sedevuelve” a 1.
8. Para salir del modo de ajuste dezona y “bloquear” el cambio,presione y suelte el control RESET.
Efectúe la calibración de la brújula en un área abierta, sin estructuras deacero ni cables de alto voltaje. Para lograr una calibración óptima,apague todos los accesorios eléctricos (calefactor, aire acondicionado,limpiadores, etc.) y asegúrese que todas las puertas del vehículo esténcerradas.
123
4
5
6 7 8 91011
12
1314
15
2006 Navigator (nav)Owners Guide (post-2002-fmt)USA (fus)
Controles del conductor
168
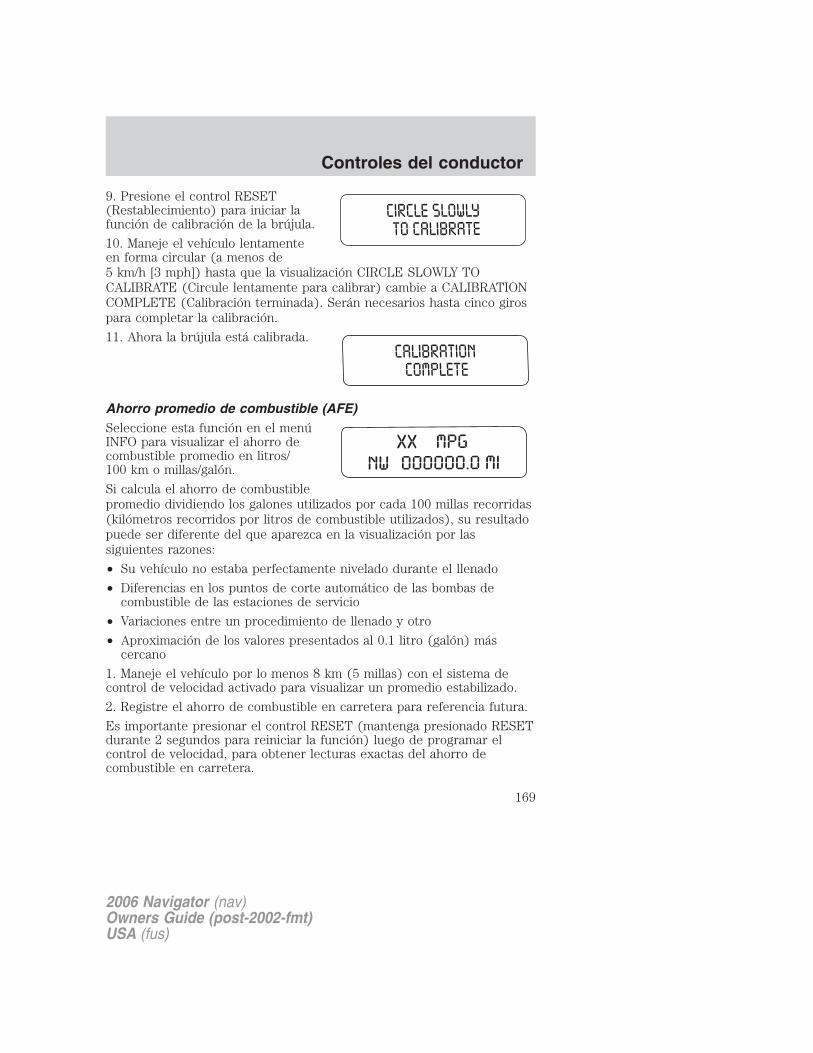
9. Presione el control RESET(Restablecimiento) para iniciar lafunción de calibración de la brújula.
10. Maneje el vehículo lentamenteen forma circular (a menos de5 km/h [3 mph]) hasta que la visualización CIRCLE SLOWLY TOCALIBRATE (Circule lentamente para calibrar) cambie a CALIBRATIONCOMPLETE (Calibración terminada). Serán necesarios hasta cinco girospara completar la calibración.
11. Ahora la brújula está calibrada.
Ahorro promedio de combustible (AFE)Seleccione esta función en el menúINFO para visualizar el ahorro decombustible promedio en litros/100 km o millas/galón.
Si calcula el ahorro de combustiblepromedio dividiendo los galones utilizados por cada 100 millas recorridas(kilómetros recorridos por litros de combustible utilizados), su resultadopuede ser diferente del que aparezca en la visualización por lassiguientes razones:
• Su vehículo no estaba perfectamente nivelado durante el llenado
• Diferencias en los puntos de corte automático de las bombas decombustible de las estaciones de servicio
• Variaciones entre un procedimiento de llenado y otro
• Aproximación de los valores presentados al 0.1 litro (galón) máscercano
1. Maneje el vehículo por lo menos 8 km (5 millas) con el sistema decontrol de velocidad activado para visualizar un promedio estabilizado.
2. Registre el ahorro de combustible en carretera para referencia futura.
Es importante presionar el control RESET (mantenga presionado RESETdurante 2 segundos para reiniciar la función) luego de programar elcontrol de velocidad, para obtener lecturas exactas del ahorro decombustible en carretera.
2006 Navigator (nav)Owners Guide (post-2002-fmt)USA (fus)
Controles del conductor
169

Tiempo transcurrido de viajeSeleccione esta función desde elmenú INFO para que aparezca uncronómetro.
Para manejar el Tiempo transcurridode viaje, realice lo siguiente:
1. Presione y suelte RESET para iniciar el cronómetro.
2. Presione y suelte RESET para pausar el cronómetro.
3. Mantenga presionado RESET durante 2 segundos para restablecer elcronómetro.
Distancia antes de quedar el tanque vacío (DTE)Al seleccionar esta función desde elmenú INFO, se obtiene un cálculoaproximado de la distancia quepuede manejar con el combustibleque queda en el tanque, encondiciones normales de manejo.Recuerde apagar el encendido cuando vuelva a cargar combustible parapermitir que esta función detecte correctamente la cantidad decombustible agregado.
La función DTE muestra LOW FUEL LEVEL (Nivel de combustible bajo)y suena un tono durante un segundo cuando le quedan unos 80 km(50 millas) para que se vacíe el estanque. Si Restablece (RESET) estemensaje de advertencia, esta visualización y el tono volverán en10 minutos.
El DTE se calcula mediante el ahorro de combustible promedio defuncionamiento, que se basa en su historial de manejo reciente de800 km (500 millas). Este valor no es el mismo que el de la visualizaciónde economía promedio de combustible. La economía de combustiblepromedio de funcionamiento se reinicia en el valor predeterminado defábrica si se desconecta la batería.
2006 Navigator (nav)Owners Guide (post-2002-fmt)USA (fus)
Controles del conductor
170
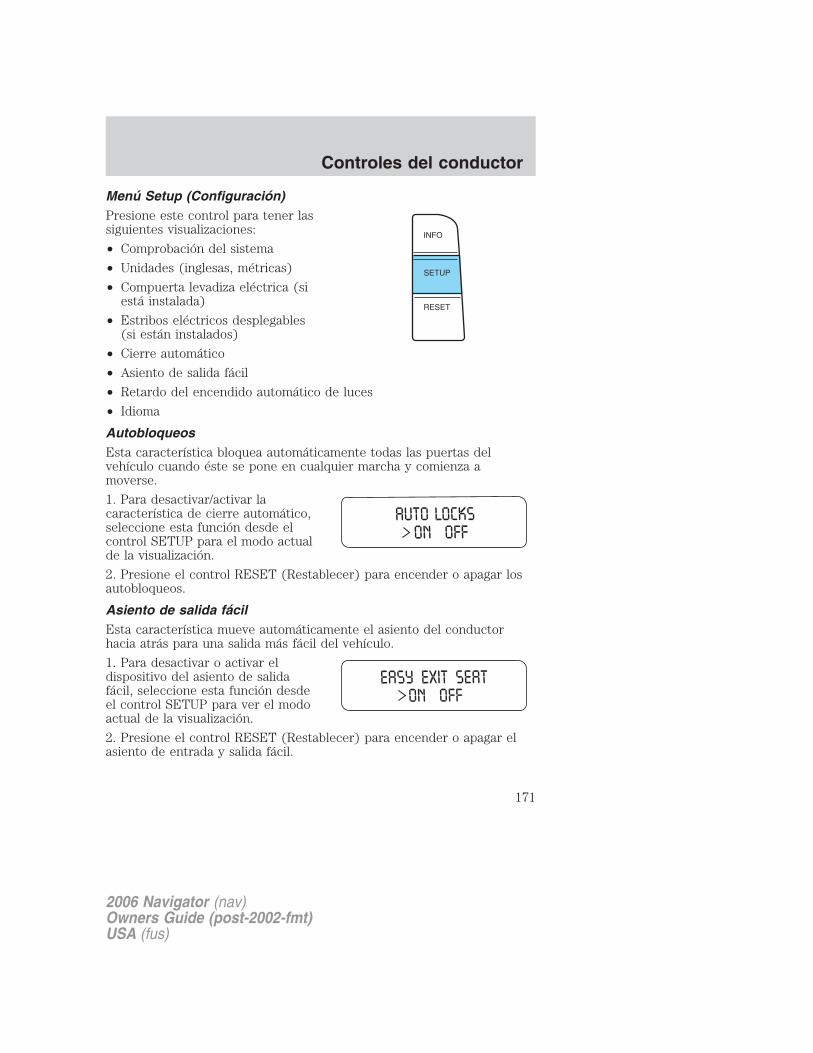
Menú Setup (Configuración)Presione este control para tener lassiguientes visualizaciones:
• Comprobación del sistema
• Unidades (inglesas, métricas)
• Compuerta levadiza eléctrica (siestá instalada)
• Estribos eléctricos desplegables(si están instalados)
• Cierre automático
• Asiento de salida fácil
• Retardo del encendido automático de luces
• Idioma
AutobloqueosEsta característica bloquea automáticamente todas las puertas delvehículo cuando éste se pone en cualquier marcha y comienza amoverse.
1. Para desactivar/activar lacaracterística de cierre automático,seleccione esta función desde elcontrol SETUP para el modo actualde la visualización.
2. Presione el control RESET (Restablecer) para encender o apagar losautobloqueos.
Asiento de salida fácilEsta característica mueve automáticamente el asiento del conductorhacia atrás para una salida más fácil del vehículo.
1. Para desactivar o activar eldispositivo del asiento de salidafácil, seleccione esta función desdeel control SETUP para ver el modoactual de la visualización.
2. Presione el control RESET (Restablecer) para encender o apagar elasiento de entrada y salida fácil.
2006 Navigator (nav)Owners Guide (post-2002-fmt)USA (fus)
Controles del conductor
171
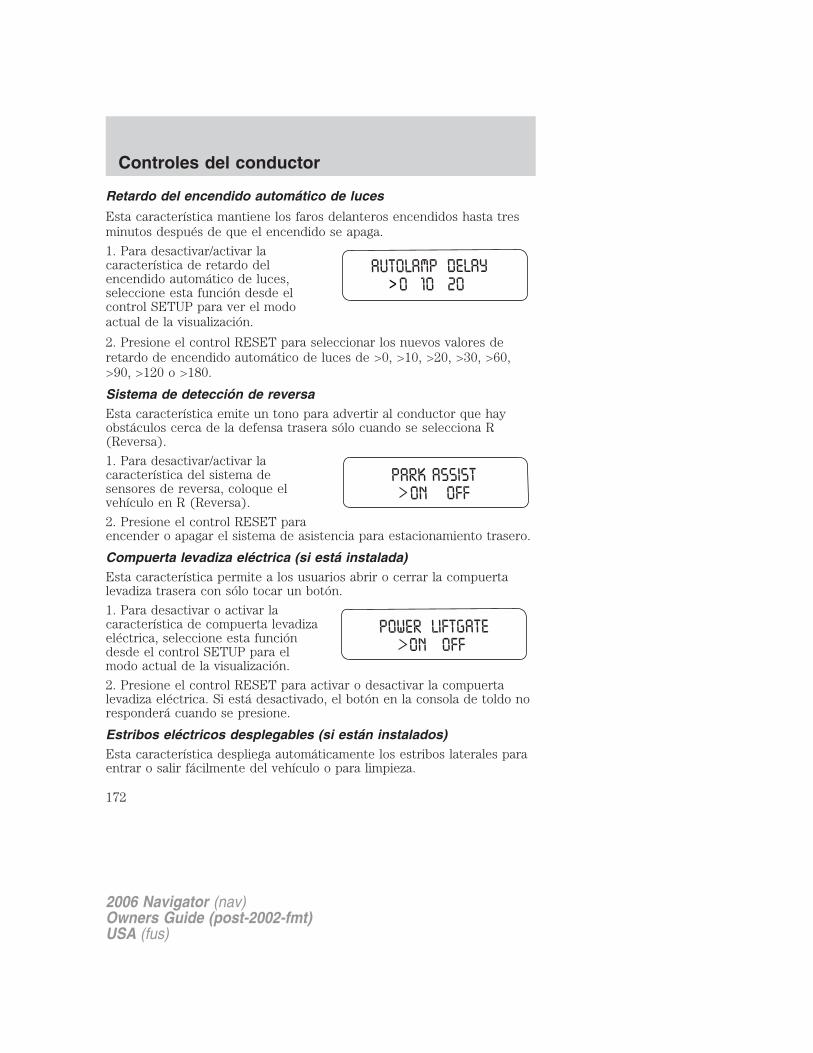
Retardo del encendido automático de luces
Esta característica mantiene los faros delanteros encendidos hasta tresminutos después de que el encendido se apaga.
1. Para desactivar/activar lacaracterística de retardo delencendido automático de luces,seleccione esta función desde elcontrol SETUP para ver el modoactual de la visualización.
2. Presione el control RESET para seleccionar los nuevos valores deretardo de encendido automático de luces de >0, >10, >20, >30, >60,>90, >120 o >180.
Sistema de detección de reversaEsta característica emite un tono para advertir al conductor que hayobstáculos cerca de la defensa trasera sólo cuando se selecciona R(Reversa).
1. Para desactivar/activar lacaracterística del sistema desensores de reversa, coloque elvehículo en R (Reversa).
2. Presione el control RESET paraencender o apagar el sistema de asistencia para estacionamiento trasero.
Compuerta levadiza eléctrica (si está instalada)Esta característica permite a los usuarios abrir o cerrar la compuertalevadiza trasera con sólo tocar un botón.
1. Para desactivar o activar lacaracterística de compuerta levadizaeléctrica, seleccione esta funcióndesde el control SETUP para elmodo actual de la visualización.
2. Presione el control RESET para activar o desactivar la compuertalevadiza eléctrica. Si está desactivado, el botón en la consola de toldo noresponderá cuando se presione.
Estribos eléctricos desplegables (si están instalados)Esta característica despliega automáticamente los estribos laterales paraentrar o salir fácilmente del vehículo o para limpieza.
2006 Navigator (nav)Owners Guide (post-2002-fmt)USA (fus)
Controles del conductor
172
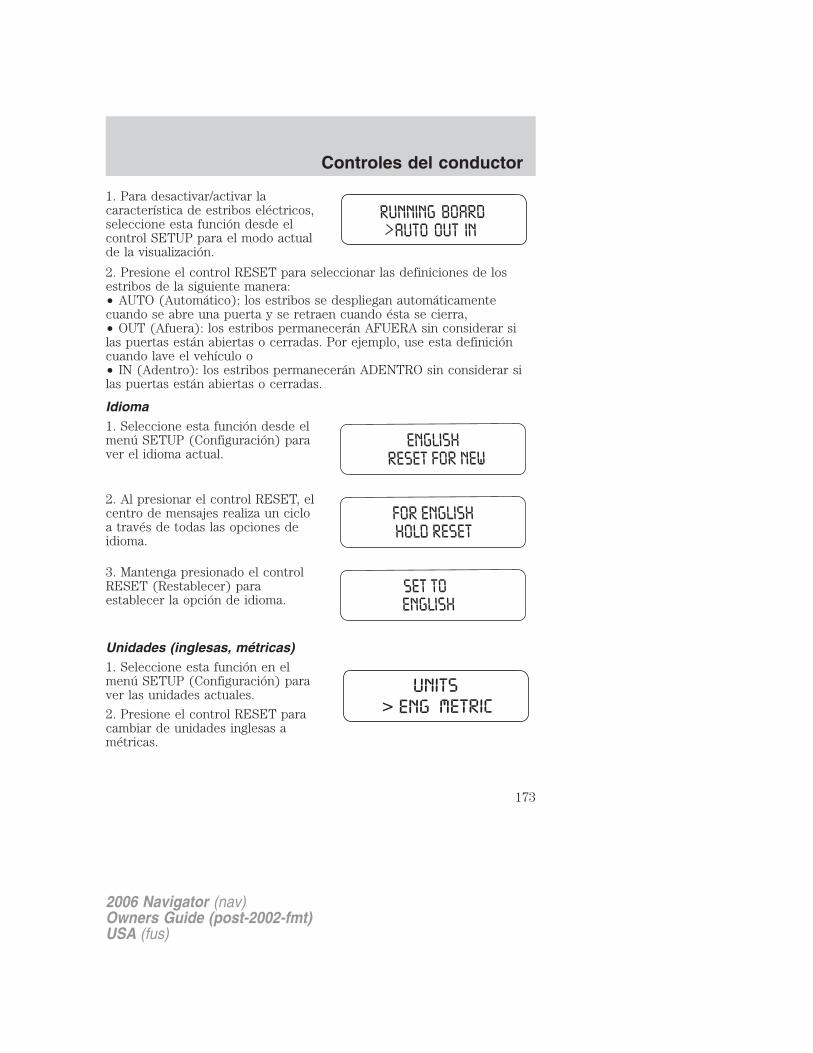
1. Para desactivar/activar lacaracterística de estribos eléctricos,seleccione esta función desde elcontrol SETUP para el modo actualde la visualización.
2. Presione el control RESET para seleccionar las definiciones de losestribos de la siguiente manera:• AUTO (Automático): los estribos se despliegan automáticamentecuando se abre una puerta y se retraen cuando ésta se cierra,• OUT (Afuera): los estribos permanecerán AFUERA sin considerar silas puertas están abiertas o cerradas. Por ejemplo, use esta definicióncuando lave el vehículo o• IN (Adentro): los estribos permanecerán ADENTRO sin considerar silas puertas están abiertas o cerradas.
Idioma1. Seleccione esta función desde elmenú SETUP (Configuración) paraver el idioma actual.
2. Al presionar el control RESET, elcentro de mensajes realiza un cicloa través de todas las opciones deidioma.
3. Mantenga presionado el controlRESET (Restablecer) paraestablecer la opción de idioma.
Unidades (inglesas, métricas)1. Seleccione esta función en elmenú SETUP (Configuración) paraver las unidades actuales.
2. Presione el control RESET paracambiar de unidades inglesas amétricas.
2006 Navigator (nav)Owners Guide (post-2002-fmt)USA (fus)
Controles del conductor
173
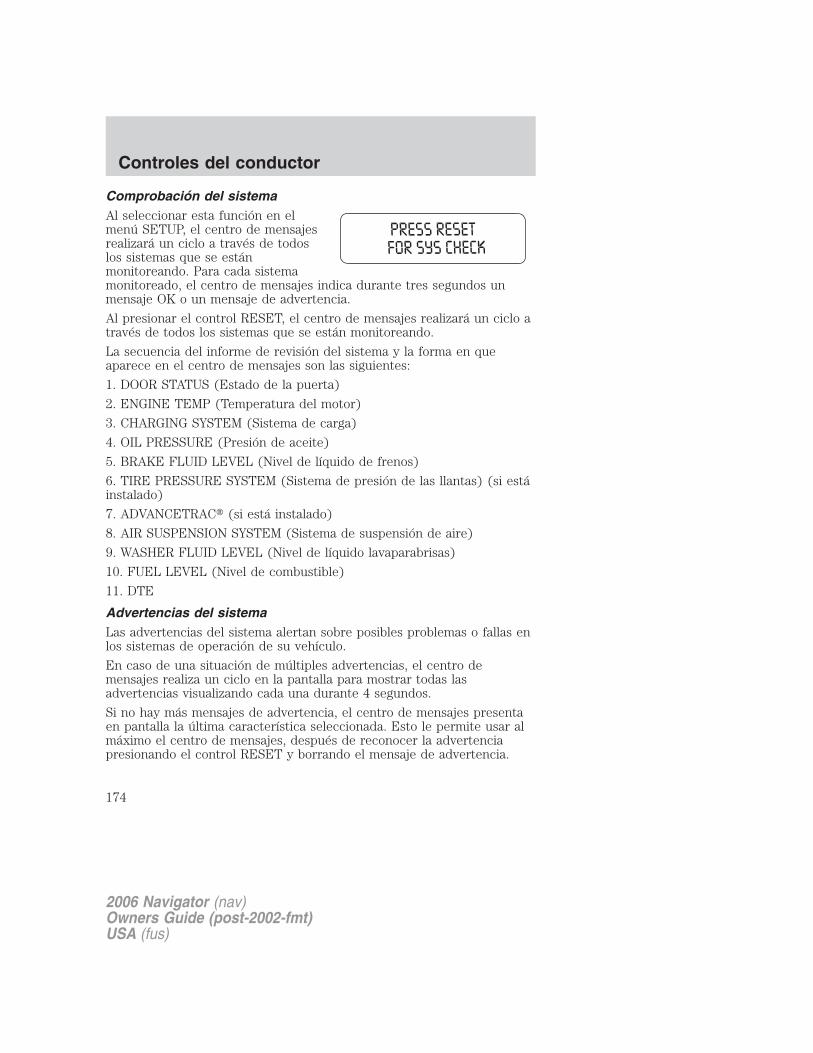
Comprobación del sistemaAl seleccionar esta función en elmenú SETUP, el centro de mensajesrealizará un ciclo a través de todoslos sistemas que se estánmonitoreando. Para cada sistemamonitoreado, el centro de mensajes indica durante tres segundos unmensaje OK o un mensaje de advertencia.
Al presionar el control RESET, el centro de mensajes realizará un ciclo através de todos los sistemas que se están monitoreando.
La secuencia del informe de revisión del sistema y la forma en queaparece en el centro de mensajes son las siguientes:
1. DOOR STATUS (Estado de la puerta)
2. ENGINE TEMP (Temperatura del motor)
3. CHARGING SYSTEM (Sistema de carga)
4. OIL PRESSURE (Presión de aceite)
5. BRAKE FLUID LEVEL (Nivel de líquido de frenos)
6. TIRE PRESSURE SYSTEM (Sistema de presión de las llantas) (si estáinstalado)
7. ADVANCETRAC� (si está instalado)
8. AIR SUSPENSION SYSTEM (Sistema de suspensión de aire)
9. WASHER FLUID LEVEL (Nivel de líquido lavaparabrisas)
10. FUEL LEVEL (Nivel de combustible)
11. DTE
Advertencias del sistemaLas advertencias del sistema alertan sobre posibles problemas o fallas enlos sistemas de operación de su vehículo.
En caso de una situación de múltiples advertencias, el centro demensajes realiza un ciclo en la pantalla para mostrar todas lasadvertencias visualizando cada una durante 4 segundos.
Si no hay más mensajes de advertencia, el centro de mensajes presentaen pantalla la última característica seleccionada. Esto le permite usar almáximo el centro de mensajes, después de reconocer la advertenciapresionando el control RESET y borrando el mensaje de advertencia.
2006 Navigator (nav)Owners Guide (post-2002-fmt)USA (fus)
Controles del conductor
174

Los mensajes de advertencia que se han restablecido se dividen en trescategorías:
• Éstos no se pueden borrar hasta que la condición se corrija.
• Vuelven a aparecer en la pantalla diez minutos después de surestablecimiento.
• No volverán a aparecer hasta que se haya completado un ciclo deencendido OFF-ON.
Esto funciona como un recordatorio que estas condiciones deadvertencia aún permanecen en el vehículo.
Visualización de advertencia Status (Estado)
Sistema auxiliar paraestacionamiento en reversaACTIVADO/DESACTIVADO (siestá instalado)
La advertencia aparece cuando seselecciona R (Reversa).
AdvTrac ON (Tracciónavanzada encendida)
Aparece en pantalla durante 4segundos
AdvTrac OFF (Tracciónavanzada apagada)Compuerta levadiza eléctricaapagadaCompuerta levadiza o vidrio dela compuerta levadiza abierto
La advertencia vuelve después de 10minutos
4X4 high (alta) temporalCheck AdvTrac (Revisión de latracción avanzada)Low fuel level (Nivel decombustible bajo)Revise el sistema de cargaNivel de líquido de frenos bajoLow oil pressure (Baja presiónde aceite)Revisar la temperatura delmotor
2006 Navigator (nav)Owners Guide (post-2002-fmt)USA (fus)
Controles del conductor
175
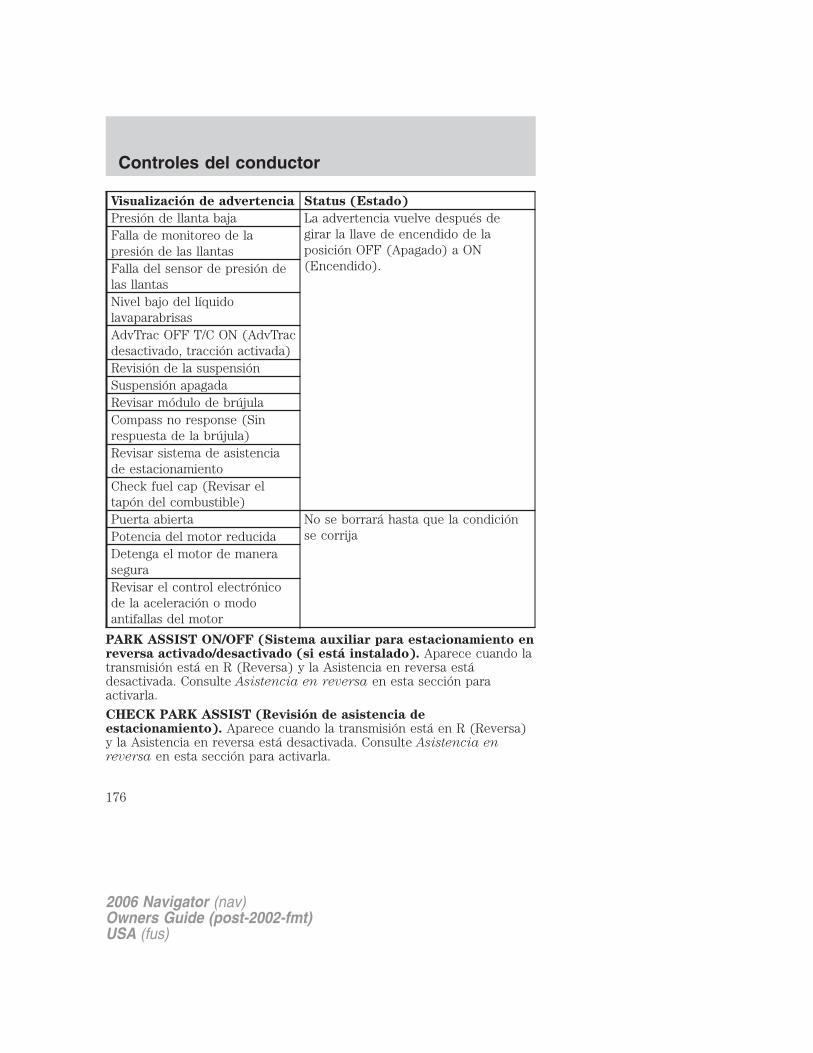
Visualización de advertencia Status (Estado)
Presión de llanta baja La advertencia vuelve después degirar la llave de encendido de laposición OFF (Apagado) a ON(Encendido).
Falla de monitoreo de lapresión de las llantasFalla del sensor de presión delas llantasNivel bajo del líquidolavaparabrisasAdvTrac OFF T/C ON (AdvTracdesactivado, tracción activada)Revisión de la suspensiónSuspensión apagadaRevisar módulo de brújulaCompass no response (Sinrespuesta de la brújula)Revisar sistema de asistenciade estacionamientoCheck fuel cap (Revisar eltapón del combustible)Puerta abierta No se borrará hasta que la condición
se corrijaPotencia del motor reducidaDetenga el motor de maneraseguraRevisar el control electrónicode la aceleración o modoantifallas del motor
PARK ASSIST ON/OFF (Sistema auxiliar para estacionamiento enreversa activado/desactivado (si está instalado). Aparece cuando latransmisión está en R (Reversa) y la Asistencia en reversa estádesactivada. Consulte Asistencia en reversa en esta sección paraactivarla.
CHECK PARK ASSIST (Revisión de asistencia deestacionamiento). Aparece cuando la transmisión está en R (Reversa)y la Asistencia en reversa está desactivada. Consulte Asistencia enreversa en esta sección para activarla.
2006 Navigator (nav)Owners Guide (post-2002-fmt)USA (fus)
Controles del conductor
176

ADVTRAC ON (Tracción avanzada encendida). Aparece cuandoAdvanceTrac� con RSC está ON (Activado).
ADVTRAC OFF (Tracción avanzada apagada). Aparece cuandoAdvanceTrac� con RSC está OFF (Desactivado).
POWER LIFTGATE OFF (Compuerta levadiza eléctrica apagada).Aparece cuando la compuerta levadiza eléctrica está en OFF.
DOOR AJAR (Puerta abierta). Aparece cuando una puerta no estátotalmente cerrada.
LIFTGATE OR LIFTGATE GLASS AJAR (Compuerta levadiza ovidrio de la compuerta levadiza abierto). Aparece cuando lacompuerta levadiza o el vidrio de la ventana levadiza están mal cerrados.
CHECK ENGINE TEMPERATURE (Revisar la temperatura delmotor). Aparece en la visualización cuando el refrigerante del motor seestá sobrecalentando. Detenga el vehículo lo más pronto posible, apagueel motor y déjelo enfriar. Revise el líquido refrigerante y su nivel.Consulte la sección Líquido refrigerante del motor en el capítuloMantenimiento y especificaciones. Si la advertencia permaneceencendida o si continúa encendiéndose, comuníquese con su distribuidorautorizado a la brevedad posible.
REDUCED ENGINE POWER (Potencia del motor reducida)Aparece en la visualización cuando el motor se está sobrecalentando.Detenga el vehículo a la brevedad posible y apague el motor. Si laadvertencia permanece encendida o si continúa encendiéndose,comuníquese con su distribuidor autorizado a la brevedad posible.
REVISAR EL CONTROL ELECTRÓNICO DE LA ACELERACIÓN oMODO ANTIFALLAS DEL MOTOR Aparece cuando el motor cambiaautomáticamente a un funcionamiento “debilitado a casa”. Si laadvertencia permanece encendida o si continúa encendiéndose,comuníquese con su distribuidor autorizado a la brevedad posible.
STOP ENGINE SAFELY (Detenga el motor de manera segura).Aparece en la visualización cuando el motor se está sobrecalentando.Detenga el vehículo a la brevedad posible y apague el motor. Si laadvertencia permanece encendida o si continúa encendiéndose,comuníquese con su distribuidor autorizado a la brevedad posible.
LOW TIRE PRESSURE (Presión de llanta baja). Aparece cuandouna o más de las llantas del vehículo tienen baja presión. ConsulteInspección e inflado de las llantas en el capítulo Llantas, ruedas ycarga.
2006 Navigator (nav)Owners Guide (post-2002-fmt)USA (fus)
Controles del conductor
177
TIRE PRESSURE MONITOR FAULT (Falla de monitoreo de lapresión de las llantas). Aparece en pantalla cuando el Sistema demonitoreo de presión de las llantas funciona incorrectamente. Si laadvertencia permanece encendida o sigue apareciendo, haga que elrepresentante de servicio revise el sistema
TIRE PRESSURE SENSOR FAULT (Falla del sensor de presión delas llantas). Aparece cuando un sensor de presión de llantas nofunciona correctamente o cuando está en uso la llanta de refacción. Paraobtener más información sobre el funcionamiento del sistema en estascondiciones, consulte Conocimiento del sistema de monitoreo depresión de las llantas en el capítulo Llantas, ruedas y carga. Si laadvertencia permanece encendida o sigue apareciendo, haga que elrepresentante de servicio revise el sistema
LOW FUEL LEVEL (Nivel bajo de combustible). Aparece en pantallacomo recordatorio previo a una condición de combustible bajo.
CHECK CHARGING SYSTEM (Revisión del sistema de carga).Aparece cuando el sistema eléctrico no mantiene un voltaje adecuado. Sihace funcionar accesorios eléctricos con el motor en ralentí a unavelocidad baja, apague la mayor cantidad de cargas eléctricas tan prontocomo sea posible. Si la advertencia permanece encendida o si seenciende cuando el motor está funcionando a velocidades normales, hagarevisar el sistema eléctrico lo más pronto posible.
LOW BRAKE FLUID LEVEL (Nivel de líquido de frenos bajo).Indica que el nivel del líquido de frenos está bajo y que es necesarioinspeccionar el sistema de frenos de inmediato. Consulte Depósito delíquido de frenos en el capítulo Mantenimiento y especificaciones.
LOW OIL PRESSURE (Baja presión de aceite). Aparece cuando lapresión de aceite del motor está baja. Si aparece este mensaje deadvertencia, revise el nivel de aceite del motor. Consulte Aceite delmotor en el capítulo Mantenimiento y especificaciones para obtenermás información sobre el llenado de aceite del motor. Si el nivel deaceite está correcto y la advertencia persiste, apague el motorinmediatamente y comuníquese con su distribuidor autorizado paraobtener servicio.
LOW WASHER FLUID LEVEL (NIVEL LÍQUIDOLAVAPARABRISAS BAJO). Indica que el depósito de líquido dellavador tiene menos de un cuarto de su capacidad. Revise el nivel dellíquido del lavador. Consulte Líquido de lavaparabrisas en el capítuloMantenimiento y especificaciones.
2006 Navigator (nav)Owners Guide (post-2002-fmt)USA (fus)
Controles del conductor
178
CHECK ADVTRAC (Revisión de la tracción avanzada). Aparececuando el sistema AdvanceTrac� con RSC no está funcionandocorrectamente. Si este mensaje aparece en el centro de mensajes, esposible que el sistema AdvanceTrac� con RSC esté funcionandoparcialmente. Si esta advertencia permanece encendida mientras elmotor está funcionando, comuníquese con su distribuidor autorizado paraobtener servicio a la brevedad posible. Para obtener más información,consulte Sistema de aumento de estabilidad AdvanceTrac� con RSCen el capítulo Manejo.ADVTRAC OFF T/C ON (AdvTrac desactivado, tracción activada).Aparece en pantalla de vehículos 4x4 sólo cuando está seleccionada laPotencia baja 4x4. En este modo, la parte de aumento de estabilidadAdvanceTrac� con RSC está desactivada, pero la característica deaumento de la tracción permanece activada. Para obtener másinformación, consulte Sistema de aumento de estabilidadAdvanceTrac� con RSC en el capítulo Manejo.TEMPORARY 4X4 HIGH (4X4 high (alta) temporal). Aparececuando el sistema 4x4 se bloquea automáticamente para evitar daños porsobrecalentamiento.
CHECK SUSPENSION (Revisión de la suspensión). Aparece cuandoel sistema de suspensión de aire no está funcionando correctamente. Sieste mensaje aparece durante el manejo, salga del camino sin peligro a labrevedad posible. Para obtener información, consulte Suspensión deaire en el capítulo Manejo.
SUSPENSION SWITCHED OFF (Suspensión apagada). Aparece enpantalla cuando el interruptor de la suspensión de aire está en laposición OFF. Para obtener información, consulte Suspensión de aire enel capítulo Manejo.
CHECK FUEL CAP (Revisar el tapón del combustible). Aparece enpantalla cuando el tapón de llenado de combustible no está instaladocorrectamente. Revise que el tapón de llenado de combustible estépuesto correctamente. Consulte Tapón de llenado de combustible en elcapítulo Mantenimiento y especificaciones.
CHECK COMPASS MODULE (Revisar módulo de brújula). Aparececuando la brújula no está funcionando correctamente. Si la advertenciapermanece encendida o si continúa encendiéndose, comuníquese con sudistribuidor autorizado a la brevedad posible.
COMPASS NO RESPONSE (Brújula no responde). Aparece cuandola brújula no está funcionando correctamente. Si la advertenciapermanece encendida o si continúa encendiéndose, comuníquese con sudistribuidor autorizado a la brevedad posible.
2006 Navigator (nav)Owners Guide (post-2002-fmt)USA (fus)
Controles del conductor
179
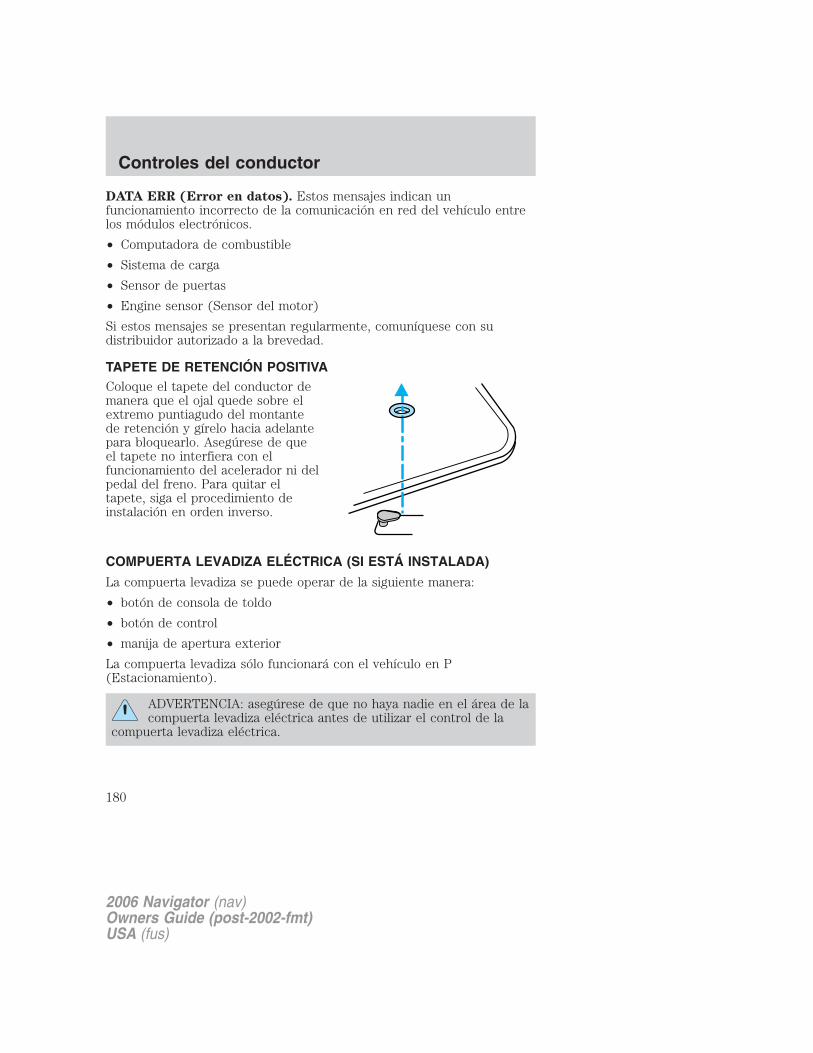
DATA ERR (Error en datos). Estos mensajes indican unfuncionamiento incorrecto de la comunicación en red del vehículo entrelos módulos electrónicos.
• Computadora de combustible
• Sistema de carga
• Sensor de puertas
• Engine sensor (Sensor del motor)
Si estos mensajes se presentan regularmente, comuníquese con sudistribuidor autorizado a la brevedad.
TAPETE DE RETENCIÓN POSITIVAColoque el tapete del conductor demanera que el ojal quede sobre elextremo puntiagudo del montantede retención y gírelo hacia adelantepara bloquearlo. Asegúrese de queel tapete no interfiera con elfuncionamiento del acelerador ni delpedal del freno. Para quitar eltapete, siga el procedimiento deinstalación en orden inverso.
COMPUERTA LEVADIZA ELÉCTRICA (SI ESTÁ INSTALADA)
La compuerta levadiza se puede operar de la siguiente manera:
• botón de consola de toldo
• botón de control
• manija de apertura exterior
La compuerta levadiza sólo funcionará con el vehículo en P(Estacionamiento).
ADVERTENCIA: asegúrese de que no haya nadie en el área de lacompuerta levadiza eléctrica antes de utilizar el control de la
compuerta levadiza eléctrica.
2006 Navigator (nav)Owners Guide (post-2002-fmt)USA (fus)
Controles del conductor
180

Mantenga las llaves fuera del alcance de los niños. No permitaque los niños jueguen cerca de una compuerta levadiza eléctrica
abierta o en movimiento.
No abra la compuerta levadiza en un garaje u otra área cerrada con untecho bajo. Si el techo es bajo, la compuerta levadiza se podría dañar allevantarse.
Para abrir la compuerta levadiza desde la consola de toldo:
Consulte Controles de toldo en esta sección.
Para abrir la compuerta levadiza con el control:
Consulte Sistema de entrada a control remoto en el capítulo Seguros yseguridad.
Para abrir la compuerta levadizacon la manija de aperturaexterior (accionamientomanual):
1. Para abrir, abra la compuertalevadiza con el control o controleléctrico de apertura de la puerta.
2. Jale y suelte la manija de lacompuerta levadiza para activar lacaracterística de asistencia eléctrica.
3. Para abrir la ventana trasera, presione el botón en el costado izquierdode la manija de la compuerta levadiza sobre la placa.
Nota: si se fuerza hacia arriba en forma continua luego del desenganche,se puede activar la característica de detección de obstáculos y detener elsistema eléctrico. Para un mejor rendimiento deje que el sistemaeléctrico abra la compuerta levadiza después de soltar la manija.
4. Para cerrar, jale hacia abajo la compuerta levadiza unas pulgadas paraactivar el cierre eléctrico. Si cierra el portón en forma rápida o más deunas pulgadas puede activar la característica de detección de obstáculosy detener el sistema eléctrico.
Nota: deberá esperar 2 segundos después de abrir la compuerta levadizapara comenzar a cerrar manualmente la compuerta levadiza eléctrica.
2006 Navigator (nav)Owners Guide (post-2002-fmt)USA (fus)
Controles del conductor
181

Detección de obstáculos
El sistema de compuerta levadiza eléctrica está equipado con unacaracterística de detección de obstáculos.Si la compuerta levadiza eléctrica se está cerrando, el sistema estádiseñado para invertir el proceso y abrirla completamente en caso de quedetecte un obstáculo sólido. Cuando se haya quitado el obstáculo, lacompuerta levadiza se puede cerrar eléctricamente.Si se está abriendo la compuerta levadiza eléctrica, el sistema estádiseñado para detenerla cuando detecta un obstáculo sólido. Si lacompuerta levadiza se detiene más abajo de la mitad de la posición deapertura, deberá cerrarla y colocarle el seguro en forma manual. Elfuncionamiento normal se puede reanudar entonces.Restablecimiento de la compuerta levadiza eléctrica:
Es posible que la compuerta levadiza eléctrica no funcione en lassiguientes condiciones: Si ocurre alguno de estos casos, la compuertalevadiza eléctrica se debe restablecer.• bajo voltaje o batería descargada• batería desconectada• la compuerta levadiza quedó abierta o parcialmente cerrada durante
más de seis (6) horas.• la compuerta levadiza se abrió manualmente y se dejó abierta (sin
seguro)Para restablecer la compuerta levadiza eléctrica:1. Cierre y coloque el seguro a la compuerta levadiza manualmente.2. Abra en forma eléctrica la compuerta levadiza utilizando el control o elbotón de la consola de toldo.3. Una vez que esté completamente abierta, cierre la compuerta levadizausando el control o el botón de la consola de toldo.Nota: si el sistema eléctrico de la compuerta levadiza se <DESACTIVA>en el centro de mensajes, el sistema no se puede activar con ningúninterruptor ni con la manija de la compuerta levadiza. El sistema deberá<ACTIVARSE> para poder realizar cualquier operación eléctrica.Señal de compuerta levadiza abierta
Si la compuerta levadiza o el vidrio de ésta no está completamentecerrado, recibirá un mensaje “LIFTGATE o LIFTGATEGLASS AJAR”(Compuerta levadiza o vidrio de la compuerta levadiza abierto) en eltablero de instrumentos. Si lee este mensaje, revise el vidrio y la puertade la compuerta levadiza para asegurarse de que estén completamentecerradas.
2006 Navigator (nav)Owners Guide (post-2002-fmt)USA (fus)
Controles del conductor
182
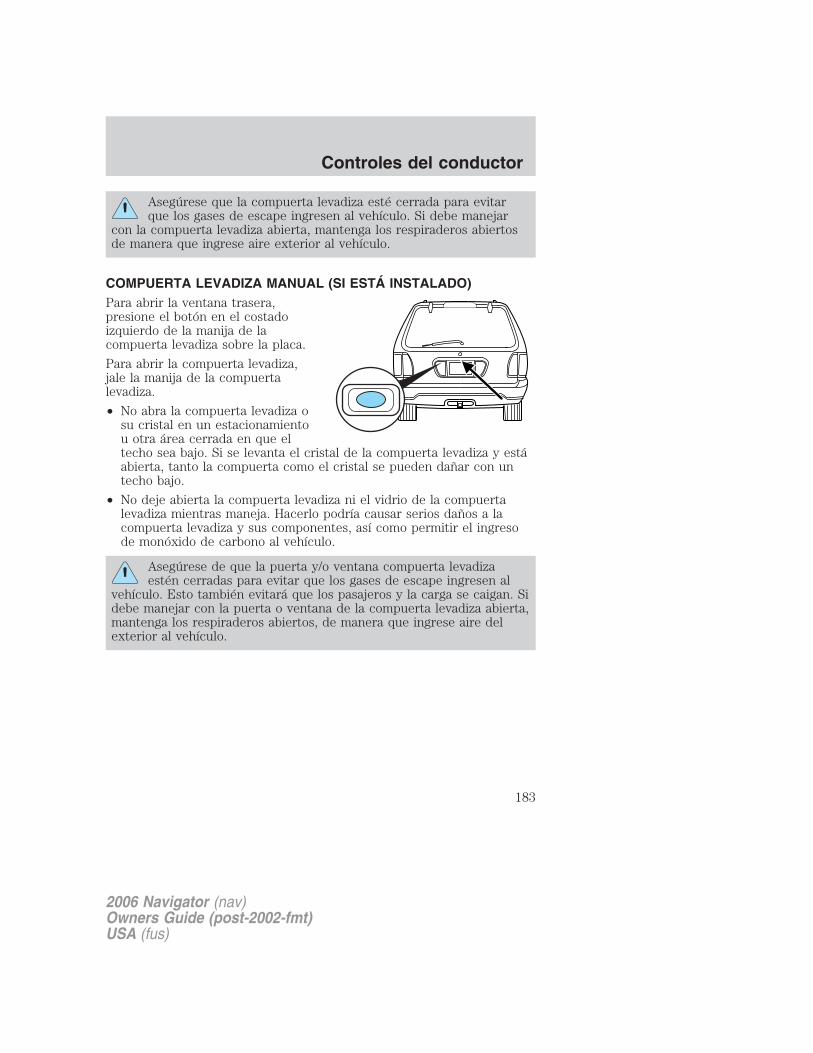
Asegúrese que la compuerta levadiza esté cerrada para evitarque los gases de escape ingresen al vehículo. Si debe manejar
con la compuerta levadiza abierta, mantenga los respiraderos abiertosde manera que ingrese aire exterior al vehículo.
COMPUERTA LEVADIZA MANUAL (SI ESTÁ INSTALADO)Para abrir la ventana trasera,presione el botón en el costadoizquierdo de la manija de lacompuerta levadiza sobre la placa.
Para abrir la compuerta levadiza,jale la manija de la compuertalevadiza.
• No abra la compuerta levadiza osu cristal en un estacionamientou otra área cerrada en que eltecho sea bajo. Si se levanta el cristal de la compuerta levadiza y estáabierta, tanto la compuerta como el cristal se pueden dañar con untecho bajo.
• No deje abierta la compuerta levadiza ni el vidrio de la compuertalevadiza mientras maneja. Hacerlo podría causar serios daños a lacompuerta levadiza y sus componentes, así como permitir el ingresode monóxido de carbono al vehículo.
Asegúrese de que la puerta y/o ventana compuerta levadizaestén cerradas para evitar que los gases de escape ingresen al
vehículo. Esto también evitará que los pasajeros y la carga se caigan. Sidebe manejar con la puerta o ventana de la compuerta levadiza abierta,mantenga los respiraderos abiertos, de manera que ingrese aire delexterior al vehículo.
2006 Navigator (nav)Owners Guide (post-2002-fmt)USA (fus)
Controles del conductor
183
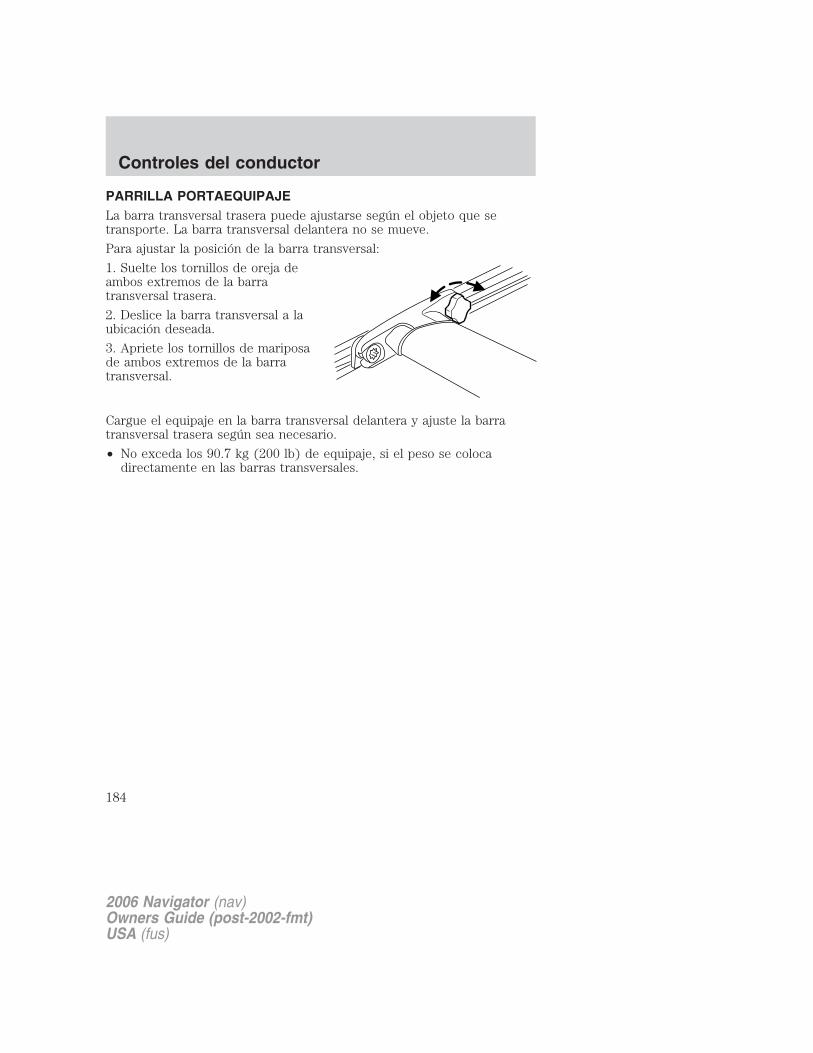
PARRILLA PORTAEQUIPAJELa barra transversal trasera puede ajustarse según el objeto que setransporte. La barra transversal delantera no se mueve.
Para ajustar la posición de la barra transversal:
1. Suelte los tornillos de oreja deambos extremos de la barratransversal trasera.
2. Deslice la barra transversal a laubicación deseada.
3. Apriete los tornillos de mariposade ambos extremos de la barratransversal.
Cargue el equipaje en la barra transversal delantera y ajuste la barratransversal trasera según sea necesario.
• No exceda los 90.7 kg (200 lb) de equipaje, si el peso se colocadirectamente en las barras transversales.
2006 Navigator (nav)Owners Guide (post-2002-fmt)USA (fus)
Controles del conductor
184

LLAVESUna llave hace funcionar todos los seguros y arranca el vehículo. Llevesiempre un duplicado de la llave en caso de emergencia.Las llaves están programadas para su vehículo; el uso de una llave noprogramada no permitirá que el vehículo arranque. Si pierde las llavessuministradas por el distribuidor autorizado, éste tiene llaves dereemplazo disponibles. Para obtener mayor información, consulte másadelante la sección Sistema pasivo antirrobo SecuriLock� .
SEGUROS ELÉCTRICOS DE LAS PUERTASSi la puerta no se abre cuando se presiona el control, consulte la secciónCaracterística de desactivación de seguros eléctricos de las puertasen este capítulo.
Presione el control para abrir todaslas puertas.
Presione el control para cerrar todaslas puertas.
Característica de apertura inteligenteLa característica de apertura inteligente ayuda a impedir que ustedmismo se quede fuera del vehículo. Con la llave en cualquier posición delencendido, la puerta del conductor se desbloqueará inmediatamente encaso de estar bloqueada usando el control de bloqueo de energía en elpanel de la puerta del conductor mientras está última permanece abierta.
2006 Navigator (nav)Owners Guide (post-2002-fmt)USA (fus)
Seguridad y seguros
185

SEGUROS DE PUERTAS A PRUEBA DE NIÑOSAl colocar estos seguros, las puertastraseras no se pueden abrir desde elinterior. Las puertas traseras sepueden abrir desde el exteriorcuando están sin seguro.
Los seguros a prueba de niños estánubicados en el borde trasero decada puerta trasera y debencolocarse por separado en cadapuerta. Si coloca el seguro en unapuerta, no bloquearáautomáticamente ambas puertas.Mueva el control del seguro hacia arriba para activar el seguro a pruebade niños. Mueva el control hacia abajo para desactivar los seguros aprueba de niños.
SISTEMA DE ENTRADA A CONTROL REMOTOEste dispositivo cumple con la parte 15 de las normas FCC (FederalCommunications Commission - Comisión federal de comunicaciones) ycon el RS-210 de la industria canadiense. El funcionamiento está sujeto alas siguientes dos condiciones: (1) este dispositivo no debiera causarinterferencia dañina y (2), este dispositivo debe aceptar cualquierinterferencia recibida, incluso interferencia que podría causar unfuncionamiento no deseado.
Los cambios o modificaciones que no estén expresamenteaprobados por la parte responsable del cumplimiento podríaninvalidar la autoridad del usuario para operar el equipo.
El sistema de entrada a control remoto le permite cerrar o abrir todas laspuertas del vehículo y la compuerta levadiza y abrir la ventana decompuerta levadiza sin usar una llave.
La característica de bloqueo y desbloqueo de la entrada remota funcionaen cualquier posición del encendido. Las características del vidrio de lacompuerta levadiza funcionan siempre que la velocidad del vehículo seainferior a los 8 km/h (5 mph). La característica de emergencia funcionacon la llave en la posición 1 (OFF/LOCK).
Si el vehículo tuviese algún problema en el sistema de entrada sin llave acontrol remoto, asegúrese de entregar TODOS los transmisores deentrada a control remoto a su distribuidor autorizado, para ayudar aresolver el problema.
2006 Navigator (nav)Owners Guide (post-2002-fmt)USA (fus)
Seguridad y seguros
186

Desbloqueo de las puertas y la compuerta levadiza
Presione este control para abrir la puerta del conductor. Las lucesinteriores se iluminarán con el encendido en la posición 1 (OFF/LOCK).
• Control remoto de 4 botones
• Control remoto de 5 botones
Presione el control por segunda vez en un intervalo de tres segundospara abrir todas las puertas y la compuerta levadiza.
Cierre de las puertas y de la compuerta levadiza
Presione este control para cerrar todas las puertas y la compuertalevadiza. Las luces direccionales/de estacionamiento destellarán una vez.
Para confirmar que todas las puertas estén cerradas y bloqueadas,presione el control una segunda vez en un periodo de tres segundos; lasluces direccionales/de estacionamiento destellarán una vez y el claxonsonará.
2006 Navigator (nav)Owners Guide (post-2002-fmt)USA (fus)
Seguridad y seguros
187
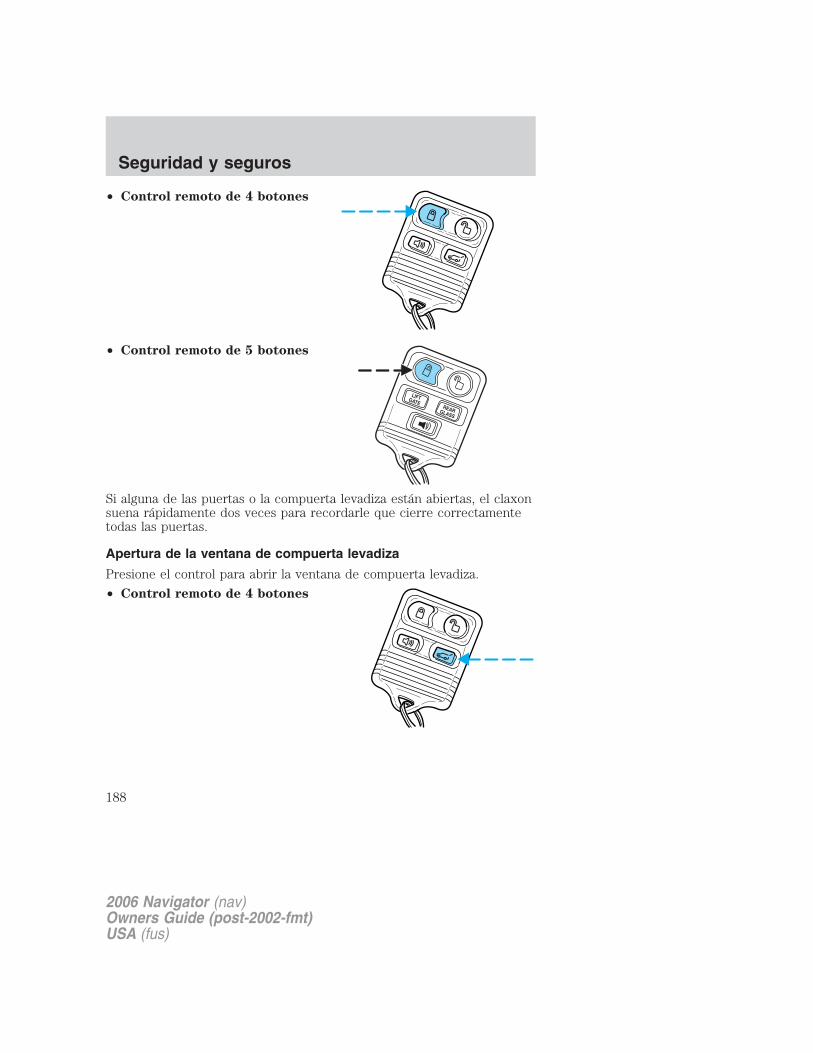
• Control remoto de 4 botones
• Control remoto de 5 botones
Si alguna de las puertas o la compuerta levadiza están abiertas, el claxonsuena rápidamente dos veces para recordarle que cierre correctamentetodas las puertas.
Apertura de la ventana de compuerta levadiza
Presione el control para abrir la ventana de compuerta levadiza.
• Control remoto de 4 botones
2006 Navigator (nav)Owners Guide (post-2002-fmt)USA (fus)
Seguridad y seguros
188
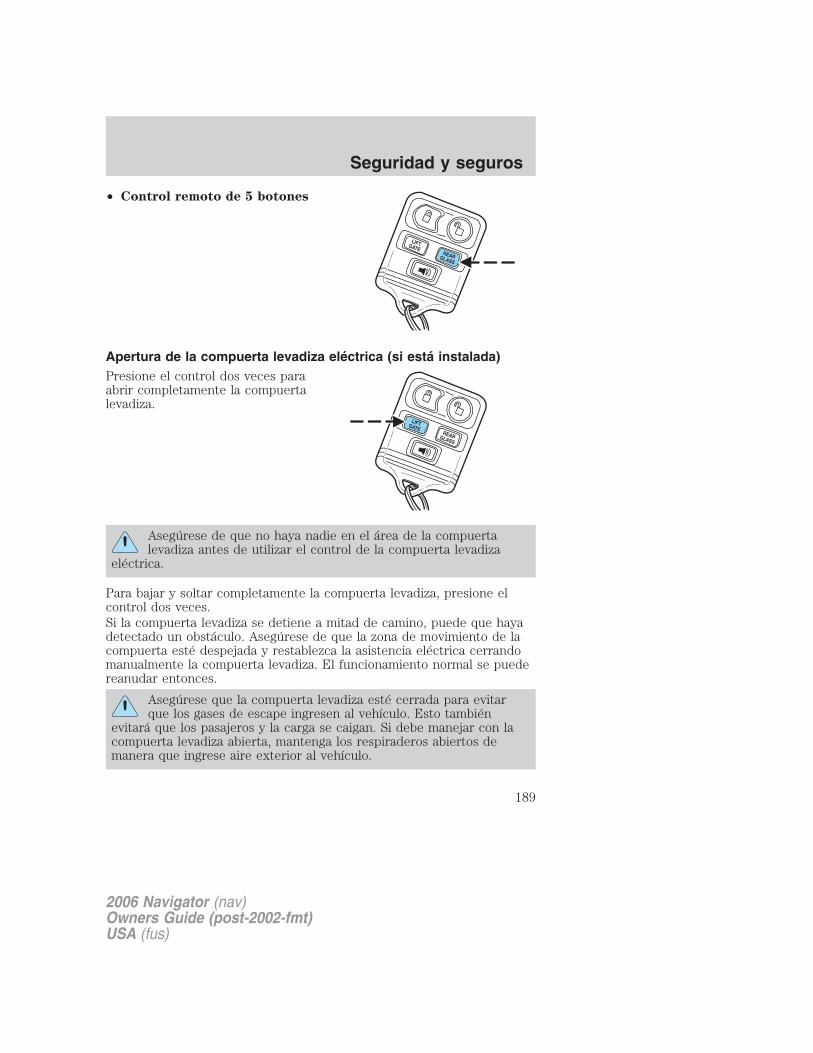
• Control remoto de 5 botones
Apertura de la compuerta levadiza eléctrica (si está instalada)Presione el control dos veces paraabrir completamente la compuertalevadiza.
Asegúrese de que no haya nadie en el área de la compuertalevadiza antes de utilizar el control de la compuerta levadiza
eléctrica.
Para bajar y soltar completamente la compuerta levadiza, presione elcontrol dos veces.Si la compuerta levadiza se detiene a mitad de camino, puede que hayadetectado un obstáculo. Asegúrese de que la zona de movimiento de lacompuerta esté despejada y restablezca la asistencia eléctrica cerrandomanualmente la compuerta levadiza. El funcionamiento normal se puedereanudar entonces.
Asegúrese que la compuerta levadiza esté cerrada para evitarque los gases de escape ingresen al vehículo. Esto también
evitará que los pasajeros y la carga se caigan. Si debe manejar con lacompuerta levadiza abierta, mantenga los respiraderos abiertos demanera que ingrese aire exterior al vehículo.
2006 Navigator (nav)Owners Guide (post-2002-fmt)USA (fus)
Seguridad y seguros
189
Activación de una alarma de emergencia
Presione este control para activar la alarma.
La alarma de emergencia personal cambia de ON/OFF el claxon y lasluces de estacionamiento.
• Control remoto de 4 botones
• Control remoto de 5 botones
Para desactivar la alarma, presione nuevamente el control o gire elencendido a la posición 2 (ACCESSORY) o a la posición 3 (ON).
Característica de memoria
El sistema de entrada a control remoto también puede controlar lacaracterística de memoria.
Presione el control una vez para desbloquear la puerta del conductor. Aloprimir el control, el asiento, los espejos retrovisores y los pedalesajustables se moverán automáticamente a la posición deseada de lamemoria (la posición de la memoria corresponde al transmisor que seusa).
2006 Navigator (nav)Owners Guide (post-2002-fmt)USA (fus)
Seguridad y seguros
190
• Control remoto de 4 botones
• Control remoto de 5 botones
Activación de la característica de la memoriaPara activar esta característica:
1. Ponga el asiento, el espejo retrovisor y los pedales ajustables a laposición deseada.
2. Presione el control SET (Establecer) del panel de la puerta delconductor.
3. En un intervalo de 5 segundos, presione un control en el transmisor acontrol remoto y luego presione el control 1 ó 2 del panel de la puertadel conductor con el que desea asociar las posiciones del Conductor 1 oConductor 2.
4. Si lo desea, repita este procedimiento para otro transmisor a controlremoto.
2006 Navigator (nav)Owners Guide (post-2002-fmt)USA (fus)
Seguridad y seguros
191
Desactivación de la característica de asientos con memoria
Para desactivar esta característica:
1. Presione el control SET(Establecer) del panel de la puertadel conductor.
2. En un intervalo de 5 segundos,presione cualquier control deltransmisor a control remoto quedesee desactivar y luego presione elcontrol SET del panel de la puertadel conductor.
3. Si lo desea, repita este procedimiento para otro transmisor a controlremoto.
Cambio de la batería
El transmisor de entrada a control remoto usa una batería de litio tipomoneda de tres voltios CR2032 o equivalente.
Para cambiar la batería:
1. Coloque una moneda delgadaentre las dos mitades del transmisorde entrada a control remoto cercadel llavero. NO SAQUE LACUBIERTA DE HULE NI ELTABLERO DE CIRCUITOS DELALOJAMIENTO DELANTERO DELTRANSMISOR DE ENTRADA ACONTROL REMOTO.
2. No limpie la grasa de losterminales de la batería de lasuperficie trasera del tablero decircuitos.
2006 Navigator (nav)Owners Guide (post-2002-fmt)USA (fus)
Seguridad y seguros
192

3. Quite la batería antigua. Nota: consulte las normas locales al eliminarlas baterías del transmisor.4. Inserte la batería nueva. Consulte el diagrama dentro del transmisorde entrada a control remoto para lograr la orientación correcta de labatería. Presione la batería para asegurarse que esté asentadacorrectamente en la cavidad de alojamiento.5. Vuelva a juntar las dos mitades presionándolas.Nota: el reemplazo de la batería no provocará que se desprograme eltransmisor a control remoto de su vehículo. El transmisor a controlremoto debe funcionar normalmente después de haber reemplazado labatería.Reemplazo de transmisores perdidosSi se ha perdido un transmisor a control remoto y usted desea retirarlode la memoria del vehículo o desea comprar transmisores a controlremoto adicionales y que se programen para su vehículo:• Lleve todos los transmisores del vehículo a su distribuidor para su
programación o bien• Realice el procedimiento de programación usted mismo.
Programación de los transmisores a control remotoEs necesario tener todos los transmisores a control remoto (seis comomáximo, originales y/o nuevos) antes de iniciar este procedimiento. Si nohay ningún transmisor de entrada a control remoto durante elprocedimiento de programación, los transmisores que no estén presentesdurante programación ya no harán funcionar el vehículo. Note: nopresione el pedal del freno durante esta secuencia, hacerlo invalidará elprocedimiento.Para programar los transmisores usted mismo:
• Abra las puertas con el controleléctrico de apertura y cierre depuertas. Inserte una llave en elencendido y gírela de la posición1 (OFF/LOCK) a la posición 3(ON) y realice el ciclo ocho vecesentre la posición 1 (OFF/LOCK) y3 (ON) en sucesión rápida(dentro de 10 segundos); eloctavo giro debe terminar en laposición 3 (ON). Los seguros harán un ciclo entre desbloqueado ybloqueado para confirmar que se ha ingresado el modo deprogramación.
4
3
2
1
2006 Navigator (nav)Owners Guide (post-2002-fmt)USA (fus)
Seguridad y seguros
193
• En un lapso de 20 segundos, programe un transmisor a control remotopresionando cualquier botón de un transmisor. Los seguros realizaránun ciclo para confirmar que se ha programado el transmisor a controlremoto. Si han pasado más de 20 segundos antes de presionar elbotón del transmisor a control remoto, se sale del modo deprogramación y el procedimiento tendrá que repetirse.
• Repita el paso previo para programar transmisores a control remotoadicionales. Los seguros realizarán un ciclo para confirmar que se haprogramado cada transmisor a control remoto.
• Cuando haya finalizado la programación de los transmisores a controlremoto, gire el encendido a la posición 1 (OFF/LOCK) o espere 20segundos. Nuevamente las puertas se cerrarán y se abrirán paraconfirmar que ha finalizado la programación.
Entrada iluminadaLas luces se encienden cuando el sistema de entrada a control remoto seusa para abrir una o más puertas.El sistema se desactiva automáticamente después de 25 segundos ocuando el encendido se gira a la posición 2 (ACCESSORY) o 3 (ON). Elcontrol de la luz superior de techo no debe estar en la posición OFFpara que funcione el sistema de entrada iluminada.
Característica de apertura inteligenteLa característica de apertura inteligente impide que usted quede fueradel vehículo abriendo las puertas en caso que la llave esté en elencendido y que la puerta del conductor quede abierta o entreabiertacuando las puertas del vehículo se cerraron con el control debloqueo/desbloqueo eléctrico.La característica de apertura inteligente funciona independiente de laposición del encendido.Característica de cierre automáticoLa característica de cierre automático bloquea todas las puertas delvehículo cuando se producen las siguientes condiciones:• Todas las puertas, incluida la compuerta levadiza, están cerradas.• El freno se presiona mientras el encendido está en la posición 3 (ON).• La transmisión está en un cambio hacia adelante o en reversa.• El vehículo tiene una velocidad de 8 km/h (5 mph) o más.Esta característica vuelve a cerrar todas las puertas en caso que se abraalguna puerta, el freno se presione después de que todas las puertas secierren nuevamente y el vehículo alcance una velocidad de 8 km/h(5 mph) o más.
2006 Navigator (nav)Owners Guide (post-2002-fmt)USA (fus)
Seguridad y seguros
194
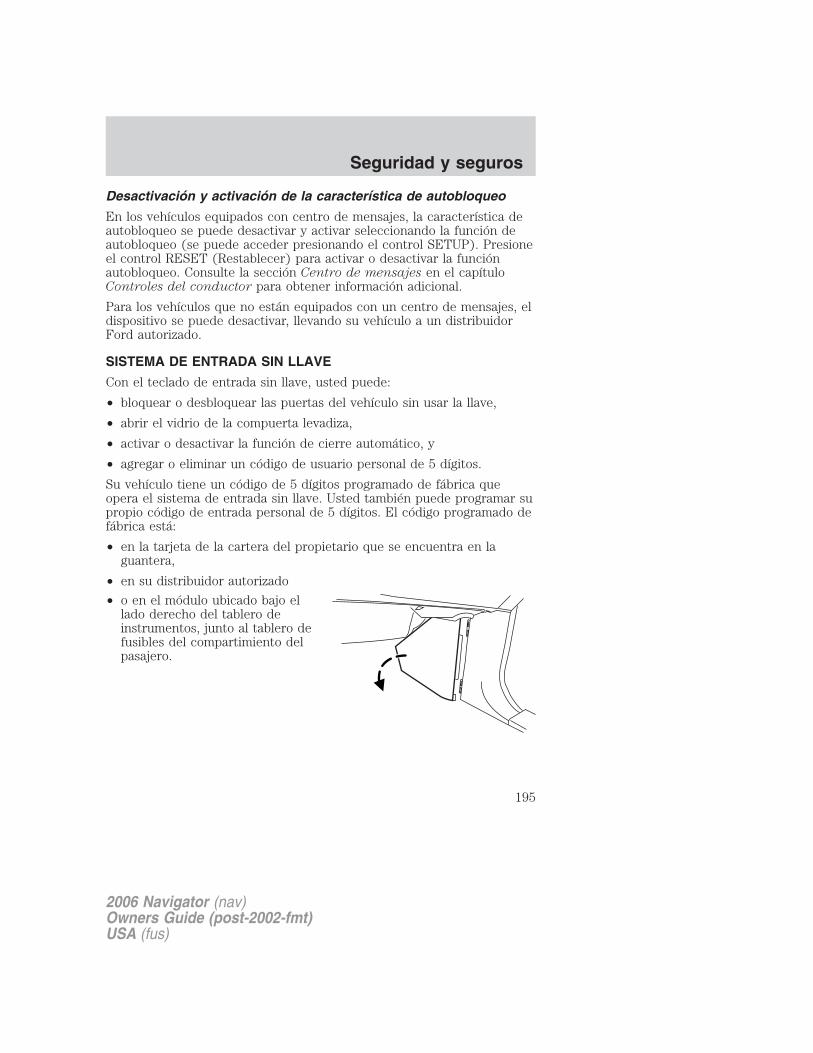
Desactivación y activación de la característica de autobloqueo
En los vehículos equipados con centro de mensajes, la característica deautobloqueo se puede desactivar y activar seleccionando la función deautobloqueo (se puede acceder presionando el control SETUP). Presioneel control RESET (Restablecer) para activar o desactivar la funciónautobloqueo. Consulte la sección Centro de mensajes en el capítuloControles del conductor para obtener información adicional.
Para los vehículos que no están equipados con un centro de mensajes, eldispositivo se puede desactivar, llevando su vehículo a un distribuidorFord autorizado.
SISTEMA DE ENTRADA SIN LLAVE
Con el teclado de entrada sin llave, usted puede:
• bloquear o desbloquear las puertas del vehículo sin usar la llave,
• abrir el vidrio de la compuerta levadiza,
• activar o desactivar la función de cierre automático, y
• agregar o eliminar un código de usuario personal de 5 dígitos.
Su vehículo tiene un código de 5 dígitos programado de fábrica queopera el sistema de entrada sin llave. Usted también puede programar supropio código de entrada personal de 5 dígitos. El código programado defábrica está:
• en la tarjeta de la cartera del propietario que se encuentra en laguantera,
• en su distribuidor autorizado
• o en el módulo ubicado bajo ellado derecho del tablero deinstrumentos, junto al tablero defusibles del compartimiento delpasajero.
2006 Navigator (nav)Owners Guide (post-2002-fmt)USA (fus)
Seguridad y seguros
195
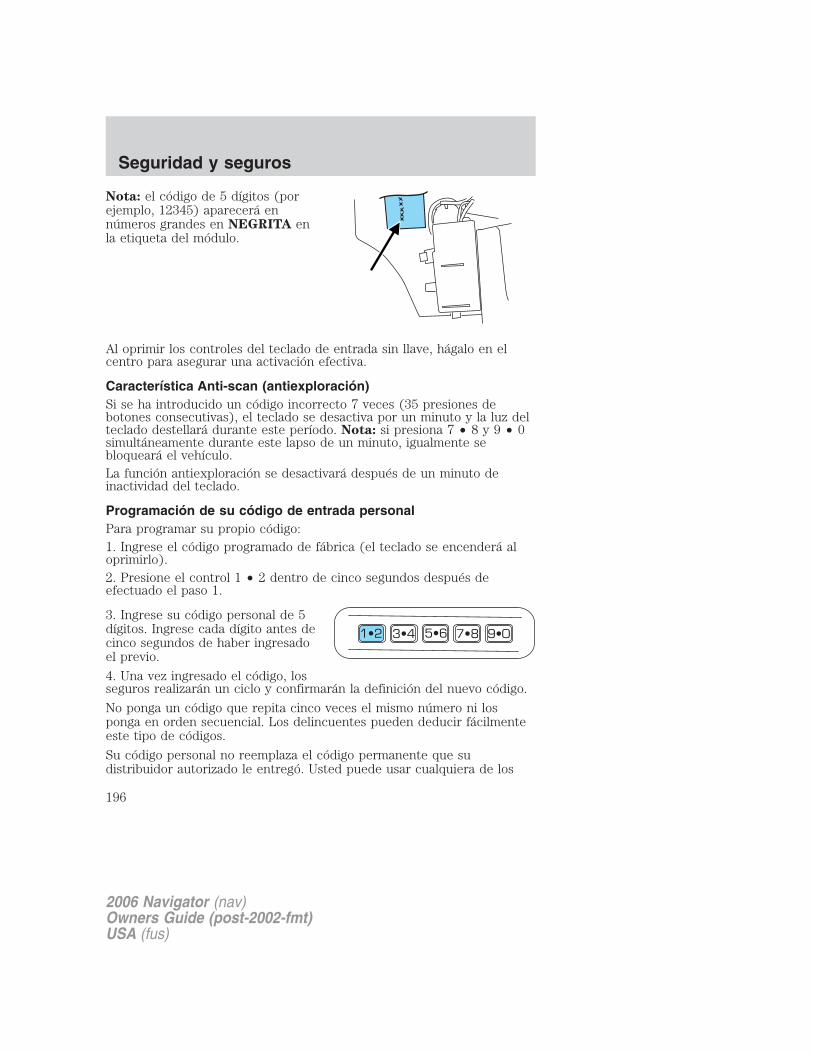
Nota: el código de 5 dígitos (porejemplo, 12345) aparecerá ennúmeros grandes en NEGRITA enla etiqueta del módulo.
Al oprimir los controles del teclado de entrada sin llave, hágalo en elcentro para asegurar una activación efectiva.
Característica Anti-scan (antiexploración)Si se ha introducido un código incorrecto 7 veces (35 presiones debotones consecutivas), el teclado se desactiva por un minuto y la luz delteclado destellará durante este período. Nota: si presiona 7 • 8 y 9 • 0simultáneamente durante este lapso de un minuto, igualmente sebloqueará el vehículo.La función antiexploración se desactivará después de un minuto deinactividad del teclado.
Programación de su código de entrada personalPara programar su propio código:1. Ingrese el código programado de fábrica (el teclado se encenderá aloprimirlo).2. Presione el control 1 • 2 dentro de cinco segundos después deefectuado el paso 1.
3. Ingrese su código personal de 5dígitos. Ingrese cada dígito antes decinco segundos de haber ingresadoel previo.
4. Una vez ingresado el código, losseguros realizarán un ciclo y confirmarán la definición del nuevo código.
No ponga un código que repita cinco veces el mismo número ni losponga en orden secuencial. Los delincuentes pueden deducir fácilmenteeste tipo de códigos.
Su código personal no reemplaza el código permanente que sudistribuidor autorizado le entregó. Usted puede usar cualquiera de los
2006 Navigator (nav)Owners Guide (post-2002-fmt)USA (fus)
Seguridad y seguros
196

dos códigos para desbloquear el vehículo. Si se ingresa un segundocódigo personal, el módulo borrará el código personal antiguo yconservará el nuevo.Si desea borrar su código personal, use las siguientes instrucciones:1. Ingrese el código programado de fábrica.2. Presione el control 1 • 2 y suelte.Ahora, el sistema sólo responderá al código programado de fábrica.
Apertura y cierre de las puertas, de la compuerta levadiza y de laventana de compuerta levadiza mediante la entrada sin llavePara abrir la puerta del conductor, ingrese el código de cinco dígitosprogramado de fábrica o su código personal. Cada número se debepresionar en un lapso de cinco segundos. se encenderán las lucesinteriores.Para abrir todas las puertas y la compuerta levadiza, presione elcontrol 3 • 4 en un lapso de cinco segundos.Para abrir la ventana de compuerta levadiza, presione el control 5 •6 en un lapso de cinco segundos.Para cerrar todas las puertas, la compuerta levadiza y la ventanade compuerta levadiza, presione 7 • 8 y 9 • 0 al mismo tiempo. Nota:la puerta del conductor debe estar cerrada. No es necesario ingresarprimero el código del teclado.
Activación y desactivación del autobloqueo con el sistema deentrada sin llave1. Gire el encendido a la posición 1 (OFF/LOCK).2. Cierre todas las puertas, la compuerta levadiza y la ventana de lacompuerta levadiza.3. Ingrese el código de entrada de 5 dígitos4. Mantenga presionado 7 • 8. Mientras presiona 7 • 8, presione 3 • 4.5. Suelte 3 • 4.6. Suelte 7 • 8.El usuario debe escuchar un sonido de claxon que indica que elsistema se ha desactivado o un sonido seguido de un bocinazo que indicaque el sistema se ha activado.
SISTEMA PASIVO ANTIRROBO SECURILOCK�El sistema pasivo antirrobo SecuriLock� es un sistema de inmovilizacióndel motor. Este sistema está diseñado para evitar el arranque del motor,a menos que se use una llave codificada programada para elvehículo.
2006 Navigator (nav)Owners Guide (post-2002-fmt)USA (fus)
Seguridad y seguros
197
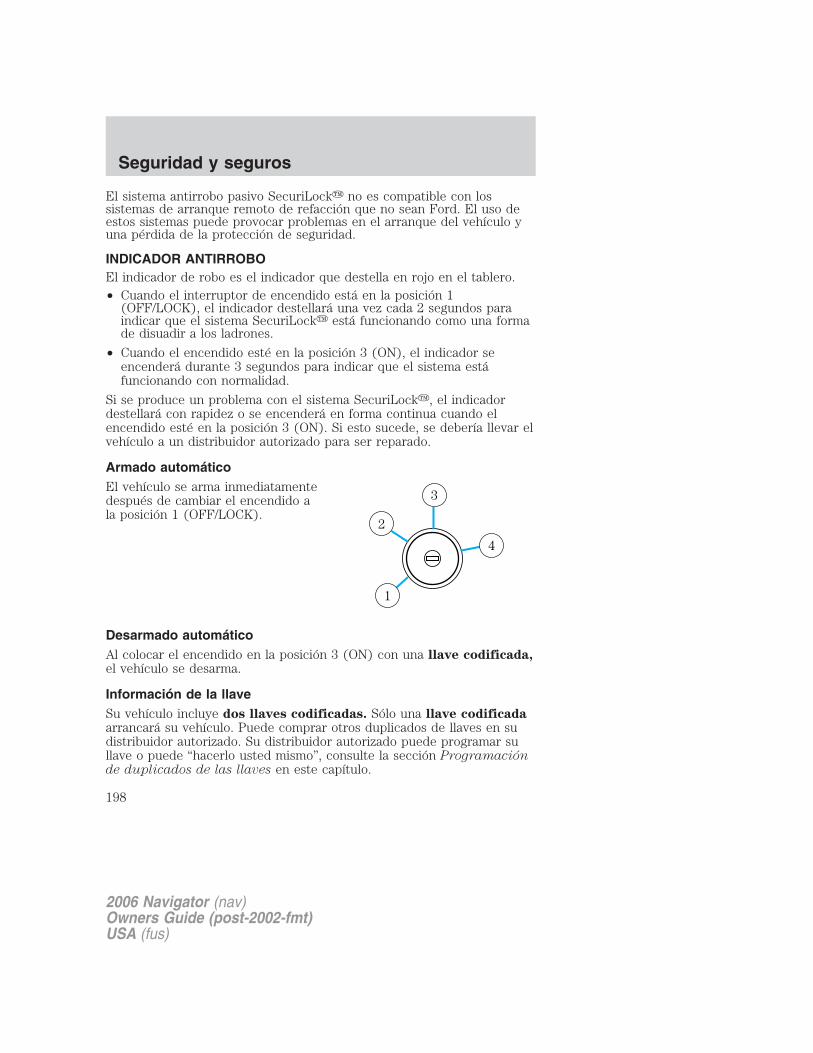
El sistema antirrobo pasivo SecuriLock� no es compatible con lossistemas de arranque remoto de refacción que no sean Ford. El uso deestos sistemas puede provocar problemas en el arranque del vehículo yuna pérdida de la protección de seguridad.
INDICADOR ANTIRROBOEl indicador de robo es el indicador que destella en rojo en el tablero.• Cuando el interruptor de encendido está en la posición 1
(OFF/LOCK), el indicador destellará una vez cada 2 segundos paraindicar que el sistema SecuriLock� está funcionando como una formade disuadir a los ladrones.
• Cuando el encendido esté en la posición 3 (ON), el indicador seencenderá durante 3 segundos para indicar que el sistema estáfuncionando con normalidad.
Si se produce un problema con el sistema SecuriLock�, el indicadordestellará con rapidez o se encenderá en forma continua cuando elencendido esté en la posición 3 (ON). Si esto sucede, se debería llevar elvehículo a un distribuidor autorizado para ser reparado.
Armado automáticoEl vehículo se arma inmediatamentedespués de cambiar el encendido ala posición 1 (OFF/LOCK).
Desarmado automáticoAl colocar el encendido en la posición 3 (ON) con una llave codificada,el vehículo se desarma.
Información de la llaveSu vehículo incluye dos llaves codificadas. Sólo una llave codificadaarrancará su vehículo. Puede comprar otros duplicados de llaves en sudistribuidor autorizado. Su distribuidor autorizado puede programar sullave o puede “hacerlo usted mismo”, consulte la sección Programaciónde duplicados de las llaves en este capítulo.
4
3
2
1
2006 Navigator (nav)Owners Guide (post-2002-fmt)USA (fus)
Seguridad y seguros
198
Los siguientes elementos pueden impedir el arranque del vehículo:• objetos metálicos grandes.• dispositivos electrónicos en la cadena del llavero que se pueden usar
para adquirir gasolina u otros elementos similares.• una segunda llave en el mismo llavero como llave codificada.Si cualquiera de estos elementos está presente, evite que estos objetosentren en contacto con la llave codificada cuando arranque el motor.Estos objetos y dispositivos no pueden dañar la llave codificada, peropueden causar una condición de �falla en el arranque� si están demasiadocerca de la llave al arrancar el motor. Si se produce un problema, gire elencendido a OFF y vuelva a arrancar el motor con todos los demásobjetos del llavero lejos de la llave de encendido. Revise y asegúrese deque la llave codificada sea una llave codificada aprobada por Lincoln.Si pierde o le roban las llaves, necesitará hacer lo siguiente:• Use el duplicado de la llave para arrancar el vehículo o• Haga remolcar su vehículo a un distribuidor autorizado o a un
cerrajero. Los códigos de las llaves deberán borrarse del vehículo y lasllaves tendrán que volver a codificarse.
El reemplazo de las llaves codificadas puede ser muy costoso y ustedquerrá guardar una llave programada extra lejos del vehículo, en un lugarseguro para evitar un imprevisto.
La llave codificada correcta se debe usar en su vehículo. El uso de untipo equivocado de llave codificada puede provocar una situación de“no arranque”.
El uso de una llave no programada en el encendido puedeprovocar una situación de “falla en el arranque”.
Programación de duplicados de las llavesSe puede codificar un máximo de ocho llaves para su vehículo. Sólo sepueden usar llaves SecuriLock�. Para programar usted mismo una llavecodificada, necesitará tener dos llaves codificadas previamenteprogramadas (llaves que ya hayan hecho funcionar el vehículo) y una omás llaves nuevas no programadas disponibles, para una implementaciónoportuna de cada paso del procedimiento.
Si no dispone de dos llaves codificadas previamente programadas, debellevar su vehículo a su distribuidor autorizado para que le programen unoo más duplicados de las llaves codificadas.
Antes de comenzar, asegúrese de leer y entender el procedimientocompleto.
2006 Navigator (nav)Owners Guide (post-2002-fmt)USA (fus)
Seguridad y seguros
199
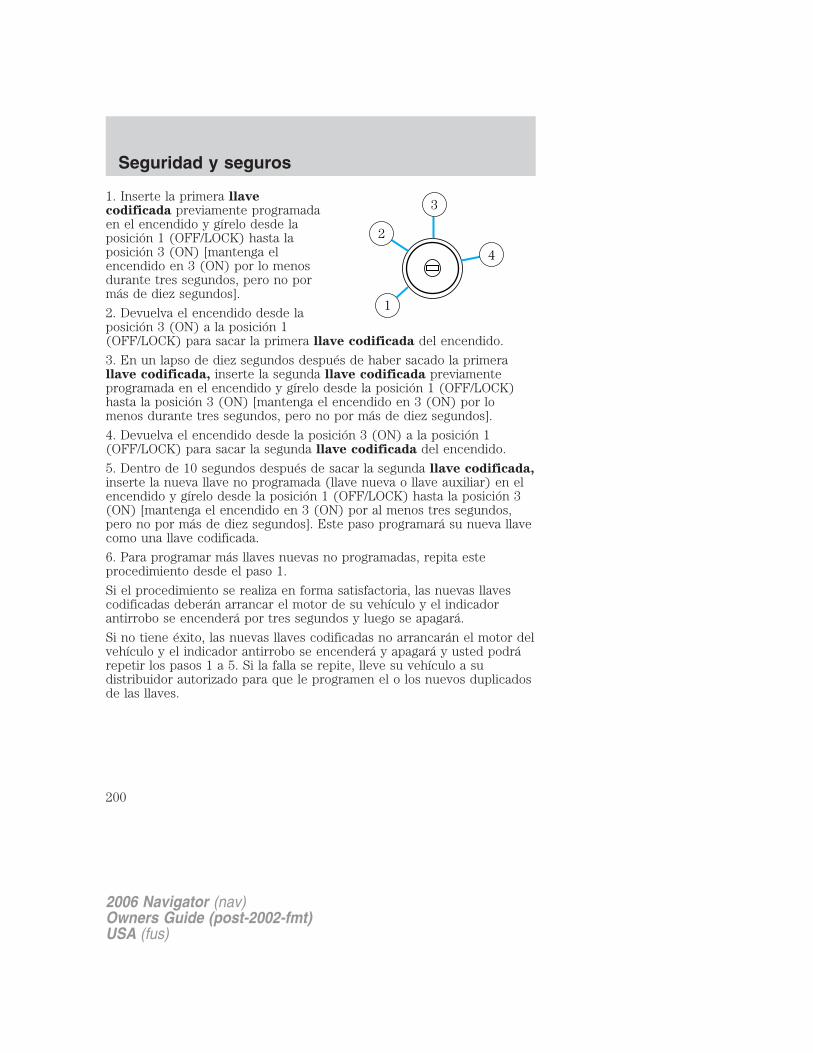
1. Inserte la primera llavecodificada previamente programadaen el encendido y gírelo desde laposición 1 (OFF/LOCK) hasta laposición 3 (ON) [mantenga elencendido en 3 (ON) por lo menosdurante tres segundos, pero no pormás de diez segundos].
2. Devuelva el encendido desde laposición 3 (ON) a la posición 1(OFF/LOCK) para sacar la primera llave codificada del encendido.
3. En un lapso de diez segundos después de haber sacado la primerallave codificada, inserte la segunda llave codificada previamenteprogramada en el encendido y gírelo desde la posición 1 (OFF/LOCK)hasta la posición 3 (ON) [mantenga el encendido en 3 (ON) por lomenos durante tres segundos, pero no por más de diez segundos].
4. Devuelva el encendido desde la posición 3 (ON) a la posición 1(OFF/LOCK) para sacar la segunda llave codificada del encendido.
5. Dentro de 10 segundos después de sacar la segunda llave codificada,inserte la nueva llave no programada (llave nueva o llave auxiliar) en elencendido y gírelo desde la posición 1 (OFF/LOCK) hasta la posición 3(ON) [mantenga el encendido en 3 (ON) por al menos tres segundos,pero no por más de diez segundos]. Este paso programará su nueva llavecomo una llave codificada.
6. Para programar más llaves nuevas no programadas, repita esteprocedimiento desde el paso 1.
Si el procedimiento se realiza en forma satisfactoria, las nuevas llavescodificadas deberán arrancar el motor de su vehículo y el indicadorantirrobo se encenderá por tres segundos y luego se apagará.
Si no tiene éxito, las nuevas llaves codificadas no arrancarán el motor delvehículo y el indicador antirrobo se encenderá y apagará y usted podrárepetir los pasos 1 a 5. Si la falla se repite, lleve su vehículo a sudistribuidor autorizado para que le programen el o los nuevos duplicadosde las llaves.
4
3
2
1
2006 Navigator (nav)Owners Guide (post-2002-fmt)USA (fus)
Seguridad y seguros
200

ASIENTOS
Apoyacabezas ajustables de la fila delantera
Los asientos de su vehículo tienen apoyacabezas ajustables con 4posiciones. El objetivo de estos apoyacabezas es ayudar a limitar elmovimiento de la cabeza en caso de un choque trasero. Para ajustarcorrectamente el apoyacabezas, levántelo de modo que quededirectamente detrás de su cabeza o lo más cerca posible de esa posición.Consulte las siguientes ilustraciones para subir y bajar los apoyacabezas.
Los apoyacabezas se pueden moverhacia adelante y hacia atrás, haciaarriba y hacia abajo.
Presione el control para bajar elapoyacabezas.
Uso del soporte lumbar eléctricoEl control del soporte lumbareléctrico está ubicado en el ladoexterior del asiento.
Presione el lado delantero delcontrol para ajustar la firmeza.
Presione el lado trasero del control para ajustar la blandura.
2006 Navigator (nav)Owners Guide (post-2002-fmt)USA (fus)
Asientos y sistemas de seguridad
201
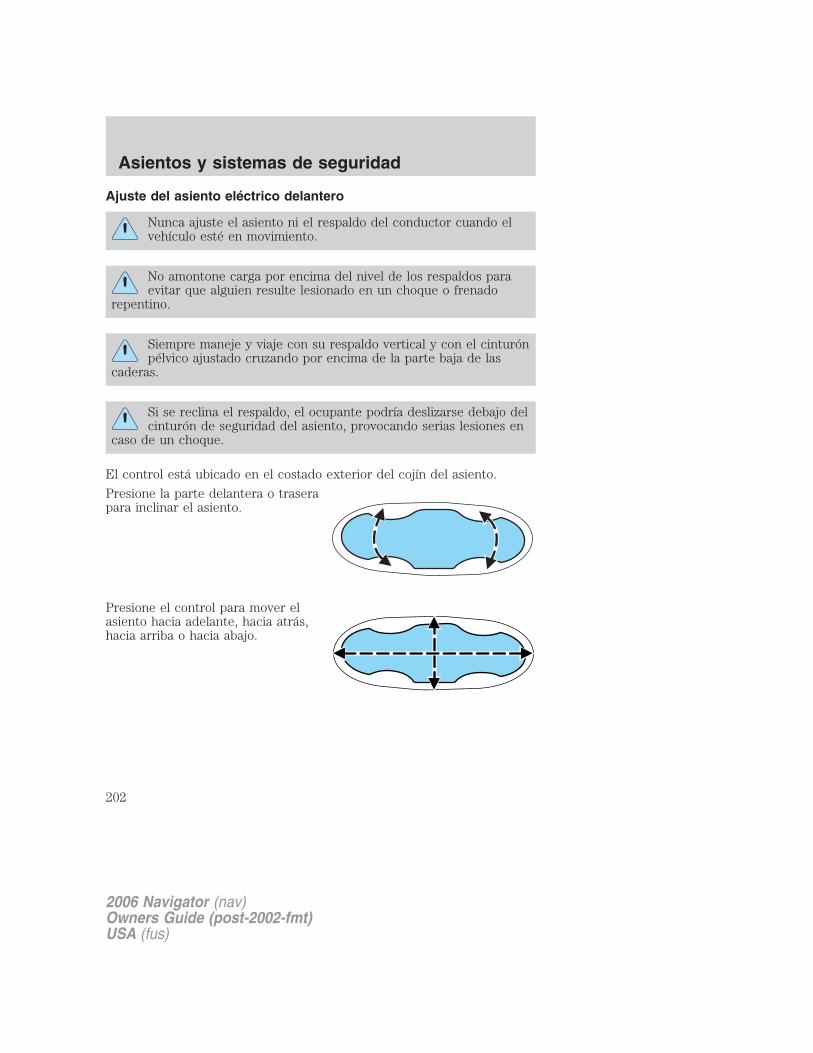
Ajuste del asiento eléctrico delantero
Nunca ajuste el asiento ni el respaldo del conductor cuando elvehículo esté en movimiento.
No amontone carga por encima del nivel de los respaldos paraevitar que alguien resulte lesionado en un choque o frenado
repentino.
Siempre maneje y viaje con su respaldo vertical y con el cinturónpélvico ajustado cruzando por encima de la parte baja de las
caderas.
Si se reclina el respaldo, el ocupante podría deslizarse debajo delcinturón de seguridad del asiento, provocando serias lesiones en
caso de un choque.
El control está ubicado en el costado exterior del cojín del asiento.
Presione la parte delantera o traserapara inclinar el asiento.
Presione el control para mover elasiento hacia adelante, hacia atrás,hacia arriba o hacia abajo.
2006 Navigator (nav)Owners Guide (post-2002-fmt)USA (fus)
Asientos y sistemas de seguridad
202
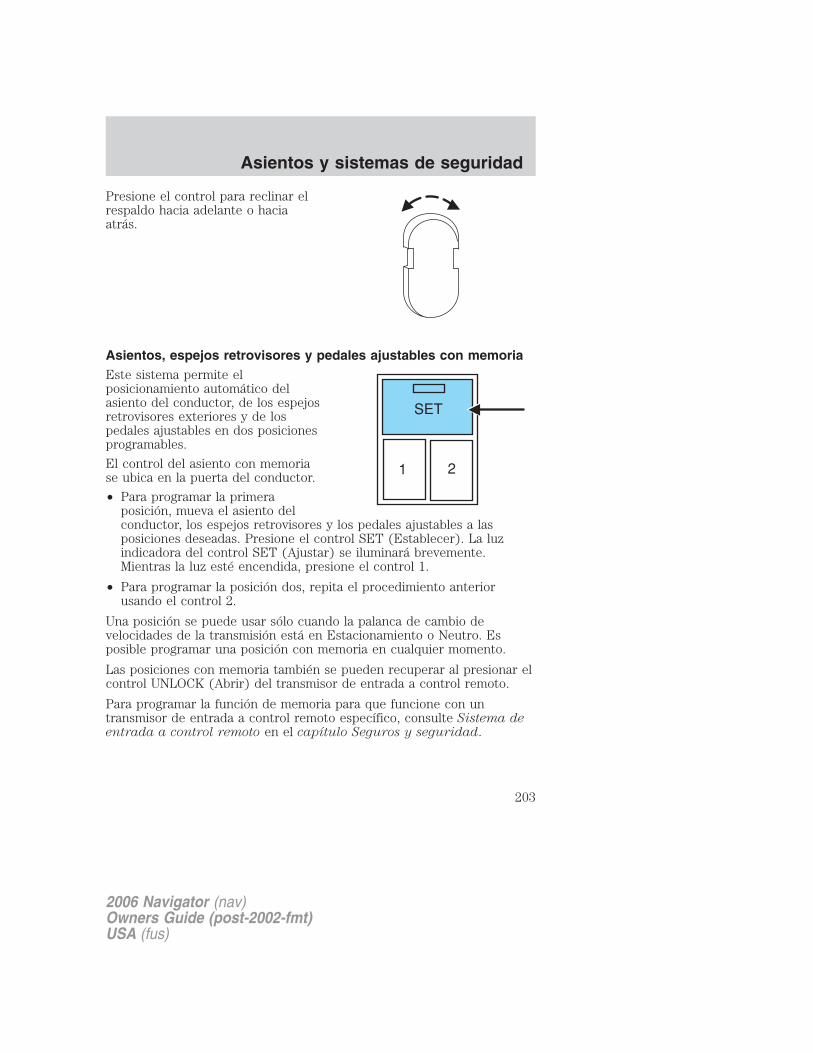
Presione el control para reclinar elrespaldo hacia adelante o haciaatrás.
Asientos, espejos retrovisores y pedales ajustables con memoriaEste sistema permite elposicionamiento automático delasiento del conductor, de los espejosretrovisores exteriores y de lospedales ajustables en dos posicionesprogramables.
El control del asiento con memoriase ubica en la puerta del conductor.
• Para programar la primeraposición, mueva el asiento delconductor, los espejos retrovisores y los pedales ajustables a lasposiciones deseadas. Presione el control SET (Establecer). La luzindicadora del control SET (Ajustar) se iluminará brevemente.Mientras la luz esté encendida, presione el control 1.
• Para programar la posición dos, repita el procedimiento anteriorusando el control 2.
Una posición se puede usar sólo cuando la palanca de cambio develocidades de la transmisión está en Estacionamiento o Neutro. Esposible programar una posición con memoria en cualquier momento.
Las posiciones con memoria también se pueden recuperar al presionar elcontrol UNLOCK (Abrir) del transmisor de entrada a control remoto.
Para programar la función de memoria para que funcione con untransmisor de entrada a control remoto específico, consulte Sistema deentrada a control remoto en el capítulo Seguros y seguridad.
2006 Navigator (nav)Owners Guide (post-2002-fmt)USA (fus)
Asientos y sistemas de seguridad
203

Funcionamiento de los asientos con control de aire acondicionadoy calefacción (si está instalado)
Los controles para los asientos con control de aire acondicionado ycalefacción están ubicados en el sistema electrónico doble de control detemperatura automático (DATC). Consulte Controles de aireacondicionado y calefacción para obtener más información.
Reemplazo del filtro de aire de asientos con control de aireacondicionado y calefacción
El sistema de asientos con control de aire acondicionado y calefacciónincluye un filtro de aire que se tiene que reemplazar periódicamente.Consulte la información de mantenimiento programado para obtenermás información.
• Hay un filtro ubicado debajo deambos asientos delanteros.
• Se puede acceder al mismo desdeel asiento de la segunda fila.Mueva el asiento delanterocompletamente hacia adelante yhacia arriba para tener un accesofácil.
����
2006 Navigator (nav)Owners Guide (post-2002-fmt)USA (fus)
Asientos y sistemas de seguridad
204

Para quitar el filtro de aire delasiento con control de aireacondicionado y calefacción:
• Saque la llave del encendido.
• Empuje el borde rígido exteriordel filtro de aire por el centro ygire hacia abajo una vez que lalengüeta se haya soltado.
• Saque el filtro.
Para instalar el filtro de aire del asiento con control de aireacondicionado y calefacción:
• Primero, coloque el filtro en sualojamiento asegurándose de queel extremo más apartado estécompletamente en su alojamiento.Luego empuje en el centro delextremo exterior del filtro y gírelohacia arriba dentro delalojamiento hasta que quedesujeto en su posición.
ASIENTOS TRASEROS
Asientos de la segunda fila
Las posiciones de los asientos de costado de la segunda fila del vehículoestán equipados con apoyacabezas con ajuste vertical. El objetivo deestos apoyacabezas es ayudar a limitar el movimiento de la cabeza encaso de un choque trasero. Para ajustar correctamente el apoyacabezas,levántelo de modo que quede directamente detrás de su cabeza o lo máscerca posible de esa posición.
����
2006 Navigator (nav)Owners Guide (post-2002-fmt)USA (fus)
Asientos y sistemas de seguridad
205
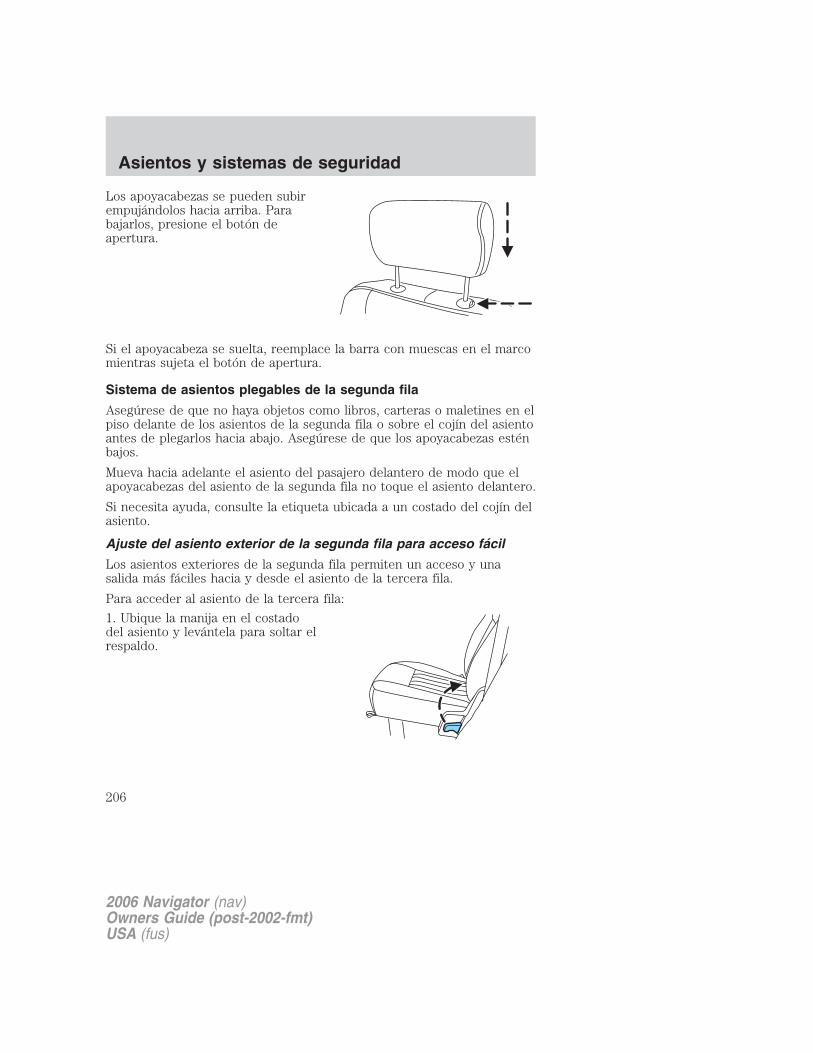
Los apoyacabezas se pueden subirempujándolos hacia arriba. Parabajarlos, presione el botón deapertura.
Si el apoyacabeza se suelta, reemplace la barra con muescas en el marcomientras sujeta el botón de apertura.
Sistema de asientos plegables de la segunda fila
Asegúrese de que no haya objetos como libros, carteras o maletines en elpiso delante de los asientos de la segunda fila o sobre el cojín del asientoantes de plegarlos hacia abajo. Asegúrese de que los apoyacabezas esténbajos.
Mueva hacia adelante el asiento del pasajero delantero de modo que elapoyacabezas del asiento de la segunda fila no toque el asiento delantero.
Si necesita ayuda, consulte la etiqueta ubicada a un costado del cojín delasiento.
Ajuste del asiento exterior de la segunda fila para acceso fácil
Los asientos exteriores de la segunda fila permiten un acceso y unasalida más fáciles hacia y desde el asiento de la tercera fila.
Para acceder al asiento de la tercera fila:
1. Ubique la manija en el costadodel asiento y levántela para soltar elrespaldo.
2006 Navigator (nav)Owners Guide (post-2002-fmt)USA (fus)
Asientos y sistemas de seguridad
206

2. Jale la manija ubicada en la parte trasera del asiento. El asiento seplegará hacia adelante.
3. Para devolver el asiento a suposición normal, empújelo hasta quequede asegurado al piso.
2006 Navigator (nav)Owners Guide (post-2002-fmt)USA (fus)
Asientos y sistemas de seguridad
207
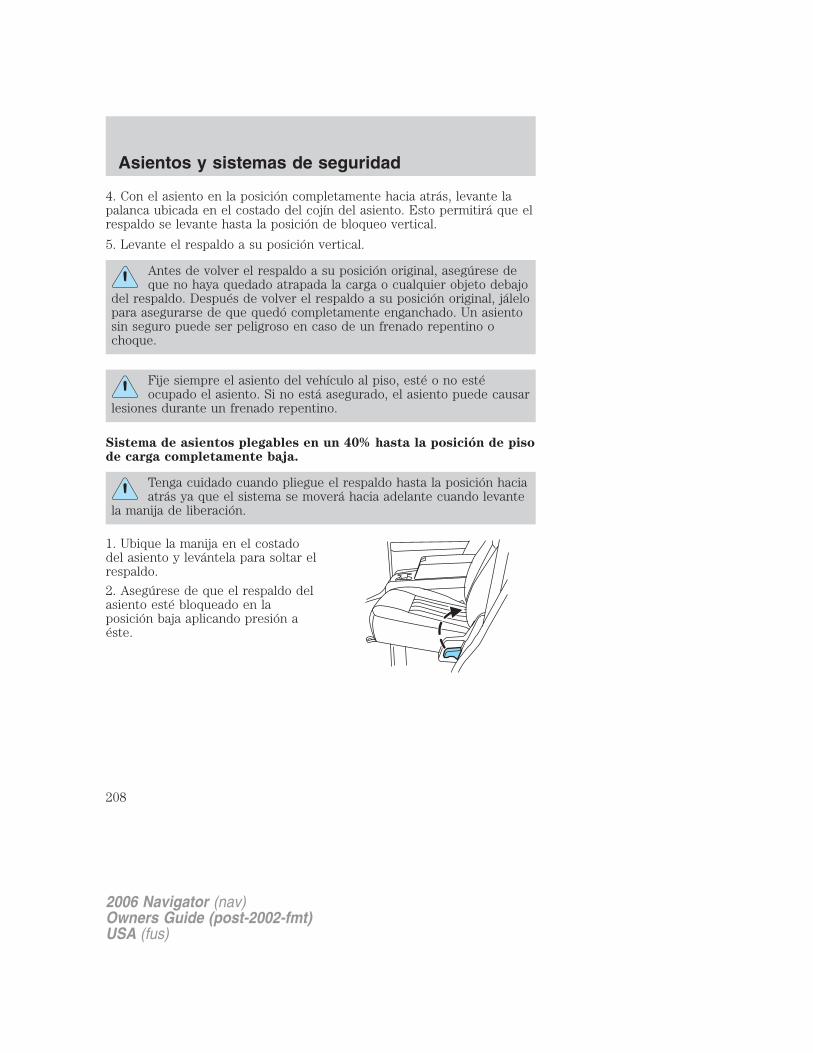
4. Con el asiento en la posición completamente hacia atrás, levante lapalanca ubicada en el costado del cojín del asiento. Esto permitirá que elrespaldo se levante hasta la posición de bloqueo vertical.
5. Levante el respaldo a su posición vertical.
Antes de volver el respaldo a su posición original, asegúrese deque no haya quedado atrapada la carga o cualquier objeto debajo
del respaldo. Después de volver el respaldo a su posición original, jálelopara asegurarse de que quedó completamente enganchado. Un asientosin seguro puede ser peligroso en caso de un frenado repentino ochoque.
Fije siempre el asiento del vehículo al piso, esté o no estéocupado el asiento. Si no está asegurado, el asiento puede causar
lesiones durante un frenado repentino.
Sistema de asientos plegables en un 40% hasta la posición de pisode carga completamente baja.
Tenga cuidado cuando pliegue el respaldo hasta la posición haciaatrás ya que el sistema se moverá hacia adelante cuando levante
la manija de liberación.
1. Ubique la manija en el costadodel asiento y levántela para soltar elrespaldo.
2. Asegúrese de que el respaldo delasiento esté bloqueado en laposición baja aplicando presión aéste.
2006 Navigator (nav)Owners Guide (post-2002-fmt)USA (fus)
Asientos y sistemas de seguridad
208

3. Ubique la correa sujetadora en laparte delantera del asiento y jálelapara soltar el asiento hasta unaposición de piso de carga inclinadahacia abajo. Es posible que haya queaplicar un poco de fuerza paramover el asiento hacia adelante ohacia abajo.
Una vez que los asientos de lasegunda fila estén en posiciónhorizontal, los asientos delanteros sepueden volver a ajustar.
Volver a la posición vertical desde la posición de piso de cargacompletamente baja
El respaldo no se puede devolver hasta la posición vertical hasta que elasiento se devuelva de la posición inclinada hacia abajo. Para volver acolocar el asiento en la posición vertical:
Desde la posición completamentebaja:
1. Levante y jale el asiento haciaatrás hasta que quede enganchado.
No intente desenganchar losganchos del piso traseromientras el asiento está en laposición inclinada hacia abajo.
Los ganchos de ajustetraseros deben estar
correctamente enganchados con laplaca de tope del piso. Coloque laspatas traseras del asiento sobre lasplacas de tope del piso yengánchelas.
2006 Navigator (nav)Owners Guide (post-2002-fmt)USA (fus)
Asientos y sistemas de seguridad
209

2. Con el asiento en la posicióncompletamente hacia atrás, levantela palanca ubicada en el costado delcojín del asiento. Esto permitirá queel respaldo se levante hasta laposición de bloqueo vertical.
Antes de volver el respaldo a su posición original, asegúrese deque no haya quedado atrapada la carga o cualquier objeto debajo
del respaldo. Después de volver el respaldo a su posición original, jálelopara asegurarse de que quedó completamente enganchado. Un asientosin seguro puede ser peligroso en caso de un frenado repentino ochoque.
Sistema de asientos plegables en un 20% (si está instalado)
1. Ubique la correa de liberaciónentre el cojín delantero y el respaldodel asiento y jale la correa parasoltar el enganche del asientoplegado.
Para evitar posibles daños al asiento o a los cinturones deseguridad, asegúrese de que los cinturones no estén abrochados
cuando el asiento se mueva a la posición de piso de carga.
2006 Navigator (nav)Owners Guide (post-2002-fmt)USA (fus)
Asientos y sistemas de seguridad
210
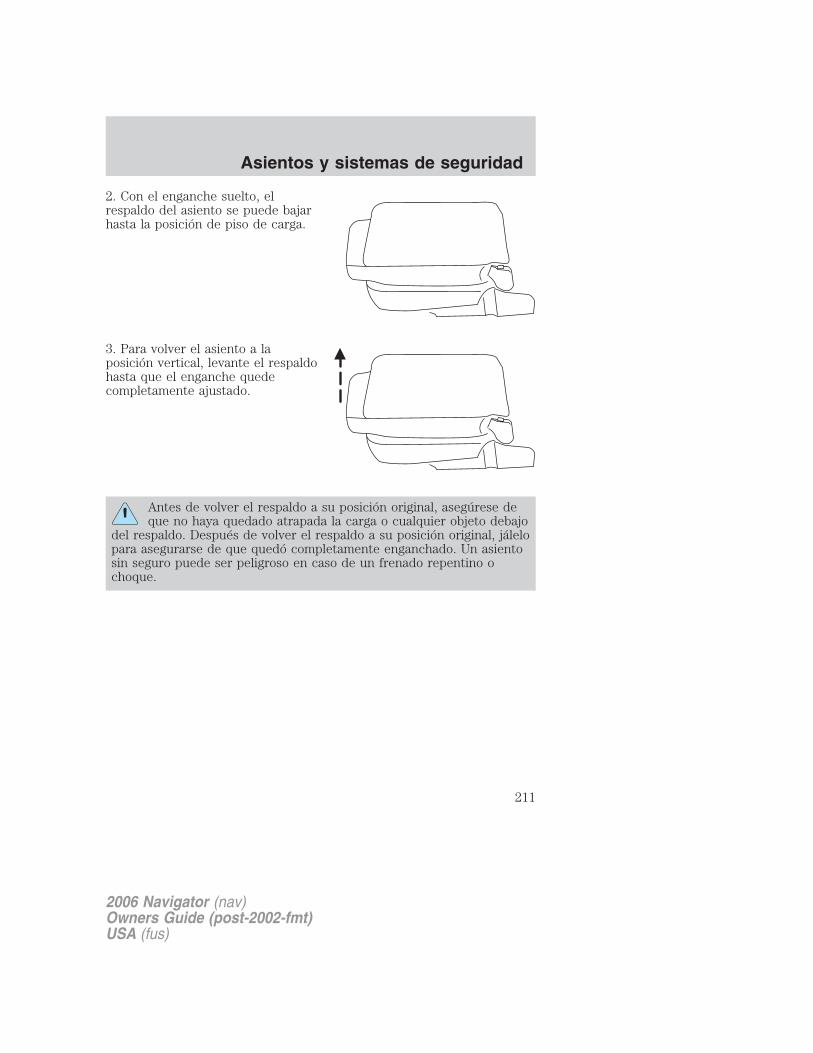
2. Con el enganche suelto, elrespaldo del asiento se puede bajarhasta la posición de piso de carga.
3. Para volver el asiento a laposición vertical, levante el respaldohasta que el enganche quedecompletamente ajustado.
Antes de volver el respaldo a su posición original, asegúrese deque no haya quedado atrapada la carga o cualquier objeto debajo
del respaldo. Después de volver el respaldo a su posición original, jálelopara asegurarse de que quedó completamente enganchado. Un asientosin seguro puede ser peligroso en caso de un frenado repentino ochoque.
2006 Navigator (nav)Owners Guide (post-2002-fmt)USA (fus)
Asientos y sistemas de seguridad
211

Ajuste del asiento plegable en un 20% de la segunda fila(si está equipado)Levante la manija para mover elasiento hacia adelante o hacia atrás.
Nota: este asiento se puede mover hacia adelante para mantenera un niño en un sistema de sujeción para niños cerca de lospasajeros del asiento delantero. El asiento se debe mover hastala posición completamente hacia atrás cuando esté ocupado porniños mayores o adultos.
Reclinado del respaldo en un 40% del asiento de la segunda filaUbique la manija de liberación en elcostado exterior del cojín delasiento y levántela con cuidado parapermitir que el respaldo se ajuste ala posición deseada.
Si se reclina el respaldo, el ocupante podría deslizarse debajo delcinturón de seguridad del asiento, provocando serias lesiones en
caso de un choque.
Asientos en la tercera filaAsegúrese de que no haya objetos como libros, carteras o maletines en elpiso delante de los asientos en la tercera fila o sobre el cojín del asientoantes de plegarlos hacia abajo. Asegúrese de que los apoyacabezas esténbajos.
2006 Navigator (nav)Owners Guide (post-2002-fmt)USA (fus)
Asientos y sistemas de seguridad
212
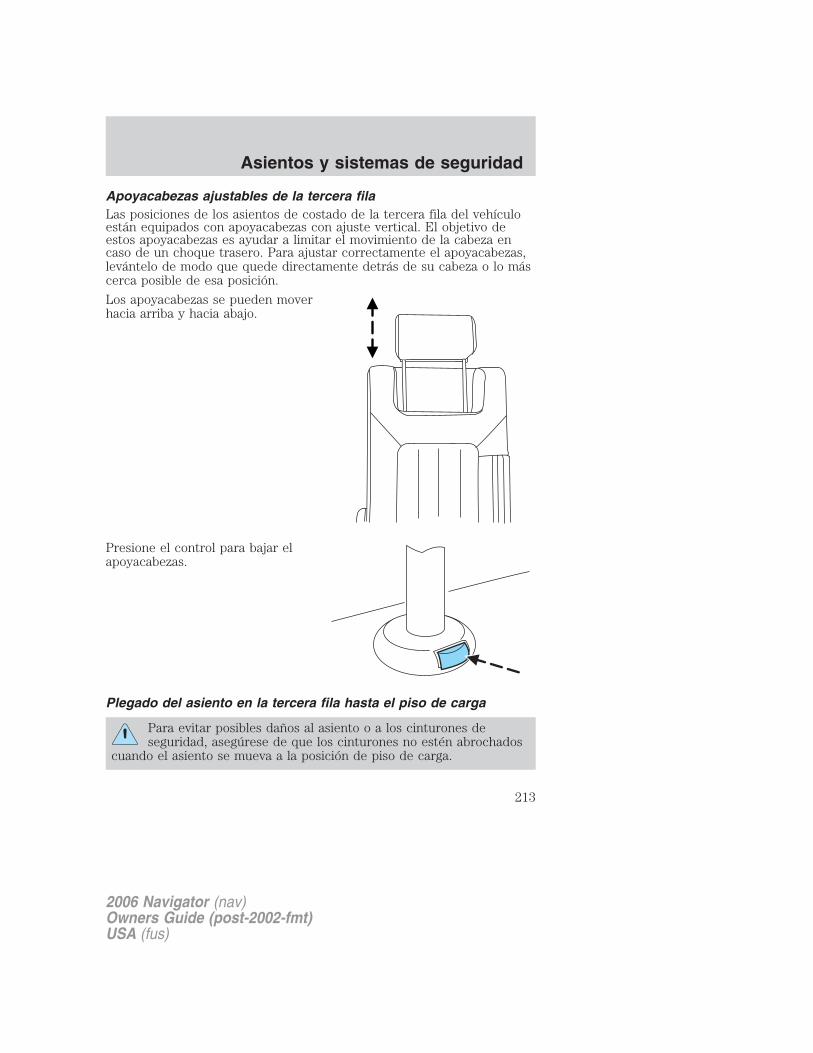
Apoyacabezas ajustables de la tercera filaLas posiciones de los asientos de costado de la tercera fila del vehículoestán equipados con apoyacabezas con ajuste vertical. El objetivo deestos apoyacabezas es ayudar a limitar el movimiento de la cabeza encaso de un choque trasero. Para ajustar correctamente el apoyacabezas,levántelo de modo que quede directamente detrás de su cabeza o lo máscerca posible de esa posición.
Los apoyacabezas se pueden moverhacia arriba y hacia abajo.
Presione el control para bajar elapoyacabezas.
Plegado del asiento en la tercera fila hasta el piso de carga
Para evitar posibles daños al asiento o a los cinturones deseguridad, asegúrese de que los cinturones no estén abrochados
cuando el asiento se mueva a la posición de piso de carga.
2006 Navigator (nav)Owners Guide (post-2002-fmt)USA (fus)
Asientos y sistemas de seguridad
213
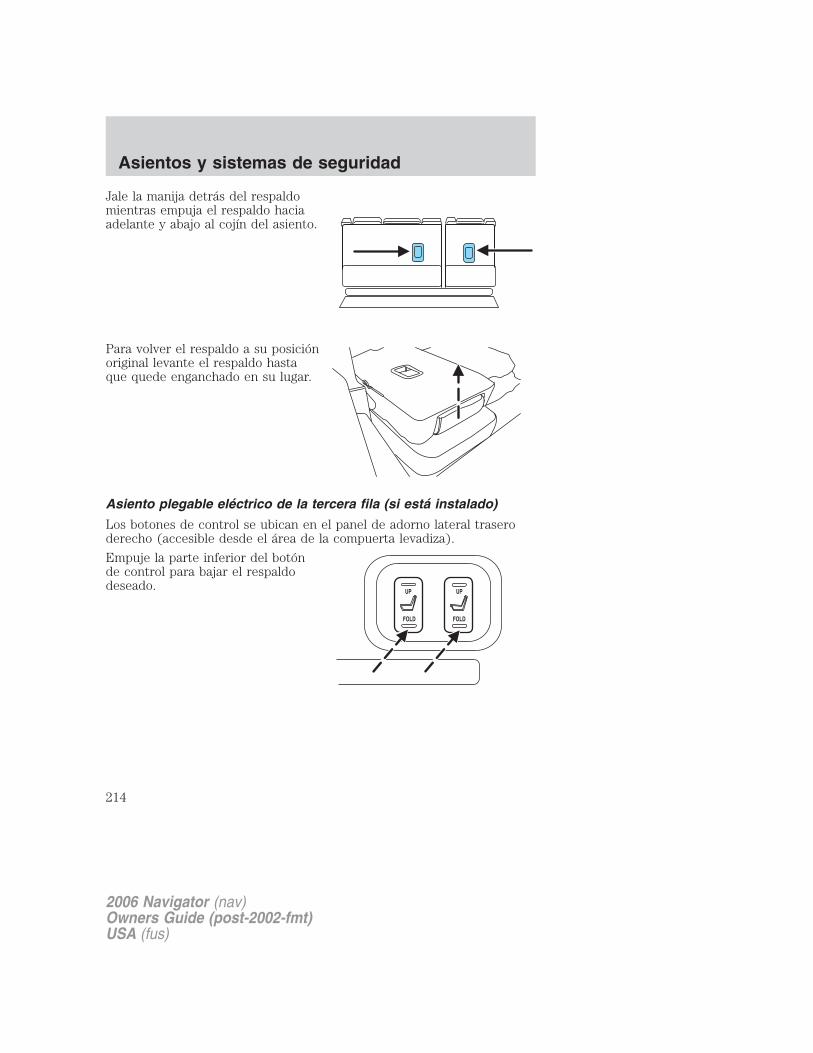
Jale la manija detrás del respaldomientras empuja el respaldo haciaadelante y abajo al cojín del asiento.
Para volver el respaldo a su posiciónoriginal levante el respaldo hastaque quede enganchado en su lugar.
Asiento plegable eléctrico de la tercera fila (si está instalado)
Los botones de control se ubican en el panel de adorno lateral traseroderecho (accesible desde el área de la compuerta levadiza).
Empuje la parte inferior del botónde control para bajar el respaldodeseado.
2006 Navigator (nav)Owners Guide (post-2002-fmt)USA (fus)
Asientos y sistemas de seguridad
214
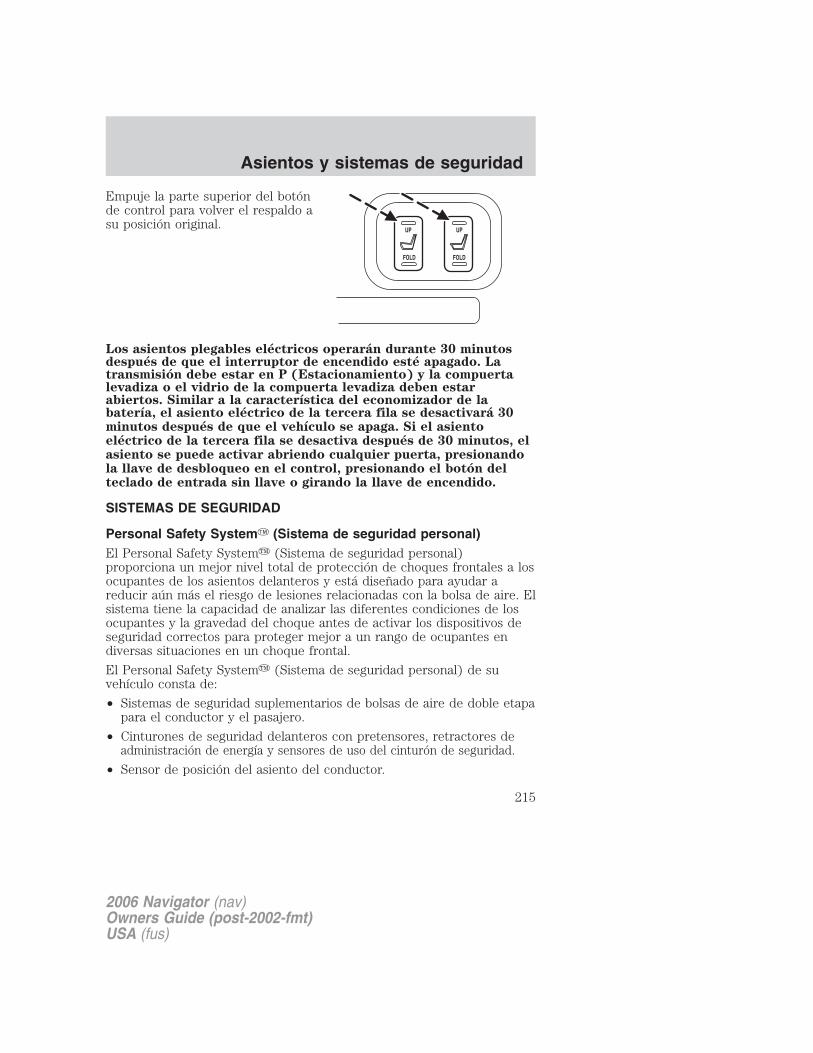
Empuje la parte superior del botónde control para volver el respaldo asu posición original.
Los asientos plegables eléctricos operarán durante 30 minutosdespués de que el interruptor de encendido esté apagado. Latransmisión debe estar en P (Estacionamiento) y la compuertalevadiza o el vidrio de la compuerta levadiza deben estarabiertos. Similar a la característica del economizador de labatería, el asiento eléctrico de la tercera fila se desactivará 30minutos después de que el vehículo se apaga. Si el asientoeléctrico de la tercera fila se desactiva después de 30 minutos, elasiento se puede activar abriendo cualquier puerta, presionandola llave de desbloqueo en el control, presionando el botón delteclado de entrada sin llave o girando la llave de encendido.
SISTEMAS DE SEGURIDAD
Personal Safety System� (Sistema de seguridad personal)El Personal Safety System� (Sistema de seguridad personal)proporciona un mejor nivel total de protección de choques frontales a losocupantes de los asientos delanteros y está diseñado para ayudar areducir aún más el riesgo de lesiones relacionadas con la bolsa de aire. Elsistema tiene la capacidad de analizar las diferentes condiciones de losocupantes y la gravedad del choque antes de activar los dispositivos deseguridad correctos para proteger mejor a un rango de ocupantes endiversas situaciones en un choque frontal.
El Personal Safety System� (Sistema de seguridad personal) de suvehículo consta de:
• Sistemas de seguridad suplementarios de bolsas de aire de doble etapapara el conductor y el pasajero.
• Cinturones de seguridad delanteros con pretensores, retractores deadministración de energía y sensores de uso del cinturón de seguridad.
• Sensor de posición del asiento del conductor.
2006 Navigator (nav)Owners Guide (post-2002-fmt)USA (fus)
Asientos y sistemas de seguridad
215
• Sensor de gravedad de choque frontal.• Módulo de control de los sistemas de seguridad (RCM).• Luz de advertencia del sistema de seguridad y tono de respaldo.• El cableado eléctrico de las bolsas de aire, sensores de choque,
pretensores del cinturón de seguridad, sensores de uso del cinturónde seguridad delantero, sensor de posición del asiento del conductor yluces indicadoras.
¿Cómo funciona el Personal Safety System�(Sistema de seguridad personal)?El Personal Safety System� (Sistema de seguridad personal) puedeadaptar la estrategia de despliegue de los dispositivos de seguridad de suvehículo según la gravedad del choque y las condiciones de losocupantes. Todos los sensores de choque y de los ocupantesproporcionan información acerca del Módulo de control de los sistemasde seguridad (RCM). En un choque, el RCM acciona los pretensores delcinturón de seguridad y/o uno o ambos estados de los sistemas deseguridad suplementarios de bolsas de aire de doble etapa según lagravedad del choque y la condición de los ocupantes.
El hecho de que los pretensores o las bolsas de aire no se activen paraambos ocupantes de los asientos delanteros en un choque no significaque el sistema funcione incorrectamente. Más bien significa que elPersonal Safety System� (Sistema de seguridad personal) determinó quelas condiciones del accidente (gravedad del choque, uso del cinturón,etc.) no eran adecuadas para activar estos dispositivos de seguridad. Lasbolsas de aire delanteras están diseñadas para activarse sólo en choquesfrontales y semifrontales, no en volcaduras, impactos laterales niimpactos traseros, a menos que el choque provoque una desaceleraciónlongitudinal suficiente.
Sistemas de seguridad suplementarios de bolsas de aire de dobleetapa para el conductor y el pasajero.Las bolsas de aire de doble etapa tienen la capacidad de ajustar el nivelde energía de inflado de la bolsa de aire. Un nivel menor de energía sedestina a los impactos de gravedad moderada más comunes. Un nivelmayor de energía se utiliza en los impactos de mayor gravedad. Consultela sección Sistemas de sujeción suplementarios de bolsa de aire eneste capítulo.
Sensor de gravedad de choque frontalEl sensor de gravedad de choques frontales aumenta la capacidad paradetectar la gravedad de un impacto. Ubicado en la parte delantera,
2006 Navigator (nav)Owners Guide (post-2002-fmt)USA (fus)
Asientos y sistemas de seguridad
216

proporciona información valiosa y oportuna en el caso de que ocurra unaccidente con respecto a la gravedad del impacto. Esto permite que elPersonal Safety System� (Sistema de seguridad personal) distinga entrediferentes niveles de gravedad del choque y modifique la estrategia dedespliegue de las bolsas de aire de doble etapa y los pretensores delcinturón de seguridad.
Sensor de posición del asiento del conductorEl sensor de posición del asiento del conductor le permite al PersonalSafety System� (Sistema de seguridad personal) ajustar el nivel dedespliegue de la bolsa de aire de doble etapa según la posición delasiento. El sistema está diseñado para ayudar a proteger a losconductores más bajos que se sientan cerca de la bolsa de aire delconductor, proporcionando un nivel más bajo de salida de esta bolsa.
Sensores de uso del cinturón de seguridad delanteroLos sensores de uso del cinturón de seguridad delantero pueden detectarsi están abrochados los cinturones de seguridad del conductor y delpasajero delantero exterior. Esta información permite al Personal SafetySystem� (Sistema de seguridad personal) ajustar el despliegue de labolsa de aire y la activación del pretensor del cinturón de seguridadsegún el uso de éste. Consulte la sección Sistemas de seguridad en estecapítulo.
Pretensores del cinturón de seguridad delanteroLos pretensores del cinturón de seguridad en las posiciones de asientofrontal de costado están diseñados para apretar los cinturones deseguridad firmemente contra el cuerpo del ocupante durante un choquefrontal y con volcadura cuando el vehículo cuenta con el sistema SafetyCanopy�. Esto maximiza la efectividad de los cinturones de seguridad.En choques frontales, los pretensores del cinturón de seguridad sepueden activar solos o, si el choque es suficientemente grave, se puedenactivar junto con las bolsas de aire delanteras.
Retractores de administración de energía del cinturón deseguridad delanteroLos retractores de administración de energía del cinturón de seguridadexterior delantero permiten que el retractor despliegue la correa enforma gradual y controlada en respuesta al impulso hacia adelante delocupante. Esto reduce el riesgo de lesiones asociadas a la fuerza aplicadaen el pecho del pasajero, limitando la carga sobre éste. Consulte lasección Sistemas de seguridad en este capítulo.
2006 Navigator (nav)Owners Guide (post-2002-fmt)USA (fus)
Asientos y sistemas de seguridad
217
Para determinar si el Personal Safety System�(Sistema de seguridad personal) funciona
El Personal Safety System� (Sistema de seguridad personal) usa una luzde advertencia en el grupo de instrumentos o un tono de respaldo paraindicar la condición del sistema. Consulte la sección Luces y
campanillas de advertencia en el capítulo Grupo de instrumentos. Nose requiere mantenimiento de rutina del Personal Safety System�(Sistema de seguridad personal).
El Módulo de control de sistemas de seguridad (RCM) monitorea suspropios circuitos internos y los circuitos de los sistemas de seguridadsuplementarios de la bolsa de aire, de los sensores de choque,pretensores del cinturón de seguridad, sensores de hebilla del cinturónde seguridad delantero y del sensor de posición del asiento delconductor. Además, el RCM monitorea la luz de advertencia del sistemade seguridad en el grupo de instrumentos. Una o más de las siguientessituaciones reflejan una dificultad en el sistema:
• La luz de advertencia destella o permanece encendida.
• La luz de advertencia no se enciende inmediatamente después deactivarse el encendido.
• Se escuchará una serie de cinco pitidos. El patrón de tono se repite demanera periódica hasta que se reparan el problema y la luz deadvertencia.
Si cualquiera de estas cosas sucede, incluso de manera intermitente,haga revisar de inmediato el Personal Safety System� en un distribuidorautorizado. A menos que se repare, es posible que el sistema no funcionecorrectamente en caso de un choque.
Precauciones con los sistemas de seguridad
Siempre maneje y viaje con su respaldo vertical y con el cinturónpélvico ajustado cruzando por encima de la parte baja de las
caderas.
Para reducir el riesgo de lesiones, asegúrese de sentar a losniños en el asiento trasero donde estén apropiadamente
asegurados.
2006 Navigator (nav)Owners Guide (post-2002-fmt)USA (fus)
Asientos y sistemas de seguridad
218
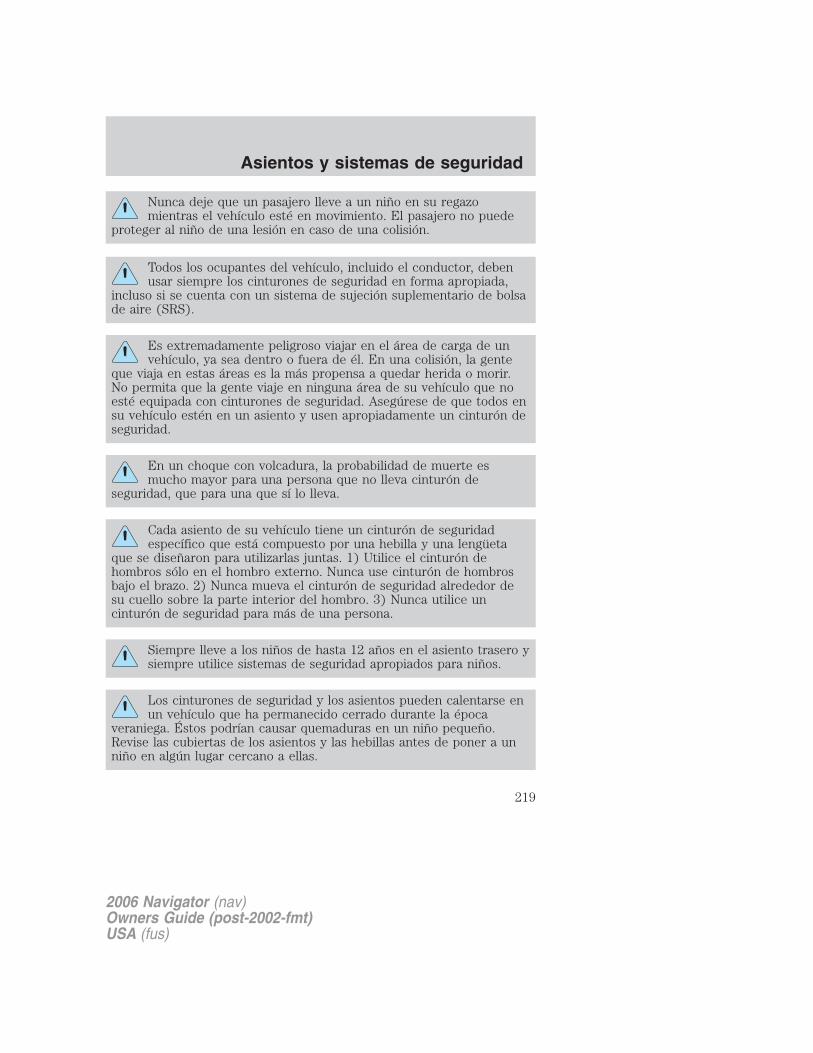
Nunca deje que un pasajero lleve a un niño en su regazomientras el vehículo esté en movimiento. El pasajero no puede
proteger al niño de una lesión en caso de una colisión.
Todos los ocupantes del vehículo, incluido el conductor, debenusar siempre los cinturones de seguridad en forma apropiada,
incluso si se cuenta con un sistema de sujeción suplementario de bolsade aire (SRS).
Es extremadamente peligroso viajar en el área de carga de unvehículo, ya sea dentro o fuera de él. En una colisión, la gente
que viaja en estas áreas es la más propensa a quedar herida o morir.No permita que la gente viaje en ninguna área de su vehículo que noesté equipada con cinturones de seguridad. Asegúrese de que todos ensu vehículo estén en un asiento y usen apropiadamente un cinturón deseguridad.
En un choque con volcadura, la probabilidad de muerte esmucho mayor para una persona que no lleva cinturón de
seguridad, que para una que sí lo lleva.
Cada asiento de su vehículo tiene un cinturón de seguridadespecífico que está compuesto por una hebilla y una lengüeta
que se diseñaron para utilizarlas juntas. 1) Utilice el cinturón dehombros sólo en el hombro externo. Nunca use cinturón de hombrosbajo el brazo. 2) Nunca mueva el cinturón de seguridad alrededor desu cuello sobre la parte interior del hombro. 3) Nunca utilice uncinturón de seguridad para más de una persona.
Siempre lleve a los niños de hasta 12 años en el asiento trasero ysiempre utilice sistemas de seguridad apropiados para niños.
Los cinturones de seguridad y los asientos pueden calentarse enun vehículo que ha permanecido cerrado durante la época
veraniega. Éstos podrían causar quemaduras en un niño pequeño.Revise las cubiertas de los asientos y las hebillas antes de poner a unniño en algún lugar cercano a ellas.
2006 Navigator (nav)Owners Guide (post-2002-fmt)USA (fus)
Asientos y sistemas de seguridad
219
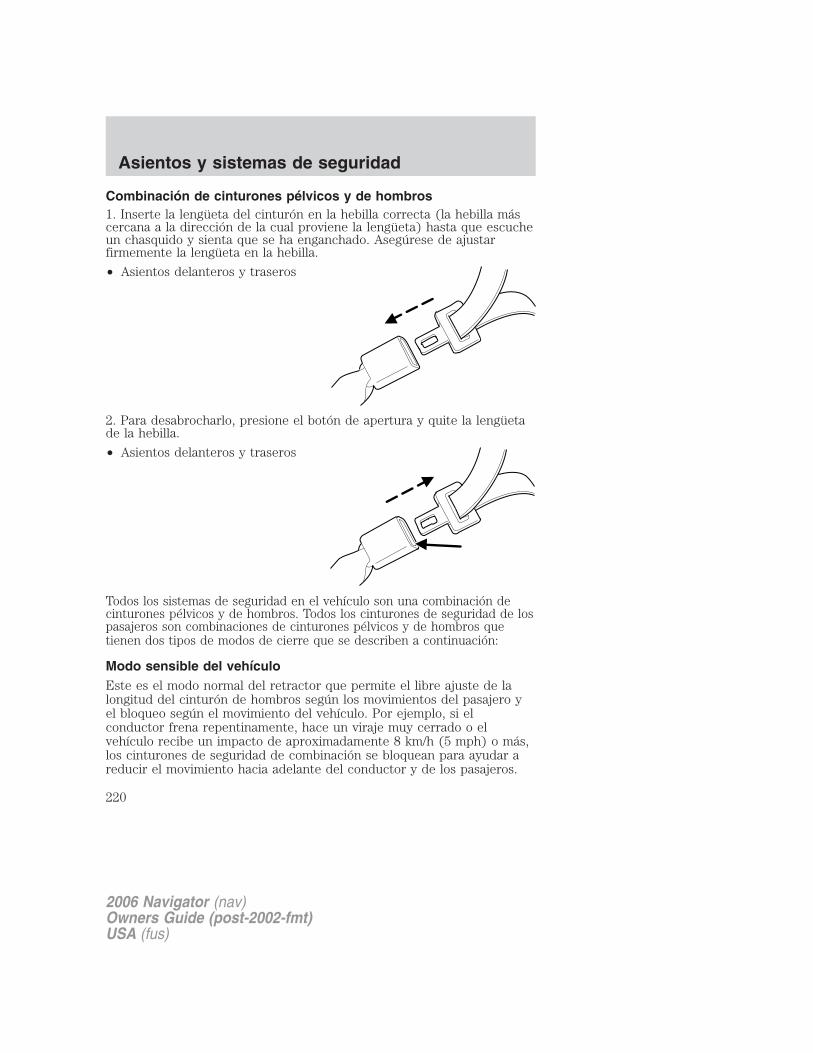
Combinación de cinturones pélvicos y de hombros1. Inserte la lengüeta del cinturón en la hebilla correcta (la hebilla máscercana a la dirección de la cual proviene la lengüeta) hasta que escucheun chasquido y sienta que se ha enganchado. Asegúrese de ajustarfirmemente la lengüeta en la hebilla.
• Asientos delanteros y traseros
2. Para desabrocharlo, presione el botón de apertura y quite la lengüetade la hebilla.
• Asientos delanteros y traseros
Todos los sistemas de seguridad en el vehículo son una combinación decinturones pélvicos y de hombros. Todos los cinturones de seguridad de lospasajeros son combinaciones de cinturones pélvicos y de hombros quetienen dos tipos de modos de cierre que se describen a continuación:
Modo sensible del vehículoEste es el modo normal del retractor que permite el libre ajuste de lalongitud del cinturón de hombros según los movimientos del pasajero yel bloqueo según el movimiento del vehículo. Por ejemplo, si elconductor frena repentinamente, hace un viraje muy cerrado o elvehículo recibe un impacto de aproximadamente 8 km/h (5 mph) o más,los cinturones de seguridad de combinación se bloquean para ayudar areducir el movimiento hacia adelante del conductor y de los pasajeros.
2006 Navigator (nav)Owners Guide (post-2002-fmt)USA (fus)
Asientos y sistemas de seguridad
220
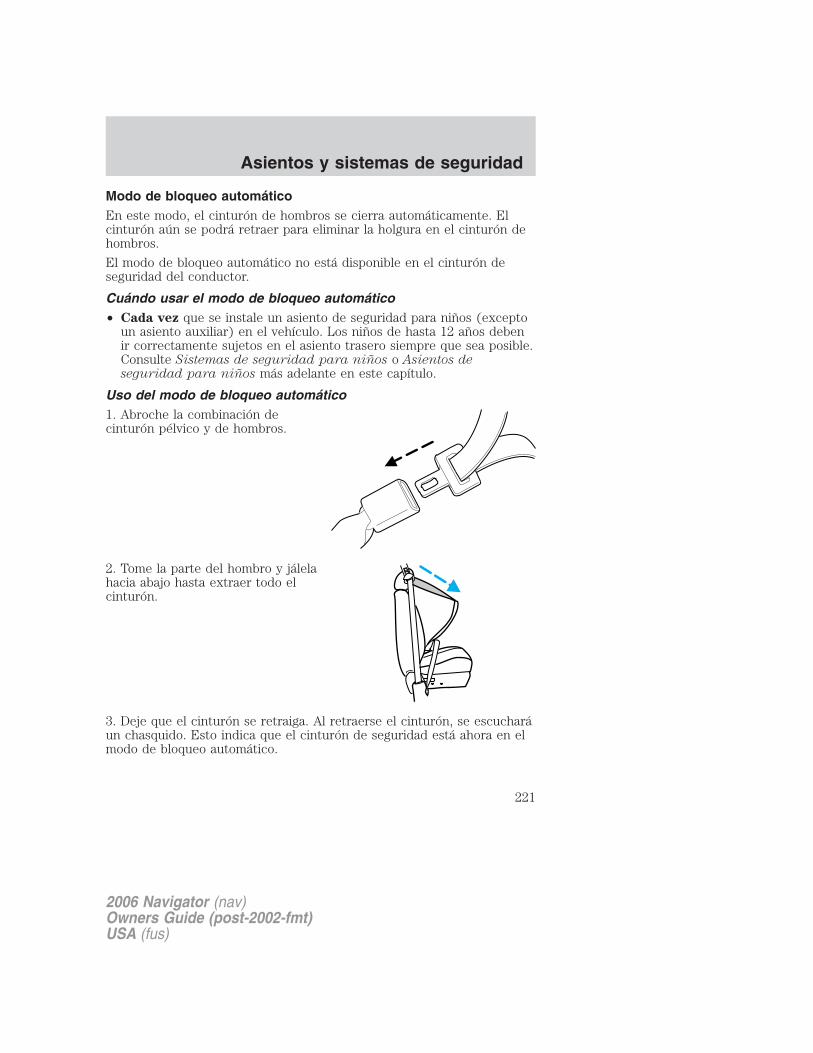
Modo de bloqueo automáticoEn este modo, el cinturón de hombros se cierra automáticamente. Elcinturón aún se podrá retraer para eliminar la holgura en el cinturón dehombros.
El modo de bloqueo automático no está disponible en el cinturón deseguridad del conductor.
Cuándo usar el modo de bloqueo automático• Cada vez que se instale un asiento de seguridad para niños (excepto
un asiento auxiliar) en el vehículo. Los niños de hasta 12 años debenir correctamente sujetos en el asiento trasero siempre que sea posible.Consulte Sistemas de seguridad para niños o Asientos deseguridad para niños más adelante en este capítulo.
Uso del modo de bloqueo automático1. Abroche la combinación decinturón pélvico y de hombros.
2. Tome la parte del hombro y jálelahacia abajo hasta extraer todo elcinturón.
3. Deje que el cinturón se retraiga. Al retraerse el cinturón, se escucharáun chasquido. Esto indica que el cinturón de seguridad está ahora en elmodo de bloqueo automático.
2006 Navigator (nav)Owners Guide (post-2002-fmt)USA (fus)
Asientos y sistemas de seguridad
221

Cómo desactivar el modo de bloqueo automáticoDesabroche la combinación de cinturón pélvico y de hombros y deje quese retraiga por completo para desactivar el modo de bloqueo automáticoy volver al modo de bloqueo sensible (emergencia) del vehículo.
Después de un choque vehicular, el sistema de combinación decinturones pélvicos y de hombros en todas las posiciones de
asientos de pasajeros debe ser revisado por un distribuidor autorizadopara verificar que la función “retractor de bloqueo automático” de losasientos para niños siga funcionando correctamente. Además deberánrealizarse otras revisiones que permitan determinar que el sistema decinturones de seguridad funciona adecuadamente.
EL CONJUNTO DE CINTURÓN Y RETRACTOR DEBEREEMPLAZARSE si el dispositivo “retractor de bloqueo
automático” del conjunto de cinturones de seguridad o algún otrodispositivo de éste no funciona correctamente. Además, todos loscinturones de seguridad deben revisarse para comprobar que funcionancorrectamente. Si no se reemplaza el conjunto de cinturón y retractor,el riesgo de lesiones puede aumentar en caso de un choque.
Pretensor del cinturón de seguridadSu vehículo tiene pretensores del cinturón de seguridad en los asientosdel conductor y del pasajero delantero derecho.El pretensor del cinturón de seguridad quita holgura del sistema decinturón de seguridad al inicio de un choque. Este pretensor del cinturónde seguridad usa el mismo sistema de sensor de impacto que las bolsasde aire frontales y el Sistema de seguridad Safety Canopy�. Cuando seactiva el pretensor del cinturón de seguridad, el cinturón pélvico y dehombros se ajustan.Al activarse el sistema de seguridad Safety Canopy� y/o las bolsas deaire delanteras, los pretensores del cinturón de seguridad de los asientosdel conductor y del pasajero delantero derecho se activarán cuando elcinturón de seguridad respectivo esté correctamente abrochado.
Se debe reemplazar el sistema de cinturones de seguridad delconductor y del pasajero delantero derecho (incluidos
retractores, hebillas y ajustadores de altura) si el vehículo participó enun choque que produjo el inflado de las bolsas de aire delanteras o elsistema Safety Canopy� y la activación de los pretensores del cinturónde seguridad.
2006 Navigator (nav)Owners Guide (post-2002-fmt)USA (fus)
Asientos y sistemas de seguridad
222
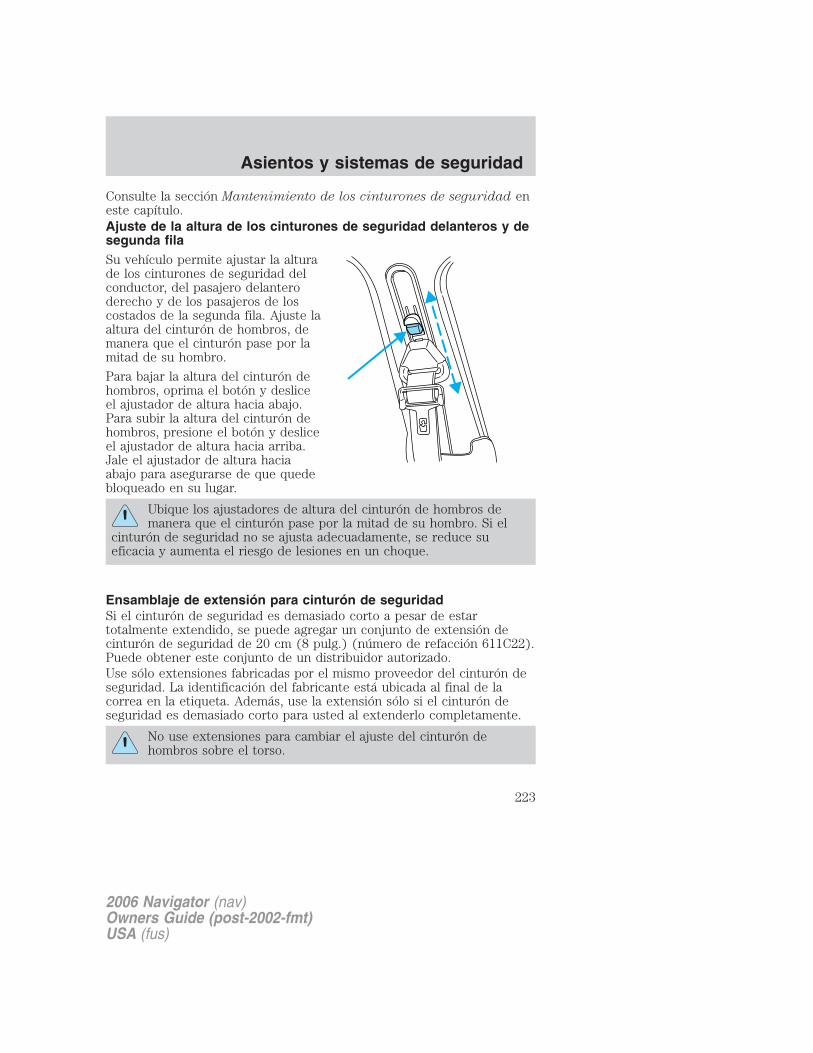
Consulte la sección Mantenimiento de los cinturones de seguridad eneste capítulo.Ajuste de la altura de los cinturones de seguridad delanteros y desegunda filaSu vehículo permite ajustar la alturade los cinturones de seguridad delconductor, del pasajero delanteroderecho y de los pasajeros de loscostados de la segunda fila. Ajuste laaltura del cinturón de hombros, demanera que el cinturón pase por lamitad de su hombro.
Para bajar la altura del cinturón dehombros, oprima el botón y desliceel ajustador de altura hacia abajo.Para subir la altura del cinturón dehombros, presione el botón y desliceel ajustador de altura hacia arriba.Jale el ajustador de altura haciaabajo para asegurarse de que quedebloqueado en su lugar.
Ubique los ajustadores de altura del cinturón de hombros demanera que el cinturón pase por la mitad de su hombro. Si el
cinturón de seguridad no se ajusta adecuadamente, se reduce sueficacia y aumenta el riesgo de lesiones en un choque.
Ensamblaje de extensión para cinturón de seguridadSi el cinturón de seguridad es demasiado corto a pesar de estartotalmente extendido, se puede agregar un conjunto de extensión decinturón de seguridad de 20 cm (8 pulg.) (número de refacción 611C22).Puede obtener este conjunto de un distribuidor autorizado.Use sólo extensiones fabricadas por el mismo proveedor del cinturón deseguridad. La identificación del fabricante está ubicada al final de lacorrea en la etiqueta. Además, use la extensión sólo si el cinturón deseguridad es demasiado corto para usted al extenderlo completamente.
No use extensiones para cambiar el ajuste del cinturón dehombros sobre el torso.
2006 Navigator (nav)Owners Guide (post-2002-fmt)USA (fus)
Asientos y sistemas de seguridad
223
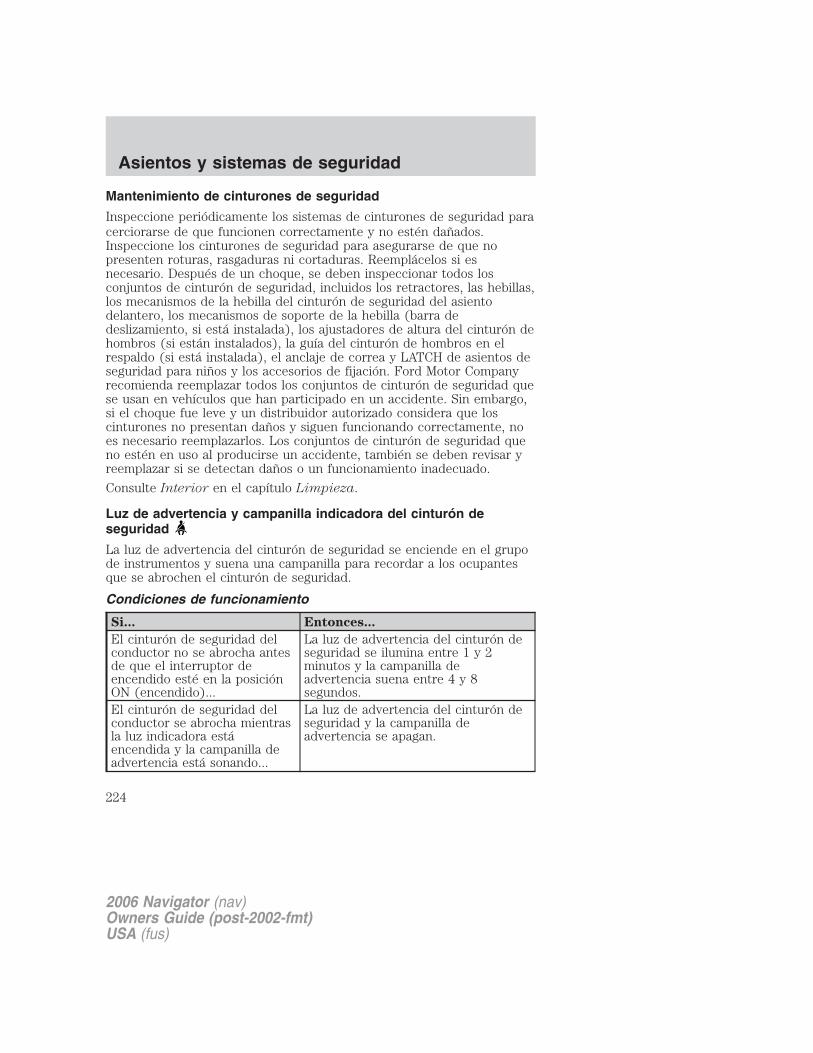
Mantenimiento de cinturones de seguridad
Inspeccione periódicamente los sistemas de cinturones de seguridad paracerciorarse de que funcionen correctamente y no estén dañados.Inspeccione los cinturones de seguridad para asegurarse de que nopresenten roturas, rasgaduras ni cortaduras. Reemplácelos si esnecesario. Después de un choque, se deben inspeccionar todos losconjuntos de cinturón de seguridad, incluidos los retractores, las hebillas,los mecanismos de la hebilla del cinturón de seguridad del asientodelantero, los mecanismos de soporte de la hebilla (barra dedeslizamiento, si está instalada), los ajustadores de altura del cinturón dehombros (si están instalados), la guía del cinturón de hombros en elrespaldo (si está instalada), el anclaje de correa y LATCH de asientos deseguridad para niños y los accesorios de fijación. Ford Motor Companyrecomienda reemplazar todos los conjuntos de cinturón de seguridad quese usan en vehículos que han participado en un accidente. Sin embargo,si el choque fue leve y un distribuidor autorizado considera que loscinturones no presentan daños y siguen funcionando correctamente, noes necesario reemplazarlos. Los conjuntos de cinturón de seguridad queno estén en uso al producirse un accidente, también se deben revisar yreemplazar si se detectan daños o un funcionamiento inadecuado.
Consulte Interior en el capítulo Limpieza.
Luz de advertencia y campanilla indicadora del cinturón deseguridad
La luz de advertencia del cinturón de seguridad se enciende en el grupode instrumentos y suena una campanilla para recordar a los ocupantesque se abrochen el cinturón de seguridad.
Condiciones de funcionamiento
Si... Entonces...
El cinturón de seguridad delconductor no se abrocha antesde que el interruptor deencendido esté en la posiciónON (encendido)...
La luz de advertencia del cinturón deseguridad se ilumina entre 1 y 2minutos y la campanilla deadvertencia suena entre 4 y 8segundos.
El cinturón de seguridad delconductor se abrocha mientrasla luz indicadora estáencendida y la campanilla deadvertencia está sonando...
La luz de advertencia del cinturón deseguridad y la campanilla deadvertencia se apagan.
2006 Navigator (nav)Owners Guide (post-2002-fmt)USA (fus)
Asientos y sistemas de seguridad
224
Si... Entonces...
El cinturón de seguridad delconductor se abrocha antes deque el interruptor deencendido se coloque en laposición ON (encendido)...
La luz de advertencia del cinturón deseguridad y la campanilla indicadorapermanecen apagadas.
BeltMinder� (Recordatorio de cinturón de seguridad)La característica BeltMinder� es una advertencia suplementaria a lafunción de advertencia del cinturón de seguridad. Esta característicaproporciona recordatorios adicionales al conductor de que su cinturón deseguridad está desabrochado, mediante la activación intermitente de unacampanilla y el encendido de la luz de advertencia de los cinturones deseguridad en el grupo de instrumentos.
Si... Entonces...
El cinturón de seguridad delconductor no se abrocha 5segundos después de que se haapagado la luz de advertenciadel cinturón de seguridad...
Se activa la característicaBeltMinder� - se enciende la luz deadvertencia del cinturón de seguridady suena la campanilla de advertenciadurante 6 segundos cada 30 segundos,y se repite durante aproximadamente5 minutos o hasta que se abroche elcinturón de seguridad.
El cinturón de seguridad delconductor se abrocha mientrasla luz indicadora de cinturónde seguridad está encendida yla campanilla de advertenciadel cinturón de seguridad estásonando...
La característica BeltMinder� no seactivará.
El cinturón de seguridad delconductor se abrocha antes deque el interruptor deencendido se coloque en laposición ON...
La característica BeltMinder� no seactivará.
El objetivo de BeltMinder� es recordarle a los usuarios ocasionales quesiempre usen los cinturones de seguridad.
2006 Navigator (nav)Owners Guide (post-2002-fmt)USA (fus)
Asientos y sistemas de seguridad
225
Las siguientes razones son las que más a menudo se dan para no usarcinturón de seguridad (todas las estadísticas se basan en datos deEE.UU.):
Razones dadas... Considere...
“Los accidentes son eventospoco frecuentes”
Diariamente se producen 36 700
accidentes. Mientras másconducimos, más nos exponemos aeventos “poco frecuentes”, incluso losbuenos conductores. 1 de cada 4
personas sufrirá lesiones graves en
un choque durante el transcurso de
su vida.
“No voy muy lejos” 3 de 4 choques fatales ocurren dentrode 40 km (25 millas) de casa.
“Los cinturones sonincómodos”
Diseñamos nuestros cinturones deseguridad para aumentar lacomodidad. Si se siente incómodo,pruebe las diferentes posiciones delanclaje superior del cinturón yrespaldo del asiento, que debe estar lomás vertical posible; esto puedeaumentar la comodidad.
“Estaba apurado” Tiempo en que ocurren más
accidentes. El Recordatorio decinturón (BeltMinder�) le recuerdatomarse algunos segundos paraabrochar la hebilla.
“Los cinturones de seguridadno funcionan”
Cuando los cinturones de
seguridad se usan correctamente,reducen el riesgo de muerte de losocupantes de los asientos delanterosen un 45% en automóviles y en un60% en camionetas.
2006 Navigator (nav)Owners Guide (post-2002-fmt)USA (fus)
Asientos y sistemas de seguridad
226

Razones dadas... Considere...
“Hay poco tráfico” Aproximadamente 1 de cada 2
muertes se producen en
accidentes de un solo vehículo,
muchas veces cuando no hay otrosvehículos alrededor.
“Los cinturones me arrugan laropa”
Posiblemente, pero un accidente gravepuede hacer mucho más que arrugarsu ropa, especialmente, si no tienepuesto el cinturón de seguridad.
“Las personas que estánconmigo no usan cinturón”
Dé el ejemplo, las muertes de jóvenesse producen 4 veces más a menudo envehículos con DOS o MÁS personas.Los niños y hermanos/as más jóvenesimitan el comportamiento queobservan.
“Tengo bolsa de aire” Las bolsas de aire brindan una mayorprotección cuando se usan concinturones de seguridad. Las bolsas deaire delanteras no están diseñadaspara inflarse en choques traseros,laterales o volcaduras.
“Prefiero salir disparado” Mala idea. Las personas que salen
disparadas tienen 40 veces más
posibilidades de MORIR. Loscinturones de seguridad ayudan aimpedir salir disparado, NOPODEMOS “ELEGIR NUESTROCHOQUE”.
No se siente sobre un cinturón de seguridad abrochado paraevitar que suene la campanilla BeltMinder� . Sentarse sobre el
cinturón de seguridad aumentará el riesgo de lesiones en un accidente.Para desactivar (una vez) o inhabilitar la característica BeltMinder�,siga las indicaciones que aparecen a continuación.
2006 Navigator (nav)Owners Guide (post-2002-fmt)USA (fus)
Asientos y sistemas de seguridad
227
Desactivar una vezCada vez que el cinturón de seguridad se abrocha y se desabrochadurante un ciclo ON de encendido, el recordatorio de cinturonesBeltMinder� se desactivará sólo durante ese ciclo de encendido.
Desactivación/activación de la característica BeltMinder�Lea detalladamente los pasos 1 al 4 antes de continuar con elprocedimiento de programación de activación y desactivación.
La característica BeltMinder� del conductor se puede activar ydesactivar efectuando el siguiente procedimiento:Antes de efectuar el procedimiento, asegúrese de que:• El freno de estacionamiento esté puesto• La palanca de cambio de velocidades esté en P (Estacionamiento)
(transmisión automática)• El interruptor de encendido esté en la posición OFF (Apagado)• El cinturón de seguridad del conductor está desabrochado
Para disminuir el riesgo de lesiones, no desactive/active lacaracterística BeltMinder� mientras conduce el vehículo.
1. Gire el interruptor de encendido a la posición RUN (Marcha) u ON(Encendido). (NO ARRANQUE EL MOTOR)2. Espere hasta que se apague la luz de advertencia de los cinturones deseguridad. (Aproximadamente 1 minuto.)• El paso 3 se debe completar dentro de los 50 segundos transcurridos
después de que se apaga la luz de advertencia del cinturón deseguridad.
3. A una velocidad moderada, abroche y desabroche el cinturón deseguridad 9 veces y finalice dejándolo desabrochado. (El paso 3 se debecompletar dentro de 50 segundos una vez que se apaga la luz deadvertencia del cinturón de seguridad.)
• Después del paso 3, la luz de advertencia del sistema de sujeción (luzde la bolsa de aire) se encenderá durante tres segundos.
4. Dentro de 10 segundos de encendida la luz, a velocidad moderada,abroche y luego desabroche el cinturón de seguridad.
• Esto desactivará la característica BeltMinder� para esa posición delasiento si se encuentra actualmente activada. A modo de confirmación,la luz de advertencia del sistema de sujeción se encenderá 4 veces porsegundo durante tres segundos.
2006 Navigator (nav)Owners Guide (post-2002-fmt)USA (fus)
Asientos y sistemas de seguridad
228
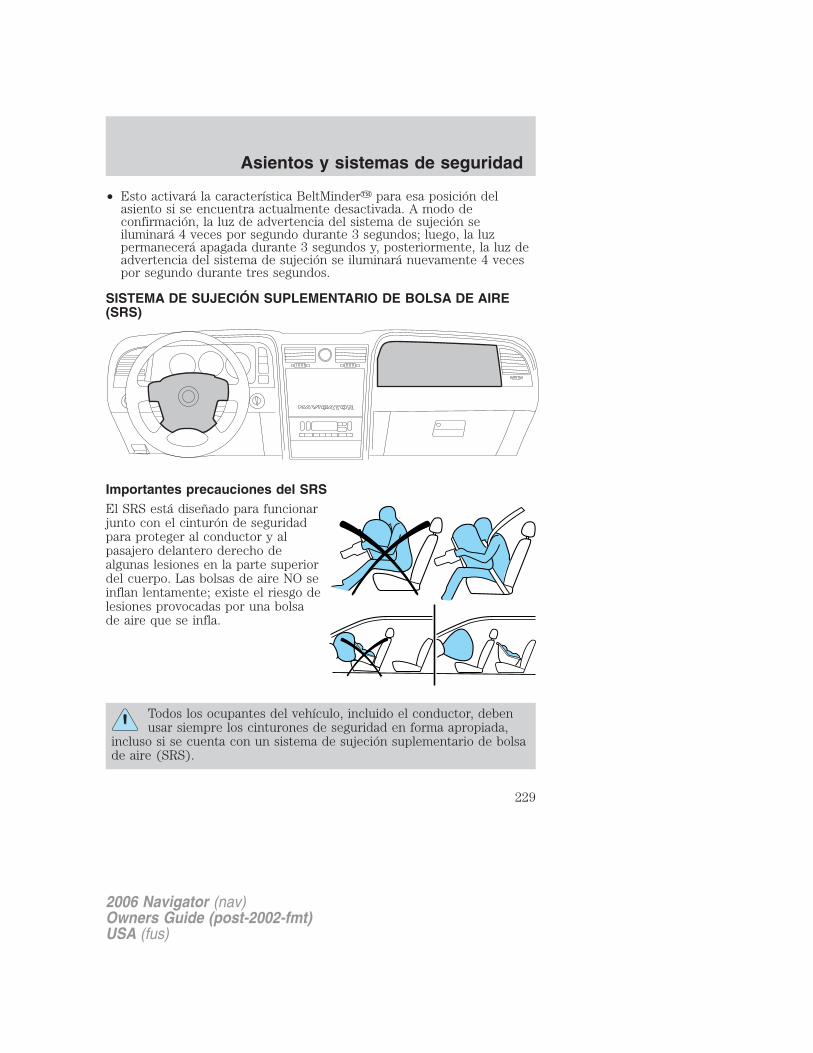
• Esto activará la característica BeltMinder� para esa posición delasiento si se encuentra actualmente desactivada. A modo deconfirmación, la luz de advertencia del sistema de sujeción seiluminará 4 veces por segundo durante 3 segundos; luego, la luzpermanecerá apagada durante 3 segundos y, posteriormente, la luz deadvertencia del sistema de sujeción se iluminará nuevamente 4 vecespor segundo durante tres segundos.
SISTEMA DE SUJECIÓN SUPLEMENTARIO DE BOLSA DE AIRE(SRS)
Importantes precauciones del SRSEl SRS está diseñado para funcionarjunto con el cinturón de seguridadpara proteger al conductor y alpasajero delantero derecho dealgunas lesiones en la parte superiordel cuerpo. Las bolsas de aire NO seinflan lentamente; existe el riesgo delesiones provocadas por una bolsade aire que se infla.
Todos los ocupantes del vehículo, incluido el conductor, debenusar siempre los cinturones de seguridad en forma apropiada,
incluso si se cuenta con un sistema de sujeción suplementario de bolsade aire (SRS).
2006 Navigator (nav)Owners Guide (post-2002-fmt)USA (fus)
Asientos y sistemas de seguridad
229
Siempre lleve a los niños de hasta 12 años en el asiento trasero ysiempre utilice sistemas de seguridad apropiados para niños.
La National Highway Traffic Safety Administration (NHTSA)recomienda una distancia mínima de al menos 25 cm (10
pulgadas) entre el pecho de un ocupante y el módulo de la bolsa deaire del conductor.
Nunca ponga su brazo sobre el módulo de la bolsa de aire, yaque ésta puede provocar graves fracturas u otras lesiones al
inflarse.
Para colocarse a una distancia correcta de la bolsa de aire:
• Mueva su asiento hacia atrás lo más posible, sin dejar de alcanzarcómodamente los pedales.
• Recline levemente el asiento uno o dos grados desde la posiciónvertical.
No coloque nada en o sobre el módulo de la bolsa de aire.Colocar objetos sobre o al lado del área de inflado de la bolsa de
aire puede hacer que estos objetos sean impulsados por la bolsa de airehacia su rostro y torso causando lesiones graves.
No intente revisar, reparar ni modificar los sistemas de sujeciónsuplementarios de bolsa de aire ni sus fusibles. Consulte con su
distribuidor autorizado.
La bolsa de aire del pasajero delantero no está diseñada paraproteger a un ocupante del asiento central delantero.
Modificar o agregar equipos al extremo delantero del vehículo(incluido el bastidor, la defensa, la estructura de la carrocería
delantera del extremo y los ganchos para remolque) puede afectar elrendimiento del sistema de bolsas de aire, aumentando el riesgo delesiones. No modifique el extremo delantero del vehículo.
2006 Navigator (nav)Owners Guide (post-2002-fmt)USA (fus)
Asientos y sistemas de seguridad
230
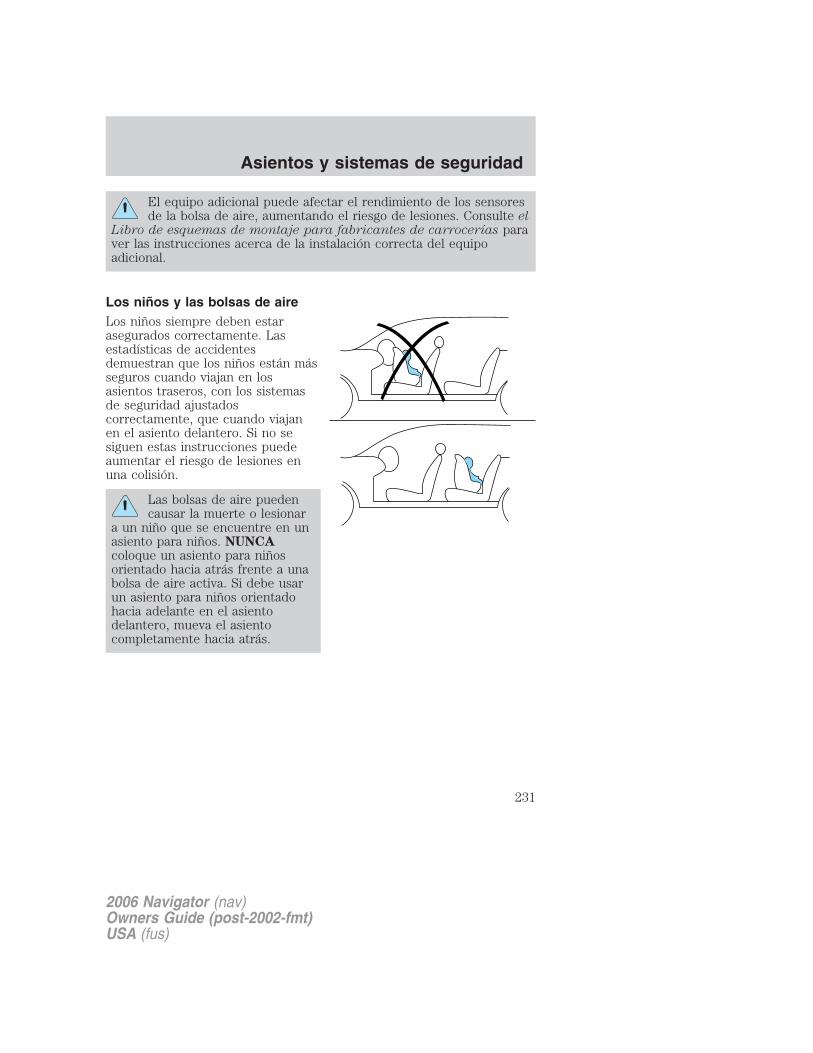
El equipo adicional puede afectar el rendimiento de los sensoresde la bolsa de aire, aumentando el riesgo de lesiones. Consulte el
Libro de esquemas de montaje para fabricantes de carrocerías paraver las instrucciones acerca de la instalación correcta del equipoadicional.
Los niños y las bolsas de aireLos niños siempre deben estarasegurados correctamente. Lasestadísticas de accidentesdemuestran que los niños están másseguros cuando viajan en losasientos traseros, con los sistemasde seguridad ajustadoscorrectamente, que cuando viajanen el asiento delantero. Si no sesiguen estas instrucciones puedeaumentar el riesgo de lesiones enuna colisión.
Las bolsas de aire puedencausar la muerte o lesionar
a un niño que se encuentre en unasiento para niños. NUNCAcoloque un asiento para niñosorientado hacia atrás frente a unabolsa de aire activa. Si debe usarun asiento para niños orientadohacia adelante en el asientodelantero, mueva el asientocompletamente hacia atrás.
2006 Navigator (nav)Owners Guide (post-2002-fmt)USA (fus)
Asientos y sistemas de seguridad
231

¿Cómo funciona el sistema de seguridad suplementario de bolsasde aire?El SRS de la bolsa de aire estádiseñado para activarse cuando elvehículo sufre una desaceleraciónlongitudinal suficiente como parahacer que los sensores cierren uncircuito eléctrico que inicia elinflado de las bolsas de aire.
El hecho de que las bolsas de aireno se inflen en un accidente, nosignifica que el sistema funcioneincorrectamente. Más bien, significaque la fuerza del impacto no fue lo suficientemente grande como paraproducir la activación. Las bolsas de aire del conductor y pasajero estándiseñadas para inflarse en choques frontales y semifrontales, no envolcaduras, impactos laterales ni impactos traseros, a menos que elchoque provoque una desaceleración longitudinal suficiente.
Las bolsas de aire se inflan ydesinflan rápidamente al activarse.Después de que la bolsa de aire seinfla, es normal observar residuos depolvo, similares al humo, u oler elpropelente quemado. Esto puedeconsistir en fécula de maíz, polvosde talco (para lubricar la bolsa) ocompuestos de sodio (por ejemplo,bicarbonato de sodio), producidospor el proceso de combustión queinfla la bolsa de aire. Es posible quehaya pequeñas cantidades dehidróxido de sodio que puedenirritar la piel y los ojos, peroninguno de los residuos es tóxico.
Aunque el sistema está diseñado para ayudar a reducir lesiones graves, elcontacto con una bolsa de aire que se infla también puede causarabrasiones, hinchazones o pérdidas temporales de la audición. Debido aque las bolsas de aire se deben inflar rápidamente y con una fuerzaconsiderable, existe el riesgo de muerte o de lesiones graves tales comofracturas, lesiones faciales y oculares o lesiones internas, particularmentepara los ocupantes que no cumplen con las medidas de seguridad o están
2006 Navigator (nav)Owners Guide (post-2002-fmt)USA (fus)
Asientos y sistemas de seguridad
232

mal sentados en el momento en que la bolsa de aire se infla. Por lotanto, es extremadamente importante que los ocupantes esténcorrectamente sujetos y lo más lejos posible del módulo de la bolsa deaire, sin dejar de mantener el control del vehículo.
Después del inflado se calientan varios componentes del sistemade bolsa de aire. No los toque después del inflado.
Si la bolsa de aire se ha inflado, ésta no volverá a funcionar yse debe reemplazar de inmediato. Si la bolsa de aire no se
reemplaza, el área sin reparar aumentará el riesgo de lesiones en unchoque.
El SRS consta de:
• módulos de bolsas de aire del conductor y del pasajero (que incluyenlos infladores y las bolsas de aire),
• uno o más sensores de impacto y seguridad y un monitor dediagnóstico (RCM),
• una luz y un tono de disponibilidad
• el cableado eléctrico que conecta los componentes.
El RCM (módulo de control de sistemas de seguridad) monitorea suspropios circuitos internos y la conexión del sistema eléctricosuplementario de las bolsas de aire (incluidos los sensores de impacto, elcableado del sistema, la luz de disponibilidad de las bolsas de aire, laenergía de respaldo de las bolsas de aire y los dispositivos de activaciónde las bolsas de aire).
Para determinar si el sistema funcionaEl SRS usa una luz de disponibilidad en el grupo de instrumentos o untono para indicar la condición del sistema. Consulte la secciónDisponibilidad de bolsa de aire en el capítulo Grupo de instrumentos.No se requiere mantenimiento de rutina de la bolsa de aire.
Una o más de las siguientes situaciones reflejan una dificultad en elsistema:
• La luz de disponibilidad destella opermanece encendida.
• La luz de disponibilidad no seiluminará inmediatamente después de activar el encendido.
2006 Navigator (nav)Owners Guide (post-2002-fmt)USA (fus)
Asientos y sistemas de seguridad
233
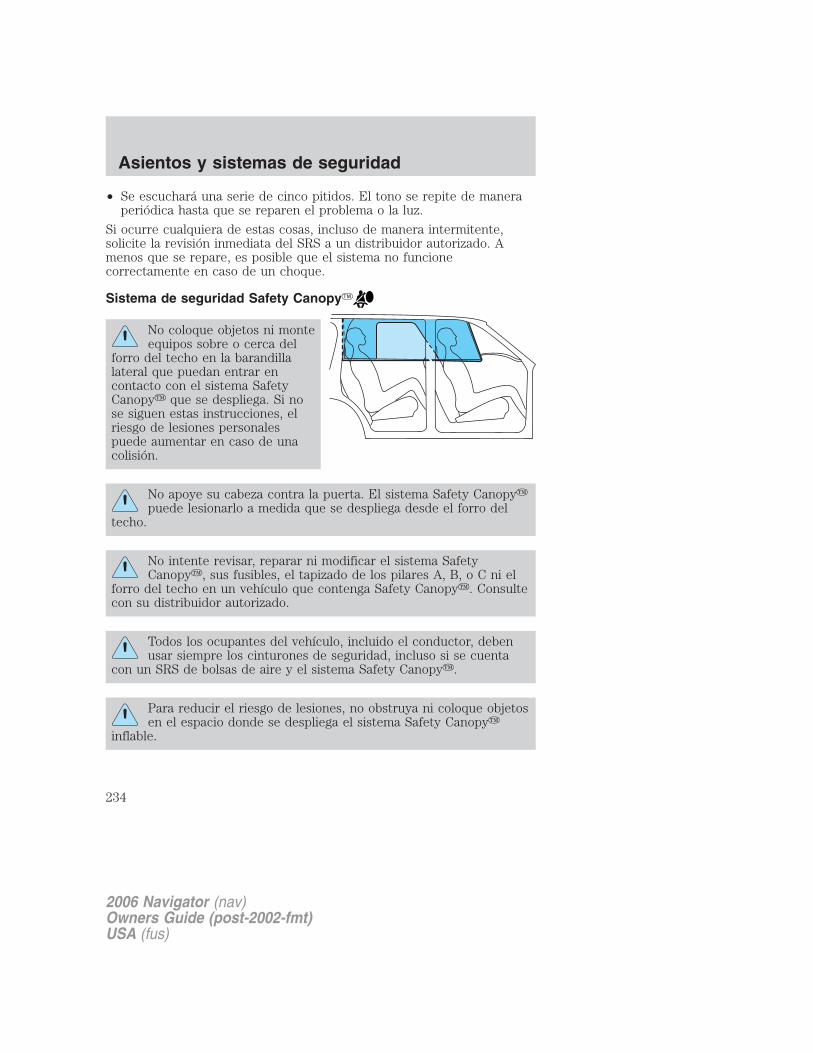
• Se escuchará una serie de cinco pitidos. El tono se repite de maneraperiódica hasta que se reparen el problema o la luz.
Si ocurre cualquiera de estas cosas, incluso de manera intermitente,solicite la revisión inmediata del SRS a un distribuidor autorizado. Amenos que se repare, es posible que el sistema no funcionecorrectamente en caso de un choque.
Sistema de seguridad Safety Canopy�
No coloque objetos ni monteequipos sobre o cerca del
forro del techo en la barandillalateral que puedan entrar encontacto con el sistema SafetyCanopy� que se despliega. Si nose siguen estas instrucciones, elriesgo de lesiones personalespuede aumentar en caso de unacolisión.
No apoye su cabeza contra la puerta. El sistema Safety Canopy�puede lesionarlo a medida que se despliega desde el forro del
techo.
No intente revisar, reparar ni modificar el sistema SafetyCanopy�, sus fusibles, el tapizado de los pilares A, B, o C ni el
forro del techo en un vehículo que contenga Safety Canopy�. Consultecon su distribuidor autorizado.
Todos los ocupantes del vehículo, incluido el conductor, debenusar siempre los cinturones de seguridad, incluso si se cuenta
con un SRS de bolsas de aire y el sistema Safety Canopy�.
Para reducir el riesgo de lesiones, no obstruya ni coloque objetosen el espacio donde se despliega el sistema Safety Canopy�
inflable.
2006 Navigator (nav)Owners Guide (post-2002-fmt)USA (fus)
Asientos y sistemas de seguridad
234
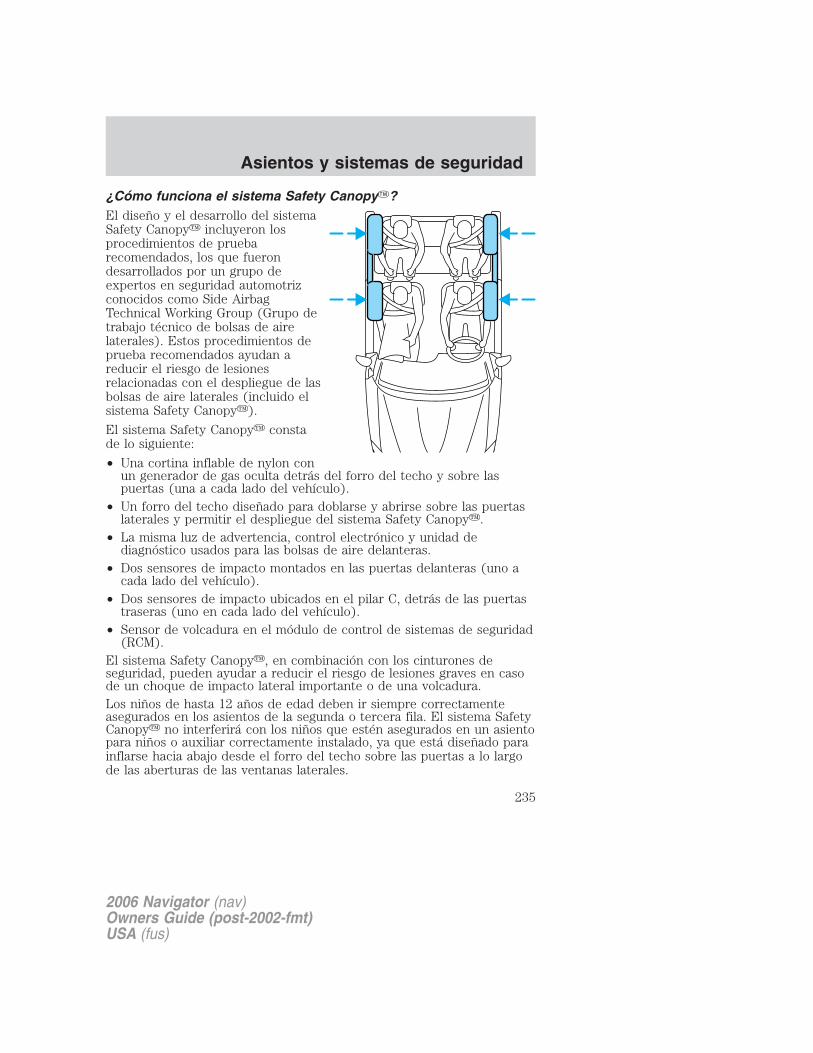
¿Cómo funciona el sistema Safety Canopy�?El diseño y el desarrollo del sistemaSafety Canopy� incluyeron losprocedimientos de pruebarecomendados, los que fuerondesarrollados por un grupo deexpertos en seguridad automotrizconocidos como Side AirbagTechnical Working Group (Grupo detrabajo técnico de bolsas de airelaterales). Estos procedimientos deprueba recomendados ayudan areducir el riesgo de lesionesrelacionadas con el despliegue de lasbolsas de aire laterales (incluido elsistema Safety Canopy�).
El sistema Safety Canopy� constade lo siguiente:
• Una cortina inflable de nylon conun generador de gas oculta detrás del forro del techo y sobre laspuertas (una a cada lado del vehículo).
• Un forro del techo diseñado para doblarse y abrirse sobre las puertaslaterales y permitir el despliegue del sistema Safety Canopy�.
• La misma luz de advertencia, control electrónico y unidad dediagnóstico usados para las bolsas de aire delanteras.
• Dos sensores de impacto montados en las puertas delanteras (uno acada lado del vehículo).
• Dos sensores de impacto ubicados en el pilar C, detrás de las puertastraseras (uno en cada lado del vehículo).
• Sensor de volcadura en el módulo de control de sistemas de seguridad(RCM).
El sistema Safety Canopy�, en combinación con los cinturones deseguridad, pueden ayudar a reducir el riesgo de lesiones graves en casode un choque de impacto lateral importante o de una volcadura.Los niños de hasta 12 años de edad deben ir siempre correctamenteasegurados en los asientos de la segunda o tercera fila. El sistema SafetyCanopy� no interferirá con los niños que estén asegurados en un asientopara niños o auxiliar correctamente instalado, ya que está diseñado parainflarse hacia abajo desde el forro del techo sobre las puertas a lo largode las aberturas de las ventanas laterales.
2006 Navigator (nav)Owners Guide (post-2002-fmt)USA (fus)
Asientos y sistemas de seguridad
235

El sistema Safety Canopy� está diseñado para activarse cuando elvehículo sufre una desaceleración lateral suficiente como para hacer queel sensor de impacto lateral cierre un circuito eléctrico que inicia elinflado del sistema Safety Canopy�, o cuando el sensor de volcaduradetecta la posibilidad de un evento de volcadura.
El sistema Safety Canopy� está montado en la lámina metálica de labarandilla lateral del techo, detrás del forro del techo y sobre losasientos de la primera y segunda fila. En ciertos choques laterales oeventos de volcadura, el sistema Safety Canopy� se activará, sinconsiderar qué asientos estén ocupados. El sistema Safety Canopy� estádiseñado para inflarse entre el área de las ventanas laterales y lospasajeros con el fin de aumentar la protección proporcionada en choquesde impacto lateral y eventos de volcadura.
El hecho de que el sistema Safety Canopy� no se active en un choqueno significa que el sistema funcione incorrectamente. Más bien, significaque la fuerza del impacto no fue lo suficientemente grande como paraproducir la activación. El sistema Safety Canopy� está diseñado parainflarse en ciertos choques de impacto lateral o en eventos de volcadura,no en choques de impacto trasero, frontal ni semifrontal, a menos que elchoque produzca una desaceleración lateral suficiente o la posibilidad deuna volcadura.
Varios componentes delsistema Safety Canopy� se
calientan después del inflado. Nolos toque después del inflado.
Si se desplegó, el sistema Safety Canopy� no volverá afuncionar a menos que se reemplace. El sistema Safety
Canopy� (incluido el tapizado de los pilares A, B y C) debe serinspeccionado y revisado por un distribuidor autorizado. Si elsistema Safety Canopy� no se reemplaza, el área sin repararaumentará el riesgo de lesiones en un choque.
2006 Navigator (nav)Owners Guide (post-2002-fmt)USA (fus)
Asientos y sistemas de seguridad
236

Para determinar si el sistema funcionaEl SRS usa una luz de disponibilidad en el grupo de instrumentos o untono para indicar la condición del sistema. Consulte la secciónDisponibilidad de bolsa de aire en el capítulo Grupo de instrumentos.No se requiere mantenimiento de rutina de la bolsa de aire.Cualquier dificultad del sistema se indica mediante una o más de lassiguientes situaciones:• La luz de disponibilidad (la misma para el sistema de bolsas de aire
delanteras) destellará o permanecerá encendida.• La luz de disponibilidad no se iluminará inmediatamente después de
activar el encendido.
• Se escuchará una serie de cinco pitidos. El patrón de tonos se repetiráperiódicamente hasta que el problema y la luz se reparen.
Si ocurre cualquiera de estas cosas, incluso de manera intermitente,solicite la revisión inmediata del SRS a un distribuidor autorizado. Amenos que se repare, es posible que el sistema no funcionecorrectamente en caso de un choque o de un evento de volcadura.
Eliminación de bolsas de aire y de vehículos con bolsas de aire(incluidos los pretensores)Consulte con su distribuidor autorizado. Las bolsas de aire DEBEN SEReliminadas por personal calificado.
SISTEMAS DE SEGURIDAD PARA NIÑOSVea las siguientes secciones para obtener instrucciones sobre cómoutilizar los sistemas de seguridad para niños en forma correcta. Tambiénvea Sistema de sujeción suplementario de bolsas de aire (SRS) eneste capítulo para obtener instrucciones especiales sobre cómo usar lasbolsas de aire.
Precauciones importantes de los sistemas de seguridad paraniñosLa ley en Estados Unidos y Canadá exige el uso de sistemas de seguridadpara niños. Si en el vehículo viajan niños pequeños (generalmente niñosde cuatro años de edad o menores y que pesan 18 kg [40 lbs] o menos),debe sentarlos en asientos de seguridad fabricados especialmente paraellos. Muchos estados exigen que los niños utilicen asientos auxiliaresaprobados hasta que tengan ocho años. Revise las leyes locales, estataleso provinciales para ver si hay requisitos específicos con relación a laseguridad de los niños en su vehículo. Cuando sea posible, ponga
2006 Navigator (nav)Owners Guide (post-2002-fmt)USA (fus)
Asientos y sistemas de seguridad
237
siempre a los niños menores de 12 años en el asiento trasero delvehículo. Las estadísticas de accidentes demuestran que los niños estánmás seguros cuando viajan en los asientos traseros, con los sistemas deseguridad ajustados correctamente, que cuando viajan en el asientodelantero.
Nunca deje que un pasajero lleve a un niño en su regazomientras el vehículo esté en movimiento. El pasajero no puede
proteger al niño de una lesión en caso de una colisión.
Siga siempre las instrucciones y advertencias que vienen con los sistemasde seguridad para niños que pueda usar.
Los niños y los cinturones de seguridadSi el niño tiene el tamaño adecuado, asegúrelo en un asiento deseguridad.Los niños demasiado grandes para usar asientos de seguridad para niños(según las especificaciones del fabricante de asientos de seguridad paraniños) siempre deben usar cinturones de seguridad.Siga todas las precauciones importantes de los sistemas de seguridad yde las bolsas de aire que se aplican a los pasajeros adultos en suvehículo.Si la parte del cinturón de hombros de una combinación de cinturónpélvico y de hombros se puede colocar de tal manera que no cruce ni seapoye sobre la cara o cuello del niño, éste debe usar el cinturón pélvicoy de hombros. Si acerca el niño al centro del vehículo, puede ayudar aque el cinturón de hombros se ajuste correctamente.
No deje sin vigilancia en su vehículo a niños, a adultos que nopueden valerse por sí mismos ni a mascotas.
Asientos auxiliares para niñosLos niños superan el tamaño de un asiento convertible común o paraniños cuando pesan 18 kilos (40 lb) y tienen aproximadamente 4 años deedad. A pesar que el cinturón pélvico y de hombros brinda algunaprotección, estos niños son aún muy pequeños para que estos tipos decinturón se puedan ajustar correctamente, lo que aumenta el riesgo delesiones graves.
Para que el cinturón pélvico y el de hombros se ajusten mejor en losniños que han superado el tamaño de los asientos de seguridad paraniños, Ford Motor Company recomienda el uso de un reforzador decolocación de cinturón.
2006 Navigator (nav)Owners Guide (post-2002-fmt)USA (fus)
Asientos y sistemas de seguridad
238
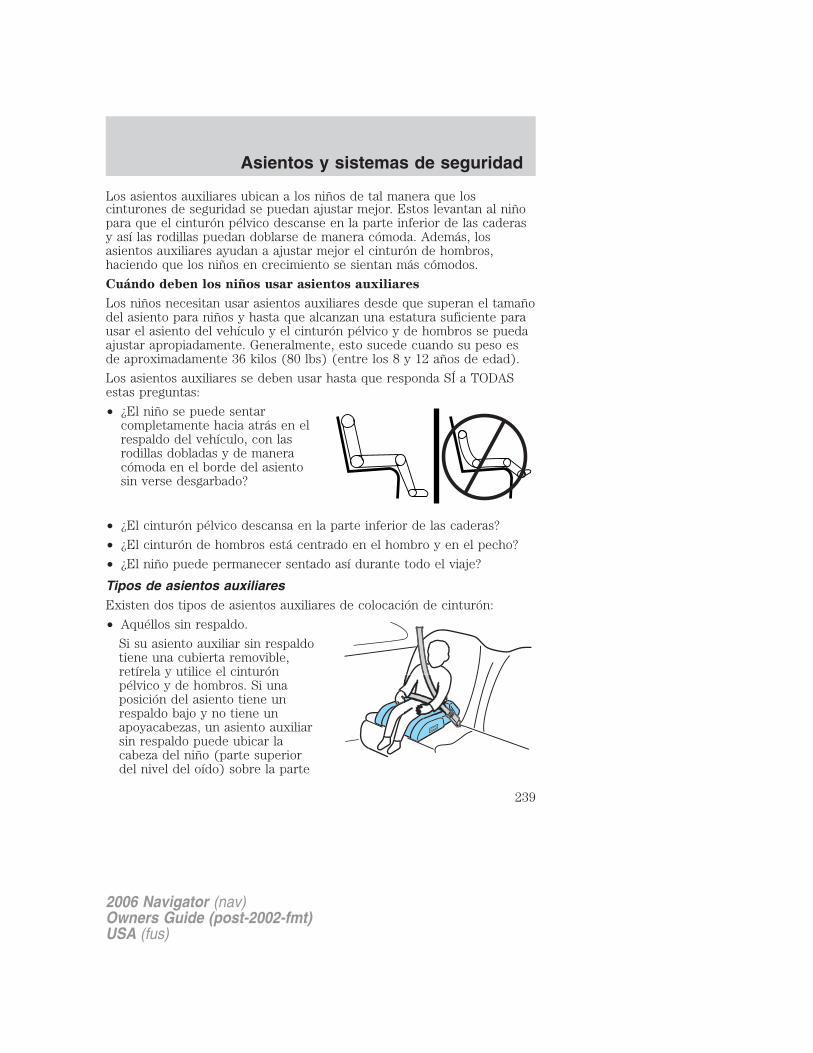
Los asientos auxiliares ubican a los niños de tal manera que loscinturones de seguridad se puedan ajustar mejor. Estos levantan al niñopara que el cinturón pélvico descanse en la parte inferior de las caderasy así las rodillas puedan doblarse de manera cómoda. Además, losasientos auxiliares ayudan a ajustar mejor el cinturón de hombros,haciendo que los niños en crecimiento se sientan más cómodos.
Cuándo deben los niños usar asientos auxiliares
Los niños necesitan usar asientos auxiliares desde que superan el tamañodel asiento para niños y hasta que alcanzan una estatura suficiente parausar el asiento del vehículo y el cinturón pélvico y de hombros se puedaajustar apropiadamente. Generalmente, esto sucede cuando su peso esde aproximadamente 36 kilos (80 lbs) (entre los 8 y 12 años de edad).
Los asientos auxiliares se deben usar hasta que responda SÍ a TODASestas preguntas:
• ¿El niño se puede sentarcompletamente hacia atrás en elrespaldo del vehículo, con lasrodillas dobladas y de maneracómoda en el borde del asientosin verse desgarbado?
• ¿El cinturón pélvico descansa en la parte inferior de las caderas?
• ¿El cinturón de hombros está centrado en el hombro y en el pecho?
• ¿El niño puede permanecer sentado así durante todo el viaje?
Tipos de asientos auxiliaresExisten dos tipos de asientos auxiliares de colocación de cinturón:
• Aquéllos sin respaldo.
Si su asiento auxiliar sin respaldotiene una cubierta removible,retírela y utilice el cinturónpélvico y de hombros. Si unaposición del asiento tiene unrespaldo bajo y no tiene unapoyacabezas, un asiento auxiliarsin respaldo puede ubicar lacabeza del niño (parte superiordel nivel del oído) sobre la parte
2006 Navigator (nav)Owners Guide (post-2002-fmt)USA (fus)
Asientos y sistemas de seguridad
239

de arriba del asiento. En este caso, mueva el asiento auxiliar sinrespaldo a otra posición del asiento con un respaldo más alto y concinturones pélvicos y de hombros.
• Aquéllos con un respaldo alto.
Si no puede encontrar unaposición de asiento que apoye demanera adecuada la cabeza delniño, a pesar de tener un asientoauxiliar sin respaldo, la mejoralternativa sería un asientoauxiliar con respaldo alto.
Ambos se pueden usar en cualquier vehículo en una posición de asientoequipada con cinturones pélvicos y de hombros en caso que el niño pesemás de 18 kilos (40 lbs.)
El cinturón de hombros debe cruzar el pecho, ajustándose perfectamenteen el centro del hombro. El cinturón pélvico debe ajustarse y colocarseen la parte inferior de las caderas, nunca más arriba sobre el estómago.
Si el asiento auxiliar se desliza en el asiento del vehículo, puede colocaruna malla de goma como plataforma o un forro de tapete bajo el asientoauxiliar y así se puede mejorar esta condición.
Importancia de los cinturones de hombros
Si utiliza un asiento auxiliar sin cinturón de hombros, aumenta el riesgoque la cabeza del niño se golpee contra una superficie dura en caso deun choque. Por esta razón, nunca use un asiento auxiliar sólo concinturón pélvico. Es mejor usar un asiento auxiliar con cinturonespélvicos y de hombros en el asiento trasero, que es el lugar más seguropara los niños en un viaje.
Siga todas las instrucciones proporcionadas por el fabricante delasiento auxiliar.
Nunca coloque el cinturón de hombros bajo el brazo del niño odetrás de la espalda, ya que puede eliminar la protección para la
parte superior del cuerpo y puede aumentar el riesgo de sufrir lesioneso de tener consecuencias fatales en un choque.
2006 Navigator (nav)Owners Guide (post-2002-fmt)USA (fus)
Asientos y sistemas de seguridad
240

Nunca use almohadas, libros ni toallas para reforzar al niño.Éstos pueden deslizarse y aumentar la probabilidad de sufrir
lesiones o de tener consecuencias fatales en un choque.
ASIENTOS DE SEGURIDAD PARA NIÑOS
Asientos de seguridad para niños y bebés o para niñosUse un asiento de seguridad adecuado para el tamaño y peso del niño.Siga cuidadosamente todas las instrucciones del fabricante provistas conel asiento de seguridad que coloque en su vehículo. Si no instala o nousa el asiento de seguridad correctamente, el niño puede resultarlesionado en un frenado repentino o en un choque.
Al instalar un asiento de seguridad para niños:
• En este capítulo, revise y siga lainformación presentada en lasección Sistema de sujeciónsuplementario de bolsa de aire(SRS).
• Use la hebilla del cinturón deseguridad correcta para laposición del asiento (la hebillamás cercana a la dirección de laque viene la lengüeta).
• Inserte la lengüeta del cinturónen la hebilla correspondientehasta que escuche un chasquido ysienta que se engancha.Asegúrese de ajustar firmementela lengüeta en la hebilla.
• Coloque el respaldo en posición vertical.
• Ponga el cinturón de seguridad en el modo de bloqueo automático.Consulte la sección Modo de bloqueo automático en este capítulo.
• El asiento central de la segunda fila se puede mover hacia adelantepara mantener a un niño en un sistema de sujeción para niños cercade los pasajeros del asiento delantero. El asiento se debe mover hastala posición completamente hacia atrás cuando esté ocupado por niñosmayores o adultos.
2006 Navigator (nav)Owners Guide (post-2002-fmt)USA (fus)
Asientos y sistemas de seguridad
241
• Se recomienda que los niños hasta 22 kg (48 lbs) utilicen los anclajesinferiores de LATCH en un sistema de seguridad para niños. Lascorreas de anclaje superiores se pueden utilizar para niños hasta 27 kg(60 lbs) en un sistema de seguridad para niños y para proporcionarseguridad para el torso superior en niños hasta 36 kg (80 lbs) queusan un arnés de torso superior y un reforzador de colocación decinturón.
Ford recomienda el uso de un asiento de seguridad para niños que tengauna correa superior de sujeción. Instale el asiento de seguridad paraniños en una posición con LATCH y anclajes de correa. Para obtener másinformación acerca de las correas de sujeción superiores y los anclajes,consulte Sujeción de asientos de seguridad con correas de sujeciónen este capítulo. Para obtener más información sobre anclajes LATCH,consulte Sujeción de asientos de seguridad con sujetadores LATCH(Anclajes inferiores y correas para niños) en este capítulo.
Siga cuidadosamente todas las instrucciones del fabricanteincluidas con el asiento de seguridad que coloque en su vehículo.
Si no instala o no usa el asiento de seguridad correctamente, el niñopuede resultar lesionado en un frenado repentino o en un choque.
Instalación de asientos de seguridad para niños con combinaciónde cinturón pélvico y de hombros
Las bolsas de aire pueden causar la muerte o lesionar a un niñoque se encuentre en un asiento para niños. NUNCA coloque un
asiento para niños orientado hacia atrás frente a una bolsa de aireactiva. Si debe usar un asiento para niños orientado hacia adelante enel asiento delantero, mueva el asiento completamente hacia atrás.
Los niños de hasta 12 años de edad deben ir correctamentesujetos en el asiento trasero cada vez que sea posible.
2006 Navigator (nav)Owners Guide (post-2002-fmt)USA (fus)
Asientos y sistemas de seguridad
242
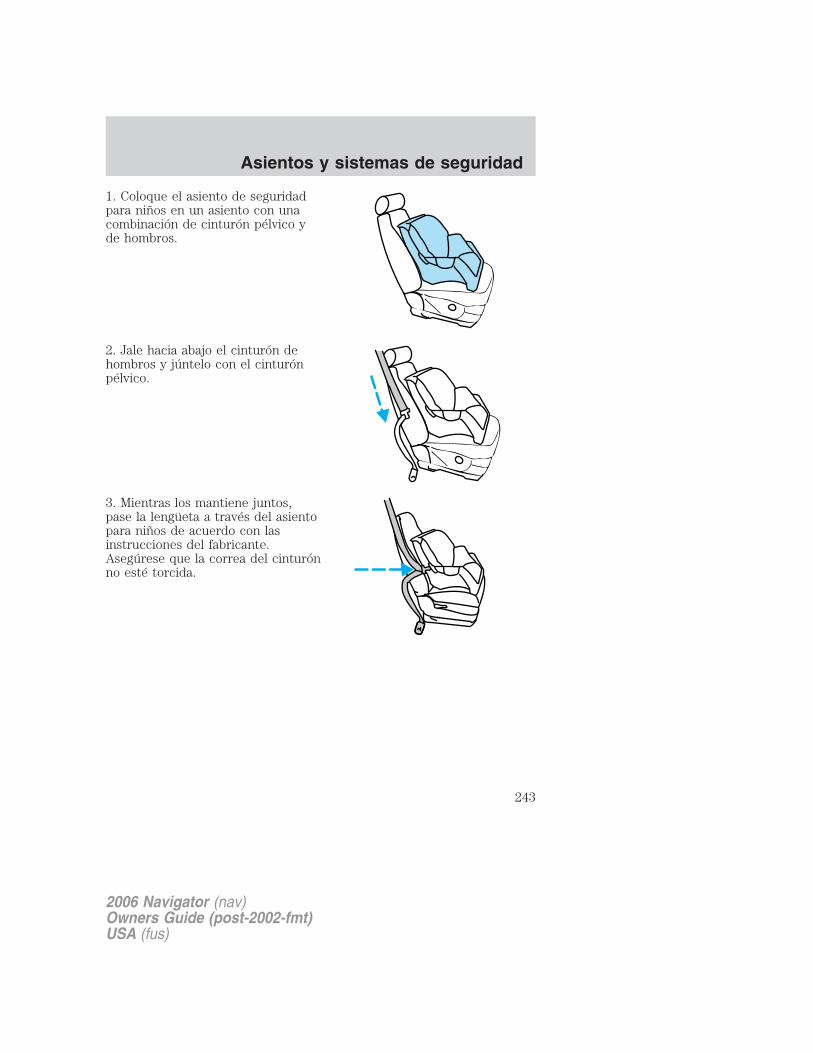
1. Coloque el asiento de seguridadpara niños en un asiento con unacombinación de cinturón pélvico yde hombros.
2. Jale hacia abajo el cinturón dehombros y júntelo con el cinturónpélvico.
3. Mientras los mantiene juntos,pase la lengüeta a través del asientopara niños de acuerdo con lasinstrucciones del fabricante.Asegúrese que la correa del cinturónno esté torcida.
2006 Navigator (nav)Owners Guide (post-2002-fmt)USA (fus)
Asientos y sistemas de seguridad
243

4. Inserte la lengüeta del cinturónen la hebilla adecuada (la hebillamás cercana a la dirección desde lacual proviene la lengüeta) para esaposición del asiento hasta queescuche un chasquido y sienta quese ha enganchado. Jálela paraasegurarse que la lengüeta estéenganchada firmemente.
5. Para poner el retractor en elmodo de bloqueo automático, tomela parte del hombro del cinturón yjale hacia abajo hasta extraer todo elcinturón y escuchar un chasquido.
6. Deje que el cinturón se retraiga. El cinturón emite un chasquido amedida que se retrae para indicar que está en el modo de bloqueoautomático.
7. Jale la parte del cinturón pélvicoa través del asiento para niños haciala hebilla y jale hacia arriba delcinturón de hombros, mientraspresiona el asiento para niños con larodilla.
2006 Navigator (nav)Owners Guide (post-2002-fmt)USA (fus)
Asientos y sistemas de seguridad
244

8. Deje que el cinturón de seguridadse retraiga para eliminar cualquierholgura en el cinturón.
9. Antes de poner al niño en elasiento, incline con fuerza el asientohacia atrás y hacia adelante paracerciorarse que esté firmementeajustado. Para verificar esto, tome elasiento en el trayecto del cinturón eintente moverlo hacia los lados yhacia adelante. Si está bieninstalado, no debería moverse más de una pulgada.
10. Trate de sacar el cinturón del retractor para asegurarse que elretractor esté en el modo de bloqueo automático (será imposible sacarmás el cinturón). Si el retractor no está bloqueado, desabroche elcinturón y repita los pasos del 2 al 9.
Verifique que el asiento para niños esté asegurado correctamente antesde cada uso.
Sujeción de asientos de seguridad para niños con correas desujeción
La mayoría de los asientos nuevos para niños con vista hacia adelanteincluyen una correa de sujeción que pasa sobre el respaldo del asiento yse engancha en un punto de anclaje. Las correas de sujeción estándisponibles como accesorio para muchos modelos antiguos de asientos deseguridad. Comuníquese con el fabricante de su asiento para niños paraobtener más información acerca de cómo ordenar una correa de sujeción.
Algunos asientos traseros de su vehículo tienen instalados anclajes decorreas de sujeción integrados que se ubican detrás de los asientos,como se describe a continuación.
En la posición de asiento central de la tercera fila, el anclaje de correade sujeción es un anillo en la parte inferior del respaldo.
Los anclajes de las correas de sujeción de su vehículo están en lassiguientes posiciones (vistos desde arriba):
2006 Navigator (nav)Owners Guide (post-2002-fmt)USA (fus)
Asientos y sistemas de seguridad
245

• Asiento corrido de la segunda fila
• Asientos bajos de la segunda fila
Enganche la correa de sujeción sólo al anclaje de correaapropiado tal como se indica. Es posible que la correa de
sujeción no funcione correctamente si se engancha en un lugar distintoal anclaje de sujeción correcto.
Posiciones del asiento de la segunda fila
1. Coloque el asiento de seguridad para niños sobre el cojín del asiento.
2. Ubique el anclaje de correa en la parte inferior trasera del asiento.
• posiciones de asiento de costado
2006 Navigator (nav)Owners Guide (post-2002-fmt)USA (fus)
Asientos y sistemas de seguridad
246
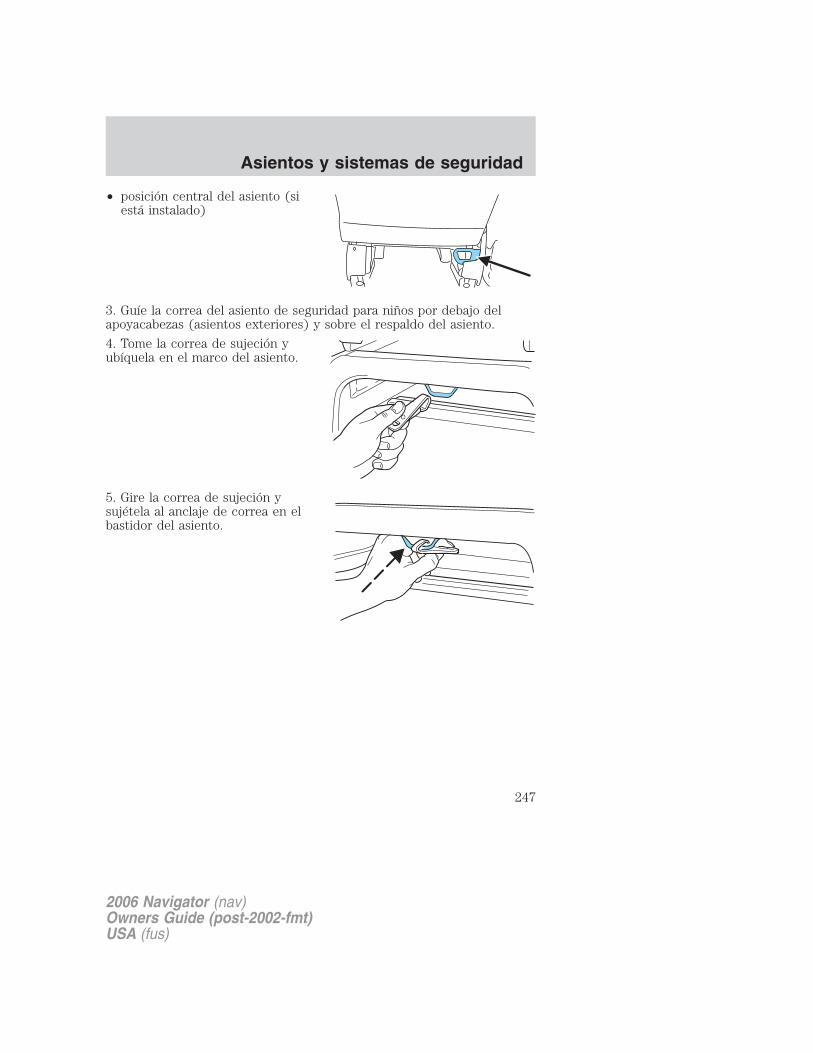
• posición central del asiento (siestá instalado)
3. Guíe la correa del asiento de seguridad para niños por debajo delapoyacabezas (asientos exteriores) y sobre el respaldo del asiento.
4. Tome la correa de sujeción yubíquela en el marco del asiento.
5. Gire la correa de sujeción ysujétela al anclaje de correa en elbastidor del asiento.
2006 Navigator (nav)Owners Guide (post-2002-fmt)USA (fus)
Asientos y sistemas de seguridad
247
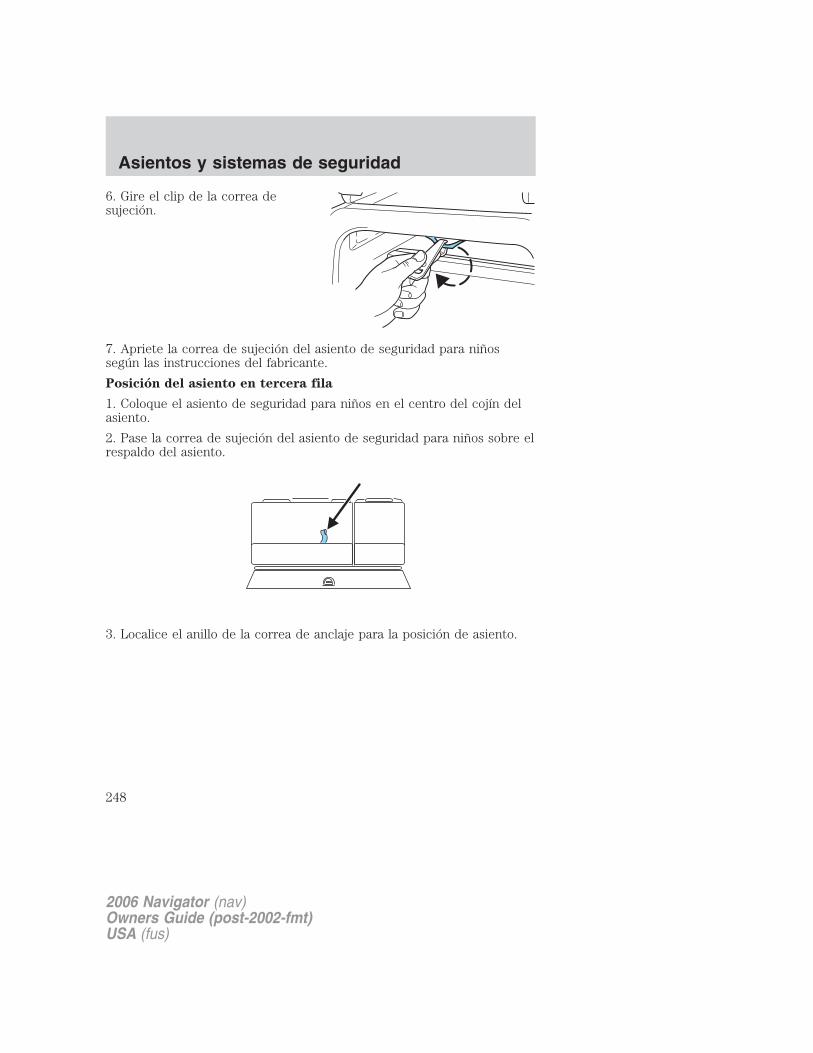
6. Gire el clip de la correa desujeción.
7. Apriete la correa de sujeción del asiento de seguridad para niñossegún las instrucciones del fabricante.
Posición del asiento en tercera fila
1. Coloque el asiento de seguridad para niños en el centro del cojín delasiento.
2. Pase la correa de sujeción del asiento de seguridad para niños sobre elrespaldo del asiento.
3. Localice el anillo de la correa de anclaje para la posición de asiento.
2006 Navigator (nav)Owners Guide (post-2002-fmt)USA (fus)
Asientos y sistemas de seguridad
248
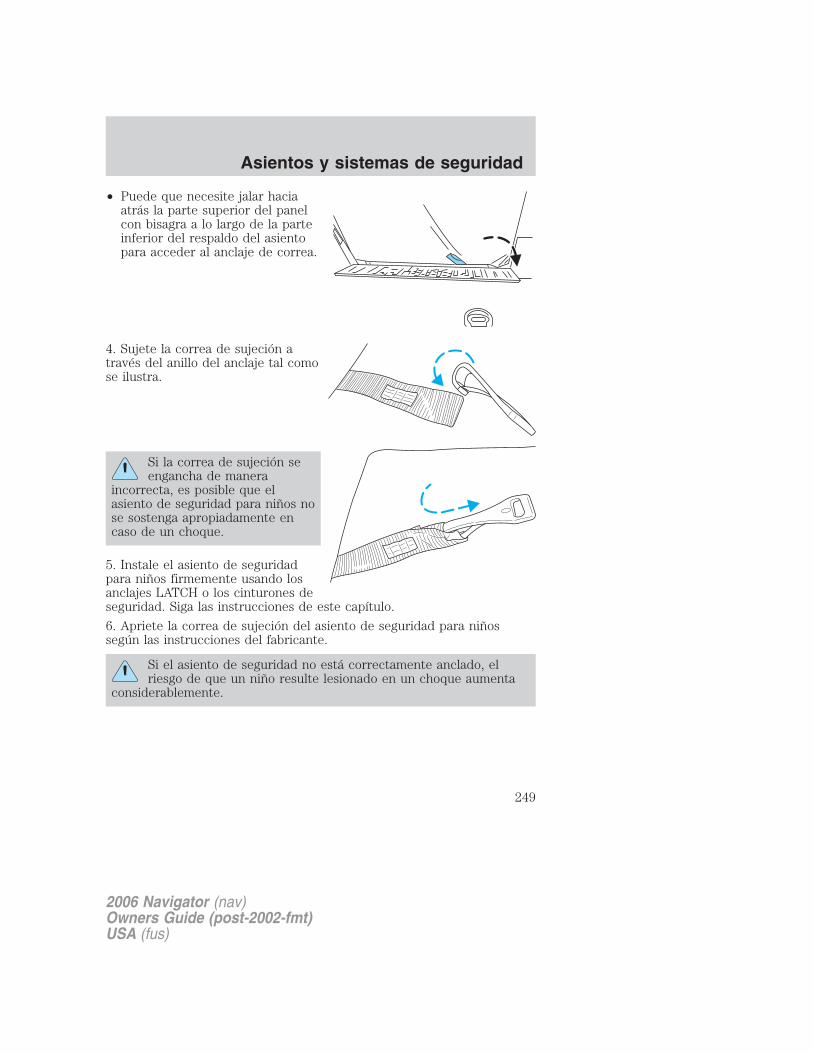
• Puede que necesite jalar haciaatrás la parte superior del panelcon bisagra a lo largo de la parteinferior del respaldo del asientopara acceder al anclaje de correa.
4. Sujete la correa de sujeción através del anillo del anclaje tal comose ilustra.
Si la correa de sujeción seengancha de manera
incorrecta, es posible que elasiento de seguridad para niños nose sostenga apropiadamente encaso de un choque.
5. Instale el asiento de seguridadpara niños firmemente usando losanclajes LATCH o los cinturones deseguridad. Siga las instrucciones de este capítulo.
6. Apriete la correa de sujeción del asiento de seguridad para niñossegún las instrucciones del fabricante.
Si el asiento de seguridad no está correctamente anclado, elriesgo de que un niño resulte lesionado en un choque aumenta
considerablemente.
2006 Navigator (nav)Owners Guide (post-2002-fmt)USA (fus)
Asientos y sistemas de seguridad
249

Ajustes de asientos de seguridad para niños con conexionesLATCH (anclajes inferiores y correas de sujeción para niños) paraanclajes de asientos para niños
Algunos asientos de seguridad para niños incluyen dos conexiones rígidaso instaladas en la correa que se conectan a dos anclajes en posiciones deasiento específicas de su vehículo. Este tipo de asiento para niñoselimina la necesidad de utilizar cinturones de seguridad para fijar elasiento para niños. En asientos de seguridad para niños con vista haciaadelante, la correa de sujeción también debe estar ajustada al anclajecorrecto de la correa. Consulte Sujeción de asientos de seguridad concorreas de sujeción en este capítulo.
Su vehículo tiene anclajes de sujeción LATCH para la instalación deasientos de seguridad para niños en las posiciones de asiento marcadascon el símbolo de asiento para niños.
Nunca fije dos asientos de seguridad para niños LATCH al mismoanclaje. En caso de accidente, es posible que un anclaje no sea
lo suficientemente fuerte como para sostener dos conexiones deasientos para niños y puede romperse, provocando lesiones graves oincluso la muerte.
2006 Navigator (nav)Owners Guide (post-2002-fmt)USA (fus)
Asientos y sistemas de seguridad
250

Los anclajes inferiores para lainstalación de asientos para niños seubican en la sección trasera delasiento de la segunda fila entre elcojín y el respaldo del asiento. Losanclajes LATCH están ubicadosdebajo de los símbolos de ubicaciónen el respaldo del asiento.
Siga las instrucciones del fabricante del asiento para niños para instalarcorrectamente los asientos para niños con conexiones LATCH.
Una las conexiones inferiores LATCH del asiento para niños sóloa los anclajes que se muestran.
Si instala un asiento para niños con conexiones rígidas LATCH, noapriete la correa de sujeción tanto que el asiento para niños se levantedel cojín del asiento del vehículo cuando el niño esté sentado en él.Mantenga la correa de sujeción ajustada tan sólo lo necesario sin que selevante la parte delantera del asiento para niños. Mantener el asientopara niños tocando levemente el asiento del vehículo, proporciona lamejor protección en caso de un accidente grave.
Cada vez que use el asiento de seguridad, revise que el asiento estécorrectamente sujeto a los anclajes inferiores y al anclaje de la correa.Intente mover el asiento para niños de lado a lado. También intente jalarel asiento hacia adelante. Verifique que los anclajes mantengan el asientoen su lugar.
Si el asiento de seguridad no está correctamente anclado, elriesgo de que un niño resulte lesionado en un choque aumenta
considerablemente.
2006 Navigator (nav)Owners Guide (post-2002-fmt)USA (fus)
Asientos y sistemas de seguridad
251
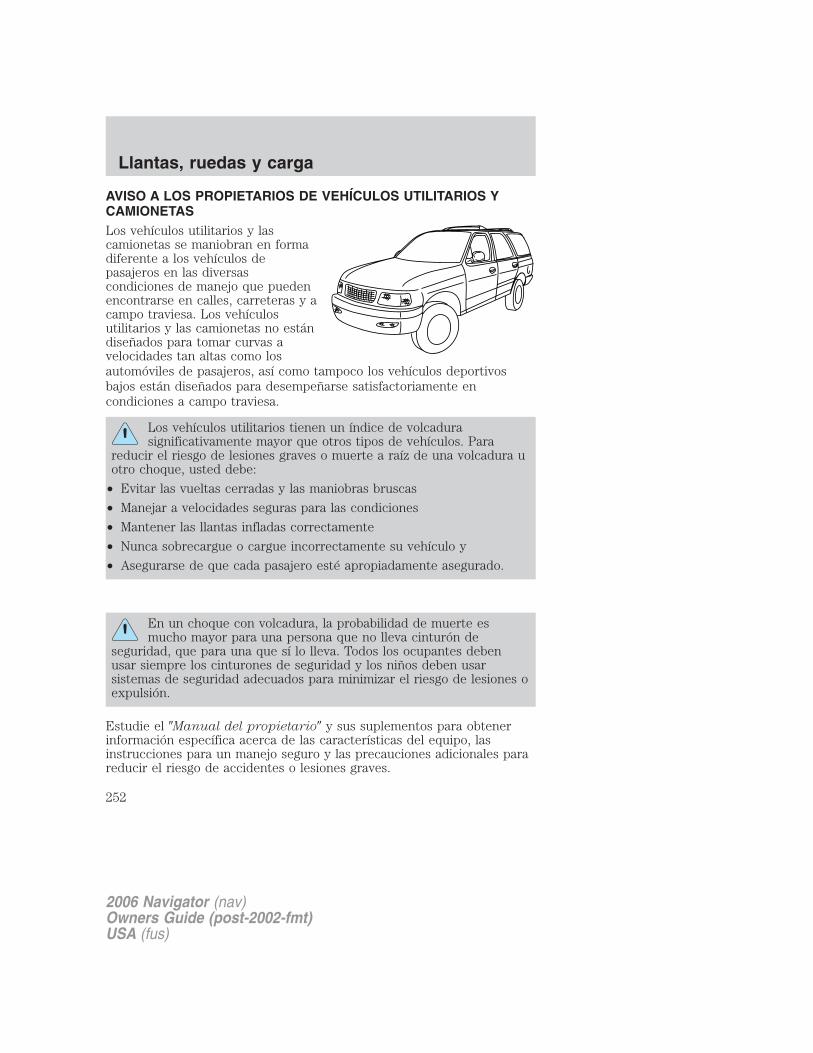
AVISO A LOS PROPIETARIOS DE VEHÍCULOS UTILITARIOS YCAMIONETASLos vehículos utilitarios y lascamionetas se maniobran en formadiferente a los vehículos depasajeros en las diversascondiciones de manejo que puedenencontrarse en calles, carreteras y acampo traviesa. Los vehículosutilitarios y las camionetas no estándiseñados para tomar curvas avelocidades tan altas como losautomóviles de pasajeros, así como tampoco los vehículos deportivosbajos están diseñados para desempeñarse satisfactoriamente encondiciones a campo traviesa.
Los vehículos utilitarios tienen un índice de volcadurasignificativamente mayor que otros tipos de vehículos. Para
reducir el riesgo de lesiones graves o muerte a raíz de una volcadura uotro choque, usted debe:
• Evitar las vueltas cerradas y las maniobras bruscas
• Manejar a velocidades seguras para las condiciones
• Mantener las llantas infladas correctamente
• Nunca sobrecargue o cargue incorrectamente su vehículo y
• Asegurarse de que cada pasajero esté apropiadamente asegurado.
En un choque con volcadura, la probabilidad de muerte esmucho mayor para una persona que no lleva cinturón de
seguridad, que para una que sí lo lleva. Todos los ocupantes debenusar siempre los cinturones de seguridad y los niños deben usarsistemas de seguridad adecuados para minimizar el riesgo de lesiones oexpulsión.
Estudie el �Manual del propietario� y sus suplementos para obtenerinformación específica acerca de las características del equipo, lasinstrucciones para un manejo seguro y las precauciones adicionales parareducir el riesgo de accidentes o lesiones graves.
2006 Navigator (nav)Owners Guide (post-2002-fmt)USA (fus)
Llantas, ruedas y carga
252

CARACTERÍSTICAS DEL VEHÍCULO
Sistemas 4WD y AWD (si están instalados)
Un vehículo equipado con AWD o 4WD (cuando lo seleccione), tiene lacapacidad de usar las cuatro ruedas para obtener energía. Esto aumentala tracción y puede permitirle manejar con seguridad sobre terrenos ycaminos en condiciones que los vehículos convencionales con tracción endos ruedas no pueden recorrer.
Se suministra potencia a las cuatroruedas a través de una caja detransferencia o unidad detransferencia de potencia. Losvehículos con tracción en las cuatroruedas le permiten seleccionardiferentes modos de manejo segúnsea necesario. La información acercadel funcionamiento de la caja de transferencia y los procedimientos decambio de velocidades se puede encontrar en el capítulo Manejo. En elcapítulo Mantenimiento y especificaciones se puede encontrarinformación sobre el mantenimiento de la caja de transferencia. Debefamiliarizarse completamente con esta información antes de hacerfuncionar su vehículo.
En algunos modelos tracción en las cuatro ruedas, el cambio inicial detracción de dos ruedas a tracción en las cuatro ruedas mientras elvehículo está en movimiento, puede causar un sonido metálico o detrinquete momentáneo. Estos sonidos son normales y se deben almecanismo de transmisión delantero que aumenta la velocidad y no sonmotivo de preocupación.
No se confíe demasiado de la capacidad de los vehículos tracciónen las cuatro ruedas o AWD. A pesar de que los vehículos con
tracción en las cuatro ruedas o AWD pueden acelerar mejor que los detracción en dos ruedas en situaciones que requieran baja tracción,éstos no frenan más rápido. Siempre maneje a una velocidad segura.
2006 Navigator (nav)Owners Guide (post-2002-fmt)USA (fus)
Llantas, ruedas y carga
253

Cómo se diferencia su vehículo de los demásLos vehículos todo terreno y lascamionetas pueden presentaralgunas diferencias perceptibles encomparación a otros vehículos. Suvehículo puede ser:
• Más alto: para permitir unacapacidad de transporte de cargasuperior y para permitir que viajesobre terrenos irregulares sinquedar atrapado o dañar loscomponentes de la parte baja.
• Más corto: para otorgar lacapacidad de aproximarse a laspendientes y sobrepasar la cimade una colina sin quedar atrapadoo dañar los componentes de la parte baja. Aunque hay igualdad entodos los demás aspectos, una distancia entre ejes más corta puedehacer que su vehículo responda más rápido a la dirección que unvehículo con una distancia entre ejes más larga.
• Más angosto: para proporcionarmayor maniobrabilidad enespacios estrechos, especialmenteen uso a campo traviesa.
Como resultado de las diferencias endimensiones indicadas arriba, losvehículos Todo terreno y lascamionetas generalmente tienen uncentro de gravedad superior y unamayor diferencia en el centro degravedad entre las condiciones cony sin carga.
Estas diferencias que hacen que suvehículo sea tan versátil tambiénprovocan que se maniobre en forma diferente a otros vehículos comunesde pasajeros.
2006 Navigator (nav)Owners Guide (post-2002-fmt)USA (fus)
Llantas, ruedas y carga
254

INFORMACIÓN SOBRE GRADO DE UNIFORMIDAD DE LACALIDAD DE LAS LLANTASLos vehículos nuevos están provistosde llantas con una clasificaciónsobre ellas, llamada Grado decalidad de la llanta. Los grados decalidad se pueden encontrar, dondesea aplicable, en el costado de lallanta entre el reborde de larodadura y el ancho máximo desección. Por ejemplo:
• Banda de rodadura 200, Tracción AA, Temperatura A
Estos grados de calidad de las llantas se determinan según normas queha establecido el Departamento de Transportes de los Estados Unidos.
Los Grados de calidad de las llantas se aplican a llantas neumáticasnuevas para uso en automóviles de pasajeros. No se aplican a rodadurasprofundas, llantas para la nieve de tipo invierno, llantas de refaccióneconomizadoras de espacio o para uso provisional, llantas con diámetrosde rin nominal de 25 a 30 cm (10 a 12 pulgadas) o llantas de producciónlimitada según se define en el Título 49 del Código de normas federales,Parte 575.104(c)(2).
Departamento de Transportes de Estados Unidos: grados decalidad de llantas: el Ministerio de transportes de Estados Unidos exigeque Ford Motor Company le proporcione la siguiente información acercade los grados de las llantas exactamente como el gobierno la haredactado.
Desgaste de los surcosEl grado de desgaste de los surcos es una clasificación comparativabasada en el nivel de desgaste de la llanta cuando ésta se prueba bajocondiciones controladas en una pista de prueba específica del gobierno.Por ejemplo, una llanta de grado 150 se desgastaría una y media (1 1/2)veces, como lo haría en la pista de prueba del gobierno como llanta degrado 100. El rendimiento relativo de las llantas depende, sin embargo,de las condiciones reales de su uso y puede apartarse significativamentede la norma debido a variaciones en costumbres de conducir, prácticasde servicio y diferencias en las características de calles y clima.
2006 Navigator (nav)Owners Guide (post-2002-fmt)USA (fus)
Llantas, ruedas y carga
255
Tracción AA, A, B y CLos grados de tracción, de mayor a menor, son AA, A, B y C. Los gradosrepresentan la capacidad de la llanta para detenerse sobre pavimentomojado según lo medido en condiciones controladas sobre superficies deprueba gubernamentales específicas de asfalto y concreto. Una llanta conla marca C puede tener un rendimiento de tracción deficiente.
El grado de tracción asignado a esta llanta se basa en laspruebas de tracción de frenado recto y no incluye características
de aceleración, curvas, deslizamiento como hidroplano o tracciónmáxima.
Temperatura A B CLas clases de temperatura son A (la más alta), B y C, las cualesrepresentan la resistencia de la llanta a la generación de calor y sucapacidad de disiparlo cuando se prueban en condiciones controladas enuna rueda de prueba de laboratorio especificada. Una temperatura altaprolongada puede hacer que el material de la llanta se degrade,reduciendo su vida útil. Una temperatura excesiva puede provocar fallasrepentinas de la llanta. La clase C corresponde a un nivel de rendimientoque deben cumplir todas las llantas de vehículos de pasajeros de acuerdocon la Norma federal de seguridad para vehículos motorizados N° 109.Las clases B y A representan niveles más altos de rendimiento de larueda en pruebas de laboratorio que el mínimo exigido por la ley.
El grado de temperatura para esta llanta se establece para unallanta apropiadamente inflada y no sobrecargada. La velocidad
excesiva, falta de aire o carga excesiva, ya sea por separado o encombinación, puede causar un calentamiento progresivo y una posiblefalla de las llantas.
LLANTASLas llantas están diseñadas para entregar miles de millas de servicio,pero se les debe realizar mantenimiento para obtener el máximobeneficio de ellas.
Glosario de terminología sobre llantas• Etiqueta de la llanta: una etiqueta que muestra los tamaños de
llantas del OE (Equipamiento original), la presión de infladorecomendada y el peso máximo que puede transportar el vehículo.
2006 Navigator (nav)Owners Guide (post-2002-fmt)USA (fus)
Llantas, ruedas y carga
256
• Número de identificación de llanta (TIN): un número en elcostado de cada llanta que entrega información acerca de la marca dela llanta y de la planta del fabricante, el tamaño de la llanta y la fechade fabricación.
• Presión de inflado: una medida de la cantidad de aire en la llanta.
• Carga estándar: un tipo de llantas P-metric o Metric diseñadas paratransportar una carga máxima a 35 psi (37 psi [2.5 baras] para llantasMetric). Si aumenta la presión de inflado más allá de esta presión, noaumentará la capacidad de transporte de carga de las llantas.
• Carga extra: un tipo de llantas P-metric o Metric diseñadas paratransportar una carga máxima más pesada a 41 psi (43 psi [2.9 baras]para llantas Metric). Si aumenta la presión de inflado más allá de estapresión, no aumentará la capacidad de transporte de carga de lasllantas.
• kPa: Kilopascales, unidad métrica de presión de aire.
• PSI: libras por pulgada cuadrada, una unidad estándar de presión deaire.
• Presión de inflado en frío: presión de la llanta cuando el vehículoha estado quieto y no expuesto directamente al sol durante una hora omás y antes de que el vehículo se manejara por 1.6 km (1 milla).
• Presión de inflado recomendada: presión de inflado en frío que seencuentra en la Etiqueta de certificación del cumplimiento de lasnormas de seguridad, ubicada en el Pilar B o en el borde de la puertadel conductor.
• Pilar B: la barra estructural al costado del vehículo detrás de lapuerta delantera.
• Área del talón de la llanta: área de la llanta que está junto al rin.
• Costado de la llanta: área entre el área del talón y la rodadura.
• Área de la rodadura de la llanta: área del perímetro de la llantaque hace contacto con el camino cuando se monta en el vehículo.
• Rin: el soporte metálico (rueda) para una llanta o un conjunto dellanta y cámara sobre el que se asientan los talones de la llanta.
2006 Navigator (nav)Owners Guide (post-2002-fmt)USA (fus)
Llantas, ruedas y carga
257

INSPECCIÓN E INFLADO DE LAS LLANTAS
Para un funcionamiento seguro de su vehículo, es necesario que susllantas estén infladas correctamente. Recuerde que una llanta puedeperder hasta la mitad de su presión de aire y sin verse desinflada.
Todos los días, antes de manejar,revise sus llantas. Si una pareceestar más baja que las otras, use unmanómetro para llantas pararevisarlas y ajustarlas según seanecesario.
Al menos una vez al mes y antes deemprender viajes largos, inspeccionecada llanta y revise la presión deaire con un manómetro de presiónpara llantas (incluida la llanta derefacción, si está instalada). Infle todas las llantas según la presión deinflado recomendada por Ford Motor Company.
Inspección de sus llantasInspeccione periódicamente las bandas de rodadura de las llantas enbusca de desgaste disparejo o excesivo y quite las piedras, clavos, vidriosu otros objetos que se puedan haber metido en sus ranuras. Revise sihay agujeros o cortaduras que puedan permitir fugas de aire de la llantay haga las reparaciones necesarias.
También inspeccione los costados de la llanta para ver si hay cortaduras,golpes y otros daños. Si sospecha que hay daño interno en la llanta,desmóntela e inspecciónela en caso que requiera reparación o reemplazo.Para su seguridad, las llantas que están dañadas no se deben usar ya queestán más expuestas a reventarse o fallar. Las llantas se pueden dañardurante el uso a campo traviesa, por eso se recomienda la inspecciónposterior a este uso.
Inflado de las llantasUse un manómetro de presión para llantas para comprobar la presión deinflado, incluida la llanta de refacción (si está instalada), al menos unavez al mes y antes de viajes largos. Es muy importante que adquiera unindicador de presión de llantas confiable, ya que los indicadoresautomáticos de las estaciones de servicio pueden ser inexactos. Fordrecomienda el uso de indicadores de presión de llantas tipo digitales ocuadrantes en lugar de los indicadores de presión de llanta tipo varilla.
2006 Navigator (nav)Owners Guide (post-2002-fmt)USA (fus)
Llantas, ruedas y carga
258
Use la presión de inflado en frío recomendada para conseguir unrendimiento y desgaste óptimo de las llantas. El inflado insuficiente oexcesivo puede causar patrones de desgaste disparejo.
El inflado insuficiente es la causa más común de fallas en lasllantas y puede tener como consecuencia un agrietamiento
severo de la llanta, la separación de la banda de rodadura o un�reventón�, con la pérdida inesperada del control del vehículo y unmayor riesgo de lesiones. El inflado insuficiente aumenta el pliegue delcostado y la resistencia de rodado, teniendo como consecuencia laacumulación de calor y el daño interno a la llanta. También puedeocasionar la tensión innecesaria de la llanta, desgaste irregular, pérdidade control del vehículo y accidentes. ¡Una llanta puede perder hasta lamitad de su presión de aire sin verse desinflada!
Siempre infle sus llantas según la presión de inflado recomendada porFord, incluso si ésta es menor a la información de presión de infladomáxima que aparece en la llanta. La presión de inflado de las llantasrecomendada por Ford se encuentra en la Etiqueta de certificación delcumplimiento de las normas de seguridad, ubicada en el Pilar B o en elborde de la puerta del conductor. Si no se siguen las recomendacionesde presión de las llantas, podría crear patrones de desgaste disparejo yafectar la forma de manejo de su vehículo.
Máxima presión de inflado permitida es la presión máxima permitidapor los fabricantes de llantas y/o la presión con la cual la llanta puedetransportar la carga máxima. Esta presión normalmente es mayor que lapresión de inflado en frío recomendada por el fabricante, que se puedeencontrar en la Etiqueta de certificación del cumplimiento de las normasde seguridad, ubicada en el Pilar B o en el borde de la puerta delconductor. La presión de inflado en frío nunca se debe ajustar por debajode la presión recomendada en la Etiqueta de certificación delcumplimiento de las normas de seguridad.
Cuando se producen cambios de temperatura en el ambiente, laspresiones de inflado de llanta también cambian. Un cambio detemperatura de 6° C (10° F) puede causar una disminucióncorrespondiente de 7 kPa (1 psi) en la presión de inflado. Revise lapresión de las llantas con frecuencia y ajústela hasta obtener la presióncorrecta, la cual se puede encontrar en la Etiqueta de certificación delcumplimiento de las normas de seguridad.
2006 Navigator (nav)Owners Guide (post-2002-fmt)USA (fus)
Llantas, ruedas y carga
259

Si está revisando la presión cuando la llanta está caliente (es decir,cuando ha conducido más de 1.6 km [1 milla]), no reduzca la presión delaire. Las llantas están calientes debido al uso y es normal que la presiónaumente sobre el nivel recomendado en frío. Una llanta caliente quemuestre la presión de inflado recomendada en frío o bajo ella, puedeestar considerablemente desinflada.
Para revisar la presión de las llantas:
1. Asegúrese que las llantas estén frías, es decir que no hayan andado nisiquiera una milla.
Nota: si debe conducir a cierta distancia para conseguir aire para lasllantas, verifique y registre la presión primero y agregue la presión deaire correcta cuando llegue a la bomba. Es normal que las llantas secalienten y que la presión del aire aumente mientras conduce. Nuncareduzca la presión del aire cuando las llantas estén calientes.
2. Retire el tapón de la válvula en una llanta, luego presione firmementeel indicador de llanta hacia la válvula y mida la presión.
3. Agregue aire hasta alcanzar la presión de aire recomendada.
Nota: si infla la llanta en exceso, libere aire presionando el vástagometálico en el centro de la válvula. Luego, vuelva a revisar la presión conel indicador.
4. Vuelva a colocar la tapa de la válvula.
5. Repita este procedimiento para cada llanta, incluida la refacción.
Nota: algunas llantas de refacción operan a mayor presión de inflado quelas demás llantas. Para las llantas de refacción pequeñas o Tipo T(consulte la sección Información de la llanta de refacción pequeña oTipo T para obtener una descripción): almacene y mantenga a 60psi(4.15 baras). Para las llantas de refacción desiguales y de tamañocompleto (consulte la sección Información de rueda/llanta derefacción desigual para obtener una descripción): almacene y mantengaen lo más alto la presión de inflado delantera y trasera, tal como semuestra en la Etiqueta de certificación del cumplimiento de las normasde seguridad.
6. Inspeccione visualmente las llantas para asegurarse que no haya clavosu otros objetos incrustados que puedan perforar la llanta y provocar unafuga de aire.
7. Verifique los costados para asegurarse que no haya ranuras, cortes niprotuberancias.
2006 Navigator (nav)Owners Guide (post-2002-fmt)USA (fus)
Llantas, ruedas y carga
260

REQUERIMIENTOS DE REEMPLAZO DE LLANTASSu vehículo está equipado con llantas diseñadas para proporcionar unamarcha y capacidad de manejo seguras.
Sólo use llantas y ruedas de reemplazo que sean del mismotamaño y tipo (como P-metric contra LT-metric o toda estación
contra todo terreno) que las proporcionadas originalmente por FordMotor Company. El uso de cualquier llanta o rueda no recomendadapor Ford Motor Company puede afectar la seguridad y el rendimientode su vehículo, lo que podría aumentar el riesgo de pérdida de controldel vehículo, volcadura, lesiones personales y muerte. De maneraadicional, el uso de llantas y ruedas no recomendadas podría causarque la dirección, suspensión, eje o caja de transferencia o unidad detransferencia de potencia fallen. Si tiene dudas con respecto alreemplazo de llantas, consulte con un distribuidor autorizado.
Asegúrese que todas las llantas y ruedas del vehículo sean del mismotamaño, tipo, diseño de banda de rodadura, marca, capacidad de carga yrégimen de velocidad, ya que esto puede afectar la seguridad yrendimiento de su vehículo, lo que puede provocar la pérdida de controldel vehículo, su volcadura, lesiones personales y muerte.
Los sensores de control de presión de las llantas montados en las ruedas(que vienen originalmente en su vehículo) no están diseñados para usoen ruedas de refacción.
La instalación de ruedas de reemplazo con armadura metálica en elcostado de la llanta puede provocar un mal funcionamiento del Sistemade control de presión de las llantas (TPMS) y no se recomienda (lainformación del material del tejido se moldea en el costado de la llanta).Adicionalmente, si su vehículo venía originalmente con llantasdesinfladas, el reemplazo de éstas por otras no idénticas a las originalespuede provocar el mal funcionamiento del TPMS, y no se recomienda. Nose debe usar llantas desinfladas para reemplazar llantas normales.Siempre revise el indicador de TPMS inmediatamente después dereemplazar una o más llantas de su vehículo. Si el indicador de TPMSestá activado, el TPMS no está funcionando correctamente. La llanta dereemplazo puede ser incompatible con el sistema TPMS o alguno de loscomponentes del sistema TPMS puede estar dañado.
Importante: recuerde reemplazar la llanta de refacción cuandoreemplace las llantas del vehículo. Incluso si nunca se ha usado, la llantade refacción debe reemplazarse porque las llantas se degradan con elpaso del tiempo.
2006 Navigator (nav)Owners Guide (post-2002-fmt)USA (fus)
Llantas, ruedas y carga
261
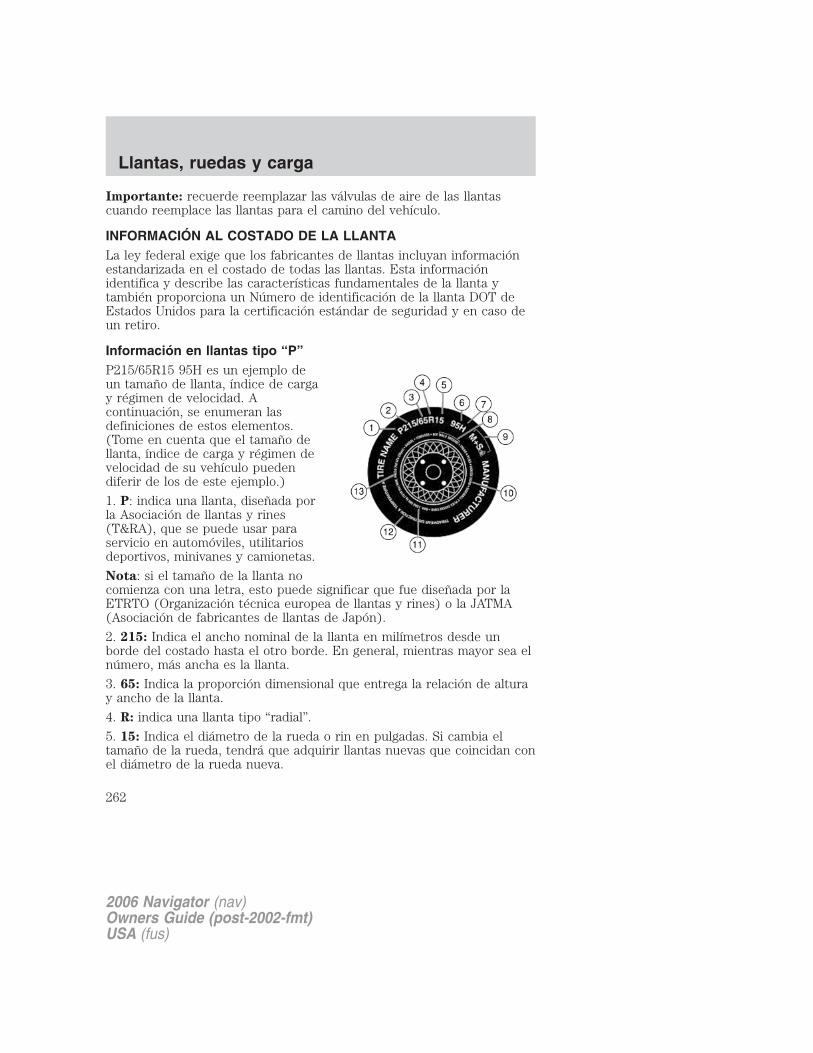
Importante: recuerde reemplazar las válvulas de aire de las llantascuando reemplace las llantas para el camino del vehículo.
INFORMACIÓN AL COSTADO DE LA LLANTALa ley federal exige que los fabricantes de llantas incluyan informaciónestandarizada en el costado de todas las llantas. Esta informaciónidentifica y describe las características fundamentales de la llanta ytambién proporciona un Número de identificación de la llanta DOT deEstados Unidos para la certificación estándar de seguridad y en caso deun retiro.
Información en llantas tipo “P”P215/65R15 95H es un ejemplo deun tamaño de llanta, índice de cargay régimen de velocidad. Acontinuación, se enumeran lasdefiniciones de estos elementos.(Tome en cuenta que el tamaño dellanta, índice de carga y régimen develocidad de su vehículo puedendiferir de los de este ejemplo.)
1. P: indica una llanta, diseñada porla Asociación de llantas y rines(T&RA), que se puede usar paraservicio en automóviles, utilitariosdeportivos, minivanes y camionetas.
Nota: si el tamaño de la llanta nocomienza con una letra, esto puede significar que fue diseñada por laETRTO (Organización técnica europea de llantas y rines) o la JATMA(Asociación de fabricantes de llantas de Japón).
2. 215: Indica el ancho nominal de la llanta en milímetros desde unborde del costado hasta el otro borde. En general, mientras mayor sea elnúmero, más ancha es la llanta.
3. 65: Indica la proporción dimensional que entrega la relación de alturay ancho de la llanta.
4. R: indica una llanta tipo “radial”.
5. 15: Indica el diámetro de la rueda o rin en pulgadas. Si cambia eltamaño de la rueda, tendrá que adquirir llantas nuevas que coincidan conel diámetro de la rueda nueva.
2006 Navigator (nav)Owners Guide (post-2002-fmt)USA (fus)
Llantas, ruedas y carga
262

6. 95: Indica el índice de carga de la llanta. Es un índice que se relacionacon el peso que puede transportar una llanta. Puede encontrar estainformación en el Manual del propietario. Si no es así, comuníquesecon un distribuidor local de llantas.Nota: es posible que no encuentre esta información en todas las llantasya que la ley federal no la exige.7. H: indica la calificación de velocidad de la llanta. El régimen develocidad indica la velocidad a la que se puede someter una llanta porperíodos prolongados, bajo condiciones estándar de carga y presión deinflado. Es posible que las llantas de su vehículo funcionen encondiciones diferentes para carga y presión de inflado. Puede que debaajustar estos regímenes de velocidad a la diferencia en las condiciones.El rango de calificaciones va de 130 km/h (81 mph) a 299 km/h (186 mph).Estos regímenes se enumeran en el siguiente cuadro.
Nota: es posible que no encuentre esta información en todas las llantasya que la ley federal no la exige.
Rotulación del régimen Calificación de velocidad: km/h
(mph)
M 130 km/h (81 mph)N 140 km/h (87 mph)Q 159 km/h (99 mph)R 171 km/h (106 mph)S 180 km/h (112 mph)T 190 km/h (118 mph)U 200 km/h (124 mph)H 210 km/h (130 mph)V 240 km/h (149 mph)W 270 km/h (168 mph)Y 299 km/h (186 mph)
Nota: para las llantas con una capacidad de velocidad máxima superiora 240 km/h (149 mph), los fabricantes de llantas, a veces, usan lasletras ZR. Para aquellos que tienen una capacidad de velocidad máximasuperior a 299 km/h (186 mph), los fabricantes de llantas siempre usanlas letras ZR.
8. Número de identificación de llanta (TIN) DOT de EE.UU. : éstecomienza con las letras “DOT” e indica que la llanta cumple con todas lasnormas federales. Los próximos dos números o letras son el código de la
2006 Navigator (nav)Owners Guide (post-2002-fmt)USA (fus)
Llantas, ruedas y carga
263
planta donde se fabricó, los dos siguientes son el código del tamaño de lallanta y los últimos cuatro números representan la semana y año en quese fabricó la llanta. Por ejemplo, los números 317 significan la semana 31de 1997. Después de 2000, los números van con cuatro dígitos. Porejemplo, 2501 significa la semana 25 del 2001. Los números del medioson códigos de identificación que se usan para seguimiento. Estainformación se usa para contactar a los clientes si un defecto en lasllantas exige un retiro.
9. M+S o M/S: lodo y nieve, oAT: todo terreno oAS: toda estación.
10. Composición de las bandas de las llantas y material usado:indica el número de bandas o el número de capas de la tela revestida encaucho en la rodadura y los costados de las llantas. Los fabricantes dellantas también deben indicar los materiales de las bandas y del costado,que incluyen acero, nylon, poliéster y otros.
11. Carga máxima: indica la carga máxima en kilogramos y libras quepuede transportar la llanta. Consulte la Etiqueta de certificación delcumplimiento de las normas de seguridad, ubicada en el Pilar B o en elborde de la puerta del conductor, para conocer la presión correcta de lasllantas de su vehículo.
12. Desgaste de los surcos, tracción y grados de temperatura
• Desgaste de los surcos: el grado de desgaste de los surcos es unaclasificación comparativa basada en el nivel de desgaste de la llantacuando ésta se prueba bajo condiciones controladas en una pista deprueba específica del gobierno. Por ejemplo, una llanta de grado 150se desgastaría una y media (1 1/2) veces, como lo haría en la pista deprueba del gobierno como llanta de grado 100.
• Tracción: los grados de tracción, de mayor a menor, son AA, A, B yC. Los grados representan la capacidad de la llanta para detenersesobre pavimento mojado según lo medido en condiciones controladassobre superficies de prueba gubernamentales específicas de asfalto yconcreto. Una llanta con la marca C puede tener un rendimiento detracción deficiente.
• Temperatura: las clases de temperatura son A (la más alta), B y C,las cuales representan la resistencia de la llanta a la generación decalor y su capacidad de disiparlo cuando se prueban en condicionescontroladas en una rueda de prueba de laboratorio especificada.
2006 Navigator (nav)Owners Guide (post-2002-fmt)USA (fus)
Llantas, ruedas y carga
264
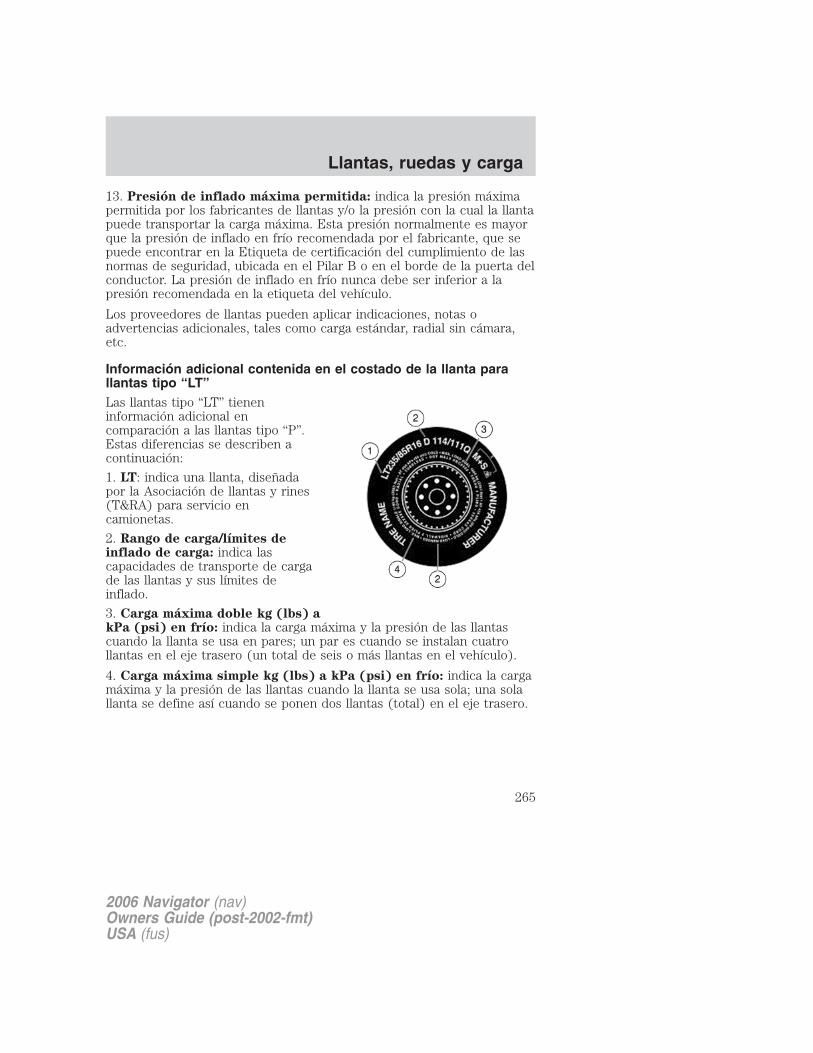
13. Presión de inflado máxima permitida: indica la presión máximapermitida por los fabricantes de llantas y/o la presión con la cual la llantapuede transportar la carga máxima. Esta presión normalmente es mayorque la presión de inflado en frío recomendada por el fabricante, que sepuede encontrar en la Etiqueta de certificación del cumplimiento de lasnormas de seguridad, ubicada en el Pilar B o en el borde de la puerta delconductor. La presión de inflado en frío nunca debe ser inferior a lapresión recomendada en la etiqueta del vehículo.
Los proveedores de llantas pueden aplicar indicaciones, notas oadvertencias adicionales, tales como carga estándar, radial sin cámara,etc.
Información adicional contenida en el costado de la llanta parallantas tipo “LT”Las llantas tipo “LT” tieneninformación adicional encomparación a las llantas tipo “P”.Estas diferencias se describen acontinuación:
1. LT: indica una llanta, diseñadapor la Asociación de llantas y rines(T&RA) para servicio encamionetas.
2. Rango de carga/límites deinflado de carga: indica lascapacidades de transporte de cargade las llantas y sus límites deinflado.
3. Carga máxima doble kg (lbs) akPa (psi) en frío: indica la carga máxima y la presión de las llantascuando la llanta se usa en pares; un par es cuando se instalan cuatrollantas en el eje trasero (un total de seis o más llantas en el vehículo).
4. Carga máxima simple kg (lbs) a kPa (psi) en frío: indica la cargamáxima y la presión de las llantas cuando la llanta se usa sola; una solallanta se define así cuando se ponen dos llantas (total) en el eje trasero.
2006 Navigator (nav)Owners Guide (post-2002-fmt)USA (fus)
Llantas, ruedas y carga
265
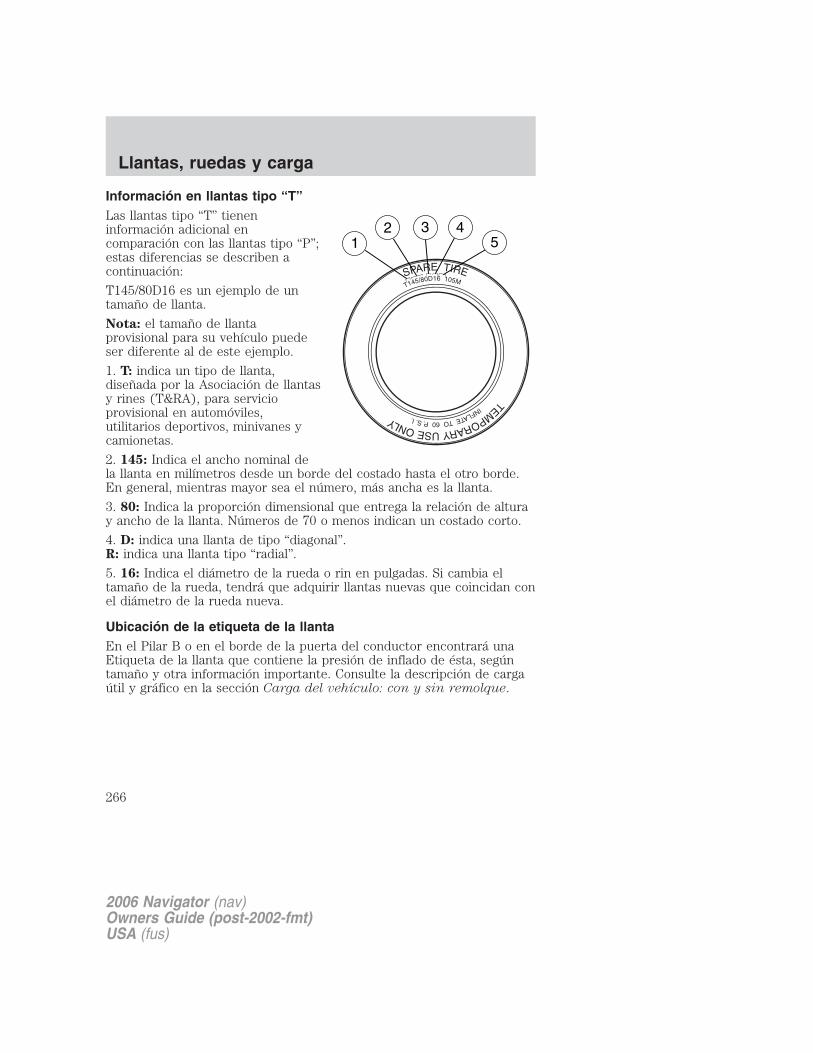
Información en llantas tipo “T”Las llantas tipo “T” tieneninformación adicional encomparación con las llantas tipo “P”;estas diferencias se describen acontinuación:
T145/80D16 es un ejemplo de untamaño de llanta.
Nota: el tamaño de llantaprovisional para su vehículo puedeser diferente al de este ejemplo.
1. T: indica un tipo de llanta,diseñada por la Asociación de llantasy rines (T&RA), para servicioprovisional en automóviles,utilitarios deportivos, minivanes ycamionetas.
2. 145: Indica el ancho nominal dela llanta en milímetros desde un borde del costado hasta el otro borde.En general, mientras mayor sea el número, más ancha es la llanta.
3. 80: Indica la proporción dimensional que entrega la relación de alturay ancho de la llanta. Números de 70 o menos indican un costado corto.
4. D: indica una llanta de tipo “diagonal”.R: indica una llanta tipo “radial”.
5. 16: Indica el diámetro de la rueda o rin en pulgadas. Si cambia eltamaño de la rueda, tendrá que adquirir llantas nuevas que coincidan conel diámetro de la rueda nueva.
Ubicación de la etiqueta de la llantaEn el Pilar B o en el borde de la puerta del conductor encontrará unaEtiqueta de la llanta que contiene la presión de inflado de ésta, segúntamaño y otra información importante. Consulte la descripción de cargaútil y gráfico en la sección Carga del vehículo: con y sin remolque.
2006 Navigator (nav)Owners Guide (post-2002-fmt)USA (fus)
Llantas, ruedas y carga
266
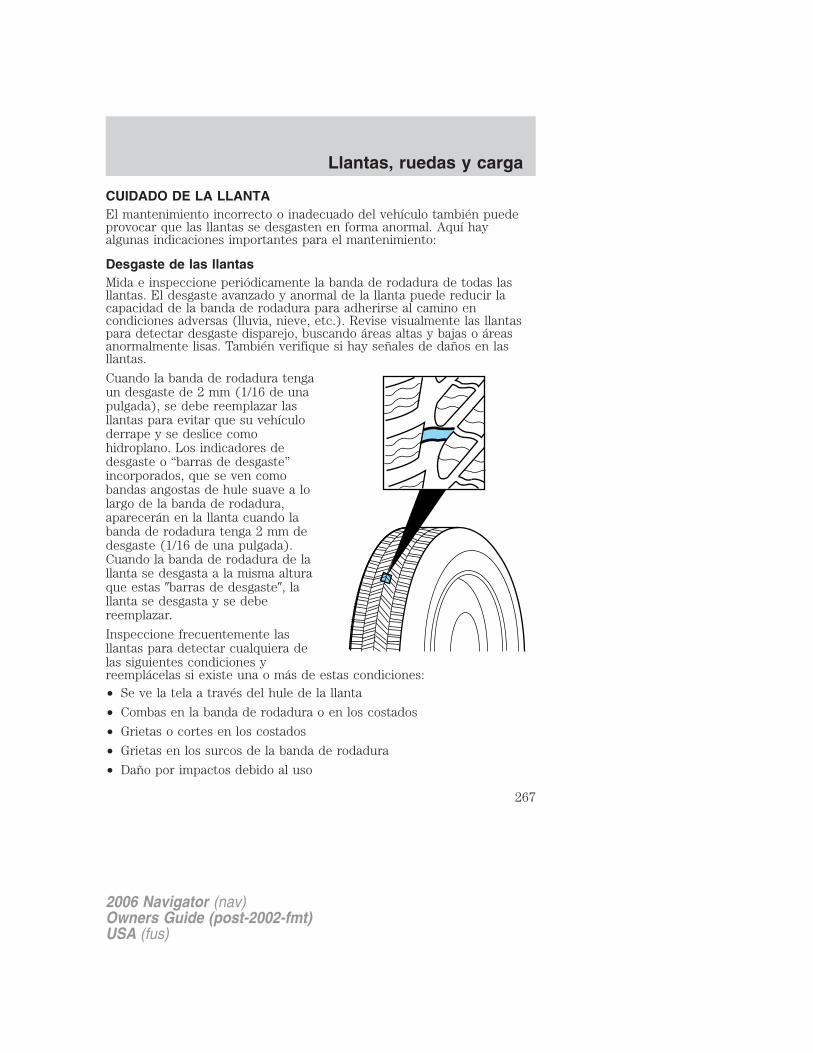
CUIDADO DE LA LLANTAEl mantenimiento incorrecto o inadecuado del vehículo también puedeprovocar que las llantas se desgasten en forma anormal. Aquí hayalgunas indicaciones importantes para el mantenimiento:
Desgaste de las llantasMida e inspeccione periódicamente la banda de rodadura de todas lasllantas. El desgaste avanzado y anormal de la llanta puede reducir lacapacidad de la banda de rodadura para adherirse al camino encondiciones adversas (lluvia, nieve, etc.). Revise visualmente las llantaspara detectar desgaste disparejo, buscando áreas altas y bajas o áreasanormalmente lisas. También verifique si hay señales de daños en lasllantas.
Cuando la banda de rodadura tengaun desgaste de 2 mm (1/16 de unapulgada), se debe reemplazar lasllantas para evitar que su vehículoderrape y se deslice comohidroplano. Los indicadores dedesgaste o “barras de desgaste”incorporados, que se ven comobandas angostas de hule suave a lolargo de la banda de rodadura,aparecerán en la llanta cuando labanda de rodadura tenga 2 mm dedesgaste (1/16 de una pulgada).Cuando la banda de rodadura de lallanta se desgasta a la misma alturaque estas �barras de desgaste�, lallanta se desgasta y se debereemplazar.
Inspeccione frecuentemente lasllantas para detectar cualquiera delas siguientes condiciones yreemplácelas si existe una o más de estas condiciones:• Se ve la tela a través del hule de la llanta
• Combas en la banda de rodadura o en los costados
• Grietas o cortes en los costados
• Grietas en los surcos de la banda de rodadura
• Daño por impactos debido al uso
2006 Navigator (nav)Owners Guide (post-2002-fmt)USA (fus)
Llantas, ruedas y carga
267

• Separación en la banda de rodadura• Separación en el costado• Abrasión severa en el costadoSi su vehículo tiene una fuga en el sistema de escape, una llanta en uso ola llanta de refacción pueden estar expuestas a altas temperaturas deescape y deberá cambiar dichas llantas.
Prácticas de seguridadLos hábitos de conducción tienen mucho que ver con el kilometraje y laseguridad de las llantas.
• Respete los límites de velocidad de las rutas
• Evite partidas, detenciones y virajes rápidos
• Evite los baches y objetos en el camino
• No pase sobre los bordes de las banquetas ni golpee las llantas contraéstos al estacionar
Si su vehículo está atascado en la nieve, lodo, arena, etc., nohaga girar las llantas rápidamente; esto puede provocar la
ruptura de una de ellas y causar una explosión. Una llanta puedeexplotar en apenas tres a cinco segundos.
Nunca gire las llantas en exceso desde el punto 55 km/h(35 mph) indicado en el velocímetro.
Riesgos en las carreterasNo importa lo cuidadoso que sea al conducir, siempre existe laposibilidad que se desinfle una llanta en la carretera. Conduzcalentamente hasta el área segura fuera del tránsito que esté más cerca.Esto puede dañar aun más la llanta desinflada, pero su seguridad es másimportante.
Si siente una repentina vibración o alteración de la marcha mientrasconduce o sospecha que una llanta o el vehículo se ha dañado, reduzcainmediatamente la velocidad. Conduzca con precaución hasta que puedasalirse en forma segura del camino. Pare y revise si hay daño en lasllantas. Si la llanta está desinflada o dañada, desínflela, saque la rueda yreemplácela con la llanta y rueda de refacción. Si no puede encontraruna causa, haga remolcar el vehículo hasta el taller de reparaciones odistribuidor de llantas más cercano para que revisen el vehículo.
2006 Navigator (nav)Owners Guide (post-2002-fmt)USA (fus)
Llantas, ruedas y carga
268

Alineación de ruedas y llantas
Una mala sacudida por golpear el borde de las banquetas o un bache,puede provocar que la parte delantera de su vehículo pierda la alineacióno se dañen las llantas. Si su vehículo parece tirar hacia un lado mientrasconduce, es posible que las ruedas hayan perdido la alineación. Haga aun distribuidor autorizado revisar periódicamente la alineación de lasruedas.
La desalineación de las ruedas delanteras o traseras puede provocar undesgaste disparejo y rápido de las llantas y la debe corregir undistribuidor autorizado. Los vehículos con tracción en las ruedasdelanteras (FWD) y aquellos con suspensión trasera independiente (siestá instalada) pueden requerir alineación de las cuatro ruedas.
Las llantas se deben balancear periódicamente. Un conjunto de llanta yrueda desbalanceado puede tener como resultado el desgaste irregularde la llanta.
Rotación de las llantas
Rotar las llantas según el intervalo recomendado (como se indica en lainformación de mantenimiento programado que viene con el vehículo),permitirá que las llantas se desgasten en forma más equilibrada,entregando un mejor rendimiento de las llantas y una mayor vida útil. Amenos que se especifique de otra manera, gire las llantas cada 8,000 km(5,000 millas).
2006 Navigator (nav)Owners Guide (post-2002-fmt)USA (fus)
Llantas, ruedas y carga
269
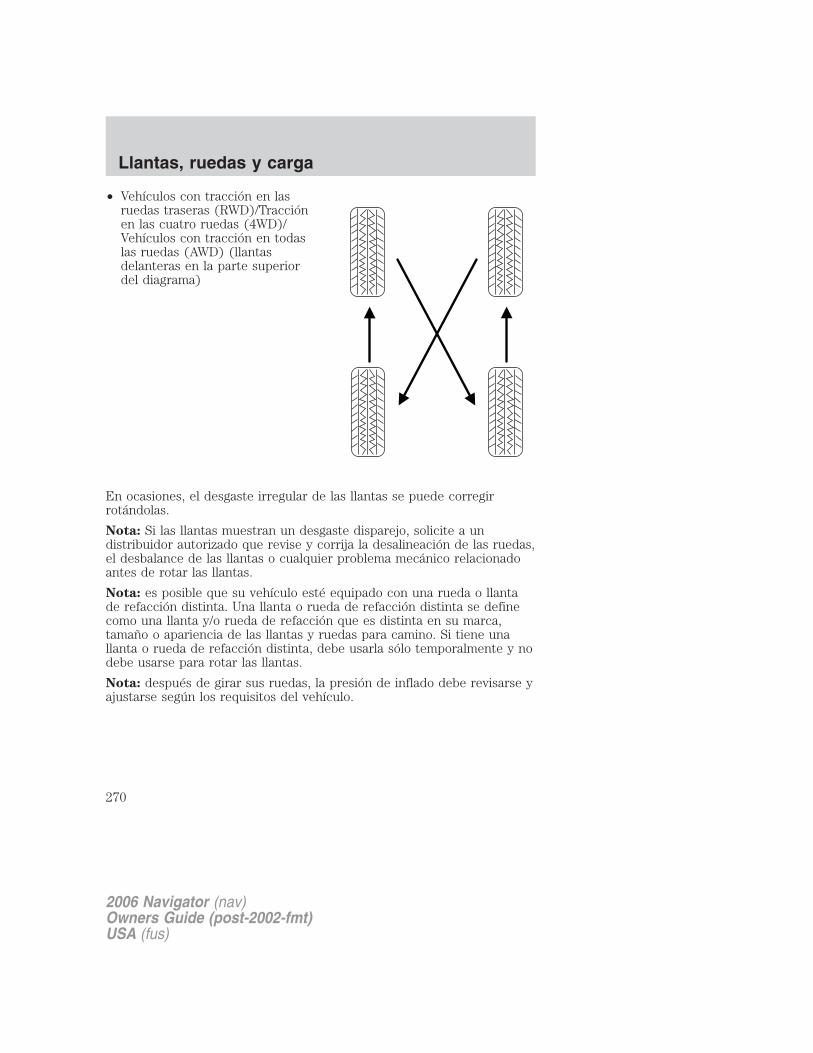
• Vehículos con tracción en lasruedas traseras (RWD)/Tracciónen las cuatro ruedas (4WD)/Vehículos con tracción en todaslas ruedas (AWD) (llantasdelanteras en la parte superiordel diagrama)
En ocasiones, el desgaste irregular de las llantas se puede corregirrotándolas.
Nota: Si las llantas muestran un desgaste disparejo, solicite a undistribuidor autorizado que revise y corrija la desalineación de las ruedas,el desbalance de las llantas o cualquier problema mecánico relacionadoantes de rotar las llantas.
Nota: es posible que su vehículo esté equipado con una rueda o llantade refacción distinta. Una llanta o rueda de refacción distinta se definecomo una llanta y/o rueda de refacción que es distinta en su marca,tamaño o apariencia de las llantas y ruedas para camino. Si tiene unallanta o rueda de refacción distinta, debe usarla sólo temporalmente y nodebe usarse para rotar las llantas.
Nota: después de girar sus ruedas, la presión de inflado debe revisarse yajustarse según los requisitos del vehículo.
2006 Navigator (nav)Owners Guide (post-2002-fmt)USA (fus)
Llantas, ruedas y carga
270

SISTEMA DE MONITOREO DE LA PRESIÓN DE LAS LLANTAS(TPMS)Cuando la luz de advertencia delsistema de monitoreo de presión delas llantas está encendida, una omás de sus llantas estáconsiderablemente desinflada. Debeparar y revisar sus llantas lo antes posible e inflarlas hasta obtener lapresión correcta, indicada en la etiqueta de información de la llanta delvehículo. Si maneja con las llantas muy desinfladas, hará que éstas sesobrecalienten, lo que puede provocar una falla de las llantas. Las llantasdesinfladas también reducen la eficiencia del combustible y la vida de lasbandas de rodadura de las llantas y puede afectar la capacidad demanejo y detención del vehículo. Incluso si su vehículo está equipadocon un Sistema de monitoreo de presión de las llantas, aún así esimportante que cada cierto tiempo revise manualmente la presión deinflado de sus llantas. Cada llanta, incluida la de refacción, se deberevisar mensualmente cuando hace frío y debe tener la presión de infladorecomendada, la cual se encuentra en la Etiqueta de certificación decumplimiento de las normas de seguridad, que está en el Pilar B o en elborde de la puerta del conductor.
El Sistema de monitoreo de presión de las llantas NO sustituyela revisión manual de la presión de las llantas. La presión de las
llantas se debe revisar periódicamente (al menos una vez al mes)usando un manómetro, consulte Inspección e inflado de las llantasen este capítulo. Si no se mantiene correctamente la presión de lasllantas, puede aumentar el riesgo de una falla de las llantas, de pérdidade control, de volcadura del vehículo y de lesiones personales.
Cambio de llantas con TPMS
Se recomienda que siempre reparesus llantas en un distribuidorautorizado. Cada llanta para elcamino tiene un sensor depresión montado en la rueda,dentro de la llanta y detrás delvástago de la válvula. El sensorde presión de las llantas se debequitar de la rueda antes delretiro de la llanta. El sensor sepuede retirar soltando la tuerca en el vástago de la válvula. Si no
2006 Navigator (nav)Owners Guide (post-2002-fmt)USA (fus)
Llantas, ruedas y carga
271
lo retira, el sensor puede resultar dañado. La arandela aislante degoma (lavador) entre la rueda y el sensor de presión de las llantas sedebe reemplazar cada vez que el sensor se saque, para reducir al mínimolas fugas de aire.
La presión de las llantas se debe revisar periódicamente (al menos unavez al mes) usando un manómetro de precisión, consulte Inspección einflado de las llantas en este capítulo.
Comprensión del Sistema de monitoreo de presión de las llantas(TPMS)El Sistema de monitoreo de presión de las llantas mide la presión en lascuatro llantas de carretera y envía las lecturas de la presión de éstas a suvehículo cada un minuto mientras usted está manejando y cada una horacuando el vehículo está estacionado. La Luz de advertencia de llantadesinflada quedará en ON (Encendida) si la presión de la llanta está 25%por debajo de la presión que se indica en la Etiqueta de certificación delcumplimiento de las normas de seguridad (aproximadamente 6 a 9 psibajo la presión recomendada por el fabricante). Si la presión de la llantaaumenta 2 psi por sobre el límite de la “Luz ENCENDIDA”, entonces laluz del TPMS se APAGARÁ. Una vez que se enciende la luz, las llantasno están suficientemente infladas y es necesario inflarlas según lapresión recomendada por el fabricante. Incluso si la luz se ENCIENDE yluego APAGA, sigue siendo necesaria la revisión de la presión de lasllantas.
En resumen, una vez que la luz se ENCIENDE, al menos hay una llantaque no está lo suficientemente inflada.
Cuando se instala la llanta de refacción provisionalCuando se ha reemplazado una de las llantas de carretera por la derefacción provisional, el sistema TPMS continúa identificando unproblema, para recordarle que la rueda/llanta de carretera dañada sedebe reparar y volver a colocar en el vehículo. Durante este tiempo, esposible que la luz de advertencia de llanta desinflada periódicamente seencienda o permanezca encendida, dependiendo del estado de larueda/llanta de carretera dañada. Esto incluirá los mensajes del centro demensajes (si está instalado).
Para restaurar toda la funcionalidad del Sistema de monitoreo de presiónde las llantas, repare y vuelva a montar la rueda/llanta de carreteradañada en el vehículo. Para obtener información adicional, consulteCambio de llantas con TPMS en esta sección.
2006 Navigator (nav)Owners Guide (post-2002-fmt)USA (fus)
Llantas, ruedas y carga
272
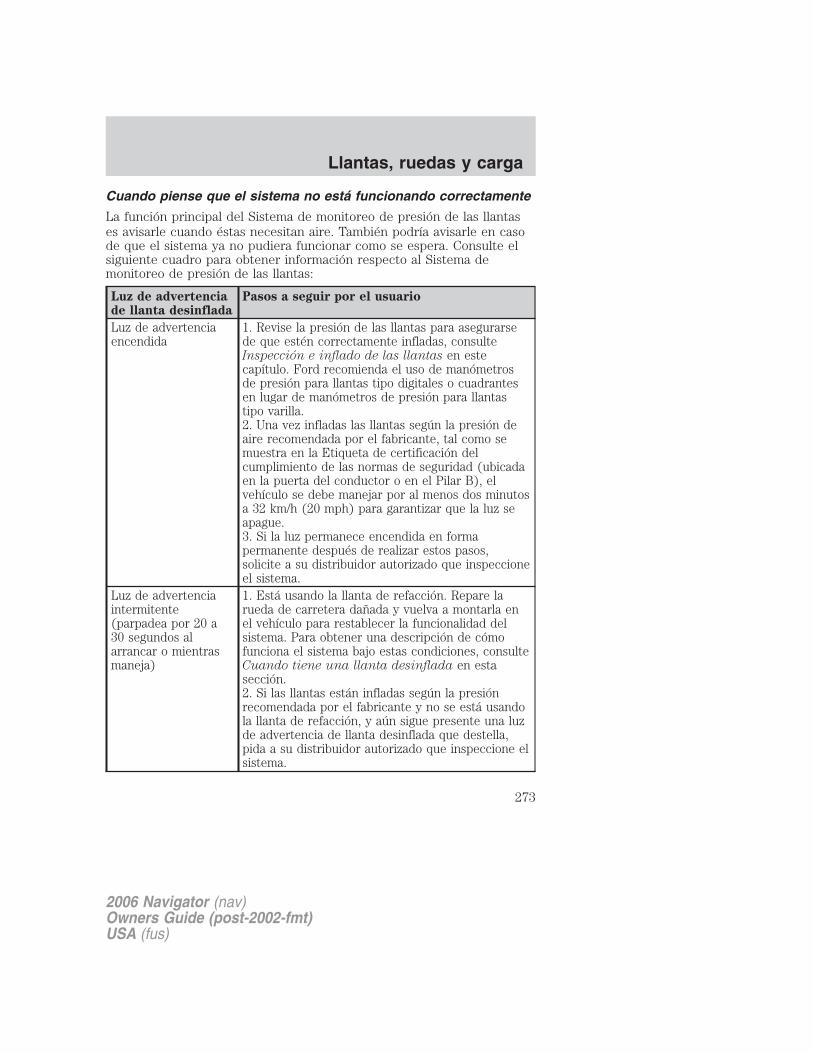
Cuando piense que el sistema no está funcionando correctamente
La función principal del Sistema de monitoreo de presión de las llantases avisarle cuando éstas necesitan aire. También podría avisarle en casode que el sistema ya no pudiera funcionar como se espera. Consulte elsiguiente cuadro para obtener información respecto al Sistema demonitoreo de presión de las llantas:
Luz de advertenciade llanta desinflada
Pasos a seguir por el usuario
Luz de advertenciaencendida
1. Revise la presión de las llantas para asegurarsede que estén correctamente infladas, consulteInspección e inflado de las llantas en estecapítulo. Ford recomienda el uso de manómetrosde presión para llantas tipo digitales o cuadrantesen lugar de manómetros de presión para llantastipo varilla.2. Una vez infladas las llantas según la presión deaire recomendada por el fabricante, tal como semuestra en la Etiqueta de certificación delcumplimiento de las normas de seguridad (ubicadaen la puerta del conductor o en el Pilar B), elvehículo se debe manejar por al menos dos minutosa 32 km/h (20 mph) para garantizar que la luz seapague.3. Si la luz permanece encendida en formapermanente después de realizar estos pasos,solicite a su distribuidor autorizado que inspeccioneel sistema.
Luz de advertenciaintermitente(parpadea por 20 a30 segundos alarrancar o mientrasmaneja)
1. Está usando la llanta de refacción. Repare larueda de carretera dañada y vuelva a montarla enel vehículo para restablecer la funcionalidad delsistema. Para obtener una descripción de cómofunciona el sistema bajo estas condiciones, consulteCuando tiene una llanta desinflada en estasección.2. Si las llantas están infladas según la presiónrecomendada por el fabricante y no se está usandola llanta de refacción, y aún sigue presente una luzde advertencia de llanta desinflada que destella,pida a su distribuidor autorizado que inspeccione elsistema.
2006 Navigator (nav)Owners Guide (post-2002-fmt)USA (fus)
Llantas, ruedas y carga
273

Al inflar las llantasAl colocar aire a las llantas (como por ejemplo, en una estación degasolina o en el garaje), es posible que el Sistema de monitoreo depresión de las llantas no responda inmediatamente al aire agregado aéstas. Aquí aparecen los detalles:
• Los sensores de monitoreo de presión de las llantas montados en lasruedas actualizan el vehículo con la información de la presión de lasllantas sólo cada un minuto, por lo tanto, podría tomar hasta unminuto en apagarse la luz, una vez que haya agregado aire a las llantassegún la presión recomendada.
• Si el vehículo ha estado estacionado por más de 15 minutos, lossensores se colocan en un modo de baja energía para conservar la vidaútil de la batería y, por lo tanto, sólo se realiza una transmisión cadauna hora. Si infla las llantas en estas condiciones, la luz podría tomarhasta una hora en apagarse después de haber agregado aire a lasllantas según la presión recomendada.
Por estos motivos, la luz de advertencia de llanta desinflada NO sustituyela utilización de un manómetro de precisión al revisar y llenar las llantas.La mejor manera de apagar la luz de advertencia de llanta desinflada esllenar las llantas según la presión recomendada y manejar el vehículo; lossensores de presión de las llantas en las ruedas actualizarán el vehículocon la presión de las llantas actualizada cuando el vehículo alcance unavelocidad de 32 km/h (20 mph) por al menos un minuto.
Cómo la temperatura afecta la presión de las llantasEl Sistema de monitoreo de presión de las llantas (TPMS) controla lapresión en cada llanta de neumático. La presión en cada llanta dependede varios factores, uno de ellos es la temperatura del aire contenido(temperatura del aire dentro de la llanta). A medida que aumenta latemperatura del aire contenido, también aumenta la presión de lasllantas. Mientras maneja en forma normal, la presión habitual de infladode una llanta de pasajero puede aumentar de unas 14 a 28 kPa (2 a 4psi) desde una situación de arranque en frío. Este aumento en la presiónde las llantas se debe a un aumento en la temperatura del airecontenido. La temperatura del aire contenido depende de varios factores,como la tasa de rotación de la llanta, la flexión de las llantas, el númerode frenados, etc. En forma similar, la presión de las llantas disminuirá sidisminuye la temperatura del aire contenido. Por ejemplo, si el vehículoestá estacionado durante la noche con una temperatura exteriorconsiderablemente menor a la del día, la presión de la llanta puededisminuir unos 20.7 kPa (3 psi) en una disminución de 16.6° C (30° F)
2006 Navigator (nav)Owners Guide (post-2002-fmt)USA (fus)
Llantas, ruedas y carga
274
en la temperatura ambiente. Este valor de presión menor puede serdetectado por el TPMS, ya que es considerablemente menor a la presiónfría indicada en la Etiqueta de certificación del cumplimiento de lasnormas de seguridad de su vehículo y activa la advertencia del TPMS porpresión baja en las llantas. Si se enciende la luz de advertencia depresión baja, revise visualmente todas las llantas para verificar que noestén desinfladas. Si una o más llantas están desinfladas, repárelas segúnsea necesario. Si todas las llantas parecen estar infladas, maneje concuidado al lugar más cercano donde pueda poner aire a las llantas. Gireel encendido a la posición “off” (apagado). Infle todas las llantas a lapresión en frío recomendada.El Sistema de monitoreo de presión de las llantas cumple con las sección15 de las reglas de FCC y con RS-210 de Industry Canada. Elfuncionamiento está sujeto a las siguientes dos condiciones: (1) estedispositivo no debiera causar interferencia dañina y (2), este dispositivodebe aceptar cualquier interferencia recibida, incluso interferencia quepodría causar un funcionamiento no deseado.
El Sistema de monitoreo de presión de las llantas NO sustituyela revisión manual de la presión de las llantas. La presión de las
llantas se debe revisar periódicamente (al menos una vez al mes)usando un manómetro, consulte Inspección e inflado de las llantasen este capítulo. Si no se mantiene correctamente la presión de lasllantas, puede aumentar el riesgo de una falla de las llantas, de pérdidade control, de volcadura del vehículo y de lesiones personales.
LLANTAS Y CADENAS PARA LA NIEVE
Las llantas para nieve deben ser del mismo tamaño y grado quelas llantas que actualmente tiene en su vehículo.
Las llantas de su vehículo tienen rodaduras para todas las condicionesclimáticas con el fin de proporcionar tracción con lluvia y con nieve. Sinembargo, en algunos climas, puede ser necesario utilizar llantas ycadenas para la nieve.Siga estas pautas al usar llantas y cadenas para la nieve:• Utilice solamente cadenas tipo cable o cadenas que Ford ofrece como
accesorio o sus equivalentes. Otras cadenas del tipo con eslabonesconvencionales pueden entrar en contacto con el alojamiento de larueda y/o la carrocería y producir daños a estos.
• No instale cadenas en las ruedas delanteras. Las cadenas en las ruedasdelanteras pueden interferir con los componentes de la suspensión.
2006 Navigator (nav)Owners Guide (post-2002-fmt)USA (fus)
Llantas, ruedas y carga
275

• No se recomienda utilizar las cadenas en las llantas opcionalesP275/65R18.
• Instale las cadenas de manera segura, verificando que no toquenningún cableado, líneas de frenos o de combustible.
• Maneje con precaución. Si siente que las cadenas rozan el vehículo ose golpean contra él, deténgase y vuelva a ajustarlas. Si esto nofunciona, saque las cadenas para evitar que el vehículo se dañe.
• Si es posible, evite cargar el vehículo al máximo.
• Quite las cadenas cuando ya no las necesite. No las use en caminossecos.
• El aislamiento de la suspensión y las defensas ayudarán a evitar que elvehículo se dañe. No quite estos componentes de su vehículo al usarllantas y cadenas para la nieve.
• No exceda los 48 km/h (30 mph) con cadenas para llantas en elvehículo.
CARGA DEL VEHÍCULO: CON Y SIN REMOLQUE
Esta sección lo guiará en la forma adecuada de cargar el vehículo y/oremolque, para mantener el peso del vehículo cargado dentro de sucapacidad de diseño, con o sin remolque. La carga adecuada del vehículole permitirá aprovechar al máximo el rendimiento del diseño. Antes decargar su vehículo, familiarícese con los siguientes términos paradeterminar los pesos máximos del vehículo, con o sin remolque, que seencuentran en la Etiqueta de certificación del cumplimiento de lasnormas de seguridad del vehículo:
Peso base listo para rodar: es el peso del vehículo que incluye untanque lleno de combustible y todo el equipamiento estándar. No incluyepasajeros, carga ni equipamiento opcional.
Peso listo para rodar del vehículo: es el peso del vehículo nuevo almomento de retirarlo de su distribuidor autorizado, más algúnequipamiento alternativo.
2006 Navigator (nav)Owners Guide (post-2002-fmt)USA (fus)
Llantas, ruedas y carga
276
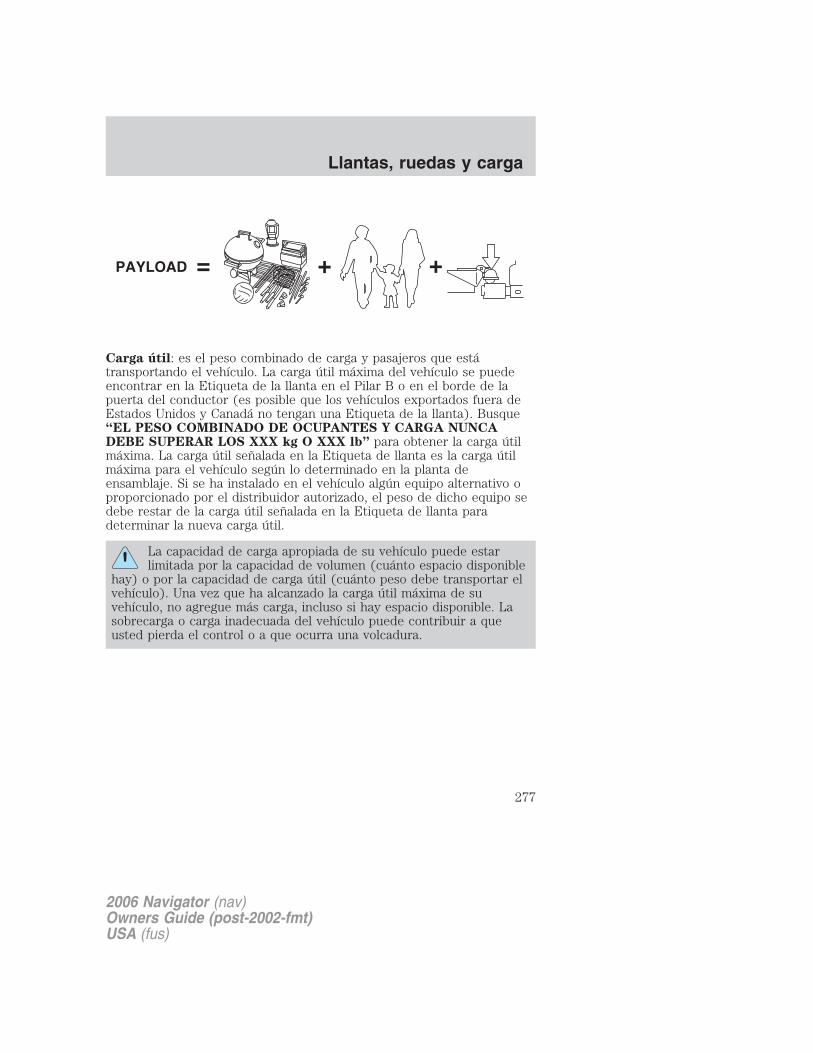
Carga útil: es el peso combinado de carga y pasajeros que estátransportando el vehículo. La carga útil máxima del vehículo se puedeencontrar en la Etiqueta de la llanta en el Pilar B o en el borde de lapuerta del conductor (es posible que los vehículos exportados fuera deEstados Unidos y Canadá no tengan una Etiqueta de la llanta). Busque“EL PESO COMBINADO DE OCUPANTES Y CARGA NUNCADEBE SUPERAR LOS XXX kg O XXX lb” para obtener la carga útilmáxima. La carga útil señalada en la Etiqueta de llanta es la carga útilmáxima para el vehículo según lo determinado en la planta deensamblaje. Si se ha instalado en el vehículo algún equipo alternativo oproporcionado por el distribuidor autorizado, el peso de dicho equipo sedebe restar de la carga útil señalada en la Etiqueta de llanta paradeterminar la nueva carga útil.
La capacidad de carga apropiada de su vehículo puede estarlimitada por la capacidad de volumen (cuánto espacio disponible
hay) o por la capacidad de carga útil (cuánto peso debe transportar elvehículo). Una vez que ha alcanzado la carga útil máxima de suvehículo, no agregue más carga, incluso si hay espacio disponible. Lasobrecarga o carga inadecuada del vehículo puede contribuir a queusted pierda el control o a que ocurra una volcadura.
2006 Navigator (nav)Owners Guide (post-2002-fmt)USA (fus)
Llantas, ruedas y carga
277
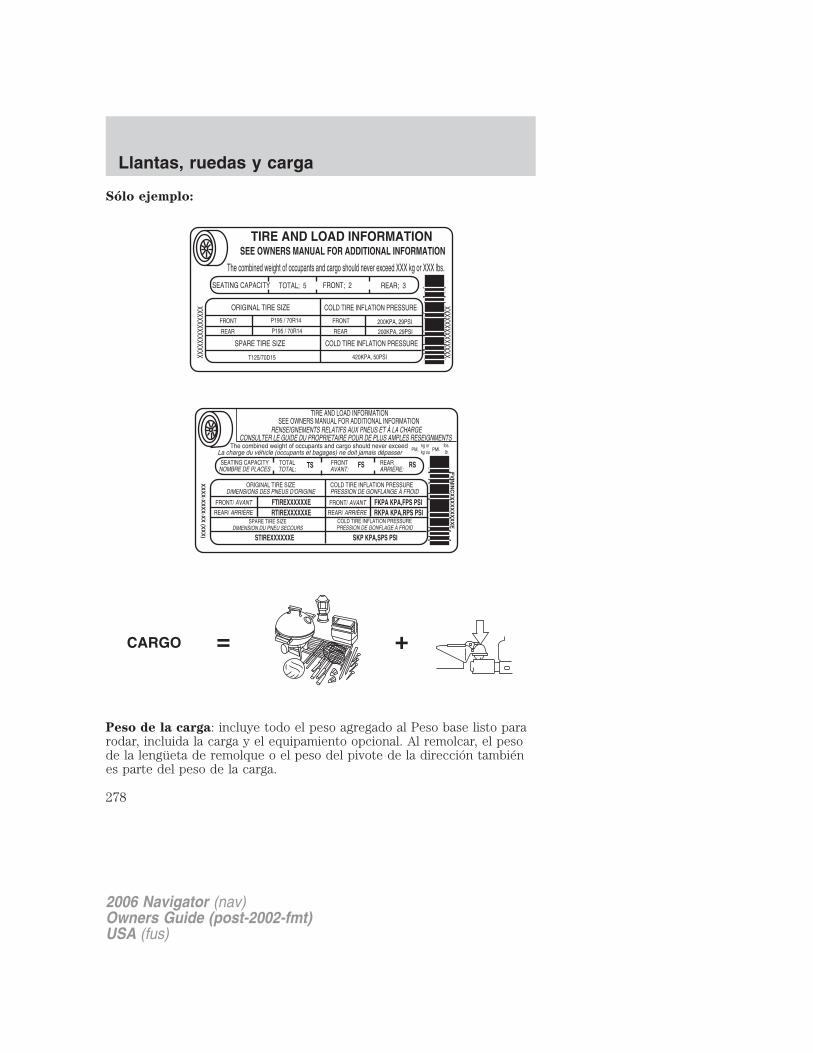
Sólo ejemplo:
Peso de la carga: incluye todo el peso agregado al Peso base listo pararodar, incluida la carga y el equipamiento opcional. Al remolcar, el pesode la lengüeta de remolque o el peso del pivote de la dirección tambiénes parte del peso de la carga.
2006 Navigator (nav)Owners Guide (post-2002-fmt)USA (fus)
Llantas, ruedas y carga
278
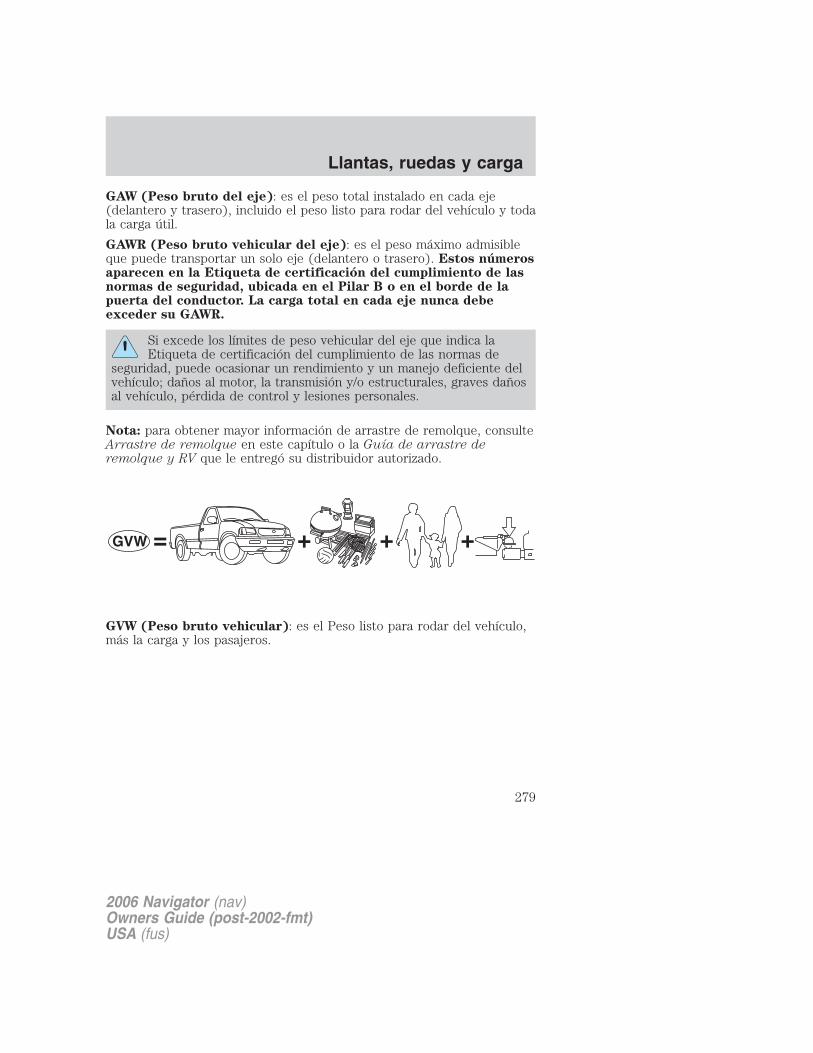
GAW (Peso bruto del eje): es el peso total instalado en cada eje(delantero y trasero), incluido el peso listo para rodar del vehículo y todala carga útil.
GAWR (Peso bruto vehicular del eje): es el peso máximo admisibleque puede transportar un solo eje (delantero o trasero). Estos númerosaparecen en la Etiqueta de certificación del cumplimiento de lasnormas de seguridad, ubicada en el Pilar B o en el borde de lapuerta del conductor. La carga total en cada eje nunca debeexceder su GAWR.
Si excede los límites de peso vehicular del eje que indica laEtiqueta de certificación del cumplimiento de las normas de
seguridad, puede ocasionar un rendimiento y un manejo deficiente delvehículo; daños al motor, la transmisión y/o estructurales, graves dañosal vehículo, pérdida de control y lesiones personales.
Nota: para obtener mayor información de arrastre de remolque, consulteArrastre de remolque en este capítulo o la Guía de arrastre deremolque y RV que le entregó su distribuidor autorizado.
GVW (Peso bruto vehicular): es el Peso listo para rodar del vehículo,más la carga y los pasajeros.
2006 Navigator (nav)Owners Guide (post-2002-fmt)USA (fus)
Llantas, ruedas y carga
279

GVWR (Peso bruto vehicularmáximo): es el peso máximoadmisible del vehículo totalmentecargado (incluidas todas lasopciones, equipamiento, pasajeros ycarga). El GVWR aparece en laEtiqueta de certificación delcumplimiento de las normas deseguridad, ubicada en el Pilar Bo en el borde de la puerta delconductor. El GVW nunca debeexceder el GVWR.
Si excede los límites de peso vehicular del eje que indica laEtiqueta de certificación del cumplimiento de las normas de
seguridad, puede ocasionar un rendimiento y un manejo deficiente delvehículo; daños al motor, la transmisión y/o estructurales, graves dañosal vehículo, pérdida de control y lesiones personales.
GCW (Peso bruto combinado): es el peso del vehículo cargado (GVW)más el peso del remolque totalmente cargado.GCWR (Peso bruto vehicular combinado máximo): es el pesomáximo admisible del vehículo y del remolque cargado, incluida toda lacarga y los pasajeros, que el vehículo puede manejar sin riesgo de sufrirdaños. (Importante: el sistema de frenos de los vehículos de remolqueestá determinado según el funcionamiento en GVWR, no en GCWR.)Deben usarse frenos funcionales separados para el control de laseguridad de vehículos remolcados y para remolques donde el GCW delvehículo de remolque más el remolque sobrepase el GVWR del vehículode remolque. El GCW nunca debe exceder el GCWR.
2006 Navigator (nav)Owners Guide (post-2002-fmt)USA (fus)
Llantas, ruedas y carga
280

Peso máximo de remolque cargado: es el mayor peso posible de unremolque completamente cargado que puede arrastrar el vehículo.Supone un vehículo sólo con opciones indispensables, sin carga (internao externa), un peso de lengüeta de 10% a 15% (remolque convencional)o un peso del pivote de dirección de 15% a 25% (remolque de quintarueda) y sólo el conductor (68 kg [150 lb]). Consulte con sudistribuidor autorizado (o en la Guía de arrastre de remolque y RVsuministrada por su distribuidor autorizado) para obtenerinformación más detallada.
Peso de lengüeta o Peso del pivote de la dirección de quintarueda: se refiere a la cantidad de peso que aplica un remolque sobre elenganche del remolque.Ejemplos: para un remolque convencional de 2,268 kg (5,000 lb),multiplique 5,000 por 0.10 y 0.15 para obtener un rango apropiado decarga de lengüeta de 227 a 340 kg (500 a 750 lb). Para un remolque dequinta rueda de 5,216 kg (11,500 lb), multiplique por 0.15 y 0.25 paraobtener un rango de carga del pivote de la dirección adecuado de 782 a1,304 kg (1,725 a 2,875 lb).
No exceda el GVWR o el GAWR específicos en la Etiqueta decertificación del cumplimiento de las normas de seguridad.
No utilice llantas de refacción con una capacidad de transportede carga inferior a las originales, porque pueden disminuir las
limitaciones del GVWR y del GAWR del vehículo. Las llantas derefacción con un límite mayor que las originales no aumentan laslimitaciones del GVWR ni del GAWR.
Si excede alguna limitación de peso vehicular máximo puedeprovocar graves daños al vehículo o lesiones personales.
Pasos para determinar el límite correcto de carga:
1. Ubique el mensaje “The combined weight of occupants and cargoshould never exceed XXX kg or XXX lbs.” (“El peso combinado deocupantes y carga nunca debe exceder los XXX kilos o XXX libras”) enla etiqueta del vehículo.
2. Determine el peso combinado del conductor y los pasajeros queviajarán en el vehículo.
3. Reste el peso combinado del conductor y los pasajeros de XXX kg oXXX lbs.
2006 Navigator (nav)Owners Guide (post-2002-fmt)USA (fus)
Llantas, ruedas y carga
281
4. La cifra resultante es igual a la cantidad disponible de carga y capacidadde carga de equipaje. Por ejemplo, si la cantidad “XXX” es igual a 1,400 lby habrá cinco pasajeros de 150 lb en el vehículo, la cantidad de carga ycapacidad de carga de equipaje disponible es 650 lb (1400–750 (5 x 150) =650 lb). En unidades métricas (635–340 (5 x 68) = 295 kg.)5. Determine el peso combinado de equipaje y carga que llevará elvehículo. Ese peso no puede exceder, sin correr peligro, la capacidad decarga de equipaje y la carga disponible calculadas en el Paso 4.6. Si el vehículo va a arrastrar un remolque, la carga del remolque setrasladará al vehículo. Consulte este manual para determinar cómo estoreduce la capacidad de carga de equipaje y la carga disponible del vehículo.A continuación, se entregan algunos ejemplos de cómo calcular lacantidad disponible de capacidad para carga y equipaje:• Otro ejemplo para su vehículo con una capacidad de carga y equipaje
de 635 kg (1400 libras). Decide ir a jugar golf. ¿Hay suficientecapacidad de carga para transportar a sus cuatro amigos y todas lasbolsas de golf? Usted y sus amigos tienen un peso promedio de 99 kg(220 lb) cada uno y las bolsas de golf pesan aproximadamente 13.5 kg(30 libras) cada una. El cálculo sería: 1400 – (5 x 220) – (5 x 30) =1400 – 1100 – 150 = 150 lb. Sí, tiene suficiente capacidad de carga enel vehículo para transportar a cuatro amigos y sus bolsas de golf. Enunidades métricas, el cálculo sería: 635 kg — (5 x 99 kg) — (5 x 13.5kg) = 635 — 495 — 67.5 = 72.5 kg.
• Un último ejemplo para su vehículo con una capacidad para carga yequipaje de 635 kg (1400 libras.). Usted y uno de sus amigos decidenir a comprar cemento a una tienda local para mejoras en el hogar paraterminar ese patio que ha estado planificando durante los dos últimosaños. Al medir el interior del vehículo con el asiento trasero plegado,tiene espacio para 12 bolsas de cemento de 45 kg (100 libras). ¿Tienesuficiente capacidad de carga para llevar el cemento a casa? Si usted ysu amigo pesan cada uno 220 lb. (99 kg), el cálculo sería: 1400 – (2 x220) – (12 x 100) = 1400 – 440 – 1200 = – 240 lb. No, no tienesuficiente capacidad de carga para transportar tanto peso. Enunidades métricas, el cálculo sería: 635 kg — (2 x 99 kg) — (12 x 45kg) = 635 — 198 — 540 = —103 kg. Deberá reducir el peso de lacarga en al menos 104 kg (240 lb). Si quita 3 bolsas de cemento de 45kg (100 libras), el cálculo de la carga sería:
1400 – (2 x 220) – (9 x 100) = 1400 – 440 – 900 = 60 libras. Ahoratiene la capacidad de carga para transportar el cemento y a su amigohasta la casa. En unidades métricas, el cálculo sería: 635 kg — (2 x 99kg) — (9 x 45 kg) = 635 — 198 — 405 = 32 kg.
2006 Navigator (nav)Owners Guide (post-2002-fmt)USA (fus)
Llantas, ruedas y carga
282
En los cálculos anteriores, se supone que la carga se pone en el vehículode una manera tal que no sobrecargue el Peso bruto vehicular del ejedelantero o trasero, especificado para su vehículo en la Etiqueta decertificación del cumplimiento de las normas de seguridad que seencuentra en la puerta del conductor.
Instrucciones especiales de carga para propietarios de camionetaspickup y vehículos tipo utilitario
Para obtener información importante con relación alfuncionamiento seguro de este tipo de vehículo, consulte la
sección Preparación para manejar el vehículo en el capítuloManejo de este manual del propietario.
Los vehículos cargados, con un centro de gravedad más alto,pueden maniobrarse distinto de los vehículos no cargados. Al
manejar un vehículo demasiado cargado se deben tomar mayoresprecauciones, tales como manejar a velocidades más bajas y manteneruna mayor distancia de frenado.
Su vehículo tiene la capacidad de transportar más carga y personas quela mayoría de los automóviles de pasajeros. Dependiendo del tipo yubicación de la carga, el transporte de carga y de personas puede elevarel centro de gravedad del vehículo.
ARRASTRE DE REMOLQUEEl arrastre de un remolque significa una carga adicional para el motor, latransmisión, el eje, los frenos, las llantas y la suspensión de su vehículo.Para su seguridad y para maximizar el rendimiento del vehículo,asegúrese de usar los equipos adecuados al remolcar.
Siga estas pautas para asegurar un arrastre de remolque seguro:
• Manténgase dentro de los límites de carga de su vehículo.
• Prepare completamente el vehículo para el remolque. ConsultePreparación para remolcar en este capítulo.
• Tome precauciones adicionales cuando maneje arrastrando unremolque. Consulte Manejo al remolcar en este capítulo.
• Haga revisar el vehículo con mayor frecuencia si arrastra un remolque.Consulte el programa para uso severo en el registro de mantenimientoprogramado.
2006 Navigator (nav)Owners Guide (post-2002-fmt)USA (fus)
Llantas, ruedas y carga
283
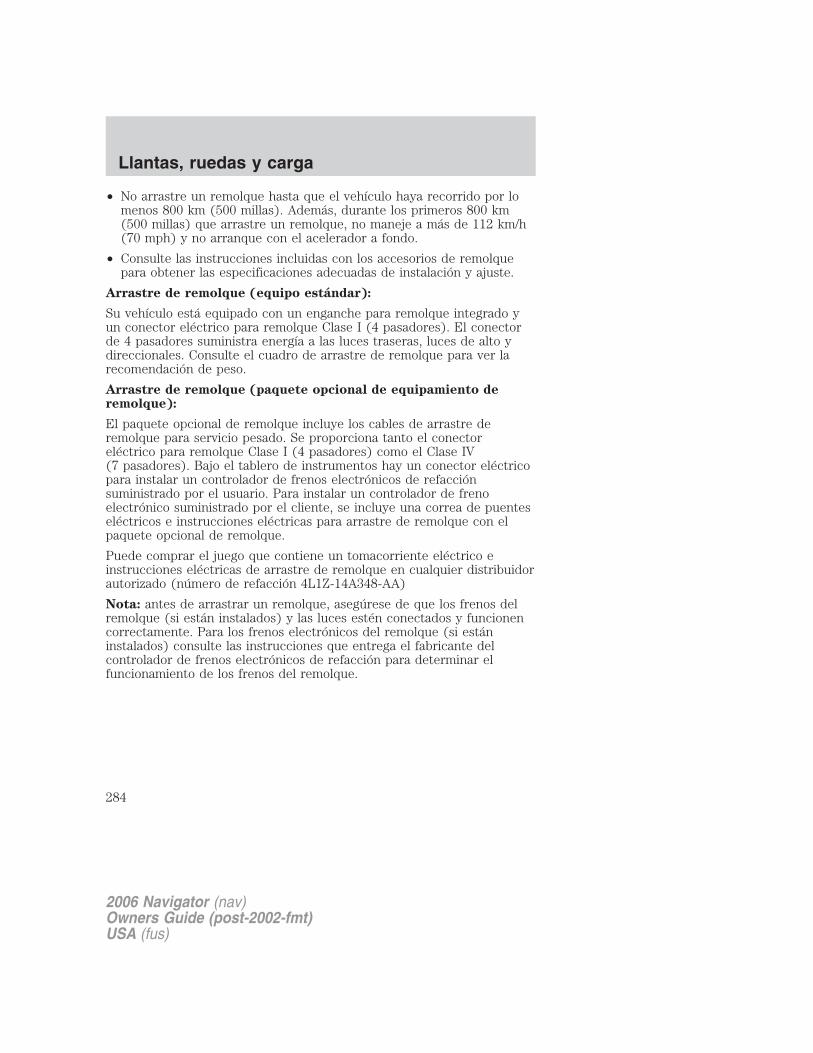
• No arrastre un remolque hasta que el vehículo haya recorrido por lomenos 800 km (500 millas). Además, durante los primeros 800 km(500 millas) que arrastre un remolque, no maneje a más de 112 km/h(70 mph) y no arranque con el acelerador a fondo.
• Consulte las instrucciones incluidas con los accesorios de remolquepara obtener las especificaciones adecuadas de instalación y ajuste.
Arrastre de remolque (equipo estándar):
Su vehículo está equipado con un enganche para remolque integrado yun conector eléctrico para remolque Clase I (4 pasadores). El conectorde 4 pasadores suministra energía a las luces traseras, luces de alto ydireccionales. Consulte el cuadro de arrastre de remolque para ver larecomendación de peso.
Arrastre de remolque (paquete opcional de equipamiento deremolque):
El paquete opcional de remolque incluye los cables de arrastre deremolque para servicio pesado. Se proporciona tanto el conectoreléctrico para remolque Clase I (4 pasadores) como el Clase IV(7 pasadores). Bajo el tablero de instrumentos hay un conector eléctricopara instalar un controlador de frenos electrónicos de refacciónsuministrado por el usuario. Para instalar un controlador de frenoelectrónico suministrado por el cliente, se incluye una correa de puenteseléctricos e instrucciones eléctricas para arrastre de remolque con elpaquete opcional de remolque.
Puede comprar el juego que contiene un tomacorriente eléctrico einstrucciones eléctricas de arrastre de remolque en cualquier distribuidorautorizado (número de refacción 4L1Z-14A348-AA)
Nota: antes de arrastrar un remolque, asegúrese de que los frenos delremolque (si están instalados) y las luces estén conectados y funcionencorrectamente. Para los frenos electrónicos del remolque (si estáninstalados) consulte las instrucciones que entrega el fabricante delcontrolador de frenos electrónicos de refacción para determinar elfuncionamiento de los frenos del remolque.
2006 Navigator (nav)Owners Guide (post-2002-fmt)USA (fus)
Llantas, ruedas y carga
284
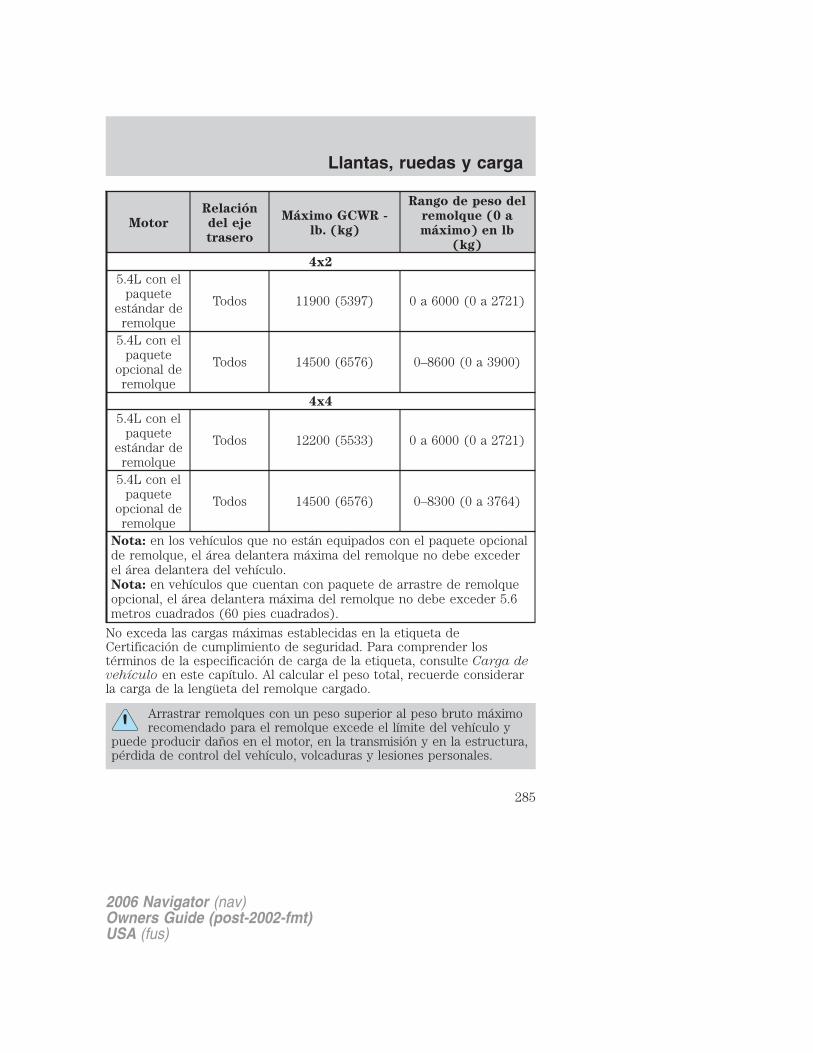
Motor
Relación
del eje
trasero
Máximo GCWR -
lb. (kg)
Rango de peso del
remolque (0 a
máximo) en lb
(kg)
4x2
5.4L con elpaquete
estándar deremolque
Todos 11900 (5397) 0 a 6000 (0 a 2721)
5.4L con elpaquete
opcional deremolque
Todos 14500 (6576) 0–8600 (0 a 3900)
4x4
5.4L con elpaquete
estándar deremolque
Todos 12200 (5533) 0 a 6000 (0 a 2721)
5.4L con elpaquete
opcional deremolque
Todos 14500 (6576) 0–8300 (0 a 3764)
Nota: en los vehículos que no están equipados con el paquete opcionalde remolque, el área delantera máxima del remolque no debe excederel área delantera del vehículo.Nota: en vehículos que cuentan con paquete de arrastre de remolqueopcional, el área delantera máxima del remolque no debe exceder 5.6metros cuadrados (60 pies cuadrados).
No exceda las cargas máximas establecidas en la etiqueta deCertificación de cumplimiento de seguridad. Para comprender lostérminos de la especificación de carga de la etiqueta, consulte Carga devehículo en este capítulo. Al calcular el peso total, recuerde considerarla carga de la lengüeta del remolque cargado.
Arrastrar remolques con un peso superior al peso bruto máximorecomendado para el remolque excede el límite del vehículo y
puede producir daños en el motor, en la transmisión y en la estructura,pérdida de control del vehículo, volcaduras y lesiones personales.
2006 Navigator (nav)Owners Guide (post-2002-fmt)USA (fus)
Llantas, ruedas y carga
285
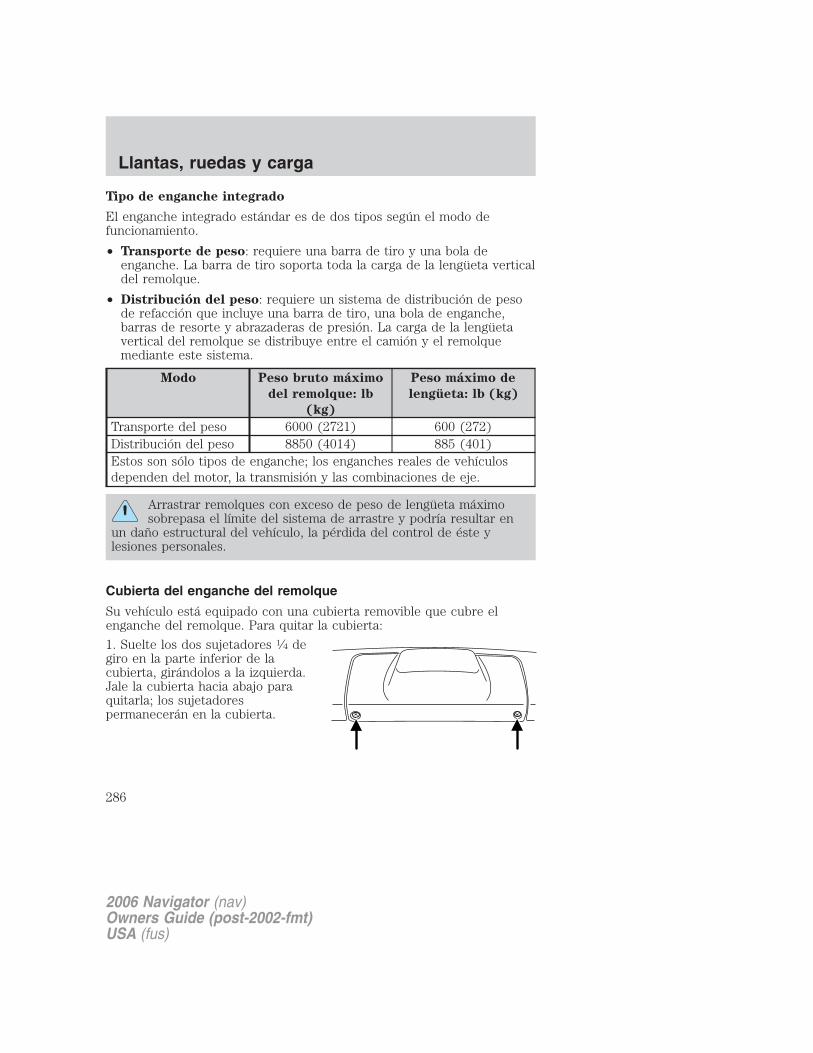
Tipo de enganche integrado
El enganche integrado estándar es de dos tipos según el modo defuncionamiento.
• Transporte de peso: requiere una barra de tiro y una bola deenganche. La barra de tiro soporta toda la carga de la lengüeta verticaldel remolque.
• Distribución del peso: requiere un sistema de distribución de pesode refacción que incluye una barra de tiro, una bola de enganche,barras de resorte y abrazaderas de presión. La carga de la lengüetavertical del remolque se distribuye entre el camión y el remolquemediante este sistema.
Modo Peso bruto máximo
del remolque: lb
(kg)
Peso máximo de
lengüeta: lb (kg)
Transporte del peso 6000 (2721) 600 (272)Distribución del peso 8850 (4014) 885 (401)Estos son sólo tipos de enganche; los enganches reales de vehículosdependen del motor, la transmisión y las combinaciones de eje.
Arrastrar remolques con exceso de peso de lengüeta máximosobrepasa el límite del sistema de arrastre y podría resultar en
un daño estructural del vehículo, la pérdida del control de éste ylesiones personales.
Cubierta del enganche del remolque
Su vehículo está equipado con una cubierta removible que cubre elenganche del remolque. Para quitar la cubierta:
1. Suelte los dos sujetadores 1⁄4 degiro en la parte inferior de lacubierta, girándolos a la izquierda.Jale la cubierta hacia abajo paraquitarla; los sujetadorespermanecerán en la cubierta.
2006 Navigator (nav)Owners Guide (post-2002-fmt)USA (fus)
Llantas, ruedas y carga
286
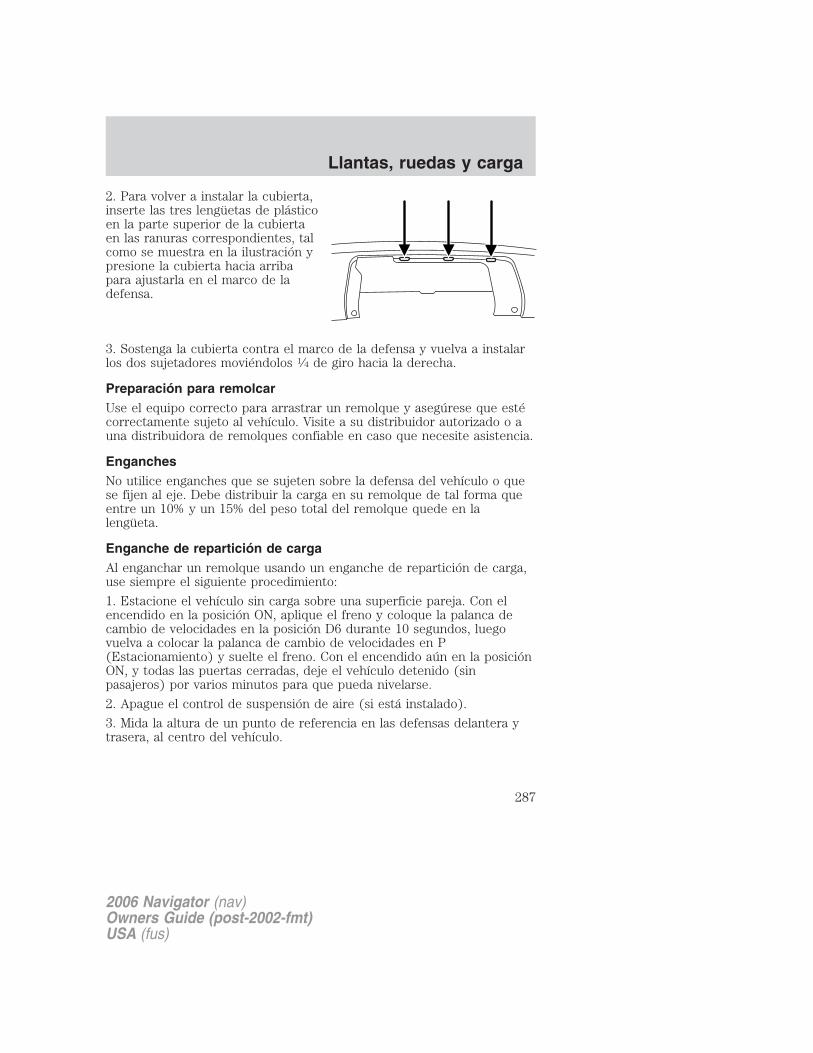
2. Para volver a instalar la cubierta,inserte las tres lengüetas de plásticoen la parte superior de la cubiertaen las ranuras correspondientes, talcomo se muestra en la ilustración ypresione la cubierta hacia arribapara ajustarla en el marco de ladefensa.
3. Sostenga la cubierta contra el marco de la defensa y vuelva a instalarlos dos sujetadores moviéndolos 1⁄4 de giro hacia la derecha.
Preparación para remolcarUse el equipo correcto para arrastrar un remolque y asegúrese que estécorrectamente sujeto al vehículo. Visite a su distribuidor autorizado o auna distribuidora de remolques confiable en caso que necesite asistencia.
EnganchesNo utilice enganches que se sujeten sobre la defensa del vehículo o quese fijen al eje. Debe distribuir la carga en su remolque de tal forma queentre un 10% y un 15% del peso total del remolque quede en lalengüeta.
Enganche de repartición de cargaAl enganchar un remolque usando un enganche de repartición de carga,use siempre el siguiente procedimiento:
1. Estacione el vehículo sin carga sobre una superficie pareja. Con elencendido en la posición ON, aplique el freno y coloque la palanca decambio de velocidades en la posición D6 durante 10 segundos, luegovuelva a colocar la palanca de cambio de velocidades en P(Estacionamiento) y suelte el freno. Con el encendido aún en la posiciónON, y todas las puertas cerradas, deje el vehículo detenido (sinpasajeros) por varios minutos para que pueda nivelarse.
2. Apague el control de suspensión de aire (si está instalado).
3. Mida la altura de un punto de referencia en las defensas delantera ytrasera, al centro del vehículo.
2006 Navigator (nav)Owners Guide (post-2002-fmt)USA (fus)
Llantas, ruedas y carga
287
4. Enganche el remolque al vehículo y ajuste los ecualizadores delenganche de modo que la altura de la defensa delantera esté dentro de13 mm (1⁄2”) del punto de referencia. Después del ajuste correcto, ladefensa trasera no debe estar más alta que en el paso 3.
5. Encienda el control de suspensión de aire (si está instalado).
Nota: ajustar un enganche de repartición de manera que la defensatrasera del vehículo esté más alta que cuando estaba descargado,anularía la función del enganche de repartición de carga y puede causarun manejo impredecible.
Cadenas de seguridadSiempre coloque las cadenas de seguridad del remolque al bastidor o alos retenes de gancho del enganche del vehículo. Para colocar lascadenas de seguridad del remolque, crúcelas por debajo de la lengüetadel remolque y déjelas holgadas para poder virar en las esquinas.
Si usa un remolque arrendado, siga las instrucciones que le dé la agenciade arriendo.
No enganche cadenas de seguridad en la defensa.
Frenos del remolqueLos frenos eléctricos y los frenos de remolque manuales, automáticos opor impulso son seguros si están instalados adecuadamente y si seajustan a las especificaciones del fabricante. Los frenos del remolquedeben cumplir con la normativa local y federal.
No conecte el sistema de frenos hidráulicos del remolquedirectamente al sistema de frenos del vehículo. Es posible que su
vehículo no tenga suficiente potencia de frenado, por lo que aumentala posibilidad de sufrir un choque.
El sistema de frenado del vehículo de arrastre tiene capacidad para usocon el GVWR, no con el GCWR.
Luces del remolqueLas luces de remolque se requieren en la mayoría de los vehículosremolcados. Asegúrese que todas las luces de marcha, luces de freno,direccionales y luces de emergencia estén funcionando. Consulte con sudistribuidor autorizado o la agencia de arrendamiento de remolques paraobtener las instrucciones y los equipos adecuados para conectar las lucesdel remolque.
2006 Navigator (nav)Owners Guide (post-2002-fmt)USA (fus)
Llantas, ruedas y carga
288
Conducción al remolcarAl arrastrar un remolque:• Apague el control de velocidad. Éste se puede desactivar
automáticamente al remolcar en pendientes largas y empinadas.• Consulte las normas locales de velocidad de vehículos motorizados
para el arrastre de un remolque.• Para eliminar el cambio de velocidades excesivo, conduzca a una
velocidad menor. Esto ayudará también al enfriamiento de latransmisión. (Para obtener más información, consulte la secciónConocimiento de las posiciones de la transmisión automática de 6velocidades en este capítulo.)
• Anticípese a las paradas y frene gradualmente.• No exceda la capacidad máxima de GCWR, ya que se puede dañar la
transmisión.Si su vehículo posee AdvanceTrac� con RSC, puede experimentar lasactivaciones del AdvanceTrac� con RSC durante las maniobras típicas enlas curvas con un remolque de gran carga; esto es normal. El viraje encurvas a una velocidad menor cuando se arrastra un remolque disminuirála tendencia a activarse del sistema de aumento de estabilidadAdvanceTrac�.Servicio después de remolcarSi arrastra un remolque por largas distancias, su vehículo necesitaráintervalos de servicio con mayor frecuencia. Para obtener másinformación, consulte el Registro de mantenimiento programado.
Consejos para arrastrar remolques• Practique los virajes, el frenado y el retroceso antes de salir de viaje
para acostumbrarse a la combinación del vehículo y el remolque. Aldar vuelta, haga giros más amplios, de manera que las ruedas delremolque no toquen los bordes de las banquetas ni otros obstáculos.
• Deje una mayor distancia para detenerse con un remolqueenganchado.
• Si está manejando en bajada en una pendiente pronunciada, cambie auna velocidad menor. No aplique los frenos muy seguido, ya que sepueden sobrecalentar y ser menos eficaces.
• El peso de la lengüeta del remolque debe representar entre un 10% yun 15% del peso del remolque cargado.
• Después de haber viajado 80 km/h (50 millas), revise minuciosamenteel enganche, las conexiones eléctricas y las tuercas de seguridad deruedas del remolque.
2006 Navigator (nav)Owners Guide (post-2002-fmt)USA (fus)
Llantas, ruedas y carga
289
• Como ayuda para que se enfríe el motor y la transmisión y el A/Afuncione en forma óptima en climas calurosos mientras se estádetenido en el tráfico, coloque la palanca de cambio de velocidades enP (Estacionamiento).
• Los vehículos con remolques no se deben estacionar en desnivel. Si seve obligado a hacerlo, coloque cuñas debajo de las ruedas delremolque.
Botadura o recuperación de un boteDesconecte el cableado al remolque antes de moverlo hacia atrásdentro del agua. Vuelva a conectar el cableado al remolquedespués de sacar el remolque del agua.
Al moverse hacia atrás en una rampa durante la botadura o recuperaciónde un bote:• no permita que el nivel estático del agua se eleve por encima del
borde inferior de la defensa trasera.• No permita que las olas rompan a más de 15 cm (6 pulg.) sobre el
borde inferior de la defensa trasera.Al exceder estos límites, existe una mayor probabilidad de que entreagua en los componentes del vehículo, lo que podría:• causar daños internos a los componentes.• afectar el manejo, las emisiones y la confiabilidad.Reemplace el lubricante del eje trasero cada vez que éste haya sidosumergido en agua. No es necesario revisar ni cambiar las cantidades delubricante del eje trasero, a menos que se sospeche una fuga o serequiera reparación.
REMOLQUE VACACIONAL(TODAS LAS RUEDAS SOBRE EL SUELO)Un ejemplo de esto sería remolcar el vehículo con una casa rodante. Sigaestas instrucciones si debe efectuar un remolque vacacional del vehículocon las cuatro ruedas en contacto con el suelo. Estas pautas estándiseñadas para asegurar que la transmisión no resulte dañada.Vehículos 2WD (con transmisiones automáticas):
• Ponga la transmisión en N (Neutro)• La velocidad máxima es 56 km/h (35 mph).• La distancia máxima es 80 km (50 millas)Si tuviera que exceder una distancia de 80 km (50 millas) o unavelocidad de 56 km (35 mph), el eje de transmisión se debe quitar antesde remolcar el vehículo.
2006 Navigator (nav)Owners Guide (post-2002-fmt)USA (fus)
Llantas, ruedas y carga
290
Ford recomienda que el retiro o instalación del eje de transmisión searealizado solamente por un técnico calificado en un distribuidorautorizado. Visite a su distribuidor autorizado para el retiro o instalacióndel eje de transmisión.
La remoción o instalación del eje de transmisión en formaincorrecta puede causar pérdida de líquido de la transmisión ydaño al eje de transmisión y a los componentes internos de latransmisión.
Vehículos equipados con sistema de tracción en las cuatro ruedascon Control Trac:
Los vehículos equipados con sistema de tracción en las cuatro ruedascon Control Trac no se pueden remolcar con ninguna rueda sobre elsuelo. Consulte con su distribuidor autorizado si tiene que remolcar suvehículo equipado con sistema de tracción en las cuatro ruedas conControl Trac.
2006 Navigator (nav)Owners Guide (post-2002-fmt)USA (fus)
Llantas, ruedas y carga
291
ARRANQUE
Posiciones del encendido1. OFF/LOCK (Apagado/Bloqueo),bloquea el volante de la dirección, lapalanca de cambio de velocidadesde la transmisión automática ypermite quitar la llave.
2. ACCESSORY (Accesorios),permite que los accesorioseléctricos, como el radio, funcionenmientras el motor no está enmarcha.
3. ON (Encendido), todos los circuitos eléctricos están en condiciones defuncionar. Se encienden las luces de advertencia. Posición de la llave almanejar.
4. START (Arranque), da marcha al motor. Suelte la llave tan prontoarranque el motor.
Preparación para arrancar el vehículoEl arranque del motor se controla mediante el sistema de control deltren motriz. Este sistema cumple con todos los requisitos de las normascanadienses para equipos que provocan interferencias, que regulan lapotencia del impulso del campo eléctrico de la interferencia de radio.
Al arrancar un motor con inyección de combustible, evite pisar elacelerador antes o durante el arranque. Use el acelerador sólo cuandotenga dificultad para arrancar el motor. Para obtener más informaciónsobre el arranque del vehículo, consulte Arranque del motor en estecapítulo.
El ralentí prolongado a altas velocidades puede producirtemperaturas muy altas en el motor y en el sistema de escape,
creando el riesgo de incendio y otros daños.
No estacione, ponga en ralentí o maneje su vehículo en pastoseco u otras superficies secas. El sistema de emisión de gases
calienta el compartimiento del motor y el sistema de escape, lo quepuede iniciar un incendio.
2006 Navigator (nav)Owners Guide (post-2002-fmt)USA (fus)
Manejo
292

No arranque su vehículo en un garaje cerrado o en otras áreasencerradas. Los gases de escape pueden ser tóxicos. Siempre
abra la puerta del garaje antes de arrancar el motor. Para obtener másinstrucciones consulte Precauciones ante los gases de escape en estecapítulo.
Si huele gases de escape dentro de su vehículo, haga que sudistribuidor lo inspeccione de inmediato. No conduzca si huele
gases de escape.
Precauciones de seguridad importantes
Un sistema computacional controla las revoluciones por minuto (RPM)en ralentí del motor. Cuando el motor arranca, las RPM en ralentí sonmayores de lo normal para calentar el motor. Si la velocidad en ralentídel motor no disminuye automáticamente, haga que revisen el vehículo.No permita que el vehículo funcione en ralentí por más de diez minutosa las RPM máximas del motor.
Antes de arrancar el vehículo:
1. Asegúrese de que todos los ocupantes del vehículo tengan suscinturones de seguridad abrochados. Para mayor información acerca delos cinturones de seguridad y su uso adecuado, consulte el capítuloAsientos y sistemas de seguridad.
2. Asegúrese de que los faros delanteros y los accesorios del vehículoestén apagados.
2006 Navigator (nav)Owners Guide (post-2002-fmt)USA (fus)
Manejo
293
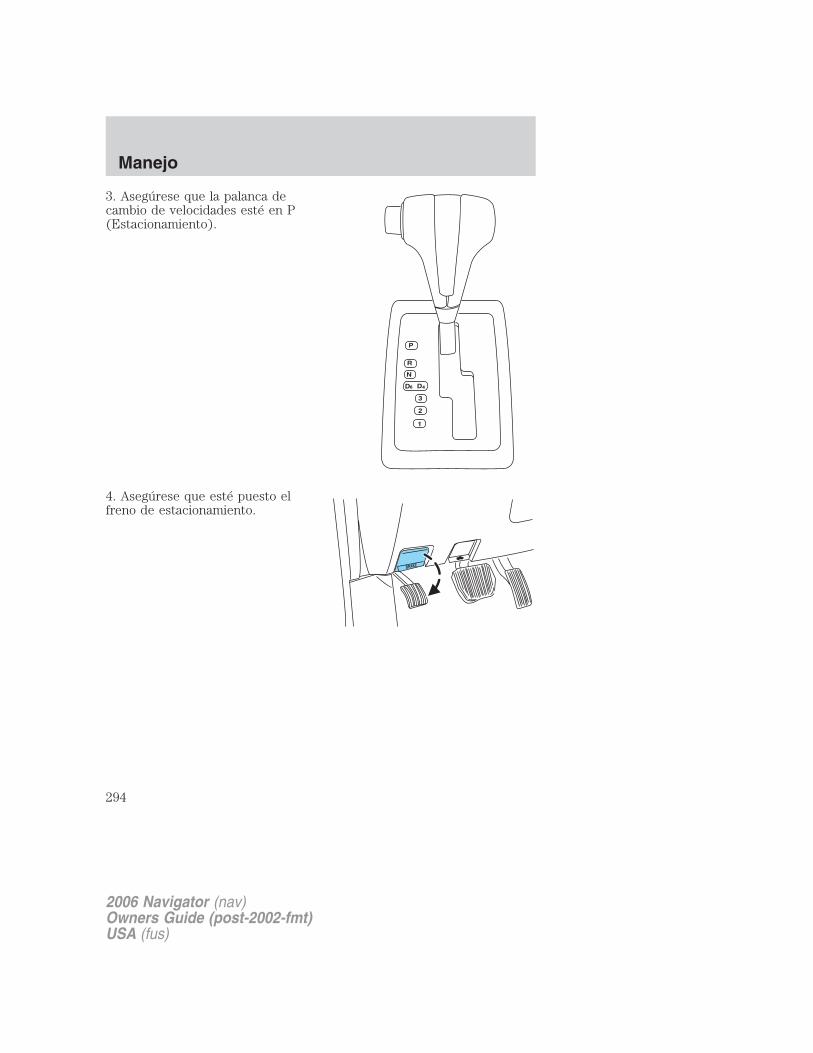
3. Asegúrese que la palanca decambio de velocidades esté en P(Estacionamiento).
4. Asegúrese que esté puesto elfreno de estacionamiento.
2006 Navigator (nav)Owners Guide (post-2002-fmt)USA (fus)
Manejo
294
5. Gire la llave a 3 (ON) sin girarla a4 (START).
Algunas luces de advertencia se iluminarán brevemente. Consulte Lucesy campanillas de advertencia en el capítulo Grupo de instrumentos,para obtener más información con respecto a las luces de advertencia.
Arranque del motor
Nota: cada vez que arranque el vehículo, suelte la llave en cuantoarranque el motor. Los giros excesivos pueden dañar el motor dearranque.
1. Gire la llave a 4 (START) sinpresionar el pedal del acelerador ysuéltela en cuanto el motorarranque. La llave volverá a 3 (ON).
2. Cuando el motor arranque, sueltela llave.
3. Después de estar en ralentídurante algunos segundos, pise elfreno, cambie a velocidad y manejeel vehículo.
Nota: si el motor no arranca dentro de cinco segundos en el primerintento, gire la llave a OFF, espere 10 segundos y vuelva a intentarlo. Siel motor continúa sin arrancar, presione el acelerador hasta el piso yvuelva a intentarlo; esto permitirá que el motor gire con el paso delcombustible cortado en caso de que esté inundado con combustible.
Protección contra los gases de escape
El monóxido de carbono está presente en los gases de escape. Tomeprecauciones para evitar sus efectos dañinos.
2006 Navigator (nav)Owners Guide (post-2002-fmt)USA (fus)
Manejo
295

Si huele gases de escape dentro de su vehículo, haga que sudistribuidor lo inspeccione de inmediato. No conduzca si huele
gases de escape.
Información importante sobre la ventilación
Si el motor funciona en ralentí mientras el vehículo está detenido por unperíodo largo, abra las ventanas al menos 2.5 cm (una pulgada) o ajustela calefacción o aire acondicionado para que entre aire fresco.
USO DEL CALEFACTOR DE BLOQUE DEL MOTOR(SI ESTÁ INSTALADO)Si su vehículo está equipado defábrica con calefactor de bloque demotor, se debe ver una tapa o tapónde goma unido a la rejilla frontal delvehículo. Para los vehículosequipados de fábrica, este conjuntose embarca suelto en el vehículopara que el distribuidor autorizadolo instale. Si no está equipado defábrica, el calefactor de bloque delmotor se puede adquirir a través delos accesorios del distribuidorautorizado. Las tapas de goma derefacción están disponibles en sudistribuidor autorizado con el código3L1Z-6E088-AA.
Se recomienda enfáticamente el uso de un calefactor de bloque delmotor si vive en una región en que las temperaturas descienden a -23°C(-10°F) o menos. Para obtener mejores resultados, conecte el calefactoral menos tres horas antes de arrancar el vehículo (el calefactor se puedeconectar la noche antes de arrancar el vehículo). Para conectar elcalefactor, saque la tapa del enchufe e insértelo en un tomacorriente de110 voltios con conexión a tierra. Asegúrese de volver a poner la tapa enel enchufe cuando no esté usando el calefactor.
Nota: asegúrese de desconectar la tapa del enchufe cuando abra elcofre.
2006 Navigator (nav)Owners Guide (post-2002-fmt)USA (fus)
Manejo
296
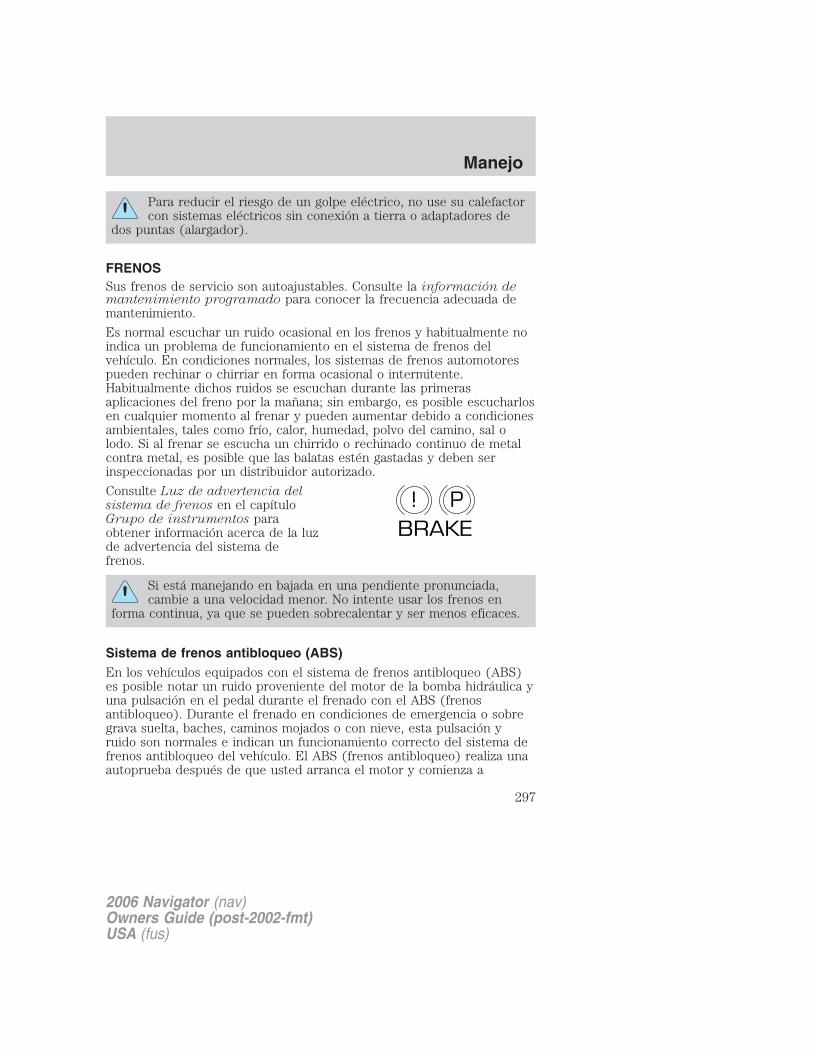
Para reducir el riesgo de un golpe eléctrico, no use su calefactorcon sistemas eléctricos sin conexión a tierra o adaptadores de
dos puntas (alargador).
FRENOSSus frenos de servicio son autoajustables. Consulte la información demantenimiento programado para conocer la frecuencia adecuada demantenimiento.
Es normal escuchar un ruido ocasional en los frenos y habitualmente noindica un problema de funcionamiento en el sistema de frenos delvehículo. En condiciones normales, los sistemas de frenos automotorespueden rechinar o chirriar en forma ocasional o intermitente.Habitualmente dichos ruidos se escuchan durante las primerasaplicaciones del freno por la mañana; sin embargo, es posible escucharlosen cualquier momento al frenar y pueden aumentar debido a condicionesambientales, tales como frío, calor, humedad, polvo del camino, sal olodo. Si al frenar se escucha un chirrido o rechinado continuo de metalcontra metal, es posible que las balatas estén gastadas y deben serinspeccionadas por un distribuidor autorizado.
Consulte Luz de advertencia delsistema de frenos en el capítuloGrupo de instrumentos paraobtener información acerca de la luzde advertencia del sistema defrenos.
Si está manejando en bajada en una pendiente pronunciada,cambie a una velocidad menor. No intente usar los frenos en
forma continua, ya que se pueden sobrecalentar y ser menos eficaces.
Sistema de frenos antibloqueo (ABS)En los vehículos equipados con el sistema de frenos antibloqueo (ABS)es posible notar un ruido proveniente del motor de la bomba hidráulica yuna pulsación en el pedal durante el frenado con el ABS (frenosantibloqueo). Durante el frenado en condiciones de emergencia o sobregrava suelta, baches, caminos mojados o con nieve, esta pulsación yruido son normales e indican un funcionamiento correcto del sistema defrenos antibloqueo del vehículo. El ABS (frenos antibloqueo) realiza unaautoprueba después de que usted arranca el motor y comienza a
P!BRAKE
2006 Navigator (nav)Owners Guide (post-2002-fmt)USA (fus)
Manejo
297
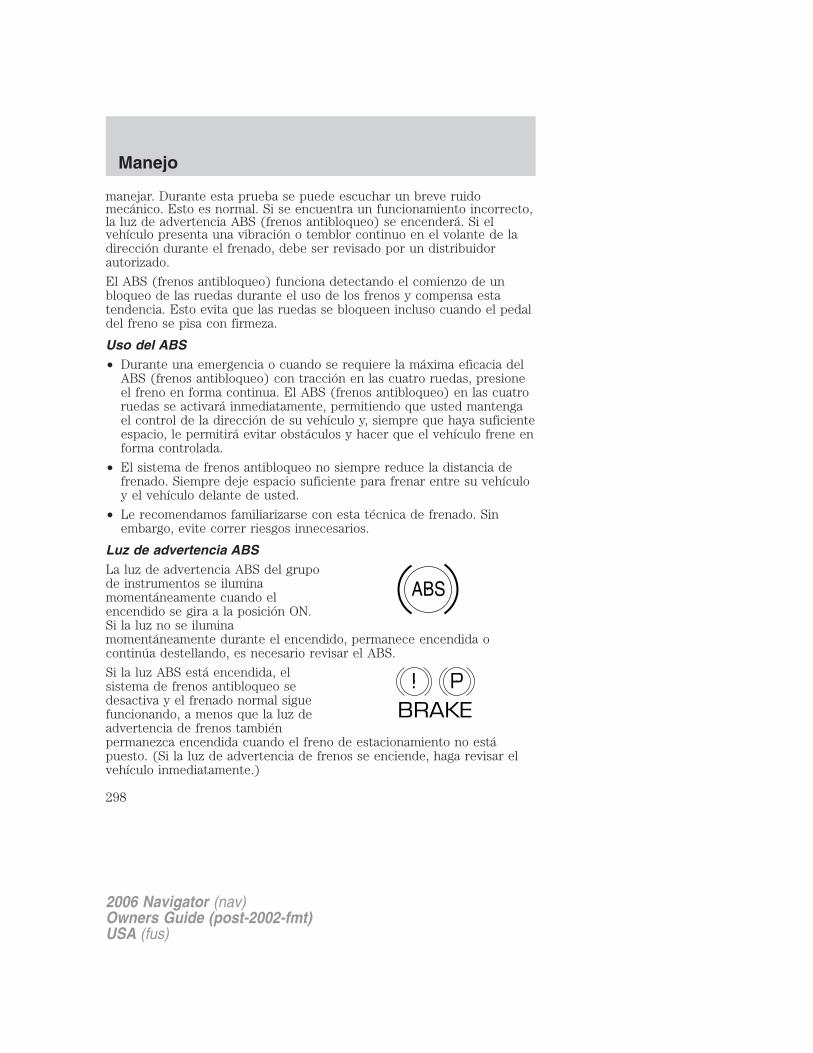
manejar. Durante esta prueba se puede escuchar un breve ruidomecánico. Esto es normal. Si se encuentra un funcionamiento incorrecto,la luz de advertencia ABS (frenos antibloqueo) se encenderá. Si elvehículo presenta una vibración o temblor continuo en el volante de ladirección durante el frenado, debe ser revisado por un distribuidorautorizado.
El ABS (frenos antibloqueo) funciona detectando el comienzo de unbloqueo de las ruedas durante el uso de los frenos y compensa estatendencia. Esto evita que las ruedas se bloqueen incluso cuando el pedaldel freno se pisa con firmeza.
Uso del ABS• Durante una emergencia o cuando se requiere la máxima eficacia del
ABS (frenos antibloqueo) con tracción en las cuatro ruedas, presioneel freno en forma continua. El ABS (frenos antibloqueo) en las cuatroruedas se activará inmediatamente, permitiendo que usted mantengael control de la dirección de su vehículo y, siempre que haya suficienteespacio, le permitirá evitar obstáculos y hacer que el vehículo frene enforma controlada.
• El sistema de frenos antibloqueo no siempre reduce la distancia defrenado. Siempre deje espacio suficiente para frenar entre su vehículoy el vehículo delante de usted.
• Le recomendamos familiarizarse con esta técnica de frenado. Sinembargo, evite correr riesgos innecesarios.
Luz de advertencia ABSLa luz de advertencia ABS del grupode instrumentos se iluminamomentáneamente cuando elencendido se gira a la posición ON.Si la luz no se iluminamomentáneamente durante el encendido, permanece encendida ocontinúa destellando, es necesario revisar el ABS.
Si la luz ABS está encendida, elsistema de frenos antibloqueo sedesactiva y el frenado normal siguefuncionando, a menos que la luz deadvertencia de frenos tambiénpermanezca encendida cuando el freno de estacionamiento no estápuesto. (Si la luz de advertencia de frenos se enciende, haga revisar elvehículo inmediatamente.)
ABS
P!BRAKE
2006 Navigator (nav)Owners Guide (post-2002-fmt)USA (fus)
Manejo
298
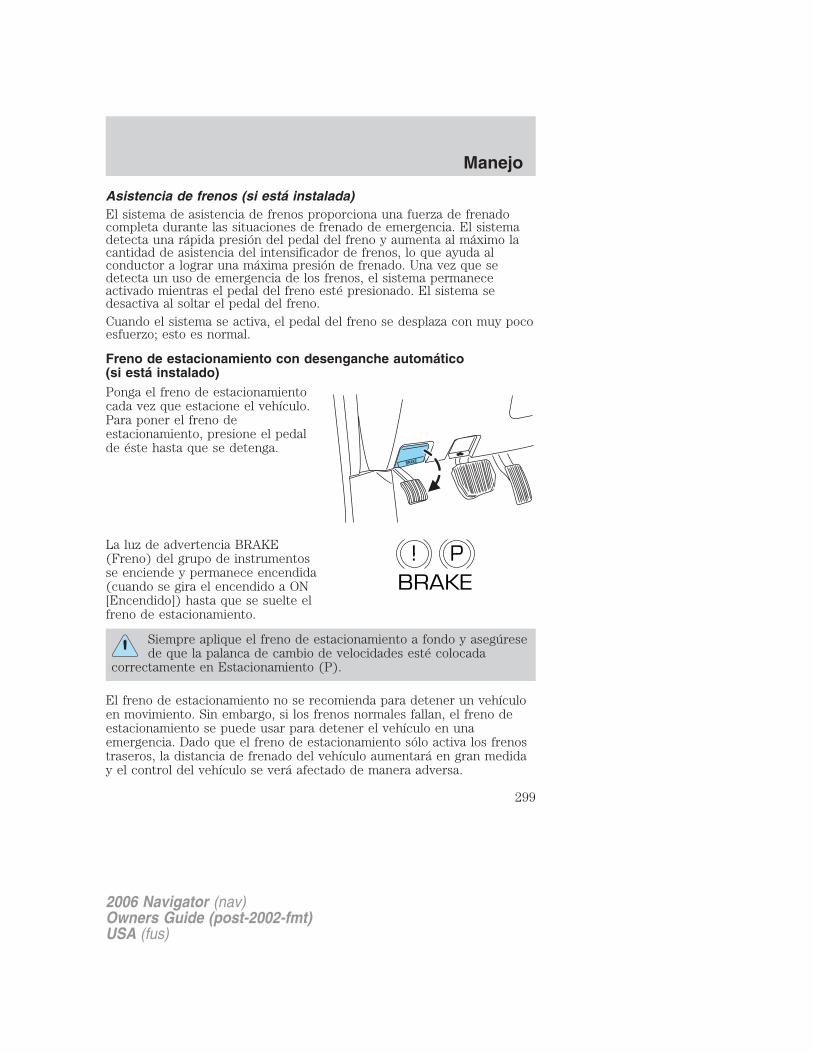
Asistencia de frenos (si está instalada)El sistema de asistencia de frenos proporciona una fuerza de frenadocompleta durante las situaciones de frenado de emergencia. El sistemadetecta una rápida presión del pedal del freno y aumenta al máximo lacantidad de asistencia del intensificador de frenos, lo que ayuda alconductor a lograr una máxima presión de frenado. Una vez que sedetecta un uso de emergencia de los frenos, el sistema permaneceactivado mientras el pedal del freno esté presionado. El sistema sedesactiva al soltar el pedal del freno.Cuando el sistema se activa, el pedal del freno se desplaza con muy pocoesfuerzo; esto es normal.
Freno de estacionamiento con desenganche automático(si está instalado)Ponga el freno de estacionamientocada vez que estacione el vehículo.Para poner el freno deestacionamiento, presione el pedalde éste hasta que se detenga.
La luz de advertencia BRAKE(Freno) del grupo de instrumentosse enciende y permanece encendida(cuando se gira el encendido a ON[Encendido]) hasta que se suelte elfreno de estacionamiento.
Siempre aplique el freno de estacionamiento a fondo y asegúresede que la palanca de cambio de velocidades esté colocada
correctamente en Estacionamiento (P).
El freno de estacionamiento no se recomienda para detener un vehículoen movimiento. Sin embargo, si los frenos normales fallan, el freno deestacionamiento se puede usar para detener el vehículo en unaemergencia. Dado que el freno de estacionamiento sólo activa los frenostraseros, la distancia de frenado del vehículo aumentará en gran mediday el control del vehículo se verá afectado de manera adversa.
P!BRAKE
2006 Navigator (nav)Owners Guide (post-2002-fmt)USA (fus)
Manejo
299
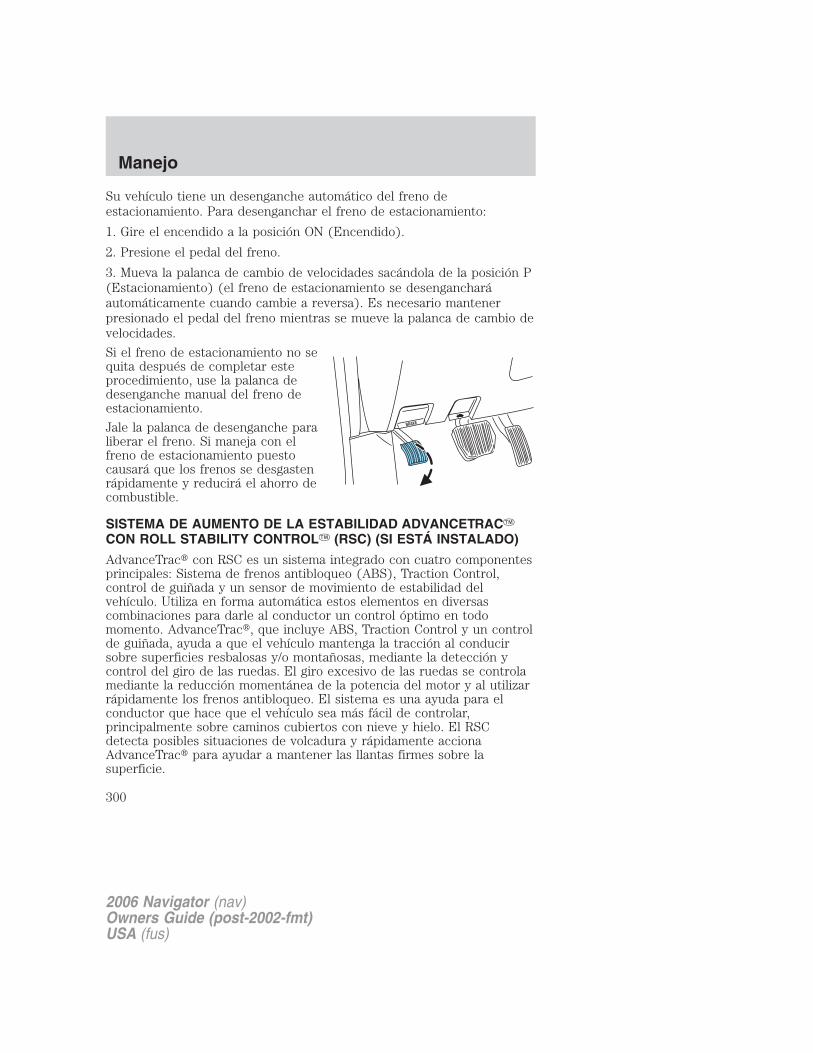
Su vehículo tiene un desenganche automático del freno deestacionamiento. Para desenganchar el freno de estacionamiento:
1. Gire el encendido a la posición ON (Encendido).
2. Presione el pedal del freno.
3. Mueva la palanca de cambio de velocidades sacándola de la posición P(Estacionamiento) (el freno de estacionamiento se desengancharáautomáticamente cuando cambie a reversa). Es necesario mantenerpresionado el pedal del freno mientras se mueve la palanca de cambio develocidades.
Si el freno de estacionamiento no sequita después de completar esteprocedimiento, use la palanca dedesenganche manual del freno deestacionamiento.
Jale la palanca de desenganche paraliberar el freno. Si maneja con elfreno de estacionamiento puestocausará que los frenos se desgastenrápidamente y reducirá el ahorro decombustible.
SISTEMA DE AUMENTO DE LA ESTABILIDAD ADVANCETRAC�CON ROLL STABILITY CONTROL� (RSC) (SI ESTÁ INSTALADO)
AdvanceTrac� con RSC es un sistema integrado con cuatro componentesprincipales: Sistema de frenos antibloqueo (ABS), Traction Control,control de guiñada y un sensor de movimiento de estabilidad delvehículo. Utiliza en forma automática estos elementos en diversascombinaciones para darle al conductor un control óptimo en todomomento. AdvanceTrac�, que incluye ABS, Traction Control y un controlde guiñada, ayuda a que el vehículo mantenga la tracción al conducirsobre superficies resbalosas y/o montañosas, mediante la detección ycontrol del giro de las ruedas. El giro excesivo de las ruedas se controlamediante la reducción momentánea de la potencia del motor y al utilizarrápidamente los frenos antibloqueo. El sistema es una ayuda para elconductor que hace que el vehículo sea más fácil de controlar,principalmente sobre caminos cubiertos con nieve y hielo. El RSCdetecta posibles situaciones de volcadura y rápidamente accionaAdvanceTrac� para ayudar a mantener las llantas firmes sobre lasuperficie.
2006 Navigator (nav)Owners Guide (post-2002-fmt)USA (fus)
Manejo
300
Si el vehículo se atasca en nieve o fango profundo, active el sistemaAdvanceTrac� con RSC pulsando el botón AdvanceTrac� con RSC que seencuentra en la consola central. Esto permitirá que las llantas “excaven”para lograr tracción.Si se activa y desactiva en forma excesiva el sistema AdvanceTrac� conRSC en un período breve, la parte de freno del sistema se desactivarápara permitir el enfriamiento de los frenos. Una función limitada delAdvanceTrac� con RSC que usa sólo la reducción de la potencia delmotor seguirá ayudando a controlar el giro excesivo de las ruedas.Cuando los frenos se hayan enfriado, el sistema volverá a funcionar demanera normal. El sistema de frenos antibloqueo no se ve afectado poresta condición y funcionará normalmente durante el período deenfriamiento.
El sistema AdvanceTrac� con RSC aumenta la estabilidad del vehículodurante las maniobras que requieren toda la tracción disponible de lasllantas, como por ejemplo en caminos húmedos, con nieve o hielo y/ocuando se realizan maniobras de emergencia. Al cambiar de emergenciade un carril a otro, el conductor sentirá una mejor tracción general delvehículo y tendrá un mejor control del mismo.
El sistema AdvanceTrac� con RSC ayuda al conductor a mantener elcontrol de la dirección si el vehículo comienza a deslizarseexcesivamente hacia la izquierda o hacia la derecha, o a patinar.AdvanceTrac� con RSC intentará corregir el movimiento deslizantemediante el uso de fuerza de frenado en cada llanta y, si es necesario,con una reducción de la potencia del motor.
Las condiciones de manejo, que pueden activar el sistema AdvanceTrac�con RSC, incluyen:
• Virar demasiado rápido
• Maniobrar rápidamente para evitar un accidente o para esquivar unpeatón o un obstáculo
• Golpear un trozo de hielo
• Cambiar de carriles en un camino con surcos de nieve
• Entrar en un camino sin nieve desde una calle lateral cubierta denieve o viceversa
• Entrar en un camino pavimentado desde un camino de grava oviceversa
• Golpear un borde de la banqueta al dar vuelta
• Manejar sobre superficies resbaladizas
2006 Navigator (nav)Owners Guide (post-2002-fmt)USA (fus)
Manejo
301
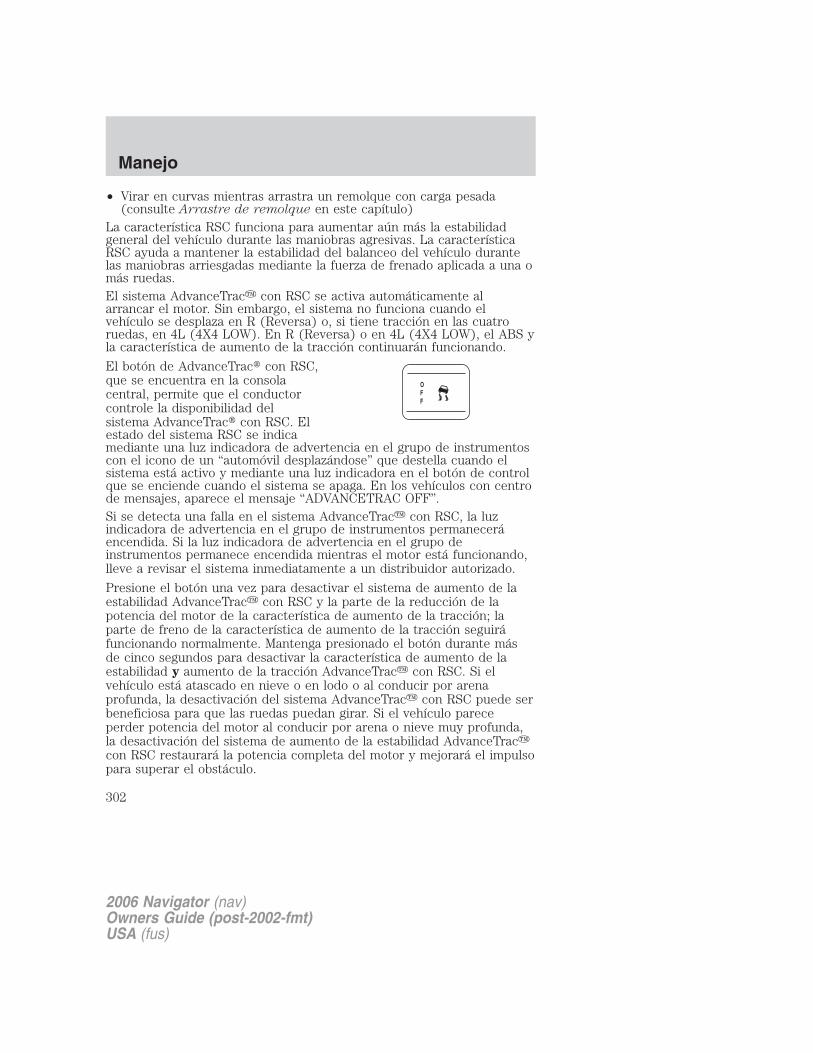
• Virar en curvas mientras arrastra un remolque con carga pesada(consulte Arrastre de remolque en este capítulo)
La característica RSC funciona para aumentar aún más la estabilidadgeneral del vehículo durante las maniobras agresivas. La característicaRSC ayuda a mantener la estabilidad del balanceo del vehículo durantelas maniobras arriesgadas mediante la fuerza de frenado aplicada a una omás ruedas.El sistema AdvanceTrac� con RSC se activa automáticamente alarrancar el motor. Sin embargo, el sistema no funciona cuando elvehículo se desplaza en R (Reversa) o, si tiene tracción en las cuatroruedas, en 4L (4X4 LOW). En R (Reversa) o en 4L (4X4 LOW), el ABS yla característica de aumento de la tracción continuarán funcionando.
El botón de AdvanceTrac� con RSC,que se encuentra en la consolacentral, permite que el conductorcontrole la disponibilidad delsistema AdvanceTrac� con RSC. Elestado del sistema RSC se indicamediante una luz indicadora de advertencia en el grupo de instrumentoscon el icono de un “automóvil desplazándose” que destella cuando elsistema está activo y mediante una luz indicadora en el botón de controlque se enciende cuando el sistema se apaga. En los vehículos con centrode mensajes, aparece el mensaje “ADVANCETRAC OFF”.Si se detecta una falla en el sistema AdvanceTrac� con RSC, la luzindicadora de advertencia en el grupo de instrumentos permaneceráencendida. Si la luz indicadora de advertencia en el grupo deinstrumentos permanece encendida mientras el motor está funcionando,lleve a revisar el sistema inmediatamente a un distribuidor autorizado.
Presione el botón una vez para desactivar el sistema de aumento de laestabilidad AdvanceTrac� con RSC y la parte de la reducción de lapotencia del motor de la característica de aumento de la tracción; laparte de freno de la característica de aumento de la tracción seguiráfuncionando normalmente. Mantenga presionado el botón durante másde cinco segundos para desactivar la característica de aumento de laestabilidad y aumento de la tracción AdvanceTrac� con RSC. Si elvehículo está atascado en nieve o en lodo o al conducir por arenaprofunda, la desactivación del sistema AdvanceTrac� con RSC puede serbeneficiosa para que las ruedas puedan girar. Si el vehículo pareceperder potencia del motor al conducir por arena o nieve muy profunda,la desactivación del sistema de aumento de la estabilidad AdvanceTrac�con RSC restaurará la potencia completa del motor y mejorará el impulsopara superar el obstáculo.
OFF
2006 Navigator (nav)Owners Guide (post-2002-fmt)USA (fus)
Manejo
302

Algunos conductores pueden observar un leve movimiento del pedal delfreno cuando el AdvanceTrac� con RSC realiza una autoprueba. Duranteel funcionamiento del sistema AdvanceTrac� con RSC, puedeexperimentar lo siguiente:• Un ruido sordo o de chirrido• Una leve desaceleración del vehículo• Destellará la luz indicadora de AdvanceTrac� con RSC• Si tiene el pie en el pedal del freno, sentirá una vibración en el pedal.• Si la condición de conducción es severa y su pie no está sobre el
freno, el pedal del freno se mueve para aplicar una mayor fuerza defrenado. Puede que también escuche un silbido de aire que sale desdeabajo del tablero durante esta condición grave.
Todas estas condiciones son normales durante el funcionamiento deAdvanceTrac� con RSC.
No altere ni modifique la suspensión o la dirección del vehículo;los cambios resultantes en el manejo del vehículo pueden afectarde manera adversa el sistema AdvanceTrac� con Roll StabilityControl�. Asimismo, no instale una bocina estéreo cerca de laconsola central delantera ni debajo de los asientos delanteros.Las vibraciones de las bocinas pueden afectar de manera adversalos sensores de AdvanceTrac� con Roll Stability Control�ubicados en esta área.
Nota: si se presiona el botón AdvanceTrac� con RSC, se desactivará elsistema AdvanceTrac� con RSC.
Una conducción agresiva en cualquier condición de caminopuede provocar que usted pierda el control de su vehículo,
aumentando el riesgo de lesiones graves o daños a la propiedad. Unevento de AdvanceTrac� con Roll Stability Control� indica que almenos alguna de las llantas sobrepasó su capacidad de agarre alcamino; esto puede derivar en un mayor riesgo de perder el control delvehículo, una volcadura, lesiones personales y la muerte. Siexperimenta un evento grave en la carretera, DISMINUYA LAVELOCIDAD.
DIRECCIÓNSu vehículo tiene instalada dirección hidráulica. La dirección hidráulicautiliza la energía del motor para disminuir el esfuerzo del conductor aldirigir el vehículo.
2006 Navigator (nav)Owners Guide (post-2002-fmt)USA (fus)
Manejo
303
Para evitar daños en la bomba de la dirección hidráulica:• Nunca mantenga el volante de la dirección muy a la derecha ni muy a
la izquierda por más de algunos segundos cuando el motor estéfuncionando.
• No haga funcionar el vehículo con un nivel de líquido de bomba de ladirección hidráulica por debajo de la marca MIN en el depósito.
Si el sistema de dirección hidráulica falla (o si el motor se apaga), ustedpuede dirigir el vehículo en forma manual; sin embargo, esto exige unmayor esfuerzo.Si la dirección se desvía o se pone dura, revise si hay:• Llantas desinfladas en una o más ruedas• Carga dispareja del vehículo
• Una comba en medio del camino
• Vientos fuertes de costado
• Ruedas mal alineadas
• Componentes de la suspensión sueltos o desgastados
Dirección sensible a la velocidadSu vehículo tiene instalada una dirección hidráulica de asistencia variabley sensible a la velocidad. A velocidades bajas, la asistencia de ladirección se ajustará para disminuir el esfuerzo y mejorar lamaniobrabilidad a baja velocidad y a excesos de velocidad, la asistenciase ajustará para aumentar la sensación de la dirección.
Si la cantidad de esfuerzo necesaria para manejar su vehículo cambia alconducir a una velocidad constante, haga que el distribuidor autorizadorevise el sistema de la dirección hidráulica.
SISTEMA DE SUSPENSIÓN DE AIREEl sistema de suspensión de aire está diseñado para mejorar lacomodidad de marcha, el manejo vehicular y el rendimiento general delvehículo, ajustando la altura de marcha del vehículo de acuerdo con lavelocidad de éste, el peso que se le ha agregado o quitado y elfuncionamiento de la tracción en las cuatro ruedas (si está instalada). Laoperación normal del vehículo no exige ninguna acción de parte delconductor.
Cuando ingresa al vehículo y el encendido está apagado, la suspensión deaire bajará automáticamente el vehículo hasta su menor altura paraproporcionar una entrada más fácil. Cada vez que se abre una puerta o la
2006 Navigator (nav)Owners Guide (post-2002-fmt)USA (fus)
Manejo
304
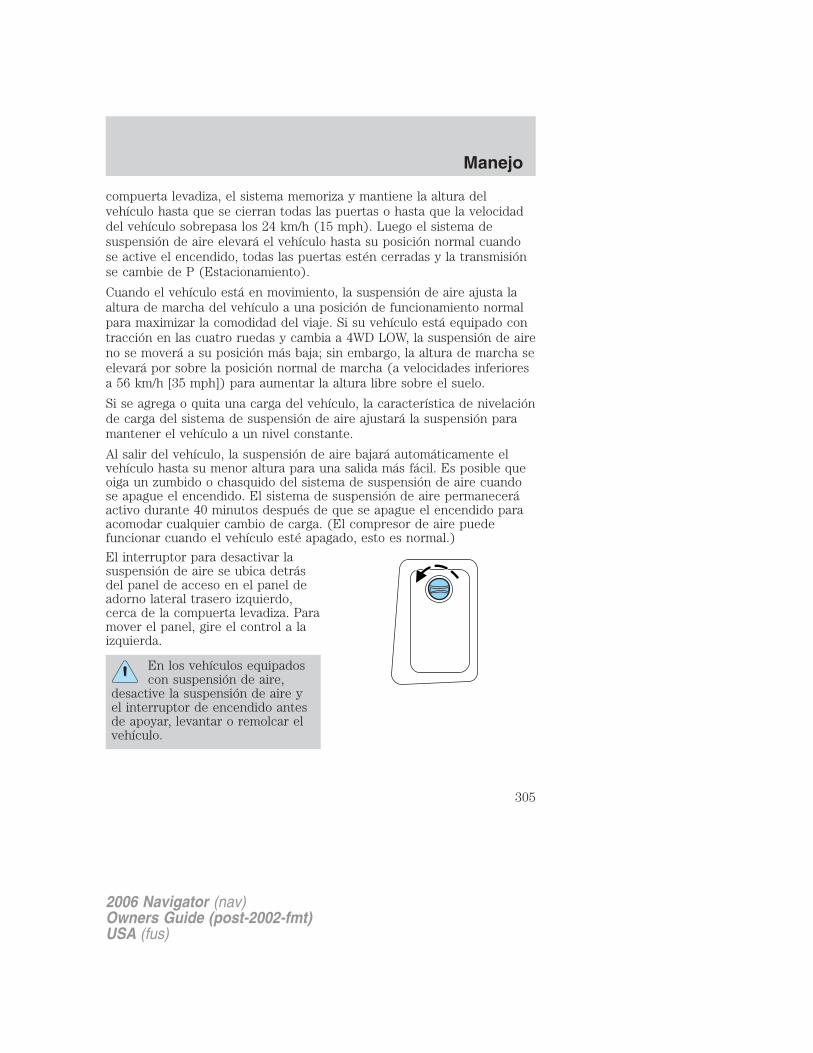
compuerta levadiza, el sistema memoriza y mantiene la altura delvehículo hasta que se cierran todas las puertas o hasta que la velocidaddel vehículo sobrepasa los 24 km/h (15 mph). Luego el sistema desuspensión de aire elevará el vehículo hasta su posición normal cuandose active el encendido, todas las puertas estén cerradas y la transmisiónse cambie de P (Estacionamiento).
Cuando el vehículo está en movimiento, la suspensión de aire ajusta laaltura de marcha del vehículo a una posición de funcionamiento normalpara maximizar la comodidad del viaje. Si su vehículo está equipado contracción en las cuatro ruedas y cambia a 4WD LOW, la suspensión de aireno se moverá a su posición más baja; sin embargo, la altura de marcha seelevará por sobre la posición normal de marcha (a velocidades inferioresa 56 km/h [35 mph]) para aumentar la altura libre sobre el suelo.
Si se agrega o quita una carga del vehículo, la característica de nivelaciónde carga del sistema de suspensión de aire ajustará la suspensión paramantener el vehículo a un nivel constante.
Al salir del vehículo, la suspensión de aire bajará automáticamente elvehículo hasta su menor altura para una salida más fácil. Es posible queoiga un zumbido o chasquido del sistema de suspensión de aire cuandose apague el encendido. El sistema de suspensión de aire permaneceráactivo durante 40 minutos después de que se apague el encendido paraacomodar cualquier cambio de carga. (El compresor de aire puedefuncionar cuando el vehículo esté apagado, esto es normal.)
El interruptor para desactivar lasuspensión de aire se ubica detrásdel panel de acceso en el panel deadorno lateral trasero izquierdo,cerca de la compuerta levadiza. Paramover el panel, gire el control a laizquierda.
En los vehículos equipadoscon suspensión de aire,
desactive la suspensión de aire yel interruptor de encendido antesde apoyar, levantar o remolcar elvehículo.
2006 Navigator (nav)Owners Guide (post-2002-fmt)USA (fus)
Manejo
305
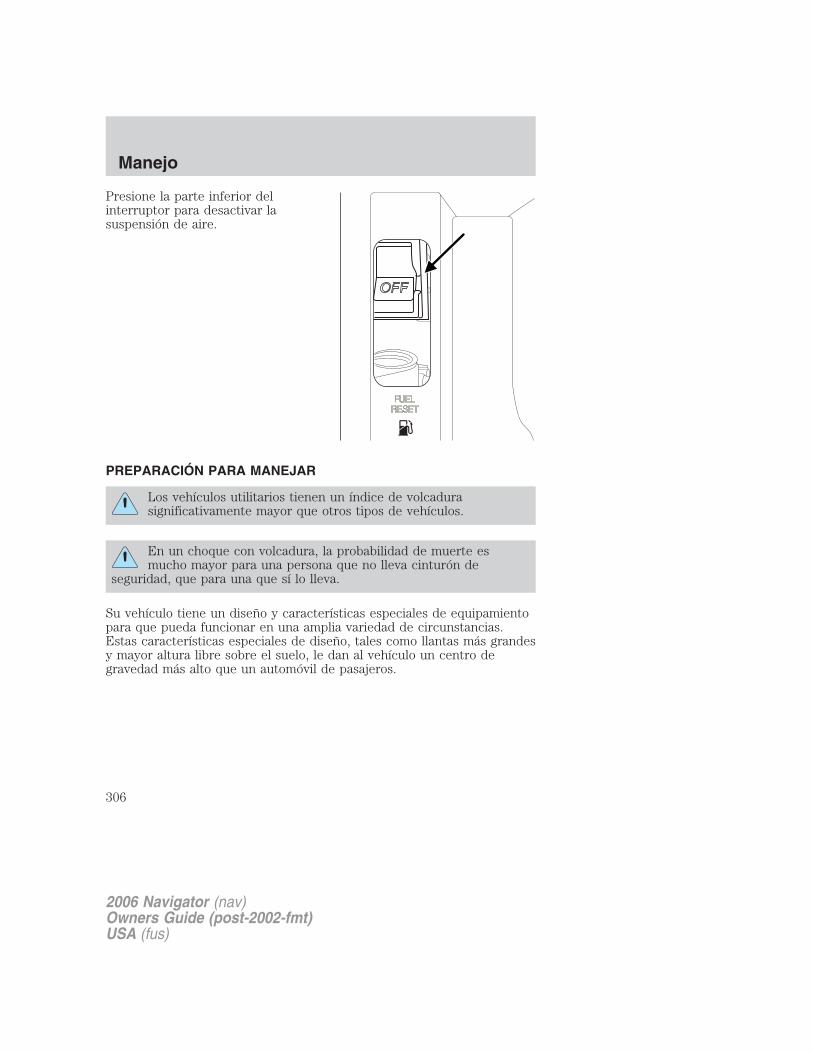
Presione la parte inferior delinterruptor para desactivar lasuspensión de aire.
PREPARACIÓN PARA MANEJAR
Los vehículos utilitarios tienen un índice de volcadurasignificativamente mayor que otros tipos de vehículos.
En un choque con volcadura, la probabilidad de muerte esmucho mayor para una persona que no lleva cinturón de
seguridad, que para una que sí lo lleva.
Su vehículo tiene un diseño y características especiales de equipamientopara que pueda funcionar en una amplia variedad de circunstancias.Estas características especiales de diseño, tales como llantas más grandesy mayor altura libre sobre el suelo, le dan al vehículo un centro degravedad más alto que un automóvil de pasajeros.
2006 Navigator (nav)Owners Guide (post-2002-fmt)USA (fus)
Manejo
306

Los vehículos con un centro de gravedad más alto, como losutilitarios y los vehículos con tracción en las cuatro ruedas, se
maniobran distinto a los vehículos con un centro de gravedad más bajo.Los vehículos utilitarios y los que cuentan con tracción en las cuatroruedas no están diseñados para efectuar curvas a velocidades tan altascomo los automóviles de pasajeros, así como tampoco los vehículosdeportivos bajos, están diseñados para desempeñarsesatisfactoriamente en condiciones a campo traviesa. Evite vueltascerradas, exceso de velocidad y maniobras bruscas en estos vehículos.No conducir con cuidado puede aumentar el riesgo de pérdida decontrol del vehículo, volcaduras, lesiones personales y muerte.
Los vehículos cargados, con un centro de gravedad más alto,pueden maniobrarse distinto de los vehículos no cargados. Al
manejar un vehículo demasiado cargado se deben tomar mayoresprecauciones, tales como manejar a velocidades más bajas y manteneruna mayor distancia de frenado.
Su vehículo tiene la capacidad de transportar más carga y personas quela mayoría de los automóviles de pasajeros. Dependiendo del tipo yubicación de la carga, el transporte de pasajeros y de carga puede elevarel centro de gravedad del vehículo.
Mientras se familiariza con el vehículo, tome mayores precauciones. Sepacuáles son sus capacidades y limitaciones como conductor y las delvehículo.
FUNCIONAMIENTO DE LA TRANSMISIÓN AUTOMÁTICA
Interbloqueo del cambio de velocidades y frenoEste vehículo cuenta con un bloqueo de palanca de cambio develocidades mediante el freno, que impide que la palanca de cambio develocidades se mueva de P (Estacionamiento) cuando el encendido estáen la posición ON (Encendido), a menos que se oprima el pedal delfreno.
Si no puede sacar la palanca de cambio de P (Estacionamiento) con elencendido en la posición ON y el pedal de freno presionado, es posibleque se haya quemado un fusible o que las luces de freno del vehículo noestén funcionando correctamente. Consulte Fusibles y relevadores en elcapítulo Emergencias en el camino.
2006 Navigator (nav)Owners Guide (post-2002-fmt)USA (fus)
Manejo
307
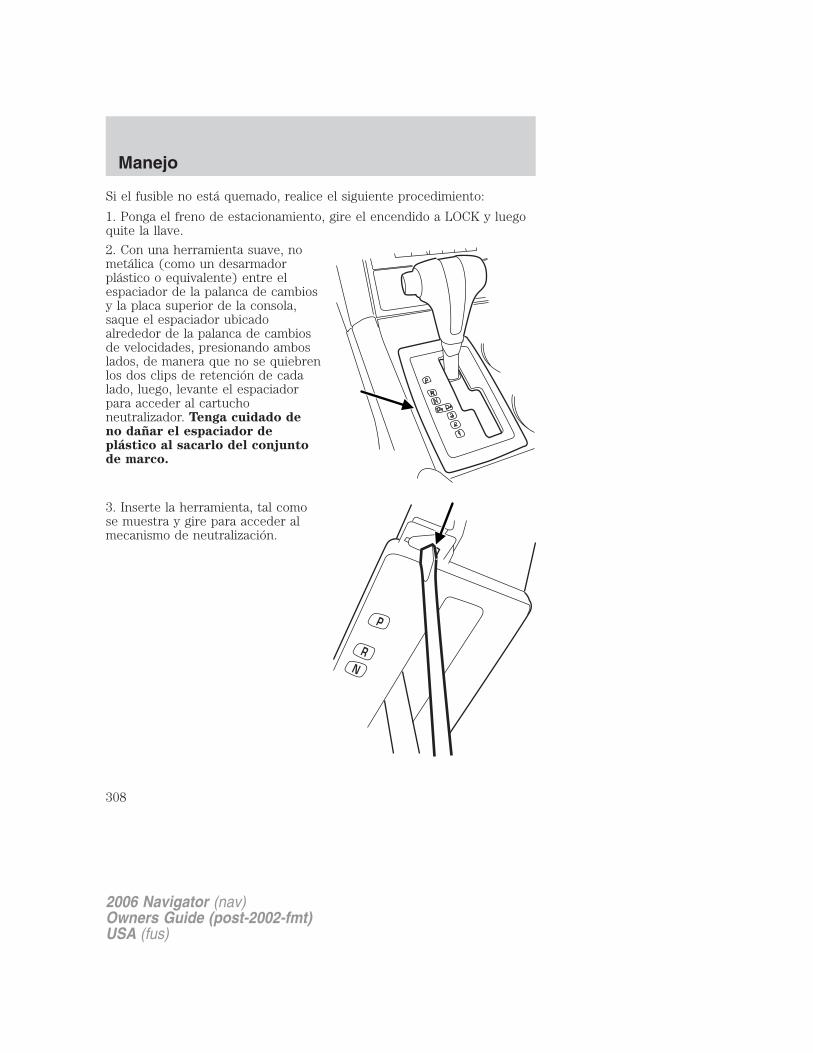
Si el fusible no está quemado, realice el siguiente procedimiento:
1. Ponga el freno de estacionamiento, gire el encendido a LOCK y luegoquite la llave.
2. Con una herramienta suave, nometálica (como un desarmadorplástico o equivalente) entre elespaciador de la palanca de cambiosy la placa superior de la consola,saque el espaciador ubicadoalrededor de la palanca de cambiosde velocidades, presionando amboslados, de manera que no se quiebrenlos dos clips de retención de cadalado, luego, levante el espaciadorpara acceder al cartuchoneutralizador. Tenga cuidado deno dañar el espaciador deplástico al sacarlo del conjuntode marco.
3. Inserte la herramienta, tal comose muestra y gire para acceder almecanismo de neutralización.
2006 Navigator (nav)Owners Guide (post-2002-fmt)USA (fus)
Manejo
308
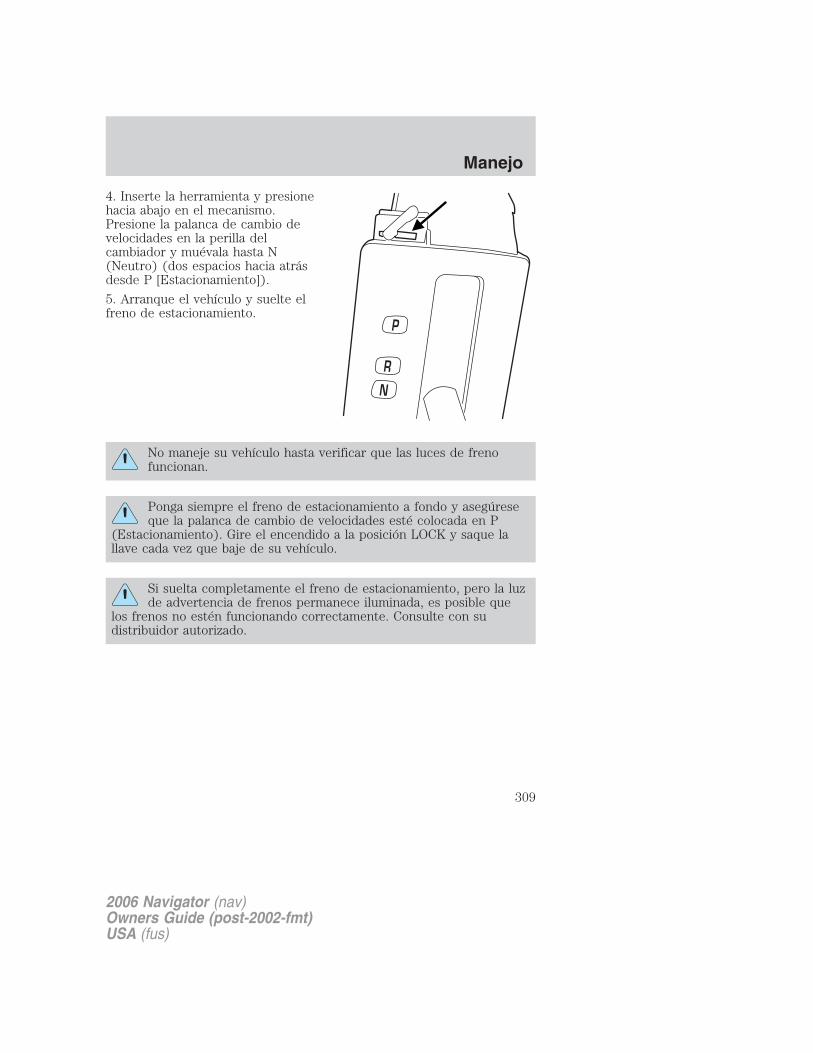
4. Inserte la herramienta y presionehacia abajo en el mecanismo.Presione la palanca de cambio develocidades en la perilla delcambiador y muévala hasta N(Neutro) (dos espacios hacia atrásdesde P [Estacionamiento]).
5. Arranque el vehículo y suelte elfreno de estacionamiento.
No maneje su vehículo hasta verificar que las luces de frenofuncionan.
Ponga siempre el freno de estacionamiento a fondo y asegúreseque la palanca de cambio de velocidades esté colocada en P
(Estacionamiento). Gire el encendido a la posición LOCK y saque lallave cada vez que baje de su vehículo.
Si suelta completamente el freno de estacionamiento, pero la luzde advertencia de frenos permanece iluminada, es posible que
los frenos no estén funcionando correctamente. Consulte con sudistribuidor autorizado.
2006 Navigator (nav)Owners Guide (post-2002-fmt)USA (fus)
Manejo
309
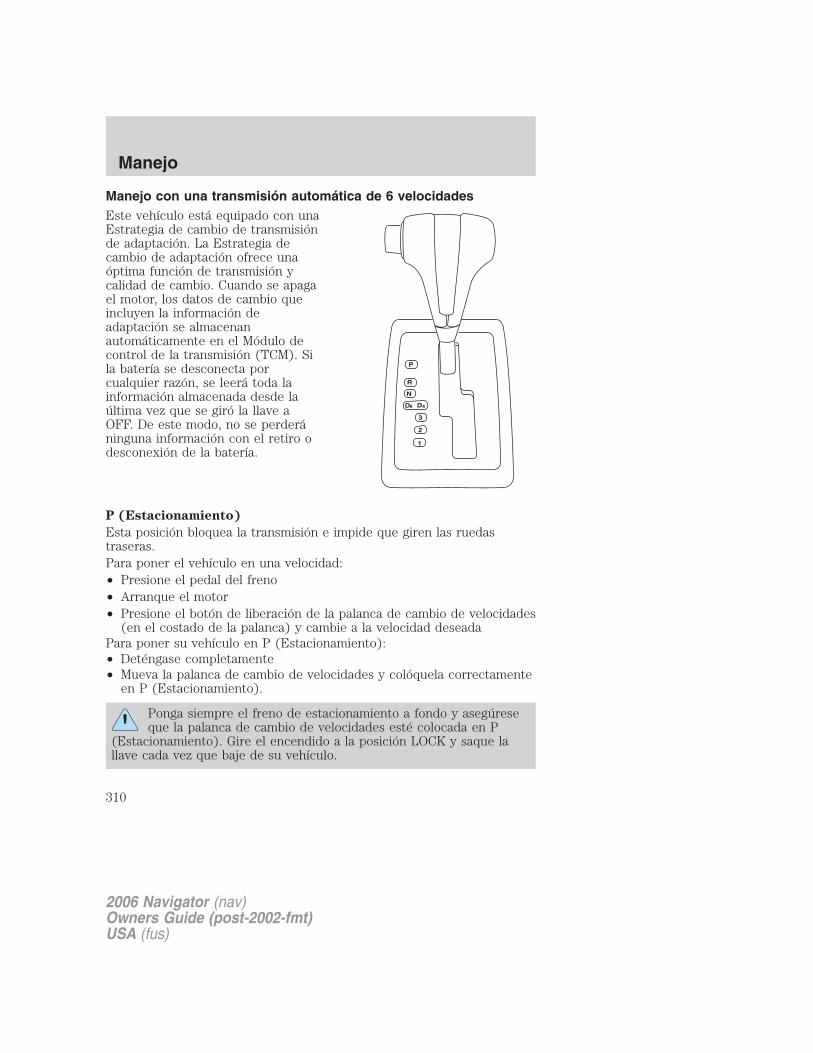
Manejo con una transmisión automática de 6 velocidadesEste vehículo está equipado con unaEstrategia de cambio de transmisiónde adaptación. La Estrategia decambio de adaptación ofrece unaóptima función de transmisión ycalidad de cambio. Cuando se apagael motor, los datos de cambio queincluyen la información deadaptación se almacenanautomáticamente en el Módulo decontrol de la transmisión (TCM). Sila batería se desconecta porcualquier razón, se leerá toda lainformación almacenada desde laúltima vez que se giró la llave aOFF. De este modo, no se perderáninguna información con el retiro odesconexión de la batería.
P (Estacionamiento)
Esta posición bloquea la transmisión e impide que giren las ruedastraseras.Para poner el vehículo en una velocidad:• Presione el pedal del freno• Arranque el motor• Presione el botón de liberación de la palanca de cambio de velocidades
(en el costado de la palanca) y cambie a la velocidad deseadaPara poner su vehículo en P (Estacionamiento):• Deténgase completamente• Mueva la palanca de cambio de velocidades y colóquela correctamente
en P (Estacionamiento).
Ponga siempre el freno de estacionamiento a fondo y asegúreseque la palanca de cambio de velocidades esté colocada en P
(Estacionamiento). Gire el encendido a la posición LOCK y saque lallave cada vez que baje de su vehículo.
2006 Navigator (nav)Owners Guide (post-2002-fmt)USA (fus)
Manejo
310
R (Reversa)
Con la palanca de cambio de velocidades en R (Reversa), el vehículo semueve hacia atrás. Siempre detenga completamente el vehículo antes decambiar hacia y desde R (Reversa).
N (Neutro)
Con la palanca de cambio de velocidades en N (Neutro), el vehículopuede arrancar y desplazarse libremente. Mantenga presionado el pedaldel freno mientras está en esta posición.
D6 (Directa, 6ta velocidad)
La posición normal de conducción para el mejor ahorro de combustible.La transmisión funciona en las velocidades primera a sexta excepto en4L donde opera en velocidades de segunda a sexta.
D4 (Directa, 4ta velocidad)
La transmisión funciona en las velocidades primera a cuarta, excepto en4L donde opera en velocidades segunda a sexta.
Esta posición:
• Permite todas las velocidades hacia adelante, 1 a 4; 5ta y 6ta velocidadno están disponibles.
• Proporciona frenado del motor.
• Úselo cuando las condiciones de manejo provoquen un cambioexcesivo de D6 a otras velocidades. Ejemplos: tráfico de ciudad,terreno montañoso, caminos pesados, arrastre de remolque y cuandose requiera frenado del motor.
• La selección de D4 a velocidades mayores provocará que latransmisión efectúe un cambio descendente a la cuarta velocidad.
• Se permite la realización de cambios ascendentes a 5ta y 6tavelocidad, moviendo la palanca de cambio de velocidades a D6.
3 (Tercera)
La transmisión sólo funciona en tercera.
Se usa para mejorar la tracción en caminos resbalosos. Al seleccionar 3(Tercera) se obtiene frenado del motor.
Para volver a D6 o D4, mueva la palanca de cambio de velocidades de latransmisión a la posición D6 o D4.
2006 Navigator (nav)Owners Guide (post-2002-fmt)USA (fus)
Manejo
311
2 (Segunda)
La transmisión sólo funciona en 2da.
Use 2 (Segunda) para arrancar en caminos resbalosos o paraproporcionar frenado adicional del motor al bajar pendientes.
Para volver a D6, D4 ó 3 (Tercera), mueva la palanca de cambios de latransmisión a la posición D6, D4 ó 3 (Tercera).
1 (Primera)
• La transmisión sólo funciona en 1ra.
• Suministra frenado máximo del motor.
• Permite cambios ascendentes con el movimiento de la palanca decambio de velocidades.
• No efectúa un cambio descendente a 1 (Primera) a exceso develocidad; permite 1 (Primera) cuando el vehículo alcanza velocidadesmenores.
Cambios descendentes forzados
• Sólo se permite en D6 (Directa, 6ta velocidad) o D4 (Directa, 4tavelocidad).
• Presione el acelerador hasta el piso.
• Permite que la transmisión seleccione una velocidad adecuada.
Si su vehículo se atasca en el lodo o la nieveSi su vehículo queda atascado en lodo o nieve, es posible balancearlopara sacarlo cambiando entre velocidades de avance y reversa y haciendouna pausa entre cambios con un patrón constante. Presione levemente elacelerador en cada velocidad.
No balancee el vehículo si el motor no está a la temperatura defuncionamiento normal, de lo contrario, es posible que se dañe latransmisión.
No balancee el vehículo por más de un minuto, de lo contrario, esposible que se dañen la transmisión y las llantas o bien, sesobrecaliente el motor.
Si su vehículo posee AdvanceTrac� con RSC, puede ser beneficiosodesactivar el sistema de modo que las ruedas puedan girar.
2006 Navigator (nav)Owners Guide (post-2002-fmt)USA (fus)
Manejo
312
SISTEMA AUXILIAR EXTENDIDO PARA ESTACIONAMIENTO ENREVERSA
El sistema auxiliar extendido para estacionamiento en reversa activa unsonido para advertir al conductor que hay obstáculos cerca de la defensatrasera cuando se selecciona la posición R (Reversa).
Para evitar lesiones personales, lea y entienda las limitacionesdel sistema auxiliar extendido para estacionamiento en reversa
incluidas en esta sección. La asistencia en reversa sólo ayuda en elcaso de algunos objetos (generalmente grandes y fijos) al desplazarseen reversa en una superficie plana a “velocidades de estacionamiento”.Las condiciones climáticas adversas también pueden afectar elfuncionamiento del sistema; esto puede incluir una disminución delrendimiento o activaciones falsas.
Para prevenir lesiones personales, tenga siempre precaución alestar en R (Reversa) y cuando use el sistema auxiliar extendido
para estacionamiento en reversa.
Este sistema no está diseñado para evitar el contacto con objetospequeños o en movimiento. Por el contrario, está diseñado para
proporcionar una advertencia que ayude al conductor a detectarobjetos y evite dañar el vehículo. Es posible que el sistema no detecteobjetos más pequeños, especialmente aquellos que estén cerca delsuelo.
Ciertos dispositivos adicionales, como enganches de remolquegrandes, parrillas para bicicletas o tablas de surf y todo
dispositivo que pueda bloquear la zona de detección normal del sistemaRSS puede generar pitidos falsos.
El sistema ayudará al conductor a detectar algunos objetos mientras elvehículo se mueve lentamente en reversa a velocidades inferiores a10 km/h (6 mph). Éste no es efectivo a velocidades mayores que10 km/h (6 mph) y puede no detectar algunos objetos angulares o enmovimiento.
2006 Navigator (nav)Owners Guide (post-2002-fmt)USA (fus)
Manejo
313
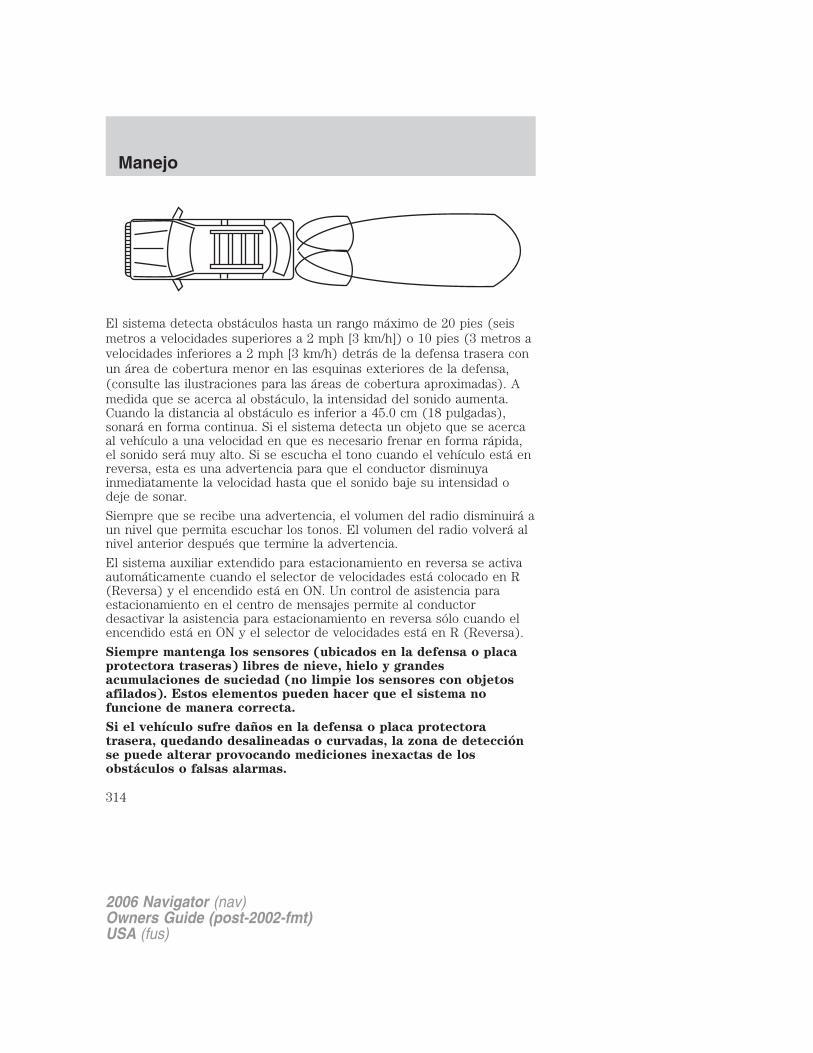
El sistema detecta obstáculos hasta un rango máximo de 20 pies (seismetros a velocidades superiores a 2 mph [3 km/h]) o 10 pies (3 metros avelocidades inferiores a 2 mph [3 km/h) detrás de la defensa trasera conun área de cobertura menor en las esquinas exteriores de la defensa,(consulte las ilustraciones para las áreas de cobertura aproximadas). Amedida que se acerca al obstáculo, la intensidad del sonido aumenta.Cuando la distancia al obstáculo es inferior a 45.0 cm (18 pulgadas),sonará en forma continua. Si el sistema detecta un objeto que se acercaal vehículo a una velocidad en que es necesario frenar en forma rápida,el sonido será muy alto. Si se escucha el tono cuando el vehículo está enreversa, esta es una advertencia para que el conductor disminuyainmediatamente la velocidad hasta que el sonido baje su intensidad odeje de sonar.
Siempre que se recibe una advertencia, el volumen del radio disminuirá aun nivel que permita escuchar los tonos. El volumen del radio volverá alnivel anterior después que termine la advertencia.
El sistema auxiliar extendido para estacionamiento en reversa se activaautomáticamente cuando el selector de velocidades está colocado en R(Reversa) y el encendido está en ON. Un control de asistencia paraestacionamiento en el centro de mensajes permite al conductordesactivar la asistencia para estacionamiento en reversa sólo cuando elencendido está en ON y el selector de velocidades está en R (Reversa).
Siempre mantenga los sensores (ubicados en la defensa o placaprotectora traseras) libres de nieve, hielo y grandesacumulaciones de suciedad (no limpie los sensores con objetosafilados). Estos elementos pueden hacer que el sistema nofuncione de manera correcta.
Si el vehículo sufre daños en la defensa o placa protectoratrasera, quedando desalineadas o curvadas, la zona de detecciónse puede alterar provocando mediciones inexactas de losobstáculos o falsas alarmas.
2006 Navigator (nav)Owners Guide (post-2002-fmt)USA (fus)
Manejo
314
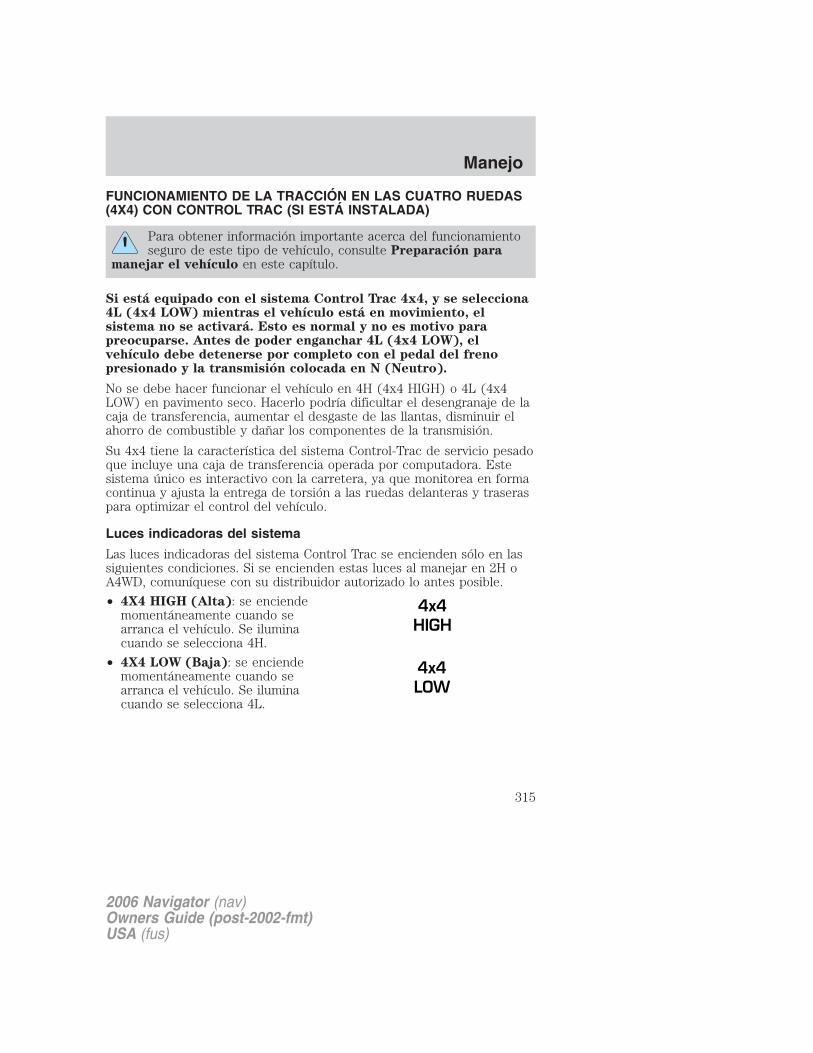
FUNCIONAMIENTO DE LA TRACCIÓN EN LAS CUATRO RUEDAS(4X4) CON CONTROL TRAC (SI ESTÁ INSTALADA)
Para obtener información importante acerca del funcionamientoseguro de este tipo de vehículo, consulte Preparación para
manejar el vehículo en este capítulo.
Si está equipado con el sistema Control Trac 4x4, y se selecciona4L (4x4 LOW) mientras el vehículo está en movimiento, elsistema no se activará. Esto es normal y no es motivo parapreocuparse. Antes de poder enganchar 4L (4x4 LOW), elvehículo debe detenerse por completo con el pedal del frenopresionado y la transmisión colocada en N (Neutro).
No se debe hacer funcionar el vehículo en 4H (4x4 HIGH) o 4L (4x4LOW) en pavimento seco. Hacerlo podría dificultar el desengranaje de lacaja de transferencia, aumentar el desgaste de las llantas, disminuir elahorro de combustible y dañar los componentes de la transmisión.
Su 4x4 tiene la característica del sistema Control-Trac de servicio pesadoque incluye una caja de transferencia operada por computadora. Estesistema único es interactivo con la carretera, ya que monitorea en formacontinua y ajusta la entrega de torsión a las ruedas delanteras y traseraspara optimizar el control del vehículo.
Luces indicadoras del sistema
Las luces indicadoras del sistema Control Trac se encienden sólo en lassiguientes condiciones. Si se encienden estas luces al manejar en 2H oA4WD, comuníquese con su distribuidor autorizado lo antes posible.
• 4X4 HIGH (Alta): se enciendemomentáneamente cuando searranca el vehículo. Se iluminacuando se selecciona 4H.
• 4X4 LOW (Baja): se enciendemomentáneamente cuando searranca el vehículo. Se iluminacuando se selecciona 4L.
4x4HIGH
4x4LOW
2006 Navigator (nav)Owners Guide (post-2002-fmt)USA (fus)
Manejo
315

Posiciones del sistema Control Trac (Control de tracción)El sistema Control Trac funciona encuatro modos:
• 2H (2WD HIGH) suministrapotencia sólo a las ruedastraseras. Esto es adecuado paraun manejo en carretera sobrepavimento seco.
• La posición A4WD (4X4 AUTO)entrega tracción a las cuatroruedas con control electrónicocon potencia a las cuatro ruedas, como se requiere para una tracciónmejorada. Esto es adecuado para todas las condiciones de manejo encarretera, tales como superficies secas, pavimento mojado, nieve ograva.
• 4H (4X4 HIGH) entrega potencia de tracción de las cuatro ruedasbloqueadas mecánicamente a las ruedas delanteras y traseras. Cuandose selecciona esta posición, se encenderá la luz “4X4 HIGH” en elgrupo de instrumentos. Sin embargo, esta posición no se recomiendapara uso en pavimento seco. Ésta sólo es para condiciones de campotraviesa o climáticas adversas, como nieve profunda, hielo o arenaprofunda.
• 4L (4X4 LOW) proporciona tracción en las cuatro ruedas bloqueadasmecánicamente cuando se requiere una potencia superior avelocidades reducidas. Cuando se selecciona esta posición, seencenderá la luz “4X4 LOW” en el grupo de instrumentos. Sinembargo, esta posición no se recomienda para uso en pavimento seco.El uso de esta posición para un funcionamiento a baja velocidad acampo traviesa o cuando se requiere una potencia adicional, comosubir pendientes pronunciadas, pasar por arena profunda o sacar unbote del agua.
Nota: si su vehículo posee AdvanceTrac� con RSC, dicho sistemadesactivará automáticamente la característica de aumento de estabilidadcuando cambie el sistema Control Trac A4WD a 4L (4X4 LOW). Lacaracterística de aumento de tracción de frenado seguirá activada.
El sistema de aumento de la estabilidad AdvanceTrac� con RSC sepuede desactivar manualmente presionando el botón AdvanceTrac� conRSC (consulte Sistema de aumento de la estabilidad AdvanceTrac�con Control de estabilidad de balanceo (RSC) en este capítulo)mientras funciona en 2H, A4WD o 4H al manejar en arena o nieve muy
2006 Navigator (nav)Owners Guide (post-2002-fmt)USA (fus)
Manejo
316
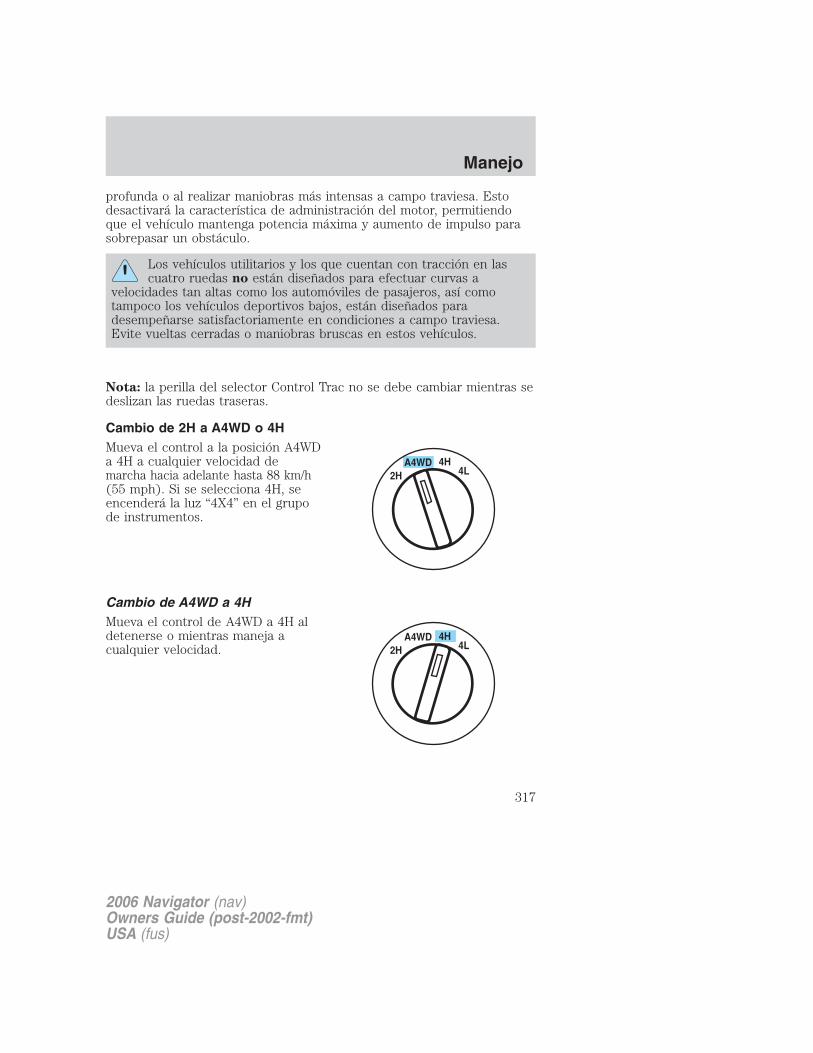
profunda o al realizar maniobras más intensas a campo traviesa. Estodesactivará la característica de administración del motor, permitiendoque el vehículo mantenga potencia máxima y aumento de impulso parasobrepasar un obstáculo.
Los vehículos utilitarios y los que cuentan con tracción en lascuatro ruedas no están diseñados para efectuar curvas a
velocidades tan altas como los automóviles de pasajeros, así comotampoco los vehículos deportivos bajos, están diseñados paradesempeñarse satisfactoriamente en condiciones a campo traviesa.Evite vueltas cerradas o maniobras bruscas en estos vehículos.
Nota: la perilla del selector Control Trac no se debe cambiar mientras sedeslizan las ruedas traseras.
Cambio de 2H a A4WD o 4HMueva el control a la posición A4WDa 4H a cualquier velocidad demarcha hacia adelante hasta 88 km/h(55 mph). Si se selecciona 4H, seencenderá la luz “4X4” en el grupode instrumentos.
Cambio de A4WD a 4HMueva el control de A4WD a 4H aldetenerse o mientras maneja acualquier velocidad.
2006 Navigator (nav)Owners Guide (post-2002-fmt)USA (fus)
Manejo
317

Cambio de 2H, A4WD o 4H a 4L1. Detenga el vehículo y mantengael pedal del freno presionado.
2. Ponga la palanca de cambio develocidades en N (Neutro).
3. Mueva el control a la posición 4L.
Si no se cumple alguna de las condiciones de cambio anteriores, elcentro de mensajes mostrará la información correspondiente.Nota: es posible que se escuchen algunos ruidos mientras el sistemarealiza el cambio o engrana.
Cambio de 4L a 4H, A4WD o 2H1. Detenga el vehículo y mantengael pedal del freno presionado.
2. Ponga la palanca de cambio develocidades en N (Neutro).
3. Mueva el control a la posición 4H,A4WD o 2H.
Si no se cumple alguna de lascondiciones de cambio anteriores, elcentro de mensajes mostrará lainformación correspondiente.
Nota: es posible que se escuchen algunos ruidos mientras el sistemarealiza el cambio o engrana.
Manejo a campo traviesa con camioneta y vehículos utilitariosLos vehículos con tracción en las cuatro ruedas están especialmenteequipados para manejo en arena, nieve, lodo y terreno irregular y tienencaracterísticas de funcionamiento distintas a las de los vehículosconvencionales, tanto en carretera como a campo traviesa.
El sistema de aumento de la estabilidad AdvanceTrac� con RSC sepuede desactivar manualmente presionando el botón AdvanceTrac� conRSC (consulte Sistema de aumento de la estabilidad AdvanceTrac�con Control de estabilidad de balanceo (RSC) en este capítulo)
2006 Navigator (nav)Owners Guide (post-2002-fmt)USA (fus)
Manejo
318
mientras funciona en 2H, A4WD o 4H al manejar en arena o nieve muyprofunda o al realizar maniobras más intensas a campo traviesa. Estodesactivará la característica de administración del motor, permitiendoque el vehículo mantenga potencia máxima y aumento de impulso parasobrepasar un obstáculo.
Cómo se diferencia su vehículo de los demásLas camionetas y los vehículos utilitarios pueden ser diferentes de otrosvehículos. Es posible que su vehículo sea más alto para permitir viajar enterreno irregular sin que cuelguen o se dañen componentes de la parteinferior de la carrocería.Las diferencias que hacen que su vehículo sea tan versátil también hacenque se maneje en forma diferente a otros vehículos comunes depasajeros.Mantenga el control del volante de la dirección en todo momento,especialmente en terreno irregular. Dado que los cambios repentinos enel terreno pueden producir un movimiento abrupto del volante de ladirección, asegúrese de sujetarlo desde la parte exterior. No lo sujete delos rayos.
Maneje cuidadosamente para evitar que el vehículo se dañe con objetosocultos tales como rocas y troncos.
Es recomendable conocer el terreno o examinar mapas del área antes demanejar. Trace su ruta antes de manejar en el área. Para mantener elcontrol de la dirección y el frenado de su vehículo, debe tener todas lasruedas en el suelo rodando y no deslizándose o girando velozmente.
Principios de funcionamiento básicos• No utilice 4H (4x4 HIGH) o 4L (4x4 LOW) en carreteras de superficie
seca y dura. Esto podría dañar la transmisión y los ejes.
• Maneje más lento con vientos de costado fuertes que podrían afectarlas características normales de dirección de su vehículo.
• Tenga mucho cuidado cuando maneje sobre pavimento resbaloso acausa de arena suelta, agua, grava, nieve o hielo.
Si su vehículo se sale del camino• Si su vehículo se sale del camino, disminuya la velocidad, pero evite
aplicar demasiado el freno. Vuelva a entrar al camino sólo después deque haya disminuido la velocidad. No gire el volante de la direccióncon demasiada brusquedad cuando vuelva al pavimento.
• Puede ser más seguro permanecer en la explanada o en elacotamiento y disminuir en forma gradual la velocidad antes de volver
2006 Navigator (nav)Owners Guide (post-2002-fmt)USA (fus)
Manejo
319
al pavimento. Puede perder el control si no disminuye la velocidad, sigira demasiado el volante de la dirección o lo hace en forma abrupta.
• A menudo, puede ser menos riesgoso golpear pequeños objetos, comoreflectores de carreteras, que ocasionarían daños menores a suvehículo, que intentar volver repentinamente al pavimento, ya queesto puede hacer que el vehículo resbale hacia los lados y pierda elcontrol o se vuelque. Recuerde, su seguridad y la de otros debe ser suprincipal preocupación.
Los vehículos con un centro de gravedad más alto, como losutilitarios y los vehículos con tracción en las cuatro ruedas, se
maniobran distinto a los vehículos con un centro de gravedad más bajo.Los vehículos utilitarios y los que cuentan con tracción en las cuatroruedas no están diseñados para efectuar curvas a velocidades tan altascomo los automóviles de pasajeros, así como tampoco los vehículosdeportivos bajos, están diseñados para desempeñarsesatisfactoriamente en condiciones a campo traviesa. Evite vueltascerradas, exceso de velocidad y maniobras bruscas en estos vehículos.No conducir con cuidado puede aumentar el riesgo de pérdida decontrol del vehículo, volcaduras, lesiones personales y muerte.
Si el vehículo queda atascado
Si su vehículo queda atascado en lodo o nieve, es posible balancearlopara sacarlo cambiando entre velocidades de avance y reversa y haciendouna pausa entre cambios con un patrón constante. Presione levemente elacelerador en cada velocidad.
No balancee el vehículo si el motor no está a la temperatura de
funcionamiento normal, de lo contrario, es posible que se dañe la
transmisión.
No balancee el vehículo por más de unos minutos; de lo contrario,
es posible que se dañen la transmisión y las llantas o sesobrecaliente el motor.
Ponga siempre el freno de estacionamiento a fondo y asegúreseque la palanca de cambio de velocidades esté colocada en P
(Estacionamiento). Gire el encendido a la posición LOCK y saque lallave cada vez que baje de su vehículo.
2006 Navigator (nav)Owners Guide (post-2002-fmt)USA (fus)
Manejo
320
Si suelta completamente el freno de estacionamiento, pero la luzde advertencia de frenos permanece iluminada, es posible que
los frenos no estén funcionando correctamente. Consulte con sudistribuidor autorizado.
No gire las ruedas a más de 56 km/h (35 mph). Las llantaspueden fallar y lesionar a un pasajero o a un observador.
Maniobras de emergencia
• En una situación de emergencia inevitable en que se tiene que hacerun viraje brusco, recuerde evitar “la sobremarcha” de su vehículo, esdecir, gire el volante de la dirección sólo a la rapidez y cantidadnecesarias para evitar la emergencia. La dirección excesiva resultaráen un menor control del vehículo, no en más. Además, las variacionesleves de la presión del pedal del acelerador o del freno se debenutilizar si se requieren cambios en la velocidad del vehículo. Evitemaniobras, aceleraciones o frenados abruptos que pueden aumentar elriesgo de pérdida de control del vehículo, volcaduras y lesionespersonales. Use todas las superficies de carretera disponibles paradevolver el vehículo a una dirección segura de viaje.
• En caso de una detención por emergencia, evite derrapar las llantas yno intente ningún movimiento brusco del volante de la dirección.
Los vehículos con un centro de gravedad más alto, como losutilitarios y los vehículos con tracción en las cuatro ruedas, se
maniobran distinto a los vehículos con un centro de gravedad más bajo.Los vehículos utilitarios y los que cuentan con tracción en las cuatroruedas no están diseñados para efectuar curvas a velocidades tan altascomo los automóviles de pasajeros, así como tampoco los vehículosdeportivos bajos, están diseñados para desempeñarsesatisfactoriamente en condiciones a campo traviesa. Evite vueltascerradas, exceso de velocidad y maniobras bruscas en estos vehículos.No conducir con cuidado puede aumentar el riesgo de pérdida decontrol del vehículo, volcaduras, lesiones personales y muerte.
• Si el vehículo pasa de una superficie a otra (es decir, de concreto agrava), habrá un cambio en la forma en que el vehículo respondefrente a una maniobra (dirección, aceleración o frenado). Nuevamente,evite estas acciones abruptas.
2006 Navigator (nav)Owners Guide (post-2002-fmt)USA (fus)
Manejo
321

Sistema de tracción en las cuatro ruedas Control Trac(si está instalado)Cuando se selecciona el modo de tracción en las cuatro ruedas, elsistema Control Trac emplea las cuatro ruedas para dar potencia alvehículo. Esto aumenta la tracción y permite manejar sobre terrenos ycaminos en condiciones que los vehículos convencionales con tracción endos ruedas no pueden recorrer.
Se suministra potencia a las cuatroruedas a través de una caja detransferencia. En vehículos contracción en las cuatro ruedas, la cajade transferencia le permiteseleccionar esta tracción cuando esnecesario. En este capítulo, sepuede encontrar la informaciónacerca del funcionamiento de la caja de transferencia y losprocedimientos de cambio de velocidades. En el capítulo Mantenimientoy especificaciones se puede encontrar información sobre elmantenimiento de la caja de transferencia. Debe familiarizarsecompletamente con esta información antes de hacer funcionar suvehículo.
Características normalesEn algunos modelos con tracción en las cuatro ruedas, el cambio inicialde tracción de dos ruedas a cuatro ruedas mientras el vehículo está enmovimiento, puede causar sonidos metálicos momentáneos o sonidos detrinquete. Esto se debe a que el mecanismo de transmisión delanteroestá adquiriendo velocidad y está accionando las ruedas delanteras, porlo tanto, no hay que preocuparse.
ArenaAl manejar sobre arena, intente mantener las cuatro ruedas en el áreamás sólida del trayecto. Evite reducir las presiones de las llantas; perocambie a una velocidad inferior y maneje uniformemente por el terreno.Presione lentamente el acelerador y evite hacer patinar las ruedas.
Nota: si el vehículo está equipado con el Sistema de monitoreo depresión de las llantas (TPMS), la luz indicadora del sistema puedeencenderse, dependiendo de cuánto aire escape de las llantas o decuánto tiempo conduzca el vehículo en estas condiciones.
Evite el exceso de velocidad, porque el impulso que lleva el vehículopuede jugarle en contra y hacer que el vehículo se atasque, al punto que
2006 Navigator (nav)Owners Guide (post-2002-fmt)USA (fus)
Manejo
322
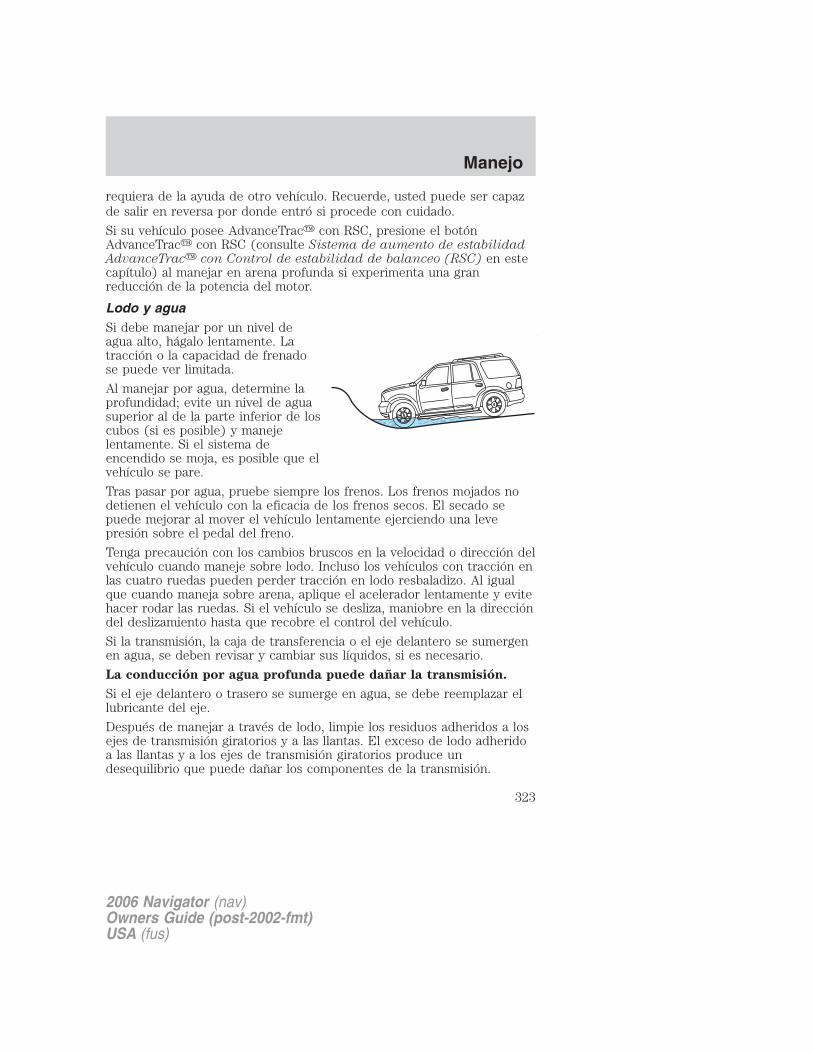
requiera de la ayuda de otro vehículo. Recuerde, usted puede ser capazde salir en reversa por donde entró si procede con cuidado.
Si su vehículo posee AdvanceTrac� con RSC, presione el botónAdvanceTrac� con RSC (consulte Sistema de aumento de estabilidadAdvanceTrac� con Control de estabilidad de balanceo (RSC) en estecapítulo) al manejar en arena profunda si experimenta una granreducción de la potencia del motor.
Lodo y aguaSi debe manejar por un nivel deagua alto, hágalo lentamente. Latracción o la capacidad de frenadose puede ver limitada.
Al manejar por agua, determine laprofundidad; evite un nivel de aguasuperior al de la parte inferior de loscubos (si es posible) y manejelentamente. Si el sistema deencendido se moja, es posible que elvehículo se pare.
Tras pasar por agua, pruebe siempre los frenos. Los frenos mojados nodetienen el vehículo con la eficacia de los frenos secos. El secado sepuede mejorar al mover el vehículo lentamente ejerciendo una levepresión sobre el pedal del freno.
Tenga precaución con los cambios bruscos en la velocidad o dirección delvehículo cuando maneje sobre lodo. Incluso los vehículos con tracción enlas cuatro ruedas pueden perder tracción en lodo resbaladizo. Al igualque cuando maneja sobre arena, aplique el acelerador lentamente y evitehacer rodar las ruedas. Si el vehículo se desliza, maniobre en la direccióndel deslizamiento hasta que recobre el control del vehículo.
Si la transmisión, la caja de transferencia o el eje delantero se sumergenen agua, se deben revisar y cambiar sus líquidos, si es necesario.
La conducción por agua profunda puede dañar la transmisión.
Si el eje delantero o trasero se sumerge en agua, se debe reemplazar ellubricante del eje.
Después de manejar a través de lodo, limpie los residuos adheridos a losejes de transmisión giratorios y a las llantas. El exceso de lodo adheridoa las llantas y a los ejes de transmisión giratorios produce undesequilibrio que puede dañar los componentes de la transmisión.
2006 Navigator (nav)Owners Guide (post-2002-fmt)USA (fus)
Manejo
323
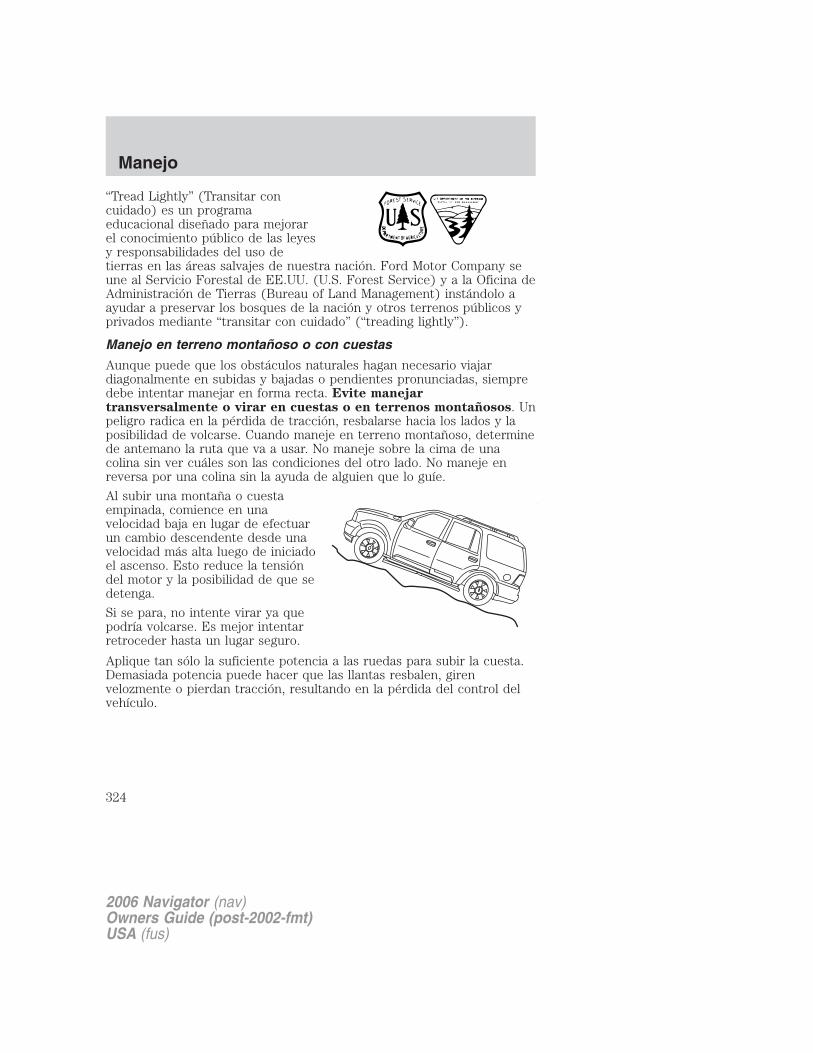
“Tread Lightly” (Transitar concuidado) es un programaeducacional diseñado para mejorarel conocimiento público de las leyesy responsabilidades del uso detierras en las áreas salvajes de nuestra nación. Ford Motor Company seune al Servicio Forestal de EE.UU. (U.S. Forest Service) y a la Oficina deAdministración de Tierras (Bureau of Land Management) instándolo aayudar a preservar los bosques de la nación y otros terrenos públicos yprivados mediante “transitar con cuidado” (“treading lightly”).
Manejo en terreno montañoso o con cuestas
Aunque puede que los obstáculos naturales hagan necesario viajardiagonalmente en subidas y bajadas o pendientes pronunciadas, siempredebe intentar manejar en forma recta. Evite manejartransversalmente o virar en cuestas o en terrenos montañosos. Unpeligro radica en la pérdida de tracción, resbalarse hacia los lados y laposibilidad de volcarse. Cuando maneje en terreno montañoso, determinede antemano la ruta que va a usar. No maneje sobre la cima de unacolina sin ver cuáles son las condiciones del otro lado. No maneje enreversa por una colina sin la ayuda de alguien que lo guíe.
Al subir una montaña o cuestaempinada, comience en unavelocidad baja en lugar de efectuarun cambio descendente desde unavelocidad más alta luego de iniciadoel ascenso. Esto reduce la tensióndel motor y la posibilidad de que sedetenga.
Si se para, no intente virar ya quepodría volcarse. Es mejor intentarretroceder hasta un lugar seguro.
Aplique tan sólo la suficiente potencia a las ruedas para subir la cuesta.Demasiada potencia puede hacer que las llantas resbalen, girenvelozmente o pierdan tracción, resultando en la pérdida del control delvehículo.
2006 Navigator (nav)Owners Guide (post-2002-fmt)USA (fus)
Manejo
324
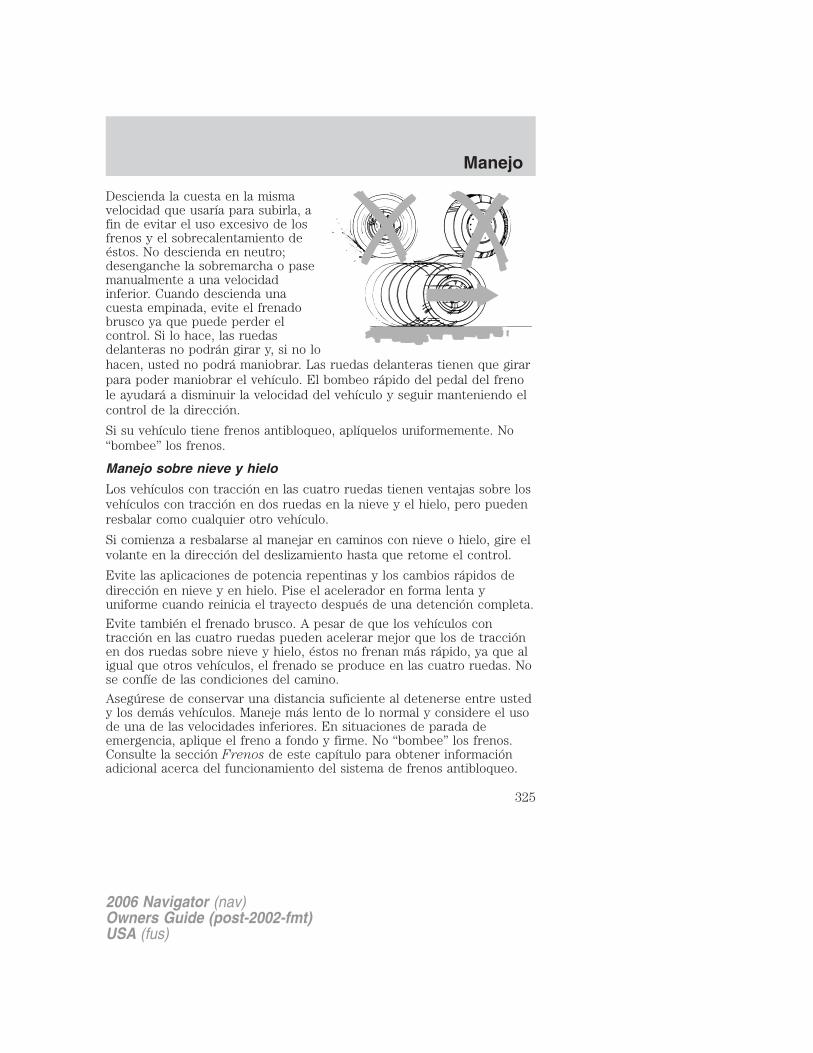
Descienda la cuesta en la mismavelocidad que usaría para subirla, afin de evitar el uso excesivo de losfrenos y el sobrecalentamiento deéstos. No descienda en neutro;desenganche la sobremarcha o pasemanualmente a una velocidadinferior. Cuando descienda unacuesta empinada, evite el frenadobrusco ya que puede perder elcontrol. Si lo hace, las ruedasdelanteras no podrán girar y, si no lohacen, usted no podrá maniobrar. Las ruedas delanteras tienen que girarpara poder maniobrar el vehículo. El bombeo rápido del pedal del frenole ayudará a disminuir la velocidad del vehículo y seguir manteniendo elcontrol de la dirección.
Si su vehículo tiene frenos antibloqueo, aplíquelos uniformemente. No“bombee” los frenos.
Manejo sobre nieve y hielo
Los vehículos con tracción en las cuatro ruedas tienen ventajas sobre losvehículos con tracción en dos ruedas en la nieve y el hielo, pero puedenresbalar como cualquier otro vehículo.
Si comienza a resbalarse al manejar en caminos con nieve o hielo, gire elvolante en la dirección del deslizamiento hasta que retome el control.
Evite las aplicaciones de potencia repentinas y los cambios rápidos dedirección en nieve y en hielo. Pise el acelerador en forma lenta yuniforme cuando reinicia el trayecto después de una detención completa.
Evite también el frenado brusco. A pesar de que los vehículos contracción en las cuatro ruedas pueden acelerar mejor que los de tracciónen dos ruedas sobre nieve y hielo, éstos no frenan más rápido, ya que aligual que otros vehículos, el frenado se produce en las cuatro ruedas. Nose confíe de las condiciones del camino.
Asegúrese de conservar una distancia suficiente al detenerse entre ustedy los demás vehículos. Maneje más lento de lo normal y considere el usode una de las velocidades inferiores. En situaciones de parada deemergencia, aplique el freno a fondo y firme. No “bombee” los frenos.Consulte la sección Frenos de este capítulo para obtener informaciónadicional acerca del funcionamiento del sistema de frenos antibloqueo.
2006 Navigator (nav)Owners Guide (post-2002-fmt)USA (fus)
Manejo
325

Mantenimiento y modificacionesLos sistemas de suspensión y dirección de su vehículo se han diseñado yprobado para proporcionar un rendimiento predecible, ya sea cargado ovacío, así como también una capacidad durable de transporte de carga.Por este motivo, Ford Motor Company recomienda no efectuarmodificaciones tales como agregar o eliminar refacciones (como losjuegos elevadores o las barras amortiguadoras) ni usar refacciones noequivalentes a los equipos originales de fábrica.
Toda modificación al vehículo que levante el centro de gravedad puedehacer que el vehículo tenga más probabilidades de volcarse como resultadode una pérdida de control. Ford Motor Company recomienda tenerprecaución con cualquier vehículo equipado con una carga o dispositivoalto (tales como parrillas de escalera o cubiertas de caja de pickup).
Si no mantiene su vehículo adecuadamente, podría anular la garantía,aumentar el costo de reparación, disminuir el rendimiento del vehículo ylas capacidades operacionales, y afectar en forma adversa la seguridaddel conductor y los pasajeros. Se recomienda efectuar inspeccionesfrecuentes a los componentes del chasis si el vehículo está sujeto a usoconstante a campo traviesa.CONDUCCIÓN A TRAVÉS DEL AGUASi no puede evitar manejar poraguas profundas o estancadas, pasemuy lentamente en especial sidesconoce la profundidad del agua.Nunca conduzca por agua cuyo nivelesté por sobre la parte inferior delos rines de las llantas (para losautomóviles) o la parte inferior de latracción delantera (para las camionetas).
Cuando se desplaza por el agua, es posible que disminuya la capacidadde la tracción o de los frenos. Además, el agua puede entrar en laadmisión de aire del motor y dañar gravemente el motor o hacer que elvehículo se detenga. Si maneja por aguas profundas y el tubo deventilación de la transmisión queda sumergido, es posible queentre agua a la transmisión, provocándole daños internos.
Una vez que pasó por el agua, siempre seque los frenos moviendoel vehículo lentamente ejerciendo una leve presión sobre el pedaldel freno. Los frenos mojados no detienen el vehículo tan rápido comolos frenos secos.
2006 Navigator (nav)Owners Guide (post-2002-fmt)USA (fus)
Manejo
326
ASISTENCIA EN EL CAMINO
Obtener asistencia en el caminoPara brindarle una ayuda total en caso de que tenga un problema con elvehículo, Ford Motor Company ofrece un programa gratuito de asistenciaen el camino. Este programa es independiente de la Garantía limitada devehículos nuevos. El servicio está disponible:
• las 24 horas, los siete días de la semana
• para el período de garantía limitada de vehículos nuevos de tres añoso 60,000 km (36,000 millas), lo que ocurra primero en los vehículosFord o Mercury, y cinco años o 80,000 km (50,000 millas) en vehículosLincoln.
La asistencia en el camino cubrirá:
• cambio de una llanta desinflada por una de refacción en buen estado(salvo Ford GT que tiene un equipo de inflado de llantas)
• arranque con cables pasacorriente de la batería
• asistencia al quedarse afuera (el costo del repuesto de llave esresponsabilidad del cliente)
• entrega de combustible (7.5 L [2.0 galones], máximo dos veces en unperíodo de 12 meses)
• remolque de su vehículo averiado hasta el distribuidor autorizado máscercano, o su distribuidor autorizado de ventas, si está a menos de56.3 km (35 millas) del distribuidor autorizado más cercano (unremolque por cada avería). Incluso remolques fuera de la garantía,como accidentes, están cubiertos (algunas excepciones, tales comoremolque del vehículo al corralón o recuperación).
Para clientes de Canadá, consultar el Manual de información delpropietario para obtener información sobre:
• período de cobertura
• cantidades exactas de combustible
• remolque del vehículo averiado
• reembolso de gastos de viajes de emergencia
• beneficios de planificación de viajes
2006 Navigator (nav)Owners Guide (post-2002-fmt)USA (fus)
Emergencias en el camino
327
Uso de la asistencia en el caminoComplete la tarjeta de identificación de asistencia en el camino ycolóquela en su billetera para tener una referencia rápida. En EstadosUnidos, esta tarjeta se encuentra en la carpeta del Manual delpropietario, dentro de la guantera. En Canadá, la tarjeta se encuentra enel Manual de información del propietario, dentro de la guantera.
Los usuarios de vehículos Ford o Mercury de los Estados Unidos, quenecesiten asistencia en el camino, deben llamar al 1-800-241-3673 y losusuarios de vehículos Lincoln al 1-800-521-4140.
Los usuarios canadienses que requieran de asistencia en el camino,pueden llamar al 1-800-665-2006.
Si necesita contratar usted mismo la asistencia en el camino, Ford MotorCompany le reembolsará un monto razonable. Los clientes de vehículosFord o Mercury de EE.UU. que quieran obtener información acerca delos reembolsos, pueden llamar al 1-800-241-3673; los usuarios devehículos Lincoln pueden llamar al 1-800-521-4140.
Los usuarios canadienses que quieran obtener información acerca de losreembolsos, pueden llamar al 1-800-665-2006.
Cobertura en el camino más allá de la garantía básicaEn Estados Unidos, usted puede adquirir una cobertura adicional deasistencia en el camino más allá de este período, a través de Ford AutoClub, contactando a su distribuidor autorizado.
En forma similar en Canadá, para obtener una cobertura ininterrumpidade Asistencia en el camino, puede adquirir una cobertura extendidaantes de que expire su Asistencia en el camino de la Garantía básica.Para obtener más información e inscribirse, llame al 1–877–294–2582 ovisite nuestro sitio Web en www.ford.ca.
2006 Navigator (nav)Owners Guide (post-2002-fmt)USA (fus)
Emergencias en el camino
328
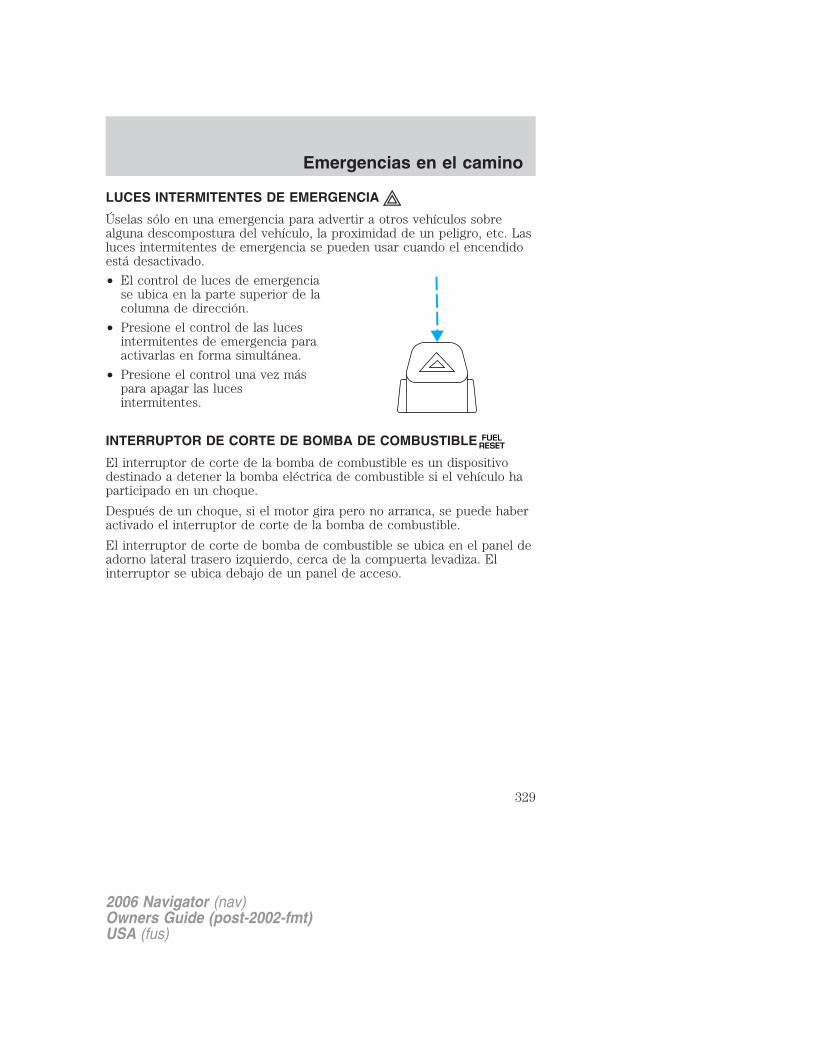
LUCES INTERMITENTES DE EMERGENCIA
Úselas sólo en una emergencia para advertir a otros vehículos sobrealguna descompostura del vehículo, la proximidad de un peligro, etc. Lasluces intermitentes de emergencia se pueden usar cuando el encendidoestá desactivado.
• El control de luces de emergenciase ubica en la parte superior de lacolumna de dirección.
• Presione el control de las lucesintermitentes de emergencia paraactivarlas en forma simultánea.
• Presione el control una vez máspara apagar las lucesintermitentes.
INTERRUPTOR DE CORTE DE BOMBA DE COMBUSTIBLE FUELRESET
El interruptor de corte de la bomba de combustible es un dispositivodestinado a detener la bomba eléctrica de combustible si el vehículo haparticipado en un choque.
Después de un choque, si el motor gira pero no arranca, se puede haberactivado el interruptor de corte de la bomba de combustible.
El interruptor de corte de bomba de combustible se ubica en el panel deadorno lateral trasero izquierdo, cerca de la compuerta levadiza. Elinterruptor se ubica debajo de un panel de acceso.
2006 Navigator (nav)Owners Guide (post-2002-fmt)USA (fus)
Emergencias en el camino
329
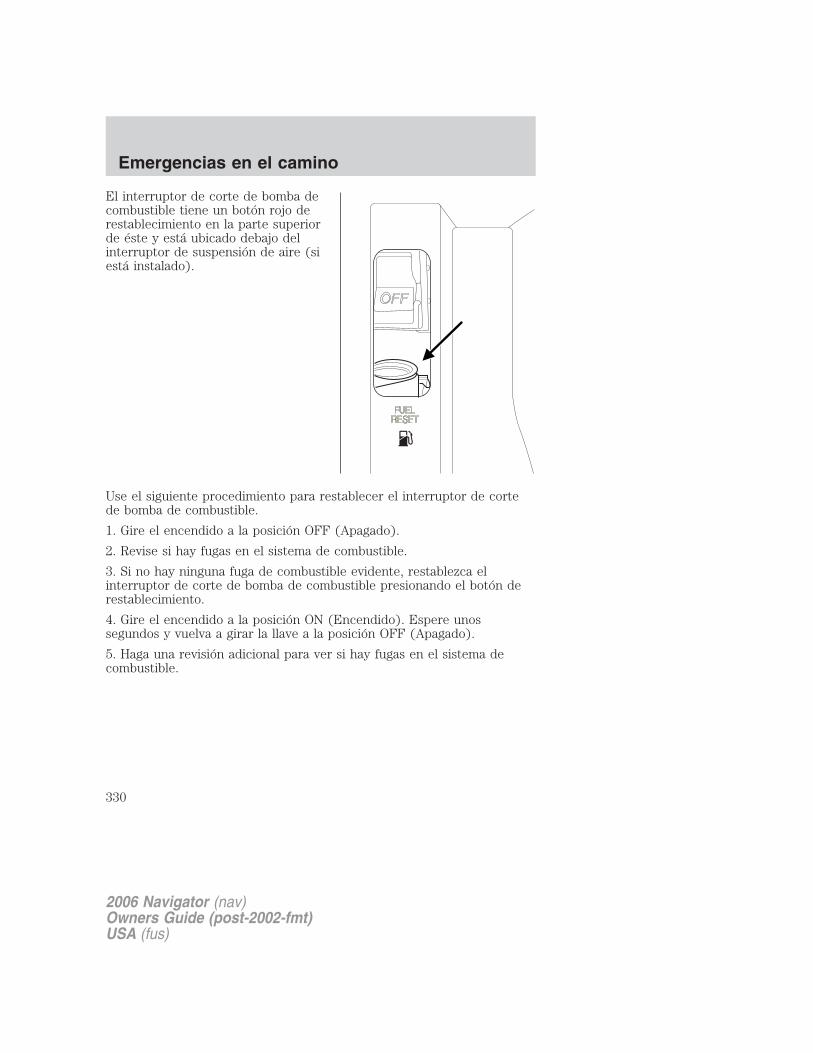
El interruptor de corte de bomba decombustible tiene un botón rojo derestablecimiento en la parte superiorde éste y está ubicado debajo delinterruptor de suspensión de aire (siestá instalado).
Use el siguiente procedimiento para restablecer el interruptor de cortede bomba de combustible.
1. Gire el encendido a la posición OFF (Apagado).
2. Revise si hay fugas en el sistema de combustible.
3. Si no hay ninguna fuga de combustible evidente, restablezca elinterruptor de corte de bomba de combustible presionando el botón derestablecimiento.
4. Gire el encendido a la posición ON (Encendido). Espere unossegundos y vuelva a girar la llave a la posición OFF (Apagado).
5. Haga una revisión adicional para ver si hay fugas en el sistema decombustible.
2006 Navigator (nav)Owners Guide (post-2002-fmt)USA (fus)
Emergencias en el camino
330
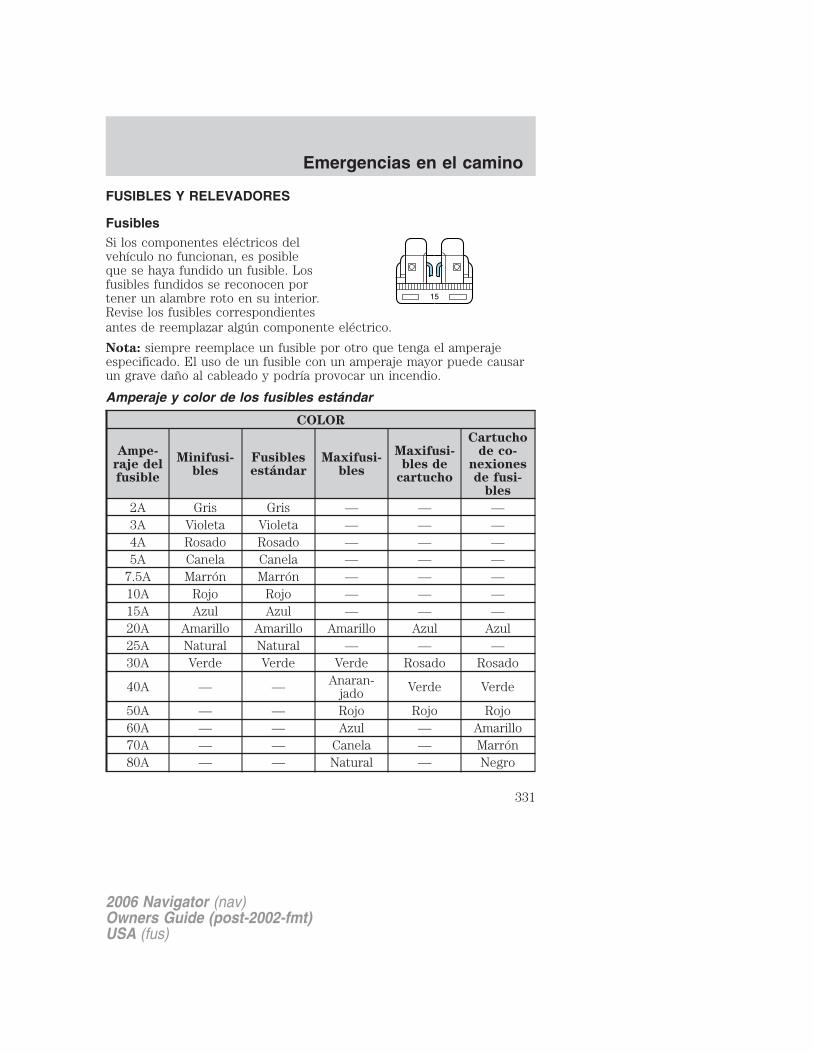
FUSIBLES Y RELEVADORES
FusiblesSi los componentes eléctricos delvehículo no funcionan, es posibleque se haya fundido un fusible. Losfusibles fundidos se reconocen portener un alambre roto en su interior.Revise los fusibles correspondientesantes de reemplazar algún componente eléctrico.
Nota: siempre reemplace un fusible por otro que tenga el amperajeespecificado. El uso de un fusible con un amperaje mayor puede causarun grave daño al cableado y podría provocar un incendio.
Amperaje y color de los fusibles estándar
COLOR
Ampe-raje delfusible
Minifusi-bles
Fusiblesestándar
Maxifusi-bles
Maxifusi-bles de
cartucho
Cartuchode co-
nexionesde fusi-
bles
2A Gris Gris — — —3A Violeta Violeta — — —4A Rosado Rosado — — —5A Canela Canela — — —
7.5A Marrón Marrón — — —10A Rojo Rojo — — —15A Azul Azul — — —20A Amarillo Amarillo Amarillo Azul Azul25A Natural Natural — — —30A Verde Verde Verde Rosado Rosado
40A — — Anaran-jado Verde Verde
50A — — Rojo Rojo Rojo60A — — Azul — Amarillo70A — — Canela — Marrón80A — — Natural — Negro
15
2006 Navigator (nav)Owners Guide (post-2002-fmt)USA (fus)
Emergencias en el camino
331
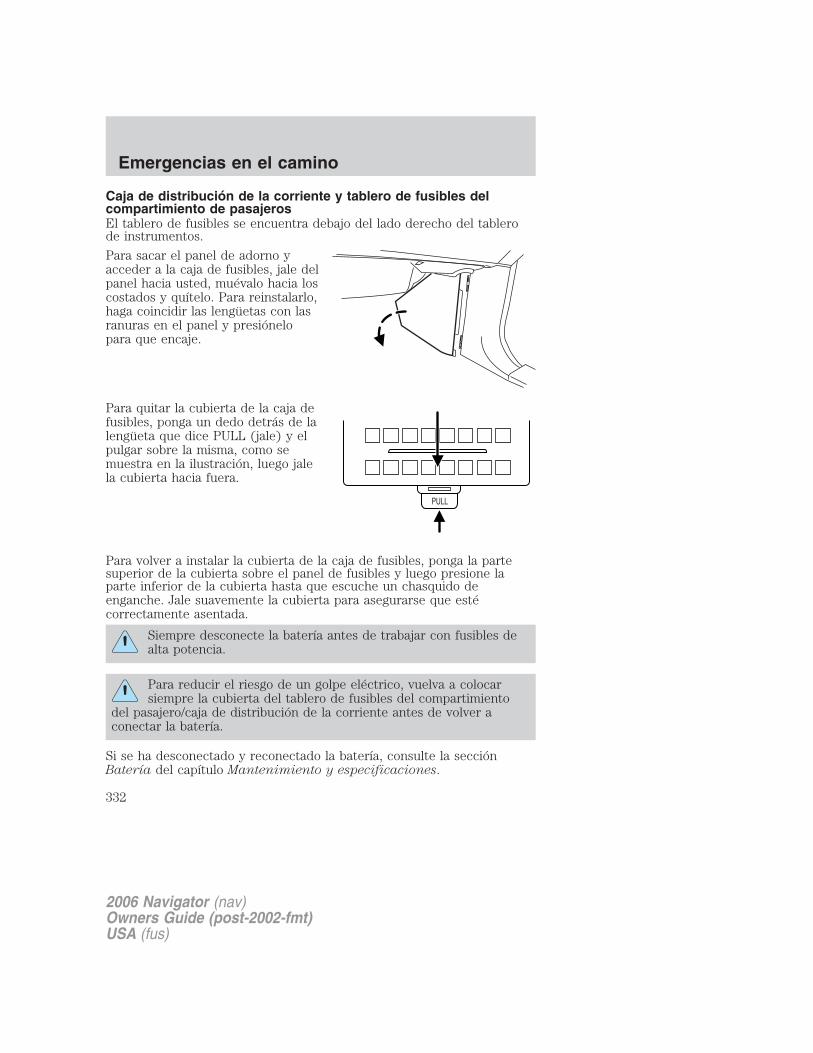
Caja de distribución de la corriente y tablero de fusibles delcompartimiento de pasajerosEl tablero de fusibles se encuentra debajo del lado derecho del tablerode instrumentos.
Para sacar el panel de adorno yacceder a la caja de fusibles, jale delpanel hacia usted, muévalo hacia loscostados y quítelo. Para reinstalarlo,haga coincidir las lengüetas con lasranuras en el panel y presiónelopara que encaje.
Para quitar la cubierta de la caja defusibles, ponga un dedo detrás de lalengüeta que dice PULL (jale) y elpulgar sobre la misma, como semuestra en la ilustración, luego jalela cubierta hacia fuera.
Para volver a instalar la cubierta de la caja de fusibles, ponga la partesuperior de la cubierta sobre el panel de fusibles y luego presione laparte inferior de la cubierta hasta que escuche un chasquido deenganche. Jale suavemente la cubierta para asegurarse que estécorrectamente asentada.
Siempre desconecte la batería antes de trabajar con fusibles dealta potencia.
Para reducir el riesgo de un golpe eléctrico, vuelva a colocarsiempre la cubierta del tablero de fusibles del compartimiento
del pasajero/caja de distribución de la corriente antes de volver aconectar la batería.
Si se ha desconectado y reconectado la batería, consulte la secciónBatería del capítulo Mantenimiento y especificaciones.
2006 Navigator (nav)Owners Guide (post-2002-fmt)USA (fus)
Emergencias en el camino
332
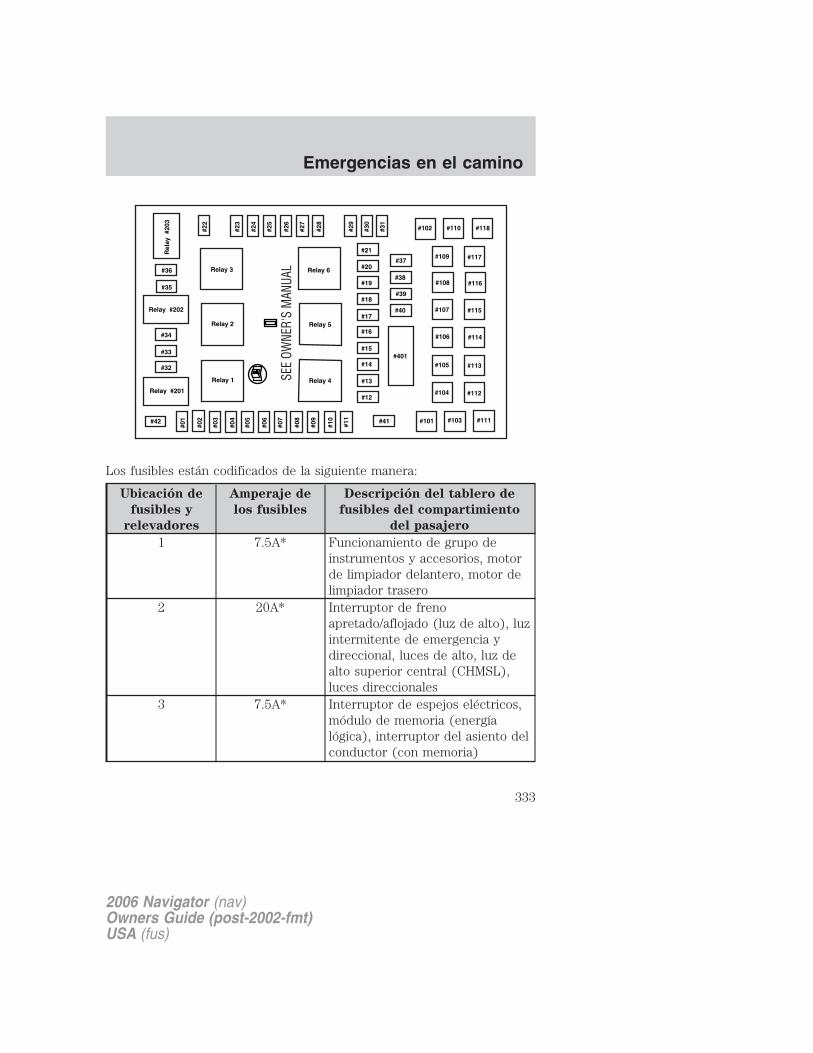
Los fusibles están codificados de la siguiente manera:
Ubicación de
fusibles y
relevadores
Amperaje de
los fusibles
Descripción del tablero de
fusibles del compartimiento
del pasajero
1 7.5A* Funcionamiento de grupo deinstrumentos y accesorios, motorde limpiador delantero, motor delimpiador trasero
2 20A* Interruptor de frenoapretado/aflojado (luz de alto), luzintermitente de emergencia ydireccional, luces de alto, luz dealto superior central (CHMSL),luces direccionales
3 7.5A* Interruptor de espejos eléctricos,módulo de memoria (energíalógica), interruptor del asiento delconductor (con memoria)
2006 Navigator (nav)Owners Guide (post-2002-fmt)USA (fus)
Emergencias en el camino
333

Ubicación de
fusibles y
relevadores
Amperaje de
los fusibles
Descripción del tablero de
fusibles del compartimiento
del pasajero
4 15A* Controles de audio del asientotrasero, módulo de navegación,reproductor de DVD
5 7.5A* Interruptor de frenoapretado/aflojado (luz de alto),módulo de control del tren motriz(PCM) (mantiene la potencia almismo nivel), comando de controldel EATC, módulo de seguridadde la carrocería (BSM) (mantienela potencia al mismo nivel),interruptor de desactivación decontrol de velocidad, LED deSecuriLock, bobinas del relevadorde asiento de 3ra fila, módulo dela compuerta levadiza eléctrica,reloj, solenoide del seguro debloqueo de la palanca del freno(BSI)
6 15A* Interruptor de faros delanteros(luces de estacionamiento yalimentación de luz de fondo delinterruptor), luces deestacionamiento, luces de placa,bobina del relevador de los farosde niebla, controlador de frenoeléctrico de arrastre de remolque(iluminación), BSM (encendidoautomático de luces, luces deestacionamiento), iluminación delselector de velocidades de laconsola del piso, indicador defaros de niebla
2006 Navigator (nav)Owners Guide (post-2002-fmt)USA (fus)
Emergencias en el camino
334

Ubicación de
fusibles y
relevadores
Amperaje de
los fusibles
Descripción del tablero de
fusibles del compartimiento
del pasajero
7 5A* Radio (señal de encendido)8 10A* Interruptor del desempañador de
la ventana trasera, espejosexteriores térmicos, indicador deldesempañador de ventana trasera(comando de control de aireacondicionado y calefacción)
9 15A* Módulo del control de transmisión10 20A* Relevador de luces de reversa de
arrastre de remolque, conector de7 cables de arrastre de remolque(luces de reversa), relevador deluces de estacionamiento dearrastre de remolque, conectoresde 7 y 4 cables de arrastre deremolque (luces deestacionamiento)
11 10A* Relevador del clutch delcompresor de A/A, solenoide delclutch del compresor de A/A,solenoide de Extremos integradosde rueda (IWE) 4x4
12 15A* Relevador de la bomba decombustible, interruptor de cortede la bomba de combustible,módulo de la transmisión de labomba de combustible, motor dela bomba de combustible
2006 Navigator (nav)Owners Guide (post-2002-fmt)USA (fus)
Emergencias en el camino
335
Ubicación de
fusibles y
relevadores
Amperaje de
los fusibles
Descripción del tablero de
fusibles del compartimiento
del pasajero
13 10A* Bobina del relevador deldesempañador de ventana trasera,interruptor de contención derefrigerante del A/A, interruptorde deshielo del A/A, interruptorde presión baja del A/A, cabezadel control del DEATC, solenoidesdel DEATC, controlador delventilador del DEATC, bobina delrelevador de carga de batería delarrastre de remolque
14 10A* Bobina del relevador deencendido de luces diurnasautomáticas (DRL), bobina delrelevador de luces de reversa delarrastre de remolque, espejoelectrocromático, relevador deluces de reversa, luces de reversa
15 5A* Interruptor de AdvanceTrac� conRSC, Grupo de instrumentos(alimentación demarcha/arranque)
16 10A* Módulo ABS/AdvanceTrac� conRSC (alimentación demarcha/arranque)
17 15A* Faros de niebla
2006 Navigator (nav)Owners Guide (post-2002-fmt)USA (fus)
Emergencias en el camino
336

Ubicación de
fusibles y
relevadores
Amperaje de
los fusibles
Descripción del tablero de
fusibles del compartimiento
del pasajero
18 10A* Accionador de la combinación depuertas de temperatura del A/Aauxiliar, control auxiliar delanterodel A/A auxiliar, bovinas delrelevador de desenganche delfreno de estacionamiento, luzintermitente direccional, espejoelectrocromático, motor de modoauxiliar
19 10A* Módulo de control de los sistemasde seguridad (RCM)
20 30A* BSM (seguros de puertas,relevador de apertura de vidrio decompuerta levadiza), motor deapertura de vidrio de compuertalevadiza, motor de la ventanadelantera izquierda, motores debloqueo de puerta/compuertalevadiza
21 15A* Grupo de instrumentos (B+),luces interiores (cortesía),relevadores de desenganche delfreno de estacionamiento, motorde desenganche del freno deestacionamiento, luz para charcos(espejos exteriores)
2006 Navigator (nav)Owners Guide (post-2002-fmt)USA (fus)
Emergencias en el camino
337
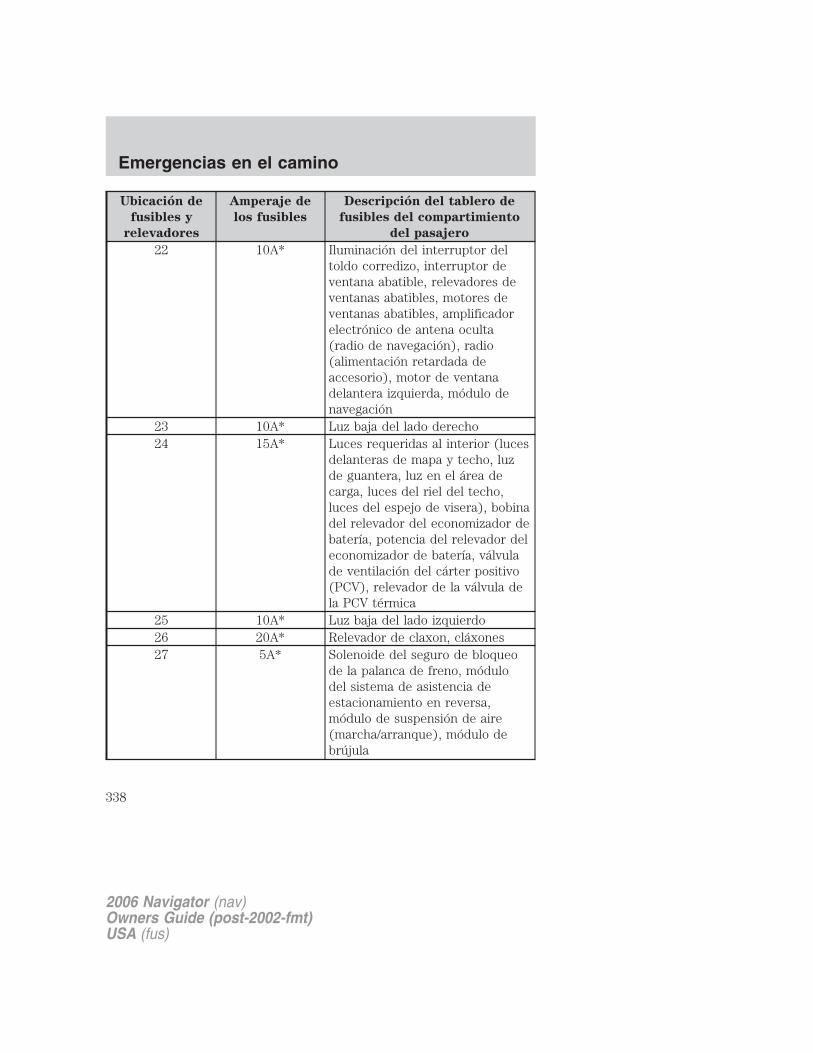
Ubicación de
fusibles y
relevadores
Amperaje de
los fusibles
Descripción del tablero de
fusibles del compartimiento
del pasajero
22 10A* Iluminación del interruptor deltoldo corredizo, interruptor deventana abatible, relevadores deventanas abatibles, motores deventanas abatibles, amplificadorelectrónico de antena oculta(radio de navegación), radio(alimentación retardada deaccesorio), motor de ventanadelantera izquierda, módulo denavegación
23 10A* Luz baja del lado derecho24 15A* Luces requeridas al interior (luces
delanteras de mapa y techo, luzde guantera, luz en el área decarga, luces del riel del techo,luces del espejo de visera), bobinadel relevador del economizador debatería, potencia del relevador deleconomizador de batería, válvulade ventilación del cárter positivo(PCV), relevador de la válvula dela PCV térmica
25 10A* Luz baja del lado izquierdo26 20A* Relevador de claxon, cláxones27 5A* Solenoide del seguro de bloqueo
de la palanca de freno, módulodel sistema de asistencia deestacionamiento en reversa,módulo de suspensión de aire(marcha/arranque), módulo debrújula
2006 Navigator (nav)Owners Guide (post-2002-fmt)USA (fus)
Emergencias en el camino
338
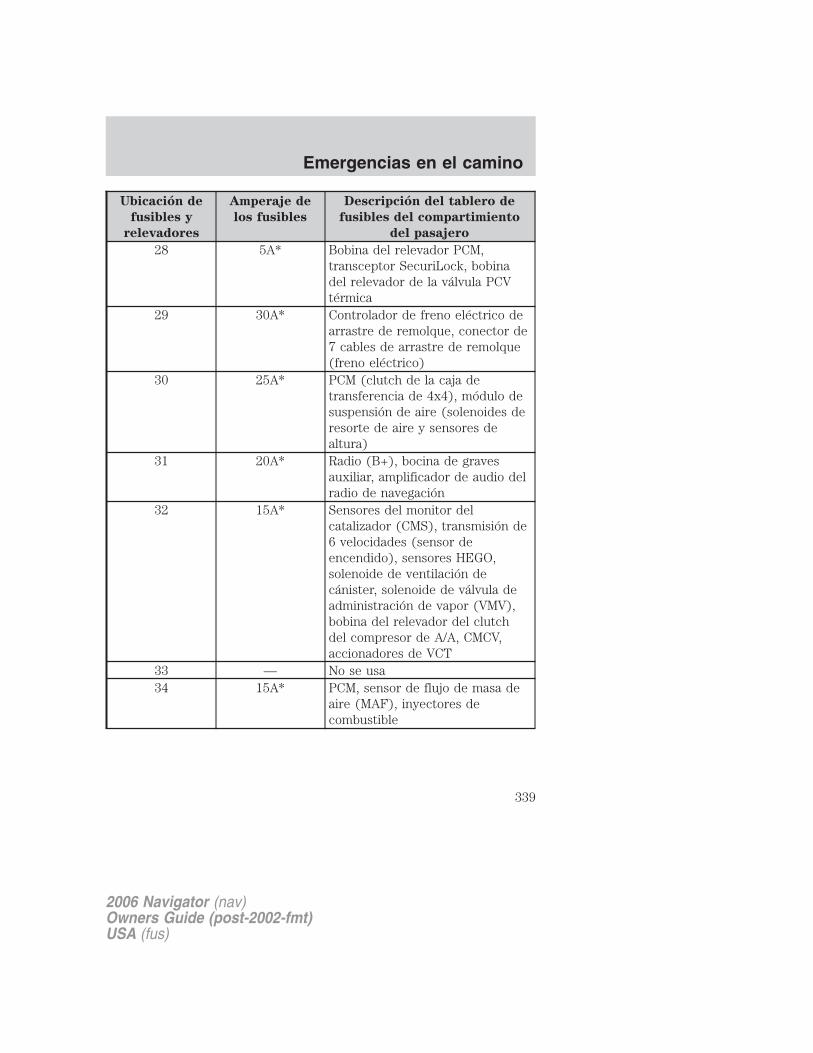
Ubicación de
fusibles y
relevadores
Amperaje de
los fusibles
Descripción del tablero de
fusibles del compartimiento
del pasajero
28 5A* Bobina del relevador PCM,transceptor SecuriLock, bobinadel relevador de la válvula PCVtérmica
29 30A* Controlador de freno eléctrico dearrastre de remolque, conector de7 cables de arrastre de remolque(freno eléctrico)
30 25A* PCM (clutch de la caja detransferencia de 4x4), módulo desuspensión de aire (solenoides deresorte de aire y sensores dealtura)
31 20A* Radio (B+), bocina de gravesauxiliar, amplificador de audio delradio de navegación
32 15A* Sensores del monitor delcatalizador (CMS), transmisión de6 velocidades (sensor deencendido), sensores HEGO,solenoide de ventilación decánister, solenoide de válvula deadministración de vapor (VMV),bobina del relevador del clutchdel compresor de A/A, CMCV,accionadores de VCT
33 — No se usa34 15A* PCM, sensor de flujo de masa de
aire (MAF), inyectores decombustible
2006 Navigator (nav)Owners Guide (post-2002-fmt)USA (fus)
Emergencias en el camino
339
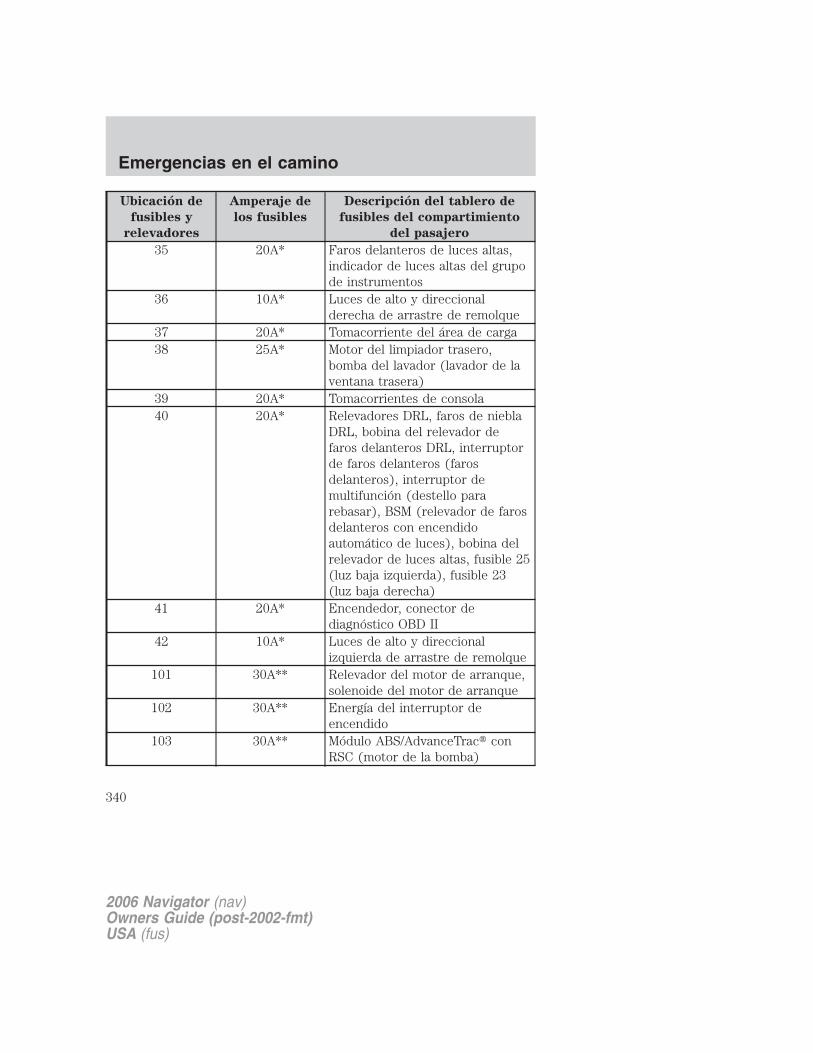
Ubicación de
fusibles y
relevadores
Amperaje de
los fusibles
Descripción del tablero de
fusibles del compartimiento
del pasajero
35 20A* Faros delanteros de luces altas,indicador de luces altas del grupode instrumentos
36 10A* Luces de alto y direccionalderecha de arrastre de remolque
37 20A* Tomacorriente del área de carga38 25A* Motor del limpiador trasero,
bomba del lavador (lavador de laventana trasera)
39 20A* Tomacorrientes de consola40 20A* Relevadores DRL, faros de niebla
DRL, bobina del relevador defaros delanteros DRL, interruptorde faros delanteros (farosdelanteros), interruptor demultifunción (destello pararebasar), BSM (relevador de farosdelanteros con encendidoautomático de luces), bobina delrelevador de luces altas, fusible 25(luz baja izquierda), fusible 23(luz baja derecha)
41 20A* Encendedor, conector dediagnóstico OBD II
42 10A* Luces de alto y direccionalizquierda de arrastre de remolque
101 30A** Relevador del motor de arranque,solenoide del motor de arranque
102 30A** Energía del interruptor deencendido
103 30A** Módulo ABS/AdvanceTrac� conRSC (motor de la bomba)
2006 Navigator (nav)Owners Guide (post-2002-fmt)USA (fus)
Emergencias en el camino
340

Ubicación de
fusibles y
relevadores
Amperaje de
los fusibles
Descripción del tablero de
fusibles del compartimiento
del pasajero
104 30A** Relevador del asiento izquierdo de3ra fila, interruptor del asientoizquierdo de 3ra fila, motor delasiento izquierdo de 3ra fila
105 30A** Módulo de compuerta levadizaeléctrica, motores de compuertalevadiza eléctrica, control deestribos eléctricos
106 30A** Relevador de carga de batería dearrastre de remolque, conector de7 cables de arrastre de remolque(carga de batería)
107 30A** Relevador del ventilador de A/Aauxiliar, motor del ventilador deA/A auxiliar
108 30A** Interruptor de motor del asientodel pasajero, interruptor y motordel soporte lumbar del asiento delpasajero
109 30A** Interruptor y motor de soportelumbar del asiento del conductor,módulo de la memoria, espejoseléctricos con memoria,interruptor y motor de pedalesajustables
110 30A** Estribos eléctricos111 50A** Relevador de compresor de
suspensión de aire, compresor desuspensión de aire
112 30A** Módulo ABS/AdvanceTrac� conRSC (válvulas)
2006 Navigator (nav)Owners Guide (post-2002-fmt)USA (fus)
Emergencias en el camino
341

Ubicación de
fusibles y
relevadores
Amperaje de
los fusibles
Descripción del tablero de
fusibles del compartimiento
del pasajero
113 30A** Motor del limpiador delantero,bomba del lavador(lavaparabrisas)
114 40A** Relevador del desempañador de laventana trasera, grilladesempañadora de la ventanatrasera, espejos térmicos (fusible8)
115 30A** Motor de cambio de la caja detransferencias, relevadores 4x4
116 40A** Relevador del motor delventilador delantero, motor delventilador delantero
117 30A** Relevador del asiento derecho de3ra fila, interruptor del asientoderecho de 3ra fila, motor delasiento derecho de 3ra fila
118 30A** Módulo del asiento de control deaire acondicionado y calefaccióndel conductor y del pasajero
401 30A CB(cortacircuitos)
Ventanas eléctricas(cortacircuitos), interruptor de laventana principal, motores de lasventanas, interruptores de lasventanas, módulo del toldocorredizo
R01 Relevador delmotor dearranque
Solenoide del motor de arranque
2006 Navigator (nav)Owners Guide (post-2002-fmt)USA (fus)
Emergencias en el camino
342
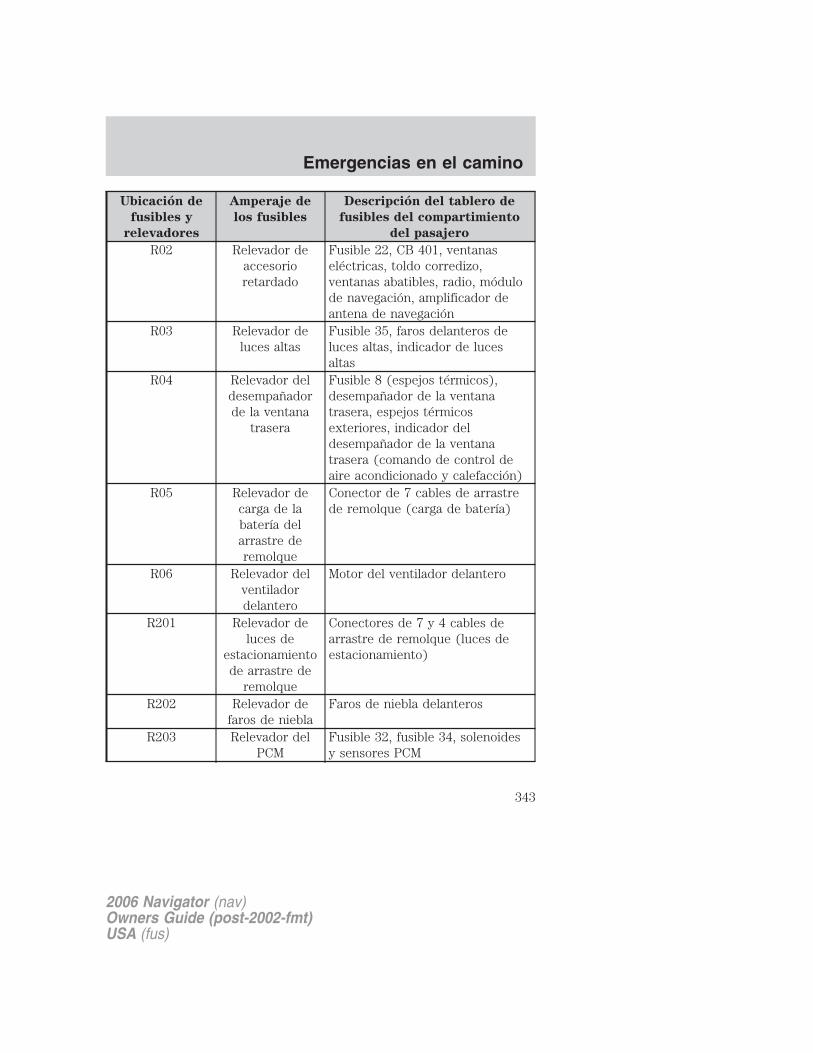
Ubicación de
fusibles y
relevadores
Amperaje de
los fusibles
Descripción del tablero de
fusibles del compartimiento
del pasajero
R02 Relevador deaccesorioretardado
Fusible 22, CB 401, ventanaseléctricas, toldo corredizo,ventanas abatibles, radio, módulode navegación, amplificador deantena de navegación
R03 Relevador deluces altas
Fusible 35, faros delanteros deluces altas, indicador de lucesaltas
R04 Relevador deldesempañadorde la ventana
trasera
Fusible 8 (espejos térmicos),desempañador de la ventanatrasera, espejos térmicosexteriores, indicador deldesempañador de la ventanatrasera (comando de control deaire acondicionado y calefacción)
R05 Relevador decarga de labatería delarrastre deremolque
Conector de 7 cables de arrastrede remolque (carga de batería)
R06 Relevador delventiladordelantero
Motor del ventilador delantero
R201 Relevador deluces de
estacionamientode arrastre de
remolque
Conectores de 7 y 4 cables dearrastre de remolque (luces deestacionamiento)
R202 Relevador defaros de niebla
Faros de niebla delanteros
R203 Relevador delPCM
Fusible 32, fusible 34, solenoidesy sensores PCM
2006 Navigator (nav)Owners Guide (post-2002-fmt)USA (fus)
Emergencias en el camino
343
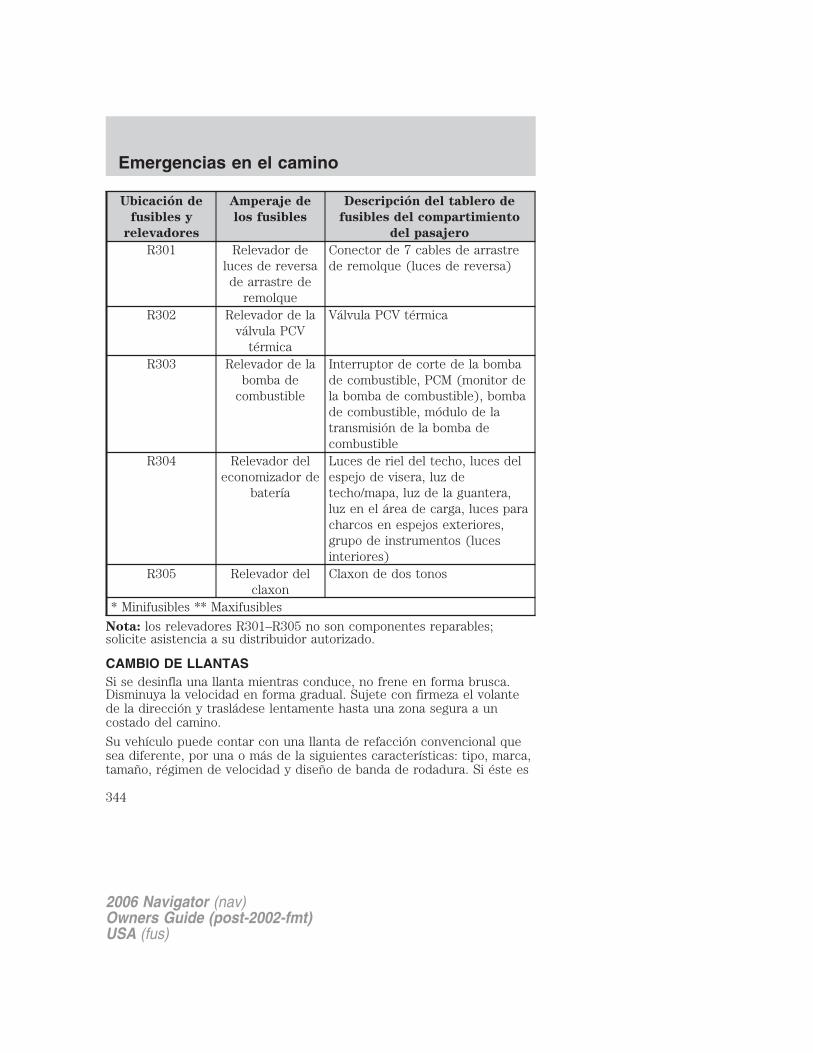
Ubicación de
fusibles y
relevadores
Amperaje de
los fusibles
Descripción del tablero de
fusibles del compartimiento
del pasajero
R301 Relevador deluces de reversade arrastre de
remolque
Conector de 7 cables de arrastrede remolque (luces de reversa)
R302 Relevador de laválvula PCV
térmica
Válvula PCV térmica
R303 Relevador de labomba de
combustible
Interruptor de corte de la bombade combustible, PCM (monitor dela bomba de combustible), bombade combustible, módulo de latransmisión de la bomba decombustible
R304 Relevador deleconomizador de
batería
Luces de riel del techo, luces delespejo de visera, luz detecho/mapa, luz de la guantera,luz en el área de carga, luces paracharcos en espejos exteriores,grupo de instrumentos (lucesinteriores)
R305 Relevador delclaxon
Claxon de dos tonos
* Minifusibles ** Maxifusibles
Nota: los relevadores R301–R305 no son componentes reparables;solicite asistencia a su distribuidor autorizado.
CAMBIO DE LLANTASSi se desinfla una llanta mientras conduce, no frene en forma brusca.Disminuya la velocidad en forma gradual. Sujete con firmeza el volantede la dirección y trasládese lentamente hasta una zona segura a uncostado del camino.
Su vehículo puede contar con una llanta de refacción convencional quesea diferente, por una o más de la siguientes características: tipo, marca,tamaño, régimen de velocidad y diseño de banda de rodadura. Si éste es
2006 Navigator (nav)Owners Guide (post-2002-fmt)USA (fus)
Emergencias en el camino
344
el caso, esta llanta de refacción distinta aun está asignada para las cargasdel vehículo (GAWR y GVWR). Su vehículo puede estar equipado conuna llanta de refacción que no coincida con las ruedas para camino y noestá equipado con un sensor del Sistema de monitoreo de presión dellantas (TPMS).
El uso de selladores para llantas puede dañarlas. El uso deselladores de llantas también puede dañar el sistema de control
de presión de las llantas.
Si el vehículo tiene instalado un Sistema de control de presiónde las llantas, consulte Sistema de control de presión de las
llantas (TPMS) en el capítulo Llantas, ruedas y carga para obtenerinformación importante. Si se daña, el sensor del monitor de presión delas llantas no volverá a funcionar.
Información de rueda o llanta de refacción distinta(si está instalada)
De no seguir estas instrucciones, podrían aumentar los riesgosde pérdida de control del vehículo, lesiones o la muerte.
Es posible que su vehículo esté equipado con una rueda o llanta derefacción distinta. Una llanta o rueda de refacción distinta se definecomo una llanta y/o rueda de refacción que es distinta en su marca,tamaño o apariencia de las llantas y ruedas para camino. Si tiene unallanta o rueda de refacción distinta, entonces, debe usarla sólotemporalmente. Esto significa que si debe usarla, tiene que reemplazarlalo antes posible por una rueda o llanta para el camino que sea del mismotamaño y tipo que las ruedas y llantas para el camino que suministróFord originalmente. Si la llanta o rueda de refacción distinta está dañada,en lugar de repararla, debe reemplazarla.
Cuando maneje con la llanta o rueda de refacción distinta, no:
• Exceda los 113 km/h (70 mph)
• Use más de una llanta o rueda de refacción distinta a la vez
• Use equipos de lavado de automóviles comerciales
• Use cadenas para la nieve en el lado del vehículo que tiene la llanta orueda de refacción distinta
2006 Navigator (nav)Owners Guide (post-2002-fmt)USA (fus)
Emergencias en el camino
345
La utilización de una rueda o llanta de refacción distinta puede ocasionarun empeoramiento en:
• manejo, estabilidad y rendimiento de los frenos
• comodidad y ruido
• distancia entre el suelo y el vehículo, y estacionamiento junto abanquetas
• capacidad de manejo en invierno
• capacidad de manejo en climas húmedos
• capacidad de manejo de todas las ruedas (si se aplica)
• ajuste de nivelación de carga (si se aplica)
Si maneja con la llanta o rueda de refacción distinta, debe poner cuidadocuando:
• arrastre un remolque
• maneje vehículos equipados con una carrocería para transportarequipo necesario para acampar
• maneje vehículos con carga en una parrilla para carga
Maneje con cuidado cuando use una llanta o rueda de refacción distintay busque servicio lo antes posible.
Información de la llanta de refacciónNota: si el vehículo está equipado con el sistema de monitoreo depresión de llantas (TPMS), la luz indicadora del sistema se encenderácuando se esté usando la llanta de refacción. Para restablecer lafuncionalidad completa del sistema TPMS, se deben instalar en elvehículo todas las ruedas para camino equipadas con sensores demonitoreo de presión de llantas
Si el vehículo tiene instalado TPMS, pida a un distribuidor autorizado querevise una llanta desinflada, con el fin de evitar que se produzca daño enel sensor TPMS, consulte Sistema de control de presión de las llantas(TPMS) en el capítulo Llantas, ruedas y carga. Reemplace la llanta derefacción por una llanta de carretera lo antes posible.
2006 Navigator (nav)Owners Guide (post-2002-fmt)USA (fus)
Emergencias en el camino
346

Ubicación de llanta de refacción y las herramientasLa llanta de refacción y las herramientas de su vehículo se guardan enlas siguientes ubicaciones:
Elemento Ubicación
Llanta de refacción Debajo del vehículo, justo delantede la defensa trasera
Herramientas del gato einstrucciones para apoyar el gato
Debajo del panel de accesoubicado en el compartimiento delpiso detrás del asiento trasero
Extracción del gato y las herramientas1. Abra la compuerta levadiza, luego ubique el tablero de acceso en elpiso detrás del asiento de la 3ra fila. Suelte y quite el panel.
2. Saque la plataforma del conjunto del gato y las herramientas delcompartimiento, girando la tuerca de mariposa hacia la izquierda paraliberar tensión contra la plataforma del conjunto del gato.
3. Desprenda la llave de tuercas de seguridad de la rueda, la extensióndel gato y la manija de la plataforma de plástico. Quite el gato y la hojade instrucciones del conjunto de la plataforma.
Extracción de la llanta de refacción1. Pliegue el asiento trasero.Consulte Asientos traseros en elcapítulo Asientos y sistemas deseguridad.
2. Saque la manija del gato y laextensión del guinche de laplataforma y ensámblelas.
3. Abra el tapón de acceso delguinche de la llanta de refacción enel fondo del compartimiento ubicadodetrás del asiento de la 3ra fila, muycerca del gato y la plataforma deherramientas.
4. Inserte el ensamblaje deherramientas de extensión delguinche a través del orificio de acceso en el piso y enganche el guinche.
2006 Navigator (nav)Owners Guide (post-2002-fmt)USA (fus)
Emergencias en el camino
347
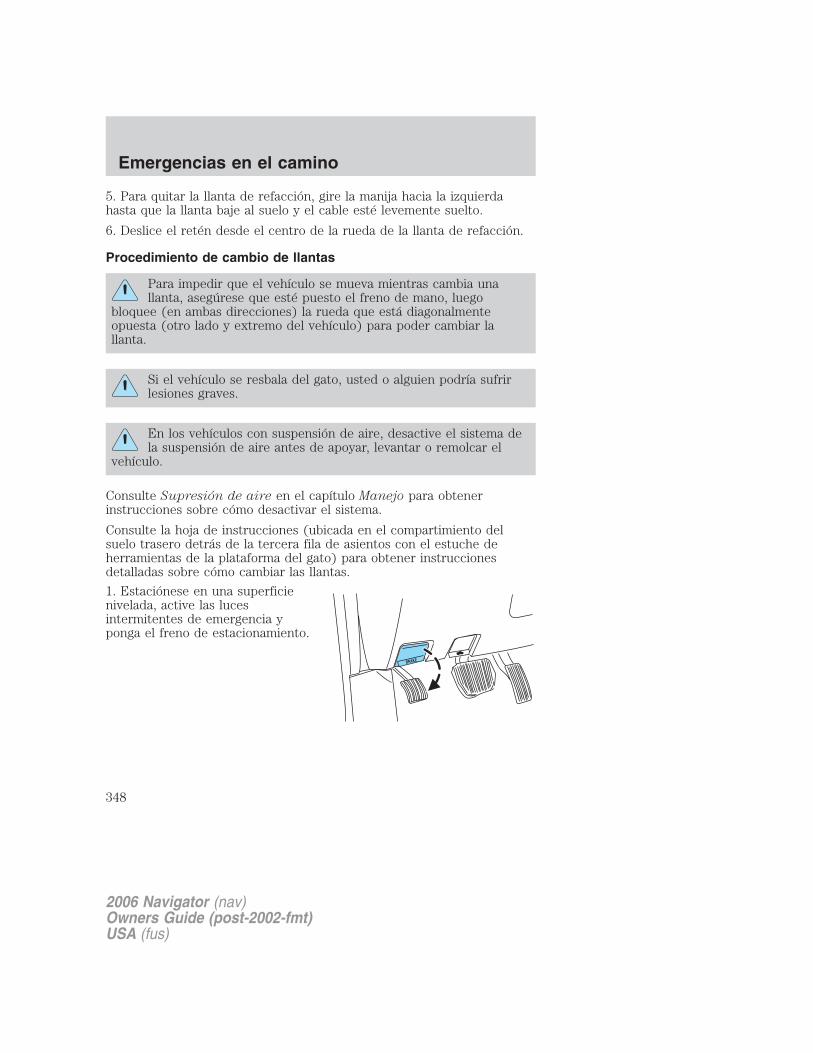
5. Para quitar la llanta de refacción, gire la manija hacia la izquierdahasta que la llanta baje al suelo y el cable esté levemente suelto.
6. Deslice el retén desde el centro de la rueda de la llanta de refacción.
Procedimiento de cambio de llantas
Para impedir que el vehículo se mueva mientras cambia unallanta, asegúrese que esté puesto el freno de mano, luego
bloquee (en ambas direcciones) la rueda que está diagonalmenteopuesta (otro lado y extremo del vehículo) para poder cambiar lallanta.
Si el vehículo se resbala del gato, usted o alguien podría sufrirlesiones graves.
En los vehículos con suspensión de aire, desactive el sistema dela suspensión de aire antes de apoyar, levantar o remolcar el
vehículo.
Consulte Supresión de aire en el capítulo Manejo para obtenerinstrucciones sobre cómo desactivar el sistema.
Consulte la hoja de instrucciones (ubicada en el compartimiento delsuelo trasero detrás de la tercera fila de asientos con el estuche deherramientas de la plataforma del gato) para obtener instruccionesdetalladas sobre cómo cambiar las llantas.
1. Estaciónese en una superficienivelada, active las lucesintermitentes de emergencia yponga el freno de estacionamiento.
2006 Navigator (nav)Owners Guide (post-2002-fmt)USA (fus)
Emergencias en el camino
348
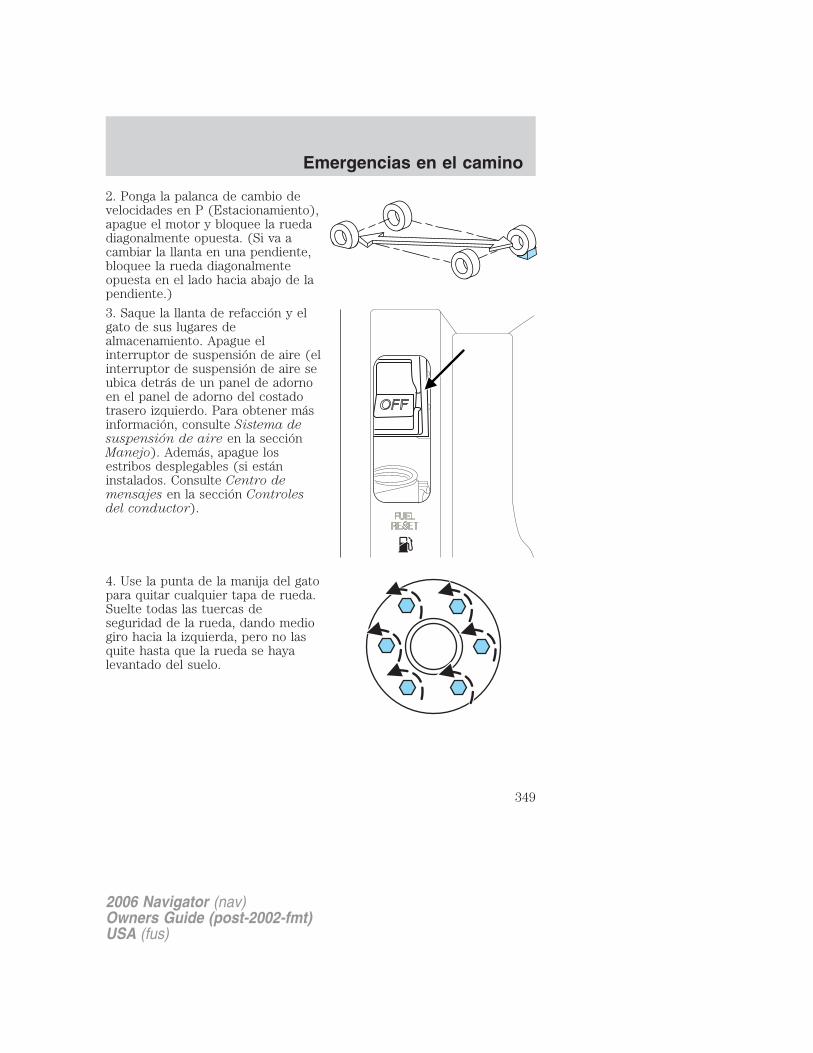
2. Ponga la palanca de cambio develocidades en P (Estacionamiento),apague el motor y bloquee la ruedadiagonalmente opuesta. (Si va acambiar la llanta en una pendiente,bloquee la rueda diagonalmenteopuesta en el lado hacia abajo de lapendiente.)
3. Saque la llanta de refacción y elgato de sus lugares dealmacenamiento. Apague elinterruptor de suspensión de aire (elinterruptor de suspensión de aire seubica detrás de un panel de adornoen el panel de adorno del costadotrasero izquierdo. Para obtener másinformación, consulte Sistema desuspensión de aire en la secciónManejo). Además, apague losestribos desplegables (si estáninstalados. Consulte Centro demensajes en la sección Controlesdel conductor).
4. Use la punta de la manija del gatopara quitar cualquier tapa de rueda.Suelte todas las tuercas deseguridad de la rueda, dando mediogiro hacia la izquierda, pero no lasquite hasta que la rueda se hayalevantado del suelo.
2006 Navigator (nav)Owners Guide (post-2002-fmt)USA (fus)
Emergencias en el camino
349

5. Coloque el gato de acuerdo a lasflechas de localización del gato quese encuentran en el bastidor y girela manija del gato y el ensamblajede herramientas de extensión haciala derecha. Nota: use el larguerodel bastidor como el punto deubicación del gato, NO el brazo decontrol.
6. Levante el vehículo de modo que la llanta quede a no más de 2.5 cm(1 pulg) del suelo cuando instale la llanta de refacción.
Cuando una de las ruedas traseras esté en el aire, la transmisiónpor sí sola no impide que el vehículo se mueva o se deslice
saliéndose del gato, incluso si la transmisión está en P(Estacionamiento). Para evitar que el vehículo se mueva cuando ustedcambia la llanta, asegúrese de que el freno de estacionamiento estécolocado y la rueda diagonalmente opuesta está bloqueada. Si elvehículo se resbala del gato, alguien puede sufrir lesiones graves.
• Delantero
• Trasero
2006 Navigator (nav)Owners Guide (post-2002-fmt)USA (fus)
Emergencias en el camino
350

Desactive los estribos (si están instalados) antes de colocar elgato o de colocar cualquier objeto debajo del vehículo. No
coloque nunca su mano entre el estribo extendido y el vehículo. Unestribo en movimiento puede causar lesiones.
• Nunca utilice el diferencialdelantero o trasero comopunto de apoyo del gato.
Para reducir el riesgo de lesiones personales, no coloque ningunaparte de su cuerpo bajo el vehículo mientras realiza un cambio
de llanta. No encienda el motor cuando su vehículo esté sobre el gato.El gato sólo debe utilizarse para cambiar llantas.
7. Quite las tuercas de seguridad con la llave de rueda.8. Reemplace la llanta desinflada con la llanta de refacción, asegurándosede que el vástago de la válvula quede hacia afuera. Vuelva a instalar lastuercas de seguridad hasta que la rueda quede ajustada contra el cubo.No apriete completamente las tuercas de seguridad hasta haber bajado larueda.
9. Baje la rueda girando la manija del gato hacia la izquierda.
10. Quite el gato y aprietecompletamente las tuercas deseguridad en el orden que se indicay vuelva a colocar la tapa de larueda.
11. Desbloquee las ruedas.
12. Guarde la llanta desinflada, elgato, la llave de rueda y lasherramientas. Asegúrese de que elgato quede bien asegurado de modoque no vibre al manejar.
2006 Navigator (nav)Owners Guide (post-2002-fmt)USA (fus)
Emergencias en el camino
351

13. Encienda el interruptor de suspensión de aire (si está instalado).
Almacenamiento de la llanta de refacción
1. Apoye la llanta en el suelo cerca de la parte trasera del vehículo con elvástago de la válvula hacia arriba.
2. Deslice parcialmente la ruedabajo el vehículo e instale elretenedor a través del centro de larueda. Luego, jale el cable paraalinear los componentes en elextremo del cable.
3. Arme la manija del gato y laextensión del guinche (como semuestra en ilustración), luegoinserte la extensión del guinche através del orificio de acceso, detrásdel asiento de 3ra fila y enganche elguinche.
4. Gire la manija del gato hacia laderecha hasta que la llanta suba asu posición de almacenamiento debajo del vehículo. La llave de tuercasse pondrá más dura para girar y el guinche de la llanta de refacciónproducirá un sonido de trinquete o se deslizará cuando la llanta llegue asu ajuste máximo. Se escuchará un chasquido en el guinche indicandoque la llanta se guardó correctamente.
5. Desmonte las herramientas y colóquelas en la plataforma deherramientas. Cierre el orificio de acceso con el tapón de hule. Vuelva ainstalar la plataforma en el vehículo y fíjela con la tuerca de mariposa(gírela hacia la derecha hasta que quede firme).
ESPECIFICACIONES DE TORSIÓN DE LAS TUERCAS DESEGURIDAD DE LAS RUEDAS
Vuelva a apretar las tuercas de seguridad a la torsión especificada a los800 km (500 millas) luego de cualquier problema con las ruedas(rotación de las llantas, cambio de una llanta desinflada, extracción de larueda, etc.).
2006 Navigator (nav)Owners Guide (post-2002-fmt)USA (fus)
Emergencias en el camino
352

Tamaño del perno Torsión de las tuercas de seguridad de las
ruedas*
lb. pies N•m
M14 x 2.0 150 200* Las especificaciones de torsión son para las roscas de pernos ytuercas sin suciedad ni óxido. Sólo utilice los sujetadores de repuestoque recomienda Ford.
Cuando instale una rueda, elimine siempre la corrosión, la tierrao los materiales extraños de las superficies de montaje de la
rueda o de la superficie de la tracción de ruedas, tambor de frenos odisco de frenos que tienen contacto con la rueda. Verifique que todoslos sujetadores que fijan el rotor al cubo estén asegurados, de maneraque no interfieran con las superficies de montaje de la rueda. Lainstalación de las ruedas sin el contacto metal con metal correcto enlas superficies de montaje de las ruedas puede hacer que las tuercasde las ruedas se suelten y la rueda se salga mientras el vehículo estáen movimiento, lo que haría perder el control.
ARRANQUE CON CABLES PASACORRIENTE
Los gases que se encuentran alrededor de la batería puedenexplotar si se exponen a las llamas, chispas o cigarrillos
encendidos. Una explosión podría terminar en lesiones o daños alvehículo.
Las baterías contienen ácido sulfúrico que pueden quemar lapiel, los ojos y la ropa, en caso de contacto.
No trate de empujar su vehículo para arrancarlo. Lastransmisiones automáticas no tienen capacidad de arrastre paraarrancar; esto sólo podría dañar el convertidor catalítico.
Preparación del vehículoCuando la batería se desconecta o se instala una nueva, la transmisióndebe volver a aprender su estrategia de control. Como consecuencia, latransmisión puede tener cambios firmes o suaves. Esta operación seconsidera normal y no afecta la función ni la durabilidad de latransmisión. Con el tiempo, el proceso de aprendizaje de adaptaciónactualizará por completo el funcionamiento de la transmisión.
2006 Navigator (nav)Owners Guide (post-2002-fmt)USA (fus)
Emergencias en el camino
353

1. Use sólo un suministro de 12 voltios para arrancar su vehículo.
2. No desconecte la batería del vehículo descompuesto, ya que estopodría dañar el sistema eléctrico del vehículo.
3. Estacione el vehículo auxiliar cerca del cofre del vehículodescompuesto, asegurándose que ambos vehículos no entren encontacto. Ponga el freno de estacionamiento en ambos vehículos yaléjese del ventilador de enfriamiento del motor y otras piezas móviles.
4. Revise todos los terminales de la batería y elimine el exceso decorrosión antes de conectar los cables de la batería. Asegúrese de quetodos los tapones de ventilación estén apretados y nivelados.
5. Encienda el ventilador del calefactor en ambos vehículos para evitardaños causados por descargas de voltaje. Apague todos los demásaccesorios.
Conexión de los cables pasacorriente
1. Conecte el cable de pasacorriente positivo (+) al terminal positivo (+)de la batería descargada.
Nota: En las ilustraciones, los pernos destacados con un rayo se usanpara designar la batería auxiliar.
+–
+–
2006 Navigator (nav)Owners Guide (post-2002-fmt)USA (fus)
Emergencias en el camino
354

2. Conecte el otro extremo del cable positivo (+) al terminal positivo (+)de la batería auxiliar.
3. Conecte el cable negativo (-) al terminal negativo (-) de la bateríaauxiliar.
+–
+–
+–
+–
2006 Navigator (nav)Owners Guide (post-2002-fmt)USA (fus)
Emergencias en el camino
355

4. Haga la conexión final del cable negativo (-) con el perno de arranque concables pasacorriente ubicado en la parte trasera del compartimiento delmotor, cerca de la batería. No use líneas de combustible, cubiertas de basedel motor ni el múltiple de admisión como puntos de conexión a tierra.
No conecte el extremo del segundo cable al terminal negativo (-)de la batería que se va a cargar. Una chispa podría provocar una
explosión de los gases alrededor de la batería.
5. Asegúrese que los cables estén alejados de las aspas de ventiladores,bandas, piezas móviles de ambos motores o de cualquier pieza delsistema de suministro de combustible.
Arranque con cables pasacorriente1. Encienda el motor del vehículo auxiliar y haga funcionar el motoraumentando la velocidad en forma moderada.2. Arranque el motor del vehículo descompuesto.3. Una vez que haya encendido el vehículo descompuesto, haga funcionarambos motores durante tres minutos más antes de desconectar los cablespasacorriente.
+–
+–
2006 Navigator (nav)Owners Guide (post-2002-fmt)USA (fus)
Emergencias en el camino
356

Retiro de los cables pasacorriente
Retire los cables pasacorriente en orden inverso al que seconectaron.
1. Retire el cable pasacorriente de la superficie metálica de conexión atierra.
Nota: En las ilustraciones, los pernos destacados con un rayo se usanpara designar la batería auxiliar.
2. Retire el cable pasacorriente de la conexión negativa (-) de la bateríadel vehículo auxiliar.
+–
+–
+–
+–
2006 Navigator (nav)Owners Guide (post-2002-fmt)USA (fus)
Emergencias en el camino
357
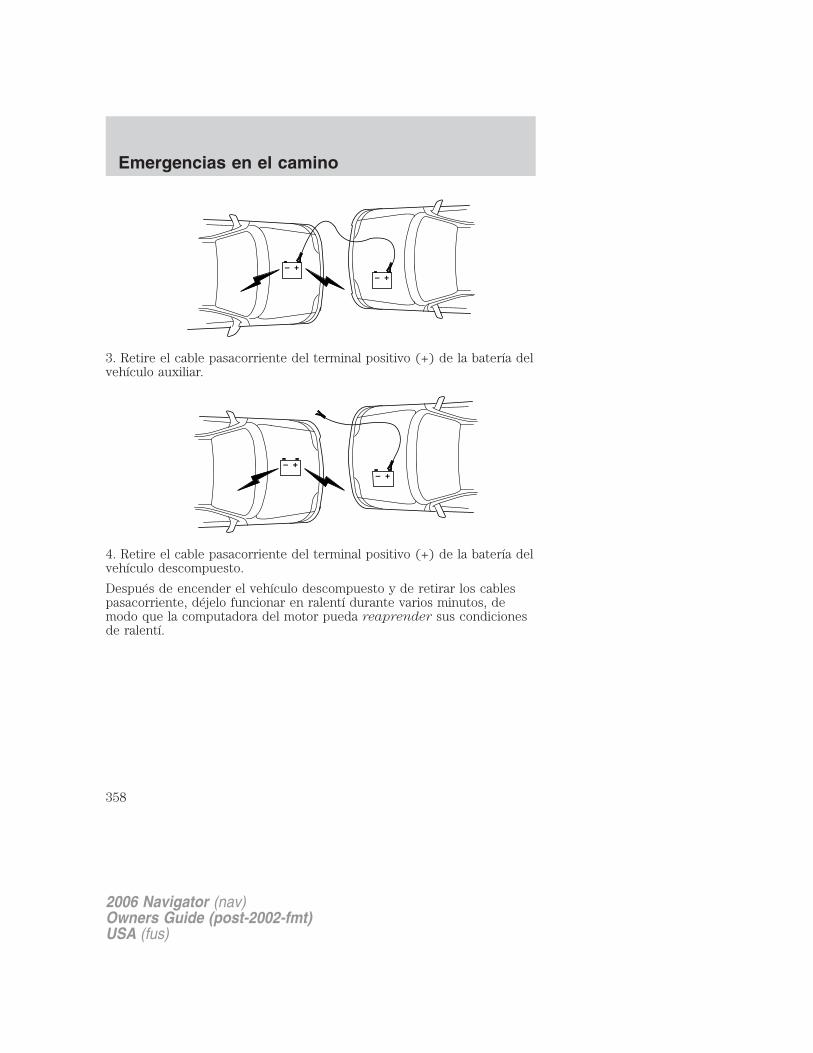
3. Retire el cable pasacorriente del terminal positivo (+) de la batería delvehículo auxiliar.
4. Retire el cable pasacorriente del terminal positivo (+) de la batería delvehículo descompuesto.
Después de encender el vehículo descompuesto y de retirar los cablespasacorriente, déjelo funcionar en ralentí durante varios minutos, demodo que la computadora del motor pueda reaprender sus condicionesde ralentí.
+–
+–
+–
+–
2006 Navigator (nav)Owners Guide (post-2002-fmt)USA (fus)
Emergencias en el camino
358
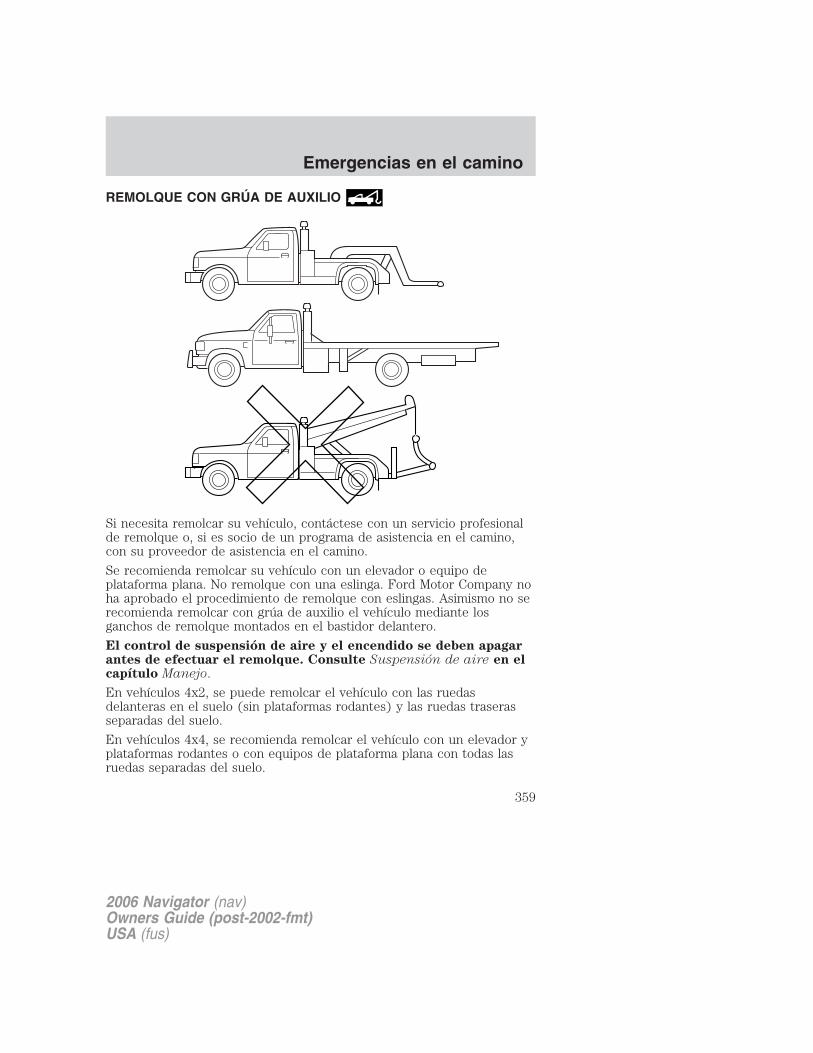
REMOLQUE CON GRÚA DE AUXILIO
Si necesita remolcar su vehículo, contáctese con un servicio profesionalde remolque o, si es socio de un programa de asistencia en el camino,con su proveedor de asistencia en el camino.
Se recomienda remolcar su vehículo con un elevador o equipo deplataforma plana. No remolque con una eslinga. Ford Motor Company noha aprobado el procedimiento de remolque con eslingas. Asimismo no serecomienda remolcar con grúa de auxilio el vehículo mediante losganchos de remolque montados en el bastidor delantero.
El control de suspensión de aire y el encendido se deben apagarantes de efectuar el remolque. Consulte Suspensión de aire en elcapítulo Manejo.
En vehículos 4x2, se puede remolcar el vehículo con las ruedasdelanteras en el suelo (sin plataformas rodantes) y las ruedas traserasseparadas del suelo.
En vehículos 4x4, se recomienda remolcar el vehículo con un elevador yplataformas rodantes o con equipos de plataforma plana con todas lasruedas separadas del suelo.
2006 Navigator (nav)Owners Guide (post-2002-fmt)USA (fus)
Emergencias en el camino
359
Su vehículo puede dañarse si se remolca en forma incorrecta ousando otros medios.
Con un vehículo descompuesto (sin tener acceso a plataformas rodantes,un remolque de transporte de automóvil o un vehículo con plataforma deremolque) su vehículo puede ser remolcado (con todas sus ruedas en elsuelo) bajo las siguientes condiciones:
Condiciones especiales:
• Quite el freno de estacionamiento.
• Apague el control de suspensión de aire.
• Gire el encendido a la posición OFF/UNLOCKED(Apagado/Desbloqueado).
• Coloque la transmisión en N (Neutro).
Si la batería del vehículo está descargada, consulte Operación detransmisión automática en el capítulo Manejo donde encontrará lasinstrucciones para sacar la palanca de cambio de velocidades de laposición P (Estacionamiento) para un remolque adecuado.
• No supere la distancia de 80 km (50 millas).
• No exceda la velocidad del vehículo de 56 km/h (35 mph).
Ford Motor Company elabora un manual de remolque para todos losoperadores autorizados de camiones de remolque. Haga que el operadorde la grúa de remolque consulte este manual para que vea losprocedimientos adecuados de enganche y remolque de su vehículo.
2006 Navigator (nav)Owners Guide (post-2002-fmt)USA (fus)
Emergencias en el camino
360

CÓMO CONSEGUIR LOS SERVICIOS QUE NECESITA
En el paísDebe llevar su vehículo Lincoln o Mercury a un distribuidor autorizadopara realizar las reparaciones cubiertas por la garantía. Si bien cualquierdistribuidor autorizado que trabaje con la línea de su vehículo leproveerá servicio cubierto por la garantía, le recomendamos regresar aldistribuidor autorizado que le vendió el vehículo, el que le asegurará unasatisfacción continua. Tenga en cuenta que algunas reparacionescubiertas por la garantía requieren de entrenamiento o equipo especial,por lo que no todos los distribuidores autorizados cuentan con permisopara realizar todas las reparaciones cubiertas por la garantía. Estosignifica que, dependiendo de la reparación con cobertura de garantíaque se necesite, tal vez deba llevar el vehículo a otro distribuidorautorizado. Cuando lleve el vehículo al distribuidor autorizado, debeconsiderar un tiempo razonable para realizar las reparaciones. Lasreparaciones se realizarán utilizando refacciones Ford o Motorcraft o bienrefacciones regeneradas o similares, que estén autorizadas por Ford.Si tiene preguntas o inquietudes o no está satisfecho con el servicio querecibe, siga estos pasos:1. Comuníquese con su Representante de ventas o Asesor de servicio desu distribuidor autorizado de ventas y servicio.2. Si sus preguntas o preocupaciones quedan sin resolver, contáctese conel Gerente de ventas o el Gerente de relaciones comerciales.3. Si necesita asistencia o aclaración acerca de las políticas oprocedimientos de Ford Motor Company, comuníquese con LincolnMercury Customer Relationship Center al 1-800-521-4140.
Fuera de la ciudadSi usted tiene un vehículo Ford o Mercury y está fuera de la ciudadcuando necesita servicio o bien, necesita más ayuda de la que puedesuministrarle el distribuidor autorizado, después de seguir los pasosdescritos anteriormente, contáctese con el Centro de asistencia al clienteFord para encontrar un distribuidor autorizado que pueda ayudarlo.
En los Estados Unidos:
Ford Motor CompanyCustomer Relationship CenterP.O. Box 6248Dearborn, MI 481211-800-392-3673 (FORD)(TDD para las personas con discapacidad auditiva: 1-800-232-5952)www.customersaskford.com
2006 Navigator (nav)Owners Guide (post-2002-fmt)USA (fus)
Asistencia al cliente
361

En Canadá:Customer Relationship CentreFord Motor Company of Canada, LimitedP.O. Box 2000Oakville, Ontario L6J 5E41-800-565-3673 (FORD)www.ford.ca
Si usted tiene un vehículo Lincoln y está fuera de la ciudad cuandonecesita servicio o bien, necesita más ayuda de la que puedesuministrarle el distribuidor autorizado, después de seguir los pasosdescritos anteriormente, contáctese con el Centro de asistencia al clienteFord para encontrar un distribuidor autorizado que pueda ayudarlo.
En Estados Unidos:Ford Motor CompanyCustomer Relationship CenterP.O. Box 6248Dearborn, MI 481211-800-521-4140(TDD para las personas con discapacidad auditiva: 1-800-232-5952)www.customersaskford.com
En Canadá:Lincoln CentreFord Motor Company of Canada, LimitedP.O. Box 2000Oakville, Ontario L6J 5E41-800-387-9333www.lincolncanada.com
Con el fin de ayudarlo a conseguir servicio para su vehículo Lincoln,tenga a mano la siguiente información cuando se comunique con elCentro Lincoln:
• Su número de teléfono (particular y laboral)
• El nombre del distribuidor autorizado y de la ciudad donde seencuentra ubicado
• El año y el modelo de su vehículo
• La fecha de compra de su vehículo
• La lectura actual del odómetro
• El número de identificación del vehículo (VIN)
2006 Navigator (nav)Owners Guide (post-2002-fmt)USA (fus)
Asistencia al cliente
362

Asistencia adicionalSi aún tiene problemas con la disputa de la garantía, puede contactarsecon el Consejo de solución de disputas (EE.UU.).
En algunos estados (en EE.UU.) se debe notificar por escritodirectamente a Ford, antes de buscar soluciones en virtud de las leyes degarantía de su estado. En algunos estados también se le permitirá a Fordintentar una reparación final.
En Estados Unidos, una disputa de garantía se debe enviar al Consejo desolución de disputas antes de tomar acciones bajo la leyl Magnuson–MossWarranty Act, o en la medida en que lo permitan las leyes del estado,antes de solicitar soluciones de reemplazo o renovación queproporcionan ciertas leyes del estado. Este procedimiento del manejo dela disputa no se requiere antes de ejercer los derechos creados por elestado u otros derechos que son independientes de las leyes delMagnuson–Moss Warranty Act o de las leyes de reemplazo o devolucióndel estado.
EN CALIFORNIA (SÓLO EE.UU.)El Código civil de California, sección 1793.2(d) exige que, si unfabricante o su representante no es capaz de reparar un vehículomotorizado para cumplir con la garantía expresa aplicable del vehículo,luego de un número razonable de intentos, se le exigirá al fabricantereemplazar el vehículo por uno prácticamente idéntico o adquirir elvehículo y reembolsar al comprador una cantidad igual al precio actualpagado o pagadero por el cliente (menos un descuento razonable por eluso que ejerció el consumidor). El consumidor tiene el derecho deescoger si recibe un reembolso o el reemplazo del vehículo.
El Código civil de California, sección 1793.22(b) asume que el fabricanteha realizado un número razonable de intentos por cumplir con lasgarantías expresas aplicables al vehículo si, dentro de los primeros 18meses de la propiedad de un vehículo nuevo o durante los primeros29,000 km. (18,000 millas), lo que se produzca primero.
1. Se han hecho dos o más intentos de reparación para el mismoproblema que podría provocar la muerte o lesiones corporales graves O
2. Se han realizado cuatro o más intentos de reparación para el mismoproblema (un defecto o condición que afecta considerablemente el uso,el valor o la seguridad del vehículo) O
3. El vehículo está fuera de servicio en reparaciones por un total de másde 30 días calendario (no necesariamente todo de una vez)
2006 Navigator (nav)Owners Guide (post-2002-fmt)USA (fus)
Asistencia al cliente
363
En el caso del número 1 ó 2 anterior, el consumidor también debenotificar al fabricante de la necesidad de reparaciones, a la siguientedirección:
Ford Motor Company16800 Executive Plaza DriveMail Drop 3NE-BDearborn, MI 48126
CONSEJO DE SOLUCIÓN DE DISPUTAS (SÓLO EE.UU.)El Consejo de solución de disputas:
• es un programa independiente de arbitraje de terceros para disputasde garantía.
• está disponible gratuitamente para propietarios y arrendatarios devehículos Ford Motor Company que cumplan con los requisitos.
Es posible que el Consejo de solución de disputas no esté disponible entodos los estados. Ford Motor Company se reserva el derecho de cambiarlas limitaciones de elegibilidad, de modificar los procedimientos ydescontinuar este servicio sin previo aviso y sin incurrir en obligacionespor las leyes aplicables del estado.
¿Qué tipo de casos revisa el Consejo?Los problemas no resueltos de reparaciones cubiertas por la garantía ode rendimiento del vehículo, ya sean automóviles Ford y Lincoln Mercuryy camionetas Ford y Lincoln Mercury, que estén dentro de los términosde cualquier garantía escrita aplicable a un vehículo nuevo sonsusceptibles de revisión, excepto aquellos que involucren:
• productos que no son Ford
• un distribuidor no autorizado
• disputas de ventas entre el usuario y el distribuidor autorizado,excepto aquellas asociadas con reparaciones de garantía o problemascon el rendimiento del vehículo según su diseño
• una solicitud de reembolso de los gastos consecuentes a menos que seesté revisando un problema de servicio o de producto
• los elementos que no son cubiertos por la Garantía limitada paravehículo nuevo (incluidos elementos de mantenimiento y de uso)
• supuestas quejas por lesiones personales/daños a la propiedad
• casos actualmente en litigio
2006 Navigator (nav)Owners Guide (post-2002-fmt)USA (fus)
Asistencia al cliente
364
• vehículos no utilizados básicamente con propósitos familiares,personales o domésticos (excepto en estados donde se requiere que elConsejo de solución de disputas revise vehículos comerciales)
• vehículos que tienen garantías que no son norteamericanasLos problemas son inelegibles para revisarse si la Garantía limitada paravehículo nuevo ha expirado en el momento de recibir su solicitud y, enciertos estados, la elegibilidad depende de la posesión que el usuariotiene del vehículo.
La elegibilidad puede diferir según las leyes del estado. Por ejemplo,consulte los folletos exclusivos para compradores y arrendatarios deCalifornia, West Virginia, Georgia y Wisconsin.
Miembros del ConsejoEl Consejo consta de:
• Tres representantes del consumidor
• Un representante de los distribuidores autorizados
Los candidatos consumidores para formar parte del Consejo sonreclutados y capacitados por una empresa consultora. El miembro delConsejo que representa a los distribuidores es escogido de laadministración de distribuidores autorizados por sus cualidades deliderazgo comercial.
Las necesidades del ConsejoPara hacer que se revise su caso debe llenar la solicitud en el folleto DSBy enviarlo por correo a la dirección que aparece en el formulario de lasolicitud. Algunos estados le exigirán que utilice correo certificado, conpresentación de recibo de remitente.
Su solicitud se revisa, y si se determina que es elegible, recibirá unaconfirmación que indica:
• El número de archivo asignado a su solicitud.
• El número telefónico sin costo del administrador independiente delDSB.
Luego se le solicitará a su distribuidor autorizado y a un representantede Ford Motor Company que presenten informes.
Para revisar adecuadamente su caso, el Consejo necesita la siguienteinformación:
• Copias legibles de todos los documentos y solicitudes demantenimiento o reparación que sean relevantes para el caso.
2006 Navigator (nav)Owners Guide (post-2002-fmt)USA (fus)
Asistencia al cliente
365
• El año, fabricación, modelo y Número de identificación del vehículo(VIN) que aparecen en la licencia de propiedad del vehículo.
• La o las fechas de reparación y el kilometraje (millaje) al momento deocurrir el o los hechos.
• El kilometraje (millaje) actual.• El nombre del o los distribuidores autorizados que vendieron o
prestaron servicio al vehículo.• Una breve descripción de su problema sin resolver.
• Un breve resumen de las medidas que tomó el o los distribuidoresautorizados y Ford Motor Company.
• Los nombres (si los sabe) de todas las personas que contactó en el olos distribuidores autorizados.
• Una descripción de la acción que espera que resuelva su problema.
Recibirá una carta de explicación si su solicitud no califica para que larevise el Consejo.
Presentaciones oralesSi quisiera hacer una presentación oral, marque YES (Sí) en la preguntaNo 6 de la solicitud. Aunque está en su derecho de hacer unapresentación oral ante el Consejo, este no es un requisito y el Consejodecidirá el caso se haya hecho o no una presentación oral. El Consejotambién puede solicitar una presentación oral.
Tomar una decisiónLos miembros del Consejo revisaron toda la información que seencontraba disponible relacionada con cada problema, incluidas laspresentaciones orales, y llegaron a una justa e imparcial decisión. Sepuede poner fin a la revisión del Consejo en cualquier momento porcualquiera de las partes.
Se hace todo lo posible por decidir el caso dentro de 40 días desde lafecha en que el Consejo recibe toda la información solicitada. Debido aque el Consejo se reúne generalmente una vez al mes, puede que demoremás en considerar algunos casos.
Una vez que se ha revisado el caso, el Consejo le envía por correo unacarta con la decisión y un formulario para aceptar o rechazar la decisióndel Consejo. Las decisiones del Consejo obligan a Ford (y, en algunoscasos, al distribuidor autorizado) pero no a los consumidores, quienesson libres de exigir otras soluciones que se encuentren disponibles bajolas leyes estatales o federales.
2006 Navigator (nav)Owners Guide (post-2002-fmt)USA (fus)
Asistencia al cliente
366
Para pedir una solicitud/folleto del DSBPara conseguir un folleto/solicitud, contáctese con su distribuidorautorizado o escriba/llame al Consejo a la siguiente dirección/número deteléfono:Dispute Settlement BoardP.O. Box 1424Waukesha, WI 53187–14241–800–428–3718También puede contactar al North American Customer RelationshipCenter en el 1-800-392-3673 (Ford), TDD para personas condiscapacidad auditiva: 1-800-232-5952 o escribir al Centro a la siguientedirección:
Ford Motor CompanyCustomer Relationship CenterP.O. Box 6248Dearborn, Michigan 48121
UTILIZACIÓN DEL PROGRAMA DE MEDIACIÓN Y ARBITRAJE(SÓLO CANADÁ)Para vehículos entregados a distribuidores autorizados canadienses. Enaquellos casos en que considere que los esfuerzos realizados por Ford deCanadá y por el distribuidor autorizado para resolver un problema delservicio del vehículo relacionado con la fabricación han sidoinsatisfactorios, Ford de Canadá participa en un programa de mediacióny arbitraje imparcial de terceros dirigido por el Plan de arbitraje paravehículos motorizados de Canadá (CAMVAP).
El Programa de arbitraje para vehículos motorizados de Canadá(CAMVAP) es una alternativa directa y relativamente rápida pararesolver desacuerdos cuando todos los otros esfuerzos para lograr unasolución han fallado. Este procedimiento no tiene costo para usted y estádiseñado para eliminar la necesidad de procedimientos legales caros yprolongados.
En el Programa de arbitraje para vehículos motorizados de Canadá(CAMVAP), árbitros imparciales que actúan como la tercera parte dirigenaudiencias en tiempos y lugares convenientes para ambos y en unambiente informal. Dichos árbitros imparciales revisaron las posicionesde las partes, tomaron decisiones y, cuando lo estimaron conveniente,emitieron juicios para resolver las disputas. Las decisiones del Plan dearbitraje para vehículos motorizados de Canadá (CAMVAP) son rápidas,justas y finales. El fallo del árbitro implica una obligación tanto parausted, como para Ford de Canadá.
2006 Navigator (nav)Owners Guide (post-2002-fmt)USA (fus)
Asistencia al cliente
367
Los servicios del Plan de arbitraje para vehículos motorizados de Canadá(CAMVAP) se encuentran disponibles en todos los territorios yprovincias. Para obtener mayor información, sin recargo u obligacióntelefonee directamente a su Administrador provincial del Plan dearbitraje para vehículos motorizados de Canadá (CAMVAP) al1-800–207–0685.
EXTENSIÓN DE SERVICIO FORDPuede obtener mayor protección para su vehículo o camioneta nuevos alcomprar la cobertura de la Extensión de Servicio Ford (Ford ESP).Entrega lo siguiente:• Beneficios durante el período de garantía dependiendo del plan que
compró (como reembolso por arriendos; cobertura en ciertoselementos de mantenimiento y de uso).
• Protección frente a costos de reparación cubiertos una vez que expirela cobertura total de la garantía.
Puede adquirir ESP de Ford con cualquier distribuidor autorizadoparticipante de Canadá. Existen varios planes disponibles en diversascombinaciones de tiempo, distancia y deducibles que se pueden ajustar asus propias necesidades de manejo. El ESP de Ford también ofrecebeneficios de reembolso para cobertura de remolque y renta.Cuando compra ESP de Ford, usted recibe protección Peace-of-Mind a lolargo de Estados Unidos y Canadá, proporcionada por una red de más de4,600 distribuidores autorizados participantes de Canadá.Si usted no aprovechó la Extensión de Servicio Ford al momento decomprar su vehículo, quizá aún pueda hacerlo. Dado que estainformación está sujeta a cambios, consulte a su distribuidor autorizadotodos los detalles sobre las opciones de cobertura de la Extensión deServicio Ford o visite el sitio Web de ESP de Ford en: www.ford-esp.com.
CÓMO CONSEGUIR ASISTENCIA FUERA DE EE.UU. Y CANADÁAntes de exportar su vehículo a otro país, contacte a la embajada oconsulado extranjero que corresponda. Dichos funcionarios puedeninformarle sobre las normas locales para registrar el vehículo y dóndeencontrar combustible sin plomo.
Si no puede encontrar combustible sin plomo o sólo puede obtenercombustible con un índice antidetonable más bajo de lo recomendadopara su vehículo, contacte una oficina de relación con el cliente de laregión.
El uso de combustible con plomo en su vehículo sin la conversióncorrecta puede dañar la efectividad del sistema de control de emisión de
2006 Navigator (nav)Owners Guide (post-2002-fmt)USA (fus)
Asistencia al cliente
368
gases y puede causar detonaciones del motor o graves daños al motor.Ford Motor Company y Ford de Canadá no se responsabilizan decualquier daño causado por el uso del combustible inadecuado. El uso decombustible con plomo también puede tener como consecuencia que seamás difícil importar nuevamente el vehículo a Estados Unidos.Si su vehículo debe recibir serviciomientras usted está viajando oviviendo en América Central, el Caribe o el Oriente Medio, comuníquesecon el distribuidor autorizado más cercano. Si el distribuidor autorizadono le puede ayudar, escriba o llame a:FORD MOTOR COMPANYWORLDWIDE DIRECT MARKET OPERATIONS1555 Fairlane DriveFairlane Business Park #3Allen Park, Michigan 48101U.S.A.Teléfono: (313) 594-4857FAX: (313) 390-0804Si se encuentra en otro país, comuníquese con el distribuidor autorizadomás cercano. Si los empleados del distribuidor autorizado no puedenayudarlo, ellos pueden llevarlo a la oficina afiliada de Ford más cercana.Si usted compra su vehículo en Norteamérica y luego lo lleva fuera de losEstados Unidos o Canadá, registre el número de identificación delvehículo (VIN) y su nueva dirección con Ford Motor Company WorldwideDirect Market Operations.Los clientes de Estados Unidos deben llamar al 1–800–392–3673.
SOLICITUD DE INFORMACIÓN ADICIONAL DEL PROPIETARIOPara solicitar las publicaciones de esta carpeta, contacte a Helm,Incorporated en:
HELM, INCORPORATEDP.O. Box 07150Detroit, Michigan 48207
o llame al:
Para obtener un catálogo gratuito, solicítelo por teléfono sincosto al: 1-800-782-4356
Lunes a viernes de 8:00 a.m. a 6:00 p.m. EST (hora del este)
También puede contactar a Helm, Incorporated a través de su sitio Web:www.helminc.com.
(Los elementos de este catálogo se pueden adquirir con tarjeta decrédito, cheque o giro postal.)
2006 Navigator (nav)Owners Guide (post-2002-fmt)USA (fus)
Asistencia al cliente
369
Cómo obtener un manual del propietario en francésPuede obtener un Manual del propietario en francés con su distribuidorautorizado o escribiendo a Ford Motor Company de Canadá, Limited,Service Publications, P.O. Box 1580, Station B, Mississauga, Ontario L4Y4G3.
INFORME DE DEFECTOS DE SEGURIDAD (EE.UU. SOLAMENTE)Si usted considera que su vehículotiene un desperfecto que podríacausar un choque, o podría producirlesiones o la muerte, deberíainformar inmediatamente a laAdministración nacional de seguridad de tránsito en carreteras (NHTSA)además de notificar a Ford Motor Company.
Si la NHTSA recibe quejas similares, puede abrir una investigación y siencuentra que existe un defecto de seguridad en un grupo de vehículos,puede solicitar una campaña de devolución y reparación. Sin embargo, laAdministración nacional de seguridad de tránsito en carreteras no sepuede involucrar en problemas individuales entre usted, su distribuidor oFord Motor Company.
Para contactarse con la NHTSA, puede llamar en forma gratuita a la líneadirecta Auto Safety al 1–800–424–9393 (o al 366–0123 en el área deWashington D.C.) o escribir a:
NHTSA400 Seventh StreetDepartamento de transporte de Estados UnidosWashington, D.C. 20590
También puede obtener otra información sobre la seguridad de losvehículos automotrices en esta línea telefónica directa.
2006 Navigator (nav)Owners Guide (post-2002-fmt)USA (fus)
Asistencia al cliente
370

LAVADO EXTERIORLave su vehículo en forma regular con agua fría o tibia y un champú conph neutro, como por ejemplo Motorcraft Detail Wash (ZC-3-A), que estádisponible con su distribuidor autorizado.• Nunca utilice detergentes o jabones caseros fuertes, como por ejemplo
lavavajillas o detergente para la ropa. Estos productos puedendecolorar y manchar las superficies pintadas.
• No lave nunca un vehículo que esté “caliente al tacto” ni durante laexposición a la luz solar intensa y directa.
• Siempre utilice una esponja limpia o un guante para lavar automóvilesy mucha agua para obtener un mejor resultado.
• Seque el vehículo con una gamuza o con una toalla de tela suave conel fin de eliminar las manchas de agua.
• Es muy importante lavar el vehículo en forma regular durante losmeses de invierno, ya que la suciedad y la sal del camino son difícilesde eliminar y dañan el vehículo.
• Quite de inmediato elementos tales como gasolina, combustible diesel,excrementos de aves y de insectos, ya que pueden dañar la pintura yel acabado del vehículo con el tiempo.
• Retire todos los accesorios exteriores, como antenas, antes de ingresara un lavado de autos.
• Los bronceadores y los repelentes contra insectos puedendañar cualquier superficie pintada; por eso si estas sustanciasentran en contacto con el vehículo, lávelas lo antes posible.
• Si su vehículo está equipado con estribos, no utilice productosprotectores de hule, plástico o vinil en la superficie del estribo,ya que puede quedar resbalosa.
• Si su vehículo está equipado con estribos desplegableseléctricos, puede escuchar ruidos mientras el sistema sedespliega debido al exceso de acumulación de tierra y mugre.Aunque el sistema no se ve afectado por esta acumulación, esimportante lavar el área regularmente para mantener elsistema en óptimo funcionamiento.
ENCERADOSi se aplica Motorcraft Paint Sealant (ZC-45) al vehículo cada seis meses,ayudará a disminuir las rayaduras pequeñas y el daño a la pintura.
• Primero lave el vehículo.
2006 Navigator (nav)Owners Guide (post-2002-fmt)USA (fus)
Limpieza
371
• No use ceras que contengan abrasivos; use Motorcraft Premium LiquidWax (ZC-53-A), disponible en su distribuidor autorizado, o unproducto de calidad equivalente.
• No permita que el sellador de pintura entre en contacto con cualquierparte coloreada que no sea de la carrocería (partes negras opacas),como el revestimiento metálico granulado del costado de la carrocería,parrillas portaequipajes, superficies de escalón de las defensas,alojamientos del espejo o área del cubretablero del parabrisas. Elsellador de pintura “pone gris” o mancha las piezas con el tiempo.
DESCASCARADOS DE PINTURASu distribuidor autorizado cuenta con pintura y rociadores para retocar yque coinciden con el color de su vehículo. Lleve a su distribuidorautorizado el código de color (impreso en la etiqueta autoadhesivaubicada en la puerta del conductor) para asegurar que obtenga el colorcorrecto.
• Elimine las partículas tales como excrementos de pájaros, savia deárbol, restos de insectos, manchas de alquitrán, sal del camino y polvoresidual de las industrias antes de reparar los descascarados de lapintura.
• Lea siempre las instrucciones antes de utilizar los productos.
RUEDAS DE ALUMINIO Y TAPONES DE LAS RUEDASLas ruedas de aluminio y los tapones de las ruedas se revisten con unacabado de pintura transparente. A fin de mantener el brillo:
• Limpie semanalmente con Motorcraft Wheel and Tire Cleaner(ZC-37-A), disponible en su distribuidor autorizado. Si hay una granacumulación de suciedad y polvo en los frenos puede que requiera unaesponja para removerla. Enjuague a fondo con gran cantidad de agua.
• Nunca aplique un producto químico de limpieza a los rines o taponesde las ruedas cuando éstas estén calientes o tibias.
• Algunos lavados automáticos de autos pueden producir daño alacabado de los rines o tapones de las ruedas. Los limpiadores químicosfuertes o los productos químicos de limpieza, junto con la agitación delcepillo para quitar el polvo y la suciedad, pueden desgastar con eltiempo la capa de pintura transparente.
• No use limpiadores para ruedas a base de ácido fluorhídrico o de basealtamente cáustica, fibras metálicas, combustible o detergentes fuertesde uso casero.
2006 Navigator (nav)Owners Guide (post-2002-fmt)USA (fus)
Limpieza
372
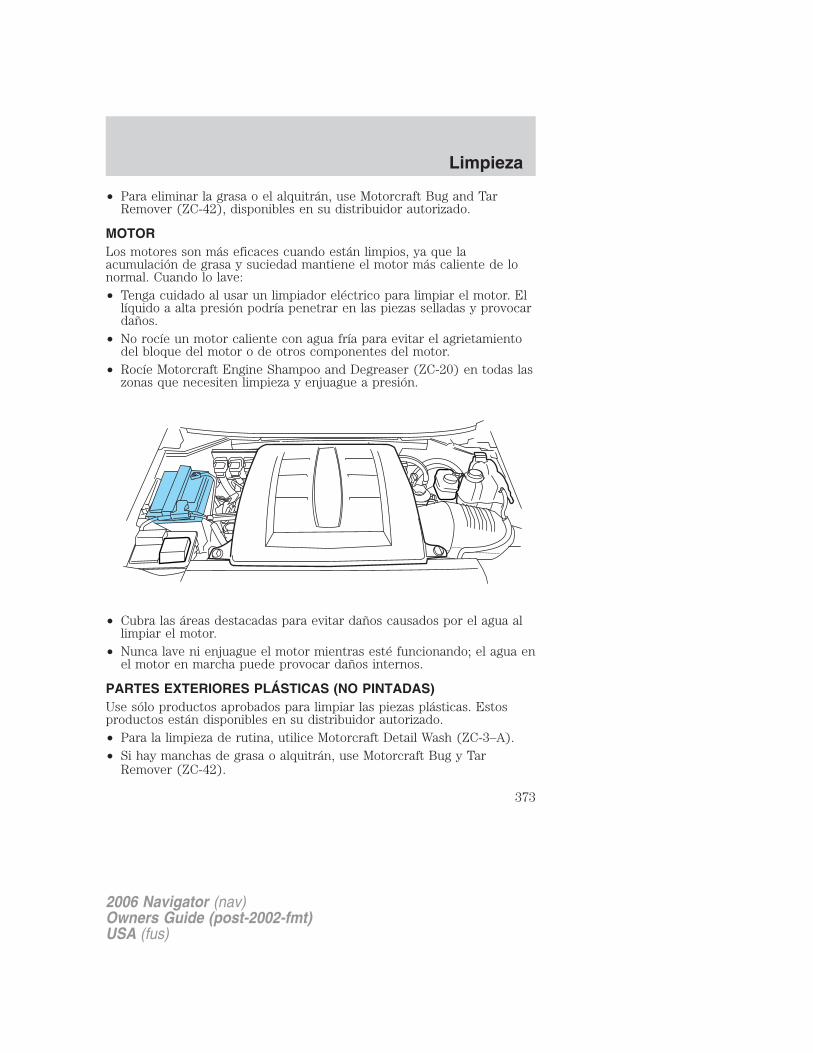
• Para eliminar la grasa o el alquitrán, use Motorcraft Bug and TarRemover (ZC-42), disponibles en su distribuidor autorizado.
MOTORLos motores son más eficaces cuando están limpios, ya que laacumulación de grasa y suciedad mantiene el motor más caliente de lonormal. Cuando lo lave:• Tenga cuidado al usar un limpiador eléctrico para limpiar el motor. El
líquido a alta presión podría penetrar en las piezas selladas y provocardaños.
• No rocíe un motor caliente con agua fría para evitar el agrietamientodel bloque del motor o de otros componentes del motor.
• Rocíe Motorcraft Engine Shampoo and Degreaser (ZC-20) en todas laszonas que necesiten limpieza y enjuague a presión.
• Cubra las áreas destacadas para evitar daños causados por el agua allimpiar el motor.
• Nunca lave ni enjuague el motor mientras esté funcionando; el agua enel motor en marcha puede provocar daños internos.
PARTES EXTERIORES PLÁSTICAS (NO PINTADAS)Use sólo productos aprobados para limpiar las piezas plásticas. Estosproductos están disponibles en su distribuidor autorizado.• Para la limpieza de rutina, utilice Motorcraft Detail Wash (ZC-3–A).• Si hay manchas de grasa o alquitrán, use Motorcraft Bug y Tar
Remover (ZC-42).
2006 Navigator (nav)Owners Guide (post-2002-fmt)USA (fus)
Limpieza
373

VENTANAS Y HOJAS DEL LIMPIADOR
El parabrisas, las ventanas trasera y laterales y las hojas de loslimpiadores se deben limpiar en forma regular. Si los limpiadores nolimpian correctamente, la causa puede ser la presencia de sustancias enel parabrisas o en las hojas de los limpiadores. Estos pueden incluirtratamientos de cera caliente utilizados por lavados comerciales devehículos, revestimientos repelentes al agua, savia de árboles u otro tipode contaminación orgánica; estos contaminantes pueden causar chirridoso castañeteos de las hojas y rayas y manchas en el parabrisas. Paralimpiar estos elementos, siga estos consejos:
• El parabrisas, las ventanas traseras y las ventanas laterales se puedenlimpiar con un limpiador no abrasivo, como por ejemplo, MotorcraftUltra Clear Spray Glass Cleaner (ZC-23), disponible con sudistribuidor autorizado.
• Las hojas del limpiador se pueden limpiar con Motorcraft PremiumWindshield Washer Concentrate (ZC-32–A), disponible en sudistribuidor autorizado. Este líquido lavaparabrisas contiene unasolución especial además de alcohol, que ayuda a eliminar losdepósitos de cera caliente en la hoja del limpiador y el parabrisas deinstalaciones de lavado automático.
• No utilice abrasivos, ya que pueden causar rayaduras.
• No utilice combustible, queroseno o diluyente de pintura para limpiarlas piezas.
• Las hojas del limpiador se pueden limpiar con alcohol isopropílico (defricción) o una solución para lavaparabrisas. Asegúrese de reemplazarlas hojas del limpiador cuando tengan un aspecto desgastado o nofuncionen correctamente.
No use objetos afilados, como una hoja de afeitar, para limpiar elinterior de la ventana trasera o para remover calcomanías, ya quepuede dañar las líneas térmicas del cuadriculado deldesempañador de la ventana trasera.
MICAS DEL TABLERO Y DEL GRUPO DE INSTRUMENTOS.Limpie el tablero de instrumentos con un paño húmedo, luego con unpaño limpio y seco, o use Motorcraft Dash & Vinyl Cleaner (ZC-38-A).
• Evite el uso de limpiadores o pulidores que aumenten el brillo de laparte superior del tablero. El acabado mate en esta área ayuda aproteger al conductor de reflejos molestos del parabrisas.
2006 Navigator (nav)Owners Guide (post-2002-fmt)USA (fus)
Limpieza
374
No use solventes químicos o detergentes fuertes al limpiar elvolante de la dirección o el tablero para evitar que se contamine
el sistema de la bolsa de aire.
• Asegúrese de lavar o secar sus manos si ha estado en contacto conciertos productos, tales como, repelente contra insectos o lociónbronceadora, a fin de evitar posibles daños a las superficies pintadasdel interior.
INTERIORPara tela, alfombras, asientos de tela y cinturones de seguridad:• Quite el polvo y la suciedad suelta con una aspiradora.• Elimine las manchas leves y la suciedad con Motorcraft Professional
Strength Carpet & Upholstery Cleaner (ZC-54).• Si hay grasa o alquitrán en el material, limpie las manchas del área
primero con Motorcraft Spot and Stain Remover (ZC-14).• Si se forma un anillo sobre la tela luego de limpiar una mancha, limpie
el área completa de inmediato (pero sin saturar en exceso) o el anillose fijará.
• No use productos de limpieza caseros o limpiadores de vidrio quepuedan decolorar y manchar la tela y afectar las capacidades deretardo de llama que poseen los materiales del asiento.
No use solventes para limpieza, blanqueador o tintura en loscinturones del vehículo, ya que pueden aflojar el tejido del
cinturón.
LIMPIEZA DE LOS ASIENTOS CON CONTROL DE AIREACONDICIONADO Y CALEFACCIÓN (SI ESTÁ INSTALADO)Elimine el polvo y la suciedad suelta con una escobilla de ropa o con unaaspiradora. Quite inmediatamente las manchas frescas. Limpie losasientos con un paño húmedo, usando un jabón suave y una solución conagua, si es necesario.
ASIENTOS DE CUEROLas superficies de sus asientos de piel tienen una capa protectora parapiel.
• Para limpiarlos, use un paño suave con Motorcraft Deluxe Leather andVinyl Cleaner (ZC-11-A). Seque con un paño suave.
2006 Navigator (nav)Owners Guide (post-2002-fmt)USA (fus)
Limpieza
375
• Para ayudar a mantener su elasticidad y color, utilice MotorcraftDeluxe Leather Care Kit (ZC-11-D), disponible en su distribuidorautorizado.
• No utilice productos de limpieza de uso casero, soluciones de alcohol,solventes ni limpiadores para hule, vinilo y plástico, oacondicionadores de petróleo para piel. Estos productos puedencausar el desgaste prematuro de la cubierta protectora.
Nota: en algunos casos, se puede producir transferencia de color otintura al poner ropa húmeda en contacto con la tapicería de piel. Si estoocurre, debe limpiarse inmediatamente la piel para evitar el teñidopermanente.
TAPIZADO INTERIOR• Limpie las áreas del tapiz interior con un paño húmedo, y luego con
un paño limpio y seco; también puede usar Motorcraft Dash & VinylCleaner (ZC-38-A).
• No use productos de limpieza o limpiavidrios para el hogar ya quepueden dañar el acabado.
PARTE INFERIOR DE LA CARROCERÍALave frecuentemente toda la parte inferior del vehículo. Mantenga losorificios de drenaje de la carrocería y de las puertas libres de suciedad.
PRODUCTOS PARA EL CUIDADO DE LOS VEHÍCULOS FORD YLINCOLN MERCURYSu distribuidor autorizado Ford o Lincoln Mercury dispone de muchosproductos de calidad para limpiar su vehículo y proteger sus acabados.Estos productos de calidad han sido diseñados específicamente parasatisfacer sus necesidades automovilísticas; están diseñadospersonalmente para complementar el estilo y la apariencia de suvehículo. Cada producto está hecho de materiales de alta calidad quecumplen o exceden especificaciones estrictas. Para obtener mejoresresultados, use los siguientes productos o alguno de calidad equivalente:
Motorcraft Bug and Tar Remover (ZC-42)
Motorcraft Car Care Kit (ZC-26)
Motorcraft Car Wash (sólo en Canadá) (CXC-21)
Motorcraft Custom Bright Metal Cleaner (ZC-15)
Motorcraft Custom Clearcoat Polish (ZC–8–A)
Motorcraft Custom Vinyl Protectant (sólo en EE.UU.) (ZC-40-A)
2006 Navigator (nav)Owners Guide (post-2002-fmt)USA (fus)
Limpieza
376

Motorcraft Dash and Vinyl Cleaner (ZC-38–A)
Motorcraft Deluxe Leather and Vinyl Cleaner (sólo en EE.UU.)(ZC-11–A)
Motorcraft Detail Wash (ZC-3-A)
Motorcraft Dusting Cloth (ZC-24)
Motorcraft Engine Shampoo and Degreaser (sólo en EE.UU.) (ZC-20)
Motorcraft Engine Shampoo (sólo en Canadá) (CXC-66-A)
Motorcraft One Step Wash and Wax Concentrate (ZC-6-A)
Motorcraft Paint Sealant (ZC-45)
Motorcraft Premium Car Wash Concentrate (sólo en EE.UU.) (ZC-17-B)
Motorcraft Carlite Glass Cleaner (sólo en Canadá) (CXC-100)
Motorcraft Premium Liquid Wax (ZC-53-A)
Motorcraft Premium Windshield Washer Concentrate (ZC-32–A)
Motorcraft Professional Strength Carpet & Upholstery Cleaner (ZC-54)
Motorcraft Spot and Stain Remover (sólo en EE.UU.) (ZC-14)
Motorcraft Tire Clean and Shine (ZC-28)
Motorcraft Triple Clean (sólo en EE:UU.) (ZC-13)
Motorcraft Ultra-Clear Spray Glass Cleaner (ZC-23)
Motorcraft Vinyl Cleaner (sólo en Canadá) (CXC-93)
Motorcraft Vinyl Conditioner (sólo en Canadá) (CXC-94)
Motorcraft Wheel and Tire Cleaner (ZC-37-A)
2006 Navigator (nav)Owners Guide (post-2002-fmt)USA (fus)
Limpieza
377
RECOMENDACIONES DE SERVICIO
Para ayudarle a prestar servicio a su vehículo:
• Hemos destacado los puntos “hágalo usted mismo” en elcompartimiento del motor para una fácil localización.
• Brindamos información de mantenimiento programado, quepermite seguir con facilidad el servicio de rutina.
Si su vehículo requiere servicio profesional, su distribuidor autorizadopuede proporcionarle las refacciones y el servicio necesario. Revise elManual de información de garantías/Manual de información del
propietario para averiguar qué refacciones y servicios están cubiertos.
Use sólo los combustibles, lubricantes, líquidos y refaccionesrecomendados que cumplan con las especificaciones. Las refaccionesMotorcraft están diseñadas y fabricadas para proporcionar el mejorrendimiento en su vehículo.
MEDIDAS DE PRECAUCIÓN DURANTE EL SERVICIO DE SUVEHÍCULO• No trabaje con el motor caliente.
• Asegúrese que no quede nada atrapado en las partes en movimiento.
• No trabaje en un vehículo con el motor en funcionamiento dentro deun espacio cerrado, a menos que esté seguro que tiene suficienteventilación.
• Mantenga todas las llamas al descubierto y cualquier otro materialincandescente lejos de la batería y de las refacciones relacionadas conel combustible.
Trabajo con el motor apagado1. Coloque el freno de estacionamiento y cambie a P (Estacionamiento).
2. Apague el motor y quite la llave.
3. Bloquee las ruedas.
Trabajo con el motor encendido1. Coloque el freno de estacionamiento y cambie a P (Estacionamiento).
2. Bloquee las ruedas.
Nota: no arranque el motor sin el filtro de aire y no lo quite mientras elmotor esté funcionando.
2006 Navigator (nav)Owners Guide (post-2002-fmt)USA (fus)
Mantenimiento y especificaciones
378
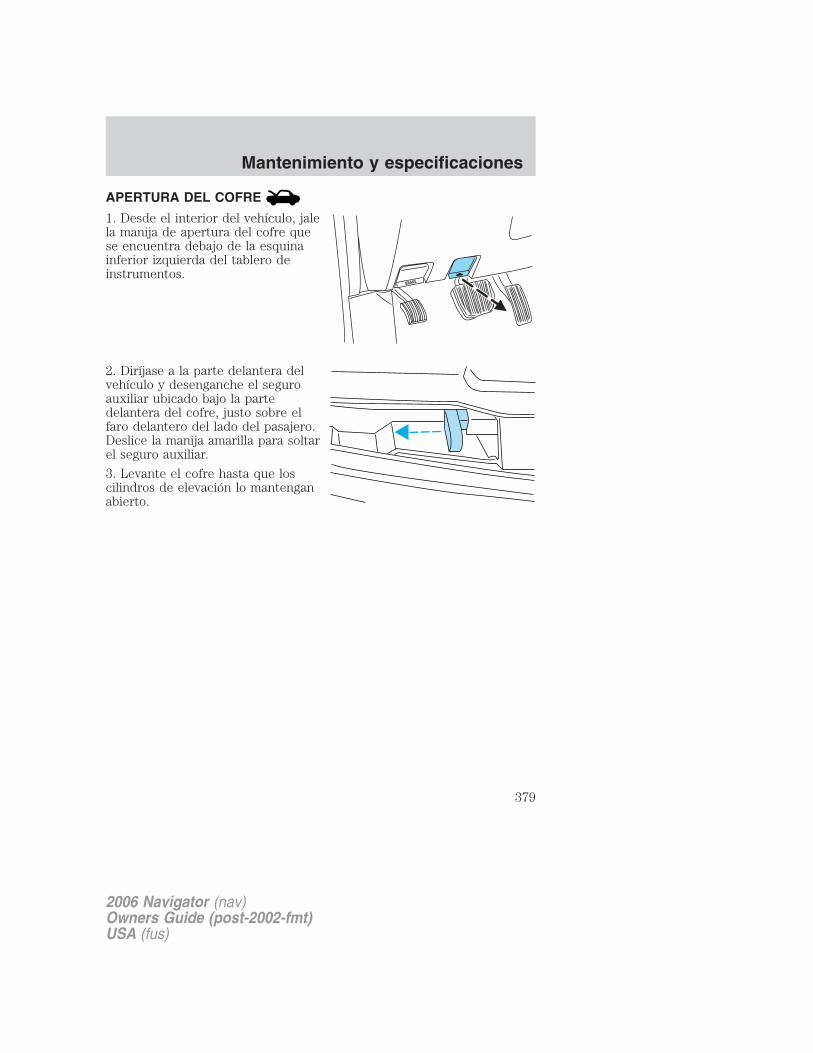
APERTURA DEL COFRE
1. Desde el interior del vehículo, jalela manija de apertura del cofre quese encuentra debajo de la esquinainferior izquierda del tablero deinstrumentos.
2. Diríjase a la parte delantera delvehículo y desenganche el seguroauxiliar ubicado bajo la partedelantera del cofre, justo sobre elfaro delantero del lado del pasajero.Deslice la manija amarilla para soltarel seguro auxiliar.
3. Levante el cofre hasta que loscilindros de elevación lo mantenganabierto.
2006 Navigator (nav)Owners Guide (post-2002-fmt)USA (fus)
Mantenimiento y especificaciones
379

IDENTIFICACIÓN DE COMPONENTES EN EL COMPARTIMIENTODEL MOTOR
Motor de 5.4L 3V V8
1. Batería
2. Conjunto del filtro de aire (ubicado bajo la cubierta de apariencia)
3. Varilla indicadora del nivel de aceite del motor
4. Depósito del líquido de frenos
5. Depósito del líquido de la dirección hidráulica
6. Depósito de líquido refrigerante del motor
7. Cubierta de apariencia del motor
8. Tapón de llenado del aceite del motor
9. Depósito del líquido lavaparabrisas
2006 Navigator (nav)Owners Guide (post-2002-fmt)USA (fus)
Mantenimiento y especificaciones
380
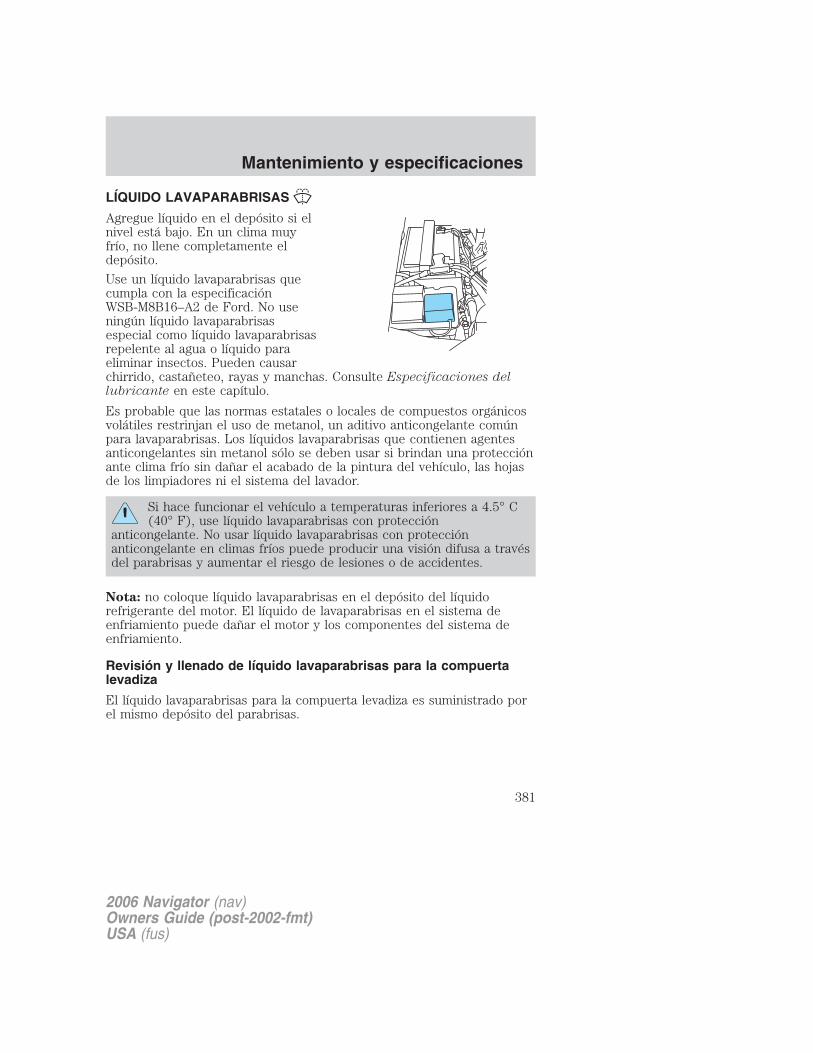
LÍQUIDO LAVAPARABRISAS
Agregue líquido en el depósito si elnivel está bajo. En un clima muyfrío, no llene completamente eldepósito.
Use un líquido lavaparabrisas quecumpla con la especificaciónWSB-M8B16–A2 de Ford. No useningún líquido lavaparabrisasespecial como líquido lavaparabrisasrepelente al agua o líquido paraeliminar insectos. Pueden causarchirrido, castañeteo, rayas y manchas. Consulte Especificaciones dellubricante en este capítulo.
Es probable que las normas estatales o locales de compuestos orgánicosvolátiles restrinjan el uso de metanol, un aditivo anticongelante comúnpara lavaparabrisas. Los líquidos lavaparabrisas que contienen agentesanticongelantes sin metanol sólo se deben usar si brindan una protecciónante clima frío sin dañar el acabado de la pintura del vehículo, las hojasde los limpiadores ni el sistema del lavador.
Si hace funcionar el vehículo a temperaturas inferiores a 4.5° C(40° F), use líquido lavaparabrisas con protección
anticongelante. No usar líquido lavaparabrisas con protecciónanticongelante en climas fríos puede producir una visión difusa a travésdel parabrisas y aumentar el riesgo de lesiones o de accidentes.
Nota: no coloque líquido lavaparabrisas en el depósito del líquidorefrigerante del motor. El líquido de lavaparabrisas en el sistema deenfriamiento puede dañar el motor y los componentes del sistema deenfriamiento.
Revisión y llenado de líquido lavaparabrisas para la compuertalevadiza
El líquido lavaparabrisas para la compuerta levadiza es suministrado porel mismo depósito del parabrisas.
2006 Navigator (nav)Owners Guide (post-2002-fmt)USA (fus)
Mantenimiento y especificaciones
381
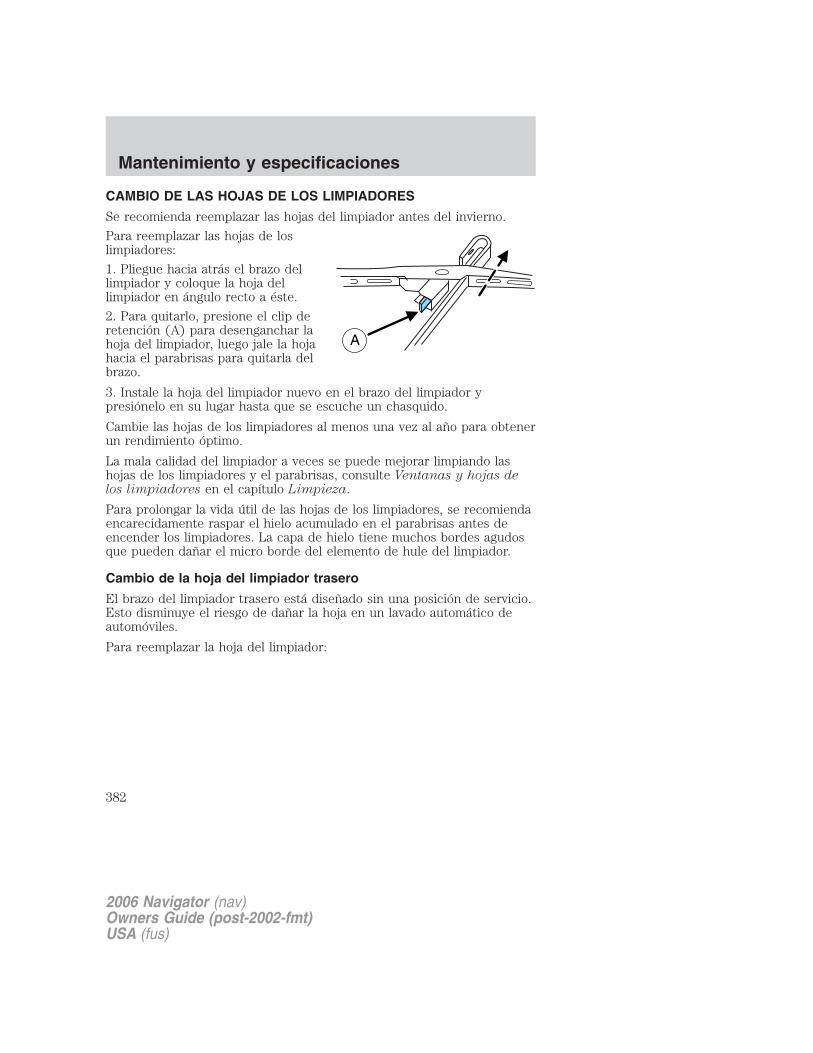
CAMBIO DE LAS HOJAS DE LOS LIMPIADORES
Se recomienda reemplazar las hojas del limpiador antes del invierno.
Para reemplazar las hojas de loslimpiadores:
1. Pliegue hacia atrás el brazo dellimpiador y coloque la hoja dellimpiador en ángulo recto a éste.
2. Para quitarlo, presione el clip deretención (A) para desenganchar lahoja del limpiador, luego jale la hojahacia el parabrisas para quitarla delbrazo.
3. Instale la hoja del limpiador nuevo en el brazo del limpiador ypresiónelo en su lugar hasta que se escuche un chasquido.
Cambie las hojas de los limpiadores al menos una vez al año para obtenerun rendimiento óptimo.
La mala calidad del limpiador a veces se puede mejorar limpiando lashojas de los limpiadores y el parabrisas, consulte Ventanas y hojas delos limpiadores en el capítulo Limpieza.
Para prolongar la vida útil de las hojas de los limpiadores, se recomiendaencarecidamente raspar el hielo acumulado en el parabrisas antes deencender los limpiadores. La capa de hielo tiene muchos bordes agudosque pueden dañar el micro borde del elemento de hule del limpiador.
Cambio de la hoja del limpiador trasero
El brazo del limpiador trasero está diseñado sin una posición de servicio.Esto disminuye el riesgo de dañar la hoja en un lavado automático deautomóviles.
Para reemplazar la hoja del limpiador:
2006 Navigator (nav)Owners Guide (post-2002-fmt)USA (fus)
Mantenimiento y especificaciones
382
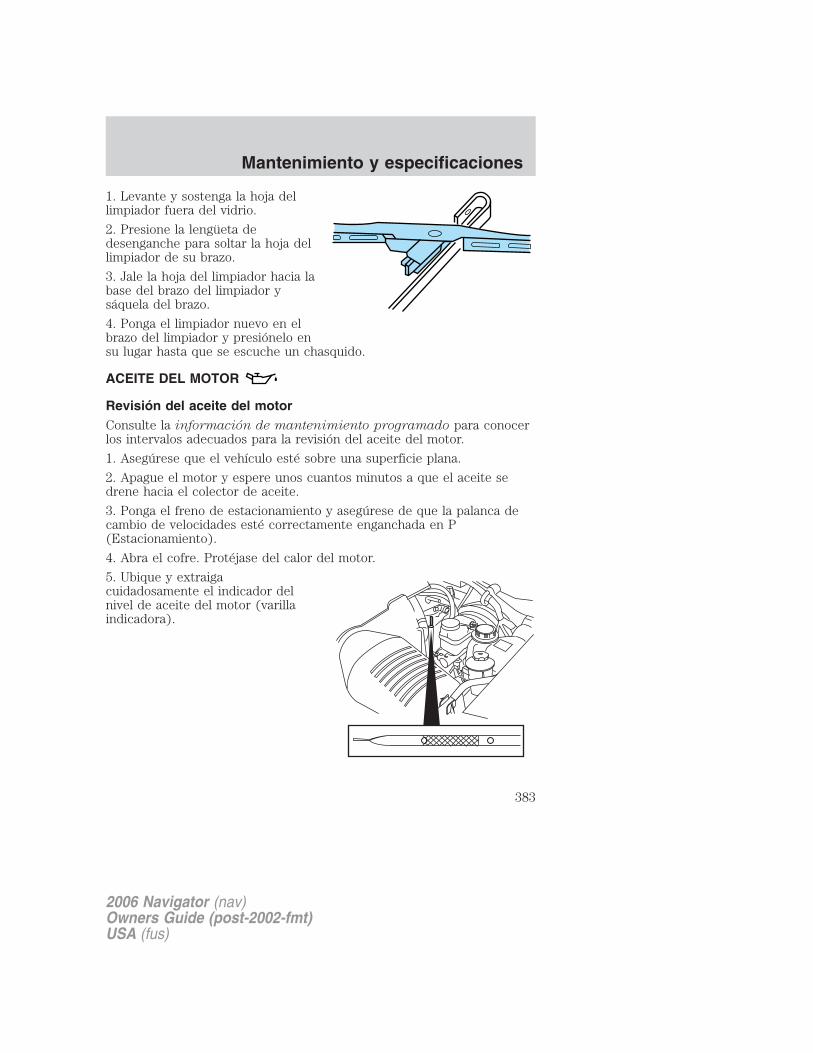
1. Levante y sostenga la hoja dellimpiador fuera del vidrio.
2. Presione la lengüeta dedesenganche para soltar la hoja dellimpiador de su brazo.
3. Jale la hoja del limpiador hacia labase del brazo del limpiador ysáquela del brazo.
4. Ponga el limpiador nuevo en elbrazo del limpiador y presiónelo ensu lugar hasta que se escuche un chasquido.
ACEITE DEL MOTOR
Revisión del aceite del motorConsulte la información de mantenimiento programado para conocerlos intervalos adecuados para la revisión del aceite del motor.
1. Asegúrese que el vehículo esté sobre una superficie plana.
2. Apague el motor y espere unos cuantos minutos a que el aceite sedrene hacia el colector de aceite.
3. Ponga el freno de estacionamiento y asegúrese de que la palanca decambio de velocidades esté correctamente enganchada en P(Estacionamiento).
4. Abra el cofre. Protéjase del calor del motor.
5. Ubique y extraigacuidadosamente el indicador delnivel de aceite del motor (varillaindicadora).
2006 Navigator (nav)Owners Guide (post-2002-fmt)USA (fus)
Mantenimiento y especificaciones
383

6. Limpie el indicador. Insértelo completamente y vuelva a extraerlo.
• Si el nivel de aceite está dentrode este rango, el nivel esaceptable. NO AGREGUEACEITE.
• Si el nivel de aceite está debajode esta marca, se debe agregaraceite del motor para aumentarel nivel dentro del rango defuncionamiento normal.
• Si se requiere, agregue aceite delmotor al motor. Consulte Llenadode aceite del motor en estecapítulo.
• No llene en exceso el motorcon aceite. Los niveles deaceite por encima de la marcapueden causar daños en elmotor. Si se llena el motor conexceso de aceite, un distribuidorautorizado debe quitar un poco de este aceite.
7. Ponga el indicador en su lugar y asegúrese que quede bien asentado.
Cómo agregar aceite de motor1. Revise el aceite del motor. Para obtener instrucciones, consulteRevisión del aceite del motor en este capítulo.2. Si el nivel de aceite del motor no está dentro del rango normal,agregue sólo aceite de motor certificado de la viscosidad recomendada.Retire el tapón de llenado de aceite del motor y use un embudo paraverter el aceite en la abertura.
2006 Navigator (nav)Owners Guide (post-2002-fmt)USA (fus)
Mantenimiento y especificaciones
384
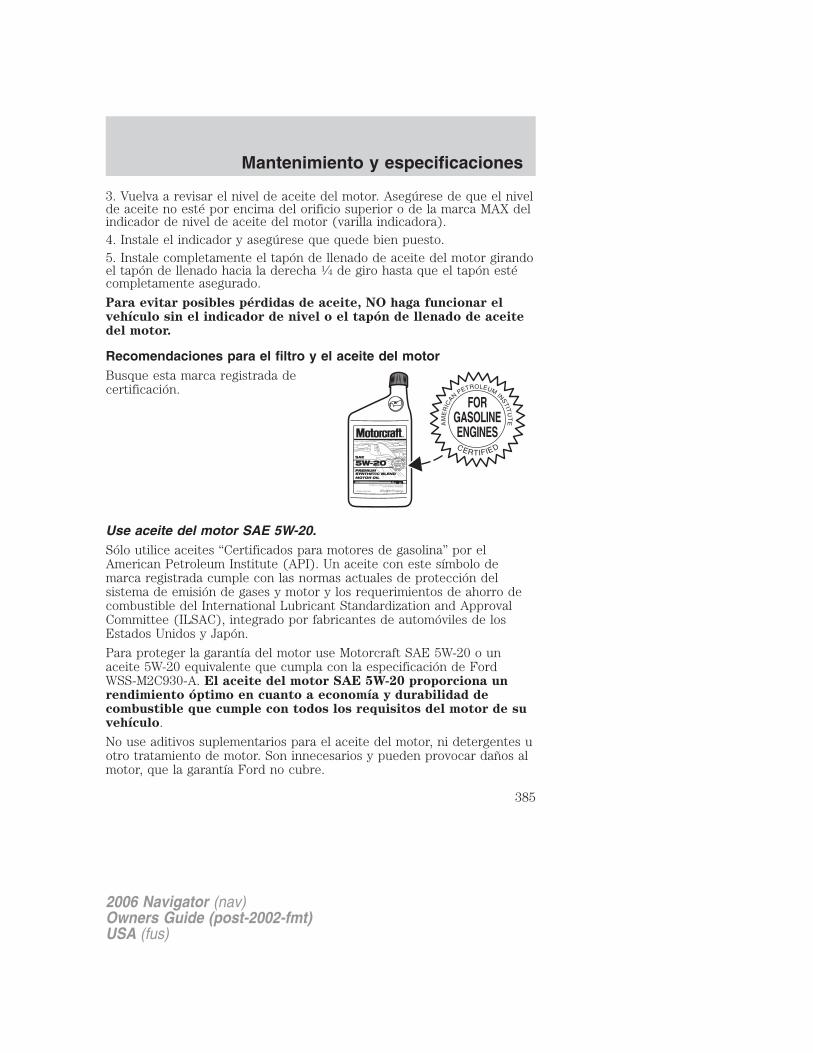
3. Vuelva a revisar el nivel de aceite del motor. Asegúrese de que el nivelde aceite no esté por encima del orificio superior o de la marca MAX delindicador de nivel de aceite del motor (varilla indicadora).4. Instale el indicador y asegúrese que quede bien puesto.5. Instale completamente el tapón de llenado de aceite del motor girandoel tapón de llenado hacia la derecha 1⁄4 de giro hasta que el tapón estécompletamente asegurado.
Para evitar posibles pérdidas de aceite, NO haga funcionar elvehículo sin el indicador de nivel o el tapón de llenado de aceitedel motor.
Recomendaciones para el filtro y el aceite del motorBusque esta marca registrada decertificación.
Use aceite del motor SAE 5W-20.Sólo utilice aceites “Certificados para motores de gasolina” por elAmerican Petroleum Institute (API). Un aceite con este símbolo demarca registrada cumple con las normas actuales de protección delsistema de emisión de gases y motor y los requerimientos de ahorro decombustible del International Lubricant Standardization and ApprovalCommittee (ILSAC), integrado por fabricantes de automóviles de losEstados Unidos y Japón.
Para proteger la garantía del motor use Motorcraft SAE 5W-20 o unaceite 5W-20 equivalente que cumpla con la especificación de FordWSS-M2C930-A. El aceite del motor SAE 5W-20 proporciona unrendimiento óptimo en cuanto a economía y durabilidad decombustible que cumple con todos los requisitos del motor de suvehículo.
No use aditivos suplementarios para el aceite del motor, ni detergentes uotro tratamiento de motor. Son innecesarios y pueden provocar daños almotor, que la garantía Ford no cubre.
2006 Navigator (nav)Owners Guide (post-2002-fmt)USA (fus)
Mantenimiento y especificaciones
385
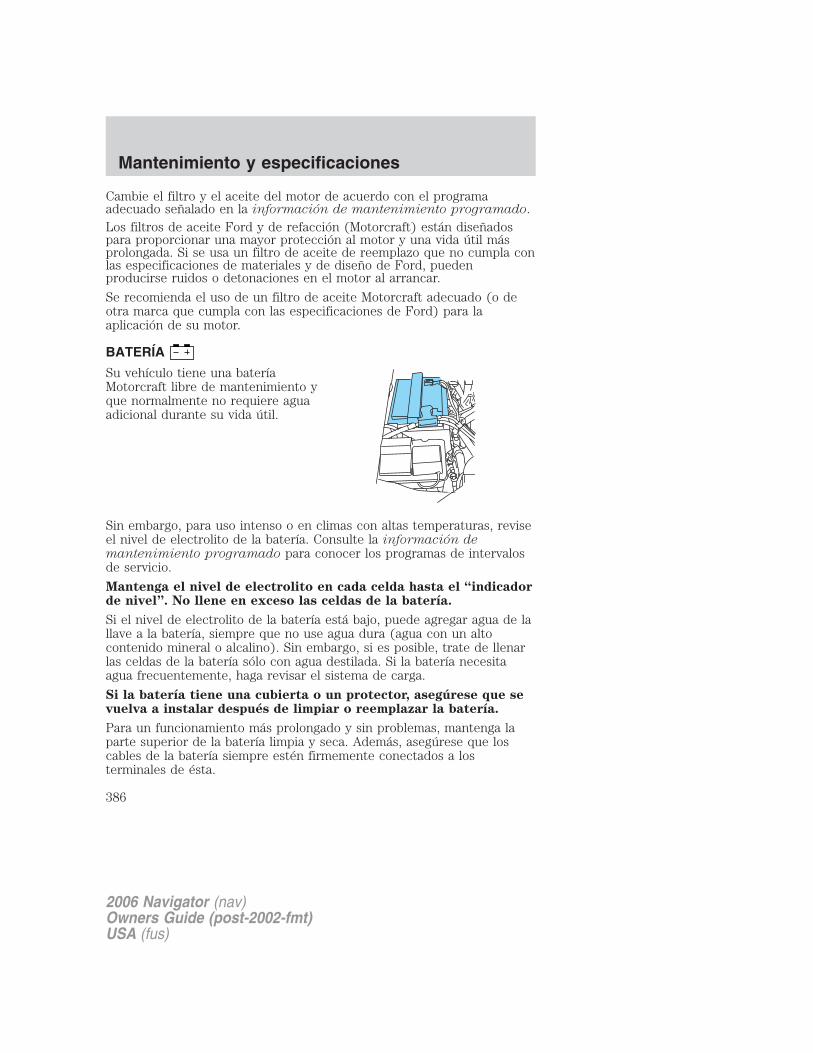
Cambie el filtro y el aceite del motor de acuerdo con el programaadecuado señalado en la información de mantenimiento programado.Los filtros de aceite Ford y de refacción (Motorcraft) están diseñadospara proporcionar una mayor protección al motor y una vida útil másprolongada. Si se usa un filtro de aceite de reemplazo que no cumpla conlas especificaciones de materiales y de diseño de Ford, puedenproducirse ruidos o detonaciones en el motor al arrancar.
Se recomienda el uso de un filtro de aceite Motorcraft adecuado (o deotra marca que cumpla con las especificaciones de Ford) para laaplicación de su motor.
BATERÍA
Su vehículo tiene una bateríaMotorcraft libre de mantenimiento yque normalmente no requiere aguaadicional durante su vida útil.
Sin embargo, para uso intenso o en climas con altas temperaturas, reviseel nivel de electrolito de la batería. Consulte la información demantenimiento programado para conocer los programas de intervalosde servicio.
Mantenga el nivel de electrolito en cada celda hasta el “indicadorde nivel”. No llene en exceso las celdas de la batería.
Si el nivel de electrolito de la batería está bajo, puede agregar agua de lallave a la batería, siempre que no use agua dura (agua con un altocontenido mineral o alcalino). Sin embargo, si es posible, trate de llenarlas celdas de la batería sólo con agua destilada. Si la batería necesitaagua frecuentemente, haga revisar el sistema de carga.
Si la batería tiene una cubierta o un protector, asegúrese que sevuelva a instalar después de limpiar o reemplazar la batería.
Para un funcionamiento más prolongado y sin problemas, mantenga laparte superior de la batería limpia y seca. Además, asegúrese que loscables de la batería siempre estén firmemente conectados a losterminales de ésta.
2006 Navigator (nav)Owners Guide (post-2002-fmt)USA (fus)
Mantenimiento y especificaciones
386
Si observa indicios de corrosión en la batería o en los terminales, quitelos cables de los terminales y límpielos con un cepillo de alambre. Puedeneutralizar el ácido con una solución de bicarbonato de sodio y agua.Cuando la batería se desconecta o se instala una nueva, la transmisióndebe aprender su estrategia adaptativa. Como resultado, la transmisiónpuede cambiar firmemente. Esta operación se considera normal y elfuncionamiento de la transmisión se actualizará completamente a supercepción de cambio óptima.Nota: la incorporación de accesorios o componentes eléctricos oelectrónicos al vehículo, por parte del distribuidor o delpropietario puede afectar el rendimiento y la durabilidad de labatería.
Las baterías normalmente producen gases explosivos que puedenprovocar lesiones personales. Por lo tanto, manténgalas lejos de
llamas, chispas o sustancias encendidas. Al trabajar cerca de la batería,protéjase siempre la cara y los ojos. Suministre siempre una ventilaciónadecuada.
Al levantar una batería con caja de plástico, la presión excesivaen las paredes del extremo puede hacer que el ácido fluya a
través de los tapones de ventilación y provoque lesiones personales odaños al vehículo o a la batería. Levante la batería con un portabateríaso con las manos apoyadas en esquinas opuestas.
Mantenga las baterías fuera del alcance de los niños. Las bateríascontienen ácido sulfúrico. Evite el contacto con la piel, los ojos o
la ropa. Protéjase los ojos al trabajar cerca de la batería pararesguardarse contra posibles salpicaduras de solución ácida. En caso decontacto del ácido con la piel o los ojos, lávese de inmediato con aguadurante 15 minutos como mínimo y consulte a un médico a labrevedad. Si el ácido se ingiere, llame de inmediato a un médico.
Los bornes, terminales y accesorios relacionados con la bateríacontienen plomo y compuestos de plomo. Lávese las manos
después de manipular.
Para obtener mayor información sobre el funcionamiento de latransmisión después de haber desconectado la batería, consulteEstrategia de cambio en el capítulo Manejo.
2006 Navigator (nav)Owners Guide (post-2002-fmt)USA (fus)
Mantenimiento y especificaciones
387

Debido a que el motor de su vehículo es controlado electrónicamente poruna computadora, algunas condiciones de control se mantienen conenergía proveniente de la batería. Cuando la batería se desconecta ocuando se instala una batería nueva, el motor debe volver a aprender suestrategia de ajuste de ralentí y combustible para un manejo yrendimiento óptimos. Para iniciar este proceso:
1. Con el vehículo completamente detenido, aplique el freno deestacionamiento.
2. Ponga la palanca de cambio de velocidades en P (Estacionamiento),desactive todos los accesorios y encienda el motor.
3. Ponga en marcha el motor hasta que alcance la temperatura normal defuncionamiento.
4. Deje que el motor funcione en ralentí durante al menos un minuto.
5. Encienda el aire acondicionado y deje que el motor funcione en ralentídurante al menos un minuto.
6. Quite el freno de estacionamiento. Con su pie en el pedal del freno ycon el aire acondicionado encendido, ponga el vehículo en D (Directa) ydeje que el motor funcione en ralentí durante al menos un minuto.
7. Maneje el vehículo para completar el nuevo proceso de aprendizaje.
• Es posible que deba manejar el vehículo 16 km (10 millas) o más parareaprender la estrategia de ajuste de ralentí y de combustible.
• Si no permite que el motor vuelva a aprender su ajuste deralentí, la calidad de ralentí de su vehículo puede verseafectada negativamente hasta que vuelva a aprenderla.
Si la batería se desconectó o si se instaló una nueva, el ajuste del reloj ydel radio se debe restablecer al volver a conectarla.
• Siempre elimine de maneraresponsable las baterías deautomóviles. Respete las normaslocales autorizadas paraeliminarlas. Llame a su centro dereciclaje local autorizado paraaveriguar más acerca del reciclajede baterías de automóviles.
LE
AD
RE
TU
RN
RECYCLE
2006 Navigator (nav)Owners Guide (post-2002-fmt)USA (fus)
Mantenimiento y especificaciones
388

LÍQUIDO REFRIGERANTE DEL MOTOR
Revisión del líquido refrigerante del motorLa concentración y nivel del líquido refrigerante del motor se debenrevisar en los intervalos indicados en la información de mantenimientoprogramado. La concentración de líquido refrigerante se debe mantenera 50/50 de líquido refrigerante y agua destilada, que equivale a un puntode congelamiento de -36° C (-34° F). La concentración del líquidorefrigerante se puede probar con un densímetro o un probadoranticongelante (como el probador Rotunda Battery and Antifreeze Tester,014–R1060). El nivel del líquido refrigerante se debe mantener en elnivel “FULL COLD” o dentro de “COLD FILL RANGE” en el depósito dellíquido refrigerante. Si el nivel cae por debajo de esta marca, agreguelíquido refrigerante según las instrucciones en la sección Llenado delíquido refrigerante del motor.
Su vehículo viene de fábrica lleno con una concentración 50/50 de líquidorefrigerante del motor y agua. Si la concentración de líquido refrigerantebaja del 40% o sobrepasa el 60%, las piezas del motor se pueden dañar opueden dejar de funcionar correctamente. Una mezcla 50/50 delíquido refrigerante y de agua proporciona lo siguiente:
• Protección contra el congelamiento hasta -36° C (-34° F)
• Protección contra la ebullición hasta 129° C (265° F).
• Protección contra óxido y otras formas de corrosión.
• Hace posible que los indicadores calibrados funcionencorrectamente.
2006 Navigator (nav)Owners Guide (post-2002-fmt)USA (fus)
Mantenimiento y especificaciones
389

Cuando el motor esté frío, revise elnivel de líquido refrigerante delmotor en el depósito.
• El líquido refrigerante del motor debe estar en el “FULL COLD” (nivelde llenado en frío) o dentro del “COLD FILL RANGE” (rango dellenado en frío) como se indica en el depósito del líquido refrigerantedel motor (dependiendo de la aplicación).
• Consulte la información de mantenimiento programado paraconocer los programas de intervalos de servicio.
• Asegúrese de leer y comprender las Precauciones al revisar suvehículo en este capítulo.
Si el líquido refrigerante del motor no se ha revisado en el intervalorecomendado, es posible que el depósito esté vacío o con un nivel bajo.Si el depósito está vacío o con un nivel bajo, agréguele líquidorefrigerante del motor. Consulte Llenado de líquido refrigerante delmotor en este capítulo.
Nota: los líquidos de automóviles no se pueden intercambiar; no utilicelíquido refrigerante del motor, anticongelante o líquido de lavaparabrisaspara una función diferente a la especificada, ni en otra parte delvehículo.
Llenado del líquido refrigerante del motorAl agregar líquido refrigerante, asegúrese que sea una mezcla 50/50 delíquido refrigerante del motor y agua destilada. Agregue la mezcla aldepósito del líquido refrigerante cuando el motor esté frío, hasta quese obtenga el nivel de llenado apropiado.
2006 Navigator (nav)Owners Guide (post-2002-fmt)USA (fus)
Mantenimiento y especificaciones
390
No agregue líquido refrigerante del motor cuando el motor estécaliente. El vapor y los líquidos candentes, liberados de un
sistema de enfriamiento caliente, pueden producirle quemadurasgraves. También puede sufrir quemaduras si derrama líquidorefrigerante en las piezas calientes del motor.
No coloque líquido refrigerante del motor en el contenedor dellíquido lavaparabrisas. Si se rocía en el parabrisas, el líquido
refrigerante del motor puede dificultar la visión a través del parabrisas.
• Agregue Motorcraft Premium Gold Engine Coolant (coloramarillo), VC-7–A (EE.UU., excepto CA, OR y NM), VC-7–B(CA, OR y NM), que cumpla con la especificación FordWSS-M97B51–A1.
Nota: el uso de Motorcraft Cooling System Stop Leak Pellets, VC-6,puede oscurecer el color de Motorcraft Premium Gold Engine Coolant deamarillo a canela.• No agregue/mezcle un líquido refrigerante color naranja de
larga vida como el Motorcraft Speciality Orange EngineCoolant, VC–2 y VC-3 (EE.UU.) o CXC–209 (Canadá), quecumple con la especificación WSS-M97B44–D de Ford, con ellíquido refrigerante que proviene de fábrica. La mezcla deMotorcraft Speciality Orange Engine Coolant o cualquier producto delarga vida de color naranja con su líquido refrigerante que proviene defábrica, puede hacer que se degrade la protección contra la corrosión.
• En caso de emergencia, se puede agregar una gran cantidad de aguasin líquido refrigerante del motor para poder llegar a un taller deservicio para su vehículo. En este caso, el sistema de enfriamiento sedebe drenar y volver a llenar lo antes posible con una mezcla 50/50 delíquido refrigerante del motor y agua destilada. Agregar solamenteagua (sin líquido refrigerante del motor) puede provocar daños en elmotor por corrosión, sobrecalentamiento o congelamiento.
• No use alcohol, metanol, agua salobre ni ningún líquidorefrigerante del motor mezclado con anticongelante (líquidorefrigerante) que contenga alcohol o metanol. El alcohol y otroslíquidos pueden provocar daños en el motor por sobrecalentamiento ocongelamiento.
• No agregue inhibidores o aditivos adicionales al líquidorefrigerante. Éstos pueden ser dañinos y pueden comprometer laprotección contra la corrosión del líquido refrigerante del motor.
2006 Navigator (nav)Owners Guide (post-2002-fmt)USA (fus)
Mantenimiento y especificaciones
391

En vehículos con sistemas de líquido refrigerante de derrame con untapón no presurizado en el sistema de recuperación del líquidorefrigerante, agregue líquido refrigerante al depósito de recuperación deeste líquido cuando el motor esté frío. Agregue la mezcla correcta delíquido refrigerante y agua hasta el nivel “FULL COLD”. Para todos losdemás vehículos que tengan un sistema de desgasificación de líquidorefrigerante con tapa presurizada o si es necesario quitar el tapón dedescarga de presión del líquido refrigerante en el radiador de un vehículocon un sistema de derrame, siga estos pasos para agregar líquidorefrigerante al motor.
Para disminuir el riesgo de sufrir lesiones personales, asegúreseque el motor esté frío antes de quitar el tapón de descarga de
presión del líquido refrigerante. El sistema de enfriamiento está bajopresión, por lo que pueden salir con fuerza vapor y líquido calientecuando se suelta ligeramente la tapa.
1. Antes de comenzar, apague el motor y deje que se enfríe.2. Cuando el motor esté frío, envuelva con un paño grueso el tapón dedescarga de presión del líquido refrigerante del depósito del líquido (unabotella de plástico translúcido). Gire el tapón lentamente hacia laizquierda hasta que la presión comience a liberarse.3. Apártese al liberar la presión.4. Cuando esté seguro que toda la presión se ha liberado, use el pañopara girar el tapón hacia la izquierda y quítelo.5. Llene lentamente el depósito del líquido refrigerante con la mezcla delíquido refrigerante correcta (ver arriba), hasta el nivel “COLD FILLRANGE” o “FULL COLD” en el depósito. Si quitó el tapón del radiadoren un sistema de derrame, llene el radiador hasta que el líquidorefrigerante resulte visible y el radiador esté prácticamente lleno.
6. Vuelva a colocar el tapón. Gire hasta que quede totalmente ajustado.(El tapón debe quedar completamente ajustado para impedir la pérdidade líquido refrigerante.)
Después de agregar cualquier líquido refrigerante, revise la concentraciónde líquido refrigerante (consulte Revisión del líquido refrigerante delmotor). Si la concentración no es 50/50 (protección hasta –34° F/–36°C), drene un poco de líquido refrigerante y ajuste la concentración. Esposible que se tengan que efectuar varios drenajes y adiciones paraobtener una concentración de líquido refrigerante 50/50.
Cada vez que se agregue líquido refrigerante, el nivel de éste en eldepósito del líquido refrigerante se debe revisar las próximas veces que
2006 Navigator (nav)Owners Guide (post-2002-fmt)USA (fus)
Mantenimiento y especificaciones
392
conduzca el vehículo. De ser necesario, agregue suficiente concentración50/50 de líquido refrigerante del motor y agua destilada para que el niveldel líquido llegue al punto apropiado.Si agregó más de 1.0 litro (1.0 cuarto de galón) de líquido refrigerantedel motor por mes, pida a su distribuidor autorizado que revise elsistema de enfriamiento del motor. El sistema de enfriamiento puedetener una fuga. Hacer funcionar un motor con un nivel de líquidorefrigerante bajo puede ocasionar un sobrecalentamiento del motor,además de posibles daños a éste.
Líquido refrigerante del motor recicladoFord Motor Company NO recomienda el uso de un líquido refrigerantereciclado del motor en vehículos originalmente provistos de MotorcraftPremium Gold Engine Coolant, dado que aún no se encuentra disponibleun proceso de reciclaje aprobado por Ford.
El líquido refrigerante del motor usado debe eliminarse de maneraapropiada. Siga las normas y reglamentos de su comunidad para reciclary eliminar los líquidos de automóviles.
Capacidad de llenado de refrigerantePara averiguar cuánto líquido puede contener el sistema de enfriamientode su vehículo, consulte Capacidades de llenado en esta sección.Llene el depósito de líquido refrigerante del motor según se describe enLlenado de líquido refrigerante del motor en esta sección.
Climas extremosSi conduce en climas extremadamente fríos (menos de –36° C [–34° F]):
• Puede ser necesario aumentar la concentración del líquidorefrigerante por encima del 50%.
• NUNCA aumente la concentración del líquido refrigerante porencima del 60%.
• Las concentraciones de líquido refrigerante del motor porencima del 60% disminuyen las características de proteccióncontra el sobrecalentamiento que posee el líquido refrigerantedel motor y pueden causar daños en el motor.
• Consulte la tabla en el envase del líquido refrigerante paraasegurarse que la concentración de líquido refrigerante de suvehículo proporcione la protección adecuada contra elcongelamiento a las temperaturas en que maneja durante losmeses de invierno.
2006 Navigator (nav)Owners Guide (post-2002-fmt)USA (fus)
Mantenimiento y especificaciones
393
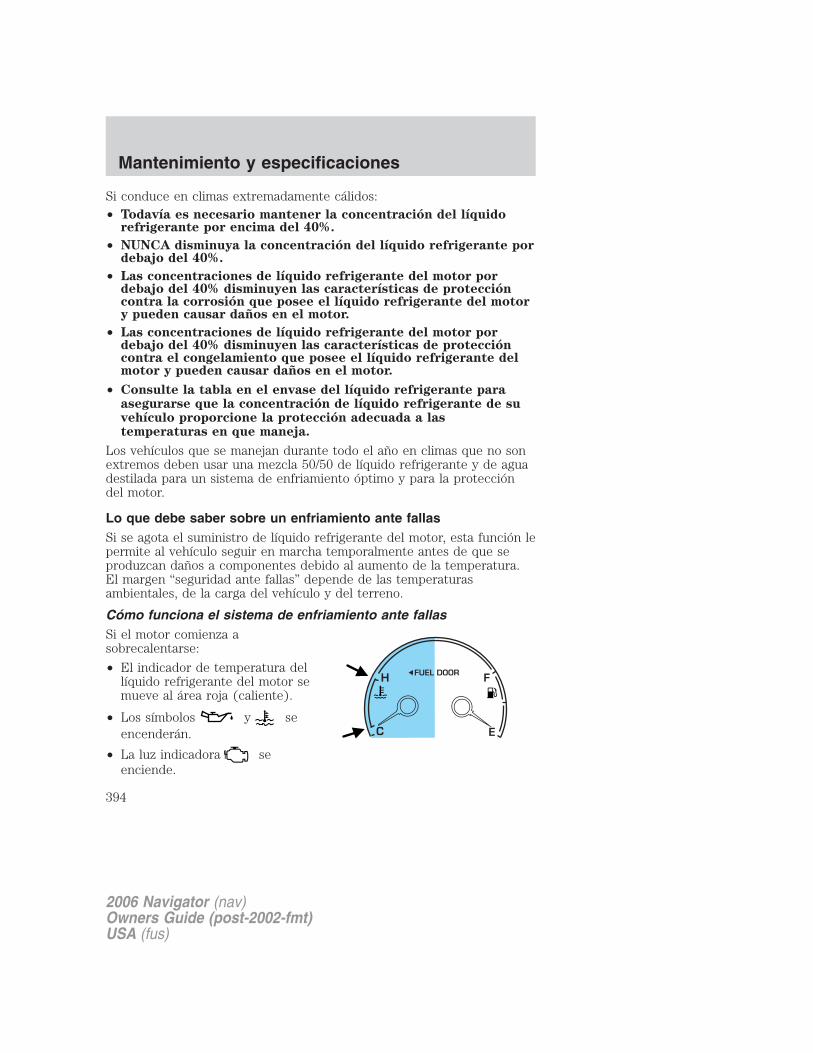
Si conduce en climas extremadamente cálidos:• Todavía es necesario mantener la concentración del líquido
refrigerante por encima del 40%.
• NUNCA disminuya la concentración del líquido refrigerante pordebajo del 40%.
• Las concentraciones de líquido refrigerante del motor pordebajo del 40% disminuyen las características de proteccióncontra la corrosión que posee el líquido refrigerante del motory pueden causar daños en el motor.
• Las concentraciones de líquido refrigerante del motor pordebajo del 40% disminuyen las características de proteccióncontra el congelamiento que posee el líquido refrigerante delmotor y pueden causar daños en el motor.
• Consulte la tabla en el envase del líquido refrigerante paraasegurarse que la concentración de líquido refrigerante de suvehículo proporcione la protección adecuada a lastemperaturas en que maneja.
Los vehículos que se manejan durante todo el año en climas que no sonextremos deben usar una mezcla 50/50 de líquido refrigerante y de aguadestilada para un sistema de enfriamiento óptimo y para la proteccióndel motor.
Lo que debe saber sobre un enfriamiento ante fallasSi se agota el suministro de líquido refrigerante del motor, esta función lepermite al vehículo seguir en marcha temporalmente antes de que seproduzcan daños a componentes debido al aumento de la temperatura.El margen “seguridad ante fallas” depende de las temperaturasambientales, de la carga del vehículo y del terreno.
Cómo funciona el sistema de enfriamiento ante fallasSi el motor comienza asobrecalentarse:
• El indicador de temperatura dellíquido refrigerante del motor semueve al área roja (caliente).
• Los símbolos y seencenderán.
• La luz indicadora seenciende.
2006 Navigator (nav)Owners Guide (post-2002-fmt)USA (fus)
Mantenimiento y especificaciones
394
• CHECK ENGINE TEMPERATURE (Revisar la temperatura del motor)se iluminará en el centro de mensajes.
Si alcanza una condición de temperatura excesiva preestablecida, elmotor cambia automáticamente al funcionamiento alterno de cilindros.Cada cilindro desactivado actúa como una bomba de aire y enfría elmotor.
Cuando esto sucede, el vehículo sigue funcionando. Sin embargo:
• La potencia del motor será limitada.
• El sistema de aire acondicionado se desactivará.
• Los mensajes de advertencia aparecerán en el centro de mensajes.
Si continúa funcionando, la temperatura del motor aumentará:
• El motor se detendrá por completo.
• Aumentará el esfuerzo de la dirección y del frenado.
Una vez que la temperatura del motor baja, éste se puede volver aarrancar. Lleve su vehículo a un taller de servicio lo más pronto posiblepara reducir el daño al motor.
Cuando se activa el modo de seguridad ante fallasAl estar en el modo seguridad ante fallas, el motor del vehículo tiene unapotencia limitada; por lo tanto, debe manejar con cuidado. El vehículo nopodrá mantener el funcionamiento en alta velocidad y el motorfuncionará en forma irregular. Recuerde que el motor es capaz dedetenerse por completo en forma automática para evitar daños en elmotor, por lo tanto:
1. Sálgase del camino lo antes posible y apague el motor.
2. Haga que su vehículo sea trasladado a un taller de servicio.
3. Si esto no es posible, espere un período corto para que el motor seenfríe.
4. Revise el nivel de líquido refrigerante y llénelo si está bajo.
Nunca quite el tapón del depósito del líquido refrigerantemientras el motor esté caliente o en funcionamiento.
5. Vuelva a arrancar el motor y lleve su vehículo a un taller de servicio.
Si maneja el vehículo sin reparar el problema del motor, laprobabilidad de que el motor se dañe aumenta. Lleve su vehículoa un lugar de servicio a la brevedad posible.
2006 Navigator (nav)Owners Guide (post-2002-fmt)USA (fus)
Mantenimiento y especificaciones
395
FILTRO DE COMBUSTIBLEPara cambiar el filtro de combustible, consulte con su distribuidorautorizado. Consulte la información de mantenimiento programadopara conocer los intervalos adecuados para cambiar el filtro decombustible.
Reemplace el filtro de combustible por una refacción Motorcraftautorizada. La garantía al usuario se puede anular por cualquierdaño al sistema de combustible, si no se usa un filtro decombustible Motorcraft autorizado.
LO QUE DEBE SABER ACERCA DE LOS COMBUSTIBLES PARAAUTOMÓVILES
Precauciones de seguridad importantes
No llene en exceso el tanque de combustible. La presión en untanque excesivamente lleno puede causar fuga de líquido y
conducir a un derrame de combustible y a un incendio.
El sistema de combustible puede estar bajo presión. Si el tapónde llenado de combustible está expulsando vapor o si escucha un
siseo, espere hasta que se detenga antes de quitar completamentedicho tapón. De lo contrario, el combustible podría derramarse yprovocarle lesiones a usted o a otros.
Si no usa el tapón de llenado de combustible correcto, la presióno el vacío excesivos en el tanque de combustible pueden dañar
el sistema de combustible o hacer que el tapón de combustible sedesenganche en caso de choque, lo que puede producir lesionespersonales.
Los combustibles para automóviles pueden causar serias heridaso la muerte si se usan o se manejan de modo indebido.
La gasolina puede contener benceno, que es un agentecancerígeno.
2006 Navigator (nav)Owners Guide (post-2002-fmt)USA (fus)
Mantenimiento y especificaciones
396

Observe las siguientes pautas al manipular combustible para automóviles:
• Apague todo artículo detabaquería y llama al descubiertoque exista en las cercanías antesde abastecer de combustible elvehículo.
• Siempre apague el vehículo antesde abastecerse se combustible.
• Los combustibles para automóviles pueden se dañinos o mortales si seingieren. Un combustible como la gasolina es altamente tóxico y si seingiere puede causar la muerte o un daño permanente. Si se ingierecombustible, llame a un médico cuanto antes, incluso si no sepresentan síntomas aparentes inmediatamente. Los efectos tóxicos delcombustible pueden no hacerse visibles durante horas.
• Evite inhalar los vapores del combustible. Inhalar demasiado vapor decombustible de cualquier tipo, puede provocar irritación a los ojos y alas vías respiratorias. En casos graves, la respiración excesiva oprolongada de vapor de combustible puede causar enfermedadesgraves y lesiones permanentes.
• Evite el contacto del combustible con los ojos. Si le salpicacombustible en los ojos, quítese los lentes de contacto (si los usa),lávese con agua abundante durante 15 minutos y busque atenciónmédica. Si no busca atención médica adecuada puede sufrir lesionespermanentes.
• Los combustibles también pueden ser dañinos si se absorben a travésde la piel. Si le salpica combustible en la piel o en la ropa, quítese deinmediato la ropa contaminada y lávese minuciosamente la piel conagua y jabón. El contacto reiterado o prolongado de la piel con líquidoo vapor de combustible produce irritación de la piel.
• Tenga especial cuidado si está tomando “Antabuse” u otras formas dedisulfiram para el tratamiento del alcoholismo. Respirar vapores degasolina o el contacto de la piel con ella puede provocar una reacciónadversa. En personas sensibles, puede producir lesiones oenfermedades graves. Si se salpica combustible en la piel, lave la pielde inmediato y minuciosamente con agua y jabón. Consulte deinmediato a un médico si sufre una reacción adversa.
Al abastecerse de combustible, apague siempre el motor y nuncapermita la presencia de chispas ni llamas cerca del cuello de
llenado. Nunca fume al abastecer de combustible. El vapor delcombustible es extremadamente peligroso bajo ciertas condiciones. Sedebe tener cuidado para evitar la inhalación en exceso de los gases.
2006 Navigator (nav)Owners Guide (post-2002-fmt)USA (fus)
Mantenimiento y especificaciones
397
El flujo de combustible a través de una boquilla de la bomba decombustible puede producir electricidad estática, lo que podría
provocar un incendio si el combustible se bombea hacia un contenedorde combustible no conectado a tierra.
Abastecimiento de combustible
El vapor del combustible quema en forma violenta y lainflamación del combustible puede causar lesiones graves. Para
evitar lesiones en usted y en otras personas:
• Lea y acate las instrucciones del lugar donde se abastecerá decombustible;
• Apague el motor antes de abastecerse de combustible;
• No fume si se encuentra cerca de combustible o si está abasteciendosu vehículo de combustible;
• Mantenga chispas, llamas y artículos de tabaquería lejos delcombustible;
• Permanezca fuera del vehículo y no deje la bomba de combustible sinsupervisión cuando abastezca el vehículo de combustible; en algunoslugares, esto es ilegal;
• Mantenga a los niños lejos de la bomba de combustible; nunca permitaque los niños bombeen combustible
Use las siguientes pautas para evitar la acumulación de estática al llenarun contenedor de combustible no conectado a tierra:
• Coloque en el suelo el contenedor aprobado de combustible.
• NO llene un contenedor de combustible mientras éste se encuentre enel vehículo (incluida el área de carga).
• Mantenga la boquilla de la bomba de combustible en contacto con elcontenedor mientras lo llena.
• NO use un dispositivo para mantener la manija de la bomba decombustible en la posición de llenado.
2006 Navigator (nav)Owners Guide (post-2002-fmt)USA (fus)
Mantenimiento y especificaciones
398
Tapón de llenado de combustibleEl tapón de llenado del tanque de combustible tiene un diseño graduadocon una característica de activación y desactivación de 1/4 de vuelta.Cuando llene el tanque de combustible de su vehículo:1. Apague el motor.2. Gire cuidadosamente el tapón de llenado 1/4 de vuelta hacia laizquierda para retirarlo.3. Jale para quitar el tapón del tubo de llenado de combustible.4. Para instalar el tapón, alinee las lengüetas del tapón con las muescasdel tubo de llenado.5. Gire el tapón de llenado 1/4 de vuelta hacia la derecha hasta que almenos se escuche un chasquido.
“CHECK FUEL CAP” (Revisar el tapón del combustible) aparece en elcentro de mensajes cuando el tapón de llenado de combustible no estácorrectamente instalado. La instalación correcta del tapón de llenado decombustible se verifica automáticamente cuando el vehículo está enfuncionamiento, pero nunca antes de haber consumido parte delcombustible (el indicador de combustible queda por debajo de la marcade tanque lleno). Una vez que el tapón de llenado de combustible estécorrectamente asegurado, la luz “CHECK FUEL CAP” (Revisar el tapóndel combustible) se apaga luego de manejar por un breve periodo.
Si debe reemplazar el tapón de llenado de combustible,reemplácelo por uno que esté diseñado para el vehículo. Lagarantía al usuario se puede anular por cualquier daño al tanquede combustible o al sistema de combustible si no se usa el tapónde llenado de combustible Ford o Motorcraft original y correcto.
El sistema de combustible puede estar bajo presión. Si el tapónde llenado de combustible está expulsando vapor o si escucha un
siseo, espere hasta que se detenga antes de quitar completamentedicho tapón. De lo contrario, el combustible podría derramarse yprovocarle lesiones a usted o a otros.
Si no usa el tapón de llenado de combustible correcto, la presióno el vacío excesivos en el tanque de combustible pueden dañar
el sistema de combustible o hacer que el tapón de combustible sedesenganche en caso de choque, lo que puede producir lesionespersonales.
2006 Navigator (nav)Owners Guide (post-2002-fmt)USA (fus)
Mantenimiento y especificaciones
399
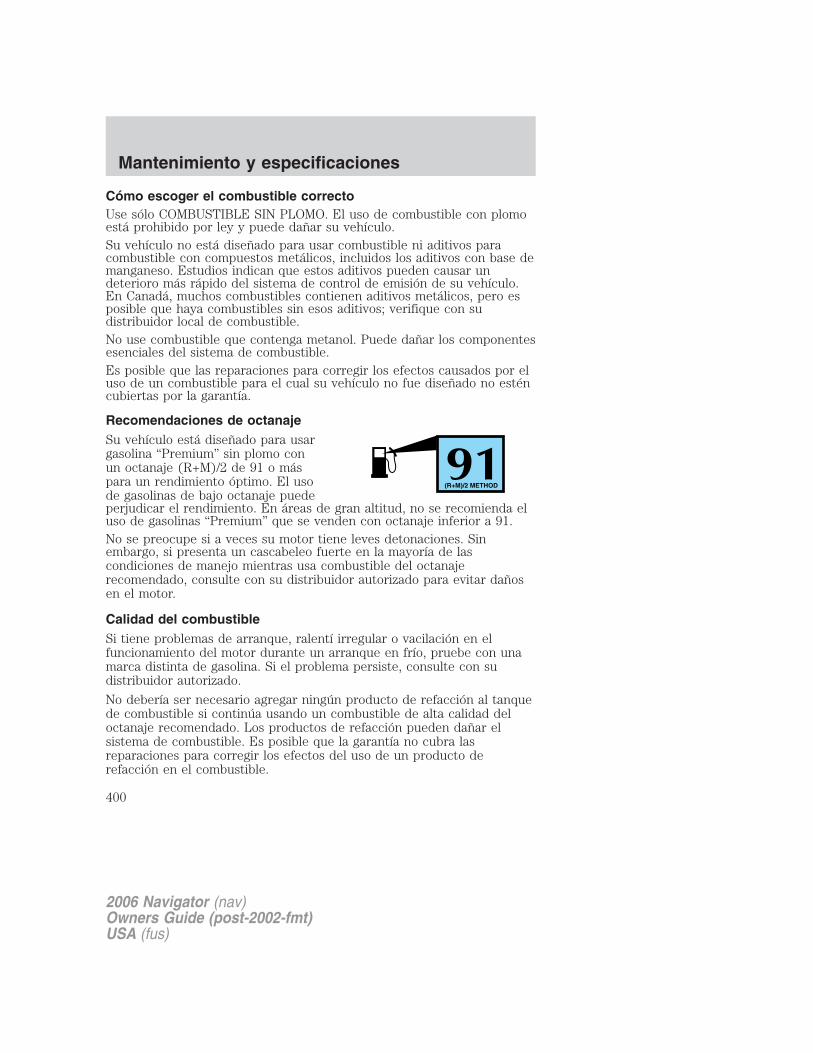
Cómo escoger el combustible correctoUse sólo COMBUSTIBLE SIN PLOMO. El uso de combustible con plomoestá prohibido por ley y puede dañar su vehículo.Su vehículo no está diseñado para usar combustible ni aditivos paracombustible con compuestos metálicos, incluidos los aditivos con base demanganeso. Estudios indican que estos aditivos pueden causar undeterioro más rápido del sistema de control de emisión de su vehículo.En Canadá, muchos combustibles contienen aditivos metálicos, pero esposible que haya combustibles sin esos aditivos; verifique con sudistribuidor local de combustible.No use combustible que contenga metanol. Puede dañar los componentesesenciales del sistema de combustible.Es posible que las reparaciones para corregir los efectos causados por eluso de un combustible para el cual su vehículo no fue diseñado no esténcubiertas por la garantía.
Recomendaciones de octanajeSu vehículo está diseñado para usargasolina “Premium” sin plomo conun octanaje (R+M)/2 de 91 o máspara un rendimiento óptimo. El usode gasolinas de bajo octanaje puedeperjudicar el rendimiento. En áreas de gran altitud, no se recomienda eluso de gasolinas “Premium” que se venden con octanaje inferior a 91.No se preocupe si a veces su motor tiene leves detonaciones. Sinembargo, si presenta un cascabeleo fuerte en la mayoría de lascondiciones de manejo mientras usa combustible del octanajerecomendado, consulte con su distribuidor autorizado para evitar dañosen el motor.
Calidad del combustibleSi tiene problemas de arranque, ralentí irregular o vacilación en elfuncionamiento del motor durante un arranque en frío, pruebe con unamarca distinta de gasolina. Si el problema persiste, consulte con sudistribuidor autorizado.
No debería ser necesario agregar ningún producto de refacción al tanquede combustible si continúa usando un combustible de alta calidad deloctanaje recomendado. Los productos de refacción pueden dañar elsistema de combustible. Es posible que la garantía no cubra lasreparaciones para corregir los efectos del uso de un producto derefacción en el combustible.
91(R+M)/2 METHOD
2006 Navigator (nav)Owners Guide (post-2002-fmt)USA (fus)
Mantenimiento y especificaciones
400
Muchos de los fabricantes de vehículos del mundo aprobaron el Cuadromundial de combustibles que recomienda especificaciones de gasolinapara proporcionar un mejor rendimiento y protección del sistema decontrol de emisión de gases del vehículo. Dentro de lo posible, se debenusar las gasolinas que cumplan con el Cuadro mundial de combustibles.Consulte al proveedor de combustible acerca de las gasolinas quecumplen con este cuadro.
Aire más limpioFord respalda el uso de gasolinas “con una combustión más limpia”reformuladas para mejorar la calidad del aire.
Sin combustibleEvite quedarse sin combustible, ya que esta situación puede afectarnegativamente los componentes del tren motriz.Si se queda sin combustible:• Es posible que usted deba realizar un ciclo de encendido desde OFF a
ON varias veces después de agregar combustible, para permitir que elsistema bombee el combustible desde el tanque al motor.
• Es posible que el indicador se encienda. Para obtener másinformación sobre el indicador “Check Engine” (Revisión del motor) oel “Service engine soon” (Servicio del motor a la brevedad), consulteel capítulo Grupo de instrumentos.
PUNTOS ESENCIALES PARA UNA BUENA ECONOMÍA DECOMBUSTIBLE
Técnicas de mediciónSu mejor fuente de información sobre la economía real del combustiblees usted, el conductor. Usted debe reunir información del modo máspreciso y constante posible. El gasto en combustible, la frecuencia dellenado o las lecturas del indicador de combustible NO son precisos comomedida de ahorro de combustible. No recomendamos medir el ahorro decombustible durante los primeros 1,600 km (1,000 millas) de manejo(período de asentamiento del motor). Obtendrá una medida más precisadespués de 3,000 a 5,000 km (2,000 a 3,000 millas).
Llenado del tanqueLa capacidad de combustible anunciada del tanque de combustible en suvehículo es igual a la capacidad promedio de llenado del tanque decombustible tal como aparece en la sección Capacidades de llenado deeste capítulo.
2006 Navigator (nav)Owners Guide (post-2002-fmt)USA (fus)
Mantenimiento y especificaciones
401
La capacidad anunciada es igual a la combinación entre la cantidad decapacidad indicada y la reserva de vacío. La capacidad indicada es ladiferencia en la cantidad de combustible en un tanque lleno y un tanquecuyo indicador de combustible señala vacío. La reserva de vacío es unapequeña cantidad de combustible que queda en el tanque de combustibledespués que el indicador de combustible señala vacío.La cantidad de combustible en la reserva de vacío varía y no sepuede confiar en ella para aumentar la capacidad de manejo. Alllenar el tanque de combustible de su vehículo después que elindicador de combustible ha señalado vacío, es posible que nopueda llenar la cantidad completa de capacidad anunciada deltanque de combustible debido a la reserva de vacío aún presenteen el tanque.
Para obtener resultados concretos al llenar el tanque de combustible:
• Apague el interruptor del motor y de encendido antes de volver allenar el tanque; podría producirse un error en la lectura si se dejaencendido.
• Use el mismo ajuste de velocidad de llenado (baja - media - alta) cadavez que llene el tanque.
• No permita más de dos chasquidos automáticos cuando llene concombustible.
• Siempre use combustible con el octanaje recomendado.
• Use una gasolina de calidad reconocida, preferentemente una marcanacional.
• Use el mismo lado de la misma bomba y coloque el vehículo en lamisma dirección cada vez que lo llene con combustible.
• Haga que la carga y la distribución del vehículo sean siempre lasmismas.
Sus resultados serán más precisos si su método de llenado es constante.
Cálculo para ahorrar combustible1. Llene completamente el tanque y registre la lectura inicial delodómetro (en kilómetros o millas).
2. Cada vez que llene el tanque, registre la cantidad de combustibleagregada (en galones o litros).
3. Después de llenar al menos tres a cinco veces el tanque, llene eltanque de combustible y registre la lectura actual del odómetro.
4. Reste de la lectura actual del odómetro su lectura inicial.
2006 Navigator (nav)Owners Guide (post-2002-fmt)USA (fus)
Mantenimiento y especificaciones
402
5. Siga uno de los cálculos simples para determinar el ahorro decombustible:
Cálculo 1: divida el total de millas recorridas por el total degalones usados.
Cálculo 2: multiplique los litros usados por 100, luego divida porel total de kilómetros recorridos.
Mantenga un registro durante al menos un mes y registre el tipo deconducción (ciudad o carretera). Esto le da una estimación precisa delahorro de combustible del vehículo en las condiciones actuales demanejo. Además, mantener registros durante el verano y el inviernomuestra la forma en que la temperatura afecta el ahorro de combustible.En general, las temperaturas bajas producen un menor ahorro decombustible.
Estilo de manejo: buenos hábitos de manejo y ahorro decombustibleDespués de analizar las listas que aparecen a continuación, usted podrácambiar algunas variables y aumentar su ahorro de combustible.Hábitos• El uso suave y moderado puede aumentar el ahorro de combustible
hasta en un 10%.• Las velocidades constantes sin paradas generalmente proporcionan el
mayor ahorro de combustible.• El ralentí durante períodos largos (más de un minuto) puede
desperdiciar combustible.• Anticipar las detenciones; disminuir la velocidad puede eliminar la
necesidad de detenerse.• Las aceleraciones repentinas o bruscas pueden reducir el ahorro de
combustible.• Baje la velocidad gradualmente.• Al manejar a velocidades razonables (viajar a 88 km/h [55 mph]), se usa
un 15% menos de combustible que cuando se viaja a 105 km/h (65 mph).• Acelerar el motor antes de apagarlo puede reducir el ahorro de
combustible.• El uso del aire acondicionado o el desempañador puede reducir el
ahorro de combustible.• Es posible que desee apagar el control de velocidad en terreno
montañoso si se producen cambios innecesarios entre tercera y cuarta.Este tipo de cambios innecesarios podría producir un menor ahorro decombustible.
2006 Navigator (nav)Owners Guide (post-2002-fmt)USA (fus)
Mantenimiento y especificaciones
403

• El calentamiento del vehículo en mañanas frías no es necesario y estopuede reducir el ahorro de combustible.
• Apoyar el pie sobre el pedal del freno al manejar puede reducir elahorro de combustible.
• Combine las diligencias y minimice el manejo con frenadas yarranques.
Mantenimiento• Mantenga las llantas correctamente infladas y use sólo el tamaño
recomendado.• El uso de un vehículo con las ruedas desalineadas reducirá el ahorro
de combustible.• Use el aceite de motor recomendado. Consulte Especificaciones del
lubricante en este capítulo.• Realice todas las tareas de mantenimiento programado en forma
regular. Siga el programa de mantenimiento recomendado y lasrevisiones de mantenimiento del propietario que aparecen en lainformación de mantenimiento programado.
Condiciones• Si carga demasiado un vehículo o si arrastra un remolque, puede
reducir el ahorro de combustible a cualquier velocidad.• Si transporta peso innecesario, el ahorro de combustible puede
reducirse (se pierde unos 0.4 km/L [1 mpg] por cada 180 kg [400 lbs]de peso transportado).
• Si agrega determinados accesorios a su vehículo (por ejemplo,deflectores de insectos, barras antivolcadura y de luces, estribos, portaski o parrillas portaequipaje), puede reducirse el ahorro decombustible.
• El uso de combustible mezclado con alcohol puede reducir el ahorrode combustible.
• El ahorro de combustible puede disminuir con temperaturas más bajasdurante los primeros 12 a 16 km (8 a 10 millas) de manejo.
• El manejo sobre terreno plano implica un mayor ahorro decombustible en comparación con el manejo sobre terreno montañoso.
• Las transmisiones proporcionan un mayor ahorro de combustible alusarlas a la velocidad de crucero máxima y con presión constantesobre el acelerador.
• El funcionamiento de la tracción en las cuatro ruedas (si estáinstalada) es menos eficiente en el uso del combustible que la tracciónen dos ruedas.
2006 Navigator (nav)Owners Guide (post-2002-fmt)USA (fus)
Mantenimiento y especificaciones
404
• Cierre las ventanas para manejar a alta velocidad.
Calcomanía EPA para la ventanaLas características del vehículo con tracción en las cuatro ruedas, comola de muchos productos similares, se ajusta a categorías en donde lasnormas de etiquetado de ahorro de combustible no se aplican. Por lotanto, la siguiente información se aplica sólo al vehículo con tracción endos ruedas.Todo vehículo nuevo debe tener la calcomanía EPA en la ventana.Comuníquese con su distribuidor autorizado si no viene la calcomanía enla ventana del vehículo. La calcomanía EPA para la ventana debe ser laguía para las comparaciones del ahorro de combustible con otrosvehículos.
Es importante observar el cuadro en el extremo inferior izquierdo de lacalcomanía para la ventana. Estos números representan el rango deahorro de combustible esperado en el vehículo en condiciones óptimas.El ahorro de combustible puede variar dependiendo del método defuncionamiento y las condiciones.
SISTEMA DE CONTROL DE EMISIÓN DE GASES
Su vehículo está equipado con diversos componentes de control deemisión de gases y un convertidor catalítico que le permitirán cumplircon las normas de emisión de gases correspondientes. Para asegurarseque el convertidor catalítico y los demás componentes de control deemisión de gases sigan funcionando correctamente:
• Use sólo el combustible especificado.
• Evite quedarse sin combustible.
• No apague el encendido mientras su vehículo está en movimiento,especialmente a altas velocidades.
• Lleve a cabo los puntos mencionados en la información demantenimiento programado de acuerdo con el programaespecificado.
Los puntos de mantenimiento programado mencionados en lainformación de mantenimiento programado son esenciales para lavida útil y el rendimiento de su vehículo y de su sistema de emisión degases.
Si se usan refacciones que no sean Ford, Motorcraft o autorizadas porFord para los reemplazos de mantenimiento o para el servicio decomponentes que afecten el control de emisión de gases, dichas
2006 Navigator (nav)Owners Guide (post-2002-fmt)USA (fus)
Mantenimiento y especificaciones
405
refacciones que no son Ford deben ser equivalentes a las refaccionesFord Motor Company originales en cuanto a rendimiento y durabilidad.
No estacione, ponga en ralentí o maneje su vehículo en pastoseco u otras superficies secas. El sistema de emisión de gases
calienta el compartimiento del motor y el sistema de escape, lo quepuede iniciar un incendio.
El encendido del indicador , la luz de advertencia del sistema decarga o la luz de advertencia de temperatura, las fugas de líquido, losolores extraños, el humo o la pérdida de potencia del motor, puedenindicar que el sistema de control de emisión de gases no estáfuncionando adecuadamente.
Las fugas del escape pueden provocar el ingreso de gasesdañinos y potencialmente letales al compartimiento de pasajeros.
No efectúe cambios no autorizados en el vehículo o el motor. Por ley, lospropietarios de vehículos y las personas que fabriquen, reparen, revisen,vendan, renten, comercialicen o supervisen una flotilla de vehículos, noestán autorizados para quitar intencionalmente un dispositivo de controlde emisión de gases ni para impedir su funcionamiento. En la Calcomaníade información sobre el control de emisión de gases del vehículo, que seencuentra en o cerca del motor, está la información acerca del sistemade emisión de gases de su vehículo. Esta calcomanía identifica lacilindrada del motor y entrega algunas especificaciones de afinamiento.Consulte su Manual de garantías para obtener una completainformación sobre la garantía del sistema de emisión de gases.
Diagnóstico a bordo (OBD-II)Su vehículo tiene una computadora que monitorea el sistema de controlde emisión de gases del motor. Este sistema se conoce comúnmentecomo Sistema de diagnóstico a bordo (OBD-II). El sistema OBD-IIprotege el medio ambiente, asegurando que su vehículo siga cumpliendocon las normas gubernamentales sobre emisión de gases. El sistemaOBD-II además ayuda a su distribuidor autorizado a prestar la asistenciaadecuada a su vehículo. Cuando el indicador se ilumina, significaque el sistema OBD-II detectó un desperfecto. Los desperfectostemporales pueden hacer que su indicador se encienda. Porejemplo:
1. El vehículo se quedó sin combustible: el motor puede fallar ofuncionar en forma deficiente.
2006 Navigator (nav)Owners Guide (post-2002-fmt)USA (fus)
Mantenimiento y especificaciones
406

2. El combustible es de mala calidad o contiene agua.
3. Es posible que el tapón de combustible no esté bien apretado.Consulte Tapón de llenado de combustible en este capítulo.
Estos desperfectos temporales se pueden corregir llenando el tanque concombustible de buena calidad y/o instalando y apretando firmemente eltapón de combustible. Después de tres ciclos de manejo sin que sepresenten estos u otros desperfectos temporales, el indicadordebería apagarse; un ciclo de manejo consiste en un arranque de motoren frío seguido por el manejo de ciudad y carretera. No se requiere unservicio adicional del vehículo.
Si el indicador continúa encendido, haga revisar su vehículo a labrevedad posible.
Disponibilidad para prueba de inspección y mantenimiento (I/M)En algunos lugares, puede ser una exigencia legal aprobar una prueba deinspección y mantenimiento (I/M) del sistema de diagnóstico a bordo. Siel indicador está encendido, consulte la descripción en la secciónLuces y campanillas de advertencia del capítulo Grupo deinstrumentos. Es posible que su vehículo no pase la prueba I/M si elindicador está encendido.
Si el sistema de tren motriz del vehículo o su batería acaba de revisarse,el sistema de diagnóstico a bordo se restablece a una condición “notready for I/M test” (no listo para prueba de I/M). Para preparar elsistema de diagnóstico a bordo para la prueba de I/M, es necesario unmínimo de 30 minutos de manejo en la ciudad y en la carretera tal comose describe a continuación:
• Primero, al menos 10 minutos de manejo en autopista o en carretera.
• Después, al menos 20 minutos de manejo con frenadas y arranques,tráfico de ciudad con al menos cuatro períodos en ralentí.
Deje detenido el vehículo por al menos ocho horas sin arrancar el motor.Luego, arranque el motor y complete el ciclo de manejo anterior. Elmotor debe alcanzar su temperatura normal de funcionamiento. Una vezque haya arrancado, no apague el motor hasta completar el ciclo demanejo indicado.
2006 Navigator (nav)Owners Guide (post-2002-fmt)USA (fus)
Mantenimiento y especificaciones
407
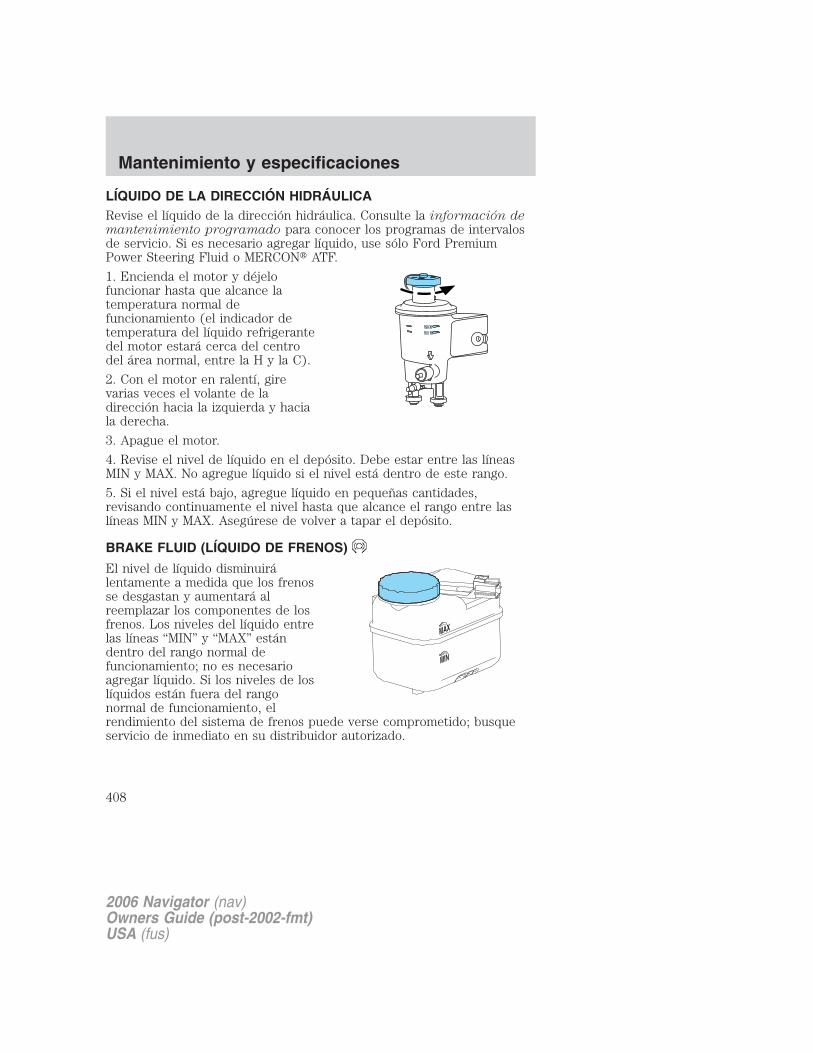
LÍQUIDO DE LA DIRECCIÓN HIDRÁULICARevise el líquido de la dirección hidráulica. Consulte la información demantenimiento programado para conocer los programas de intervalosde servicio. Si es necesario agregar líquido, use sólo Ford PremiumPower Steering Fluid o MERCON� ATF.
1. Encienda el motor y déjelofuncionar hasta que alcance latemperatura normal defuncionamiento (el indicador detemperatura del líquido refrigerantedel motor estará cerca del centrodel área normal, entre la H y la C).
2. Con el motor en ralentí, girevarias veces el volante de ladirección hacia la izquierda y haciala derecha.
3. Apague el motor.
4. Revise el nivel de líquido en el depósito. Debe estar entre las líneasMIN y MAX. No agregue líquido si el nivel está dentro de este rango.
5. Si el nivel está bajo, agregue líquido en pequeñas cantidades,revisando continuamente el nivel hasta que alcance el rango entre laslíneas MIN y MAX. Asegúrese de volver a tapar el depósito.
BRAKE FLUID (LÍQUIDO DE FRENOS)
El nivel de líquido disminuirálentamente a medida que los frenosse desgastan y aumentará alreemplazar los componentes de losfrenos. Los niveles del líquido entrelas líneas “MIN” y “MAX” estándentro del rango normal defuncionamiento; no es necesarioagregar líquido. Si los niveles de loslíquidos están fuera del rangonormal de funcionamiento, elrendimiento del sistema de frenos puede verse comprometido; busqueservicio de inmediato en su distribuidor autorizado.
2006 Navigator (nav)Owners Guide (post-2002-fmt)USA (fus)
Mantenimiento y especificaciones
408
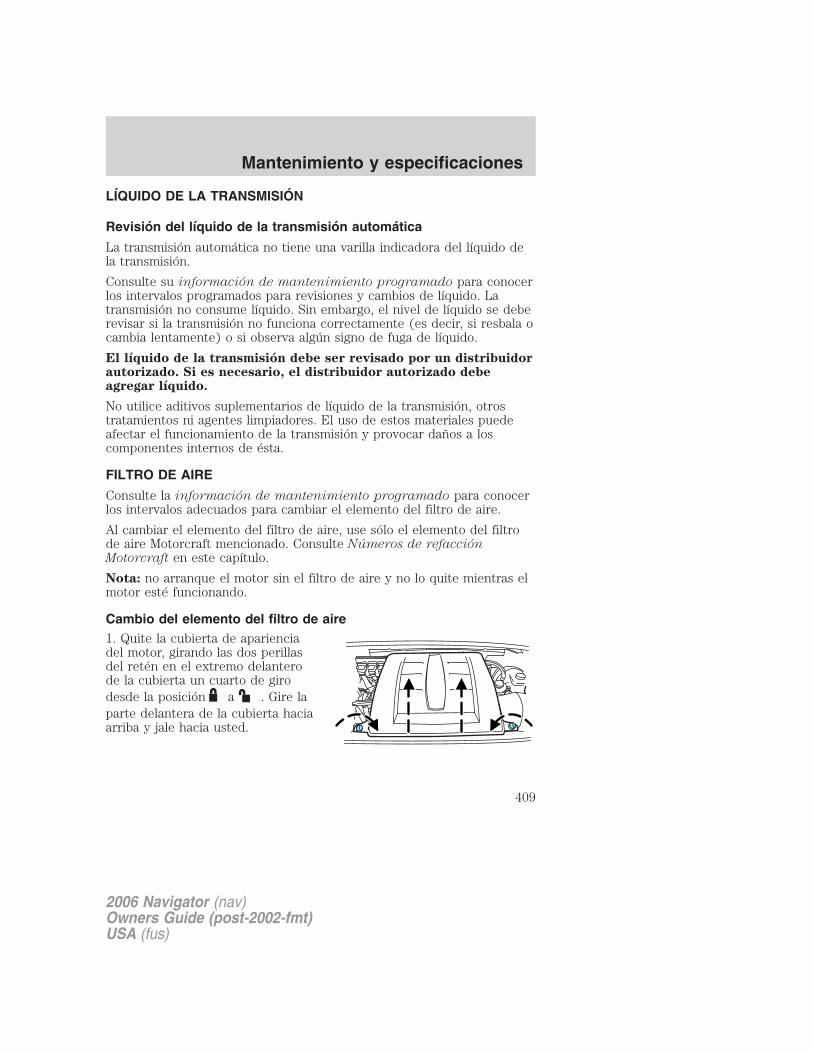
LÍQUIDO DE LA TRANSMISIÓN
Revisión del líquido de la transmisión automática
La transmisión automática no tiene una varilla indicadora del líquido dela transmisión.
Consulte su información de mantenimiento programado para conocerlos intervalos programados para revisiones y cambios de líquido. Latransmisión no consume líquido. Sin embargo, el nivel de líquido se deberevisar si la transmisión no funciona correctamente (es decir, si resbala ocambia lentamente) o si observa algún signo de fuga de líquido.
El líquido de la transmisión debe ser revisado por un distribuidorautorizado. Si es necesario, el distribuidor autorizado debeagregar líquido.
No utilice aditivos suplementarios de líquido de la transmisión, otrostratamientos ni agentes limpiadores. El uso de estos materiales puedeafectar el funcionamiento de la transmisión y provocar daños a loscomponentes internos de ésta.
FILTRO DE AIRE
Consulte la información de mantenimiento programado para conocerlos intervalos adecuados para cambiar el elemento del filtro de aire.
Al cambiar el elemento del filtro de aire, use sólo el elemento del filtrode aire Motorcraft mencionado. Consulte Números de refacciónMotorcraft en este capítulo.
Nota: no arranque el motor sin el filtro de aire y no lo quite mientras elmotor esté funcionando.
Cambio del elemento del filtro de aire1. Quite la cubierta de aparienciadel motor, girando las dos perillasdel retén en el extremo delanterode la cubierta un cuarto de girodesde la posición a . Gire laparte delantera de la cubierta haciaarriba y jale hacia usted.
2006 Navigator (nav)Owners Guide (post-2002-fmt)USA (fus)
Mantenimiento y especificaciones
409
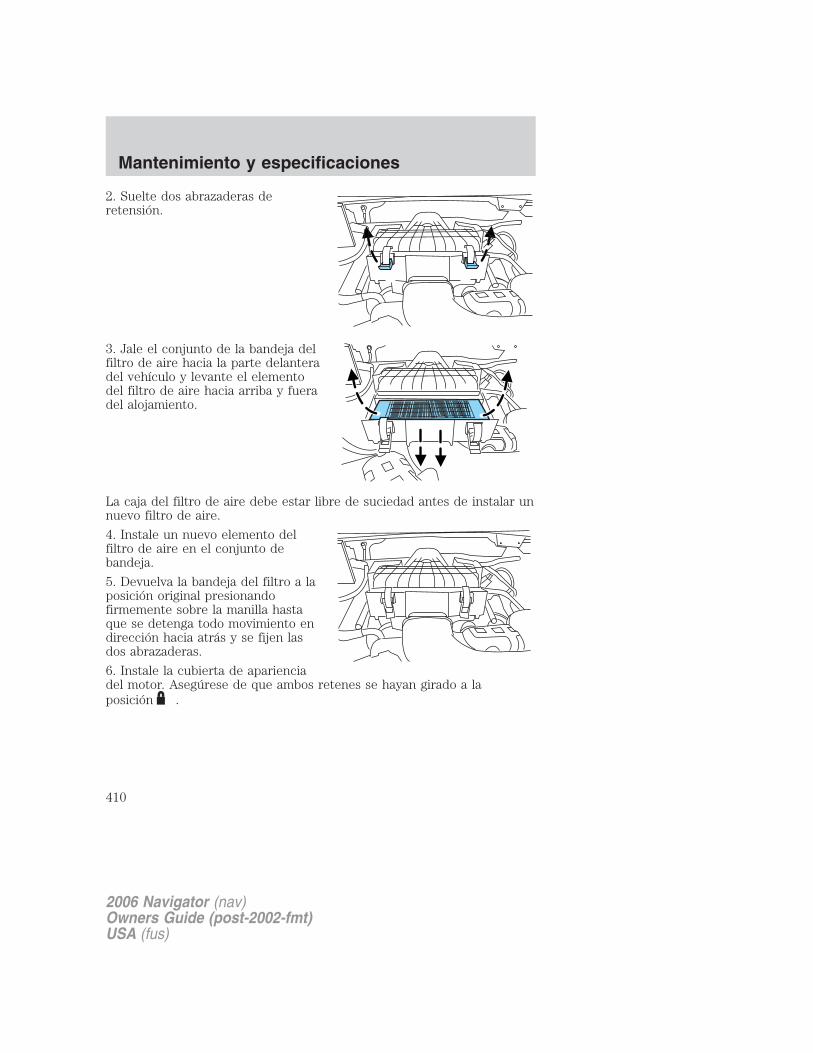
2. Suelte dos abrazaderas deretensión.
3. Jale el conjunto de la bandeja delfiltro de aire hacia la parte delanteradel vehículo y levante el elementodel filtro de aire hacia arriba y fueradel alojamiento.
La caja del filtro de aire debe estar libre de suciedad antes de instalar unnuevo filtro de aire.
4. Instale un nuevo elemento delfiltro de aire en el conjunto debandeja.
5. Devuelva la bandeja del filtro a laposición original presionandofirmemente sobre la manilla hastaque se detenga todo movimiento endirección hacia atrás y se fijen lasdos abrazaderas.
6. Instale la cubierta de aparienciadel motor. Asegúrese de que ambos retenes se hayan girado a laposición .
2006 Navigator (nav)Owners Guide (post-2002-fmt)USA (fus)
Mantenimiento y especificaciones
410
FLECHA CARDÁN Y YUGO DESPLAZABLE DE LA TRANSMISIÓN
Puede que el vehículo tenga instaladas las flechas cardán que requierenlubricación. Consulte la información de mantenimiento programado
para obtener información acerca de los intervalos de mantenimiento. Lalubricación también es necesaria si las flechas cardán originales sereemplazan por flechas cardán con conexiones de engrase.
NÚMEROS DE REFACCIONES MOTORCRAFT
Componente Motor de 5.4L 3V V8
Elemento del filtro de aire FA-1754Batería BXT-65-650Filtro de combustible FG-986BFiltro de aceite FL-820-SVálvula PCV 1
Bujías 2
1La válvula PCV es un componente de emisión crítico. Es uno de losservicios mencionados en la información de mantenimiento
programado y es esencial para la vida útil y el rendimiento del vehículoy de su sistema de emisión de gases.
Para obtener información acerca del reemplazo de la válvula PCV,consulte con su distribuidor autorizado. Consulte la información de
mantenimiento programado para conocer los intervalos adecuadospara cambiar la válvula PCV.
Reemplace la válvula PCV con una que cumpla con los materiales
y especificaciones de diseño Ford para su vehículo, tales como
refacciones de Motorcraft o equivalentes. La garantía al usuario
se puede anular por cualquier daño al sistema de emisión de
gases si no se usa una válvula PCV.
2Para el reemplazo de las bujías, consulte con su distribuidor autorizado.Consulte la información de mantenimiento programado para conocerlos intervalos adecuados para cambiar las bujías.
Reemplace las bujías por otras que cumplan con los materiales yespecificaciones de diseño Ford para su vehículo, tales comorefacciones de Motorcraft o equivalentes. La garantía al usuariose puede anular por cualquier daño al motor si no se usan talesbujías.
2006 Navigator (nav)Owners Guide (post-2002-fmt)USA (fus)
Mantenimiento y especificaciones
411
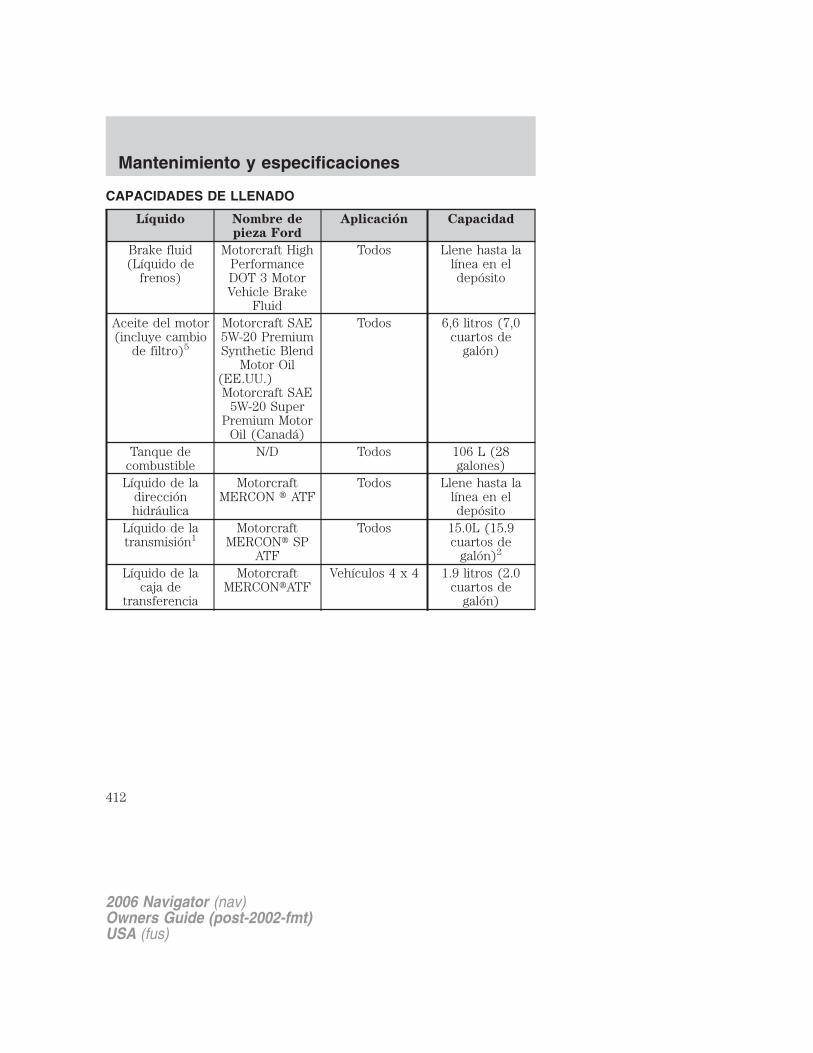
CAPACIDADES DE LLENADO
Líquido Nombre depieza Ford
Aplicación Capacidad
Brake fluid(Líquido de
frenos)
Motorcraft HighPerformanceDOT 3 MotorVehicle Brake
Fluid
Todos Llene hasta lalínea en eldepósito
Aceite del motor(incluye cambio
de filtro)5
Motorcraft SAE5W-20 PremiumSynthetic Blend
Motor Oil(EE.UU.)Motorcraft SAE
5W-20 SuperPremium Motor
Oil (Canadá)
Todos 6,6 litros (7,0cuartos de
galón)
Tanque decombustible
N/D Todos 106 L (28galones)
Líquido de ladirecciónhidráulica
MotorcraftMERCON � ATF
Todos Llene hasta lalínea en eldepósito
Líquido de latransmisión1
MotorcraftMERCON� SP
ATF
Todos 15.0L (15.9cuartos de
galón)2
Líquido de lacaja de
transferencia
MotorcraftMERCON�ATF
Vehículos 4 x 4 1.9 litros (2.0cuartos de
galón)
2006 Navigator (nav)Owners Guide (post-2002-fmt)USA (fus)
Mantenimiento y especificaciones
412
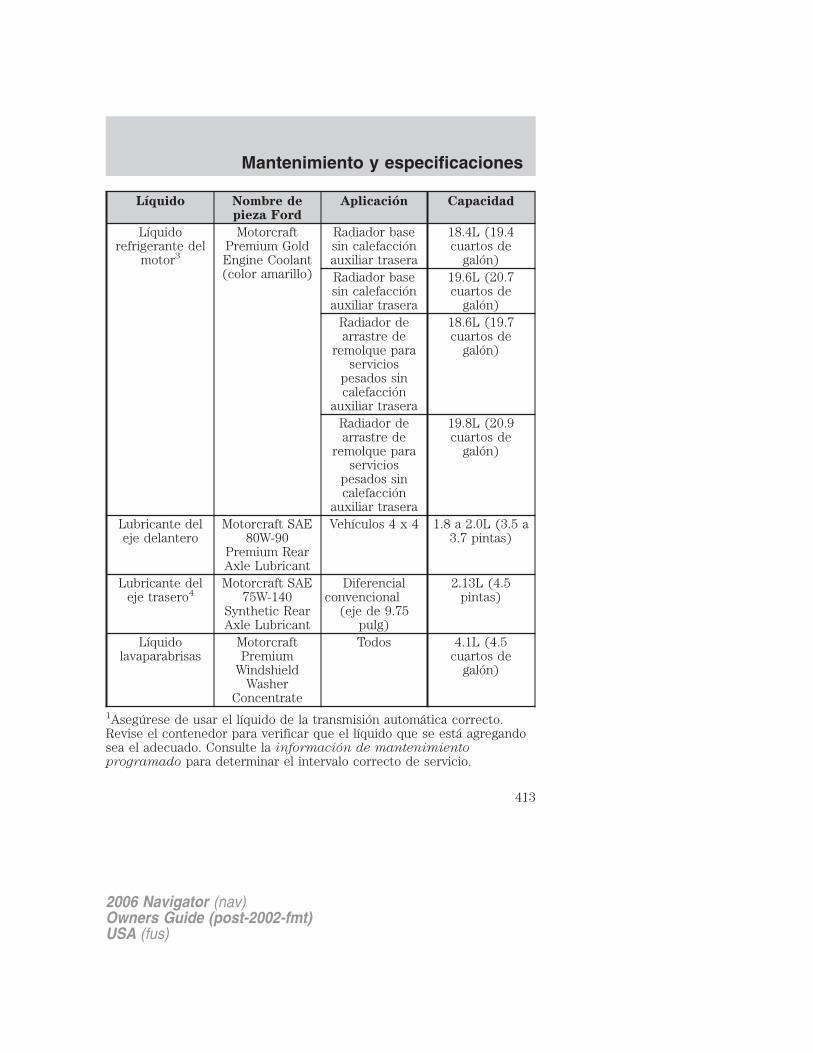
Líquido Nombre depieza Ford
Aplicación Capacidad
Líquidorefrigerante del
motor3
MotorcraftPremium GoldEngine Coolant(color amarillo)
Radiador basesin calefacciónauxiliar trasera
18.4L (19.4cuartos de
galón)Radiador basesin calefacciónauxiliar trasera
19.6L (20.7cuartos de
galón)Radiador dearrastre de
remolque paraservicios
pesados sincalefacción
auxiliar trasera
18.6L (19.7cuartos de
galón)
Radiador dearrastre de
remolque paraservicios
pesados sincalefacción
auxiliar trasera
19.8L (20.9cuartos de
galón)
Lubricante deleje delantero
Motorcraft SAE80W-90
Premium RearAxle Lubricant
Vehículos 4 x 4 1.8 a 2.0L (3.5 a3.7 pintas)
Lubricante deleje trasero4
Motorcraft SAE75W-140
Synthetic RearAxle Lubricant
Diferencialconvencional
(eje de 9.75pulg)
2.13L (4.5pintas)
Líquidolavaparabrisas
MotorcraftPremium
WindshieldWasher
Concentrate
Todos 4.1L (4.5cuartos de
galón)
1Asegúrese de usar el líquido de la transmisión automática correcto.Revise el contenedor para verificar que el líquido que se está agregandosea el adecuado. Consulte la información de mantenimientoprogramado para determinar el intervalo correcto de servicio.
2006 Navigator (nav)Owners Guide (post-2002-fmt)USA (fus)
Mantenimiento y especificaciones
413
MERCON�, MERCON� V y MERCON� SP no son intercambiables.NO mezcle MERCON�, MERCON� V y MERCON� SP. Lautilización de líquidos de uso doble en una aplicación detransmisión automática que requiere MERCON� SP puedeprovocar daños a la transmisión. El uso de cualquier líquidodistinto del recomendado puede causar daño en la transmisión.
2Indica sólo una capacidad aproximada de llenado en seco. Algunasaplicaciones pueden variar según el tamaño del enfriador y si hay unenfriador de tanque incorporado. La cantidad de líquido de latransmisión y el nivel del líquido se deben ajustar según la indicación delrango normal de funcionamiento que aparece en la varilla indicadora.3Agregue el tipo de líquido refrigerante que venía originalmente en suvehículo.4El eje trasero de su vehículo tiene lubricante sintético para el ejetrasero y se considera lubricado para toda su vida útil. No es necesariorevisar ni cambiar estos lubricantes a menos que exista sospecha de unafuga, que se requiera servicio o que el eje se haya sumergido en agua. Ellubricante del eje se debe cambiar cada vez que el eje se haya sumergidoen agua.5No es obligatorio el uso de aceite de motor sintético o de mezclasintética. El aceite del motor sólo debe cumplir con los requisitos de laespecificación WSS-M2C930-A de Ford y la Marca de certificación API.
2006 Navigator (nav)Owners Guide (post-2002-fmt)USA (fus)
Mantenimiento y especificaciones
414
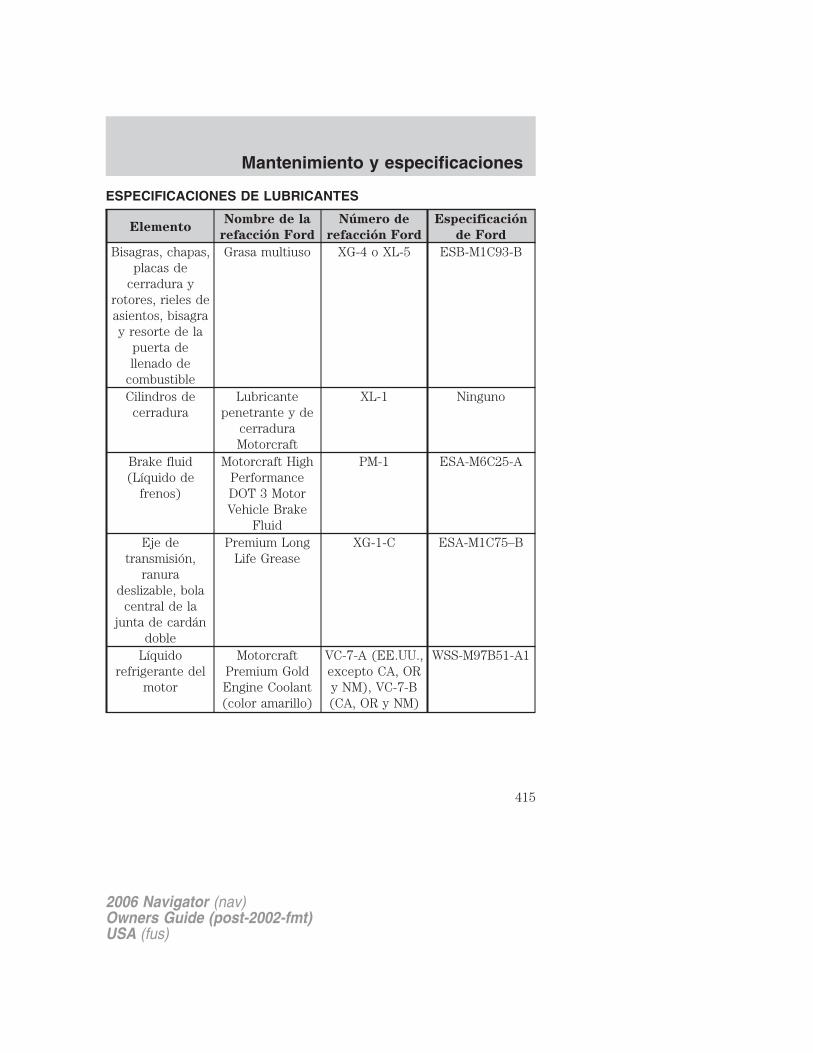
ESPECIFICACIONES DE LUBRICANTES
ElementoNombre de la
refacción Ford
Número de
refacción Ford
Especificación
de Ford
Bisagras, chapas,placas de
cerradura yrotores, rieles deasientos, bisagray resorte de la
puerta dellenado de
combustible
Grasa multiuso XG-4 o XL-5 ESB-M1C93-B
Cilindros decerradura
Lubricantepenetrante y de
cerraduraMotorcraft
XL-1 Ninguno
Brake fluid(Líquido de
frenos)
Motorcraft HighPerformanceDOT 3 MotorVehicle Brake
Fluid
PM-1 ESA-M6C25-A
Eje detransmisión,
ranuradeslizable, bola
central de lajunta de cardán
doble
Premium LongLife Grease
XG-1-C ESA-M1C75–B
Líquidorefrigerante del
motor
MotorcraftPremium GoldEngine Coolant(color amarillo)
VC-7-A (EE.UU.,excepto CA, ORy NM), VC-7-B(CA, OR y NM)
WSS-M97B51-A1
2006 Navigator (nav)Owners Guide (post-2002-fmt)USA (fus)
Mantenimiento y especificaciones
415
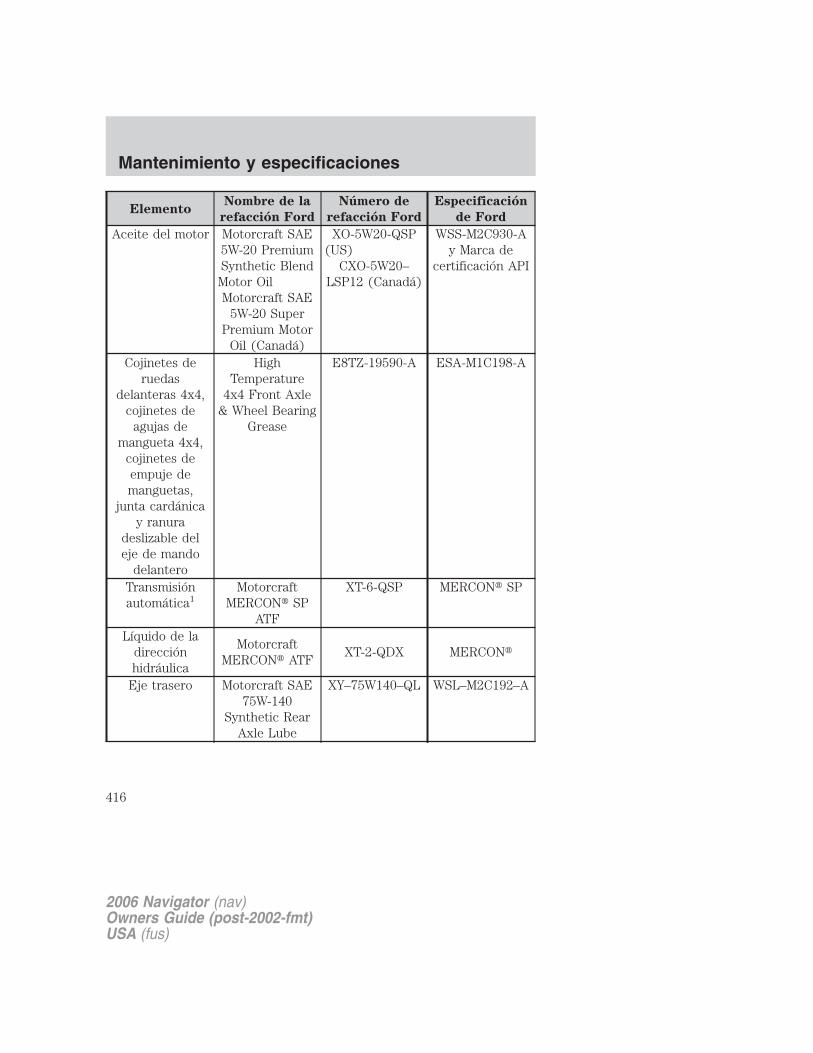
ElementoNombre de la
refacción Ford
Número de
refacción Ford
Especificación
de Ford
Aceite del motor Motorcraft SAE5W-20 PremiumSynthetic BlendMotor OilMotorcraft SAE
5W-20 SuperPremium Motor
Oil (Canadá)
XO-5W20-QSP(US)
CXO-5W20–LSP12 (Canadá)
WSS-M2C930-Ay Marca de
certificación API
Cojinetes deruedas
delanteras 4x4,cojinetes de
agujas demangueta 4x4,
cojinetes deempuje demanguetas,
junta cardánicay ranura
deslizable deleje de mando
delantero
HighTemperature
4x4 Front Axle& Wheel Bearing
Grease
E8TZ-19590-A ESA-M1C198-A
Transmisiónautomática1
MotorcraftMERCON� SP
ATF
XT-6-QSP MERCON� SP
Líquido de ladirecciónhidráulica
MotorcraftMERCON� ATF
XT-2-QDX MERCON�
Eje trasero Motorcraft SAE75W-140
Synthetic RearAxle Lube
XY–75W140–QL WSL–M2C192–A
2006 Navigator (nav)Owners Guide (post-2002-fmt)USA (fus)
Mantenimiento y especificaciones
416
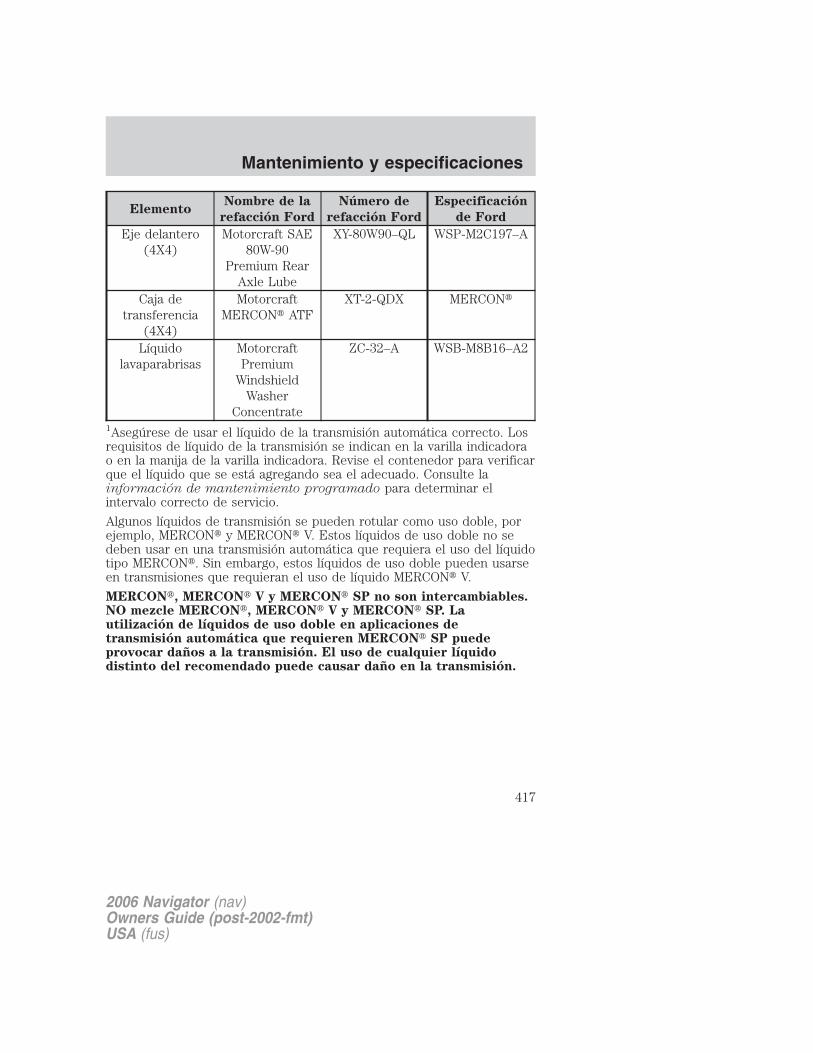
ElementoNombre de la
refacción Ford
Número de
refacción Ford
Especificación
de Ford
Eje delantero(4X4)
Motorcraft SAE80W-90
Premium RearAxle Lube
XY-80W90–QL WSP-M2C197–A
Caja detransferencia
(4X4)
MotorcraftMERCON� ATF
XT-2-QDX MERCON�
Líquidolavaparabrisas
MotorcraftPremium
WindshieldWasher
Concentrate
ZC-32–A WSB-M8B16–A2
1Asegúrese de usar el líquido de la transmisión automática correcto. Losrequisitos de líquido de la transmisión se indican en la varilla indicadorao en la manija de la varilla indicadora. Revise el contenedor para verificarque el líquido que se está agregando sea el adecuado. Consulte lainformación de mantenimiento programado para determinar elintervalo correcto de servicio.
Algunos líquidos de transmisión se pueden rotular como uso doble, porejemplo, MERCON� y MERCON� V. Estos líquidos de uso doble no sedeben usar en una transmisión automática que requiera el uso del líquidotipo MERCON�. Sin embargo, estos líquidos de uso doble pueden usarseen transmisiones que requieran el uso de líquido MERCON� V.
MERCON�, MERCON� V y MERCON� SP no son intercambiables.NO mezcle MERCON�, MERCON� V y MERCON� SP. Lautilización de líquidos de uso doble en aplicaciones detransmisión automática que requieren MERCON� SP puedeprovocar daños a la transmisión. El uso de cualquier líquidodistinto del recomendado puede causar daño en la transmisión.
2006 Navigator (nav)Owners Guide (post-2002-fmt)USA (fus)
Mantenimiento y especificaciones
417

DATOS DEL MOTOR
Motor Motor de 5.4L 3V V8
Pulgadas cúbicas 330Combustible requerido 91 octanosOrden de encendido 1-3-7-2-6-5-4-8Sistema de encendido Bobina en bujíaSeparación de los electrodos de las bujías1 0.040–0.050 pulgadas
(1.02–1.27 mm)Relación de compresión 9.85:11Separación de los electrodos de las bujías no ajustable
DIMENSIONES DEL VEHÍCULO
Dimensiones del vehículo 4x2 y 4x4 – pulgadas
(mm)
(1) Longitud total 207.5 (5270)(2) Ancho del vehículo(carrocería)
78.7 (2000)
(2) Ancho del vehículocon estribos eléctricos, espejos plegados
79.9 (2029)
(2) Ancho del vehículocon estribos fijos
82.2 (2088)
(3) Altura total 77.8 (1975)(4) Distancia entre ejes 118.8 (3018)(5) Distancia entre las ruedas delanteras 66.9 (1701)(5) Distancia entre las ruedas traseras 67.1 (1704)
2006 Navigator (nav)Owners Guide (post-2002-fmt)USA (fus)
Mantenimiento y especificaciones
418
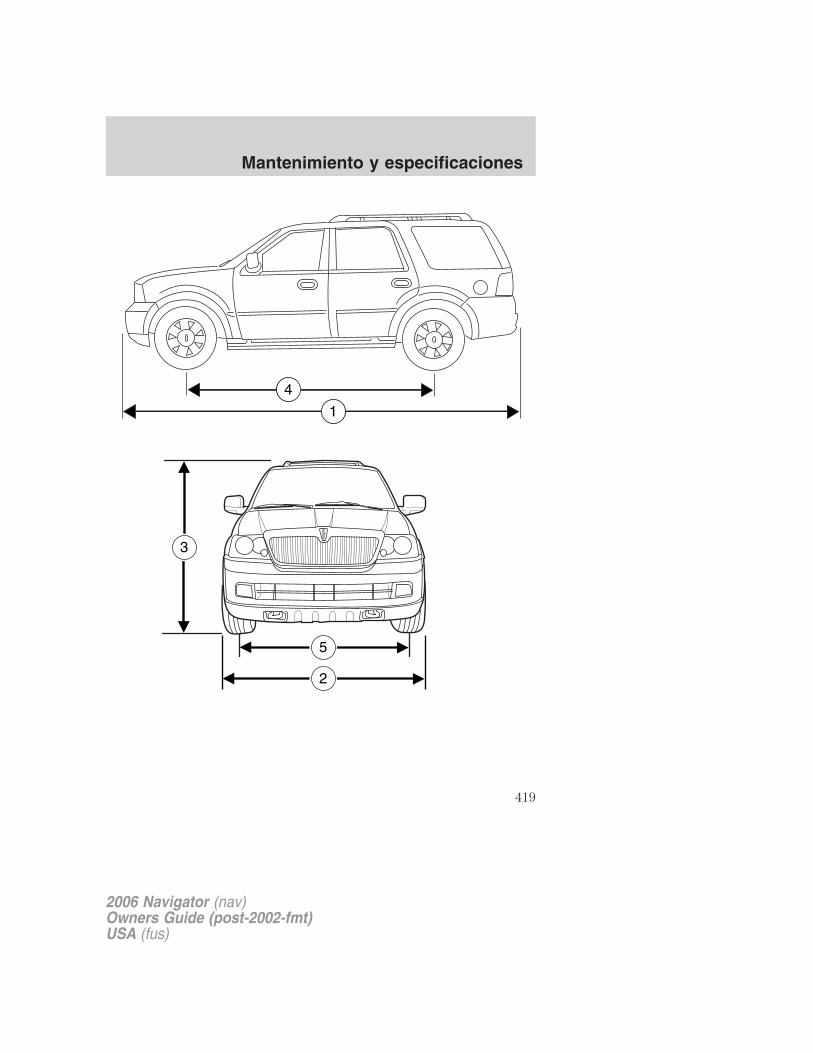
5
2
3
2006 Navigator (nav)Owners Guide (post-2002-fmt)USA (fus)
Mantenimiento y especificaciones
419

IDENTIFICACIÓN DEL VEHÍCULO
Etiqueta de certificaciónLos reglamentos de laAdministración nacional deseguridad de tránsito en carreteras(NHTSA) exigen que se adhiera unaEtiqueta de certificación delcumplimiento de las normas deseguridad y establecen el lugar enque esta etiqueta debe estarubicada. La Etiqueta de certificacióndel cumplimiento de las normas deseguridad se encuentra en laestructura junto al borde de salidade la puerta del conductor o en elborde de la puerta del conductor.
Número de identificación del vehículo (VIN)El número de identificación delvehículo está adherido a una placametálica ubicada en el tablero dellado del conductor. (Tenga encuenta que, en la ilustración, XXXXrepresenta el número deidentificación del vehículo.)
XXXXXXXXXXXXXXXXX
2006 Navigator (nav)Owners Guide (post-2002-fmt)USA (fus)
Mantenimiento y especificaciones
420
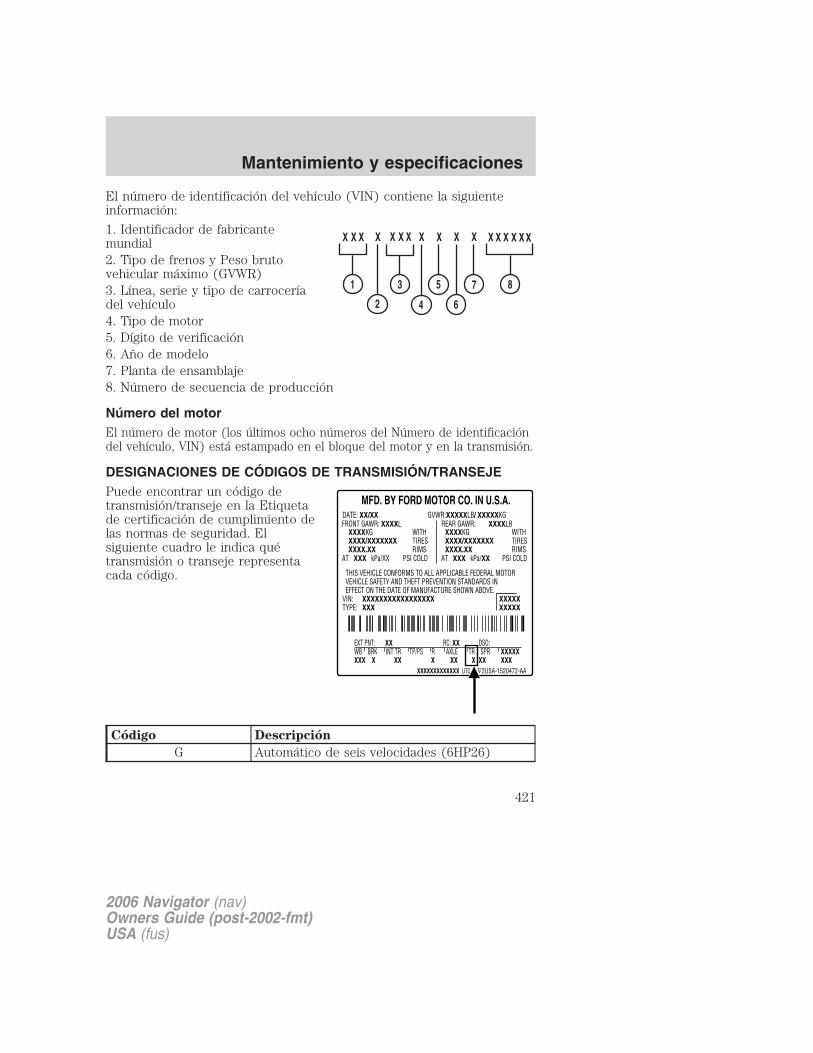
El número de identificación del vehículo (VIN) contiene la siguienteinformación:
1. Identificador de fabricantemundial2. Tipo de frenos y Peso brutovehicular máximo (GVWR)3. Línea, serie y tipo de carroceríadel vehículo4. Tipo de motor5. Dígito de verificación6. Año de modelo7. Planta de ensamblaje8. Número de secuencia de producción
Número del motorEl número de motor (los últimos ocho números del Número de identificacióndel vehículo, VIN) está estampado en el bloque del motor y en la transmisión.
DESIGNACIONES DE CÓDIGOS DE TRANSMISIÓN/TRANSEJEPuede encontrar un código detransmisión/transeje en la Etiquetade certificación de cumplimiento delas normas de seguridad. Elsiguiente cuadro le indica quétransmisión o transeje representacada código.
Código Descripción
G Automático de seis velocidades (6HP26)
2006 Navigator (nav)Owners Guide (post-2002-fmt)USA (fus)
Mantenimiento y especificaciones
421

ACCESORIOS LINCOLN PARA SU VEHÍCULOExiste una amplia variedad de accesorios Lincoln originales disponiblespara su vehículo a través de su distribuidor local autorizado de Lincoln oFord de Canadá. Estos accesorios de calidad han sido diseñadosespecíficamente para satisfacer las necesidades para su vehículo; estándiseñados especialmente para complementar el estilo y aparienciaaerodinámica de su vehículo. Además, cada accesorio está hecho demateriales de alta calidad y reúne o supera las estrictas especificacionesde seguridad e ingeniería de Lincoln. La compañía Ford Motor reparará oreemplazará cualquier accesorio Lincoln original instaladoadecuadamente por un distribuidor, que se encuentre defectuoso defábrica en sus materiales o en su ensamblaje, durante el período quedure la garantía, como también cualquier componente que se hayadañado debido al accesorio defectuoso. Los accesorios serán garantizadossegún lo que le proporcione el mayor beneficio:
• 12 meses o 20,000 km (12,000 millas) (lo que suceda primero) o
• lo que resta de la garantía limitada para vehículo nuevo.
Esto significa que los accesorios Lincoln legítimos que se han compradojunto con su nuevo vehículo y que han sido instalados por el distribuidorautorizado están cubiertos por la duración total que tiene la Garantíalimitada para vehículos nuevos; es decir, 4 años o 80,000 km (50,000 millas)(lo que suceda primero). Contacte a su distribuidor autorizado paraobtener más detalles y una copia de la garantía.
No todos los accesorios se encuentran disponibles para todos losmodelos.
La siguiente es una lista de diversos accesorios originales de Lincoln. Notodos los accesorios se encuentran disponibles para todos los modelos.Para averiguar qué accesorios están disponibles para su vehículo,contáctese con su distribuidor autorizado o visite nuestra tienda en líneaen la dirección: www.lincolnaccessories.com.
Estilo exteriorProtectores contra insectos
Deflectores
Cubiertas de extremo delantero
Faros delanteros, luces de niebla y Luces diurnas automáticas (DRL)
Salpicaderas
Ruedas
2006 Navigator (nav)Owners Guide (post-2002-fmt)USA (fus)
Accesorios
422

Estilo interiorTapetes
Estilo de vidaParrilla para bicicletas
Organización y administración de la carga
Sistemas de entretenimiento del asiento trasero
Sistema de comunicación de manos libres Mobile-Ease�
Enganches de remolque, cableados preformados y accesorios
TranquilidadJuegos de primeros auxilios y seguridad en carretera
Cubiertas para todo el vehículo
Tapa de combustible con seguro
Arranque a control remoto
Sistemas de seguridad del vehículo
Para obtener el máximo rendimiento del vehículo tenga en mente lasiguiente información al momento de agregar accesorios o equipos a suvehículo:
• Al agregar accesorios, equipos, pasajeros y equipaje a su vehículo, noexceda la capacidad total de peso del vehículo o del eje delantero otrasero (GVWR, peso bruto vehicular máximo o GAWR, peso brutovehicular del eje trasero como se indica en la Etiqueta de certificacióndel cumplimiento de las normas de seguridad). Consulte con sudistribuidor autorizado para obtener información específica del peso.
• La Comisión federal de comunicaciones de Estados Unidos (FCC,Federal Communications Commission) y la Comisión canadiense deradio y telecomunicaciones (CRTC, Canadian RadioTelecommunications Commission) regula el uso de sistemas móviles decomunicación, como por ejemplo, radios de dos vías, teléfonos yalarmas antirrobos, los cuales están equipados con transmisores deradio. Cualquiera de estos equipos instalados en su vehículo debencumplir con las normas del FCC o CRTC y deben ser instalados sólopor un técnico de servicio calificado.
• Los sistemas móviles de comunicación pueden dañar elfuncionamiento de su vehículo, especialmente si no estáncorrectamente diseñados para uso en automóviles.
2006 Navigator (nav)Owners Guide (post-2002-fmt)USA (fus)
Accesorios
423
• Para evitar interferencia con otras funciones del vehículo, tales comosistemas de freno antibloqueo, los usuarios del radio para aficionados,que instalan radios y antenas en su vehículo, no deben ubicar lasantenas del radio para aficionados en el área del cofre del lado delconductor.
• La incorporación de accesorios o componentes eléctricos oelectrónicos al vehículo por parte del distribuidor autorizado o delpropietario puede afectar el rendimiento y la durabilidad de la batería.
2006 Navigator (nav)Owners Guide (post-2002-fmt)USA (fus)
Accesorios
424
A
ABS (consulte Frenos) ............297Aceite del motor .......................383
advertencia de cambio deaceite a la brevedad, centrode mensajes ............................383capacidades de llenado ..........412especificaciones ..............415, 418filtro, especificaciones ....385, 411recomendaciones ....................385revision y llenado ...................383varilla indicadora denivel de aceite ........................383
Aceite (vea Aceitedel motor) .................................383
Agua, manejo en .......................326
Aire acondicionado ...................119calefaccion y aireacondicionado auxiliares ........124
Anticongelante (vea Lıquidorefrigerante del motor) ............389
Arranque con cables .................353
Arranque del motor ..292–293, 295
Arranque del vehıculoarranque con cablespasacorriente ..........................353
Asientos .....................................201asiento con memoria ......190, 203asientos de seguridadpara ninos ...............................241
Asientos de seguridadpara ninos ..................................241
en el asiento delantero ..........242en el asiento trasero ..............242
Asientos para bebes(vea Asientos de seguridad) ....241
Asistencia al cliente ..................327
consejo de solucion dedisputas ...................................364para obtener asistenciaen el camino ...........................327para obtener ayuda fuerade Estados Unidos y Canada .368para obtener el servicioque necesita ............................361para pedir informacionadicional sobre elpropietario ...............................369para utilizar el Programa demediacion y arbitraje .............367Plan Gane de Ford .................368
Asistencia complementaria deestacionamiento en reversa .....313
Asistencia en el camino ...........327
Aviso especialvehıculos tipo utilitarios ............8
B
Barredor de nieve .........................8
Baterıa .......................................386acido, tratamiento deemergencias ............................386libre de mantenimiento ..........386pasar corriente a unabaterıa descargada .................353reemplazo, especificaciones ..411servicio ....................................386
Bombillas (focos) ......................131
Brujula, electronicaajuste de zona establecida .....168
Bujıas, especificaciones ....411, 418
C
Caja de distribucion de lacorriente (vea Fusibles) ...........332
2006 Navigator (nav)Owners Guide (post-2002-fmt)USA (fus)
Índice
425
Cajuela ...............................188–189
Calefaccionsistema para calefaccion yaire acondicionado .................119
Calefactor del motor .................296
Cambio de llantas .....................344
Capacidades de lıquido ............412
Capacidades de llenadode lıquidos .................................412
Capota posterior .......................144
Carga de vehıculo .....................276
CD-sencillo premium ..................19
Centro de mensajes ..................166boton de medicioninglesa/metrica ........................173boton de revisiondel sistema ..............................174mensajes de advertencia ........174
Centro de mensajeselectronicos ...............................166
Cinturones de seguridad (veaRestricciones de seguridad) ....215
Cinturones de seguridad(vea Sistemasde seguridad) ....215, 218, 220–223
Cofre ..........................................379
Combustible ..............................396calculo para ahorrarcombustible .....................169, 401calidad .....................................400capacidad ................................412comparaciones con lasestimaciones de ahorro decombustible de EPA ...............405detergente en elcombustible .............................401
eleccion del combustibleadecuado .................................400filtro, especificaciones ....396, 411informacion de seguridadrelacionada con combustiblesautomotrices ...........................396interruptor de corte debomba de combustible ...........329llenado del vehıculo concombustible .............396, 399, 401mejora en el ahorro decombustible .............................401nivel de octanaje ............400, 418si se queda sin combustible ..401tapon ........................................399
Compuerta levadiza eléctrica ...180
Consola ......................................146toldo .................................142–143trasera .....................................147
Control de aire acondicionadoy calefaccion (consulte Aireacondicionado o Calefaccion) ..119
Control de crucero (consulteControl de velocidad) ...............154
Control de velocidad ................154
Controlesasiento electrico .....................202columna de direccion .............158
D
Defectos de seguridad,informe ......................................370
Desempanador deventana trasera .......................125
Desempanador de la ventanatrasera ........................................125
Dimensiones del vehıculo ........418
2006 Navigator (nav)Owners Guide (post-2002-fmt)USA (fus)
Índice
426
Direccionsensible a la velocidad ...........304
Direccion hidraulica ..........303–304lıquido, capacidadde llenado ................................412lıquido,especificaciones ..............415, 418lıquido, revision y llenado ......408
Direccional ................................130
Dispositivo de alarma deemergencia, sistema a controlremoto .......................................190
E
Ejecapacidades de llenado ..........412especificaciones delubricante ........................415, 418
Emergencias, en el caminoarranque con cablespasacorriente ..........................353
Encendido .........................292, 418
Enfriamiento a pruebade fallas .....................................394
Especificaciones dellubricante ..........................415, 418
Espejos ..............................141, 150espejo retrovisor conatenuacion automatica ...........150espejos laterales(electricos) ..............................152memoria programable ....190, 203plegables ..................................152senal ........................................152termicos ...................................152
Espejos automáticos .................151
Estribos eléctricosdesplegables ..............................153
Etiqueta de certificacióndel cumplimiento de lasnormas de seguridadon ............420
F
Faros ..........................................126alineacion ................................129encendido de lucesautomaticas .............................127encendido y apagado .............126especificaciones sobre losfocos ........................................131luces altas ...............................127reemplazo de focos ................133sistema de autoencendidode luces ...................................126
Faros de niebla .........................128
Faros delanterosdestello para pasar .................127
Filtro de aire .....................409, 411
Flecha cardan y yugodesplazable de la transmision ..411
Freno de estacionamiento .......299
Frenos ........................................297antibloqueo .....................297–299bloqueo de palanca decambio de velocidades ...........307especificaciones sobre ellubricante ........................415, 418estacionamiento ......................299lıquido, capacidades dellenado .....................................412lıquido,especificaciones ..............415, 418lıquido, revision y llenado ......408luz de advertencia de Sistemade antibloqueo de frenos(ABS) ......................................298
Fusibles ..............................331–332
2006 Navigator (nav)Owners Guide (post-2002-fmt)USA (fus)
Índice
427

G
Gases de escape ........................295Gato ...........................................344
almacenamiento ......................344posicionamiento ......................344
I
Indicador de cambio de carril(vea direccional) .......................130Indicadores ..................................16Instrucciones de carga .............283
K
Kilometraje (vea Ahorrode combustible) ........................401
L
Lımites de carga .......................276
Limpieza del vehıculocinturones de seguridad ........375compartimiento del motor .....373encerado ..................................371hojas del limpiador .................374interior .....................................375lavado ......................................371piezas de plastico ...................373ruedas ......................................372tablero .....................................374tapizado ...................................376
Lıquido de lavaparabrisas ylimpiadores ................................140
deposito de la compuerta ......381reemplazo de las hojasde los limpiadores ..................382revision y llenadode lıquido ................................381
Lıquido lavador .........................381
Lıquido refrigerantecapacidades dellenado .............................393, 412especificaciones ..............415, 418revision y llenado ...................389
Llanta de refaccion(consulte Cambio de llantas) ..346
Llantas .......................255–256, 344alineamiento ............................269cambio .....................344, 346, 348clases de llantas ......................256cuidado ....................................267etiqueta ...................................266información del costadode la llanta ..............................262inspeccionar e inflar ...............258llanta de refaccion ..................345llantas y cadenas para lanieve ........................................275prácticas de seguridad ...........268reemplazo ................................261revision de la presion .............258rodadas ............................255, 267rotacion ...................................269terminología ............................256
Llaves .................................197–199posiciones de encendido ........292
Lucescuadro de especificacionespara reemplazo de focos ........131encendido de luces diurnas ...127faros de niebla ........................128faros delanteros ......................126faros delanteros, destellopara rebasar ............................127interiores .........................130, 133reemplazode focos ...................131, 133–138sistema de encendidoautomatico de luces ...............126tablero, atenuacion .................128
2006 Navigator (nav)Owners Guide (post-2002-fmt)USA (fus)
Índice
428
Luces, de advertencia eindicadoras ..................................12
frenos antibloqueo (ABS) ......298Luces de advertencia(vea Luces) .................................12Luces diurnas automaticas(consulte Luces) .......................127Luces intermitentes deemergencia ................................329
M
Manejo bajo condicionesespeciales ..................312, 320, 324
agua .................................323, 326arena ........................................322nieve e hielo ............................325
Mantenimiento del cinturónde seguridad ..............................224
Motor .........................................418arranque despues de unaccidente .................................329capacidades de llenado ..........412control de velocidad deralentı ......................................386enfriamiento a pruebade fallas ...................................394especificaciones delubricacion .......................415, 418limpieza ...................................373lıquido refrigerante .................389puntos de servicio ..................380
N
Numero de identificaciondel vehıculo (VIN) ....................420
O
Octanaje .....................................400
P
Pabellón de seguridad ..............234
Pedales electricos ajustables ...153
Pedales (vea Pedales de pieajustables electricos) ................153
Portaequipajes ...........................184
Preparacion para manejarel vehıculo .................................306
Prueba deinspeccion/mantenimiento(I/M) ...........................................407
Puerta trasera ...180, 183, 188–189
Puertasespecificaciones sobre ellubricante ................................415
Puesta en hora del relojAM/FMCD para 6 discosintegrado al tablero ..................27CD de 6 discos integrado ........27
R
Recordatorio de cinturonde seguridad ..............................225
RefaccionesMotorcraft ..................376, 396, 411
Refacciones(vea refacciones Motorcraft) ...411
Relevadores ...............................331
Reloj ...........................................144
Remolque ...................................283remolque .................................290remolque con gruade auxilio .................................359remolque de trailer ................283
2006 Navigator (nav)Owners Guide (post-2002-fmt)USA (fus)
Índice
429
Remolque con gruade auxilio ...................................359
Restricciones deseguridad ...........215, 218, 220–223
ensamblaje de extension ........223luz de advertencia ycampanilla ...............................224mantenimiento del cinturónde seguridad ...........................224para adultos ....................220–222para ninos .......................237–238recordatorio de cinturonde seguridad ...........................225
Retardo de accesorios ..............150
S
Segurosa prueba de ninos ...................186automaticos .............................194puertas ....................................185
Seguros electricosde las puertas ....................185, 194
Servicio del vehıculo ................378
Sistema antirrobo pasivoSecuriLock .........................197–199
Sistema de apertura de lapuerta de garaje (consulteSistema de control inalámbricoHomelink) ..................................162
Sistema de audio ..................19, 24
Sistema de audio(consulte Radio) ...................19, 24
Sistema de controlde emision .................................405
Sistema de controlinalámbrico Homelink ...............162
Sistema de entrada acontrol remoto ..................186, 190
alarma de emergencia ............190apertura de la cajuela ....188–189cierre/apertura de puertas .....187entrada iluminada ...................194reemplazo/transmisoresadicionales ...............................193
Sistema de entrada sin llavecierre automatico ...................194programacion del codigo deentrada ....................................196
Sistema de frenos antibloqueo(consulte Frenos) .............297–299
Sistema de monitoreo depresión de las llantas (TPMS)
Aparece una advertencia .16, 174Emergencias en el camino .....344Llantas, ruedas y carga ..........271Manejo .....................................322
Sistema de navegacion ...............49
Sistema de navegaciónencendido rápido ......................51funciones del CD ......................68funciones del radio ...................60mode de mapa ..........................72modo del destino ......................93Ubicación de DVD ..................116
Sistema de sujecionsuplementario de bolsade aire ................................229, 234
asientos de seguridadpara ninos ...............................231bolsa de aire delconductor ........................232, 235bolsa de aire delpasajero ...........................232, 235descripcion ......................229, 234eliminacion ..............................237funcionamiento ...............232, 235
2006 Navigator (nav)Owners Guide (post-2002-fmt)USA (fus)
Índice
430
luz indicadora .................234, 237Sistemas de seguridadpara ninos ..................................238
cinturones de seguridadpara ninos ...............................238
Soporte lumbar, asientos ..........201
Suspension de aire ...................304descripcion ..............................304
T
Tabla de especificaciones,lubricantes .........................415, 418
Tableroiluminacion del tableroe interior .................................128limpieza ...................................374
Tablero de instrumentosgrupo .........................................12
Tapetes ......................................180
Tapon de la gasolina (veaTapon del combustible) ...........399
Toldo corredizo .........................161
Tomacorriente ...........................145
Tomacorrientes auxiliar ............145
Transmisiónseguro del cambio del freno(BSI) ........................................307
Transmision ...............................307especificaciones dellubricante ........................415, 418lıquido, capacidades dellenado .....................................412lıquido, revision y llenado(automatico) ...........................409
Transmision automaticalıquido, anadido ......................409lıquido, capacidades dellenado .....................................412lıquido, especificacion ............418lıquido, revision ......................409manejo con sobremarchaautomatica ...............................310
Tuercas de candado ..................352
U
Uso de teléfono celular ................8
V
Varilla indicadora de nivelde aceite
aceite del motor .....................383lıquido para transmisionautomatica ...............................409
Vehıculos con traccionen las cuatro ruedas .................315
control de traccion .................315descripcion ..............................316luz indicadora .........................315manejo campo traviesa ..........318preparacion para manejarel vehıculo ...............................306
Ventanaselectricas .................................147lavador y limpiadortraseros ....................................141
Ventilacion del vehıculo ...........296
Volante de la direccioncontroles ..................................158inclinacion ...............................141
2006 Navigator (nav)Owners Guide (post-2002-fmt)USA (fus)
Índice
431

432
Introduction 4
Instrument Cluster 12
Warning and control lights 12Gauges 15
Entertainment Systems 18
AM/FM stereo cassette with CD 18AM/FM stereo with in-dash six CD 23Rear seat controls 28Rear seat entertainment system 33Navigation system 46
Climate Controls 109
Automatic temperature control 111Auxiliary passenger climate control 115Rear window defroster 116
Lights 117
Headlamps 117Turn signal control 120Bulb replacement 122
Driver Controls 130
Windshield wiper/washer control 130Power windows 137Mirrors 140Speed control 144Message center 154
Locks and Security 170
Keys 170Locks 170
Table of Contents
1
2006 Navigator (nav)Owners Guide (post-2002-fmt)USA (fus)
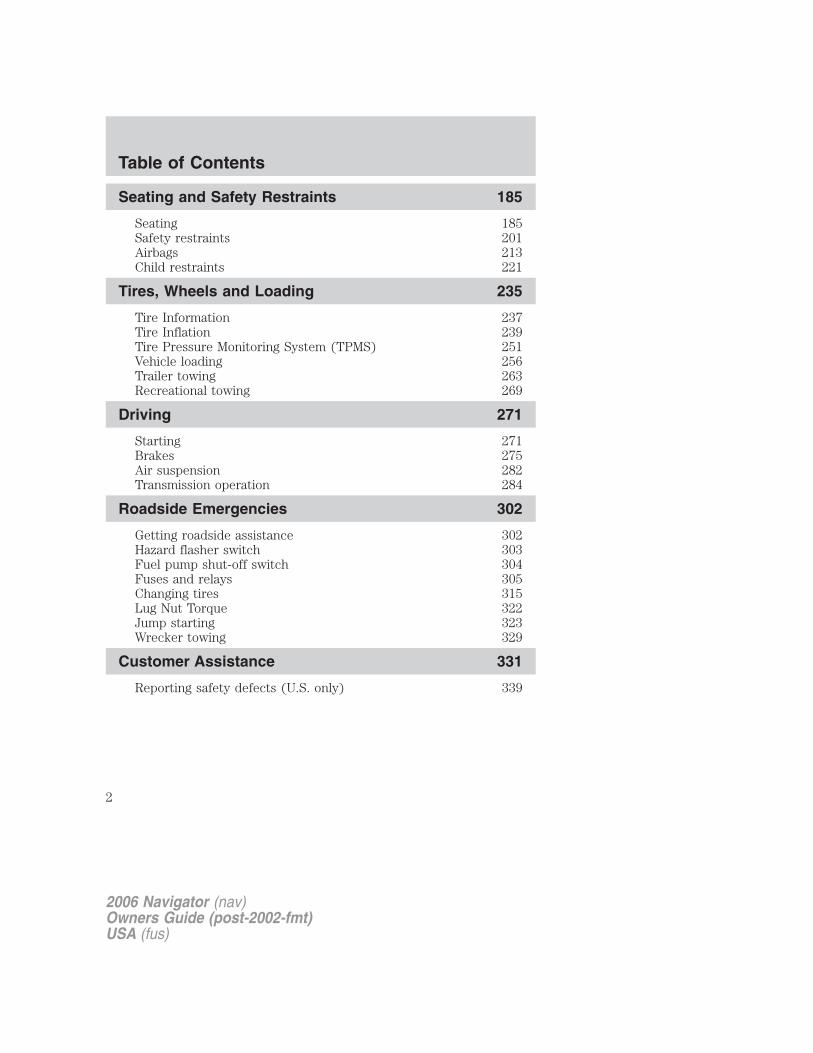
Seating and Safety Restraints 185
Seating 185Safety restraints 201Airbags 213Child restraints 221
Tires, Wheels and Loading 235
Tire Information 237Tire Inflation 239Tire Pressure Monitoring System (TPMS) 251Vehicle loading 256Trailer towing 263Recreational towing 269
Driving 271
Starting 271Brakes 275Air suspension 282Transmission operation 284
Roadside Emergencies 302
Getting roadside assistance 302Hazard flasher switch 303Fuel pump shut-off switch 304Fuses and relays 305Changing tires 315Lug Nut Torque 322Jump starting 323Wrecker towing 329
Customer Assistance 331
Reporting safety defects (U.S. only) 339
Table of Contents
2
2006 Navigator (nav)Owners Guide (post-2002-fmt)USA (fus)

Cleaning 340
Maintenance and Specifications 346
Engine compartment 348Engine oil 351Battery 354Engine Coolant 356Fuel information 362Air filter(s) 374Part numbers 376Refill capacities 377Lubricant specifications 379
Accessories 385
Index 387
All rights reserved. Reproduction by any means, electronic or mechanicalincluding photocopying, recording or by any information storage and retrievalsystem or translation in whole or part is not permitted without writtenauthorization from Ford Motor Company. Ford may change the contents withoutnotice and without incurring obligation.
Copyright © 2005 Ford Motor Company
Table of Contents
3
2006 Navigator (nav)Owners Guide (post-2002-fmt)USA (fus)

CALIFORNIA Proposition 65 Warning
WARNING: Engine exhaust, some of its constituents, andcertain vehicle components contain or emit chemicals known to
the State of California to cause cancer and birth defects or otherreproductive harm. In addition, certain fluids contained in vehicles andcertain products of component wear contain or emit chemicals knownto the State of California to cause cancer and birth defects or otherreproductive harm.
CONGRATULATIONSCongratulations on acquiring your new Lincoln. Please take the time toget well acquainted with your vehicle by reading this handbook. Themore you know and understand about your vehicle, the greater thesafety and pleasure you will derive from driving it.
For more information on Ford Motor Company and its products visit thefollowing website:
• In the United States: www.ford.com
• In Canada: www.ford.ca
• In Mexico: www.ford.com.mx
• In Australia: www.ford.com.au
Additional owner information is given in separate publications.
This Owner’s Guide describes every option and model variant availableand therefore some of the items covered may not apply to yourparticular vehicle. Furthermore, due to printing cycles it may describeoptions before they are generally available.
Remember to pass on the Owner’s Guide when reselling the vehicle. Itis an integral part of the vehicle.
Fuel pump shut-off switch: In the event of an accident thesafety switch will automatically cut off the fuel supply to the
engine. The switch can also be activated through sudden vibration (e.g.collision when parking). To reset the switch, refer to the Fuel pumpshut-off switch in the Roadside Emergencies chapter.
2006 Navigator (nav)Owners Guide (post-2002-fmt)USA (fus)
Introduction
4
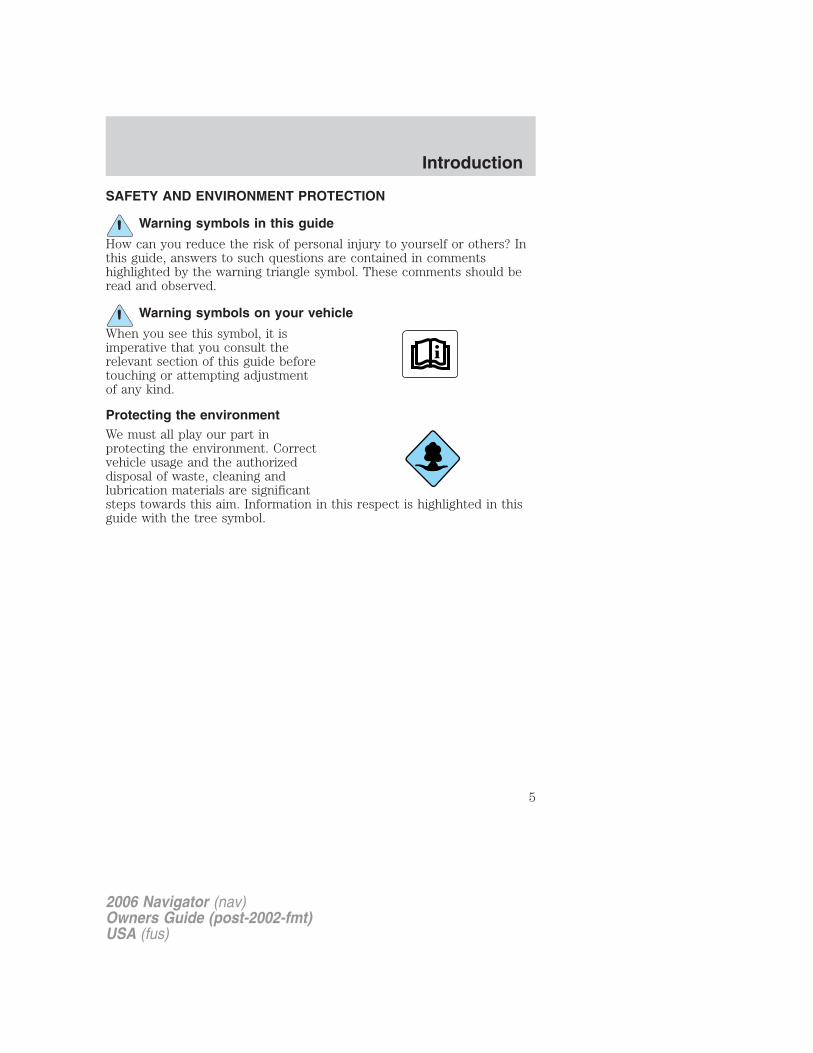
SAFETY AND ENVIRONMENT PROTECTION
Warning symbols in this guide
How can you reduce the risk of personal injury to yourself or others? Inthis guide, answers to such questions are contained in commentshighlighted by the warning triangle symbol. These comments should beread and observed.
Warning symbols on your vehicle
When you see this symbol, it isimperative that you consult therelevant section of this guide beforetouching or attempting adjustmentof any kind.
Protecting the environmentWe must all play our part inprotecting the environment. Correctvehicle usage and the authorizeddisposal of waste, cleaning andlubrication materials are significantsteps towards this aim. Information in this respect is highlighted in thisguide with the tree symbol.
2006 Navigator (nav)Owners Guide (post-2002-fmt)USA (fus)
Introduction
5

BREAKING-IN YOUR VEHICLEYour vehicle does not need an extensive break-in. Try not to drivecontinuously at the same speed for the first 1,000 miles (1,600 km) ofnew vehicle operation. Vary your speed frequently in order to give themoving parts a chance to break in.
Drive your new vehicle at least 500 miles (800 km) before towing atrailer. Additionally, during the first 500 miles (800 km) that you tow atrailer, do not drive over 70 mph (112 km/h) and do not make starts atfull throttle. This style of driving will help the engine and other parts ofyour vehicle break in at the heavier loads. For more detailed informationabout towing a trailer, refer to Trailer towing in the Tires, Wheels andLoading chapter.
Do not add friction modifier compounds or special break-in oils duringthe first few thousand miles (kilometers) of operation, since theseadditives may prevent piston ring seating. See Engine oil in theMaintenance and Specifications chapter for more information on oilusage.
SPECIAL NOTICES
New Vehicle Limited WarrantyFor a detailed description of what is covered and what is not covered byyour vehicle’s New Vehicle Limited Warranty, refer to the WarrantyGuide that is provided to you along with your Owner’s Guide.
2006 Navigator (nav)Owners Guide (post-2002-fmt)USA (fus)
Introduction
6
Service Data RecordingService data recorders in your vehicle are capable of collecting andstoring diagnostic information about your vehicle. This potentiallyincludes information about the performance or status of various systemsand modules in the vehicle, such as engine, throttle, steering or brakesystems. In order to properly diagnose and service your vehicle, FordMotor Company, Ford of Canada, and service and repair facilities mayaccess vehicle diagnostic information through a direct connection to yourvehicle when diagnosing or servicing your vehicle.
Event Data RecordingOther modules in your vehicle — event data recorders — are capable ofcollecting and storing data during a crash or near crash event. Therecorded information may assist in the investigation of such an event.The modules may record information about both the vehicle and theoccupants, potentially including information such as:
• how various systems in your vehicle were operating;
• whether or not the driver and passenger seatbelts were buckled;
• how far (if at all) the driver was depressing the accelerator and/or thebrake pedal;
• how fast the vehicle was traveling; and
• where the driver was positioning the steering wheel.
To access this information, special equipment must be directly connectedto the recording modules. Ford Motor Company and Ford of Canada donot access event data recorder information without obtaining consent,unless pursuant to court order or where required by law enforcement,other government authorities or other third parties acting with lawfulauthority. Other parties may seek to access the informationindependently of Ford Motor Company and Ford of Canada.
2006 Navigator (nav)Owners Guide (post-2002-fmt)USA (fus)
Introduction
7
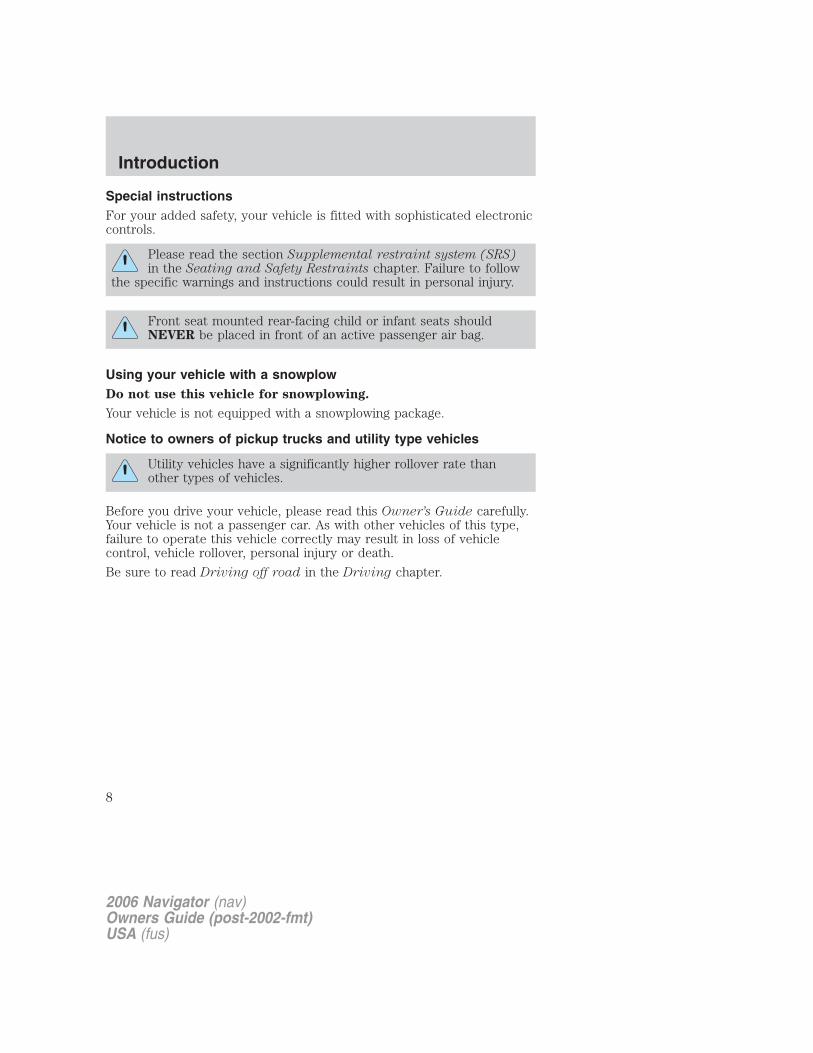
Special instructionsFor your added safety, your vehicle is fitted with sophisticated electroniccontrols.
Please read the section Supplemental restraint system (SRS)in the Seating and Safety Restraints chapter. Failure to follow
the specific warnings and instructions could result in personal injury.
Front seat mounted rear-facing child or infant seats shouldNEVER be placed in front of an active passenger air bag.
Using your vehicle with a snowplowDo not use this vehicle for snowplowing.
Your vehicle is not equipped with a snowplowing package.
Notice to owners of pickup trucks and utility type vehicles
Utility vehicles have a significantly higher rollover rate thanother types of vehicles.
Before you drive your vehicle, please read this Owner’s Guide carefully.Your vehicle is not a passenger car. As with other vehicles of this type,failure to operate this vehicle correctly may result in loss of vehiclecontrol, vehicle rollover, personal injury or death.
Be sure to read Driving off road in the Driving chapter.
2006 Navigator (nav)Owners Guide (post-2002-fmt)USA (fus)
Introduction
8

Cell phone useThe use of Mobile Communications Equipment has become increasinglyimportant in the conduct of business and personal affairs. However,drivers must not compromise their own or others’ safety when usingsuch equipment. Mobile Communications can enhance personal safetyand security when appropriately used, particularly in emergencysituations. Safety must be paramount when using mobile communicationsequipment to avoid negating these benefits.
Mobile Communication Equipment includes, but is not limited to cellularphones, pagers, portable email devices, in-vehicle communicationssystems, telematics devices and portable two-way radios.
A driver’s first responsibility is the safe operation of the vehicle.The most important thing you can do to prevent a crash is to
avoid distractions and pay attention to the road. Wait until it is safe tooperate Mobile Communications Equipment.
Middle East/North Africa vehicle specific informationFor your particular global region, your vehicle may be equipped withfeatures and options that are different from the ones that are describedin this Owner’s Guide; therefore, a supplement has been supplied thatcomplements this book. By referring to the pages in the providedsupplement, you can properly identify those features, recommendationsand specifications that are unique to your vehicle. Refer to thisOwner’s Guide for all other required information and warnings.
2006 Navigator (nav)Owners Guide (post-2002-fmt)USA (fus)
Introduction
9
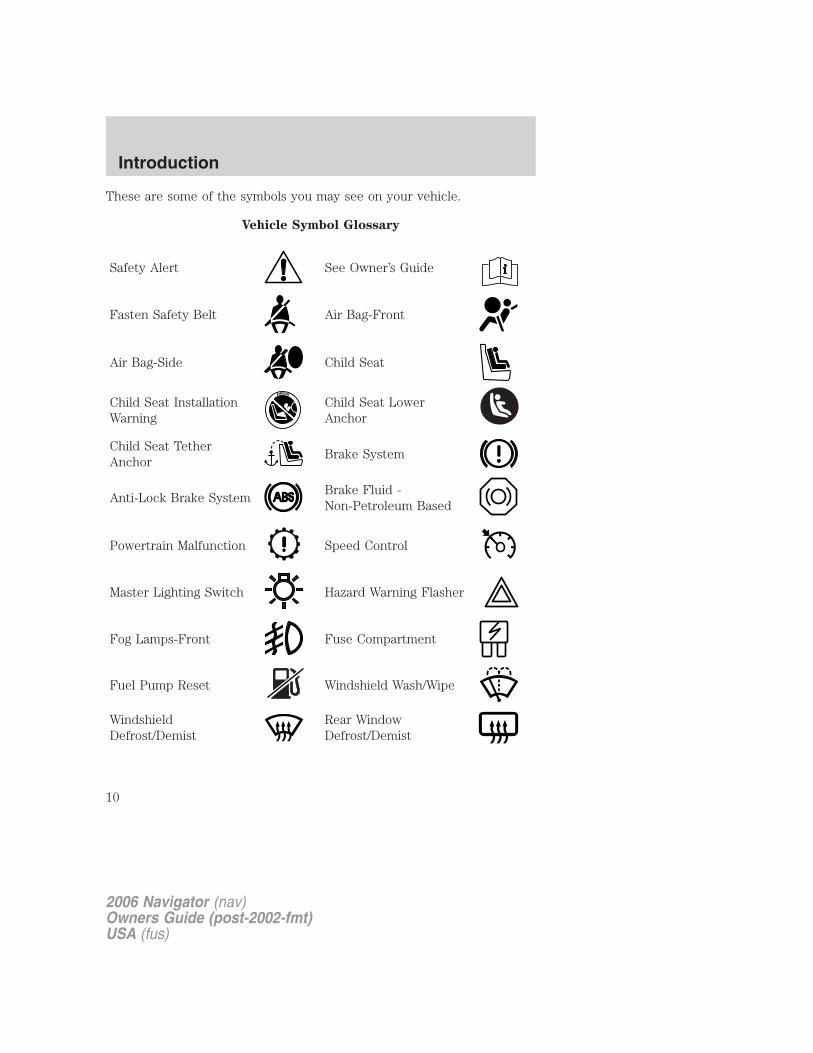
These are some of the symbols you may see on your vehicle.
Vehicle Symbol Glossary
Safety Alert See Owner’s Guide
Fasten Safety Belt Air Bag-Front
Air Bag-Side Child Seat
Child Seat InstallationWarning
Child Seat LowerAnchor
Child Seat TetherAnchor
Brake System
Anti-Lock Brake SystemBrake Fluid -Non-Petroleum Based
Powertrain Malfunction Speed Control
Master Lighting Switch Hazard Warning Flasher
Fog Lamps-Front Fuse Compartment
Fuel Pump Reset Windshield Wash/Wipe
WindshieldDefrost/Demist
Rear WindowDefrost/Demist
2006 Navigator (nav)Owners Guide (post-2002-fmt)USA (fus)
Introduction
10
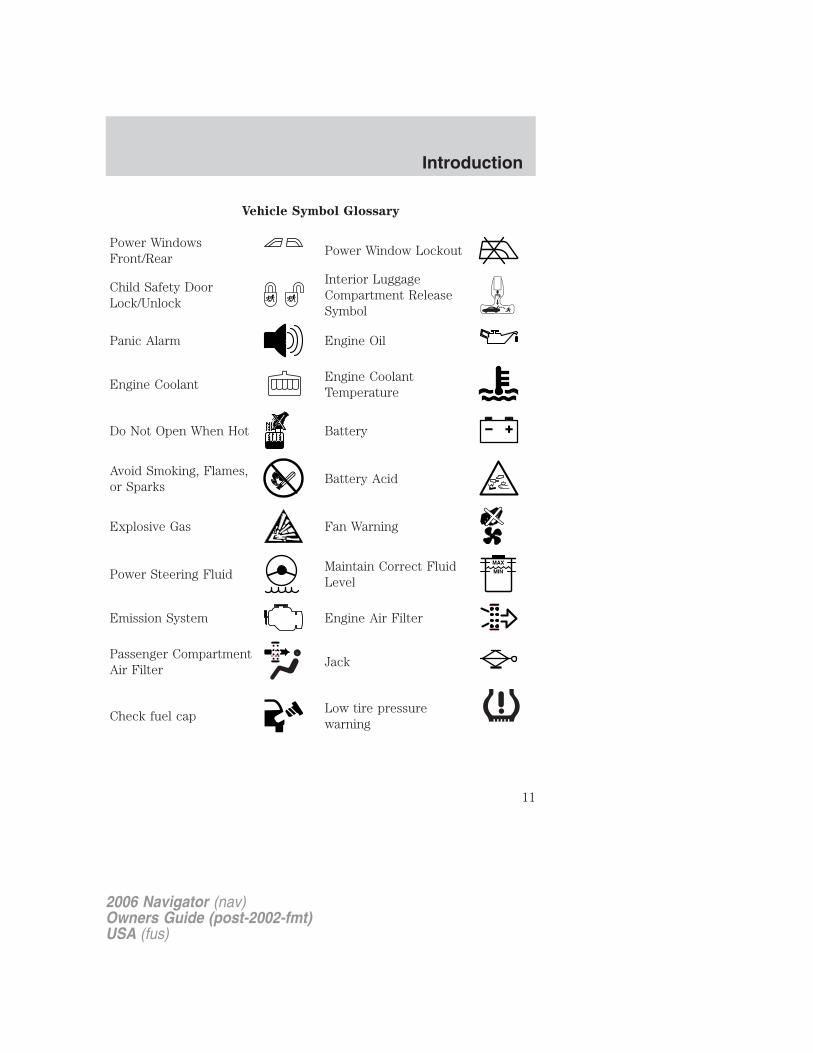
Vehicle Symbol Glossary
Power WindowsFront/Rear
Power Window Lockout
Child Safety DoorLock/Unlock
Interior LuggageCompartment ReleaseSymbol
Panic Alarm Engine Oil
Engine CoolantEngine CoolantTemperature
Do Not Open When Hot Battery
Avoid Smoking, Flames,or Sparks
Battery Acid
Explosive Gas Fan Warning
Power Steering FluidMaintain Correct FluidLevel
MAX
MIN
Emission System Engine Air Filter
Passenger CompartmentAir Filter
Jack
Check fuel capLow tire pressurewarning
2006 Navigator (nav)Owners Guide (post-2002-fmt)USA (fus)
Introduction
11
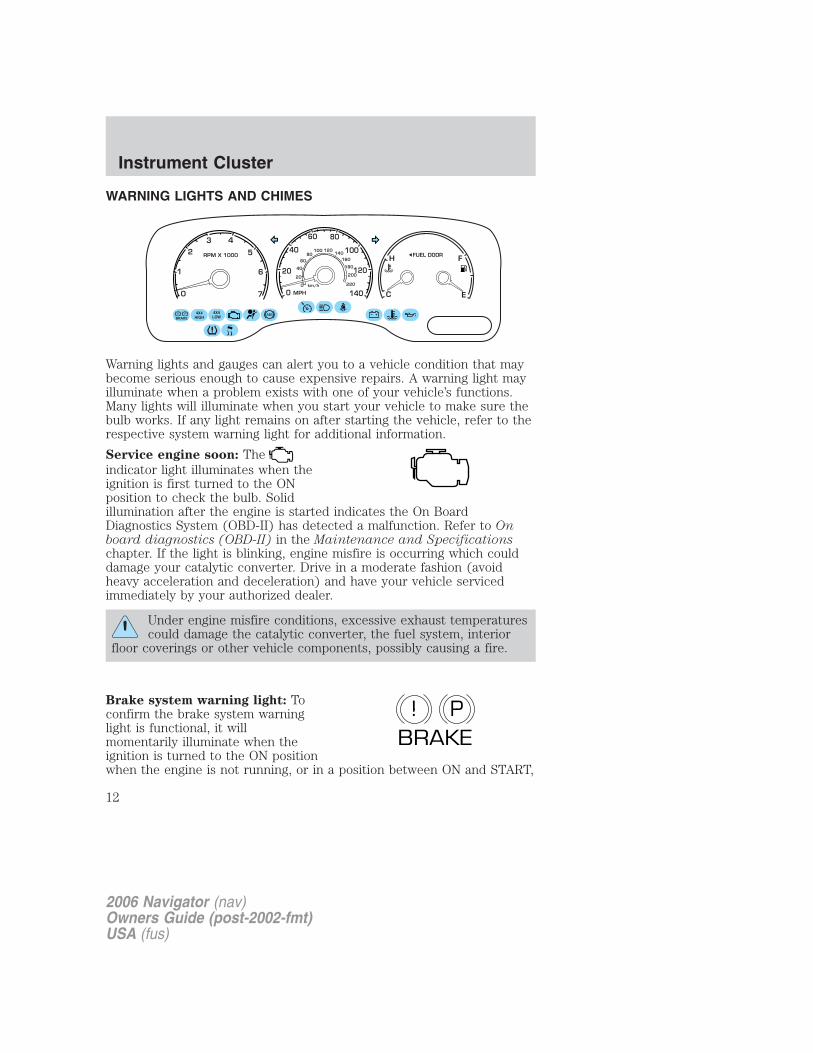
WARNING LIGHTS AND CHIMES
Warning lights and gauges can alert you to a vehicle condition that maybecome serious enough to cause expensive repairs. A warning light mayilluminate when a problem exists with one of your vehicle’s functions.Many lights will illuminate when you start your vehicle to make sure thebulb works. If any light remains on after starting the vehicle, refer to therespective system warning light for additional information.
Service engine soon: Theindicator light illuminates when theignition is first turned to the ONposition to check the bulb. Solidillumination after the engine is started indicates the On BoardDiagnostics System (OBD-II) has detected a malfunction. Refer to Onboard diagnostics (OBD-II) in the Maintenance and Specificationschapter. If the light is blinking, engine misfire is occurring which coulddamage your catalytic converter. Drive in a moderate fashion (avoidheavy acceleration and deceleration) and have your vehicle servicedimmediately by your authorized dealer.
Under engine misfire conditions, excessive exhaust temperaturescould damage the catalytic converter, the fuel system, interior
floor coverings or other vehicle components, possibly causing a fire.
Brake system warning light: Toconfirm the brake system warninglight is functional, it willmomentarily illuminate when theignition is turned to the ON positionwhen the engine is not running, or in a position between ON and START,
P!BRAKE
2006 Navigator (nav)Owners Guide (post-2002-fmt)USA (fus)
Instrument Cluster
12
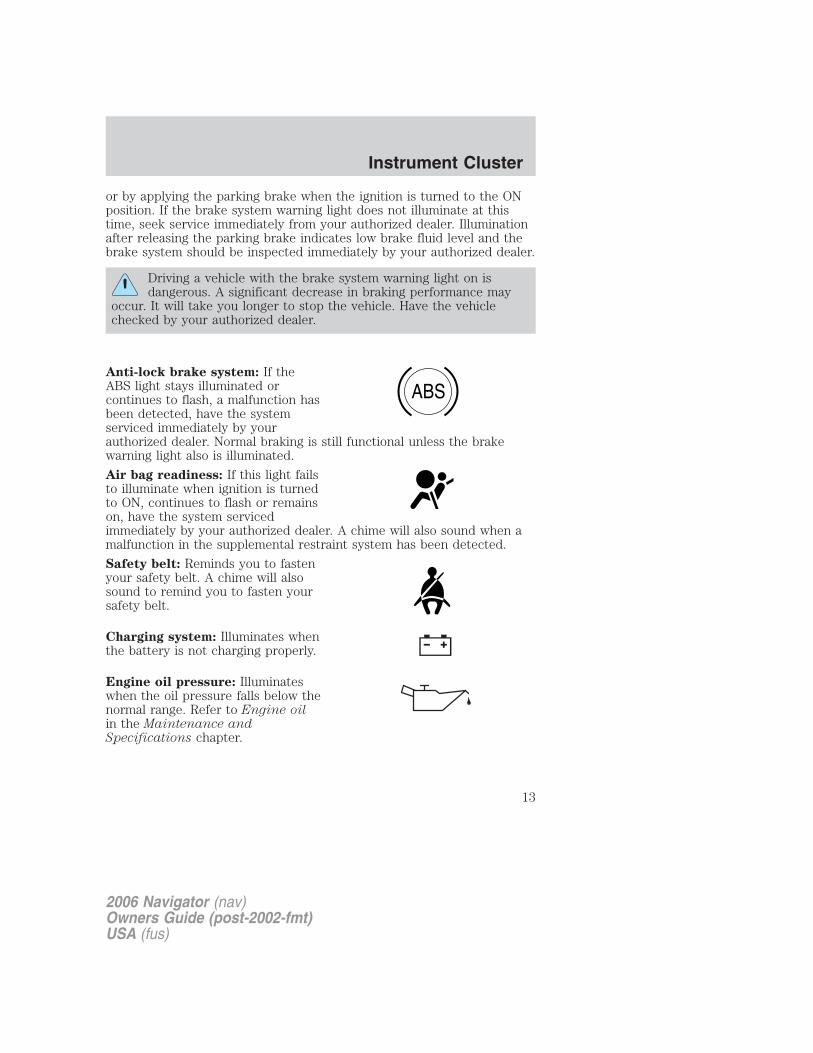
or by applying the parking brake when the ignition is turned to the ONposition. If the brake system warning light does not illuminate at thistime, seek service immediately from your authorized dealer. Illuminationafter releasing the parking brake indicates low brake fluid level and thebrake system should be inspected immediately by your authorized dealer.
Driving a vehicle with the brake system warning light on isdangerous. A significant decrease in braking performance may
occur. It will take you longer to stop the vehicle. Have the vehiclechecked by your authorized dealer.
Anti-lock brake system: If theABS light stays illuminated orcontinues to flash, a malfunction hasbeen detected, have the systemserviced immediately by yourauthorized dealer. Normal braking is still functional unless the brakewarning light also is illuminated.
Air bag readiness: If this light failsto illuminate when ignition is turnedto ON, continues to flash or remainson, have the system servicedimmediately by your authorized dealer. A chime will also sound when amalfunction in the supplemental restraint system has been detected.
Safety belt: Reminds you to fastenyour safety belt. A chime will alsosound to remind you to fasten yoursafety belt.
Charging system: Illuminates whenthe battery is not charging properly.
Engine oil pressure: Illuminateswhen the oil pressure falls below thenormal range. Refer to Engine oilin the Maintenance andSpecifications chapter.
ABS
2006 Navigator (nav)Owners Guide (post-2002-fmt)USA (fus)
Instrument Cluster
13
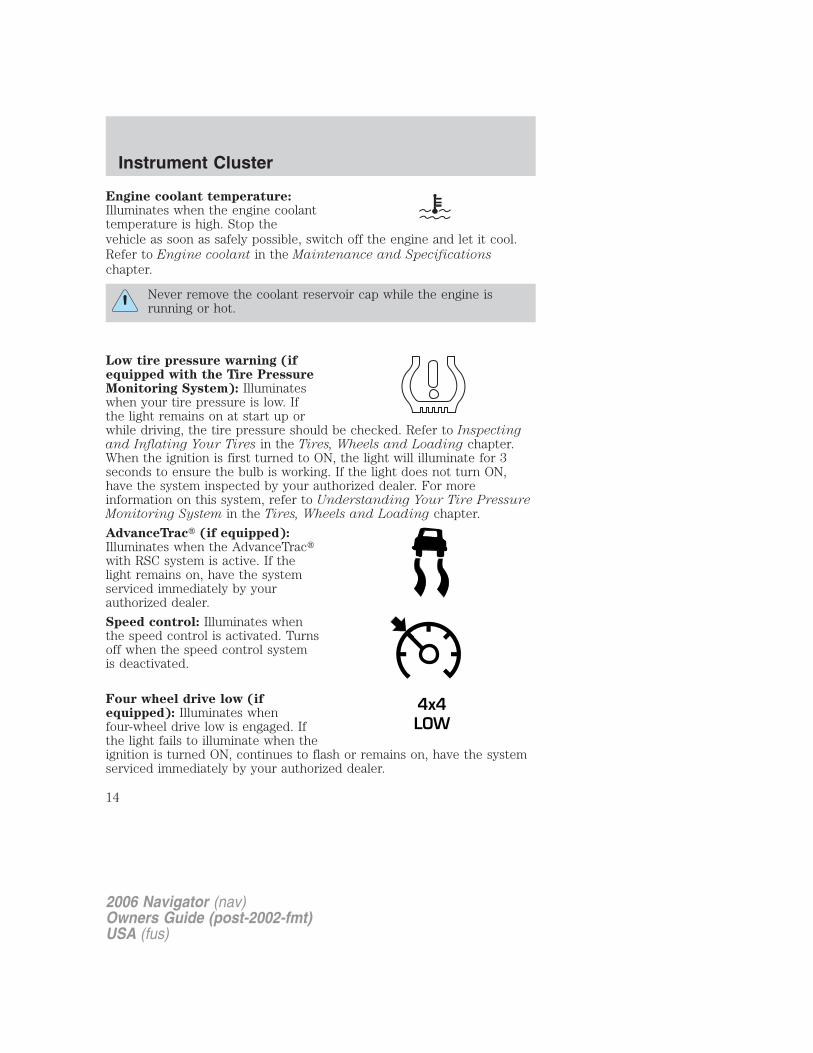
Engine coolant temperature:Illuminates when the engine coolanttemperature is high. Stop thevehicle as soon as safely possible, switch off the engine and let it cool.Refer to Engine coolant in the Maintenance and Specifications
chapter.
Never remove the coolant reservoir cap while the engine isrunning or hot.
Low tire pressure warning (ifequipped with the Tire PressureMonitoring System): Illuminateswhen your tire pressure is low. Ifthe light remains on at start up orwhile driving, the tire pressure should be checked. Refer to Inspectingand Inflating Your Tires in the Tires, Wheels and Loading chapter.When the ignition is first turned to ON, the light will illuminate for 3seconds to ensure the bulb is working. If the light does not turn ON,have the system inspected by your authorized dealer. For moreinformation on this system, refer to Understanding Your Tire PressureMonitoring System in the Tires, Wheels and Loading chapter.
AdvanceTrac� (if equipped):Illuminates when the AdvanceTrac�with RSC system is active. If thelight remains on, have the systemserviced immediately by yourauthorized dealer.
Speed control: Illuminates whenthe speed control is activated. Turnsoff when the speed control systemis deactivated.
Four wheel drive low (ifequipped): Illuminates whenfour-wheel drive low is engaged. Ifthe light fails to illuminate when theignition is turned ON, continues to flash or remains on, have the systemserviced immediately by your authorized dealer.
4x4LOW
2006 Navigator (nav)Owners Guide (post-2002-fmt)USA (fus)
Instrument Cluster
14

Four wheel drive high (ifequipped): Illuminates whenfour-wheel drive high is engaged. Ifthe light fails to illuminate when theignition is turned ON, continues to flash or remains on, have the systemserviced immediately by your authorized dealer.
Turn signal: Illuminates when theleft or right turn signal or thehazard lights are turned on. If theindicators stay on or flash faster, check for a burned out bulb.
High beams: Illuminates when thehigh beam headlamps are turned on.
Key-in-ignition warning chime: Sounds when the key is left in theignition in the OFF/LOCK or ACCESSORY position and the driver’s dooris opened.
Headlamps on warning chime: Sounds when the headlamps or parkinglamps are on, the ignition is off (the key is not in the ignition) and thedriver’s door is opened.
Door ajar warning chime: Sounds when any door, liftgate or theliftgate glass is opened (or not fully closed).
GAUGES
4x4HIGH
2006 Navigator (nav)Owners Guide (post-2002-fmt)USA (fus)
Instrument Cluster
15
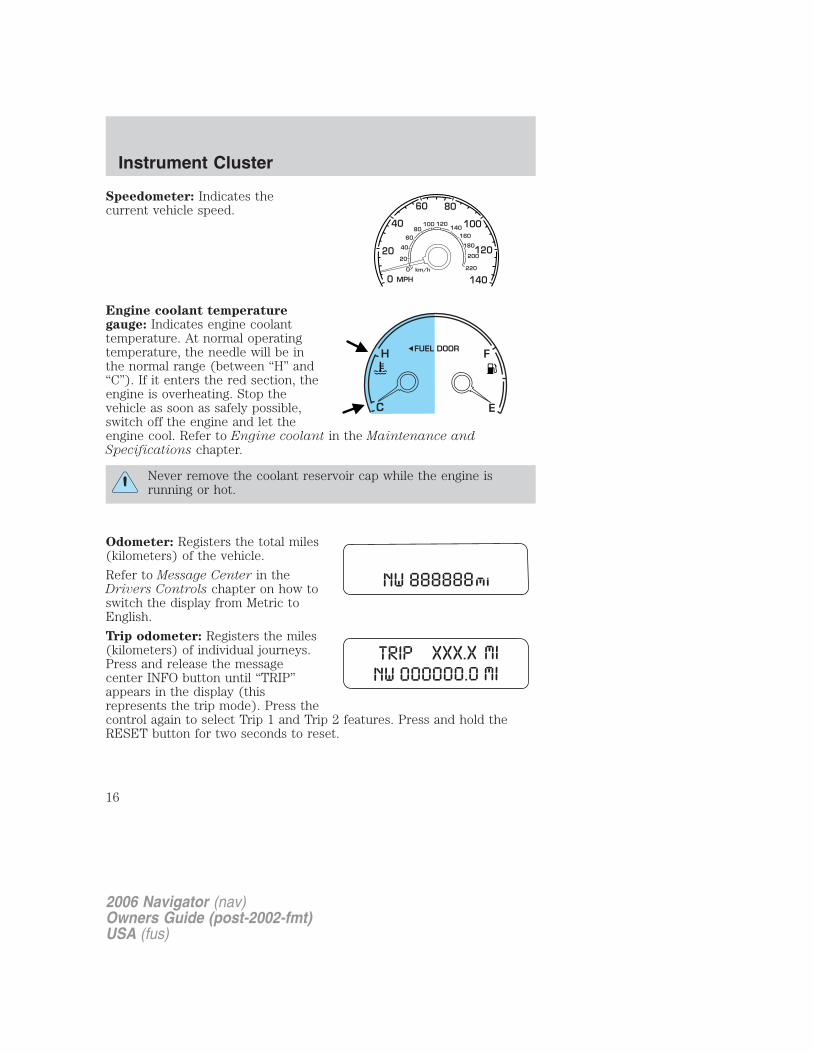
Speedometer: Indicates thecurrent vehicle speed.
Engine coolant temperaturegauge: Indicates engine coolanttemperature. At normal operatingtemperature, the needle will be inthe normal range (between “H” and“C”). If it enters the red section, theengine is overheating. Stop thevehicle as soon as safely possible,switch off the engine and let theengine cool. Refer to Engine coolant in the Maintenance andSpecifications chapter.
Never remove the coolant reservoir cap while the engine isrunning or hot.
Odometer: Registers the total miles(kilometers) of the vehicle.
Refer to Message Center in theDrivers Controls chapter on how toswitch the display from Metric toEnglish.
Trip odometer: Registers the miles(kilometers) of individual journeys.Press and release the messagecenter INFO button until “TRIP”appears in the display (thisrepresents the trip mode). Press thecontrol again to select Trip 1 and Trip 2 features. Press and hold theRESET button for two seconds to reset.
2006 Navigator (nav)Owners Guide (post-2002-fmt)USA (fus)
Instrument Cluster
16
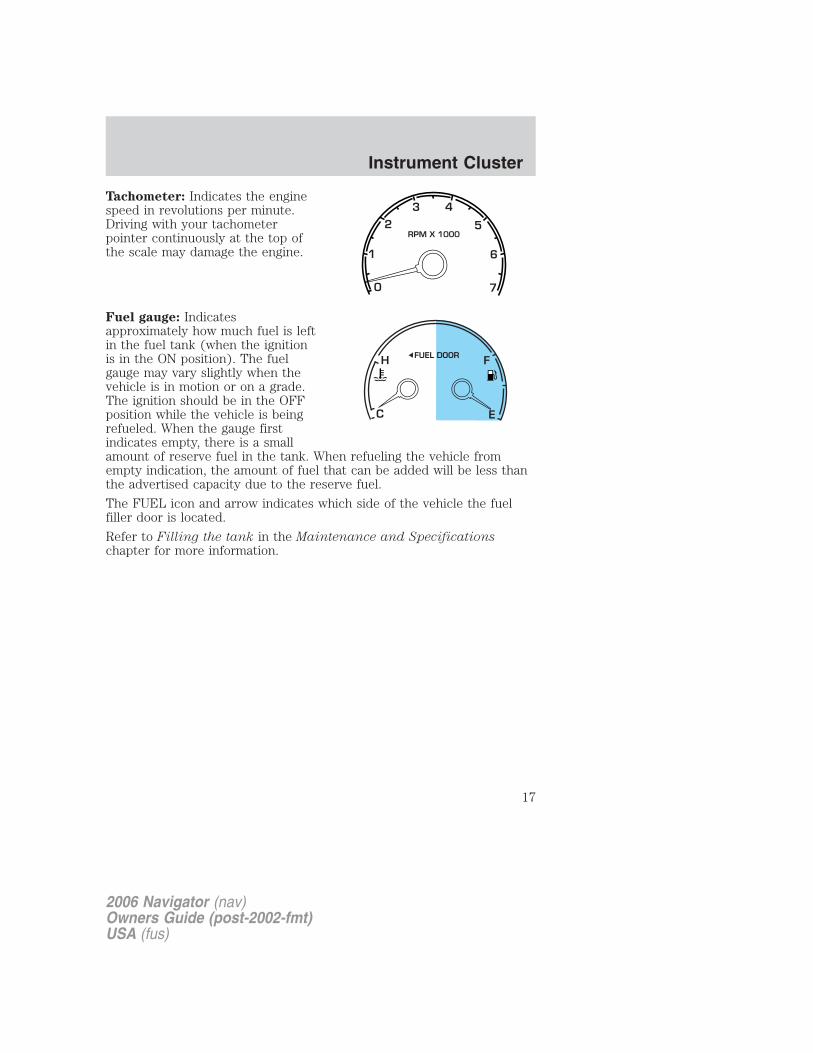
Tachometer: Indicates the enginespeed in revolutions per minute.Driving with your tachometerpointer continuously at the top ofthe scale may damage the engine.
Fuel gauge: Indicatesapproximately how much fuel is leftin the fuel tank (when the ignitionis in the ON position). The fuelgauge may vary slightly when thevehicle is in motion or on a grade.The ignition should be in the OFFposition while the vehicle is beingrefueled. When the gauge firstindicates empty, there is a smallamount of reserve fuel in the tank. When refueling the vehicle fromempty indication, the amount of fuel that can be added will be less thanthe advertised capacity due to the reserve fuel.
The FUEL icon and arrow indicates which side of the vehicle the fuelfiller door is located.
Refer to Filling the tank in the Maintenance and Specificationschapter for more information.
2006 Navigator (nav)Owners Guide (post-2002-fmt)USA (fus)
Instrument Cluster
17
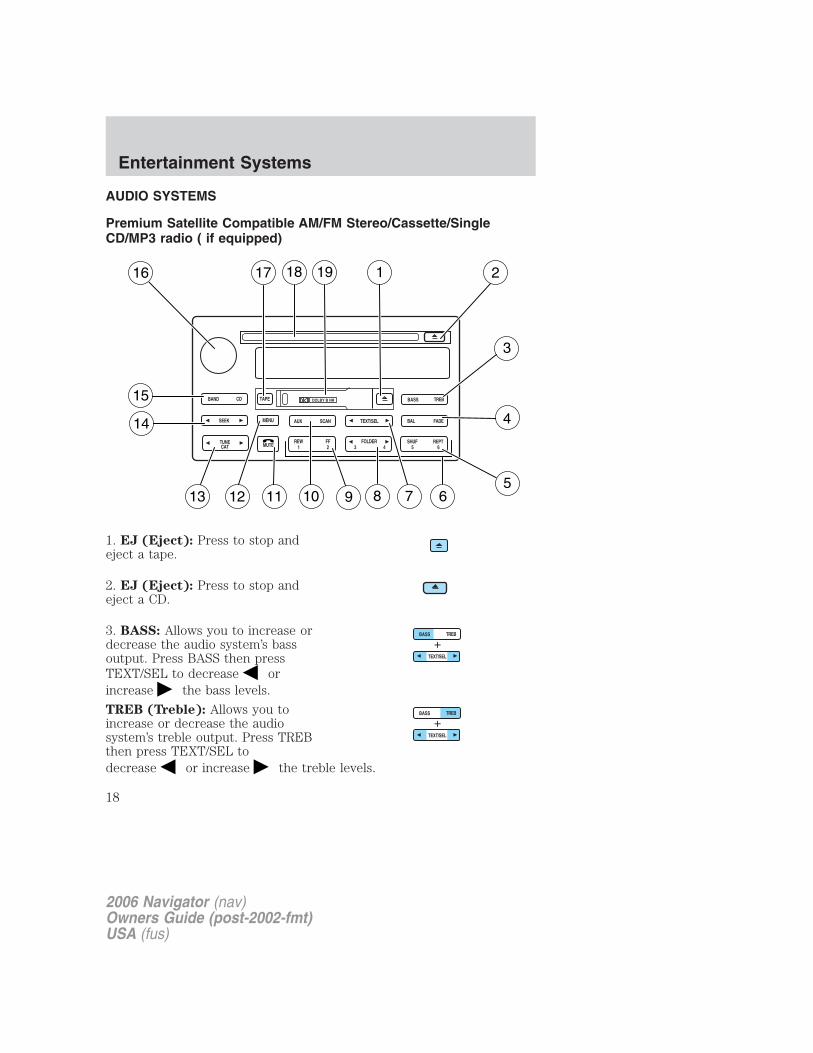
AUDIO SYSTEMS
Premium Satellite Compatible AM/FM Stereo/Cassette/SingleCD/MP3 radio ( if equipped)
1. EJ (Eject): Press to stop andeject a tape.
2. EJ (Eject): Press to stop andeject a CD.
3. BASS: Allows you to increase ordecrease the audio system’s bassoutput. Press BASS then pressTEXT/SEL to decrease orincrease the bass levels.
TREB (Treble): Allows you toincrease or decrease the audiosystem’s treble output. Press TREBthen press TEXT/SEL todecrease or increase the treble levels.
2006 Navigator (nav)Owners Guide (post-2002-fmt)USA (fus)
Entertainment Systems
18
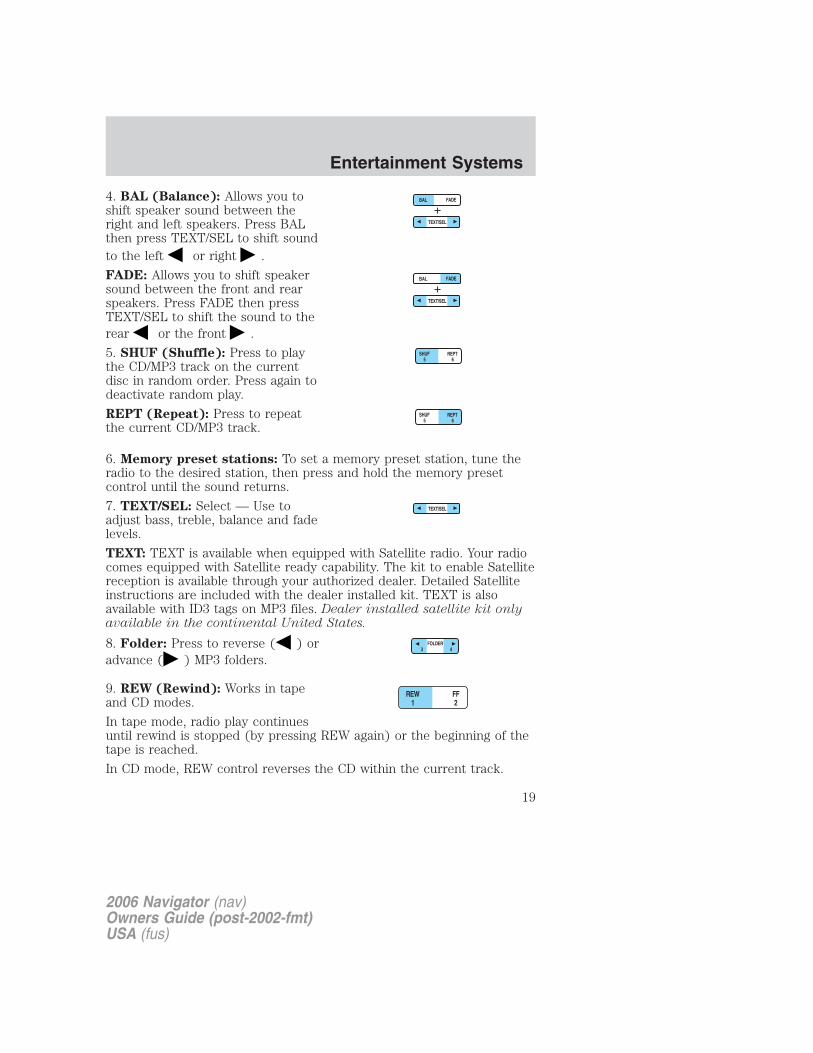
4. BAL (Balance): Allows you toshift speaker sound between theright and left speakers. Press BALthen press TEXT/SEL to shift soundto the left or right .
FADE: Allows you to shift speakersound between the front and rearspeakers. Press FADE then pressTEXT/SEL to shift the sound to therear or the front .
5. SHUF (Shuffle): Press to playthe CD/MP3 track on the currentdisc in random order. Press again todeactivate random play.
REPT (Repeat): Press to repeatthe current CD/MP3 track.
6. Memory preset stations: To set a memory preset station, tune theradio to the desired station, then press and hold the memory presetcontrol until the sound returns.
7. TEXT/SEL: Select — Use toadjust bass, treble, balance and fadelevels.
TEXT: TEXT is available when equipped with Satellite radio. Your radiocomes equipped with Satellite ready capability. The kit to enable Satellitereception is available through your authorized dealer. Detailed Satelliteinstructions are included with the dealer installed kit. TEXT is alsoavailable with ID3 tags on MP3 files. Dealer installed satellite kit onlyavailable in the continental United States.
8. Folder: Press to reverse ( ) oradvance ( ) MP3 folders.
9. REW (Rewind): Works in tapeand CD modes.
In tape mode, radio play continuesuntil rewind is stopped (by pressing REW again) or the beginning of thetape is reached.
In CD mode, REW control reverses the CD within the current track.
2006 Navigator (nav)Owners Guide (post-2002-fmt)USA (fus)
Entertainment Systems
19
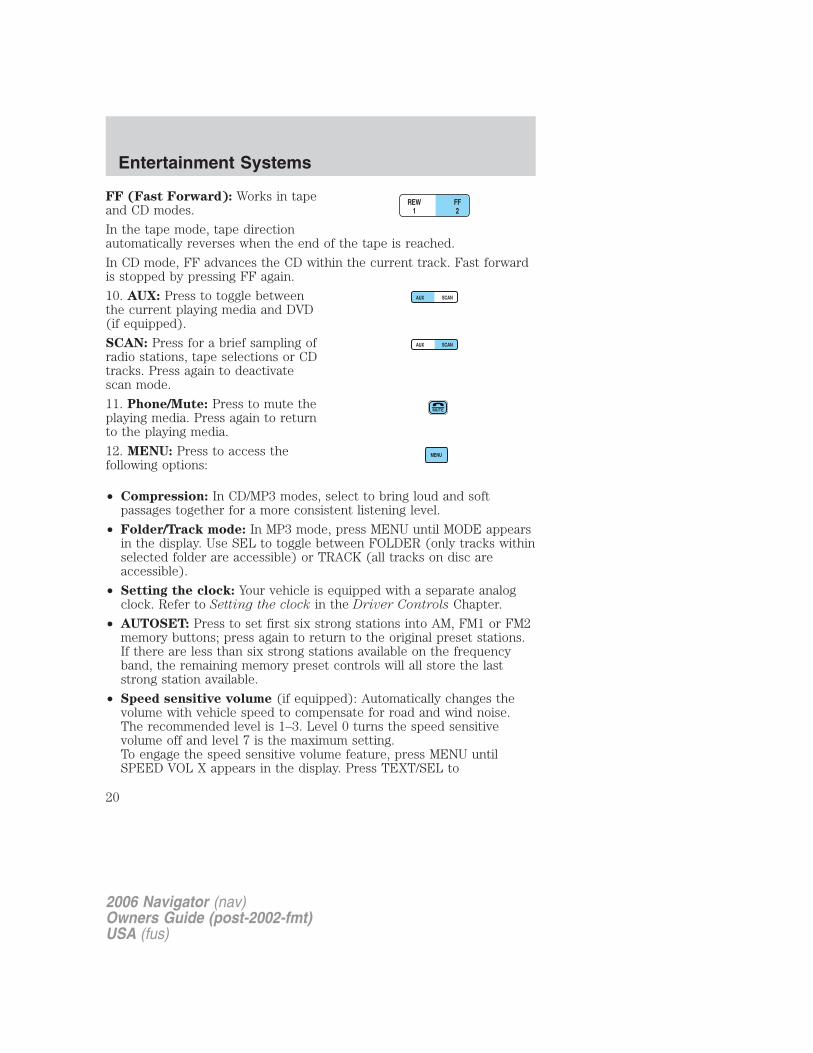
FF (Fast Forward): Works in tapeand CD modes.
In the tape mode, tape directionautomatically reverses when the end of the tape is reached.
In CD mode, FF advances the CD within the current track. Fast forwardis stopped by pressing FF again.
10. AUX: Press to toggle betweenthe current playing media and DVD(if equipped).
SCAN: Press for a brief sampling ofradio stations, tape selections or CDtracks. Press again to deactivatescan mode.
11. Phone/Mute: Press to mute theplaying media. Press again to returnto the playing media.
12. MENU: Press to access thefollowing options:
• Compression: In CD/MP3 modes, select to bring loud and softpassages together for a more consistent listening level.
• Folder/Track mode: In MP3 mode, press MENU until MODE appearsin the display. Use SEL to toggle between FOLDER (only tracks withinselected folder are accessible) or TRACK (all tracks on disc areaccessible).
• Setting the clock: Your vehicle is equipped with a separate analogclock. Refer to Setting the clock in the Driver Controls Chapter.
• AUTOSET: Press to set first six strong stations into AM, FM1 or FM2memory buttons; press again to return to the original preset stations.If there are less than six strong stations available on the frequencyband, the remaining memory preset controls will all store the laststrong station available.
• Speed sensitive volume (if equipped): Automatically changes thevolume with vehicle speed to compensate for road and wind noise.The recommended level is 1–3. Level 0 turns the speed sensitivevolume off and level 7 is the maximum setting.To engage the speed sensitive volume feature, press MENU untilSPEED VOL X appears in the display. Press TEXT/SEL to
2006 Navigator (nav)Owners Guide (post-2002-fmt)USA (fus)
Entertainment Systems
20

increase /decrease volume compensation levels. The selectedlevel will appear in the display.
13. TUNE/CAT: In radio mode,press to manually advance up/downthe frequency band. In satelliteradio mode, press CAT for a listing of available music categories.
CAT: CAT is only available when equipped with Satellite Radio. YourAudiophile radio comes equipped with Satellite ready capability. The kitto enable Satellite reception is available through your authorized dealer.Detailed Satellite instructions are included with the dealer installed kit.Dealer installed satellite kit only available in the continental UnitedStates.
For information regarding SIRIUS Satellite Radio, please call toll-free888-539-SIRIUS (888-539-7474) or visit the SIRIUS website atwww.siriusradio.com
14. SEEK: Works in radio, tape andCD modes. Press to access theprevious or next listenableradio station, tape selection or CD track.
15. BAND: Press to toggle betweenAM/FM1/FM2 frequency bands.Press while in tape or CD mode toreturn to radio mode.
CD: Press CD to enter CD modeand to play a CD already in thesystem. Press the CD control totoggle between CD and DVD (if equipped).
16. Power/volume: Press to turnthe system on/off. Turn toraise/lower the volume.
If the volume is set above a certainlevel and the ignition is turned off,the volume will come back on at a“nominal” listening level when the ignition switch is turned back on.Audio power can also be turned on by pressing the AM/FM select controlor the TAPE or CD select control.
2006 Navigator (nav)Owners Guide (post-2002-fmt)USA (fus)
Entertainment Systems
21
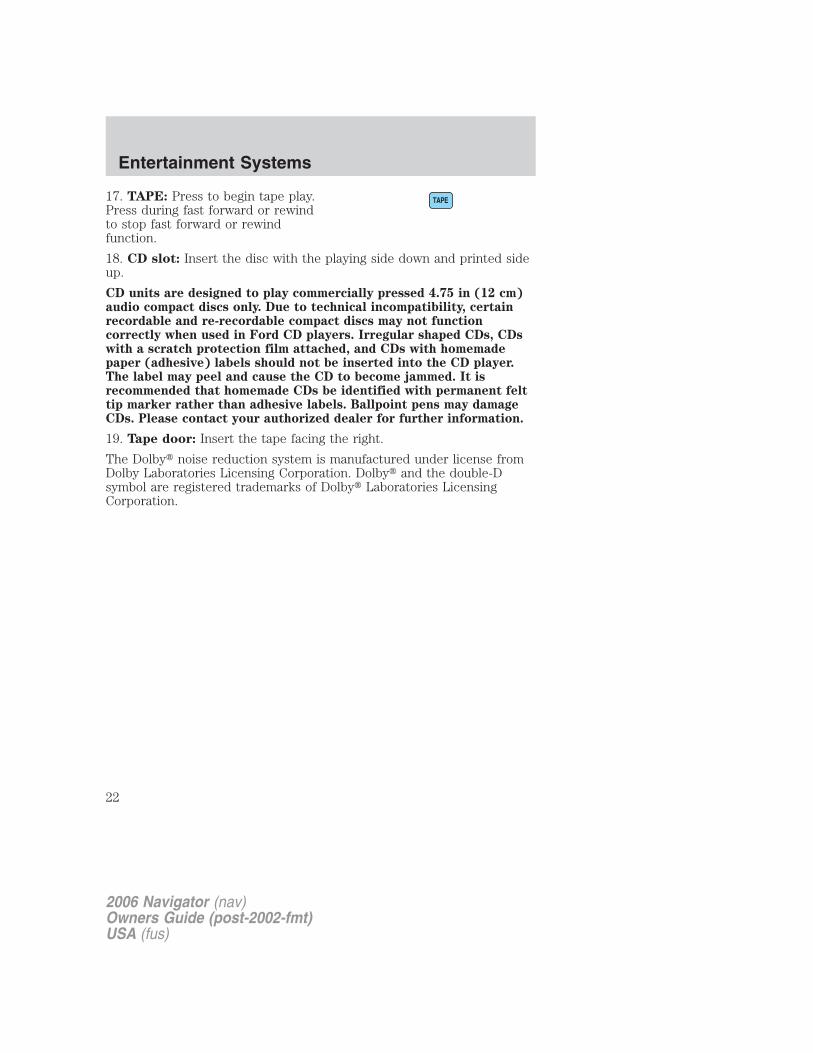
17. TAPE: Press to begin tape play.Press during fast forward or rewindto stop fast forward or rewindfunction.
18. CD slot: Insert the disc with the playing side down and printed sideup.
CD units are designed to play commercially pressed 4.75 in (12 cm)audio compact discs only. Due to technical incompatibility, certainrecordable and re-recordable compact discs may not functioncorrectly when used in Ford CD players. Irregular shaped CDs, CDswith a scratch protection film attached, and CDs with homemadepaper (adhesive) labels should not be inserted into the CD player.The label may peel and cause the CD to become jammed. It isrecommended that homemade CDs be identified with permanent felttip marker rather than adhesive labels. Ballpoint pens may damageCDs. Please contact your authorized dealer for further information.
19. Tape door: Insert the tape facing the right.
The Dolby� noise reduction system is manufactured under license fromDolby Laboratories Licensing Corporation. Dolby� and the double-Dsymbol are registered trademarks of Dolby� Laboratories LicensingCorporation.
2006 Navigator (nav)Owners Guide (post-2002-fmt)USA (fus)
Entertainment Systems
22
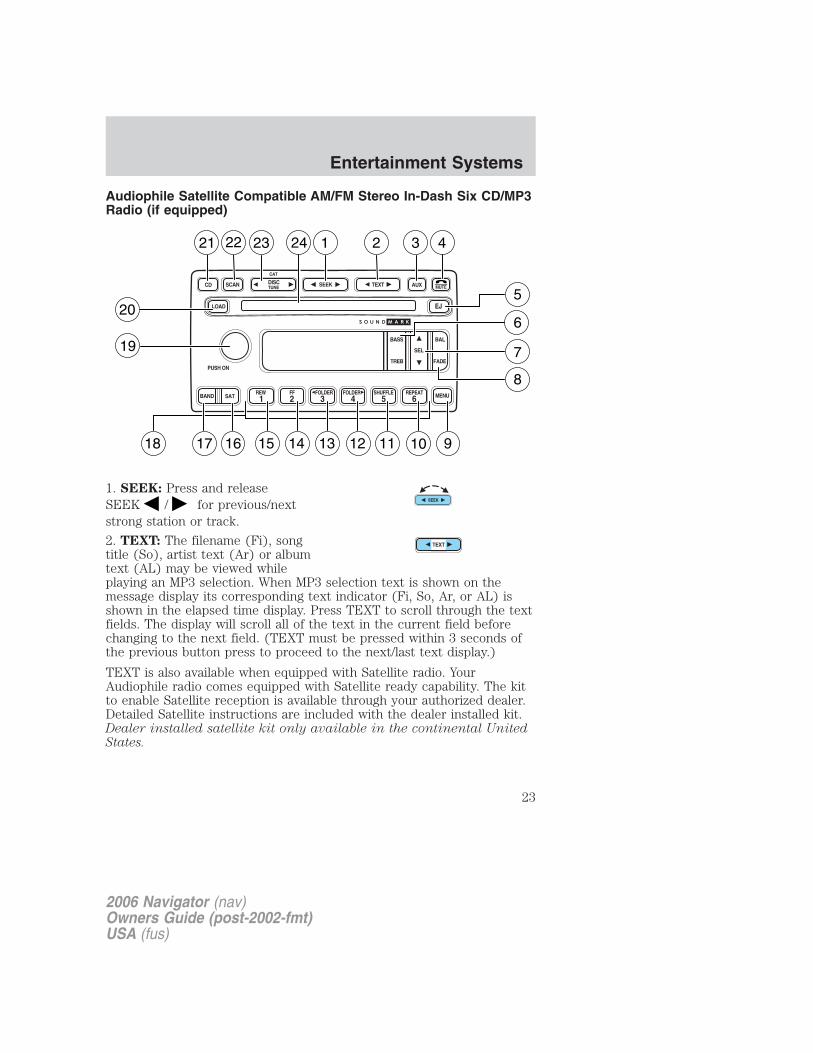
Audiophile Satellite Compatible AM/FM Stereo In-Dash Six CD/MP3Radio (if equipped)
1. SEEK: Press and releaseSEEK / for previous/nextstrong station or track.
2. TEXT: The filename (Fi), songtitle (So), artist text (Ar) or albumtext (AL) may be viewed whileplaying an MP3 selection. When MP3 selection text is shown on themessage display its corresponding text indicator (Fi, So, Ar, or AL) isshown in the elapsed time display. Press TEXT to scroll through the textfields. The display will scroll all of the text in the current field beforechanging to the next field. (TEXT must be pressed within 3 seconds ofthe previous button press to proceed to the next/last text display.)
TEXT is also available when equipped with Satellite radio. YourAudiophile radio comes equipped with Satellite ready capability. The kitto enable Satellite reception is available through your authorized dealer.Detailed Satellite instructions are included with the dealer installed kit.Dealer installed satellite kit only available in the continental UnitedStates.
2006 Navigator (nav)Owners Guide (post-2002-fmt)USA (fus)
Entertainment Systems
23
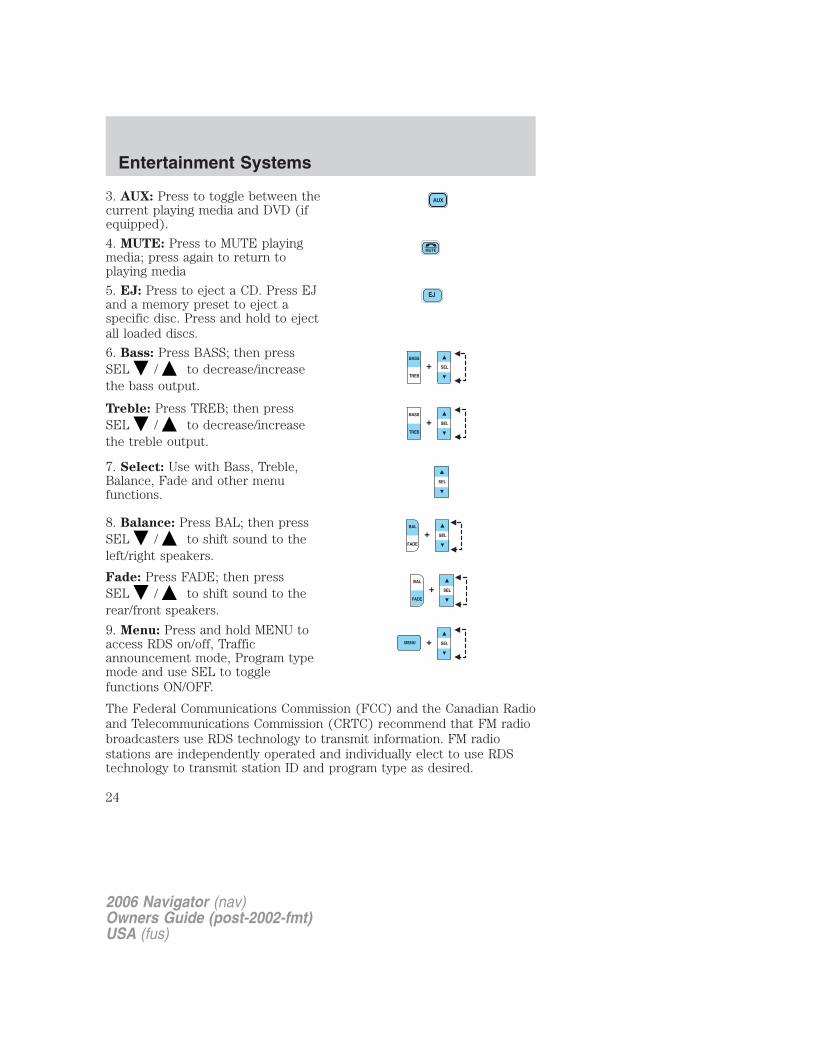
3. AUX: Press to toggle between thecurrent playing media and DVD (ifequipped).
4. MUTE: Press to MUTE playingmedia; press again to return toplaying media
5. EJ: Press to eject a CD. Press EJand a memory preset to eject aspecific disc. Press and hold to ejectall loaded discs.
6. Bass: Press BASS; then pressSEL / to decrease/increasethe bass output.
Treble: Press TREB; then pressSEL / to decrease/increasethe treble output.
7. Select: Use with Bass, Treble,Balance, Fade and other menufunctions.
8. Balance: Press BAL; then pressSEL / to shift sound to theleft/right speakers.
Fade: Press FADE; then pressSEL / to shift sound to therear/front speakers.
9. Menu: Press and hold MENU toaccess RDS on/off, Trafficannouncement mode, Program typemode and use SEL to togglefunctions ON/OFF.
The Federal Communications Commission (FCC) and the Canadian Radioand Telecommunications Commission (CRTC) recommend that FM radiobroadcasters use RDS technology to transmit information. FM radiostations are independently operated and individually elect to use RDStechnology to transmit station ID and program type as desired.
2006 Navigator (nav)Owners Guide (post-2002-fmt)USA (fus)
Entertainment Systems
24

Traffic (if equipped): Allows you to hear traffic broadcasts. With thefeature ON, press SEEK or SCAN to find a station broadcasting a trafficreport (if it is broadcasting RDS data).Traffic information is notavailable in most U.S. markets.
FIND Program type (if equipped): Allows you to searchRDS-equipped stations for a certain category of music format: Classic,Country, Info, Jazz, Oldies, R&B, Religious, Rock, Soft, Top 40.Press MENU until FIND appears in the display. Use SEL to scroll throughmusic types. Press SEEK or SCAN to search for a station playing therequested music category.Show TYPE (if equipped): Displays the station’s call letters or musicformat.Press MENU until SHOW appears in the display. Use SEL to selectNONE, NAME or TYPE.Compression: Brings soft and loud CD passages together for a moreconsistent listening level when in CD mode. Press MENU untilcompression status is displayed. Press the SEL control to enable thecompression feature when COMPRESS OFF is displayed. Press the SELcontrol again to disable the feature when COMPRESS ON is displayed.Occupancy mode (if equipped): Press MENU until occupancy modeappears in the display. Press SEL to select ALL, DRIVER or REAR SEAToccupancy mode.Autoset: Allows you to set the strongest local radio stations withoutlosing your original manually set preset stations for AM/FM1/FM2 . PressMENU until AUTOSET appears in the display. Press SEL to toggleON/OFF. When the six strongest stations are filled, the station stored inpreset 1 will begin playing. If there are less than six strong stations, thesystem will store the last one in the remaining presets.
Speed sensitive volume: Radio volume changes automatically andslightly with vehicle speed to compensate for road and wind noise.Recommended level is 1–3. Level 0 turns the feature off and level 7 isthe maximum setting.Press MENU until SPEED VOL X appears in the display. Then press SELto increase ( ) or decrease ( ) the volume setting. The level willappear in the display.
Setting the clock: Your vehicle is equipped with a separate analogclock. Refer to Setting the Clock in the Driver Controls Chapter.
Folder/Track Mode: In MP3 mode, press MENU until MODE appears inthe display. Use SEL to toggle between FOLDER (only tracks withinselected folder are accessible) or TRACK (all tracks on disc areaccessible) MODE.
2006 Navigator (nav)Owners Guide (post-2002-fmt)USA (fus)
Entertainment Systems
25
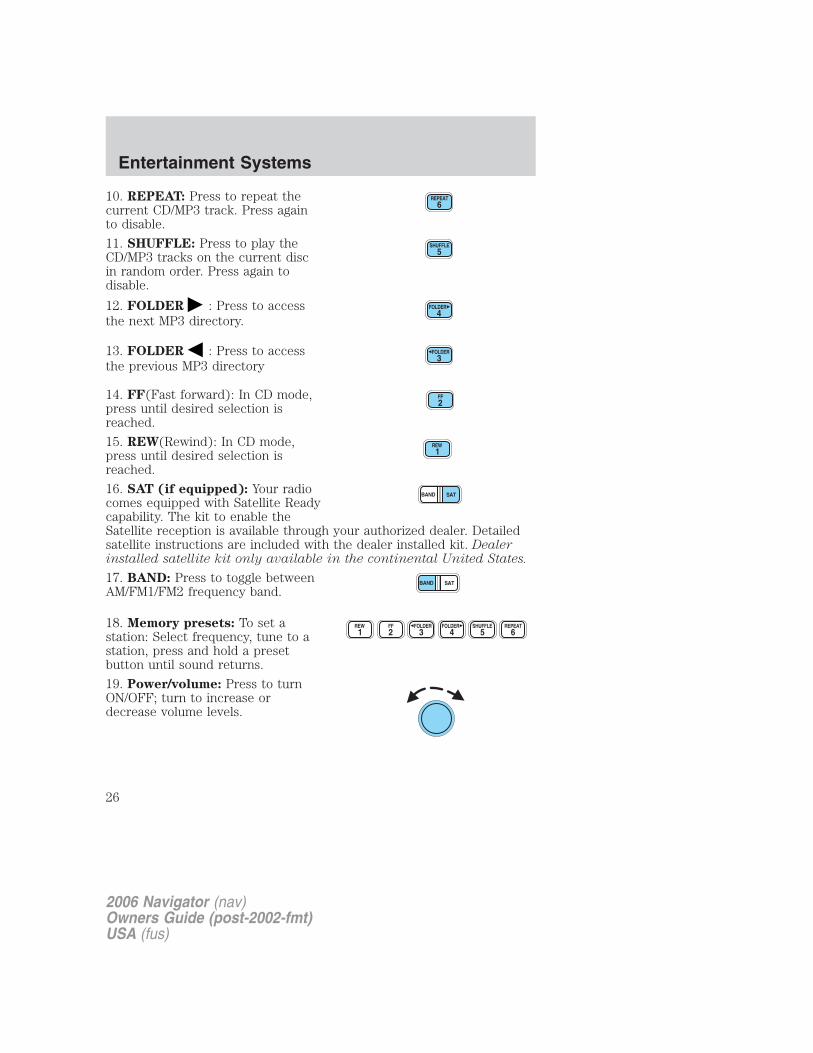
10. REPEAT: Press to repeat thecurrent CD/MP3 track. Press againto disable.
11. SHUFFLE: Press to play theCD/MP3 tracks on the current discin random order. Press again todisable.
12. FOLDER : Press to accessthe next MP3 directory.
13. FOLDER : Press to accessthe previous MP3 directory
14. FF(Fast forward): In CD mode,press until desired selection isreached.
15. REW(Rewind): In CD mode,press until desired selection isreached.
16. SAT (if equipped): Your radiocomes equipped with Satellite Readycapability. The kit to enable theSatellite reception is available through your authorized dealer. Detailedsatellite instructions are included with the dealer installed kit. Dealerinstalled satellite kit only available in the continental United States.
17. BAND: Press to toggle betweenAM/FM1/FM2 frequency band.
18. Memory presets: To set astation: Select frequency, tune to astation, press and hold a presetbutton until sound returns.
19. Power/volume: Press to turnON/OFF; turn to increase ordecrease volume levels.
2006 Navigator (nav)Owners Guide (post-2002-fmt)USA (fus)
Entertainment Systems
26
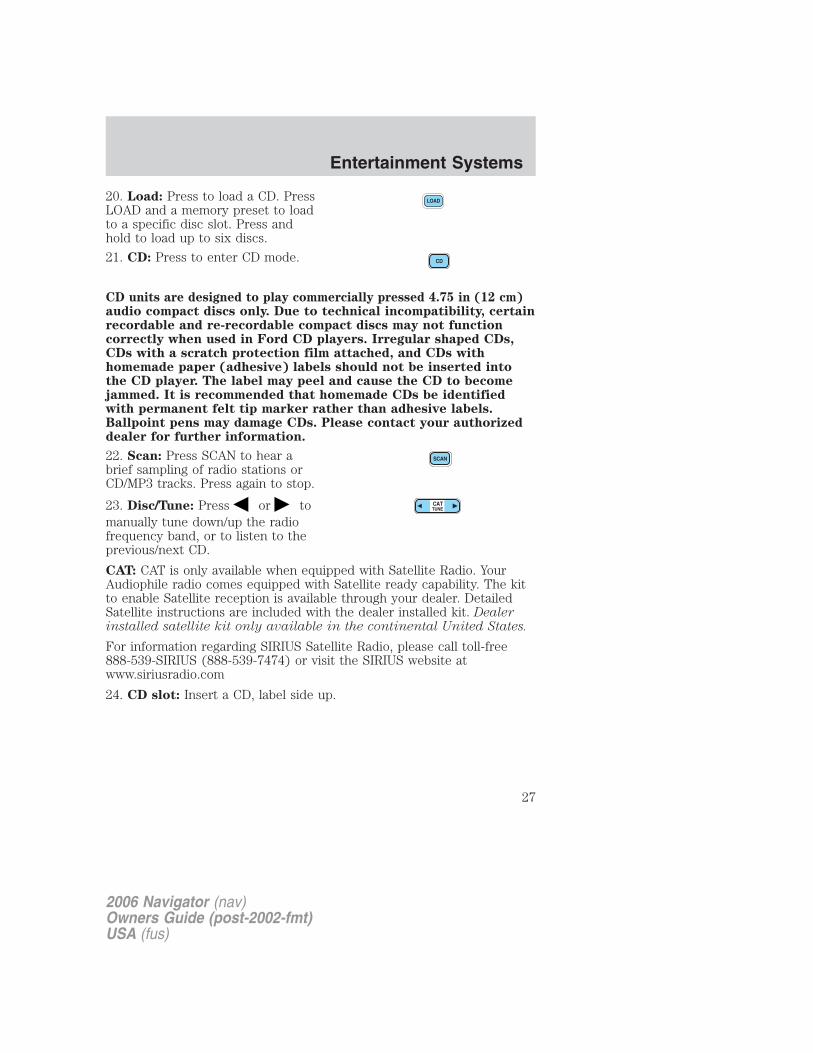
20. Load: Press to load a CD. PressLOAD and a memory preset to loadto a specific disc slot. Press andhold to load up to six discs.
21. CD: Press to enter CD mode.
CD units are designed to play commercially pressed 4.75 in (12 cm)audio compact discs only. Due to technical incompatibility, certainrecordable and re-recordable compact discs may not functioncorrectly when used in Ford CD players. Irregular shaped CDs,CDs with a scratch protection film attached, and CDs withhomemade paper (adhesive) labels should not be inserted intothe CD player. The label may peel and cause the CD to becomejammed. It is recommended that homemade CDs be identifiedwith permanent felt tip marker rather than adhesive labels.Ballpoint pens may damage CDs. Please contact your authorizeddealer for further information.
22. Scan: Press SCAN to hear abrief sampling of radio stations orCD/MP3 tracks. Press again to stop.
23. Disc/Tune: Press or tomanually tune down/up the radiofrequency band, or to listen to theprevious/next CD.
CAT: CAT is only available when equipped with Satellite Radio. YourAudiophile radio comes equipped with Satellite ready capability. The kitto enable Satellite reception is available through your dealer. DetailedSatellite instructions are included with the dealer installed kit. Dealerinstalled satellite kit only available in the continental United States.
For information regarding SIRIUS Satellite Radio, please call toll-free888-539-SIRIUS (888-539-7474) or visit the SIRIUS website atwww.siriusradio.com
24. CD slot: Insert a CD, label side up.
2006 Navigator (nav)Owners Guide (post-2002-fmt)USA (fus)
Entertainment Systems
27

Rear seat radio controls (if equipped)If your vehicle is equipped with afront row console, then it is alsoequipped with rear seat radiocontrols. This feature allows frontand middle seat passengers to listento different media sources (radio,cassette, CD or DVD)simultaneously. (However, the frontand middle-seat passengers cannotlisten to two different radio stationsat the same time.)
When the rear seat controls are activated, rear seat passengers can usethe controls to change the playing media for all passengers (Single Playmode). In this mode, all speakers will play audio from the same mediasource for all passengers to hear. To activate the rear seat radio controls:
• Press the memory preset controls3 and 5 at the same time. Aheadphone icon will illuminatein the radio display, indicating the rear seat radio controls are active.
• Press memory preset controls 3 and 5 a second time to deactivate therear seat controls. The headphone icon will turn off in the radiodisplay.
If there is a discrepancy between the rear seat controls and the frontaudio controls (such as both trying to listen to the same playing media),the front audio system will receive the desired selection.
To activate Dual Play mode (rearseat passengers listen to a differentplaying media than the front seatpassengers):
• Press the speaker/headphonecontrol.
• Press the MODE control tochange audio sources (forheadphone mode only)
• Use the SEEK, VOLUME andMEMORY controls to make adjustments to the playing media.
- VOLUME + MODE
SEEK MEMORY
- VOLUME + MODE
SEEK MEMORY
2006 Navigator (nav)Owners Guide (post-2002-fmt)USA (fus)
Entertainment Systems
28
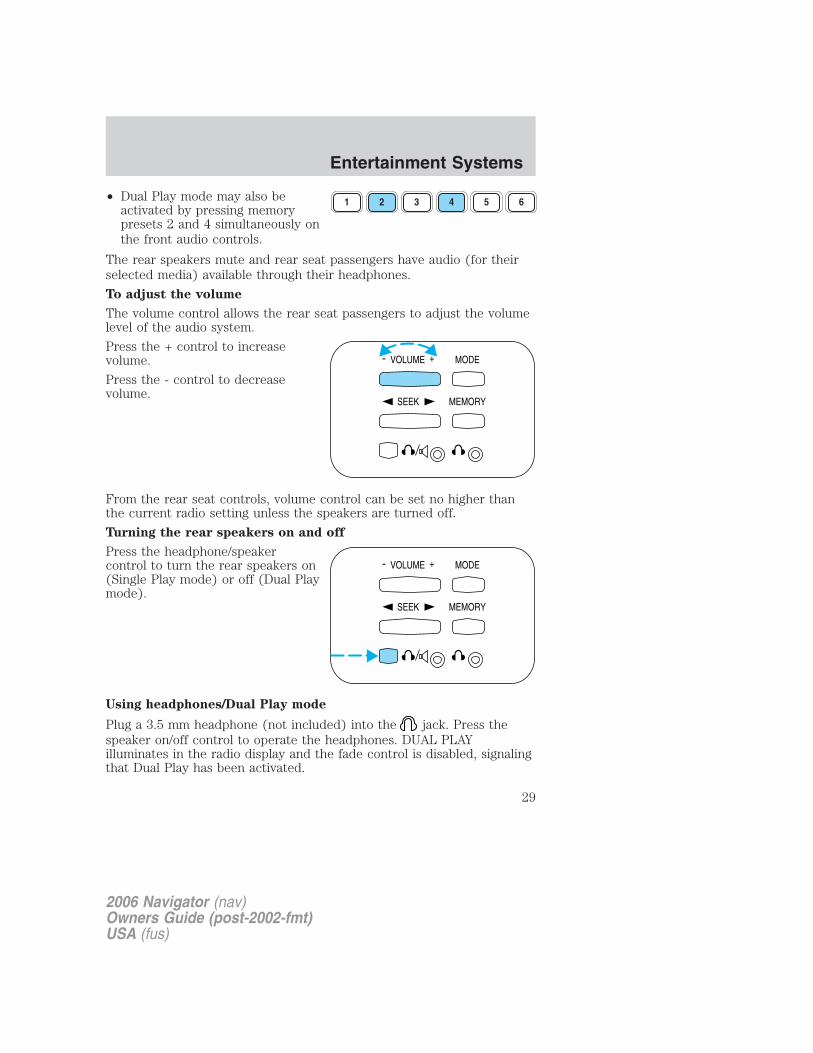
• Dual Play mode may also beactivated by pressing memorypresets 2 and 4 simultaneously onthe front audio controls.
The rear speakers mute and rear seat passengers have audio (for theirselected media) available through their headphones.
To adjust the volume
The volume control allows the rear seat passengers to adjust the volumelevel of the audio system.
Press the + control to increasevolume.
Press the - control to decreasevolume.
From the rear seat controls, volume control can be set no higher thanthe current radio setting unless the speakers are turned off.
Turning the rear speakers on and off
Press the headphone/speakercontrol to turn the rear speakers on(Single Play mode) or off (Dual Playmode).
Using headphones/Dual Play mode
Plug a 3.5 mm headphone (not included) into the jack. Press thespeaker on/off control to operate the headphones. DUAL PLAYilluminates in the radio display and the fade control is disabled, signalingthat Dual Play has been activated.
1 2 3 4 5 6
- VOLUME + MODE
SEEK MEMORY
- VOLUME + MODE
SEEK MEMORY
2006 Navigator (nav)Owners Guide (post-2002-fmt)USA (fus)
Entertainment Systems
29
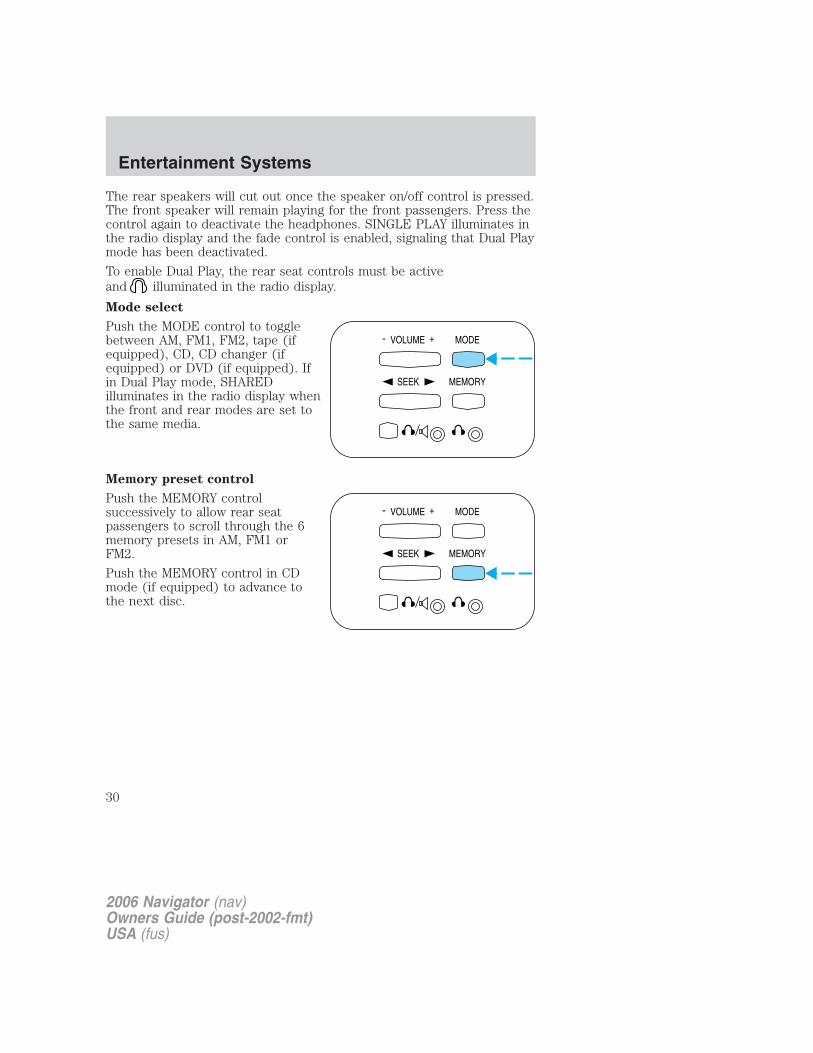
The rear speakers will cut out once the speaker on/off control is pressed.The front speaker will remain playing for the front passengers. Press thecontrol again to deactivate the headphones. SINGLE PLAY illuminates inthe radio display and the fade control is enabled, signaling that Dual Playmode has been deactivated.
To enable Dual Play, the rear seat controls must be activeand illuminated in the radio display.
Mode select
Push the MODE control to togglebetween AM, FM1, FM2, tape (ifequipped), CD, CD changer (ifequipped) or DVD (if equipped). Ifin Dual Play mode, SHAREDilluminates in the radio display whenthe front and rear modes are set tothe same media.
Memory preset control
Push the MEMORY controlsuccessively to allow rear seatpassengers to scroll through the 6memory presets in AM, FM1 orFM2.
Push the MEMORY control in CDmode (if equipped) to advance tothe next disc.
- VOLUME + MODE
SEEK MEMORY
- VOLUME + MODE
SEEK MEMORY
2006 Navigator (nav)Owners Guide (post-2002-fmt)USA (fus)
Entertainment Systems
30

Seek function
• In radio mode, press to findthe next listenable station downthe frequency band.
• In radio mode, press to findthe next listenable station up thefrequency band.
• In tape mode (if equipped), usethe SEEK function to access thenext or previousselection.
• In CD mode (if equipped), use the SEEK function to access thenext or previous selection.
Parental control
Press the memory preset controls 3and 5 simultaneously on the frontaudio controls to disable the rearseat controls. They will remain disabled until the front seat passengers“enable” them again by simultaneously pressing the 3 and 5 presetcontrols. The settings of the front seat controls will always overridethose of the rear seat controls.
GENERAL AUDIO INFORMATIONRadio frequencies: AM and FM frequencies are established by theFederal Communications Commission (FCC) and the Canadian Radio andTelecommunications Commission (CRTC). Those frequencies are:
AM - 530, 540–1700, 1710 kHz
FM- 87.7, 87.9–107.7, 107.9 MHz
Radio reception factors: There are three factors that can affect radioreception:
• Distance/strength: The further you travel from a station, the weakerthe signal and the weaker the reception.
• Terrain: Hills, mountains, tall buildings, power lines, electric fences,traffic lights and thunderstorms can interfere with your reception.
• Station overload: When you pass a broadcast tower, a stronger signalmay overtake a weaker one and play while the weak station frequencyis displayed.
- VOLUME + MODE
SEEK MEMORY
2006 Navigator (nav)Owners Guide (post-2002-fmt)USA (fus)
Entertainment Systems
31
Cassette/player care:
Do:• Use only cassettes that are 90 minutes long or less.• Tighten very loose tapes by inserting a finger or pencil into the hole
and turning the hub.• Remove loose labels before inserting tapes.• Allow tapes which have been subjected to extreme heat, humidity or
cold to reach a moderate temperature before playing.• Clean the cassette player head with a cassette cleaning cartridge after
10–12 hours of play to maintain good sound/operation.Don’t:• Expose tapes to direct sunlight, extreme humidity, heat or cold.• Leave tapes in the cassette player for a long time when not being
played.CD/CD player care:
Do:• Handle discs by their edges only. Never touch the playing surface.• Inspect discs before playing. Clean only with an approved CD cleaner
and wipe from the center out.Don’t:• Expose discs to direct sunlight or heat sources for extended periods
of time.• Insert more than one disc into each slot of the CD changer magazine.• Clean using a circular motion.CD units are designed to play commercially pressed 4.75 in (12 cm)audio compact discs only. Due to technical incompatibility, certainrecordable and re-recordable compact discs may not functioncorrectly when used in Ford CD players. Irregular shaped CDs,CDs with a scratch protection film attached, and CDs withhomemade paper (adhesive) labels should not be inserted intothe CD player. The label may peel and cause the CD to becomejammed. It is recommended that homemade CDs be identifiedwith permanent felt tip marker rather than adhesive labels.Ballpoint pens may damage CDs. Please contact your authorizeddealer for further information.
Audio system warranty and service: Refer to the Warranty Guidefor audio system warranty information. If service is necessary, see yourdealer or qualified technician.
2006 Navigator (nav)Owners Guide (post-2002-fmt)USA (fus)
Entertainment Systems
32
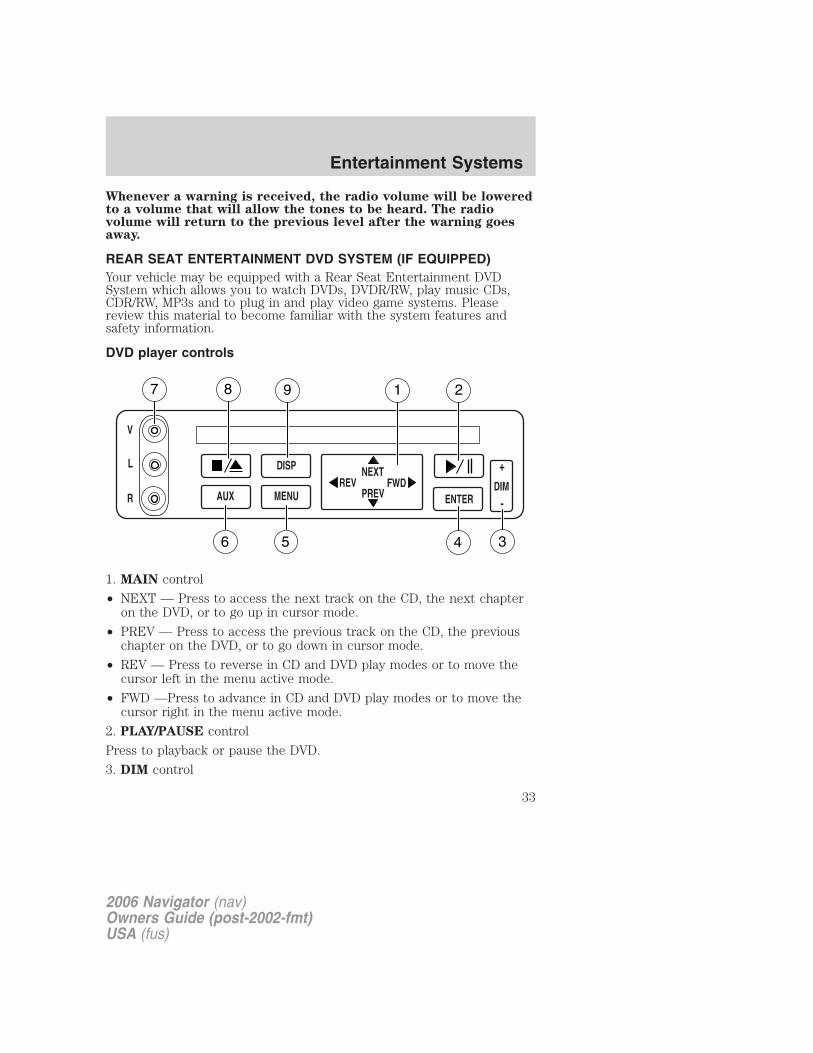
Whenever a warning is received, the radio volume will be loweredto a volume that will allow the tones to be heard. The radiovolume will return to the previous level after the warning goesaway.
REAR SEAT ENTERTAINMENT DVD SYSTEM (IF EQUIPPED)Your vehicle may be equipped with a Rear Seat Entertainment DVDSystem which allows you to watch DVDs, DVDR/RW, play music CDs,CDR/RW, MP3s and to plug in and play video game systems. Pleasereview this material to become familiar with the system features andsafety information.
DVD player controls
1. MAIN control
• NEXT — Press to access the next track on the CD, the next chapteron the DVD, or to go up in cursor mode.
• PREV — Press to access the previous track on the CD, the previouschapter on the DVD, or to go down in cursor mode.
• REV — Press to reverse in CD and DVD play modes or to move thecursor left in the menu active mode.
• FWD —Press to advance in CD and DVD play modes or to move thecursor right in the menu active mode.
2. PLAY/PAUSE control
Press to playback or pause the DVD.
3. DIM control
2006 Navigator (nav)Owners Guide (post-2002-fmt)USA (fus)
Entertainment Systems
33

Adjust to increase (+) or decrease (-) the amount of brightness on thescreen.
4. ENTER control
Press to select the function pointed to within the active menu. May alsobe used by some user interactive discs during movie play.
5. MENU control
Press to bring up the disc menu.
6. AUX control
Press to switch DVD player from play mode to auxiliary mode.
7. Auxiliary jacks
Insert lines for standard video game players.
8. STOP/EJECT control
Press once to stop DVD play. Press again to eject the DVD.
9. DISPLAY (DISP) control
Press to enable on screen display of player menu and user displayadjustments.
DVD control features
Menu controlPress the MENU control to enterinto MENU mode. This allows you tomove and choose within the DVDgenerated menu structure. Once inMENU mode:
• Press the NEXT control to movethe cursor one position upward
• Press the PREV control to movethe cursor one position downward
NEXT
PREVREV FWD
NEXT
PREVREV FWD
2006 Navigator (nav)Owners Guide (post-2002-fmt)USA (fus)
Entertainment Systems
34

• Press the REV control to movethe cursor left one position
• Press the FWD control to movethe cursor right one position
Next/Previous controlThe NEXT (up) and PREV (down)controls allow you to access thenext or previous track on a CD orchapter on a DVD. When pressed,the playing audio will mutemomentarily while the next chapteris accessed. Press and hold to advance or reverse multiple tracks orchapters.
REV/FWD controlPress the REV/FWD control duringplayback mode to reverse oradvance at a normal speed. Pressthe REV/FWD control again todisengage the reverse/advanceaction and return to normalplayback mode
Enter controlThe ENTER control allows you toselect items when in MENU mode.
Press the ENTER control to selectthe desired highlighted item.
NEXT
PREVREV FWD
NEXT
PREVREV FWD
NEXT
PREVREV FWD
NEXT
PREVREV FWD
ENTER
2006 Navigator (nav)Owners Guide (post-2002-fmt)USA (fus)
Entertainment Systems
35
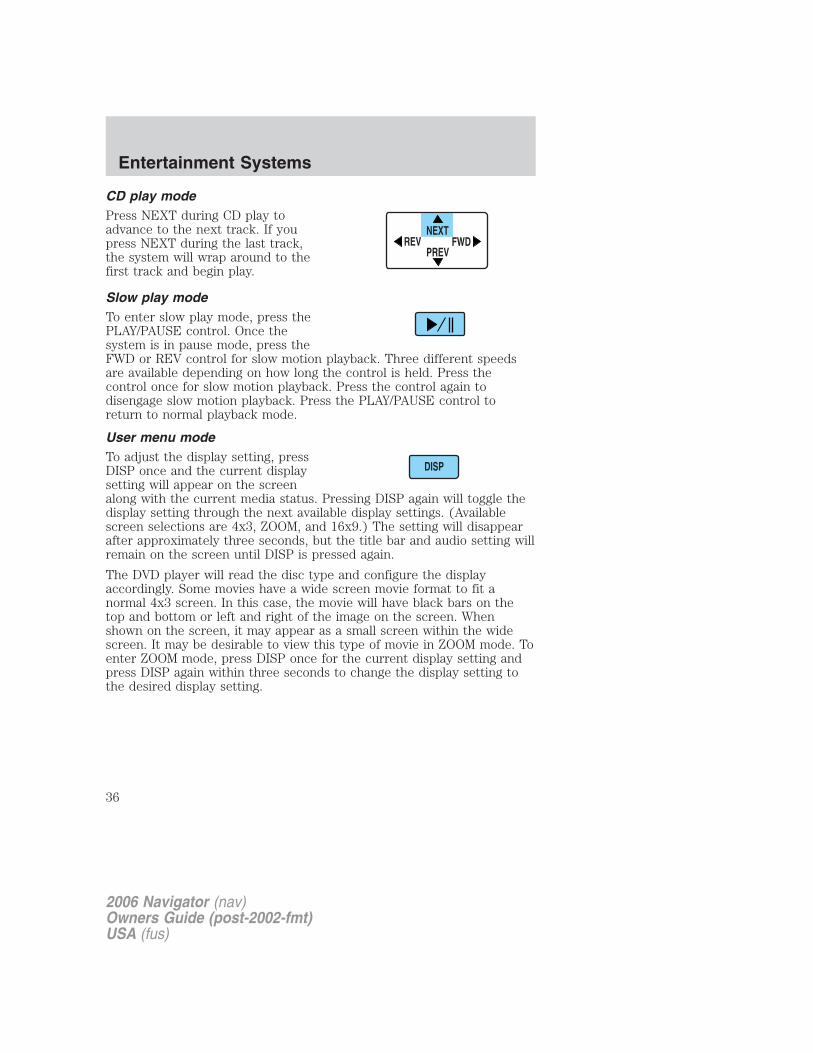
CD play modePress NEXT during CD play toadvance to the next track. If youpress NEXT during the last track,the system will wrap around to thefirst track and begin play.
Slow play modeTo enter slow play mode, press thePLAY/PAUSE control. Once thesystem is in pause mode, press theFWD or REV control for slow motion playback. Three different speedsare available depending on how long the control is held. Press thecontrol once for slow motion playback. Press the control again todisengage slow motion playback. Press the PLAY/PAUSE control toreturn to normal playback mode.
User menu modeTo adjust the display setting, pressDISP once and the current displaysetting will appear on the screenalong with the current media status. Pressing DISP again will toggle thedisplay setting through the next available display settings. (Availablescreen selections are 4x3, ZOOM, and 16x9.) The setting will disappearafter approximately three seconds, but the title bar and audio setting willremain on the screen until DISP is pressed again.
The DVD player will read the disc type and configure the displayaccordingly. Some movies have a wide screen movie format to fit anormal 4x3 screen. In this case, the movie will have black bars on thetop and bottom or left and right of the image on the screen. Whenshown on the screen, it may appear as a small screen within the widescreen. It may be desirable to view this type of movie in ZOOM mode. Toenter ZOOM mode, press DISP once for the current display setting andpress DISP again within three seconds to change the display setting tothe desired display setting.
NEXT
PREVREV FWD
DISP
2006 Navigator (nav)Owners Guide (post-2002-fmt)USA (fus)
Entertainment Systems
36
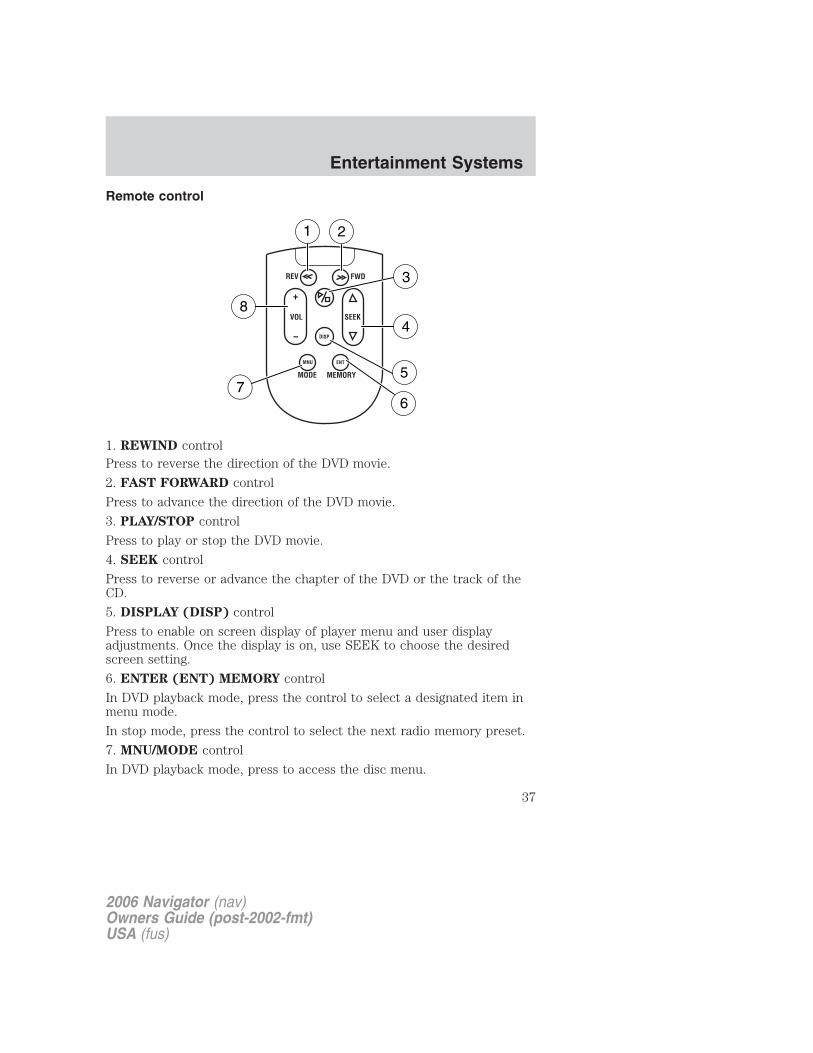
Remote control
1. REWIND controlPress to reverse the direction of the DVD movie.
2. FAST FORWARD control
Press to advance the direction of the DVD movie.
3. PLAY/STOP control
Press to play or stop the DVD movie.
4. SEEK control
Press to reverse or advance the chapter of the DVD or the track of theCD.
5. DISPLAY (DISP) control
Press to enable on screen display of player menu and user displayadjustments. Once the display is on, use SEEK to choose the desiredscreen setting.
6. ENTER (ENT) MEMORY control
In DVD playback mode, press the control to select a designated item inmenu mode.
In stop mode, press the control to select the next radio memory preset.
7. MNU/MODE control
In DVD playback mode, press to access the disc menu.
REV FWD
SEEKVOL
MODE MEMORY
+
DISP
MNU ENT
-
1 2
3
4
5
67
8
2006 Navigator (nav)Owners Guide (post-2002-fmt)USA (fus)
Entertainment Systems
37
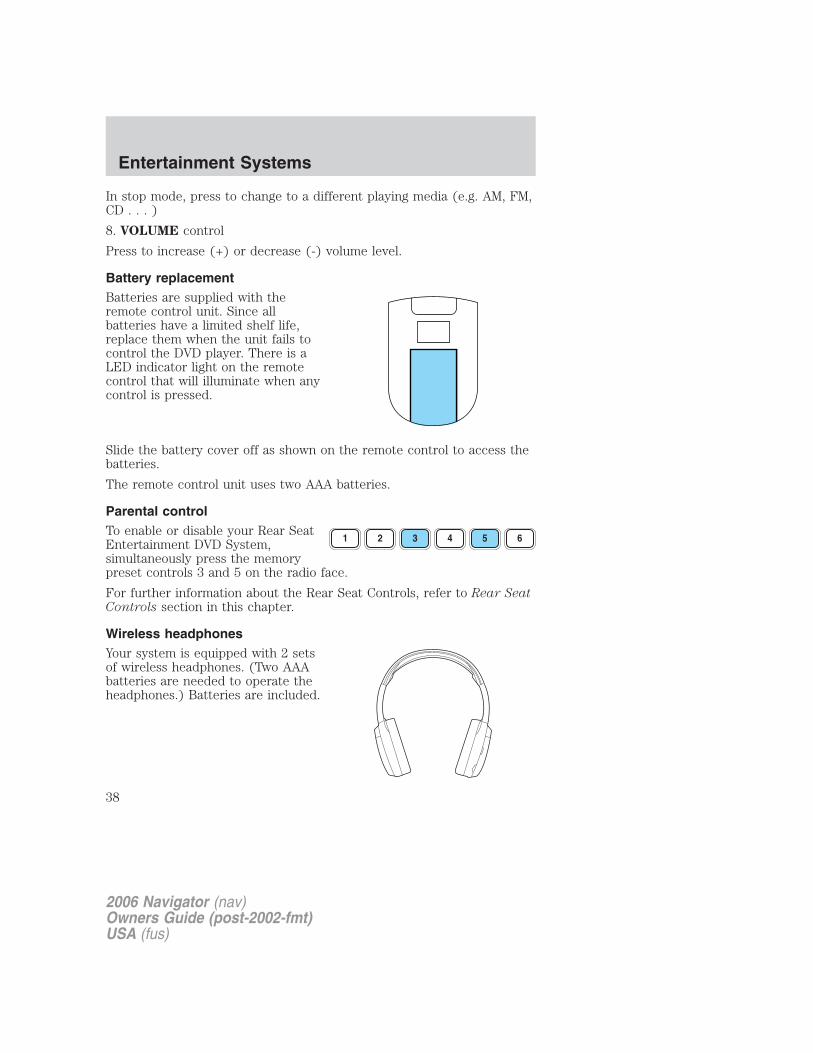
In stop mode, press to change to a different playing media (e.g. AM, FM,CD . . . )
8. VOLUME control
Press to increase (+) or decrease (-) volume level.
Battery replacementBatteries are supplied with theremote control unit. Since allbatteries have a limited shelf life,replace them when the unit fails tocontrol the DVD player. There is aLED indicator light on the remotecontrol that will illuminate when anycontrol is pressed.
Slide the battery cover off as shown on the remote control to access thebatteries.
The remote control unit uses two AAA batteries.
Parental controlTo enable or disable your Rear SeatEntertainment DVD System,simultaneously press the memorypreset controls 3 and 5 on the radio face.
For further information about the Rear Seat Controls, refer to Rear SeatControls section in this chapter.
Wireless headphonesYour system is equipped with 2 setsof wireless headphones. (Two AAAbatteries are needed to operate theheadphones.) Batteries are included.
2006 Navigator (nav)Owners Guide (post-2002-fmt)USA (fus)
Entertainment Systems
38
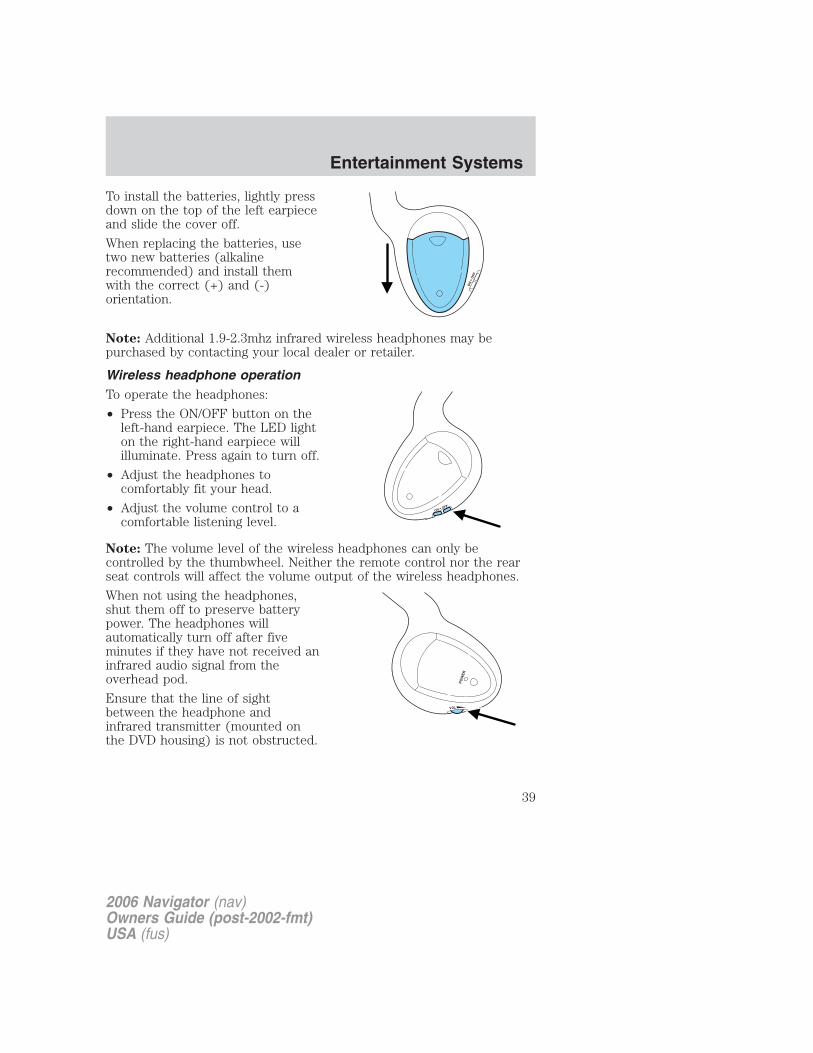
To install the batteries, lightly pressdown on the top of the left earpieceand slide the cover off.
When replacing the batteries, usetwo new batteries (alkalinerecommended) and install themwith the correct (+) and (-)orientation.
Note: Additional 1.9-2.3mhz infrared wireless headphones may bepurchased by contacting your local dealer or retailer.
Wireless headphone operationTo operate the headphones:
• Press the ON/OFF button on theleft-hand earpiece. The LED lighton the right-hand earpiece willilluminate. Press again to turn off.
• Adjust the headphones tocomfortably fit your head.
• Adjust the volume control to acomfortable listening level.
Note: The volume level of the wireless headphones can only becontrolled by the thumbwheel. Neither the remote control nor the rearseat controls will affect the volume output of the wireless headphones.
When not using the headphones,shut them off to preserve batterypower. The headphones willautomatically turn off after fiveminutes if they have not received aninfrared audio signal from theoverhead pod.
Ensure that the line of sightbetween the headphone andinfrared transmitter (mounted onthe DVD housing) is not obstructed.
ON
O
FF
ON OFF
VOL
PO
WE
R
2006 Navigator (nav)Owners Guide (post-2002-fmt)USA (fus)
Entertainment Systems
39

Liquid Crystal Display (LCD) flip-down screen
The screen rotates down to view and into the housing to store when notin use. Be sure the screen is latched into the housing when being stored.
1. 7.0” (diagonal) active matrix liquid crystal display (LCD) screen.
2. Screen housing.
3. Dimmer switch. Press +/- to increase/decrease the brightness of thescreen.
Playback and format• The DVD player of your Rear Seat Entertainment DVD System can
only be used in the “playback” mode. (The DVD player does not offera record feature.)
• The system plays standard CDs or DVDs.
• The DVD player is capable of playback of DVDs, DVDR/RW, CDs,CDR/RW and MP3s.
2006 Navigator (nav)Owners Guide (post-2002-fmt)USA (fus)
Entertainment Systems
40
Rear Seat Entertainment DVD System protection circuits
High temperature sensor circuit• Excessively high temperatures may cause damage to the DVD player.• When the temperature of the DVD player becomes too hot, the high
temperature sensor circuit stops machine operation. DVD/CD HOT willilluminate in the radio display.
• The DVD player will remain inactive until it cools to a normaloperating temperature. Length of time to cool will vary depending onconditions.
General operating tips• When the engine is not running, use the system sparingly. Otherwise,
it will run the battery down.• When the ignition is turned to OFF, the Rear Seat Entertainment DVD
System is also turned OFF. When the ignition is turned ON, thesystem will begin playback from the last selected media source whenthe play control is pressed.
• To disable the DVD player, simultaneously press the 3 and 5 memorypresets on the radio face. To enable the DVD player again, press the 3and 5 presets simultaneously.
• The DVD player is only capable of reading the bottom side of a disc.When inserting a single sided disc, the label should be up. For amulti-sided disc, the desired play side should be down when the discis inserted into the player.
• The DVD player is capable of playback of DVDs, DVDR/RW, CDs,CDR/RW and MP3s.
• DVDs are formatted by regions. This DVD system can only play region1 DVDs (DVDs manufactured for U.S. and Canada).
This unit is designed to play commercially pressed 4.75 in (12 cm)audio compact discs and DVDs only. Due to technicalincompatibility, certain recordable and re-recordable compactdiscs may not function correctly when used in Ford DVD/CDplayers. Irregular shaped discs, discs with a scratch protectionfilm attached, and discs with homemade paper (adhesive) labelsshould not be inserted into the player. The label may peel andcause the disc to become jammed. It is recommended thathomemade discs be identified with permanent felt tip markerrather than adhesive labels. Ballpoint pens may damage discs.Please contact your dealer for further information.
2006 Navigator (nav)Owners Guide (post-2002-fmt)USA (fus)
Entertainment Systems
41

Inserting a CD/DVD
Partially insert the CD/DVD into the slot and the system will fully pull inthe disc. Inserting the disc too far could cause the disc to jam in thesystem.
Inserting a CD/DVD into the DVD player automatically turns the powerON and playback should begin.
The counter is automatically reset to 0:00:00.
Removing a CD/DVD
1. Press the STOP/EJECT control to stop playback.
2. Press the STOP/EJECT control again to eject the CD/DVD.
If the CD/DVD is not removed within the allotted time, the system willpull the CD/DVD back into the system for safety purposes. If theCD/DVD will not eject from the system, press and hold the EJECTcontrol for approximately 2 seconds. The disc should eject whether thevehicle ignition is ON or OFF.
Playing a video game/auxiliary device
1. Connect the video line from your video game device to the YELLOWauxiliary input jack.
2. Connect the left and right audio lines to the WHITE and RED auxiliaryinput jacks respectively.
3. Press the MODE control until DVD/CD AUX (no disc in player) orDVD/CD play (disc in player) illuminates in the radio display. If a disc isin the system, playback should begin. To enable the aux inputs, press theSTOP control or press the AUX control on the DVD player.
2006 Navigator (nav)Owners Guide (post-2002-fmt)USA (fus)
Entertainment Systems
42
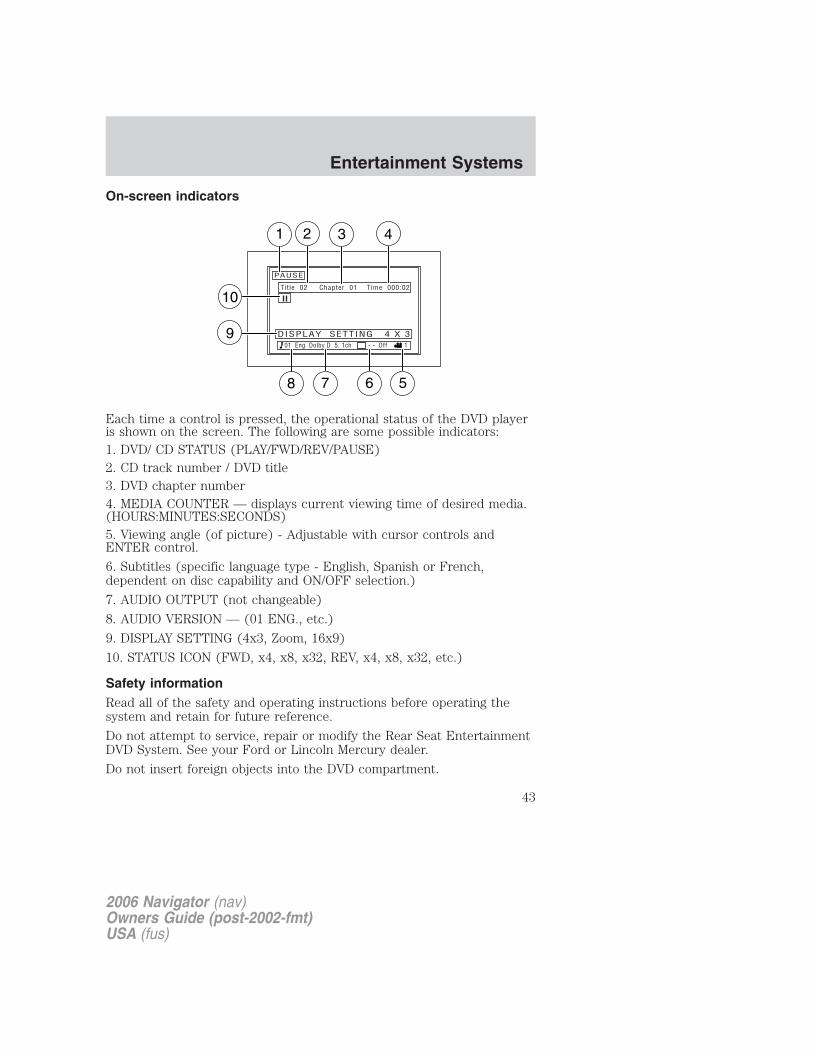
On-screen indicators
Each time a control is pressed, the operational status of the DVD playeris shown on the screen. The following are some possible indicators:1. DVD/ CD STATUS (PLAY/FWD/REV/PAUSE)2. CD track number / DVD title3. DVD chapter number4. MEDIA COUNTER — displays current viewing time of desired media.(HOURS:MINUTES:SECONDS)5. Viewing angle (of picture) - Adjustable with cursor controls andENTER control.
6. Subtitles (specific language type - English, Spanish or French,dependent on disc capability and ON/OFF selection.)
7. AUDIO OUTPUT (not changeable)
8. AUDIO VERSION — (01 ENG., etc.)
9. DISPLAY SETTING (4x3, Zoom, 16x9)
10. STATUS ICON (FWD, x4, x8, x32, REV, x4, x8, x32, etc.)
Safety informationRead all of the safety and operating instructions before operating thesystem and retain for future reference.
Do not attempt to service, repair or modify the Rear Seat EntertainmentDVD System. See your Ford or Lincoln Mercury dealer.
Do not insert foreign objects into the DVD compartment.
2006 Navigator (nav)Owners Guide (post-2002-fmt)USA (fus)
Entertainment Systems
43
The front glass on the liquid crystal display (LCD) flip-downscreen may break when hit with a hard surface. If the glass
breaks, do not touch the liquid crystalline material. In case of contactwith skin, wash immediately with soap and water.
Do not expose the liquid crystal display (LCD) flip-down screento direct sunlight or intensive ultraviolet rays for extensiveperiods of time. Ultraviolet rays deteriorate the liquid crystal.
Be sure to review user manuals for video games and video gameequipment when used as auxiliary inputs for your Rear SeatEntertainment DVD System.Do not operate video games or video equipment if the power cordsand/or cables are broken, split or damaged. Carefully place cords and/orcables where they will not be stepped on or interfere with the operationof seats and/or compartments.Disconnect video games and video equipment power cords and/or cableswhen not in use.Avoid touching auxiliary input jacks with your fingers. Do not blow onthem or allow them to get wet or dirty.Do not clean any part of the DVD player with benzene, paint thinner orany other solvent.Whenever a warning is received, the radio volume will be loweredto a volume that will allow the tones to be heard. The radiovolume will return to the previous level after the warning goesaway.
Federal Communication Commission (FCC) ComplianceChanges or modifications not approved by Ford Lincoln Mercury could voiduser’s authority to operate the equipment. This equipment has been testedand found to comply with the limits for a Class B digital device, pursuant toPart 15 of the FCC Rules. These limits are designed to provide reasonableprotection against harmful interference in a residential installation. Thisequipment generates, uses and can radiate radio frequency energy and, ifnot installed and used in accordance with the instructions, may causeharmful interference with radio communications.
However, there is no guarantee that interference will not occur in aparticular installation. If this equipment does cause harmful interferenceto radio or television reception, which can be determined by turning theequipment off and on, the user is encouraged to consult the dealer or anexperienced radio/TV technician for help.
2006 Navigator (nav)Owners Guide (post-2002-fmt)USA (fus)
Entertainment Systems
44
Care and service of the DVD player
Environmental extremesDVD players that are subjected to harsh environmental conditions maybe damaged or perform at less than maximum capability. To avoid theseoutcomes, whenever possible avoid exposing your DVD player to:• extremely hot or cold temperatures.• direct sunlight.• high humidity.• a dusty environment.• locations where strong magnetic fields are generated.
Temperature extremesWhen the vehicle is parked under direct sunlight or in an extremely coldplace for a long period of time, wait until the cabin temperature of thevehicle is at normal temperature before operating the system.Humidity and moisture condensationMoisture in the air will condense in the DVD player under extremelyhumid conditions or when moving from a cold place to a warm one. Ifmoisture condensation occurs, do not insert a CD or DVD into theplayer. If one is already in the player, remove it. Turn the DVD player ONto dry the moisture before inserting a DVD. This could take an hour ormore.Cleaning the liquid crystal display (LCD) flip-down screenClean the display screen by applying a small amount of water or anyammonia-based household glass cleaner directly to a soft cloth. Rub thescreen gently until the dust, dirt or fingerprints are removed. Do notspray the screen directly with water or glass cleaning solvents. Oversprayfrom these fluids could drip down into the internal electronics of thescreen and cause damage. Do not apply excessive pressure whilecleaning the screen.Foreign substancesExercise care to prevent dirt and foreign objects from entering the DVDplayer compartment. If liquid is accidentally spilled onto the system,immediately turn the system OFF and consult a qualified servicetechnician.Cleaning CDs and DVDsInspect all discs for contamination before playing. If necessary, cleandiscs only with an approved CD cleaner and wipe from the center out tothe edge. Do not use circular motion.
2006 Navigator (nav)Owners Guide (post-2002-fmt)USA (fus)
Entertainment Systems
45

Cleaning the DVD player exterior
Clean the exterior of the DVD player with a damp cloth. Do not use CDcleaning kits or CDs intended to clean the interior of your DVD player.Use of these products may damage your system.
LINCOLN NAVIGATION SYSTEM (IF EQUIPPED)
Your vehicle may be equipped with a Lincoln Navigation System whichallows you to listen to the radio, play CDs and also navigate the vehicleusing a navigation DVD.
THX audio system (if equipped)Your vehicle may be equipped withthe THX� certified premium audiosystem. This system creates optimalacoustic quality for all seatingpositions and road conditions.
The system offers an advancedspeaker system, amplifier, subwooferand equalizer.
Your Lincoln Navigation System has a large range of features, yet is easyto use. Guidance is shown on the display screen and is supplementedwith voice prompts. The display screen provides full information foroperating the system through use of menus, text screens and mapdisplays. Screen selections are made by touching the desired selection onthe screen.
2006 Navigator (nav)Owners Guide (post-2002-fmt)USA (fus)
Entertainment Systems
46
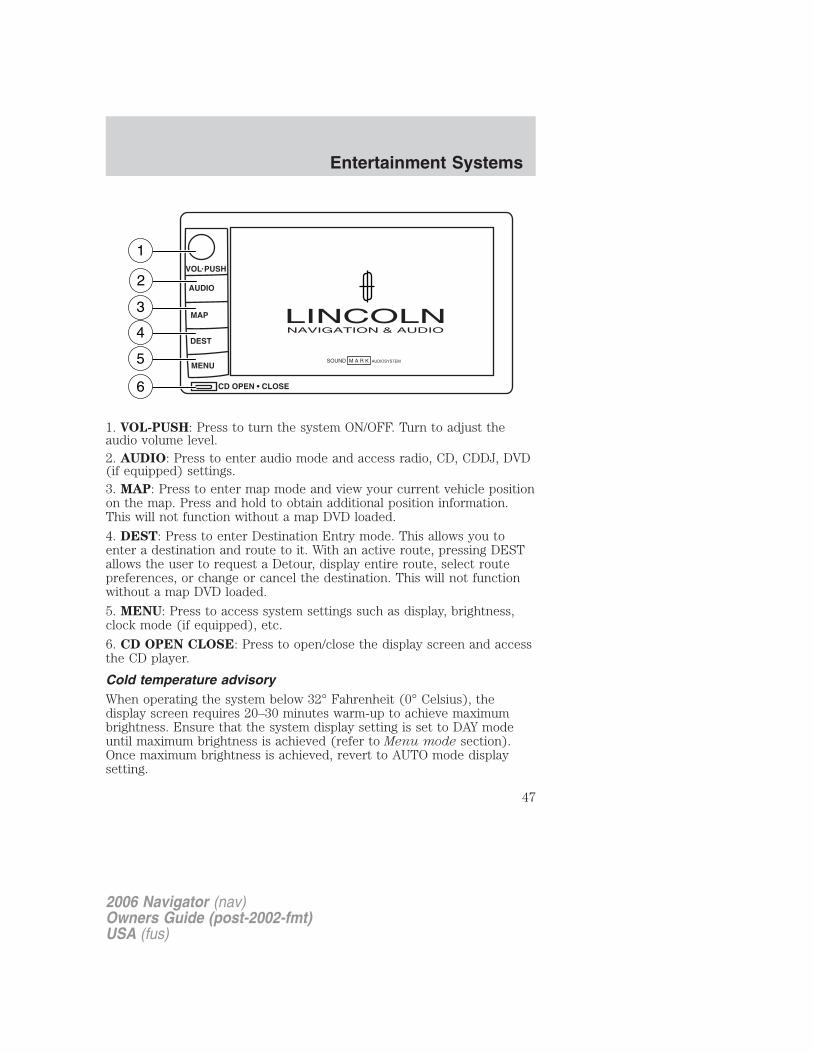
1. VOL-PUSH: Press to turn the system ON/OFF. Turn to adjust theaudio volume level.2. AUDIO: Press to enter audio mode and access radio, CD, CDDJ, DVD(if equipped) settings.3. MAP: Press to enter map mode and view your current vehicle positionon the map. Press and hold to obtain additional position information.This will not function without a map DVD loaded.
4. DEST: Press to enter Destination Entry mode. This allows you toenter a destination and route to it. With an active route, pressing DESTallows the user to request a Detour, display entire route, select routepreferences, or change or cancel the destination. This will not functionwithout a map DVD loaded.
5. MENU: Press to access system settings such as display, brightness,clock mode (if equipped), etc.
6. CD OPEN CLOSE: Press to open/close the display screen and accessthe CD player.
Cold temperature advisoryWhen operating the system below 32° Fahrenheit (0° Celsius), thedisplay screen requires 20–30 minutes warm-up to achieve maximumbrightness. Ensure that the system display setting is set to DAY modeuntil maximum brightness is achieved (refer to Menu mode section).Once maximum brightness is achieved, revert to AUTO mode displaysetting.
2006 Navigator (nav)Owners Guide (post-2002-fmt)USA (fus)
Entertainment Systems
47
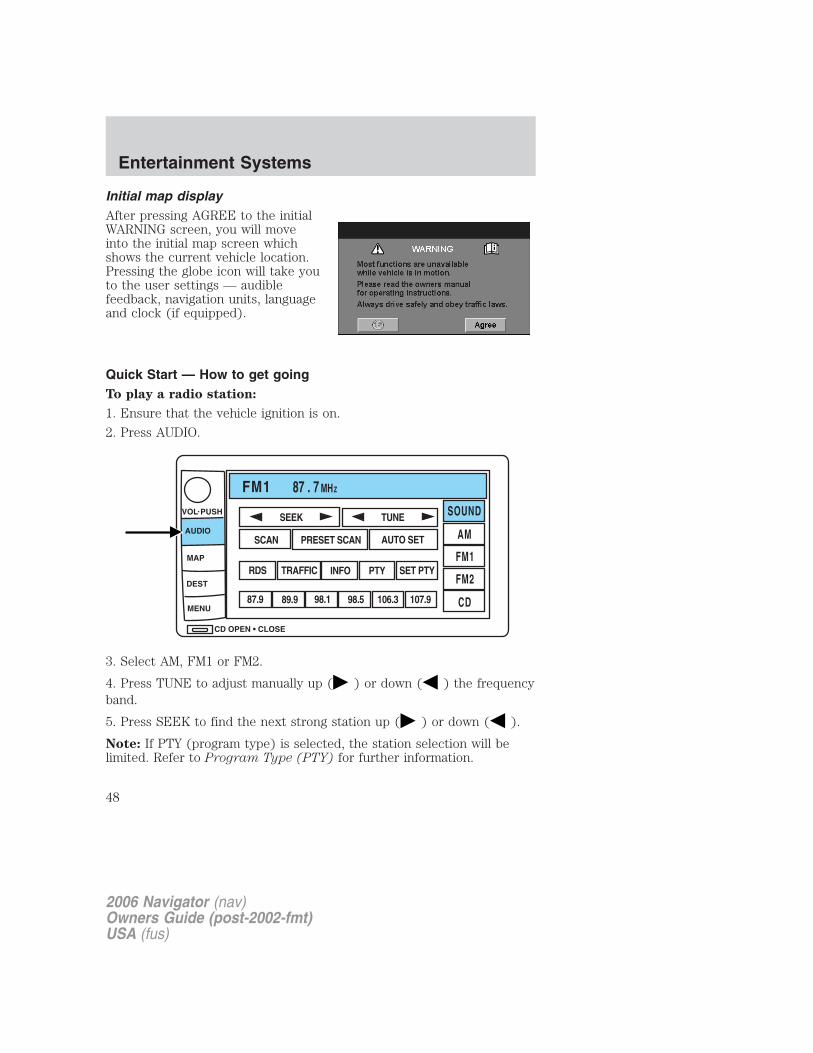
Initial map displayAfter pressing AGREE to the initialWARNING screen, you will moveinto the initial map screen whichshows the current vehicle location.Pressing the globe icon will take youto the user settings — audiblefeedback, navigation units, languageand clock (if equipped).
Quick Start — How to get goingTo play a radio station:
1. Ensure that the vehicle ignition is on.
2. Press AUDIO.
3. Select AM, FM1 or FM2.
4. Press TUNE to adjust manually up ( ) or down ( ) the frequencyband.
5. Press SEEK to find the next strong station up ( ) or down ( ).
Note: If PTY (program type) is selected, the station selection will belimited. Refer to Program Type (PTY) for further information.
2006 Navigator (nav)Owners Guide (post-2002-fmt)USA (fus)
Entertainment Systems
48
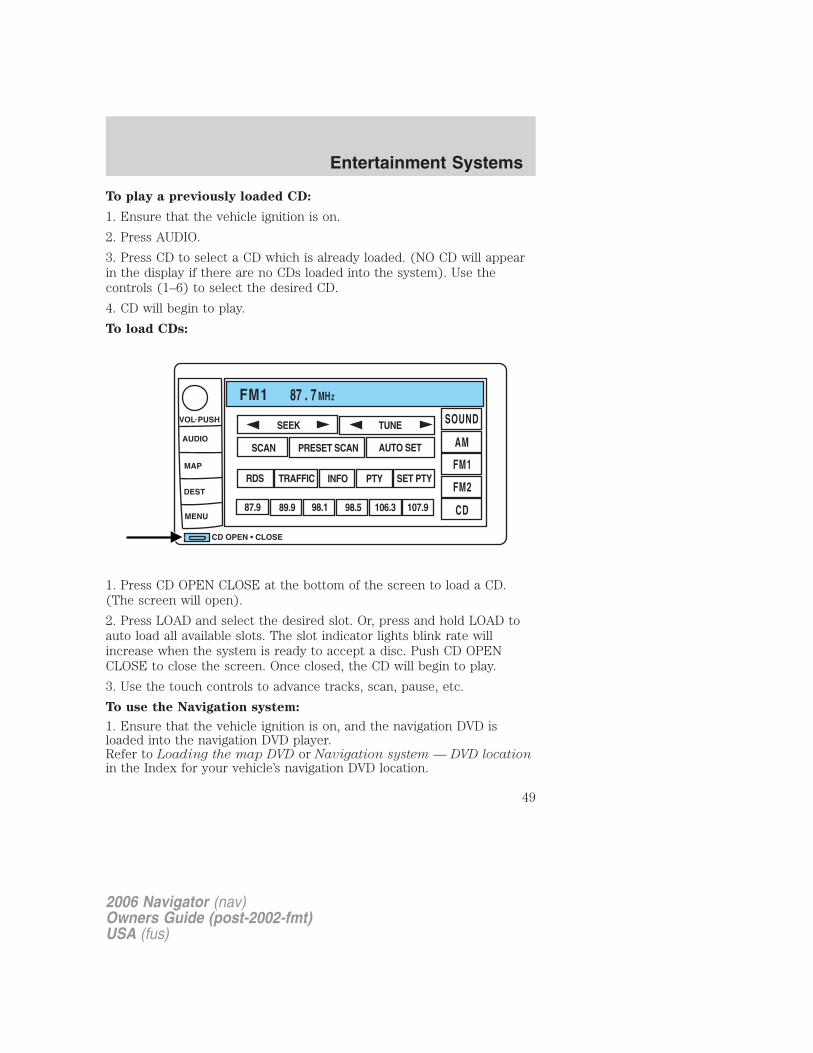
To play a previously loaded CD:
1. Ensure that the vehicle ignition is on.
2. Press AUDIO.
3. Press CD to select a CD which is already loaded. (NO CD will appearin the display if there are no CDs loaded into the system). Use thecontrols (1–6) to select the desired CD.
4. CD will begin to play.
To load CDs:
1. Press CD OPEN CLOSE at the bottom of the screen to load a CD.(The screen will open).
2. Press LOAD and select the desired slot. Or, press and hold LOAD toauto load all available slots. The slot indicator lights blink rate willincrease when the system is ready to accept a disc. Push CD OPENCLOSE to close the screen. Once closed, the CD will begin to play.
3. Use the touch controls to advance tracks, scan, pause, etc.
To use the Navigation system:
1. Ensure that the vehicle ignition is on, and the navigation DVD isloaded into the navigation DVD player.Refer to Loading the map DVD or Navigation system — DVD locationin the Index for your vehicle’s navigation DVD location.
2006 Navigator (nav)Owners Guide (post-2002-fmt)USA (fus)
Entertainment Systems
49
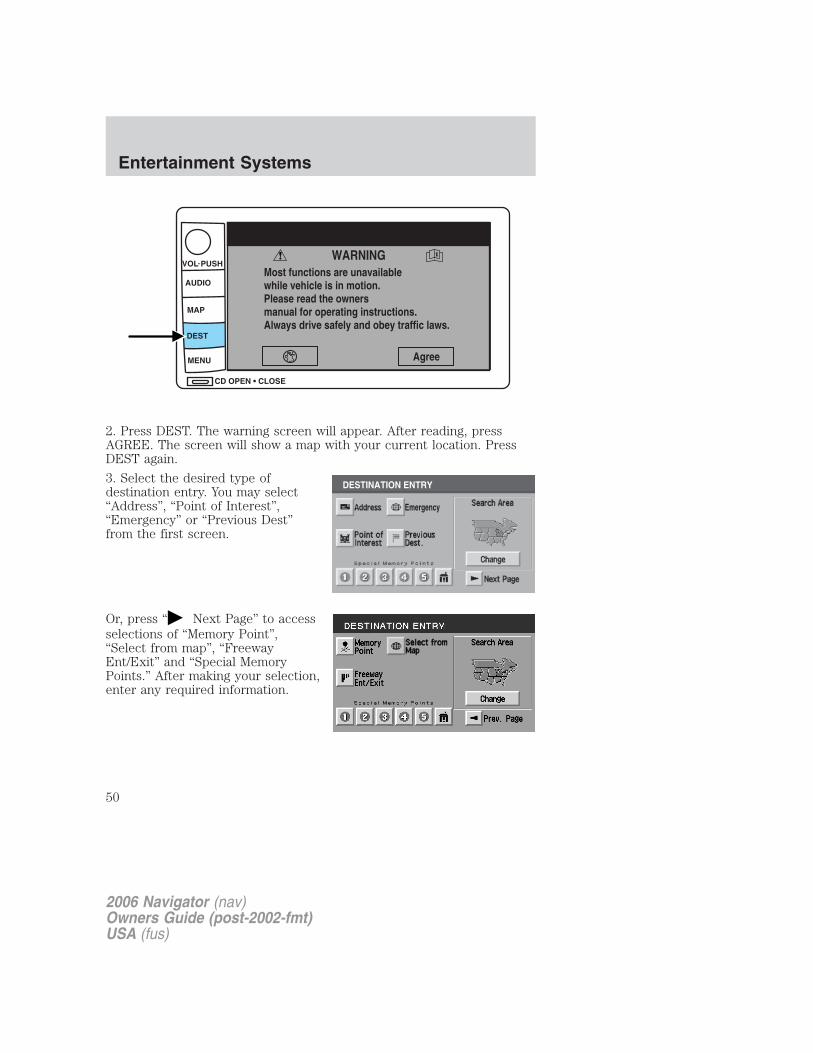
2. Press DEST. The warning screen will appear. After reading, pressAGREE. The screen will show a map with your current location. PressDEST again.
3. Select the desired type ofdestination entry. You may select“Address”, “Point of Interest”,“Emergency” or “Previous Dest”from the first screen.
Or, press “ Next Page” to accessselections of “Memory Point”,“Select from map”, “FreewayEnt/Exit” and “Special MemoryPoints.” After making your selection,enter any required information.
2006 Navigator (nav)Owners Guide (post-2002-fmt)USA (fus)
Entertainment Systems
50
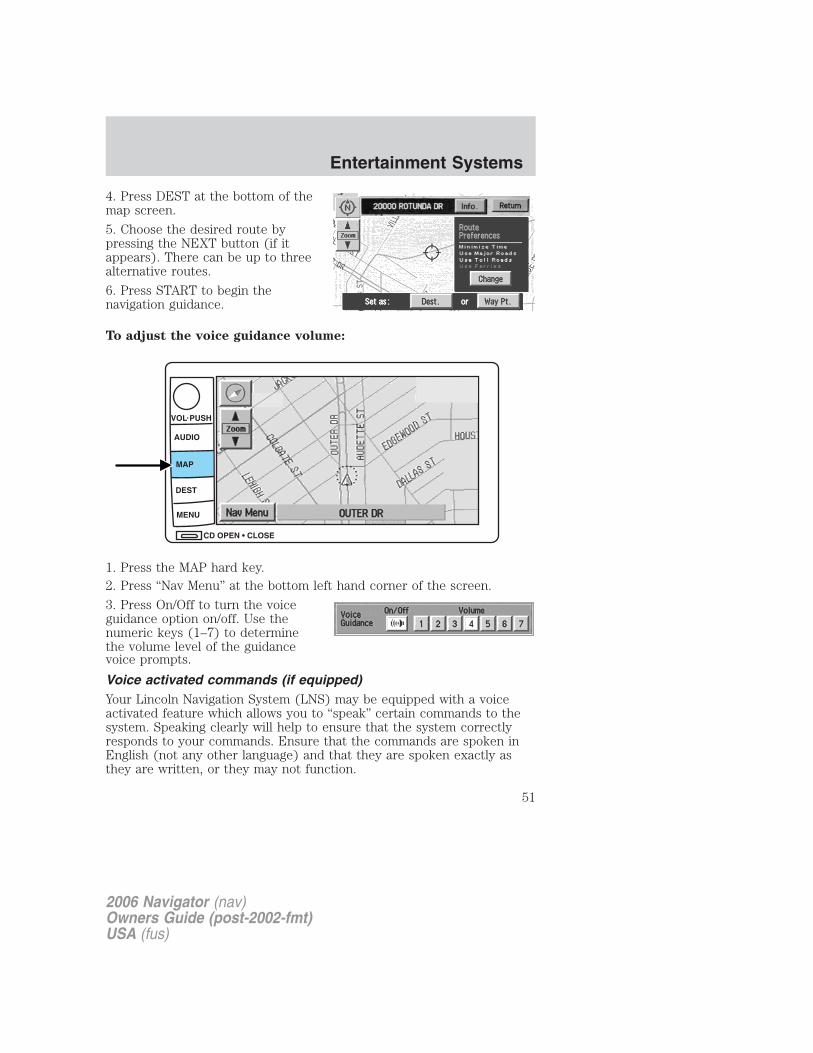
4. Press DEST at the bottom of themap screen.
5. Choose the desired route bypressing the NEXT button (if itappears). There can be up to threealternative routes.
6. Press START to begin thenavigation guidance.
To adjust the voice guidance volume:
1. Press the MAP hard key.2. Press “Nav Menu” at the bottom left hand corner of the screen.
3. Press On/Off to turn the voiceguidance option on/off. Use thenumeric keys (1–7) to determinethe volume level of the guidancevoice prompts.
Voice activated commands (if equipped)Your Lincoln Navigation System (LNS) may be equipped with a voiceactivated feature which allows you to “speak” certain commands to thesystem. Speaking clearly will help to ensure that the system correctlyresponds to your commands. Ensure that the commands are spoken inEnglish (not any other language) and that they are spoken exactly asthey are written, or they may not function.
2006 Navigator (nav)Owners Guide (post-2002-fmt)USA (fus)
Entertainment Systems
51

Press VOICE briefly (on your steering wheel controls) and the voiceicon appears on the Navigation display. Press the REPEAT button orarrow on your steering wheel controls to hear the previous commandrepeated from the navigation system.The voice activated command feature will not operate if a map DVD isnot inserted into the navigation DVD unit.At any time, you may say these commands to change modes:
• Radio • Audio on• AM • Audio off• FM1 • Power off• FM2 • CD Changer (if equipped)• CD • DVD (if equipped)• Power on
During normal radio operation, you may say:
• Seek up • Seek downDisc operation commands you may say when using a rear seat DVD (ifequipped):
• Track up • Track down• Previous track • Disc up• Disc down • Next disc• Previous disc
During CDDJ or in-dash CD play, you may say:
• Track up • Track down• Previous track • Disc up• Next disc • Disc down• Previous disc
To change the screen display, you may say the following commands:
• Screen off • Screen day mode• Day mode on • Screen night mode• Night mode on • Screen auto mode• Auto mode on
Note: If you say “Screen off”, you must touch the screen in order toactivate the screen again. The screen will not turn on again with a voicecommand.
2006 Navigator (nav)Owners Guide (post-2002-fmt)USA (fus)
Entertainment Systems
52
Commands that jump over screens:
• Current position • Current location• Map
While in navigation map mode, the following commands are available:
• Zoom in • Zoom out• Minimum scale • Maximum scale• North up • Change to North up• Heading up • Change to heading up• Map direction • Change map direction• Mark this point • Mark
While in navigation POI mode, the following commands are available byvoice activation:
• Automobile club • AAA (Triple A)• Auto service & maintenance • Auto service• Gas station • Gas• Parking garage • Parking lot• ATM • Bank• City hall • Civic center• Community center • Convention center• Exhibition center • Court house• Higher education • University• College • Hospital• Library • Police station• School • Amusement park• Casino • Golf course• Marina • Museum• Park & recreation • Parks & recreation• Performing arts • Ski resort• Skiing • Sports complex• Stadium • Tourist attraction• Winery • Restaurant• I’m hungry • American restaurant• American food • Chinese restaurant
2006 Navigator (nav)Owners Guide (post-2002-fmt)USA (fus)
Entertainment Systems
53

• Chinese food • Continental restaurant• Continental food • French restaurant• French food • Italian restaurant• Italian food • Japanese restaurant• Japanese food • Mexican restaurant• Mexican food • Seafood restaurant• Seafood • Other restaurant• Other food • Shopping• Shopping mall • Grocery store• Airport • Bus station• Ferry terminal • Historical monument• Hotel • Park and ride• Rental car agency • Rest area• Rest stop • Tourist information• Train station • Business facility• City center • POI off• Commuter rail station
While in navigation destination (DEST) mode, the following commandsare available:
• Home • Go home• Previous starting point • Go starting point• Next way point map • First way point map• Second way point map • Third way point map• Fourth way point map • Fifth way point map• Destination map • Delete destination• Cancel destination
While in navigation guidance mode, the following commands are availableby voice activation:
• Repeat guidance • Repeat voice• Louder • Softer• Voice guidance off • Voice guidance on• Open guidance screen • Close guidance screen• Arrow guidance • Arrow guide
2006 Navigator (nav)Owners Guide (post-2002-fmt)USA (fus)
Entertainment Systems
54
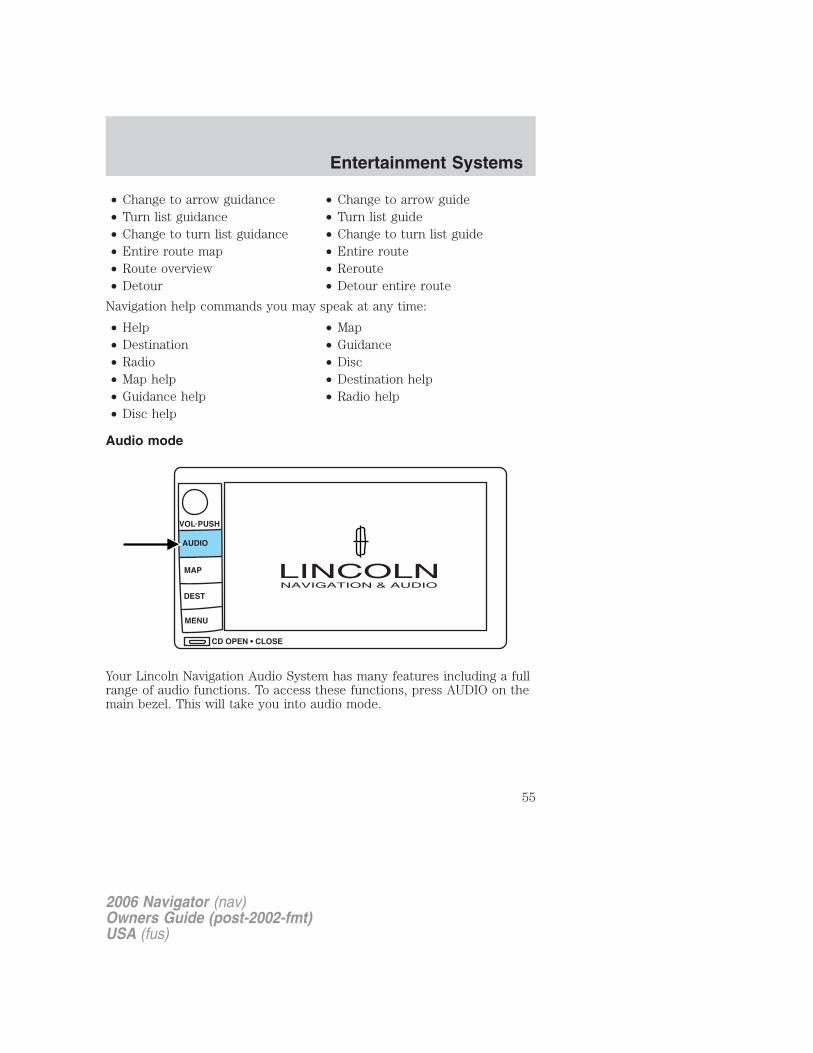
• Change to arrow guidance • Change to arrow guide• Turn list guidance • Turn list guide• Change to turn list guidance • Change to turn list guide• Entire route map • Entire route• Route overview • Reroute• Detour • Detour entire route
Navigation help commands you may speak at any time:
• Help • Map• Destination • Guidance• Radio • Disc• Map help • Destination help• Guidance help • Radio help• Disc help
Audio mode
Your Lincoln Navigation Audio System has many features including a fullrange of audio functions. To access these functions, press AUDIO on themain bezel. This will take you into audio mode.
2006 Navigator (nav)Owners Guide (post-2002-fmt)USA (fus)
Entertainment Systems
55

Volume/power controlPress knob to turn the audio systemon/off. Turn to raise or lowervolume. The levels will be displayedon the screen.
To activate the navigation mode,press MAP or DEST.
To adjust the navigation voice output level, select the NAV MENU buttonvia the map screen.
Speed compensated volume (SCV)
With this feature, radio volume changes automatically with vehicle speedto compensate for road and wind noise. To engage the SCV feature:
1. Press AUDIO.
2. Press SOUND.SOUND
AM
FM1
FM2
CD
SEEK TUNE
PRESET SCAN AUTO SET SCAN
RDS TRAFFIC INFO PTY SET PTY
87.9 89.9 98.1 98.5 106.3 107.9
2006 Navigator (nav)Owners Guide (post-2002-fmt)USA (fus)
Entertainment Systems
56
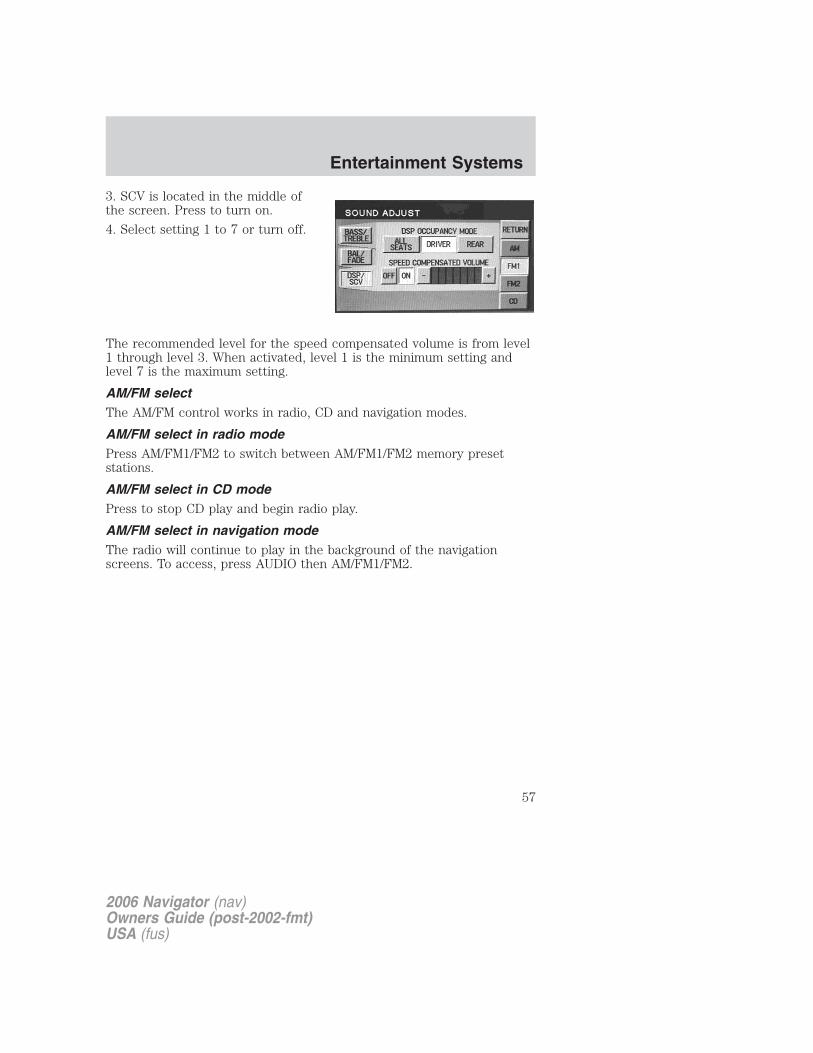
3. SCV is located in the middle ofthe screen. Press to turn on.
4. Select setting 1 to 7 or turn off.
The recommended level for the speed compensated volume is from level1 through level 3. When activated, level 1 is the minimum setting andlevel 7 is the maximum setting.
AM/FM selectThe AM/FM control works in radio, CD and navigation modes.
AM/FM select in radio modePress AM/FM1/FM2 to switch between AM/FM1/FM2 memory presetstations.
AM/FM select in CD modePress to stop CD play and begin radio play.
AM/FM select in navigation modeThe radio will continue to play in the background of the navigationscreens. To access, press AUDIO then AM/FM1/FM2.
2006 Navigator (nav)Owners Guide (post-2002-fmt)USA (fus)
Entertainment Systems
57
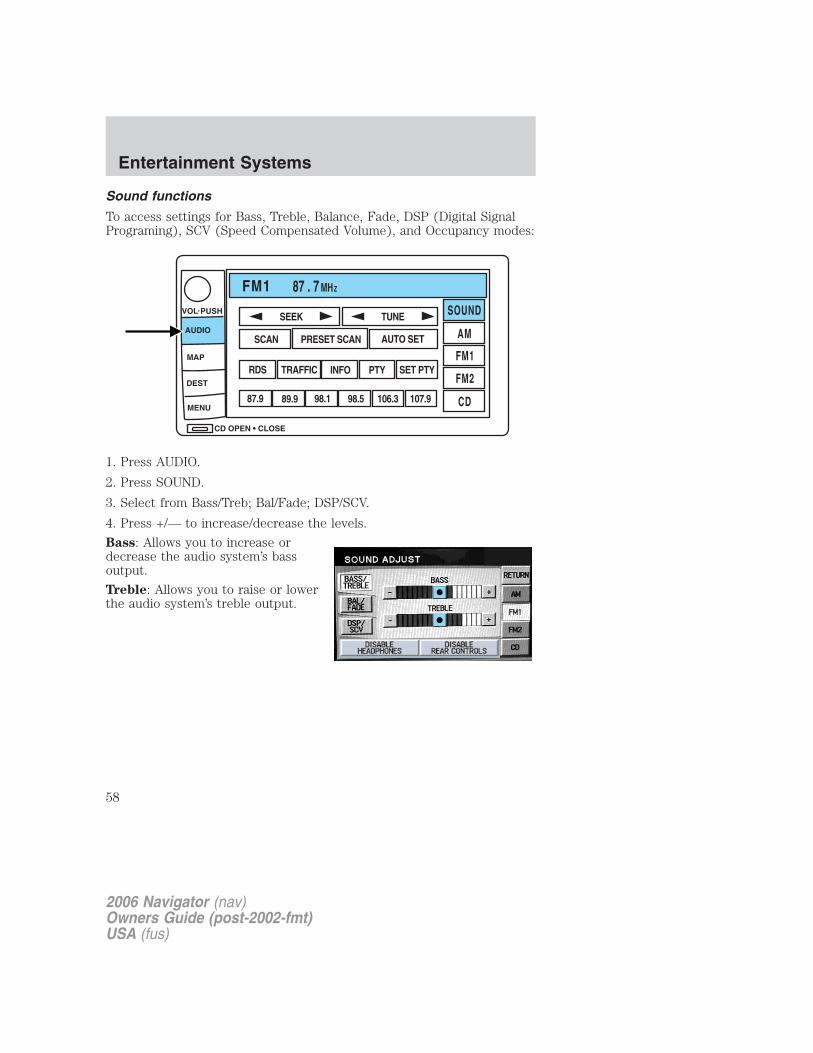
Sound functions
To access settings for Bass, Treble, Balance, Fade, DSP (Digital SignalPrograming), SCV (Speed Compensated Volume), and Occupancy modes:
1. Press AUDIO.
2. Press SOUND.
3. Select from Bass/Treb; Bal/Fade; DSP/SCV.
4. Press +/— to increase/decrease the levels.
Bass: Allows you to increase ordecrease the audio system’s bassoutput.
Treble: Allows you to raise or lowerthe audio system’s treble output.
2006 Navigator (nav)Owners Guide (post-2002-fmt)USA (fus)
Entertainment Systems
58

Fade: Allows you to adjust soundbetween the front and rearspeakers.
Balance: Allows you to adjust thesound distribution between the rightand left speakers.
SCV (Speed Compensated Volume):Automatically compensates for roadwind and noise. Refer to Speedcompensated volume earlier in thischapter.
DSP Occupancy mode:Use tooptimize the sound based upon theoccupants in the vehicle. Selectfrom ALL SEATS, REAR SEATS orDRIVER SEAT.
If your vehicle is equipped with rear seat controls, DISABLEHEADPHONES and DISABLE REAR CONTROLS will appear as optionsat the bottom of the screen. These controls allow you to turn off theheadphones and the rear controls for the rear seat passengers. Press theappropriate button to turn the headphones or rear controls off. Thebutton will highlight when the function is disabled. When the button isnot highlighted, the function is on (headphones and rear seat controlsare operating and able to be controlled by the rear seat passengers.)
Setting memory preset stations
The radio is equipped with six station memory preset controls. Thesecontrols can be used to select up to six preset AM stations and twelveFM stations (six in FM1 and six in FM2).
1. Select the frequency band with the AM/FM1/FM2 touch controls.
2. Select a station.
3. Press and hold a memory preset until the sound returns. Thefrequency will appear in the preset.
2006 Navigator (nav)Owners Guide (post-2002-fmt)USA (fus)
Entertainment Systems
59

Seek
• Press / to find the nextlistenable station up/down thefrequency band.
• Press / to advance to thenext/previous track on a CD.
Tune adjustPress TUNE to manually movedown/up ( / ) the frequencyband.
In CD mode, press TRACK to selectthe previous/next ( / ).
Autoset memory preset
Autoset allows you to set strong radio stations without losing youroriginal manually set preset stations. This feature is helpful on tripswhen you travel between cities with different radio stations.
Starting autoset memory preset1. Select a frequency band usingAM/FM1/FM2.
2. Press AUTO SET.
3. When the first six strong stationsare filled, the station stored inmemory preset control 1 will startplaying.
SOUND
AM
FM1
FM2
CD
SEEK TUNE
PRESET SCAN AUTO SET SCAN
RDS TRAFFIC INFO PTY SET PTY
87.9 89.9 98.1 98.5 106.3 107.9
2006 Navigator (nav)Owners Guide (post-2002-fmt)USA (fus)
Entertainment Systems
60
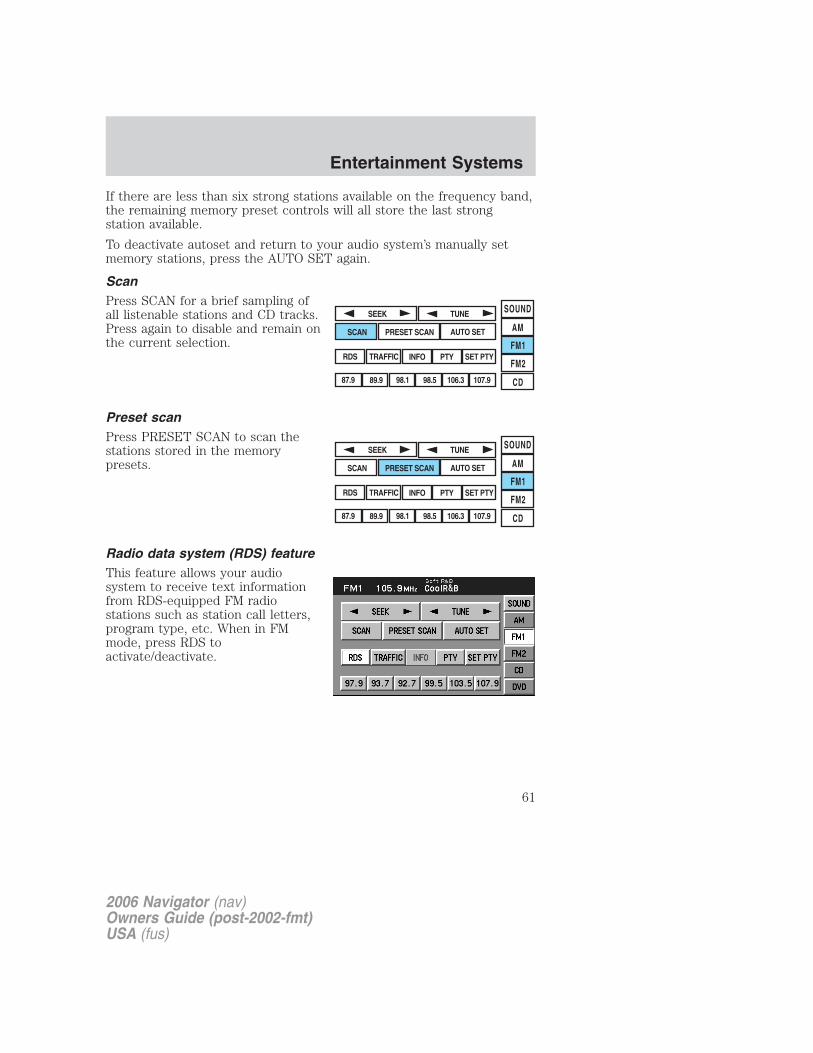
If there are less than six strong stations available on the frequency band,the remaining memory preset controls will all store the last strongstation available.
To deactivate autoset and return to your audio system’s manually setmemory stations, press the AUTO SET again.
ScanPress SCAN for a brief sampling ofall listenable stations and CD tracks.Press again to disable and remain onthe current selection.
Preset scanPress PRESET SCAN to scan thestations stored in the memorypresets.
Radio data system (RDS) featureThis feature allows your audiosystem to receive text informationfrom RDS-equipped FM radiostations such as station call letters,program type, etc. When in FMmode, press RDS toactivate/deactivate.
SOUND
AM
FM1
FM2
CD
SEEK TUNE
PRESET SCAN AUTO SET SCAN
RDS TRAFFIC INFO PTY SET PTY
87.9 89.9 98.1 98.5 106.3 107.9
SOUND
AM
FM1
FM2
CD
SEEK TUNE
PRESET SCAN AUTO SET SCAN
RDS TRAFFIC INFO PTY SET PTY
87.9 89.9 98.1 98.5 106.3 107.9
2006 Navigator (nav)Owners Guide (post-2002-fmt)USA (fus)
Entertainment Systems
61
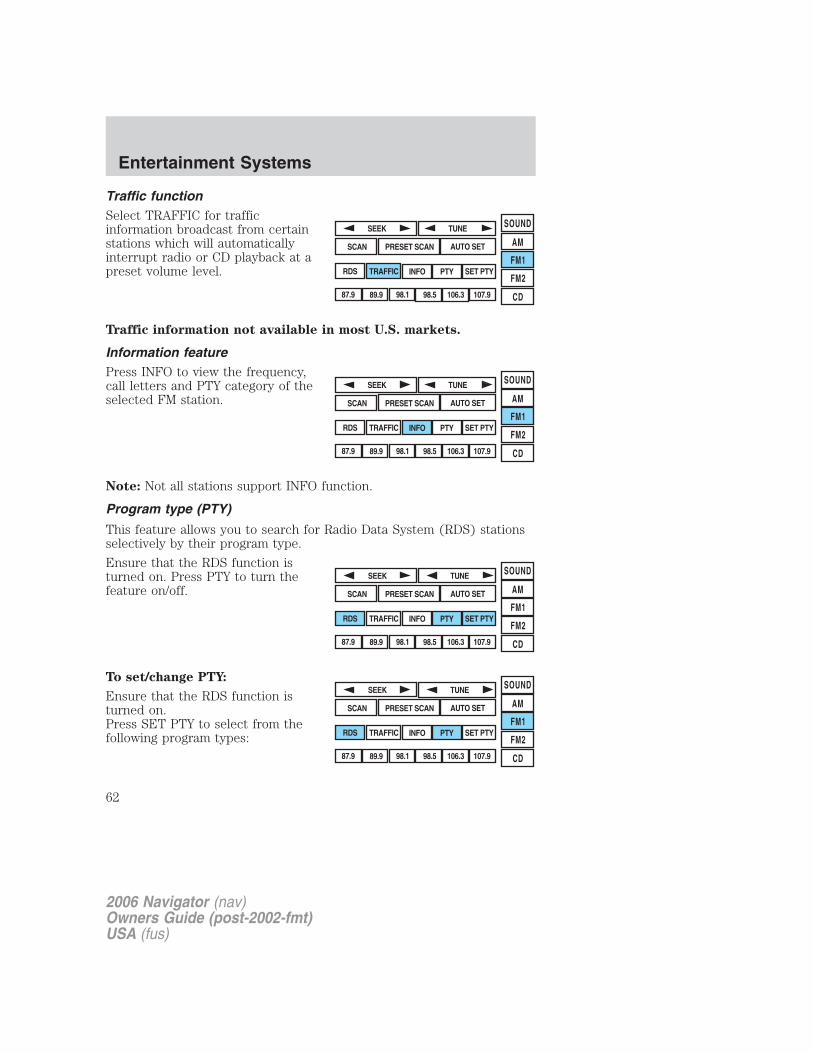
Traffic functionSelect TRAFFIC for trafficinformation broadcast from certainstations which will automaticallyinterrupt radio or CD playback at apreset volume level.
Traffic information not available in most U.S. markets.
Information featurePress INFO to view the frequency,call letters and PTY category of theselected FM station.
Note: Not all stations support INFO function.
Program type (PTY)
This feature allows you to search for Radio Data System (RDS) stationsselectively by their program type.
Ensure that the RDS function isturned on. Press PTY to turn thefeature on/off.
To set/change PTY:
Ensure that the RDS function isturned on.Press SET PTY to select from thefollowing program types:
SOUND
AM
FM1
FM2
CD
SEEK TUNE
PRESET SCAN AUTO SET SCAN
RDS TRAFFIC INFO PTY SET PTY
87.9 89.9 98.1 98.5 106.3 107.9
SOUND
AM
FM1
FM2
CD
SEEK TUNE
PRESET SCAN AUTO SET SCAN
RDS TRAFFIC INFO PTY SET PTY
87.9 89.9 98.1 98.5 106.3 107.9
SOUND
AM
FM1
FM2
CD
SEEK TUNE
PRESET SCAN AUTO SET SCAN
RDS TRAFFIC INFO PTY SET PTY
87.9 89.9 98.1 98.5 106.3 107.9
2006 Navigator (nav)Owners Guide (post-2002-fmt)USA (fus)
Entertainment Systems
62
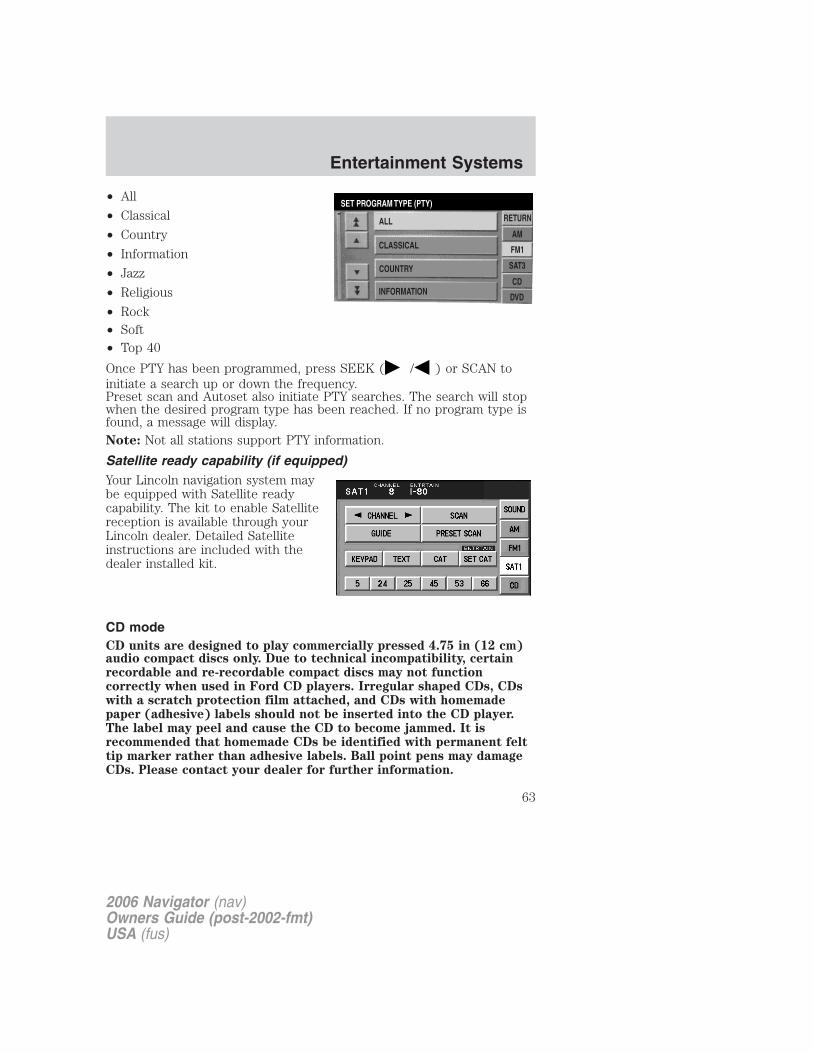
• All
• Classical
• Country
• Information
• Jazz
• Religious
• Rock• Soft• Top 40
Once PTY has been programmed, press SEEK ( / ) or SCAN toinitiate a search up or down the frequency.Preset scan and Autoset also initiate PTY searches. The search will stopwhen the desired program type has been reached. If no program type isfound, a message will display.Note: Not all stations support PTY information.
Satellite ready capability (if equipped)Your Lincoln navigation system maybe equipped with Satellite readycapability. The kit to enable Satellitereception is available through yourLincoln dealer. Detailed Satelliteinstructions are included with thedealer installed kit.
CD modeCD units are designed to play commercially pressed 4.75 in (12 cm)audio compact discs only. Due to technical incompatibility, certainrecordable and re-recordable compact discs may not functioncorrectly when used in Ford CD players. Irregular shaped CDs, CDswith a scratch protection film attached, and CDs with homemadepaper (adhesive) labels should not be inserted into the CD player.The label may peel and cause the CD to become jammed. It isrecommended that homemade CDs be identified with permanent felttip marker rather than adhesive labels. Ball point pens may damageCDs. Please contact your dealer for further information.
2006 Navigator (nav)Owners Guide (post-2002-fmt)USA (fus)
Entertainment Systems
63
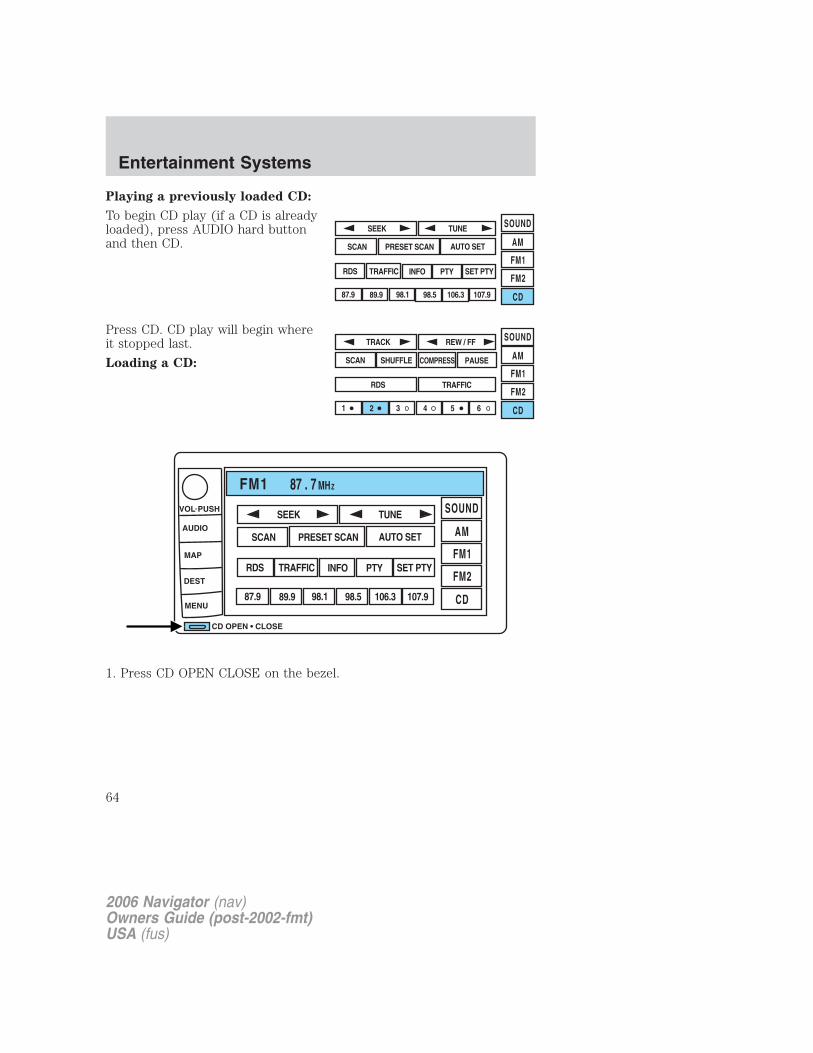
Playing a previously loaded CD:
To begin CD play (if a CD is alreadyloaded), press AUDIO hard buttonand then CD.
Press CD. CD play will begin whereit stopped last.
Loading a CD:
1. Press CD OPEN CLOSE on the bezel.
SOUND
AM
FM1
FM2
CD
SEEK TUNE
PRESET SCAN AUTO SET SCAN
RDS TRAFFIC INFO PTY SET PTY
87.9 89.9 98.1 98.5 106.3 107.9
2006 Navigator (nav)Owners Guide (post-2002-fmt)USA (fus)
Entertainment Systems
64
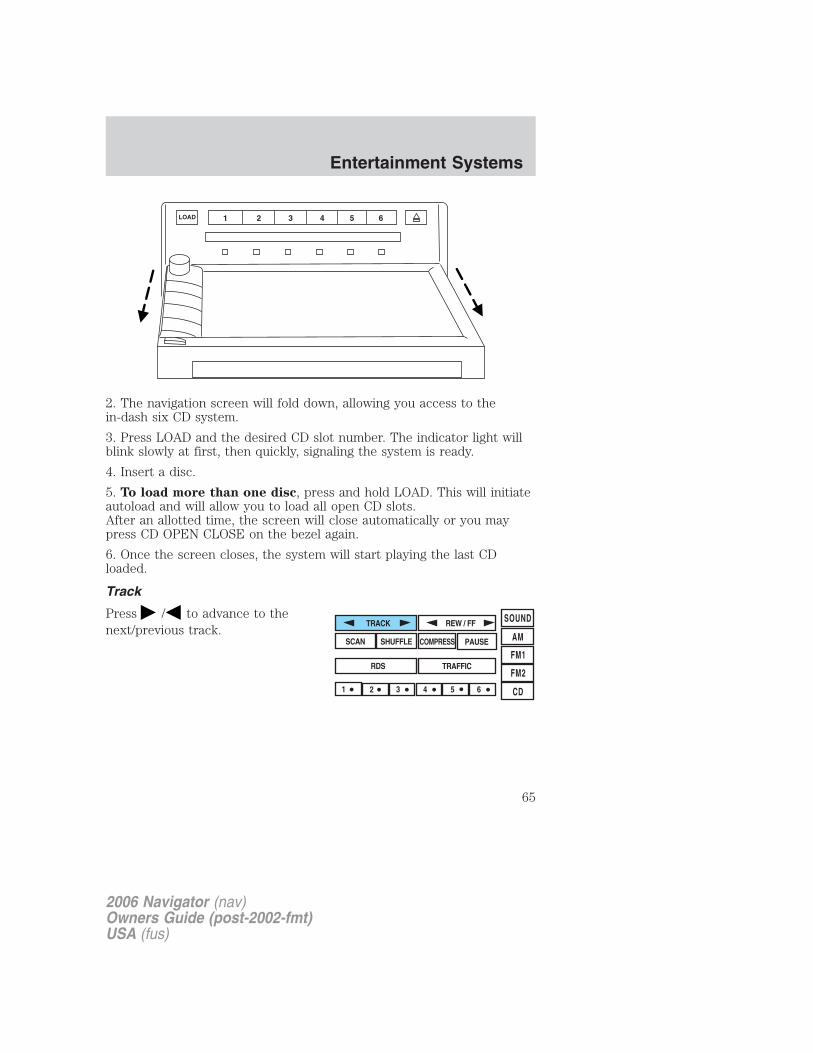
2. The navigation screen will fold down, allowing you access to thein-dash six CD system.
3. Press LOAD and the desired CD slot number. The indicator light willblink slowly at first, then quickly, signaling the system is ready.
4. Insert a disc.
5. To load more than one disc, press and hold LOAD. This will initiateautoload and will allow you to load all open CD slots.After an allotted time, the screen will close automatically or you maypress CD OPEN CLOSE on the bezel again.
6. Once the screen closes, the system will start playing the last CDloaded.
Track
Press / to advance to thenext/previous track.
2006 Navigator (nav)Owners Guide (post-2002-fmt)USA (fus)
Entertainment Systems
65
Rewind/fast forward in CD modePress to reverse or advance( / ) in the current CD track.
Scan feature in CD modePress SCAN to hear a brief samplingof all tracks on the current CD.Press again to disengage and remainwith the current track.
Shuffle feature in CD modeWhen in CD (or CDDJ mode), pressSHUFFLE to engage the shufflefeature. Press to select fromshuffling between tracks (SHUFFLETRACK) on the current CD orbetween all tracks on all CDs(SHUFFLE DISC). All tracks will beplayed in random order. Press againto disengage (SHUFFLE OFF).
Compression featureThe compression feature works inCD mode and boosts more quietmusic and lowers louder music tominimize the need for volumeadjustments.
When in CD or CDDJ mode, press COMPRESS to engage or disengagethe compression feature.
2006 Navigator (nav)Owners Guide (post-2002-fmt)USA (fus)
Entertainment Systems
66

PauseIn CD mode, press PAUSE to pausethe current track. Press again tocontinue playing.
Map mode
Map display information
To access the map display, press MAP on the bezel.
Once pressed, the current mapdisplay will appear on the screenshowing the current vehiclelocation.
Zoom controlWhen ’Zoom’ is pressed, the scale indicator is shown on the screen. Thescale markings are: 1/32, 1/16,1/4, 1/8, 1/2, 1, 2, 4, 8, 16, 32, 64, 128miles. The control can be used in a number of ways:
• Touch and hold one of the arrow buttons for the map to be displayedagain at each zoom level.
2006 Navigator (nav)Owners Guide (post-2002-fmt)USA (fus)
Entertainment Systems
67
• Touch one of the arrow buttons repeatedly for the map to bedisplayed again at the final zoom level.
• Touch one of the segments of the scale indicator for the map to bedisplayed at the selected zoom level.
Additional map function buttonsTo initiate the display of additionalmap function buttons, tap the mapanywhere on the screen or press theMAP hard key. These additionalfeatures will disappear from thescreen within five seconds unlesspressed.
• STORE - stores current vehicle location as a memory point. Refer toMemory Points for further information.
• POI (Point of Interest)- brings up the Quick POI menu which allowsthe user to perform two functions:Display POI icons on the map for one category.Select local map area POIs as destinations or waypoints. The list oflocal area POIs can be sorted by distance, name, or icon. Refer toPoints of Interest for further information.
If home has been previously programmed in the “Nav Menu”, the homeicon (house) will appear on the screen and is able to be selected as adestination.
To delete POI icons from the map, touch the map again and press thePOI off button.
2006 Navigator (nav)Owners Guide (post-2002-fmt)USA (fus)
Entertainment Systems
68
Route preferencesAfter entering a destination, theRoute preferences will appear onthe screen showing what iscurrently selected. You may chooseto activate/deactivate selectionswhich the system will factor in whencalculating your route. Thoseoptions are:
• Minimize Time/Distance
• Use Major Roads
• Use Toll Roads
• Use Ferries
Information functionINFO will appear on the screenwhen you have calculated adestination. Press INFO for moreinformation about the currentdestination, if available.
2006 Navigator (nav)Owners Guide (post-2002-fmt)USA (fus)
Entertainment Systems
69
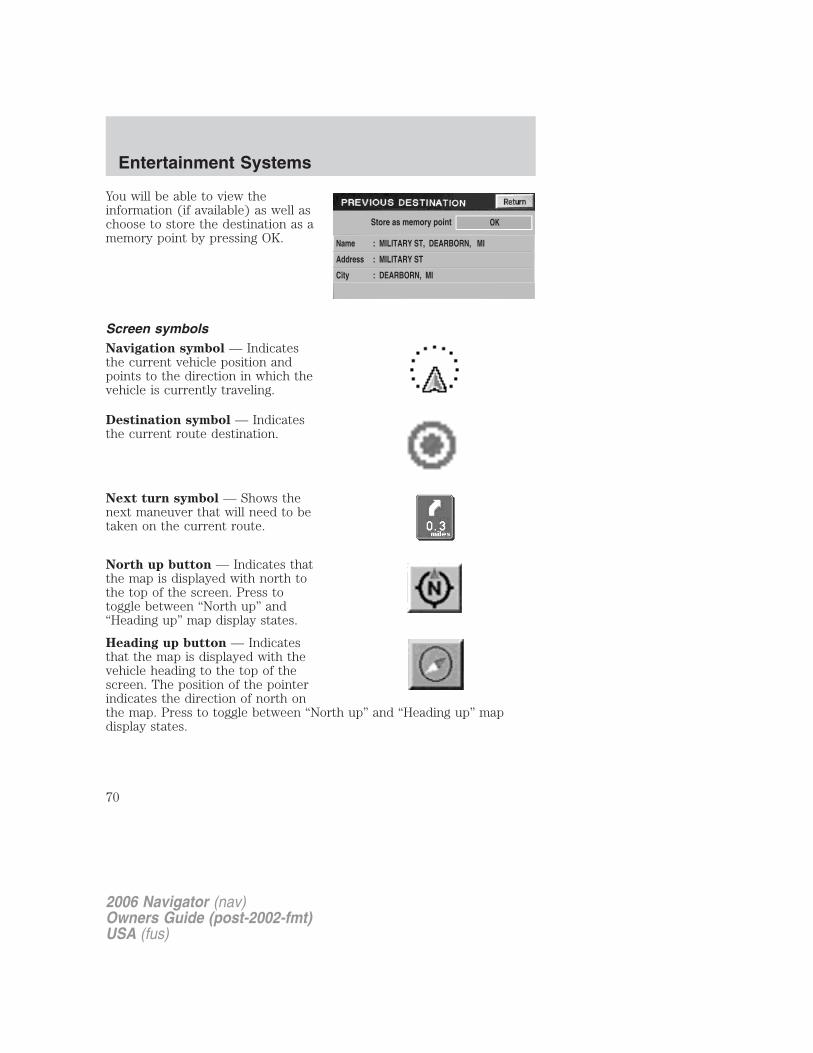
You will be able to view theinformation (if available) as well aschoose to store the destination as amemory point by pressing OK.
Screen symbolsNavigation symbol — Indicatesthe current vehicle position andpoints to the direction in which thevehicle is currently traveling.
Destination symbol — Indicatesthe current route destination.
Next turn symbol — Shows thenext maneuver that will need to betaken on the current route.
North up button — Indicates thatthe map is displayed with north tothe top of the screen. Press totoggle between “North up” and“Heading up” map display states.
Heading up button — Indicatesthat the map is displayed with thevehicle heading to the top of thescreen. The position of the pointerindicates the direction of north onthe map. Press to toggle between “North up” and “Heading up” mapdisplay states.
2006 Navigator (nav)Owners Guide (post-2002-fmt)USA (fus)
Entertainment Systems
70

Avoid areas or points — The “X”symbol indicates a point. to beavoided in route calculations.
If the avoid point is enlarged to anavoid area, it will appear on thescreen as a shaded box.
Way point symbol — Indicates thelocation of a way point (locationsyou wish to visit in route to yourultimate destination) on the map.
Home position symbol —Indicates the location on the map,currently stored as the homeposition.
Stored location symbol —Indicates the location of a memorypoint. This is the default symbolused when the point is stored. (Ifdesired, an icon of your own choice can be selected from the 15 iconsavailable.) Refer to Choosing from the icon list.
GPS symbol— Indicates thatinsufficient GPS satellite signals arebeing received for accurate mappositioning. The symbol is notdisplayed under normal operation.
Speaker icon symbol— Press toturn voice guidance on/off.
Navigation menuTo access the Navigation Menu,press NAV MENU at the bottom ofthe map screen.
2006 Navigator (nav)Owners Guide (post-2002-fmt)USA (fus)
Entertainment Systems
71
Once pressed, the Navigation Menuwill display showing the followingoptions:
• Route Options/Preferences
• Navigation Set Up
• Display Options
• Stored Locations
• On Route Scroll
• Voice Guidance/Volume
Depending upon whether or not a route is active will determine if routeoptions/route preferences is contained on the Navigation Menu.
Route options (destination entered)Once in navigation mode and aroute is currently active, press“Chng. route” to access the ROUTEOPTIONS screen. Choose from thefollowing selections:
• Detour: Press to select a detouraround the current route. Referto Detour options later in thischapter for further information.
• Route Preferences: Whencreating a destination, select from: Minimize Time/Distance, Use MajorRoads, Use Toll Roads, Use Ferries.
• Display Whole Route: Will enter MAP mode and display your entirechosen route.
Note: Route preference appears on the Nav menu when no destinationis entered.
While driving under route guidance, only follow an instructionwhen it is safe to do so as the system cannot be aware of
changing conditions. Use voice guidance as much as possible, and onlyview the display when driving conditions permit.
2006 Navigator (nav)Owners Guide (post-2002-fmt)USA (fus)
Entertainment Systems
72
Ensure that you follow highway code restrictions and do nottake any risks. For example, if you are unable to make a U-turn,
continue on your journey. The navigation system will recalculate yourroute to get you back to an appropriate road to your destination.
Navigation set upThe Navigation Set up screen willallow you to make adjustments tothe navigation displays.
Average speed settingsAllows you to set approximatespeeds you drive. These speedsenable the navigation system to aidin calculating timing for routes.
Quick POI (Point of Interest)Allows you to change the Quick POImenu settings. Select the desiredQuick POI (Gas, ATM, etc.) andthen press ’List Categories’ forfurther categories, or ’Map AreaPOIs’ to show the desired POIs onyour current map.
2006 Navigator (nav)Owners Guide (post-2002-fmt)USA (fus)
Entertainment Systems
73
Restore system defaultsResets all system user-selectableoptions to the default (automatic)values (i.e. guidance, voice, searcharea and route preferences).
CalibrationThis feature is helpful if the car hasbeen towed, or if you notice it is notregistering at the correct vehiclelocation on the map.Press “Position” to reposition thevehicle location. Press the screen toscroll the map to the desiredlocation and press OK to confirm.Press “Distance” to calibrate bydistance and improve the navigationaccuracy. It is recommended toactivate this function after every tire replacement. When the button ishighlighted, calibration is in process and will turn off automatically whencomplete.
DVD map versionDisplays the version of the insertednavigation DVD. Refer to Orderingadditional map DVDs for furtherinformation.
2006 Navigator (nav)Owners Guide (post-2002-fmt)USA (fus)
Entertainment Systems
74

Display OptionsThe Display Options screen willallow you make adjustments to thenavigation display screen. You canchoose from:
• Map Mode (Dual or Full)
• Guidance Mode (Arrows or Turnlist)
• Guidance Display (On or Off)
• Time to destination (Show orHide)
Stored locationsThe Stored locations screen willallow you to choose fromdestinations that have been savedinto the navigation system.
2006 Navigator (nav)Owners Guide (post-2002-fmt)USA (fus)
Entertainment Systems
75

In this screen, you can select fromMemory Points, Special MemoryPoints, Home, Avoid Area,Destination and Way Point, orPrevious Destination. Please refer tothe Destination menu section for acomplete description of thefunctions.
On route scrollThe system automatically scrollsthrough the entire plannednavigation route either forwards orbackwards. To activate, press thearrow buttons at the bottom left ofthe map screen.
Voice guidance/volume
Allows you to turn the voice guidance option on/off and to determine thevolume level of the guidance voice prompts. To adjust:
1. Press the MAP hard key.
2. Press “Nav Menu” at the bottom left hand corner of the screen.
2006 Navigator (nav)Owners Guide (post-2002-fmt)USA (fus)
Entertainment Systems
76

3. Press the speaker icon to turn thevoice guidance option on/off. Pressthe desired number to select thevolume level for the voice prompts.
Home
To set home for the first time:
1. Press MAP.
2. Press “Nav. Menu”.
3. Press “Stored Locations”.
2006 Navigator (nav)Owners Guide (post-2002-fmt)USA (fus)
Entertainment Systems
77
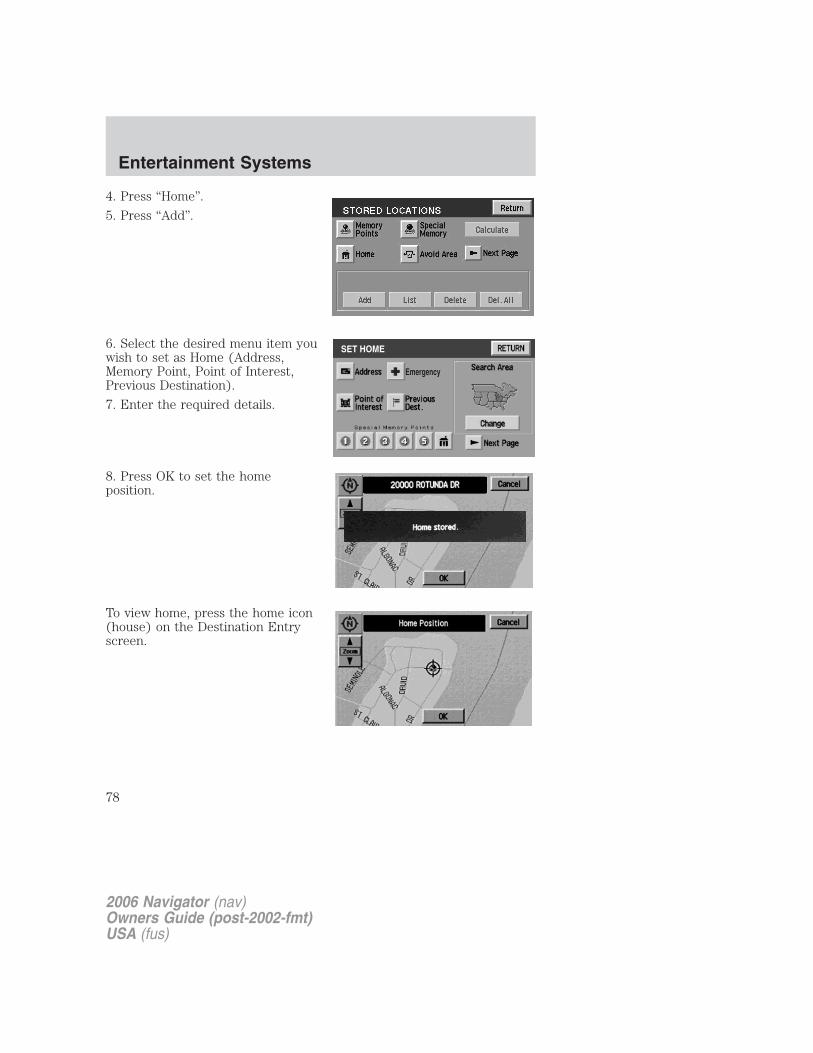
4. Press “Home”.
5. Press “Add”.
6. Select the desired menu item youwish to set as Home (Address,Memory Point, Point of Interest,Previous Destination).
7. Enter the required details.
8. Press OK to set the homeposition.
To view home, press the home icon(house) on the Destination Entryscreen.
2006 Navigator (nav)Owners Guide (post-2002-fmt)USA (fus)
Entertainment Systems
78
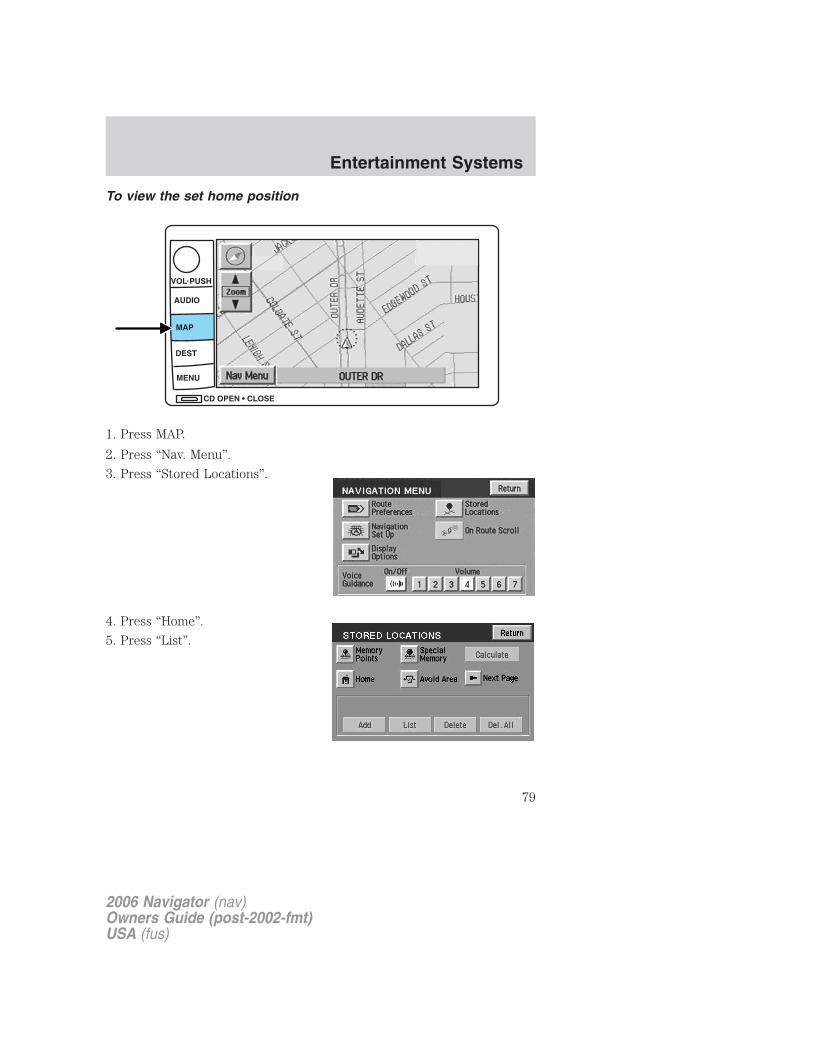
To view the set home position
1. Press MAP.
2. Press “Nav. Menu”.
3. Press “Stored Locations”.
4. Press “Home”.
5. Press “List”.
2006 Navigator (nav)Owners Guide (post-2002-fmt)USA (fus)
Entertainment Systems
79

Deleting a home location
1. Press MAP.
2. Press “Nav. Menu”.
3. Press “Stored Locations”.
4. Press “Home”.
5. Press “Delete”.
2006 Navigator (nav)Owners Guide (post-2002-fmt)USA (fus)
Entertainment Systems
80

6. Press YES to confirm.
Special memory pointsThere are five possible specialmemory points that you can set.
To set a memory point:
1. Press the MAP hard key.
2. Press “Nav. Menu”.
2006 Navigator (nav)Owners Guide (post-2002-fmt)USA (fus)
Entertainment Systems
81
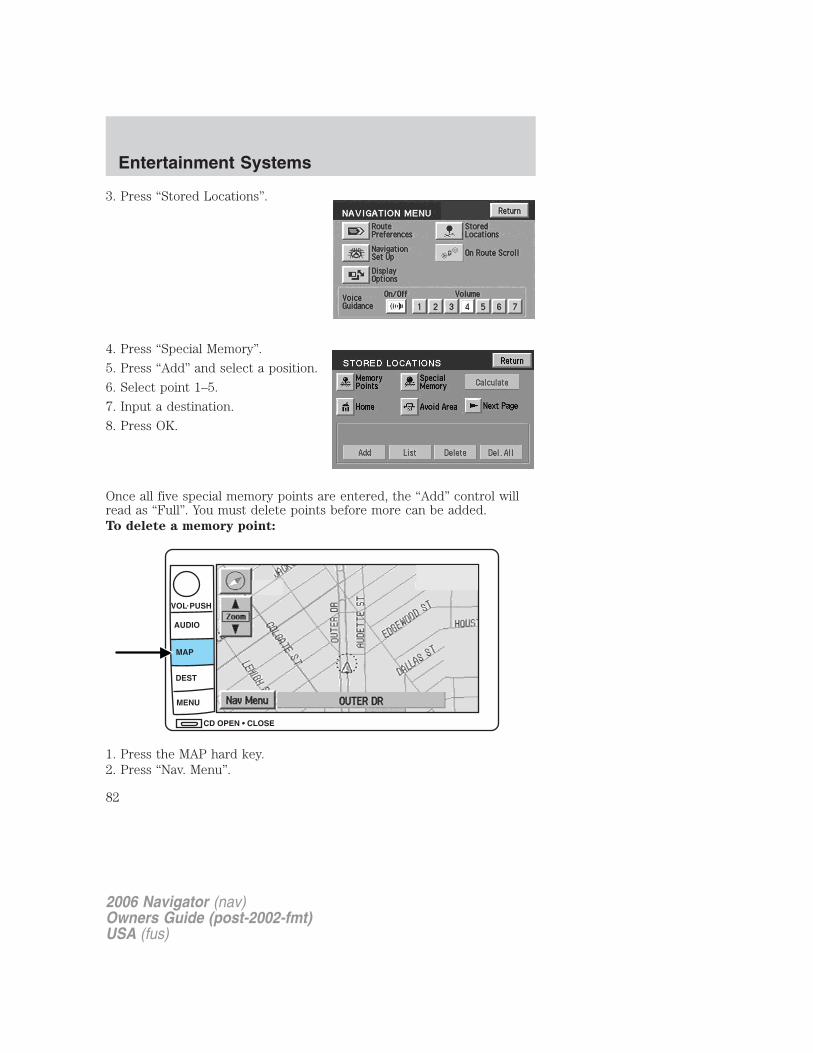
3. Press “Stored Locations”.
4. Press “Special Memory”.
5. Press “Add” and select a position.
6. Select point 1–5.
7. Input a destination.
8. Press OK.
Once all five special memory points are entered, the “Add” control willread as “Full”. You must delete points before more can be added.To delete a memory point:
1. Press the MAP hard key.2. Press “Nav. Menu”.
2006 Navigator (nav)Owners Guide (post-2002-fmt)USA (fus)
Entertainment Systems
82
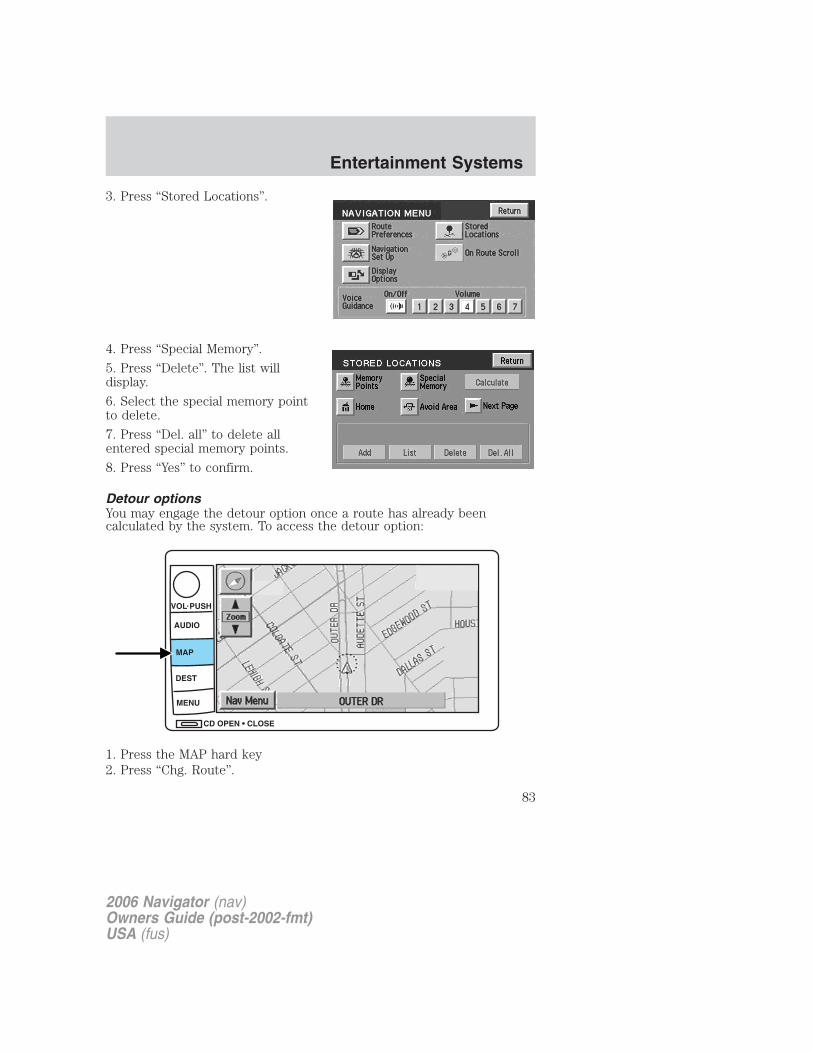
3. Press “Stored Locations”.
4. Press “Special Memory”.
5. Press “Delete”. The list willdisplay.
6. Select the special memory pointto delete.
7. Press “Del. all” to delete allentered special memory points.
8. Press “Yes” to confirm.
Detour optionsYou may engage the detour option once a route has already beencalculated by the system. To access the detour option:
1. Press the MAP hard key2. Press “Chg. Route”.
2006 Navigator (nav)Owners Guide (post-2002-fmt)USA (fus)
Entertainment Systems
83
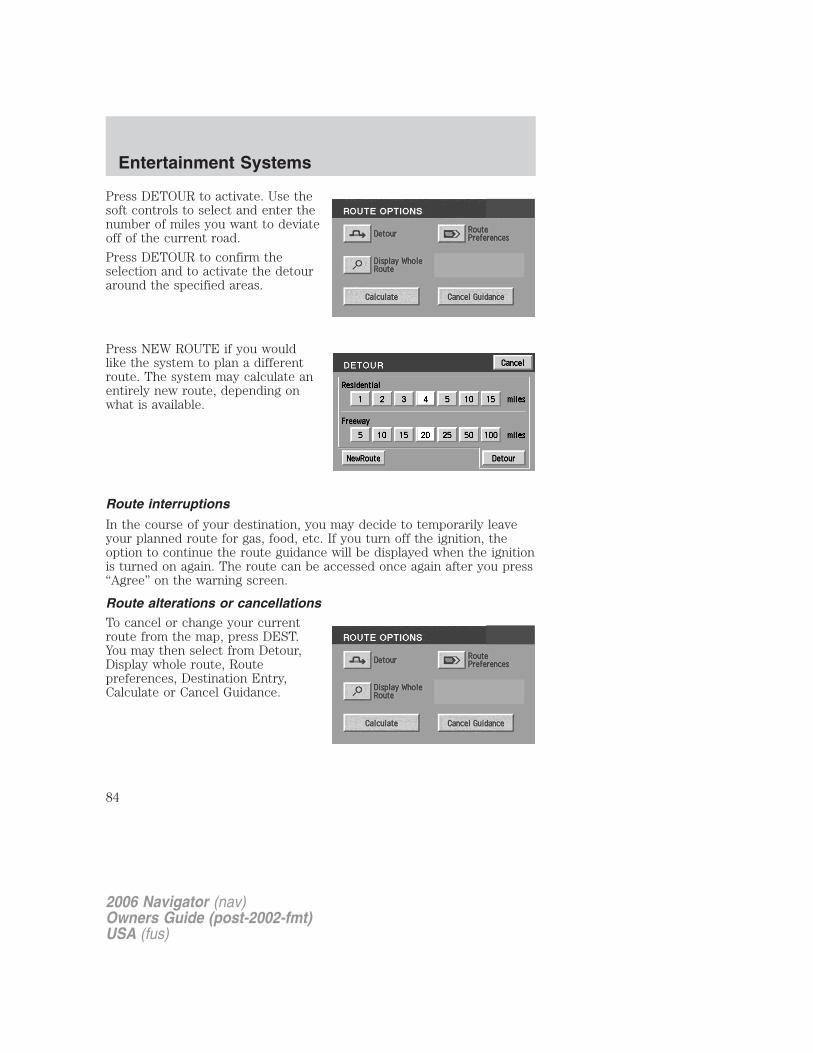
Press DETOUR to activate. Use thesoft controls to select and enter thenumber of miles you want to deviateoff of the current road.
Press DETOUR to confirm theselection and to activate the detouraround the specified areas.
Press NEW ROUTE if you wouldlike the system to plan a differentroute. The system may calculate anentirely new route, depending onwhat is available.
Route interruptions
In the course of your destination, you may decide to temporarily leaveyour planned route for gas, food, etc. If you turn off the ignition, theoption to continue the route guidance will be displayed when the ignitionis turned on again. The route can be accessed once again after you press“Agree” on the warning screen.
Route alterations or cancellationsTo cancel or change your currentroute from the map, press DEST.You may then select from Detour,Display whole route, Routepreferences, Destination Entry,Calculate or Cancel Guidance.
2006 Navigator (nav)Owners Guide (post-2002-fmt)USA (fus)
Entertainment Systems
84
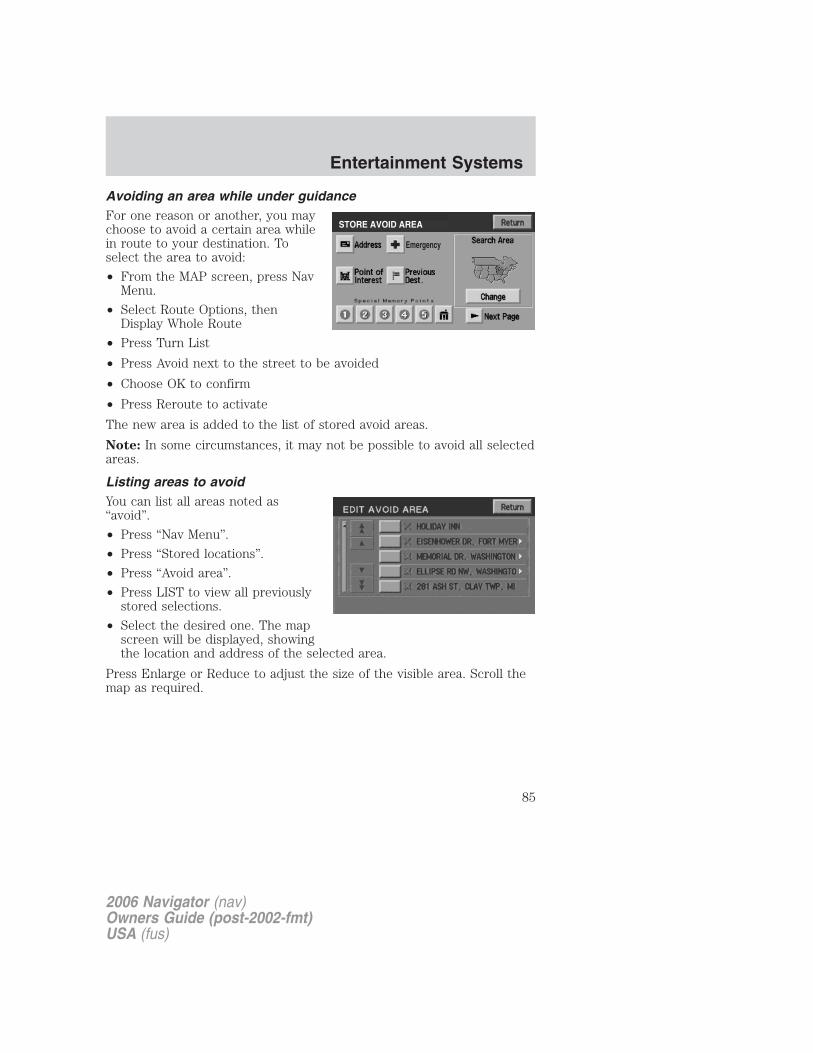
Avoiding an area while under guidanceFor one reason or another, you maychoose to avoid a certain area whilein route to your destination. Toselect the area to avoid:
• From the MAP screen, press NavMenu.
• Select Route Options, thenDisplay Whole Route
• Press Turn List
• Press Avoid next to the street to be avoided
• Choose OK to confirm
• Press Reroute to activate
The new area is added to the list of stored avoid areas.
Note: In some circumstances, it may not be possible to avoid all selectedareas.
Listing areas to avoidYou can list all areas noted as“avoid”.
• Press “Nav Menu”.
• Press “Stored locations”.
• Press “Avoid area”.
• Press LIST to view all previouslystored selections.
• Select the desired one. The mapscreen will be displayed, showingthe location and address of the selected area.
Press Enlarge or Reduce to adjust the size of the visible area. Scroll themap as required.
2006 Navigator (nav)Owners Guide (post-2002-fmt)USA (fus)
Entertainment Systems
85

Deleting areas to avoidTo delete a selection from the“Avoid area” list:
• From the stored locations menu,select “Avoid area”.
• Press DELETE
• Select the desired area to bedeleted.
• Press DEL. ALL to delete allstored areas.
• Press YES to confirm.
Destination menu
Press DEST on the main bezel to access the navigation mode.
2006 Navigator (nav)Owners Guide (post-2002-fmt)USA (fus)
Entertainment Systems
86

Initial map displayAfter pressing AGREE to the initialWARNING screen, you will moveinto the initial map screen whichshows the current vehicle location.Pressing the globe icon will take youto the user settings — audiblefeedback, navigation units, languageand clock (if equipped).
Note: There may be a slight timedelay between the soft key and thehard key functions.
Route optionsOnce in navigation mode and aroute is currently active, press theDEST hard key. The ROUTEOPTIONS screen will appear andallow you to choose from thefollowing selections:
• Detour — Press to select a detour around the current route.
• Route Preferences — When creating a destination, select from:Minimize Time/Distance, Use Major Roads, Use Toll Roads, UseFerries.
• Display Whole Route: Will enter MAP mode and display your entirechosen route.
• Destination Entry: Allows you to enter a new destination or selectfrom entries in: Address book, Points of Interest or PreviousDestinations.
While driving under route guidance, only follow an instructionwhen it is safe to do so as the system cannot be aware of
changing conditions. Use voice guidance as much as possible, and onlyview the display when driving conditions permit.
2006 Navigator (nav)Owners Guide (post-2002-fmt)USA (fus)
Entertainment Systems
87
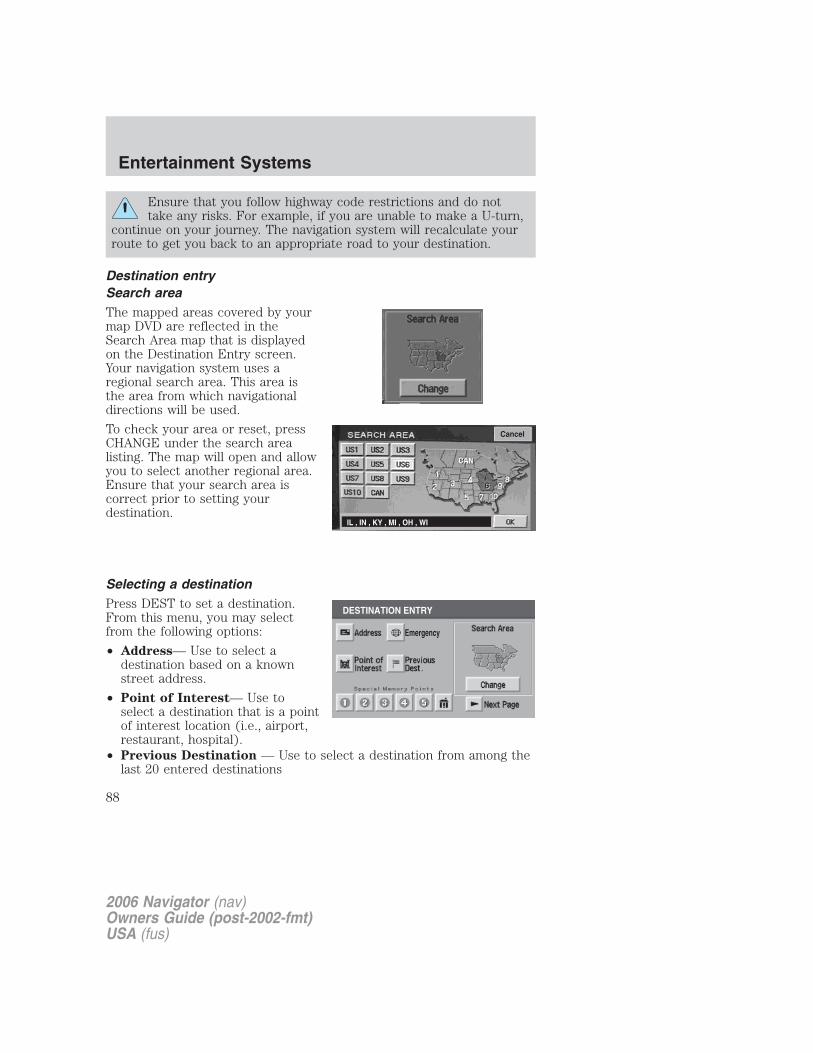
Ensure that you follow highway code restrictions and do nottake any risks. For example, if you are unable to make a U-turn,
continue on your journey. The navigation system will recalculate yourroute to get you back to an appropriate road to your destination.
Destination entrySearch areaThe mapped areas covered by yourmap DVD are reflected in theSearch Area map that is displayedon the Destination Entry screen.Your navigation system uses aregional search area. This area isthe area from which navigationaldirections will be used.
To check your area or reset, pressCHANGE under the search arealisting. The map will open and allowyou to select another regional area.Ensure that your search area iscorrect prior to setting yourdestination.
Selecting a destinationPress DEST to set a destination.From this menu, you may selectfrom the following options:
• Address— Use to select adestination based on a knownstreet address.
• Point of Interest— Use toselect a destination that is a pointof interest location (i.e., airport,restaurant, hospital).
• Previous Destination — Use to select a destination from among thelast 20 entered destinations
Cancel
IL , IN , KY , MI , OH , WI
2006 Navigator (nav)Owners Guide (post-2002-fmt)USA (fus)
Entertainment Systems
88
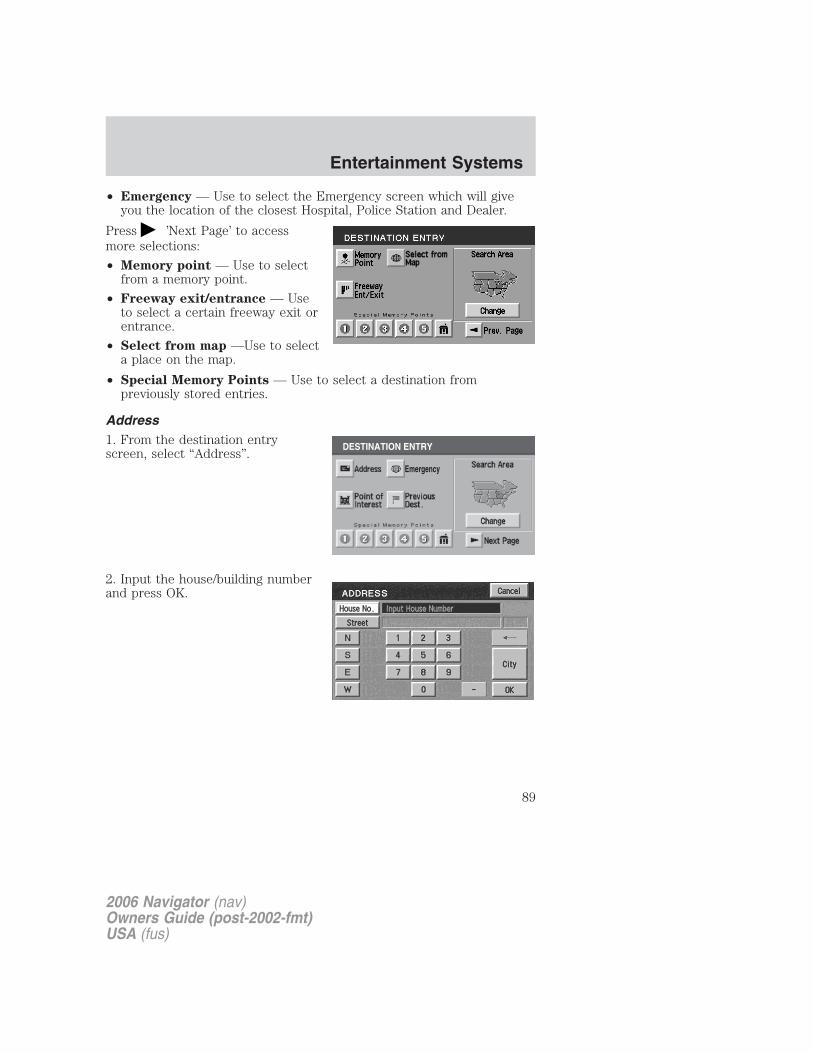
• Emergency — Use to select the Emergency screen which will giveyou the location of the closest Hospital, Police Station and Dealer.
Press ’Next Page’ to accessmore selections:
• Memory point — Use to selectfrom a memory point.
• Freeway exit/entrance — Useto select a certain freeway exit orentrance.
• Select from map —Use to selecta place on the map.
• Special Memory Points — Use to select a destination frompreviously stored entries.
Address1. From the destination entryscreen, select “Address”.
2. Input the house/building numberand press OK.
2006 Navigator (nav)Owners Guide (post-2002-fmt)USA (fus)
Entertainment Systems
89
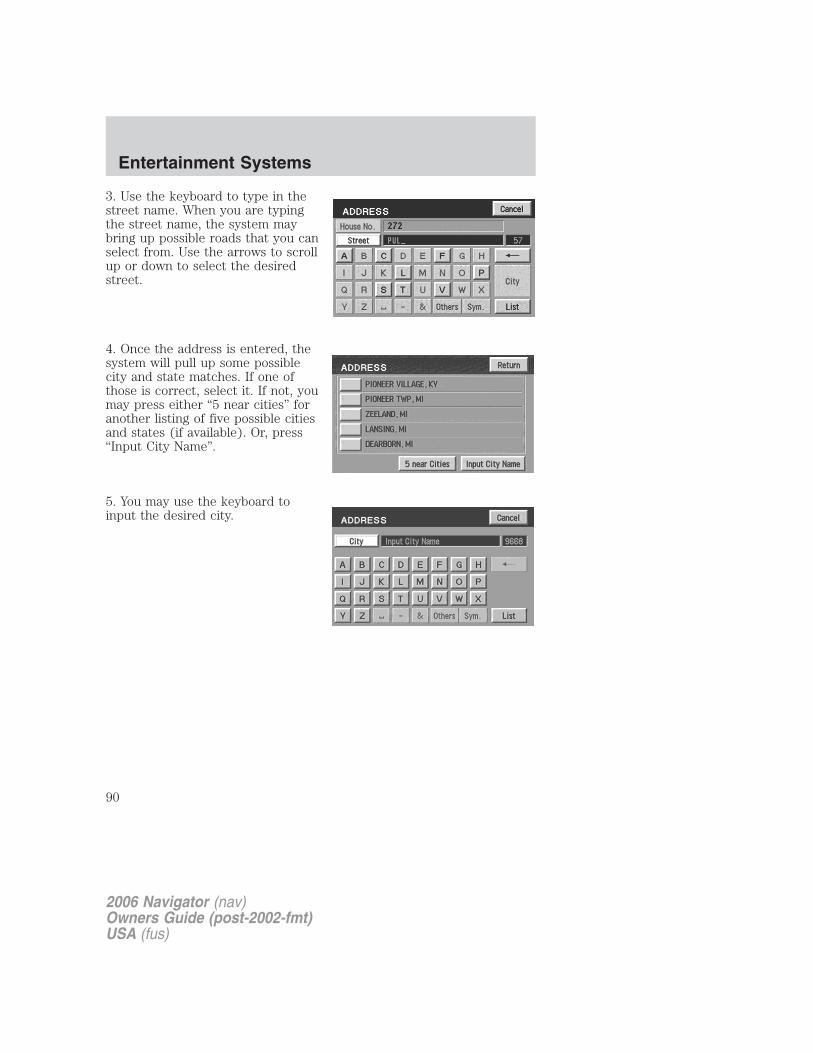
3. Use the keyboard to type in thestreet name. When you are typingthe street name, the system maybring up possible roads that you canselect from. Use the arrows to scrollup or down to select the desiredstreet.
4. Once the address is entered, thesystem will pull up some possiblecity and state matches. If one ofthose is correct, select it. If not, youmay press either “5 near cities” foranother listing of five possible citiesand states (if available). Or, press“Input City Name”.
5. You may use the keyboard toinput the desired city.
2006 Navigator (nav)Owners Guide (post-2002-fmt)USA (fus)
Entertainment Systems
90
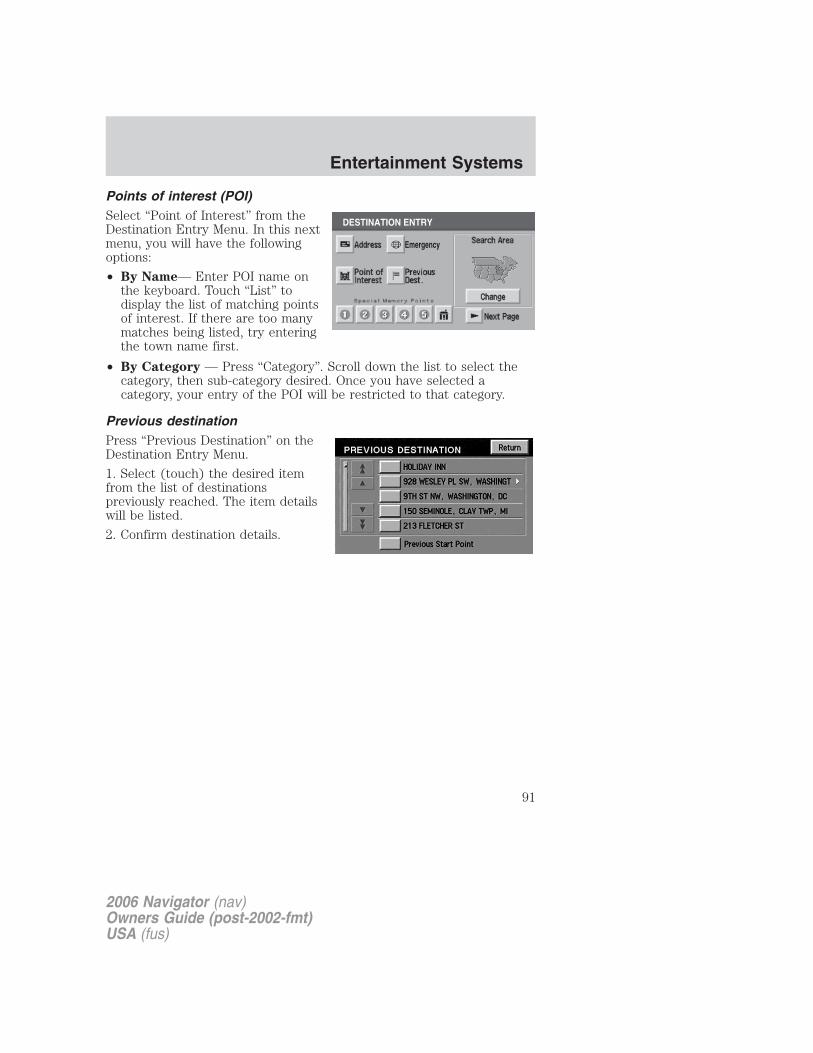
Points of interest (POI)Select “Point of Interest” from theDestination Entry Menu. In this nextmenu, you will have the followingoptions:
• By Name— Enter POI name onthe keyboard. Touch “List” todisplay the list of matching pointsof interest. If there are too manymatches being listed, try enteringthe town name first.
• By Category — Press “Category”. Scroll down the list to select thecategory, then sub-category desired. Once you have selected acategory, your entry of the POI will be restricted to that category.
Previous destinationPress “Previous Destination” on theDestination Entry Menu.
1. Select (touch) the desired itemfrom the list of destinationspreviously reached. The item detailswill be listed.
2. Confirm destination details.
2006 Navigator (nav)Owners Guide (post-2002-fmt)USA (fus)
Entertainment Systems
91
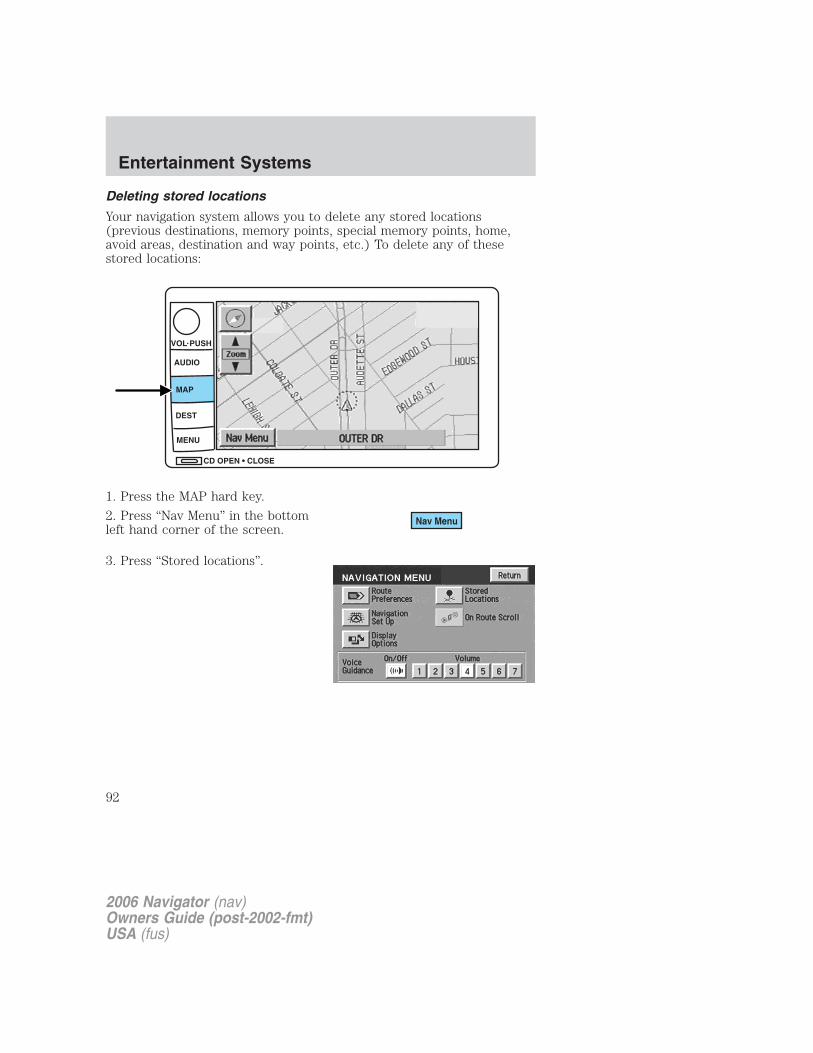
Deleting stored locations
Your navigation system allows you to delete any stored locations(previous destinations, memory points, special memory points, home,avoid areas, destination and way points, etc.) To delete any of thesestored locations:
1. Press the MAP hard key.
2. Press “Nav Menu” in the bottomleft hand corner of the screen.
3. Press “Stored locations”.
2006 Navigator (nav)Owners Guide (post-2002-fmt)USA (fus)
Entertainment Systems
92
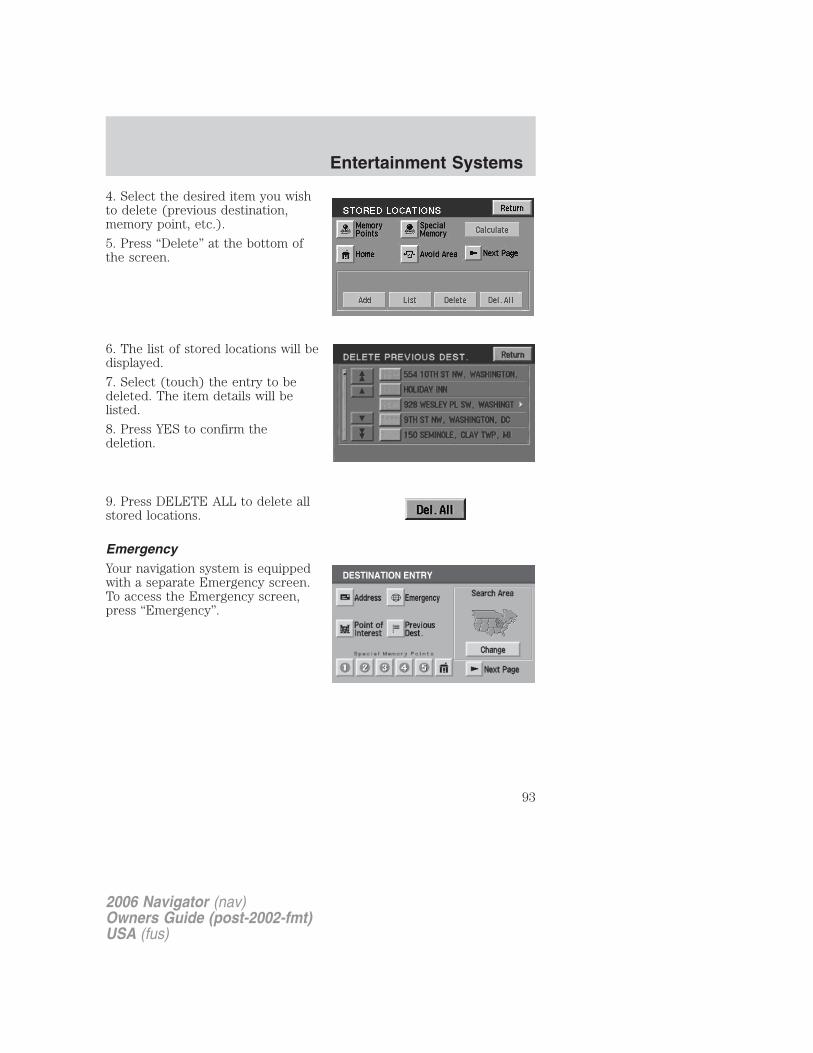
4. Select the desired item you wishto delete (previous destination,memory point, etc.).
5. Press “Delete” at the bottom ofthe screen.
6. The list of stored locations will bedisplayed.
7. Select (touch) the entry to bedeleted. The item details will belisted.
8. Press YES to confirm thedeletion.
9. Press DELETE ALL to delete allstored locations.
EmergencyYour navigation system is equippedwith a separate Emergency screen.To access the Emergency screen,press “Emergency”.
2006 Navigator (nav)Owners Guide (post-2002-fmt)USA (fus)
Entertainment Systems
93
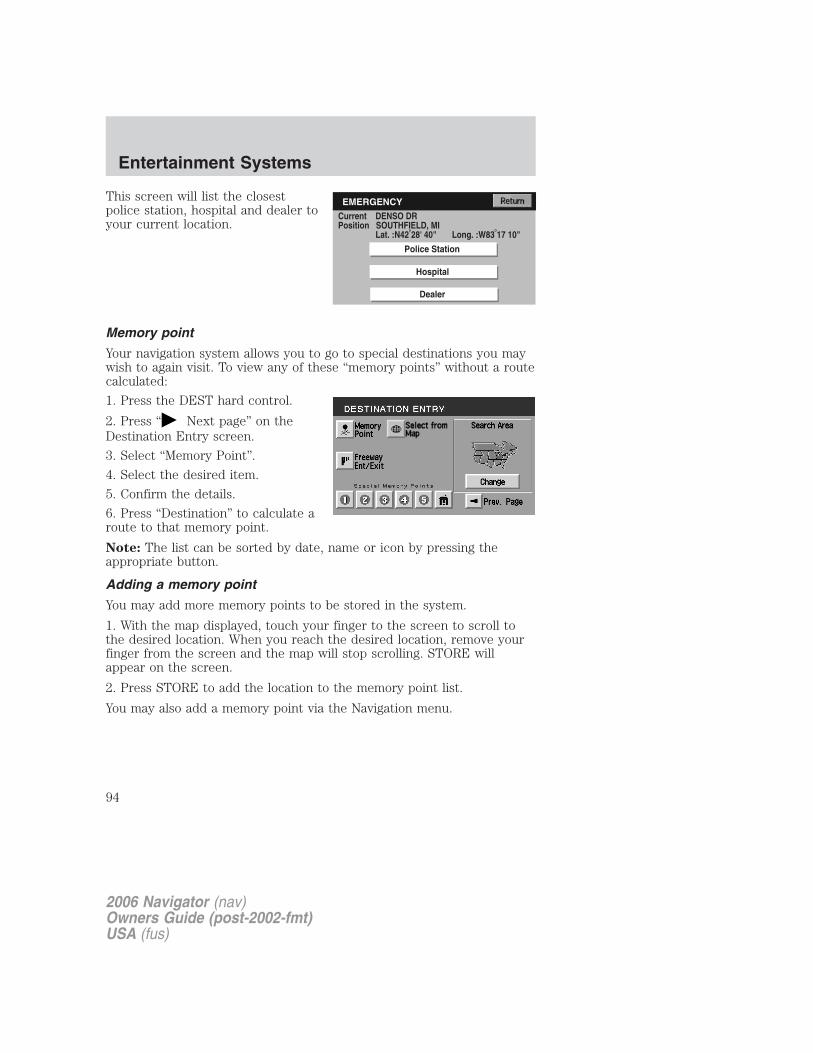
This screen will list the closestpolice station, hospital and dealer toyour current location.
Memory point
Your navigation system allows you to go to special destinations you maywish to again visit. To view any of these “memory points” without a routecalculated:
1. Press the DEST hard control.
2. Press “ Next page” on theDestination Entry screen.
3. Select “Memory Point”.
4. Select the desired item.
5. Confirm the details.
6. Press “Destination” to calculate aroute to that memory point.
Note: The list can be sorted by date, name or icon by pressing theappropriate button.
Adding a memory point
You may add more memory points to be stored in the system.
1. With the map displayed, touch your finger to the screen to scroll tothe desired location. When you reach the desired location, remove yourfinger from the screen and the map will stop scrolling. STORE willappear on the screen.
2. Press STORE to add the location to the memory point list.
You may also add a memory point via the Navigation menu.
2006 Navigator (nav)Owners Guide (post-2002-fmt)USA (fus)
Entertainment Systems
94
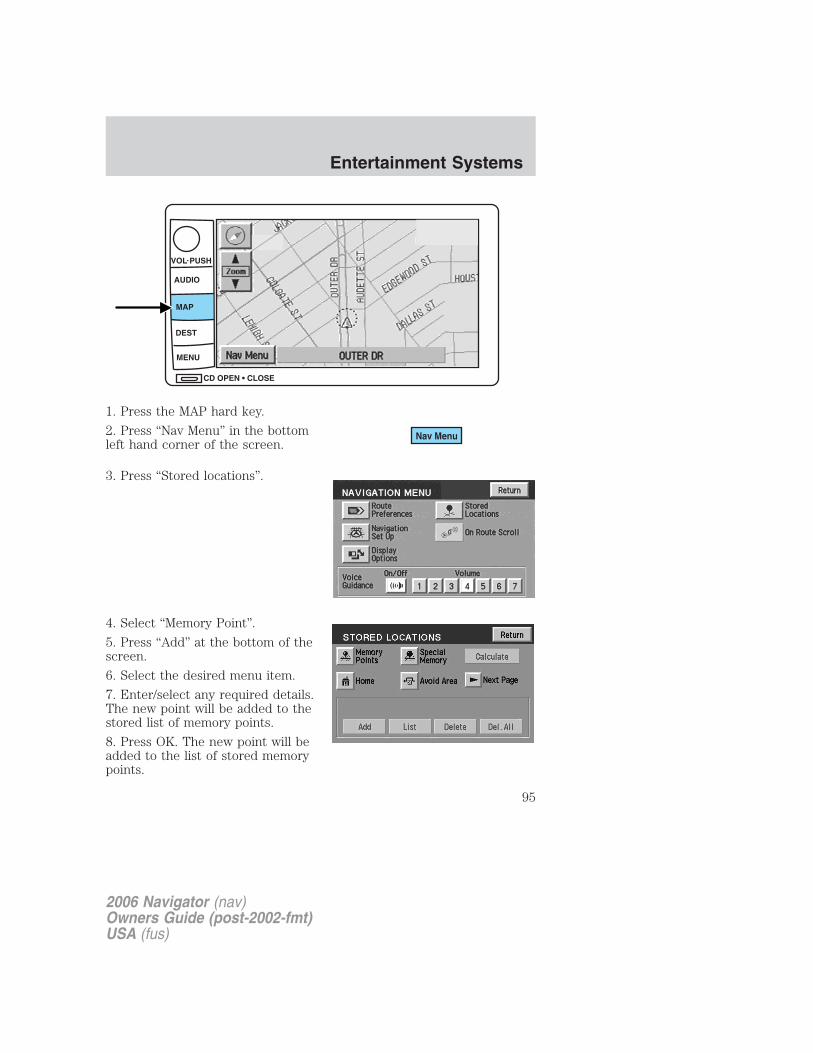
1. Press the MAP hard key.
2. Press “Nav Menu” in the bottomleft hand corner of the screen.
3. Press “Stored locations”.
4. Select “Memory Point”.
5. Press “Add” at the bottom of thescreen.
6. Select the desired menu item.
7. Enter/select any required details.The new point will be added to thestored list of memory points.
8. Press OK. The new point will beadded to the list of stored memorypoints.
2006 Navigator (nav)Owners Guide (post-2002-fmt)USA (fus)
Entertainment Systems
95
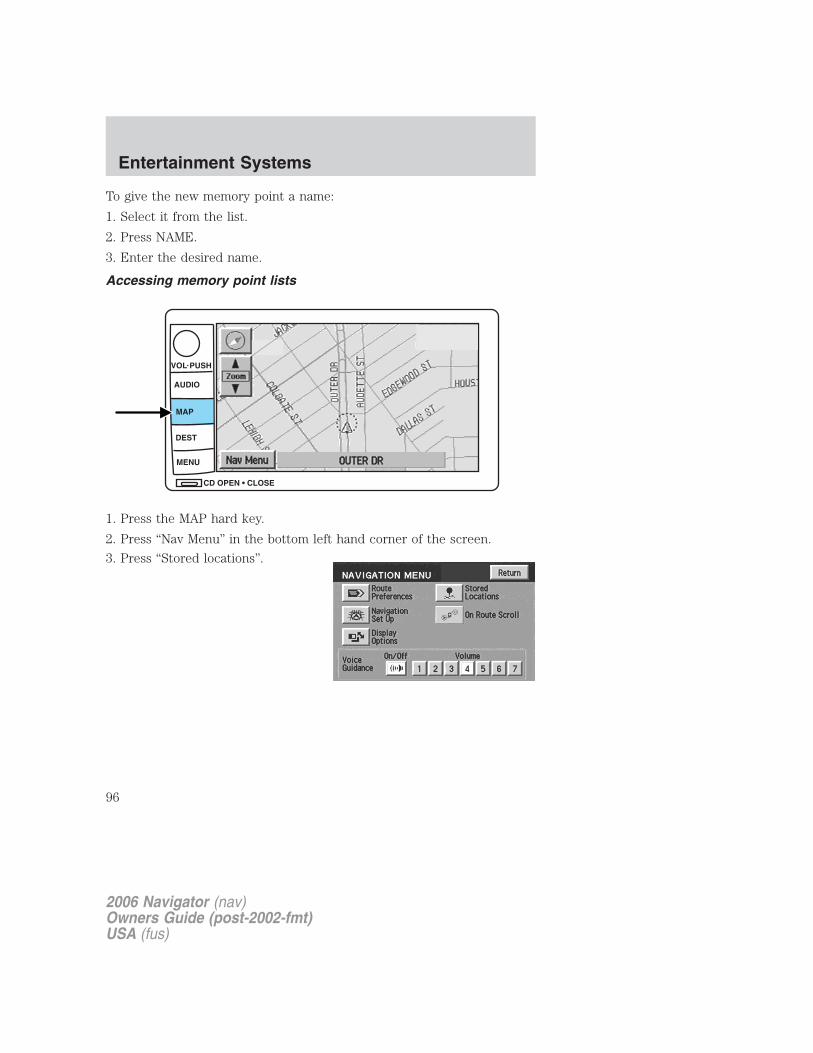
To give the new memory point a name:
1. Select it from the list.
2. Press NAME.
3. Enter the desired name.
Accessing memory point lists
1. Press the MAP hard key.
2. Press “Nav Menu” in the bottom left hand corner of the screen.
3. Press “Stored locations”.
2006 Navigator (nav)Owners Guide (post-2002-fmt)USA (fus)
Entertainment Systems
96
4. Press “Memory Point”.
5. Press LIST
6. Select the desired entry to viewits location details.
Sorting memory point lists1. Access the desired list.
2. Press the button to sort the listas desired (i.e. date, name, or icon).
When sorted by distance, the pointsare ordered by distance from thecurrent vehicle location. Whensorting by icon, the icons are listedin the order they appear on the iconselection screen.
2006 Navigator (nav)Owners Guide (post-2002-fmt)USA (fus)
Entertainment Systems
97
Choosing from the icon listAfter selecting a location, pressICON to edit. There will be 15normal and three sound iconsdisplayed. Press the icon you wishto use.
The normal icons will be displayedon the map to indicate the maplocation identified with that icon.The audible icon will sound adistinctive chime when the vehicleis approaching the memory pointassociated with that icon.
Deleting a memory point• In the Memory Point Menu, press
DELETE.
• Select the entry to be deleted.
• The system will ask you toconfirm deletion. Press YES toconfirm.
The screen will briefly show“Memory Point Deleted”.
Deleting all memory points• In the Memory Point Menu, press
DELETE ALL.
• The system will ask you to confirm deletion. Press YES to confirm.
The screen will briefly show “All Memory Points Deleted”.
2006 Navigator (nav)Owners Guide (post-2002-fmt)USA (fus)
Entertainment Systems
98

Freeway Entrance/Exit
To set a freeway entrance or exit as a destination:
1. Press the DEST hard key.
2. Press “ Next page” to accessthe second page of the DestinationEntry menu.
3. Select “Freeway Entrance/Exit”.
1. Enter freeway name— Enterthe freeway name using thekeyboard. Press “List” to select afreeway from those displayed.
To enter numbers in the freewayname, press “Sym”.
2. Select entrance/exit— Press“Entrance” if you wish to join thefreeway at this junction. Press“Exit” if you wish to leave thefreeway at this junction.
3. Select Junction— The screenwill display a list of junctions on thefreeway. They can be listed eitherby distance, (from the currentvehicle location), by pressing the“Dist” button or alphabetically bypressing the “A-Z” button. Select the desired entrance or exit.
The destination details are displayed for confirmation.
2006 Navigator (nav)Owners Guide (post-2002-fmt)USA (fus)
Entertainment Systems
99
Destination and way pointsThe Store Dest. & Way Point menuis used after a destination or waypoint has been entered for the firsttime using the Destination Entrymenu. You can store and deletedestinations and way points(locations you wish to visit in routeto your ultimate destination). Youcan also select the order in whichyou visit them.
Adding (storing) a destination or way point• Once a destination is entered,
press ADD to store the location.The Store Dest. & Way Pointmenu is displayed.
• Select whether you want to storean Address, Point of Interest orPrevious Destination.
• Enter the necessary details forthe selection.
• If a destination was entered, itwill be stored as the current location. If a way point was entered, itwill be added to the list of way points.
Listing destinations and way pointsPress LIST to display the stored waypoints and destination (if entered).
The first way point to be visited isat the bottom of the list and thedestination is at the top.
You may view the map location ofany entry. On the map, locationdetails for the entry are displayed atthe top of the screen.
To adjust the position of the way point (or destination), scroll the mapas required.
Press OK.
2006 Navigator (nav)Owners Guide (post-2002-fmt)USA (fus)
Entertainment Systems
100
Editing and changing order of way points and destinationPress “Chg. Order” to change theorder in which the way points arevisited. The points are listedchronologically from bottom up, thedestination being on the top.
Press the MAP button to edit theway point location on the mapdisplay.
Press OK to confirm.
Deleting way points and destinationAfter pressing DELETE, the list ofway points and the destination (ifentered) is displayed, showing the’Delete Dest. &Way Pt.’ menu.
Select the entry to be deleted. PressYES to confirm.
Press DELETE ALL to delete allway points. Press YES to confirm.
Selecting route criteriaOnce you have selected adestination, you may change therouting criteria by pressing“Change” in the route preferencesscreen. Refer to Route preferencesfor further information.
2006 Navigator (nav)Owners Guide (post-2002-fmt)USA (fus)
Entertainment Systems
101
Route calculationOnce the route criteria is selected,the navigation system automaticallycalculates the selected destination.The route appears on the displayscreen and a voice prompt providesinstructions.
The system may calculate up to fourroutes for the desired destination.Press “Next” to scroll through thevarious planned routes. Press “Start”to confirm the route selection andbegin route guidance.
Next routeYour navigation system may mapmore than one route to the samedestination. After the destinationhas been calculated, it will appearon the map screen. Press NEXT inthe upper right hand corner to scrollthrough other possible routes to thesame destination.
Menu mode
2006 Navigator (nav)Owners Guide (post-2002-fmt)USA (fus)
Entertainment Systems
102

To access menu mode, press the MENU hard control.
Menu mode allows you to access:
• System Set-up
• Information — Gives you theLincoln Customer AssistanceCenter information.
• Brightness/Contrast — Allows youto adjust the brightness andcontrast on the screen.
• Screen off — Allows you to turnoff the navigation screen.
2006 Navigator (nav)Owners Guide (post-2002-fmt)USA (fus)
Entertainment Systems
103
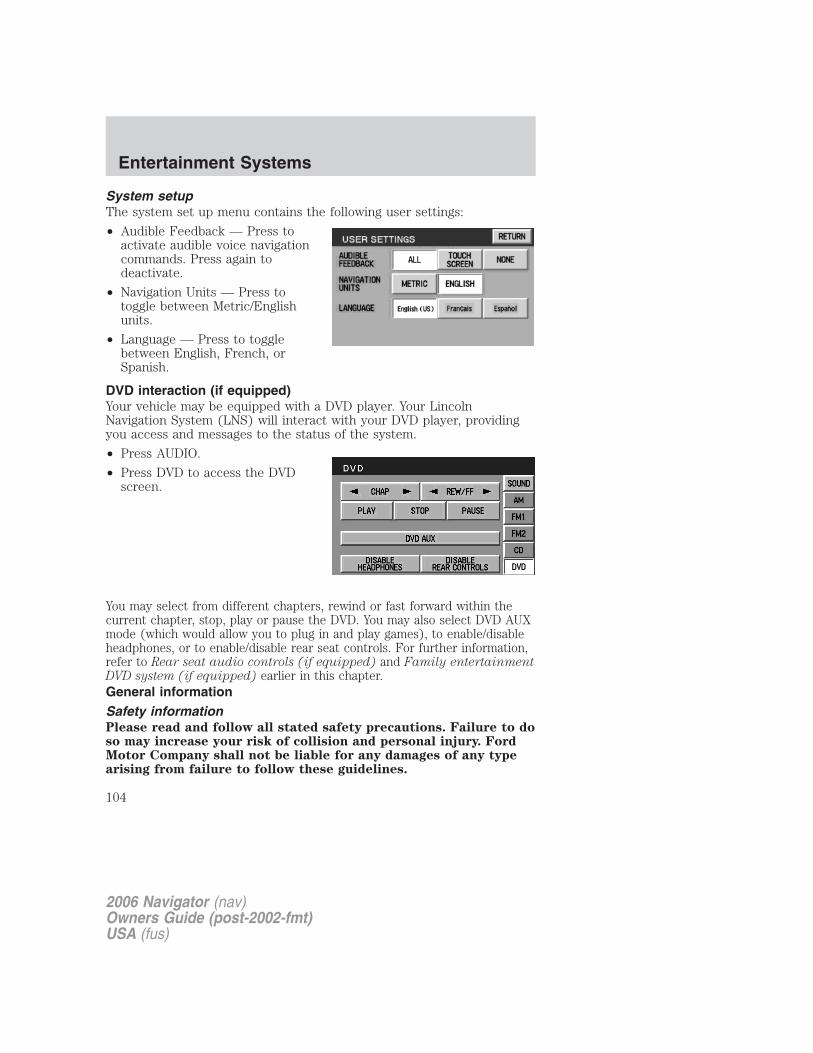
System setupThe system set up menu contains the following user settings:
• Audible Feedback — Press toactivate audible voice navigationcommands. Press again todeactivate.
• Navigation Units — Press totoggle between Metric/Englishunits.
• Language — Press to togglebetween English, French, orSpanish.
DVD interaction (if equipped)Your vehicle may be equipped with a DVD player. Your LincolnNavigation System (LNS) will interact with your DVD player, providingyou access and messages to the status of the system.
• Press AUDIO.
• Press DVD to access the DVDscreen.
You may select from different chapters, rewind or fast forward within thecurrent chapter, stop, play or pause the DVD. You may also select DVD AUXmode (which would allow you to plug in and play games), to enable/disableheadphones, or to enable/disable rear seat controls. For further information,refer to Rear seat audio controls (if equipped) and Family entertainmentDVD system (if equipped) earlier in this chapter.General informationSafety informationPlease read and follow all stated safety precautions. Failure to doso may increase your risk of collision and personal injury. FordMotor Company shall not be liable for any damages of any typearising from failure to follow these guidelines.
2006 Navigator (nav)Owners Guide (post-2002-fmt)USA (fus)
Entertainment Systems
104

Do not attempt to service, repair or modify the system. See your Ford orLincoln Mercury dealer.
The driver must not attempt to operate any detailed operation ofthe navigation system while the vehicle is in motion. Give full
attention to driving and to the road. Pull off the road and park in asafe place before performing detailed operations.
If the system is used for an extended period of time with thevehicle stationary, ensure that the engine is running to avoiddraining the battery.
Do not apply pressure to the display screen.The navigation system is not a substitute for your personal judgement.Route suggestions should not supersede local traffic regulations or safedriving practices.Do not follow route suggestions if they direct you to perform an unsafeor illegal maneuver, would place you in an unsafe situation, or wouldroute you into an area that you consider unsafe.Drivers should not rely on screen displays while their vehicle is inmotion. Let the voice guide you. If viewing is necessary, pull off the roadto a safe location.
Do not use the navigation system to locate emergency services.
For road safety reasons, the driver should program the system only whenthe vehicle is stationary. Certain functions will therefore not operatewhile the vehicle is in motion.
The map database DVD does not reflect road detours, closures orconstruction, road characteristics such as rough road surface, slope orgrade, weight or height restrictions, traffic congestion, weather or similarconditions.
To use the system as effectively and safely as possible, obtain anup-to-date map database DVD whenever they become available.
Set the volume level so that you can hear directions clearly.
Do not disassemble or modify the system as this may lead to damage andvoid your warranty. If a problem occurs, stop using the systemimmediately and contact your Ford or Lincoln Dealer.
Federal Communication Commission (FCC) ComplianceChanges or modifications not approved by Ford Lincoln Mercury couldvoid user’s authority to operate the equipment. This equipment has been
2006 Navigator (nav)Owners Guide (post-2002-fmt)USA (fus)
Entertainment Systems
105
tested and found to comply with the limits for a Class B digital device,pursuant to Part 15 of the FCC Rules. These limits are designed toprovide reasonable protection against harmful interference in aresidential installation. This equipment generates, uses and can radiateradio frequency energy and, if not installed and used in accordance withthe instructions, may cause harmful interference to radiocommunications.
However, there is no guarantee that interference will not occur in aparticular installation. If this equipment does cause harmful interferenceto radio or television reception, which can be determined by turning theequipment off and on, the user is encouraged to consult the dealer or anexperienced radio/TV technician for help.
The database reflects reality as existing before you received thedatabase and it comprises data and information from governmentand other sources, which may contain errors and omissions.Accordingly, the database may contain inaccurate or incompleteinformation due to the passage of time, changing circumstances,and due to the nature of the sources used. The database does notinclude or reflect information on neighborhood safety, lawenforcement, emergency assistance, construction work, road orlane closures, vehicle or speed restrictions, road slope or grade,bridge height, weight or other limits, road or traffic conditions,special events, traffic congestion, or travel time.
Radio reception factorsThere are certain factors that may effect your radio reception.
• Distance/strength. The further an FM signal travels, the weaker it is.The listenable range of the average FM station is approximately 40 km(24 miles). This range can be affected by “signal modulation.” Signalmodulation is a process radio stations use to increase theirstrength/volume relative to other stations.
• Terrain. Hills, mountains and tall buildings between your vehicle’santenna and the radio station signal can cause FM reception problems.Static can be caused on AM stations by power lines, electric fences,traffic lights and thunderstorms. Moving away from an interferingstructure (out of its “shadow”) returns your reception to normal.
• Station overload. Weak signals are sometimes captured by strongersignals when you pass a broadcast tower. A stronger signal maytemporarily overtake a weaker signal and play while the weak stationfrequency is displayed.
2006 Navigator (nav)Owners Guide (post-2002-fmt)USA (fus)
Entertainment Systems
106

Principles of GPS (global positioning system) operationYour system directs you based on information derived from globalpositioning satellites, road maps stored on the DVD, sensors in yourvehicle and the desired destination. The system compiles all necessaryinformation to guide you to your selected destination. Space satellitesdetermine the vehicle’s current location and transmit position and timesignals to your car.If the vehicle has been parked for a long period of time, the navigationfunction may be temporarily unresponsive. The navigation system willoperate reliably again once GPS reception is available for a few minutes.
Limited GPS receptionSystem performance may be adversely affected if GPS reception isinterrupted or interference occurs over a distance of several miles. Thefollowing are possible causes for GPS reception being interrupted. If thevehicle is:• in multi-story parking garages• in tunnels and under bridges• inside or in between buildings• by forests or tree-lined avenues• in heavy rain showers and thunderstorms• in valleys and in mountainous regions• roads under cliffs
Ensure that you do not have any metal objects on the rear parcel shelf.If your windows are tinted, ensure that you use non-metal tinting insteadof metal oxide tinting. Both of these factors can interrupt GPS reception.
Cleaning the displayDo not spray cleaning fluid directly onto the unit. Instead, spray onto asoft cloth and gently wipe the unit. Only recommended products shouldbe used.• Recommended products- Rubbing alcohol based cleaner (i.e., methyl
alcohol) or a damp clean cloth.• Not harmful but not recommended- ammonia cleaner, neutral detergent.• Harmful to system and not recommended- acid cleaner, alkali cleaner,
benzene cleaner.Do not clean any part of the system with benzene, paint thinner or anyother solvent.
Do not spill liquids of any kind onto the unit.
2006 Navigator (nav)Owners Guide (post-2002-fmt)USA (fus)
Entertainment Systems
107
Loading the map DVD• Your navigation DVD unit is located in the front lower center stack
area by the passenger’s feet (access door).
• Ensure that the vehicle ignition is ON.
• If a DVD is already loaded in the Navigation unit, push the ejectbutton.
• Load the DVD with the printed side up. Do not allow moisture orforeign objects to enter the slot.
The navigation system utilizes a database stored in a special format on aDVD. It is recommended always to use the latest update of this mapDVD.
• The navigation system will only work with DVDs specifically intendedfor your navigation system.
• Always store the map DVDs in their protective cases when not in use.
Ordering additional map DVDsIf you wish to order a replacement or additional map, please call1–888–NAV-MAPS (1–888–628–6277) or to log onto www.navtech.com.
Latest map DVDsThe map content is constantly changing due to new roads, trafficrestrictions, etc. . Therefore, it is not always possible to exactly matchthe DVD map with the current roadways. For best results, always use thelatest version of the map DVD. Map information is regularly updated, butall areas are not necessarily covered to the same level of detail. Someareas, in particular private roads, may not be included on the database.To help with accuracy, always use the latest DVD version for navigation.
Customer serviceIf you need help operating your navigation/audio system, want to reporta map database error or want to obtain a map DVD, please call 1 (888)628–6277 (NAV-MAPS) or log onto www.navtech.com.
2006 Navigator (nav)Owners Guide (post-2002-fmt)USA (fus)
Entertainment Systems
108
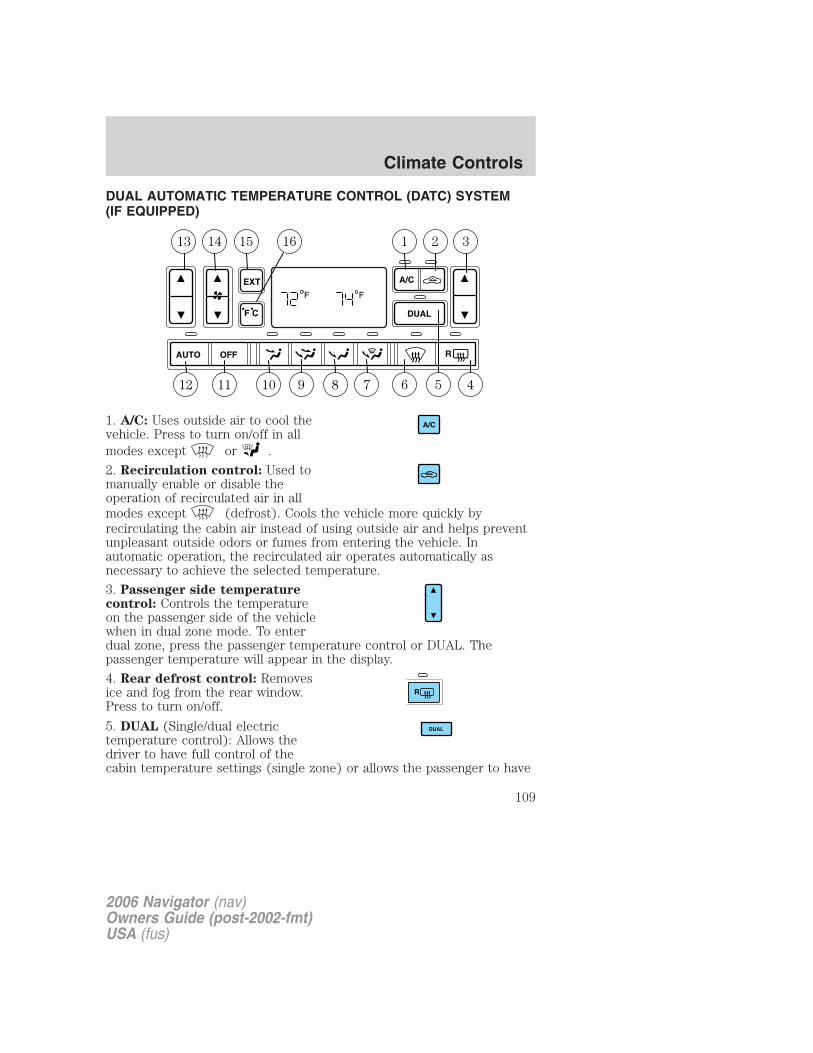
DUAL AUTOMATIC TEMPERATURE CONTROL (DATC) SYSTEM(IF EQUIPPED)
1. A/C: Uses outside air to cool thevehicle. Press to turn on/off in allmodes except or .
2. Recirculation control: Used tomanually enable or disable theoperation of recirculated air in allmodes except (defrost). Cools the vehicle more quickly byrecirculating the cabin air instead of using outside air and helps preventunpleasant outside odors or fumes from entering the vehicle. Inautomatic operation, the recirculated air operates automatically asnecessary to achieve the selected temperature.
3. Passenger side temperaturecontrol: Controls the temperatureon the passenger side of the vehiclewhen in dual zone mode. To enterdual zone, press the passenger temperature control or DUAL. Thepassenger temperature will appear in the display.
4. Rear defrost control: Removesice and fog from the rear window.Press to turn on/off.
5. DUAL (Single/dual electrictemperature control): Allows thedriver to have full control of thecabin temperature settings (single zone) or allows the passenger to have
1 213 14
56789101112 4
315 16
AUTO OFF
DUAL
A/C
R
F F
EXT
F C
A/C
R
DUAL
2006 Navigator (nav)Owners Guide (post-2002-fmt)USA (fus)
Climate Controls
109
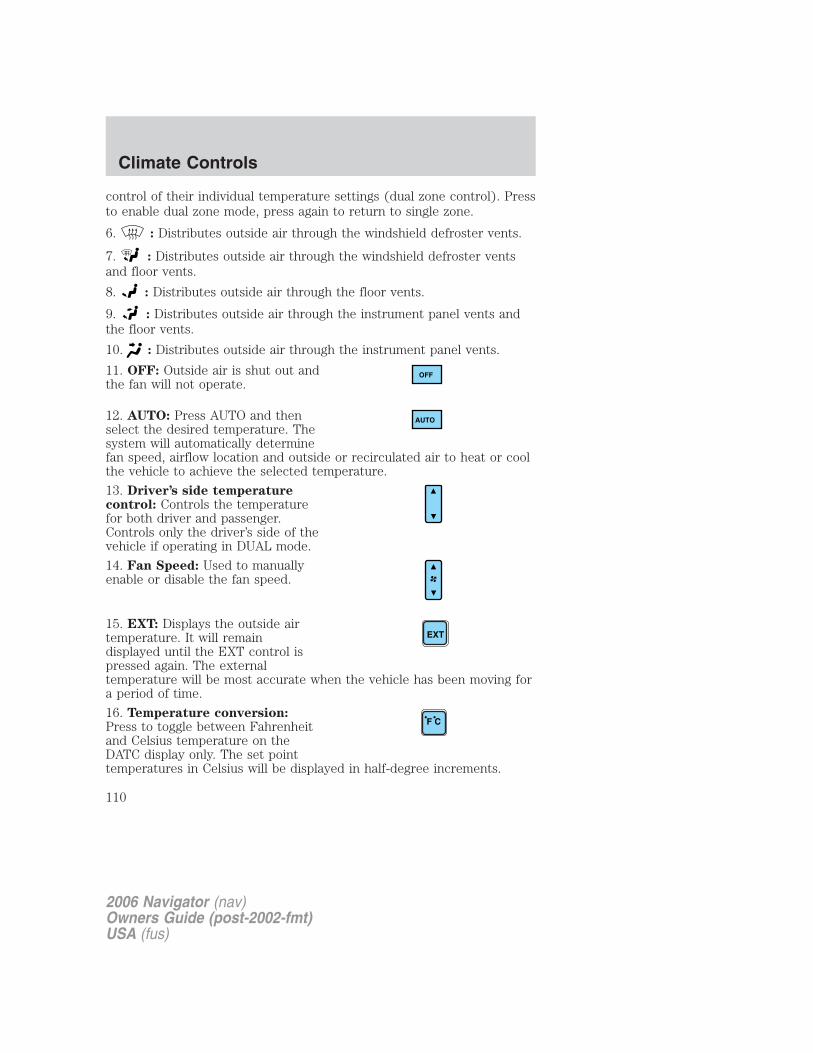
control of their individual temperature settings (dual zone control). Pressto enable dual zone mode, press again to return to single zone.
6. : Distributes outside air through the windshield defroster vents.
7. : Distributes outside air through the windshield defroster ventsand floor vents.
8. : Distributes outside air through the floor vents.
9. : Distributes outside air through the instrument panel vents andthe floor vents.
10. : Distributes outside air through the instrument panel vents.
11. OFF: Outside air is shut out andthe fan will not operate.
12. AUTO: Press AUTO and thenselect the desired temperature. Thesystem will automatically determinefan speed, airflow location and outside or recirculated air to heat or coolthe vehicle to achieve the selected temperature.
13. Driver’s side temperaturecontrol: Controls the temperaturefor both driver and passenger.Controls only the driver’s side of thevehicle if operating in DUAL mode.
14. Fan Speed: Used to manuallyenable or disable the fan speed.
15. EXT: Displays the outside airtemperature. It will remaindisplayed until the EXT control ispressed again. The externaltemperature will be most accurate when the vehicle has been moving fora period of time.
16. Temperature conversion:Press to toggle between Fahrenheitand Celsius temperature on theDATC display only. The set pointtemperatures in Celsius will be displayed in half-degree increments.
OFF
AUTO
2006 Navigator (nav)Owners Guide (post-2002-fmt)USA (fus)
Climate Controls
110
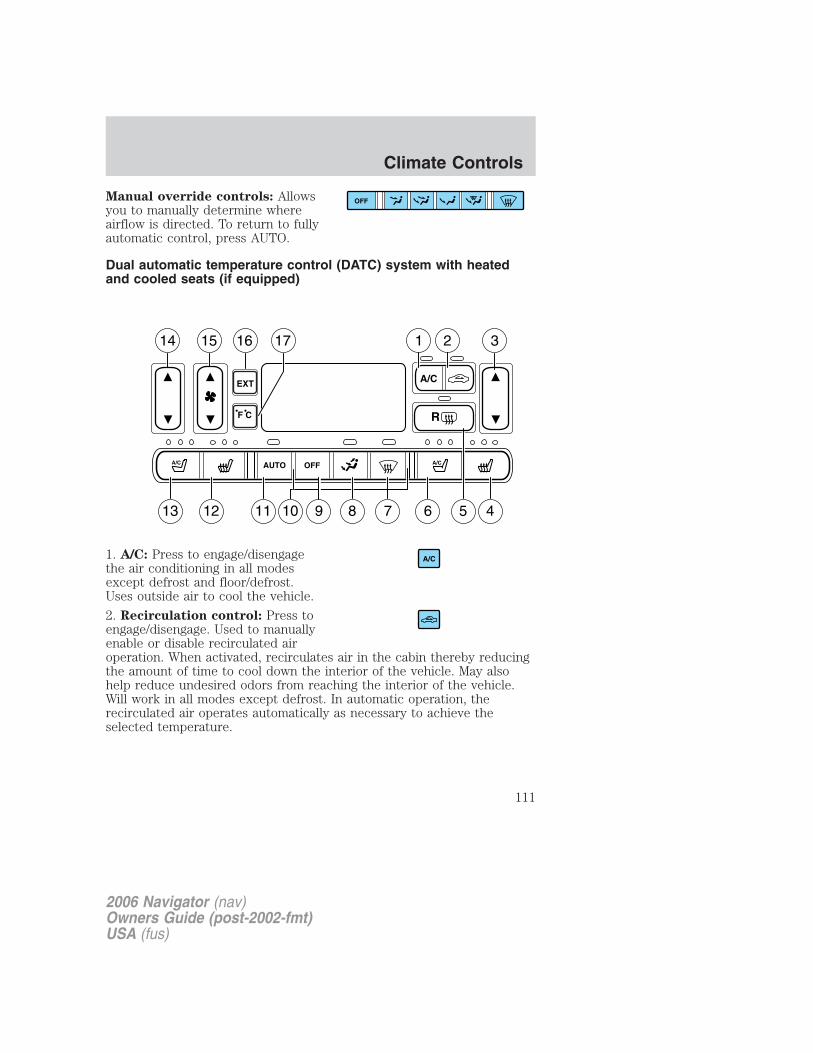
Manual override controls: Allowsyou to manually determine whereairflow is directed. To return to fullyautomatic control, press AUTO.
Dual automatic temperature control (DATC) system with heatedand cooled seats (if equipped)
1. A/C: Press to engage/disengagethe air conditioning in all modesexcept defrost and floor/defrost.Uses outside air to cool the vehicle.
2. Recirculation control: Press toengage/disengage. Used to manuallyenable or disable recirculated airoperation. When activated, recirculates air in the cabin thereby reducingthe amount of time to cool down the interior of the vehicle. May alsohelp reduce undesired odors from reaching the interior of the vehicle.Will work in all modes except defrost. In automatic operation, therecirculated air operates automatically as necessary to achieve theselected temperature.
OFF
AUTO OFF
A/C
14 15 16 17 2 31
11 9 8 7 6 5 413 12
R
10
A/C A/C
EXT
F C
A/C
2006 Navigator (nav)Owners Guide (post-2002-fmt)USA (fus)
Climate Controls
111
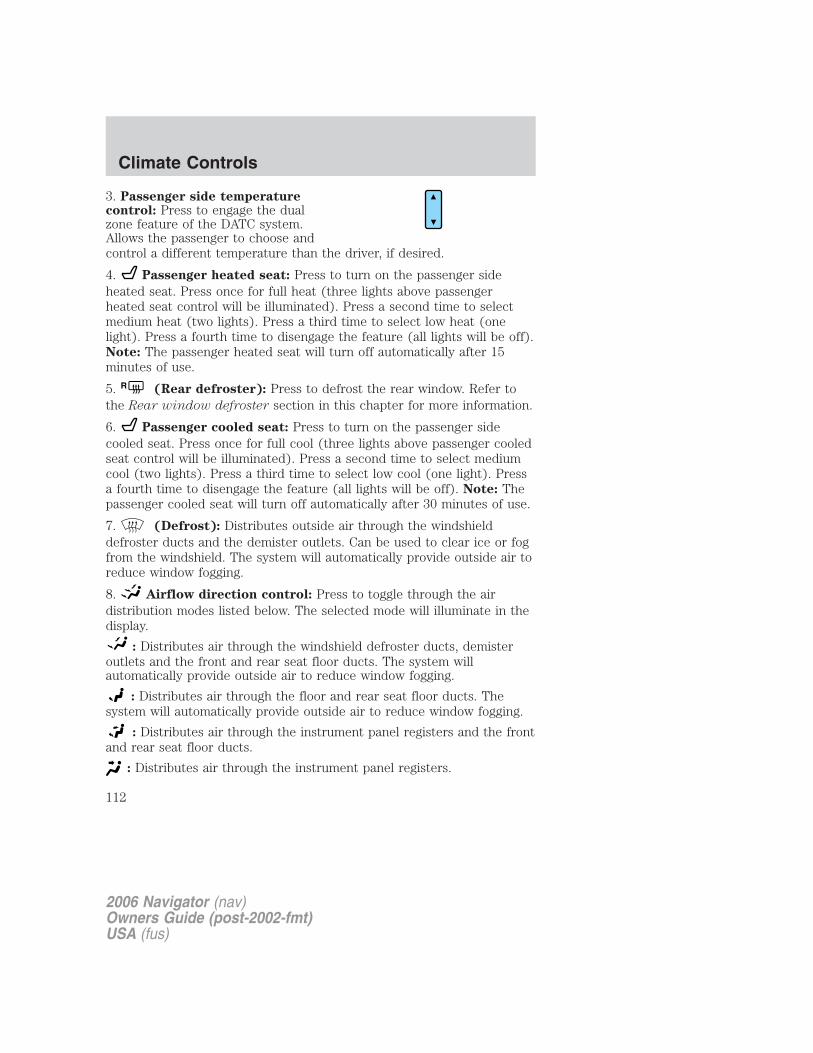
3. Passenger side temperaturecontrol: Press to engage the dualzone feature of the DATC system.Allows the passenger to choose andcontrol a different temperature than the driver, if desired.
4. Passenger heated seat: Press to turn on the passenger sideheated seat. Press once for full heat (three lights above passengerheated seat control will be illuminated). Press a second time to selectmedium heat (two lights). Press a third time to select low heat (onelight). Press a fourth time to disengage the feature (all lights will be off).Note: The passenger heated seat will turn off automatically after 15minutes of use.
5. R (Rear defroster): Press to defrost the rear window. Refer tothe Rear window defroster section in this chapter for more information.
6. Passenger cooled seat: Press to turn on the passenger sidecooled seat. Press once for full cool (three lights above passenger cooledseat control will be illuminated). Press a second time to select mediumcool (two lights). Press a third time to select low cool (one light). Pressa fourth time to disengage the feature (all lights will be off). Note: Thepassenger cooled seat will turn off automatically after 30 minutes of use.
7. (Defrost): Distributes outside air through the windshielddefroster ducts and the demister outlets. Can be used to clear ice or fogfrom the windshield. The system will automatically provide outside air toreduce window fogging.
8. Airflow direction control: Press to toggle through the airdistribution modes listed below. The selected mode will illuminate in thedisplay.
: Distributes air through the windshield defroster ducts, demisteroutlets and the front and rear seat floor ducts. The system willautomatically provide outside air to reduce window fogging.
: Distributes air through the floor and rear seat floor ducts. Thesystem will automatically provide outside air to reduce window fogging.
: Distributes air through the instrument panel registers and the frontand rear seat floor ducts.
: Distributes air through the instrument panel registers.
2006 Navigator (nav)Owners Guide (post-2002-fmt)USA (fus)
Climate Controls
112

9. OFF: Outside air is shut out andthe fan will not operate.
10. Manual override controls: Allows you to manually select whereairflow is directed. To return to full automatic control, press AUTO.
11. AUTO: Press to engageautomatic temperature control. Usethe temperature control to selectthe desired temperature setting. The system will automatically determinefan speed, airflow location, A/C on or off, and outside or recirculated airto heat or cool the vehicle, allowing it to reach the desired temperature.Press and hold AUTO for about two seconds to toggle between singlezone and dual zone temperature control.
12. Driver heated seat: Press to turn on the driver side heatedseat. Press once for full heat (three lights above driver heated seatcontrol will be illuminated). Press a second time to select medium heat(two lights). Press a third time to select low heat (one light). Press afourth time to disengage the feature (all lights will be off). Note: Thedriver heated seat will turn off automatically after 15 minutes of use.
13. Driver cooled seat: Press to turn on the driver side cooled seat.Press once for full cool (three lights above driver cooled seat control willbe illuminated). Press a second time to select medium cool (two lights).Press a third time to select low cool (one light). Press a fourth time todisengage the feature (all lights will be off). Note: The driver cooledseat will turn off automatically after 30 minutes of use.
14. Driver’s side temperaturecontrol: Controls the temperatureon the driver side of the vehicle indual zone and controls thetemperature of both the driver and passenger sides in single zone.
15. Fan Speed: Press to manuallyincrease/decrease fan speed. Inmanual mode, the display willshow with a bar graph toindicate fan speed. Fan speed can be manually adjusted in AUTO mode.To allow the system to automatically control fan speed, press AUTO.
OFF
AUTO
2006 Navigator (nav)Owners Guide (post-2002-fmt)USA (fus)
Climate Controls
113
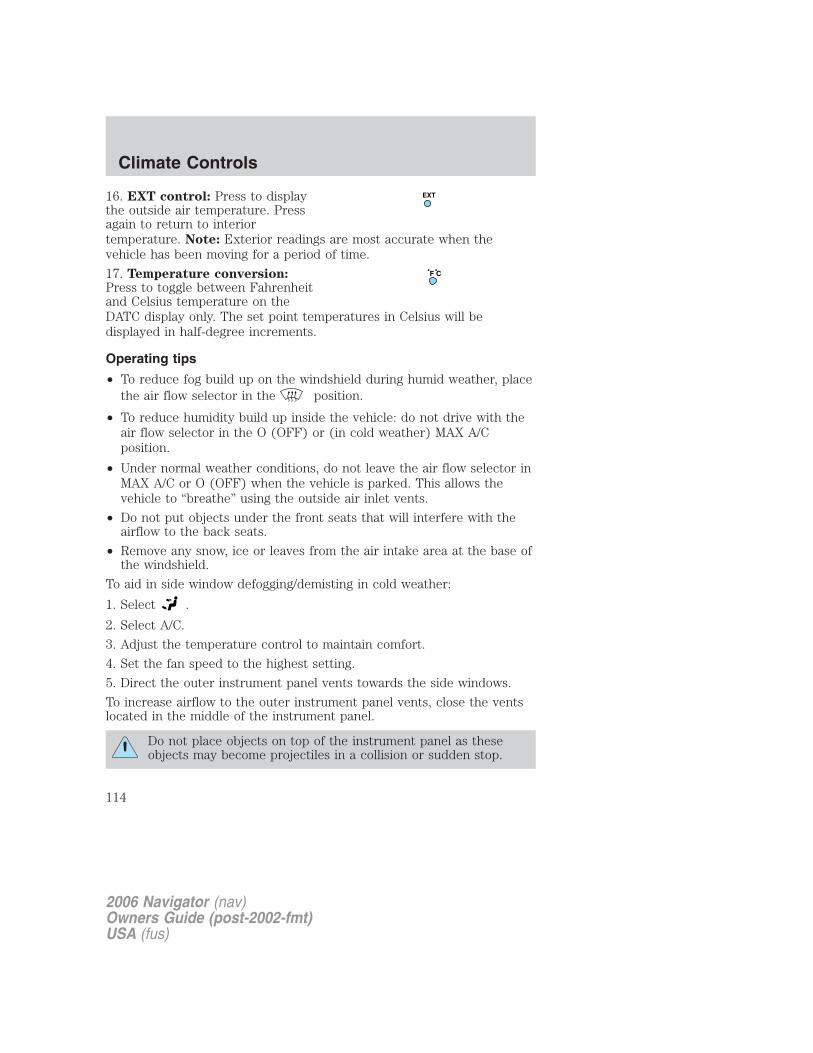
16. EXT control: Press to displaythe outside air temperature. Pressagain to return to interiortemperature. Note: Exterior readings are most accurate when thevehicle has been moving for a period of time.
17. Temperature conversion:Press to toggle between Fahrenheitand Celsius temperature on theDATC display only. The set point temperatures in Celsius will bedisplayed in half-degree increments.
Operating tips
• To reduce fog build up on the windshield during humid weather, placethe air flow selector in the position.
• To reduce humidity build up inside the vehicle: do not drive with theair flow selector in the O (OFF) or (in cold weather) MAX A/Cposition.
• Under normal weather conditions, do not leave the air flow selector inMAX A/C or O (OFF) when the vehicle is parked. This allows thevehicle to “breathe” using the outside air inlet vents.
• Do not put objects under the front seats that will interfere with theairflow to the back seats.
• Remove any snow, ice or leaves from the air intake area at the base ofthe windshield.
To aid in side window defogging/demisting in cold weather:
1. Select .
2. Select A/C.
3. Adjust the temperature control to maintain comfort.
4. Set the fan speed to the highest setting.
5. Direct the outer instrument panel vents towards the side windows.
To increase airflow to the outer instrument panel vents, close the ventslocated in the middle of the instrument panel.
Do not place objects on top of the instrument panel as theseobjects may become projectiles in a collision or sudden stop.
EXT
F C
2006 Navigator (nav)Owners Guide (post-2002-fmt)USA (fus)
Climate Controls
114

AUXILIARY A/C-HEATER CONTROLS (IF EQUIPPED)
Your vehicle may be equipped with auxiliary climate controls. Theseallow the front or rear seat passengers to control airflow direction,temperature and fan level of the rear compartment to quickly heat orcool the vehicle.
Auxiliary climate controls are located in the first row overhead consoleand in the floor console on the back of the front row console.
If the main climate control system is in the OFF position, the auxiliaryclimate control will not operate.
The auxiliary unit can be controlled either by the front seat occupant(s)using the front auxiliary control or by the rear seat passenger(s) usingthe rear auxiliary control but not both. To control the auxiliary unit usingthe rear control, the front auxiliary blower control must be in the REARposition.
Front auxiliary controls:
1. Temperature control:Determines airflow temperature inthe rear of the vehicle. If the mainclimate control system is cooling inMAX A/C or mode, theauxiliary temperature control willnot function as the entire vehiclewill operate at a full cooltemperature.
2. Mode selector: Press to selectair flow direction to (Floor) or (Panel).
Directs air to the floor of the third row seating.directs air to the overhead registers of the second and third row
seating. The selected mode will illuminate on the temperature control.
3. Fan control: Determines fan speed in the auxiliary system. Turn toREAR to give rear seat passengers control of the rear auxiliary controls.Otherwise, the front auxiliary control will determine the settings for theauxiliary A/C-heater. If set to O (OFF), the rear auxiliary controls willnot function.
2006 Navigator (nav)Owners Guide (post-2002-fmt)USA (fus)
Climate Controls
115
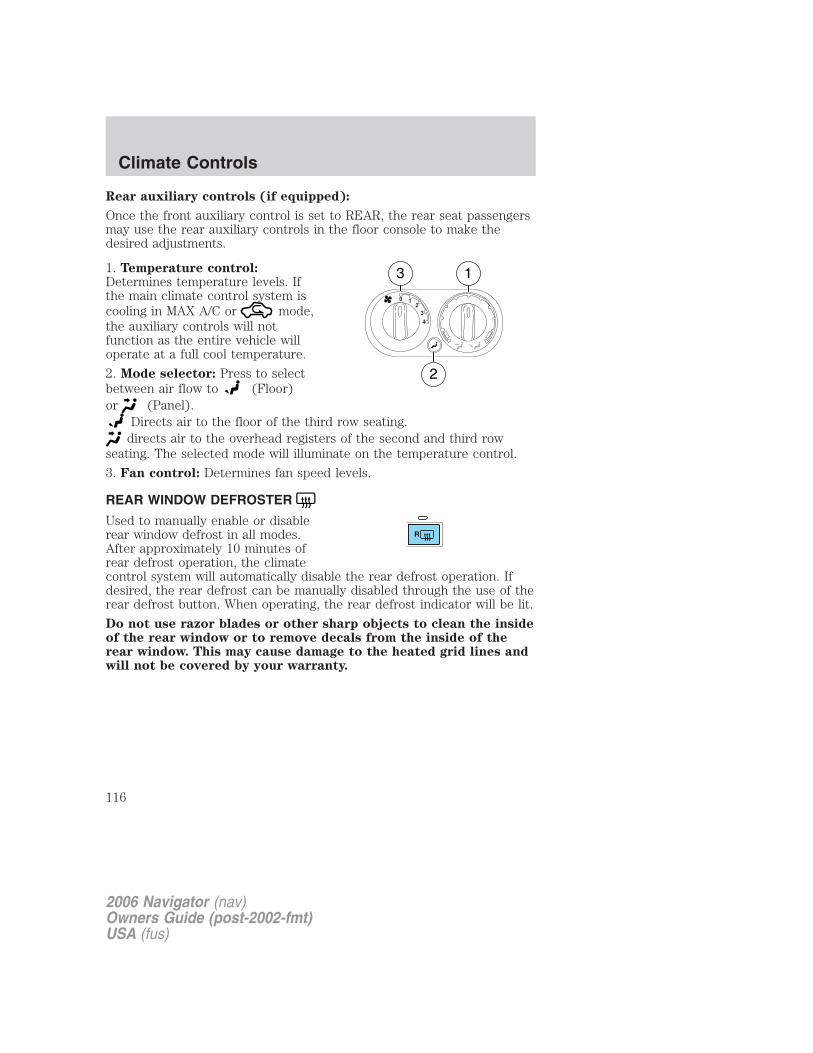
Rear auxiliary controls (if equipped):
Once the front auxiliary control is set to REAR, the rear seat passengersmay use the rear auxiliary controls in the floor console to make thedesired adjustments.
1. Temperature control:Determines temperature levels. Ifthe main climate control system iscooling in MAX A/C or mode,the auxiliary controls will notfunction as the entire vehicle willoperate at a full cool temperature.
2. Mode selector: Press to selectbetween air flow to (Floor)or (Panel).
Directs air to the floor of the third row seating.directs air to the overhead registers of the second and third row
seating. The selected mode will illuminate on the temperature control.
3. Fan control: Determines fan speed levels.
REAR WINDOW DEFROSTER
Used to manually enable or disablerear window defrost in all modes.After approximately 10 minutes ofrear defrost operation, the climatecontrol system will automatically disable the rear defrost operation. Ifdesired, the rear defrost can be manually disabled through the use of therear defrost button. When operating, the rear defrost indicator will be lit.
Do not use razor blades or other sharp objects to clean the insideof the rear window or to remove decals from the inside of therear window. This may cause damage to the heated grid lines andwill not be covered by your warranty.
4
32
10
3 1
2
R
2006 Navigator (nav)Owners Guide (post-2002-fmt)USA (fus)
Climate Controls
116
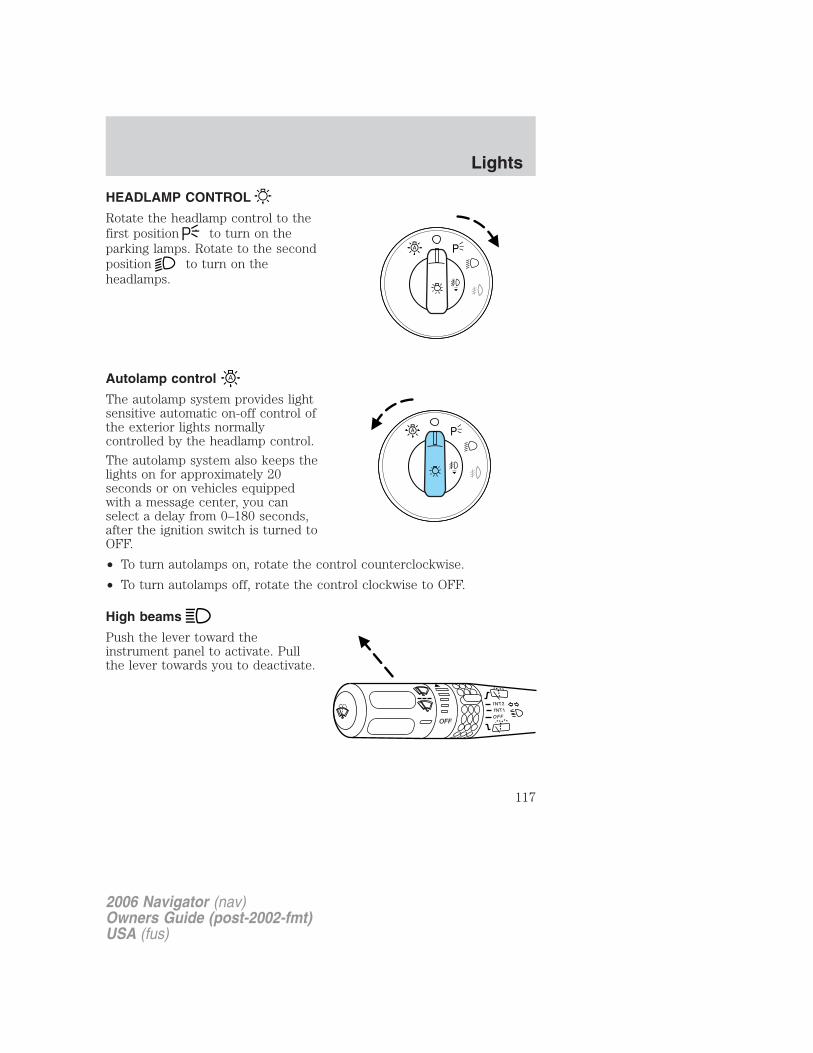
HEADLAMP CONTROL
Rotate the headlamp control to thefirst position to turn on theparking lamps. Rotate to the secondposition to turn on theheadlamps.
Autolamp control
The autolamp system provides lightsensitive automatic on-off control ofthe exterior lights normallycontrolled by the headlamp control.
The autolamp system also keeps thelights on for approximately 20seconds or on vehicles equippedwith a message center, you canselect a delay from 0–180 seconds,after the ignition switch is turned toOFF.
• To turn autolamps on, rotate the control counterclockwise.
• To turn autolamps off, rotate the control clockwise to OFF.
High beams
Push the lever toward theinstrument panel to activate. Pullthe lever towards you to deactivate.
A
A
INT2
OFFOFF
INT1
2006 Navigator (nav)Owners Guide (post-2002-fmt)USA (fus)
Lights
117

Flash to passPull toward you slightly to activateand release to deactivate.
Daytime running lamps (DRL) (if equipped)
Turns the foglamps on at full intensity output. To activate:
• the ignition must be in the ON position and
• the headlamp control must be in the OFF or Parking lamps position.
Always remember to turn on your headlamps at dusk or duringinclement weather. The Daytime Running Lamp (DRL) system
does not activate the tail lamps and generally may not provideadequate lighting during these conditions. Failure to activate yourheadlamps under these conditions may result in a collision.
Foglamp control
The headlamp control also operatesthe foglamps. The foglamps can beturned on when the headlampcontrol is in the , orpositions and the high beams arenot turned on.
Pull headlamp control towards youto turn foglamps on. The foglampindicator light will illuminate.
INT2
OFFOFF
INT1
2006 Navigator (nav)Owners Guide (post-2002-fmt)USA (fus)
Lights
118
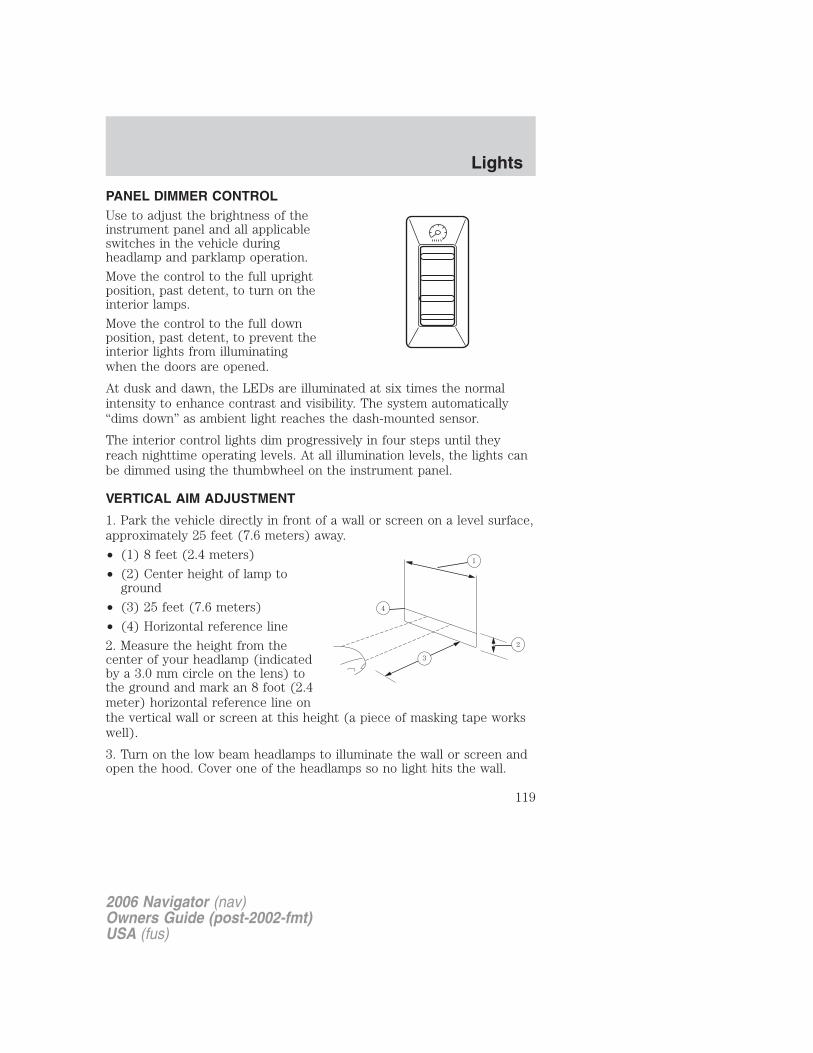
PANEL DIMMER CONTROLUse to adjust the brightness of theinstrument panel and all applicableswitches in the vehicle duringheadlamp and parklamp operation.
Move the control to the full uprightposition, past detent, to turn on theinterior lamps.
Move the control to the full downposition, past detent, to prevent theinterior lights from illuminatingwhen the doors are opened.
At dusk and dawn, the LEDs are illuminated at six times the normalintensity to enhance contrast and visibility. The system automatically“dims down” as ambient light reaches the dash-mounted sensor.
The interior control lights dim progressively in four steps until theyreach nighttime operating levels. At all illumination levels, the lights canbe dimmed using the thumbwheel on the instrument panel.
VERTICAL AIM ADJUSTMENT
1. Park the vehicle directly in front of a wall or screen on a level surface,approximately 25 feet (7.6 meters) away.
• (1) 8 feet (2.4 meters)
• (2) Center height of lamp toground
• (3) 25 feet (7.6 meters)
• (4) Horizontal reference line
2. Measure the height from thecenter of your headlamp (indicatedby a 3.0 mm circle on the lens) tothe ground and mark an 8 foot (2.4meter) horizontal reference line onthe vertical wall or screen at this height (a piece of masking tape workswell).
3. Turn on the low beam headlamps to illuminate the wall or screen andopen the hood. Cover one of the headlamps so no light hits the wall.
2006 Navigator (nav)Owners Guide (post-2002-fmt)USA (fus)
Lights
119
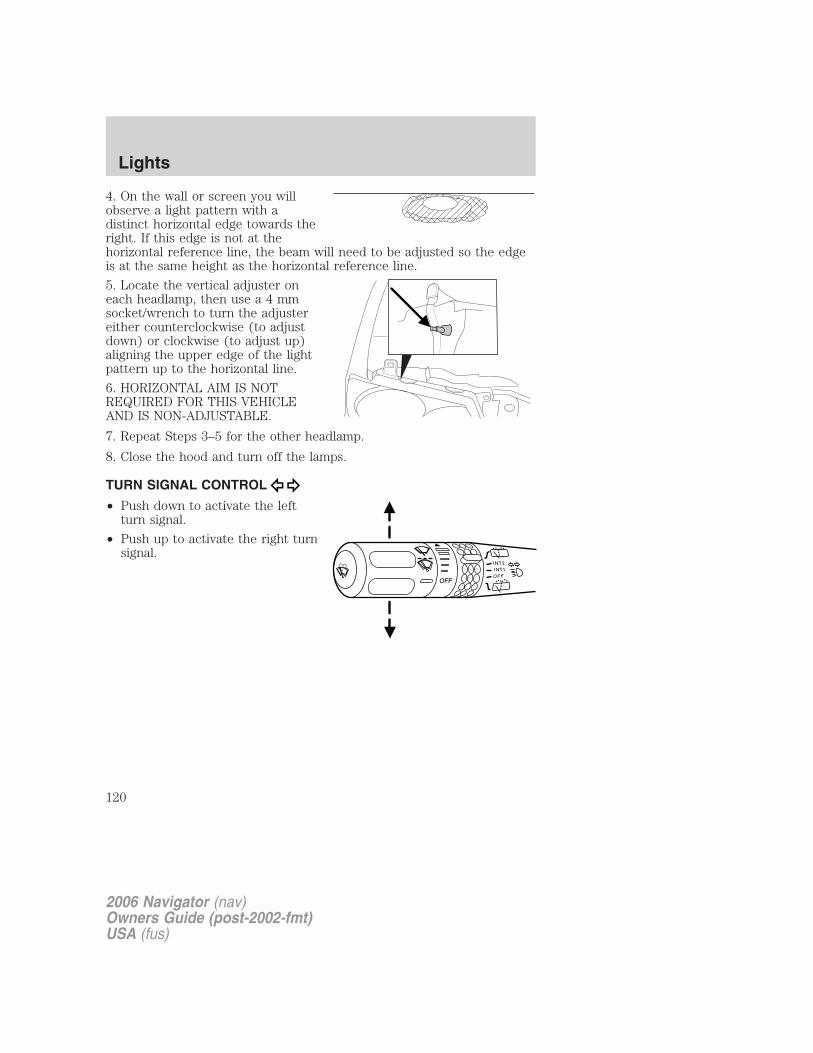
4. On the wall or screen you willobserve a light pattern with adistinct horizontal edge towards theright. If this edge is not at thehorizontal reference line, the beam will need to be adjusted so the edgeis at the same height as the horizontal reference line.
5. Locate the vertical adjuster oneach headlamp, then use a 4 mmsocket/wrench to turn the adjustereither counterclockwise (to adjustdown) or clockwise (to adjust up)aligning the upper edge of the lightpattern up to the horizontal line.
6. HORIZONTAL AIM IS NOTREQUIRED FOR THIS VEHICLEAND IS NON-ADJUSTABLE.
7. Repeat Steps 3–5 for the other headlamp.
8. Close the hood and turn off the lamps.
TURN SIGNAL CONTROL
• Push down to activate the leftturn signal.
• Push up to activate the right turnsignal.
INT2
OFFOFF
INT1
2006 Navigator (nav)Owners Guide (post-2002-fmt)USA (fus)
Lights
120

INTERIOR LAMPS
Front row map lampsTo turn on the map lamps, press therear edge of the lamp.
Rear cargo lamp
The dome lamp lights when:
• any door is opened, and theswitch is in the middle position.
• the instrument panel dimmerswitch is rotated up until thecourtesy lamps come on.
• any of the remote entry controlsare pressed and ignition is OFF(and switch is in the middleposition).
With the ignition key in the ACC or ON position, the rear dome lamp canbe turned ON or OFF by sliding the control.
Second row map lampsThe second row map lamps arelocated in the headliner above thesecond row seats.
• Press the controls to activate thelamps.
2006 Navigator (nav)Owners Guide (post-2002-fmt)USA (fus)
Lights
121

BULB REPLACEMENT
Headlamp Condensation
The headlamps are vented to equalize pressure. When moist air entersthe headlamp(s) through the vents, there is a possibility thatcondensation can occur. This condensation is normal and will clearwithin 45 minutes of headlamp operation.
Replacing exterior bulbs
Check the operation of all the bulbs frequently.
Using the right bulbs
Replacement bulbs are specified in the chart below. Headlamp bulbsmust be marked with an authorized “D.O.T.” to assure lamp performance,light brightness and pattern and safe visibility. The correct bulbs will notdamage the lamp assembly or void the lamp assembly warranty and willprovide quality bulb burn time.
Function Number of bulbs Trade number
Headlamps(low-beams)
2 9006
Headlamps (hi-beam) 2 9005Front park/turn lamps 2 3157 AK (amber)Front sidemarker 2 194 AK (amber)Foglamps 2 800Rear cargo lamp 1 578Front row map lamps 2 5792nd row reading lamp 1 578Rear cargo lamp 1 578Turn/tail/brake lamps 2 3157K or 4157KApproach lamps 2 906Mirror turn signallamps
2 906 (amber)
Liftgate lamp 2 916Backup lamp 2 3157KLicense lamp 2 168
2006 Navigator (nav)Owners Guide (post-2002-fmt)USA (fus)
Lights
122
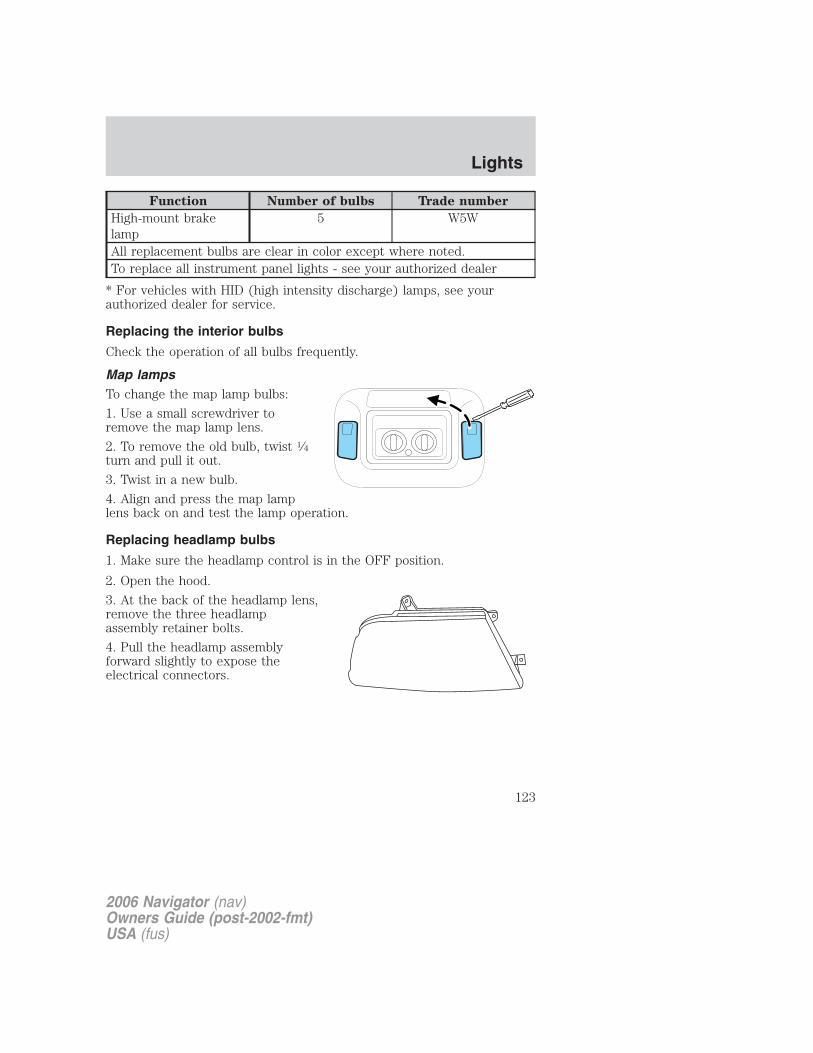
Function Number of bulbs Trade number
High-mount brakelamp
5 W5W
All replacement bulbs are clear in color except where noted.To replace all instrument panel lights - see your authorized dealer
* For vehicles with HID (high intensity discharge) lamps, see yourauthorized dealer for service.
Replacing the interior bulbs
Check the operation of all bulbs frequently.
Map lampsTo change the map lamp bulbs:
1. Use a small screwdriver toremove the map lamp lens.
2. To remove the old bulb, twist 1⁄4turn and pull it out.
3. Twist in a new bulb.
4. Align and press the map lamplens back on and test the lamp operation.
Replacing headlamp bulbs
1. Make sure the headlamp control is in the OFF position.
2. Open the hood.
3. At the back of the headlamp lens,remove the three headlampassembly retainer bolts.
4. Pull the headlamp assemblyforward slightly to expose theelectrical connectors.
2006 Navigator (nav)Owners Guide (post-2002-fmt)USA (fus)
Lights
123
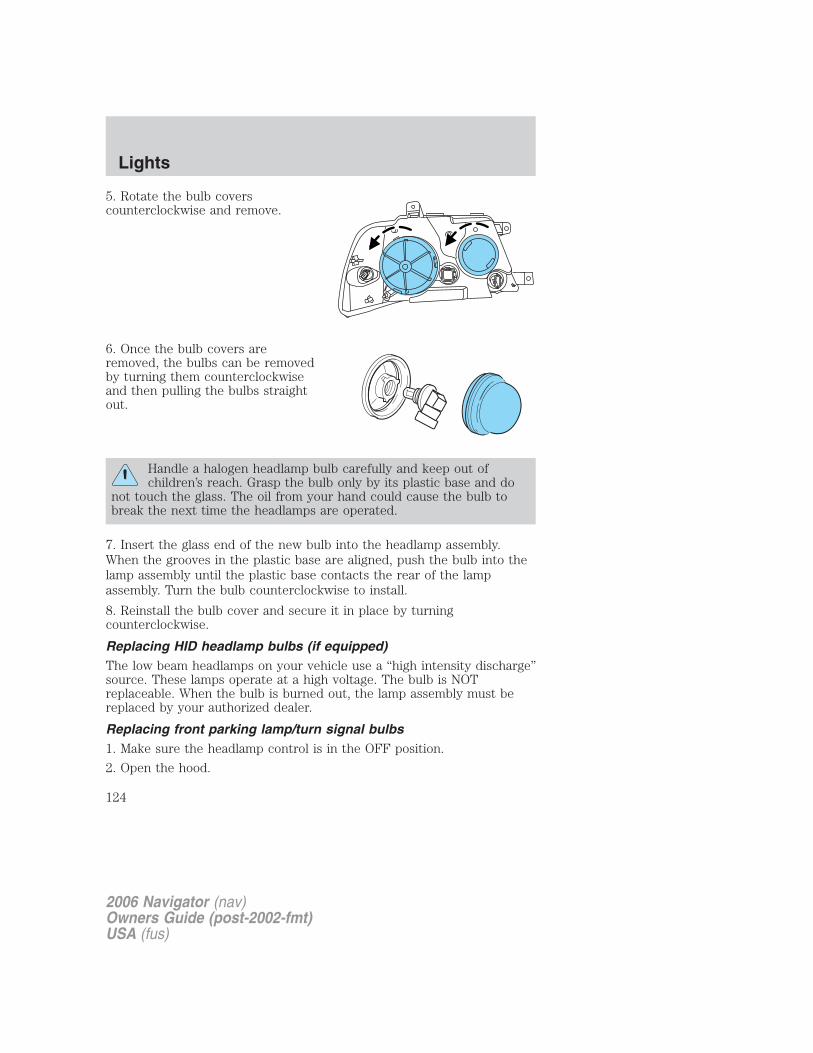
5. Rotate the bulb coverscounterclockwise and remove.
6. Once the bulb covers areremoved, the bulbs can be removedby turning them counterclockwiseand then pulling the bulbs straightout.
Handle a halogen headlamp bulb carefully and keep out ofchildren’s reach. Grasp the bulb only by its plastic base and do
not touch the glass. The oil from your hand could cause the bulb tobreak the next time the headlamps are operated.
7. Insert the glass end of the new bulb into the headlamp assembly.When the grooves in the plastic base are aligned, push the bulb into thelamp assembly until the plastic base contacts the rear of the lampassembly. Turn the bulb counterclockwise to install.
8. Reinstall the bulb cover and secure it in place by turningcounterclockwise.
Replacing HID headlamp bulbs (if equipped)The low beam headlamps on your vehicle use a “high intensity discharge”source. These lamps operate at a high voltage. The bulb is NOTreplaceable. When the bulb is burned out, the lamp assembly must bereplaced by your authorized dealer.
Replacing front parking lamp/turn signal bulbs1. Make sure the headlamp control is in the OFF position.
2. Open the hood.
2006 Navigator (nav)Owners Guide (post-2002-fmt)USA (fus)
Lights
124

3. At the back of the headlamp lens,remove the three headlampassembly bolts.
4. Pull the headlamp assemblyforward slightly to expose theelectrical connectors.
5. Rotate the bulb socketcounterclockwise and remove.
6. Pull the bulb straight out of thesocket and push in the new bulb.
7. To complete installation of theparking lamp/turn signal assembly,follow the removal procedures inreverse order.
Replacing foglamp bulbs
Handle a halogen headlamp bulb carefully and keep out ofchildren’s reach. Grasp the bulb only by its plastic base and do
not touch the glass. The oil from your hand could cause the bulb tobreak the next time the headlamps are operated.
1. Make sure the headlamp switch isin the OFF position and the engineis not running.
2. Disconnect the electricalconnector from the foglamp bulb.
3. Rotate the foglamp bulbcounterclockwise and remove fromthe foglamp (the rear side of thefoglamp is shown).
4. Install the foglamp bulb infoglamp by rotating clockwise.
5. Connect the electrical connectorto the new foglamp bulb.
2006 Navigator (nav)Owners Guide (post-2002-fmt)USA (fus)
Lights
125

Replacing tail lamp bulbs1. Make sure the headlamp switch isin the OFF position.
2. Open the liftgate to expose thelamp assembly screws.
3. Remove the two screws from thelamp assembly.
4. Carefully pry the lamp assemblyaway from the vehicle, by pullingthe assembly directly straight out, toexpose the bulb socket. DO NOTTIP THE LAMP ASSEMBLY SIDEWAYS.
5. Rotate the bulb socket counterclockwise and remove from lampassembly.
6. Pull bulb straight out of socket and push in the new bulb.
7. Install the bulb socket into the lamp assembly and rotate clockwise.
8. Install the lamp assembly on the vehicle and secure with two screws.
Replacing back-up lamp bulbsThe back-up lamp bulbs are located behind the liftgate trim panels.
To change the back-up lamp bulbs:
1. Make sure the headlamp switch isin the OFF position.
2. Remove the liftgate trim panel byremoving the two trim bolts in thegrab handle.
3. Remove the retaining nuts fromthe license plate housing to exposethe bulb socket.
4. Turn the bulb socketcounterclockwise and pull it out ofthe back-up lamp assembly.
5. Pull out the old bulb and replace it by pushing in a new bulb.
6. Push the connector back into the back-up lamp assembly and turn itclockwise to secure it in place.
7. Reinstall the liftgate trim panel.
2006 Navigator (nav)Owners Guide (post-2002-fmt)USA (fus)
Lights
126
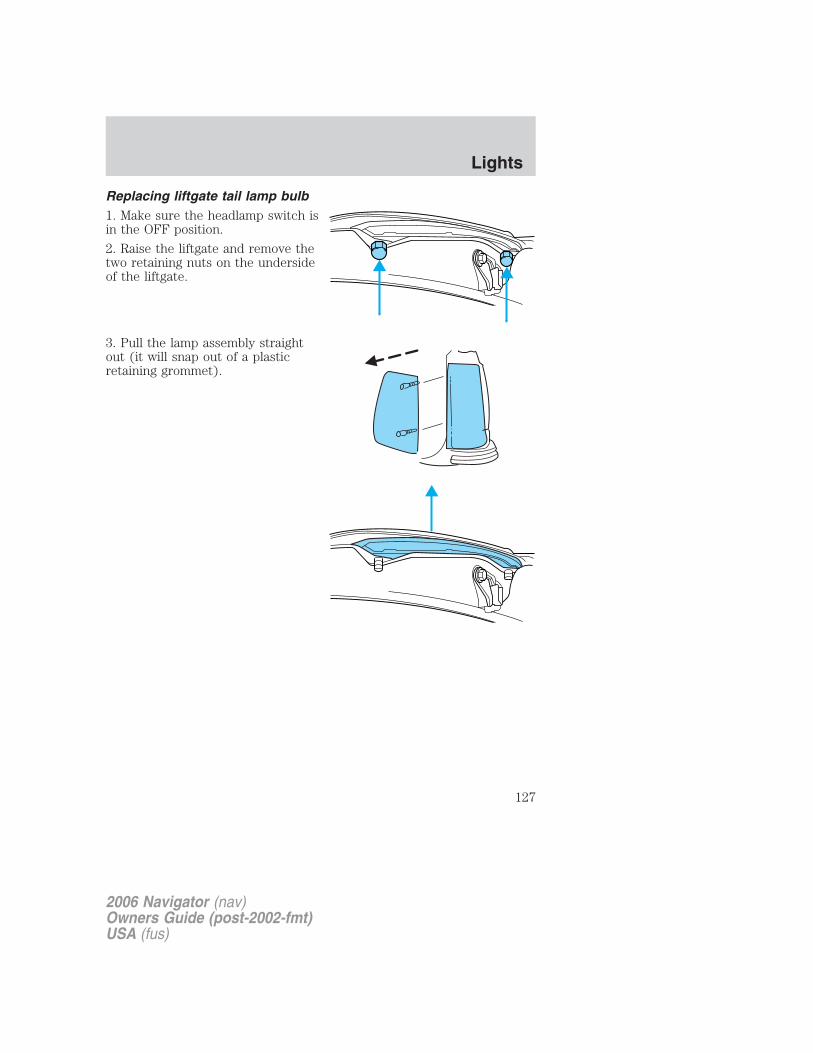
Replacing liftgate tail lamp bulb1. Make sure the headlamp switch isin the OFF position.
2. Raise the liftgate and remove thetwo retaining nuts on the undersideof the liftgate.
3. Pull the lamp assembly straightout (it will snap out of a plasticretaining grommet).
2006 Navigator (nav)Owners Guide (post-2002-fmt)USA (fus)
Lights
127
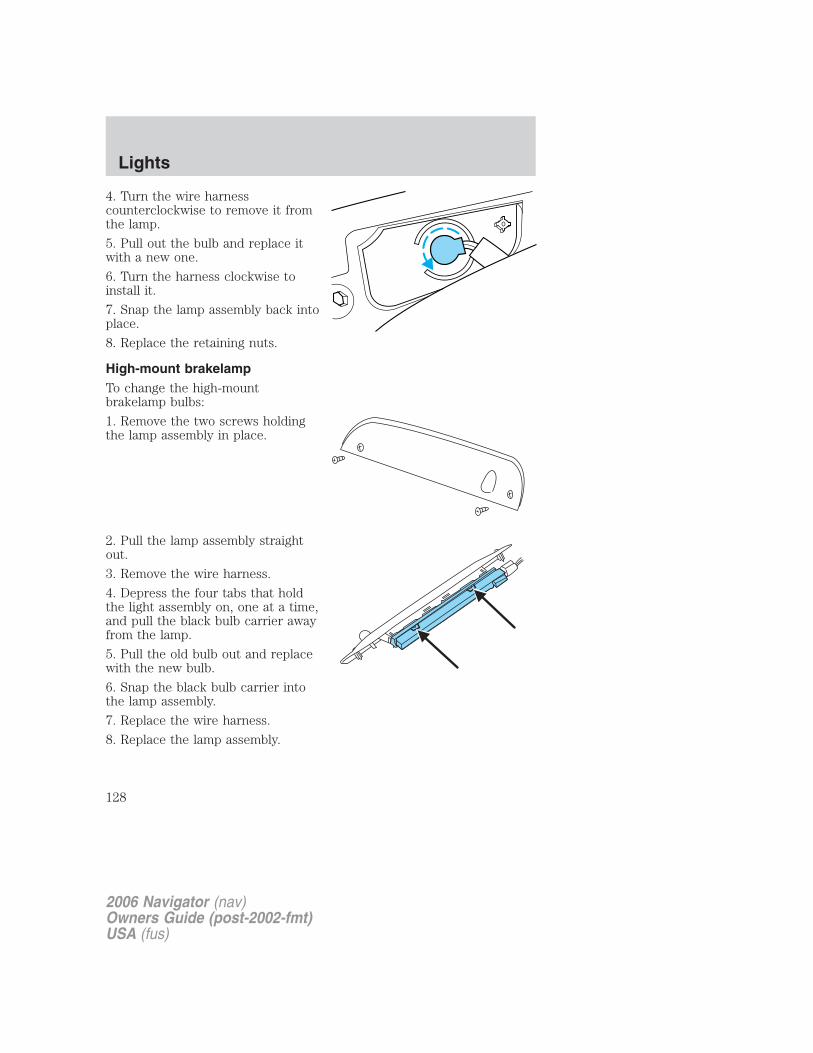
4. Turn the wire harnesscounterclockwise to remove it fromthe lamp.
5. Pull out the bulb and replace itwith a new one.
6. Turn the harness clockwise toinstall it.
7. Snap the lamp assembly back intoplace.
8. Replace the retaining nuts.
High-mount brakelampTo change the high-mountbrakelamp bulbs:
1. Remove the two screws holdingthe lamp assembly in place.
2. Pull the lamp assembly straightout.
3. Remove the wire harness.
4. Depress the four tabs that holdthe light assembly on, one at a time,and pull the black bulb carrier awayfrom the lamp.
5. Pull the old bulb out and replacewith the new bulb.
6. Snap the black bulb carrier intothe lamp assembly.
7. Replace the wire harness.
8. Replace the lamp assembly.
2006 Navigator (nav)Owners Guide (post-2002-fmt)USA (fus)
Lights
128

Replacing license plate lamp bulbThe license plate bulbs are located in the license plate housing assemblyon the liftgate. To change the license plate bulbs:
1. Make sure the headlamp switch isin the OFF position.
2. Remove the license lamp screwfrom the assembly.
3. Pull the lamp down and twist thebulb socket counterclockwise.Remove the bulb socket from thelamp.
4. Pull out the old bulb and push inthe new bulb.
5. Install the bulb socket in the lamp assembly by turning it clockwise.
6. Install the lamp assembly and secure it with the retaining screw.
Approach lamp/mirror turn signal bulb removal (if equipped)To change the bulbs:
1. Make sure the headlamp switch isin the OFF position and then foldthe mirror forward.
2. Remove the torx screw on thebottom of the turn signal lens usinga T-10 torx driver.
3. Pull the turn signal lens down toremove it from the mirror assembly.
4. Disconnect the bulb assemblyfrom the lens.
5. Remove and replace the bulb.
6. Reverse the order to reassemble lamp and lens.
2006 Navigator (nav)Owners Guide (post-2002-fmt)USA (fus)
Lights
129
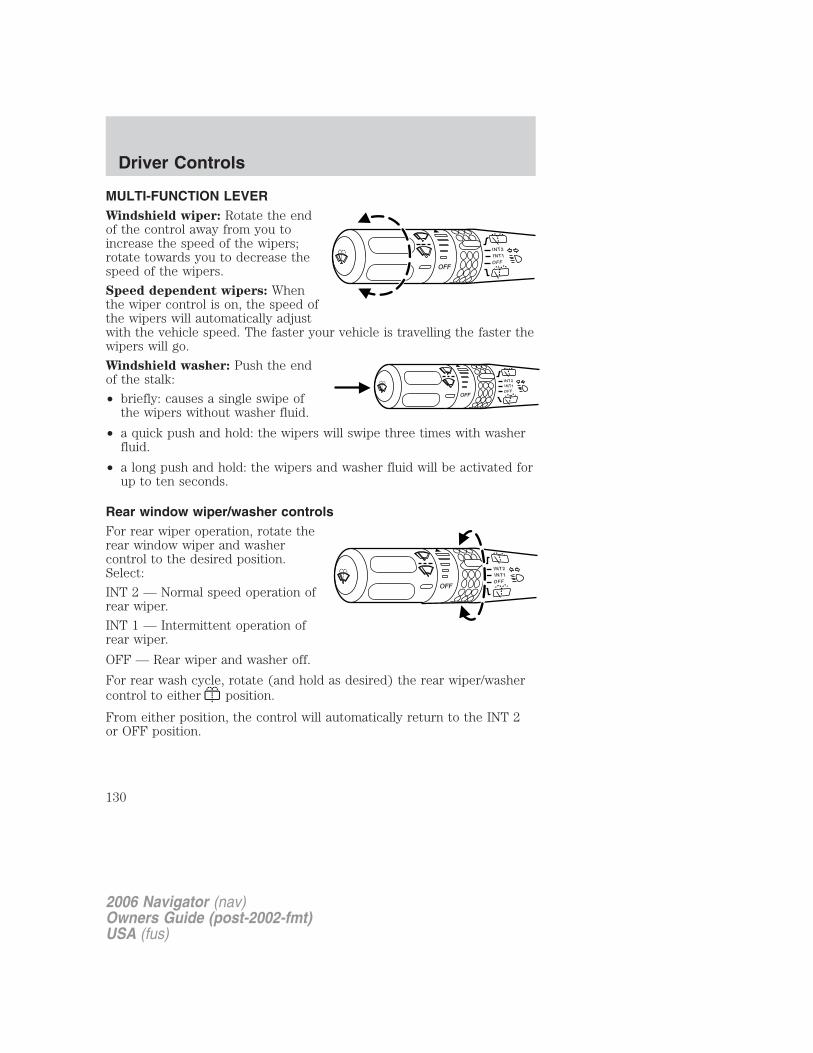
MULTI-FUNCTION LEVERWindshield wiper: Rotate the endof the control away from you toincrease the speed of the wipers;rotate towards you to decrease thespeed of the wipers.
Speed dependent wipers: Whenthe wiper control is on, the speed ofthe wipers will automatically adjustwith the vehicle speed. The faster your vehicle is travelling the faster thewipers will go.
Windshield washer: Push the endof the stalk:
• briefly: causes a single swipe ofthe wipers without washer fluid.
• a quick push and hold: the wipers will swipe three times with washerfluid.
• a long push and hold: the wipers and washer fluid will be activated forup to ten seconds.
Rear window wiper/washer controlsFor rear wiper operation, rotate therear window wiper and washercontrol to the desired position.Select:
INT 2 — Normal speed operation ofrear wiper.
INT 1 — Intermittent operation ofrear wiper.
OFF — Rear wiper and washer off.
For rear wash cycle, rotate (and hold as desired) the rear wiper/washercontrol to either position.
From either position, the control will automatically return to the INT 2or OFF position.
INT2
OFFOFF
INT1
INT1INT2
OFFOFF
INT2
OFFOFF
INT1
2006 Navigator (nav)Owners Guide (post-2002-fmt)USA (fus)
Driver Controls
130

TILT STEERINGPush the lever down to unlock thesteering column. While the lever isin the down position, tilt thesteering column to the desiredposition.
While holding the steering wheel,pull the lever up to its originalposition to lock the steering column.
Never adjust the steeringcolumn when the vehicle is
moving.
ILLUMINATED VISOR MIRROR (IF EQUIPPED)Lift the mirror cover to turn on thevisor mirror lamp.
Slide on rod feature (ifequipped)
Rotate the visor towards the sidewindow and extend it rearward foradditional sunlight coverage.
Note: To stow the visor back intothe headliner, visor must beretracted before moving it backtowards the windshield.
2006 Navigator (nav)Owners Guide (post-2002-fmt)USA (fus)
Driver Controls
131
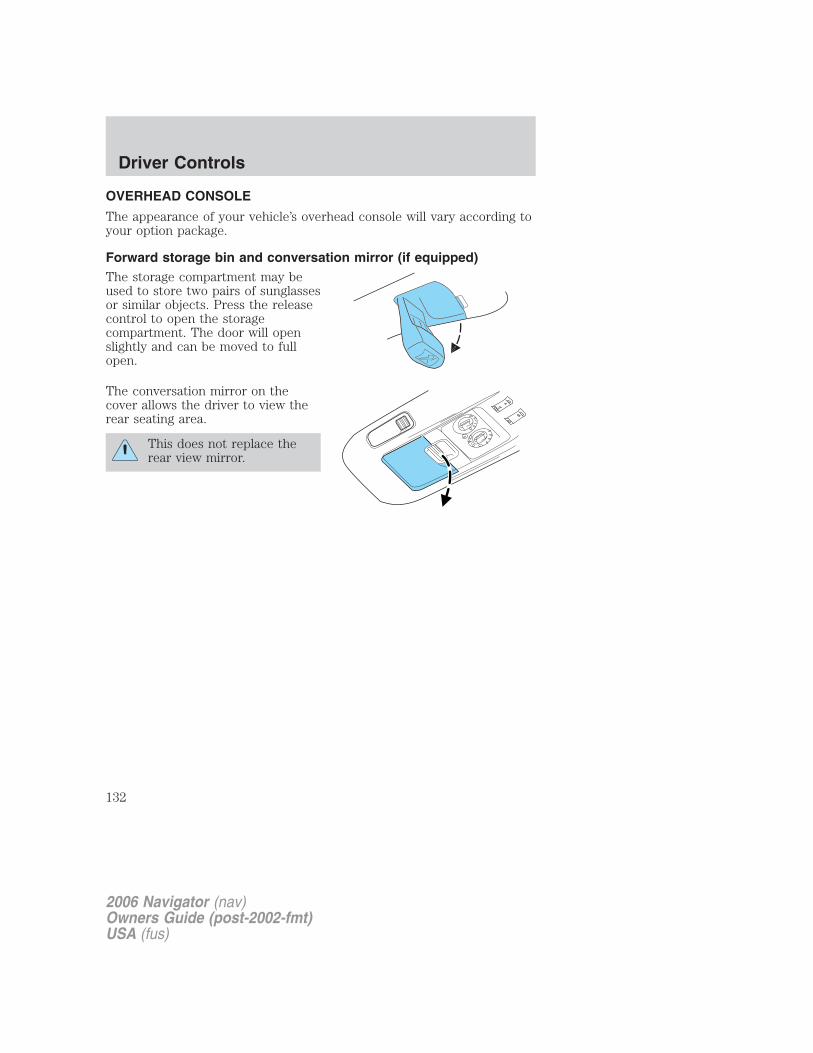
OVERHEAD CONSOLE
The appearance of your vehicle’s overhead console will vary according toyour option package.
Forward storage bin and conversation mirror (if equipped)The storage compartment may beused to store two pairs of sunglassesor similar objects. Press the releasecontrol to open the storagecompartment. The door will openslightly and can be moved to fullopen.
The conversation mirror on thecover allows the driver to view therear seating area.
This does not replace therear view mirror.
2006 Navigator (nav)Owners Guide (post-2002-fmt)USA (fus)
Driver Controls
132

Power quarter rear windows• Without a moon roof
• With a moon roof
Press the portion of the VENT control to open the power rearquarter windows.
Press the portion of the VENT control to close the power rearquarter windows.
Do not leave children unattended in the vehicle and do not letchildren play with the power rear quarter windows. They may
seriously injure themselves.
When closing the power rear quarter windows, you should verifythat it is free of obstructions and ensure that children and/or
pets are not in the proximity of the window opening.
ROOF
VENT
LIFTGATE
2006 Navigator (nav)Owners Guide (post-2002-fmt)USA (fus)
Driver Controls
133
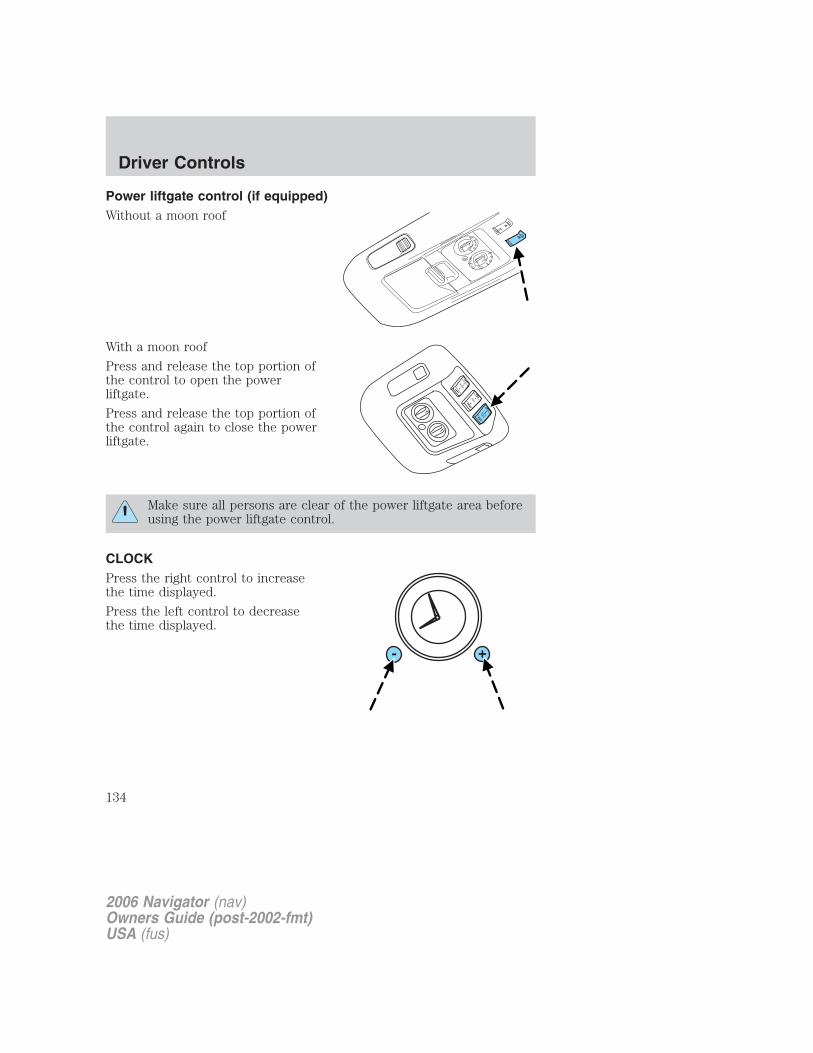
Power liftgate control (if equipped)Without a moon roof
With a moon roof
Press and release the top portion ofthe control to open the powerliftgate.
Press and release the top portion ofthe control again to close the powerliftgate.
Make sure all persons are clear of the power liftgate area beforeusing the power liftgate control.
CLOCKPress the right control to increasethe time displayed.
Press the left control to decreasethe time displayed.
ROOF
VENT
LIFTGATE
2006 Navigator (nav)Owners Guide (post-2002-fmt)USA (fus)
Driver Controls
134
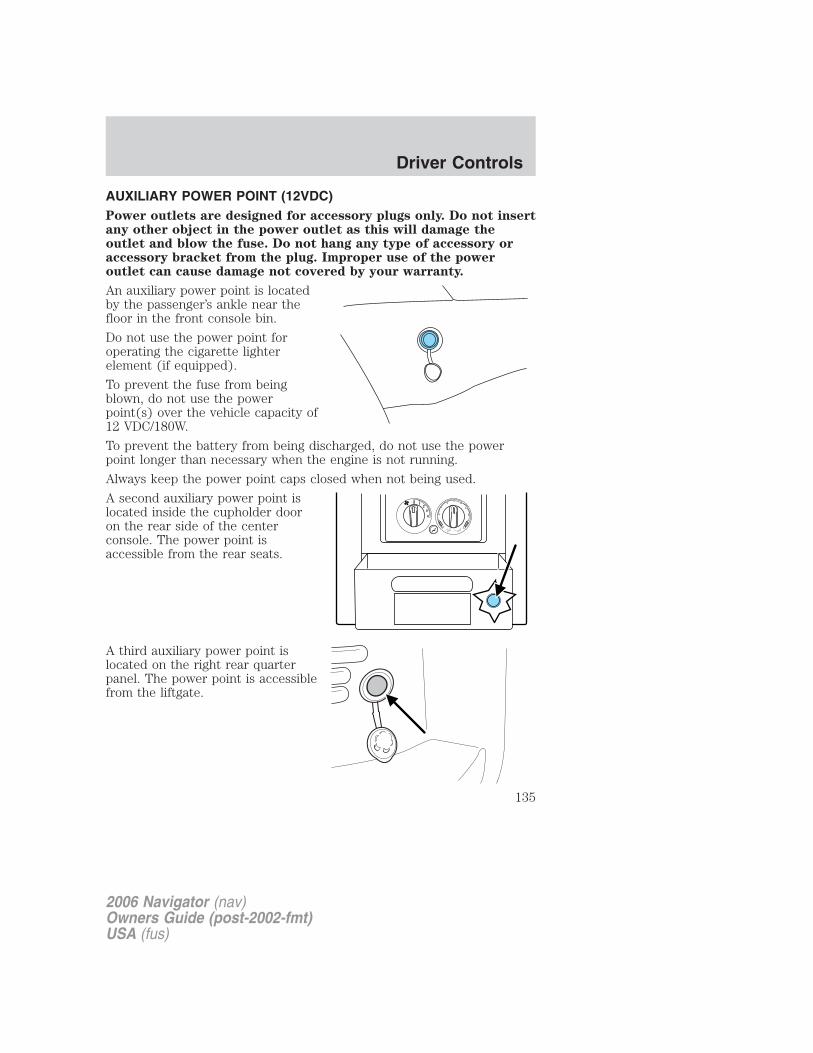
AUXILIARY POWER POINT (12VDC)Power outlets are designed for accessory plugs only. Do not insertany other object in the power outlet as this will damage theoutlet and blow the fuse. Do not hang any type of accessory oraccessory bracket from the plug. Improper use of the poweroutlet can cause damage not covered by your warranty.
An auxiliary power point is locatedby the passenger’s ankle near thefloor in the front console bin.
Do not use the power point foroperating the cigarette lighterelement (if equipped).
To prevent the fuse from beingblown, do not use the powerpoint(s) over the vehicle capacity of12 VDC/180W.
To prevent the battery from being discharged, do not use the powerpoint longer than necessary when the engine is not running.
Always keep the power point caps closed when not being used.
A second auxiliary power point islocated inside the cupholder dooron the rear side of the centerconsole. The power point isaccessible from the rear seats.
A third auxiliary power point islocated on the right rear quarterpanel. The power point is accessiblefrom the liftgate.
4
32
10
2006 Navigator (nav)Owners Guide (post-2002-fmt)USA (fus)
Driver Controls
135
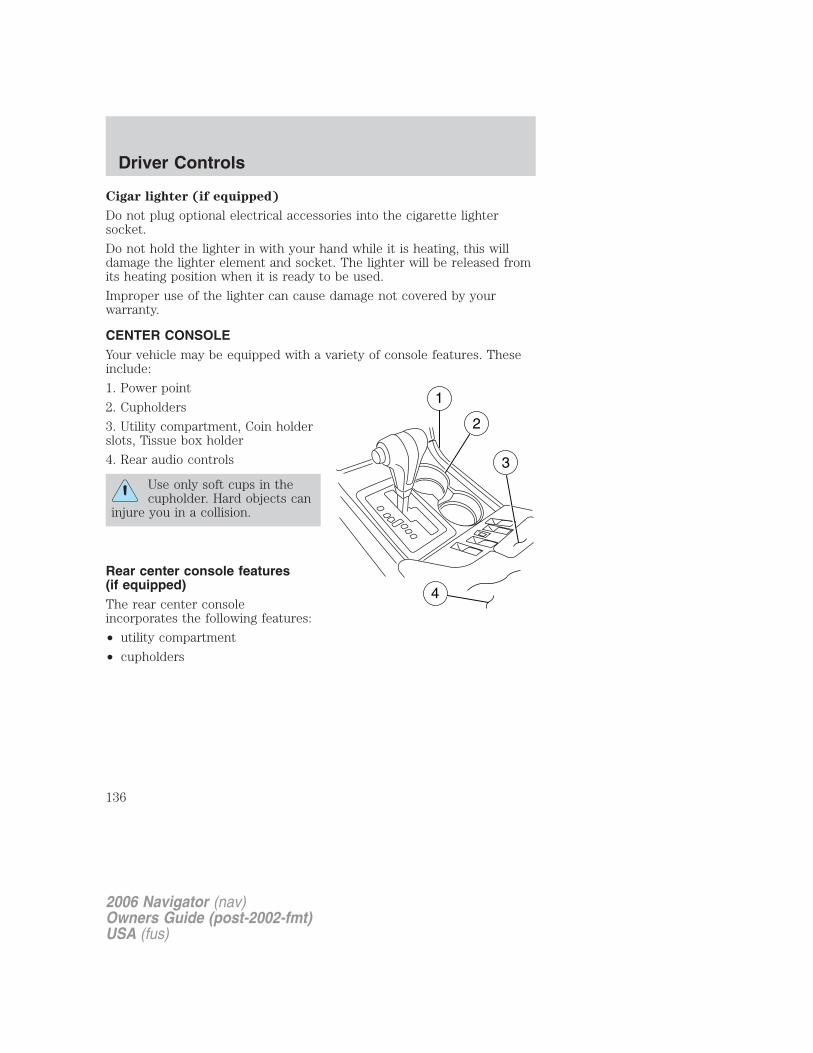
Cigar lighter (if equipped)
Do not plug optional electrical accessories into the cigarette lightersocket.
Do not hold the lighter in with your hand while it is heating, this willdamage the lighter element and socket. The lighter will be released fromits heating position when it is ready to be used.
Improper use of the lighter can cause damage not covered by yourwarranty.
CENTER CONSOLEYour vehicle may be equipped with a variety of console features. Theseinclude:
1. Power point
2. Cupholders
3. Utility compartment, Coin holderslots, Tissue box holder
4. Rear audio controls
Use only soft cups in thecupholder. Hard objects can
injure you in a collision.
Rear center console features(if equipped)The rear center consoleincorporates the following features:
• utility compartment
• cupholders
2006 Navigator (nav)Owners Guide (post-2002-fmt)USA (fus)
Driver Controls
136

POWER WINDOWS
Do not leave children unattended in the vehicle and do not letchildren play with the power windows. They may seriously injure
themselves.
When closing the power windows, you should verify they are freeof obstructions and ensure that children and/or pets are not in
the proximity of the window openings.
The power window switches locatedon the center console are calledpush-pull switches.
A. Drivers side
B. Window lock
C. Front passenger side
D. Left and right rear passenger
The following views are the driver’s side switches:
Normal operation
• Push down (to the first detent)and hold the top portion of theswitch to open the window.
2006 Navigator (nav)Owners Guide (post-2002-fmt)USA (fus)
Driver Controls
137

• Pull up (to the first detent) andhold the top portion of the switchto close the window.
The following view is the powerwindow switch on the rear door trimpanels.
• Press and hold the top or bottomof the rear rocker switches toopen or close.
One touch up or down (if equipped)
This feature is present on the driver’s window only.
To operate ONE TOUCH DOWN:
• Press the switch completely downto the second detent and releasequickly. The driver’s window willopen fully. Momentarily press theswitch to any position to stop thewindow operation.
If the switch is pressed and held tothe normal close or ONE TOUCHUP position during a ONE TOUCHDOWN event, the window will stop. If, after 1/2 second the switch is stillheld, the window will perform a normal close or ONE TOUCH UP.
2006 Navigator (nav)Owners Guide (post-2002-fmt)USA (fus)
Driver Controls
138
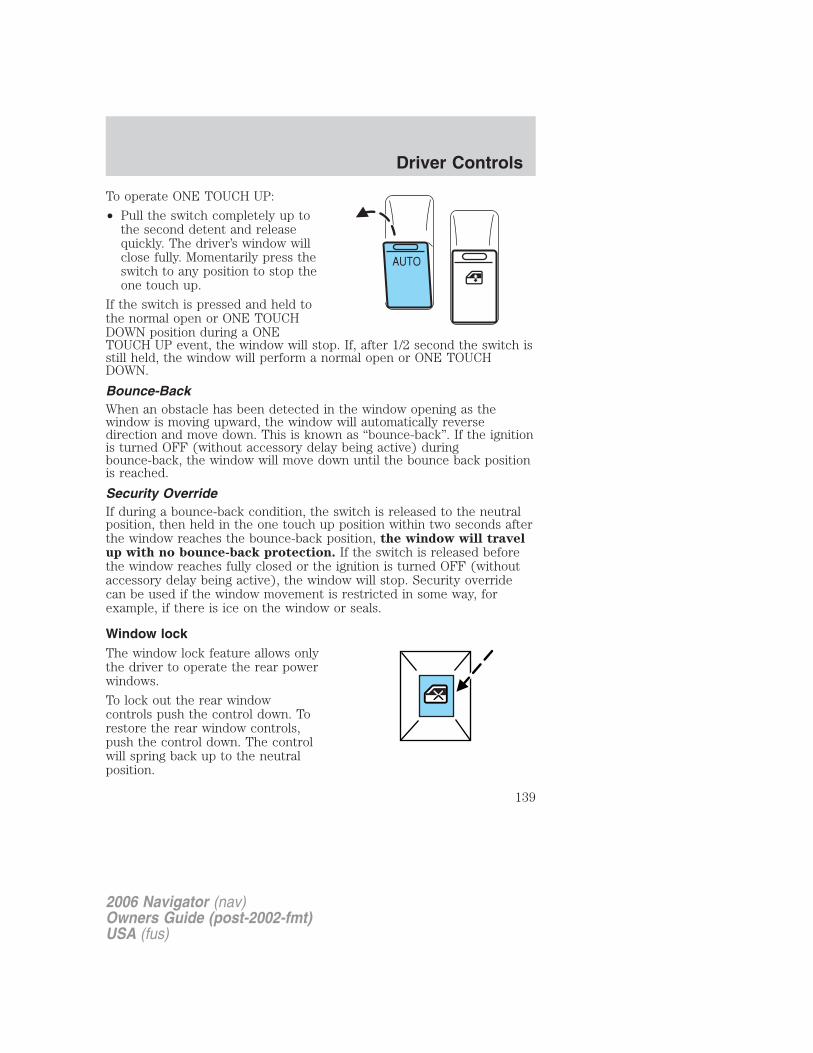
To operate ONE TOUCH UP:
• Pull the switch completely up tothe second detent and releasequickly. The driver’s window willclose fully. Momentarily press theswitch to any position to stop theone touch up.
If the switch is pressed and held tothe normal open or ONE TOUCHDOWN position during a ONETOUCH UP event, the window will stop. If, after 1/2 second the switch isstill held, the window will perform a normal open or ONE TOUCHDOWN.
Bounce-BackWhen an obstacle has been detected in the window opening as thewindow is moving upward, the window will automatically reversedirection and move down. This is known as “bounce-back”. If the ignitionis turned OFF (without accessory delay being active) duringbounce-back, the window will move down until the bounce back positionis reached.
Security OverrideIf during a bounce-back condition, the switch is released to the neutralposition, then held in the one touch up position within two seconds afterthe window reaches the bounce-back position, the window will travelup with no bounce-back protection. If the switch is released beforethe window reaches fully closed or the ignition is turned OFF (withoutaccessory delay being active), the window will stop. Security overridecan be used if the window movement is restricted in some way, forexample, if there is ice on the window or seals.
Window lockThe window lock feature allows onlythe driver to operate the rear powerwindows.
To lock out the rear windowcontrols push the control down. Torestore the rear window controls,push the control down. The controlwill spring back up to the neutralposition.
2006 Navigator (nav)Owners Guide (post-2002-fmt)USA (fus)
Driver Controls
139
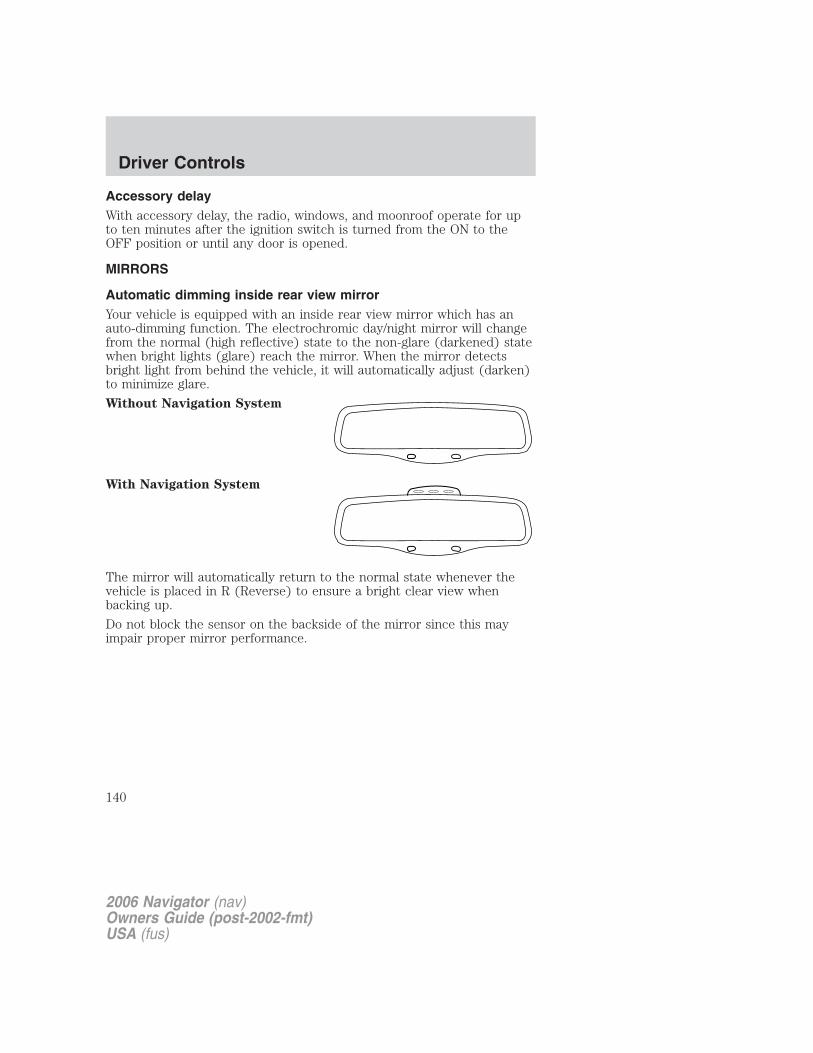
Accessory delayWith accessory delay, the radio, windows, and moonroof operate for upto ten minutes after the ignition switch is turned from the ON to theOFF position or until any door is opened.
MIRRORS
Automatic dimming inside rear view mirrorYour vehicle is equipped with an inside rear view mirror which has anauto-dimming function. The electrochromic day/night mirror will changefrom the normal (high reflective) state to the non-glare (darkened) statewhen bright lights (glare) reach the mirror. When the mirror detectsbright light from behind the vehicle, it will automatically adjust (darken)to minimize glare.
Without Navigation System
With Navigation System
The mirror will automatically return to the normal state whenever thevehicle is placed in R (Reverse) to ensure a bright clear view whenbacking up.
Do not block the sensor on the backside of the mirror since this mayimpair proper mirror performance.
2006 Navigator (nav)Owners Guide (post-2002-fmt)USA (fus)
Driver Controls
140

POWER SIDE VIEW MIRRORS
The ignition can be in any position to adjust the power side view mirrors.
To adjust your mirrors:
1. Select to adjust the leftmirror or to adjust the rightmirror.
2. Move the center control in thedirection you wish to tilt the mirror.
3. Return to the center position todisable adjust function.
Power fold mirrorsPress the control to retract orextend the outside rear viewmirrors.
If the mirrors are pushed-in orpulled-out manually, press thecontrol to retract the outside rearview mirrors and wait a short period(8 seconds), then deploy themirrors as desired.
Use caution in certain instances (i.e. automatic car washes) in order toavoid damage to the mirrors.
Heated outside mirrors
Both mirrors are heatedautomatically to remove ice, mistand fog when the rear windowdefrost is activated.
Do not remove ice from themirrors with a scraper orattempt to readjust the mirrorglass if it is frozen in place.These actions could causedamage to the glass and mirrors.
2006 Navigator (nav)Owners Guide (post-2002-fmt)USA (fus)
Driver Controls
141
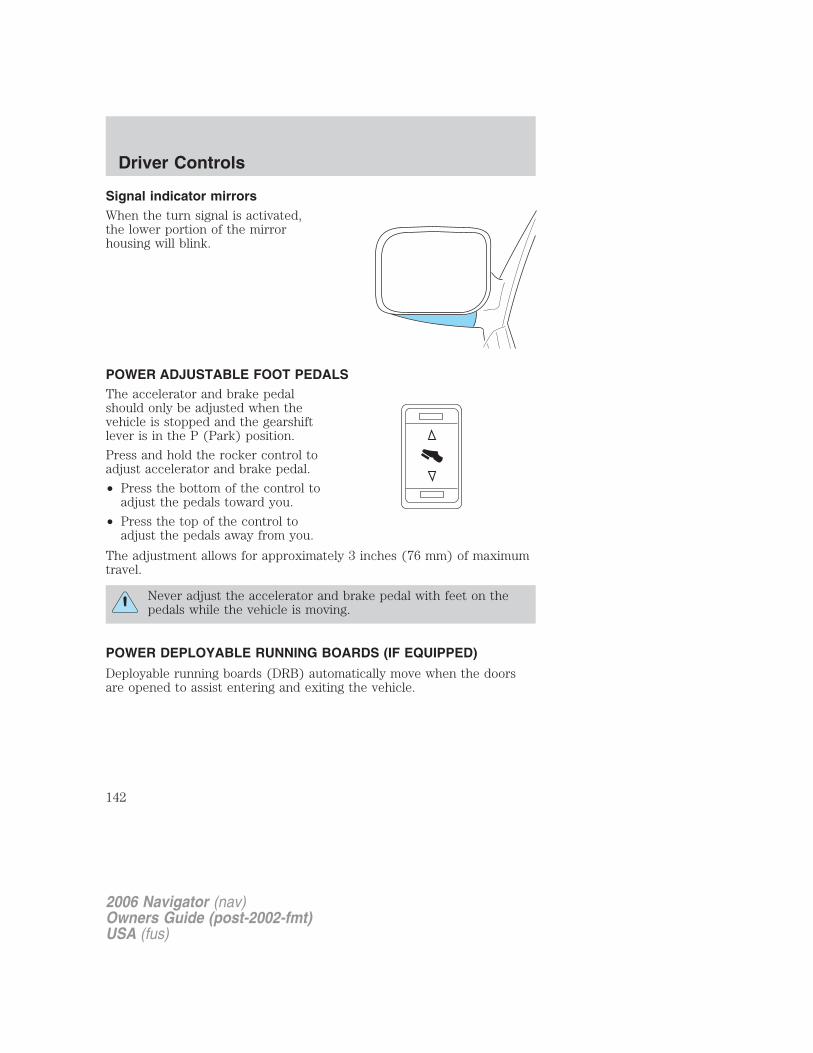
Signal indicator mirrorsWhen the turn signal is activated,the lower portion of the mirrorhousing will blink.
POWER ADJUSTABLE FOOT PEDALSThe accelerator and brake pedalshould only be adjusted when thevehicle is stopped and the gearshiftlever is in the P (Park) position.
Press and hold the rocker control toadjust accelerator and brake pedal.
• Press the bottom of the control toadjust the pedals toward you.
• Press the top of the control toadjust the pedals away from you.
The adjustment allows for approximately 3 inches (76 mm) of maximumtravel.
Never adjust the accelerator and brake pedal with feet on thepedals while the vehicle is moving.
POWER DEPLOYABLE RUNNING BOARDS (IF EQUIPPED)
Deployable running boards (DRB) automatically move when the doorsare opened to assist entering and exiting the vehicle.
2006 Navigator (nav)Owners Guide (post-2002-fmt)USA (fus)
Driver Controls
142

Automatic power deploy:
• The running boards will extendout when the doors are opened.
Automatic power stow:
• The running boards will return tothe stowed position when thedoors are closed.
Manual power deploy:
To manually operate the runningboards, refer to the Message Center in this chapter.• This feature can manually set the running boards in the deployed
position for access to the roof.• When running boards are manually set in the deployed or stowed
position, they will move back to the automatic position when thevehicle speed is greater than 5 mph (7 km).
Enable/disable:To enable/disable the power running board feature, refer to the MessageCenter in this chapter.• When this feature is disabled, the running boards will immediately
move to the stowed position regardless of the position of the doors.
• When this feature is enabled, the running boards will immediatelymove to the correct position based on the position of the doors.
Bounce-back:
• If an object is in the way of the moving running board, the runningboard will automatically bounce back in the reverse direction andmove to the end of travel.
Note: The running boards may operate slower in cooler temperatures. Inadverse conditions, mud, slush, salt, and other road debris may becometrapped in the running board mechanism possibly causing unwantednoise. If this occurs flush the underside of the running boards using ahigh-pressure car wash.
In extreme climates, excessive ice buildup may occur, causingthe running boards not to deploy. Be sure that the running
boards have deployed, and have finished moving before attempting tostep on them. Note: The running boards will resume normal functiononce the blockage is cleared.
2006 Navigator (nav)Owners Guide (post-2002-fmt)USA (fus)
Driver Controls
143
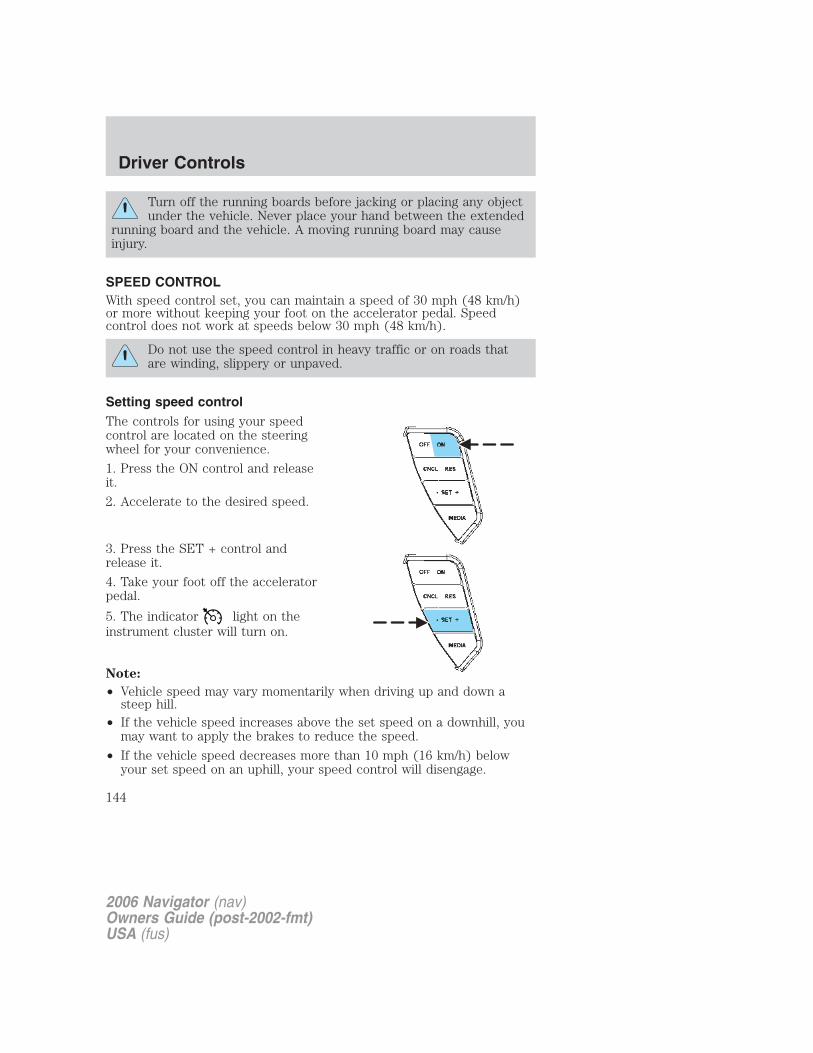
Turn off the running boards before jacking or placing any objectunder the vehicle. Never place your hand between the extended
running board and the vehicle. A moving running board may causeinjury.
SPEED CONTROLWith speed control set, you can maintain a speed of 30 mph (48 km/h)or more without keeping your foot on the accelerator pedal. Speedcontrol does not work at speeds below 30 mph (48 km/h).
Do not use the speed control in heavy traffic or on roads thatare winding, slippery or unpaved.
Setting speed controlThe controls for using your speedcontrol are located on the steeringwheel for your convenience.
1. Press the ON control and releaseit.
2. Accelerate to the desired speed.
3. Press the SET + control andrelease it.
4. Take your foot off the acceleratorpedal.
5. The indicator light on theinstrument cluster will turn on.
Note:
• Vehicle speed may vary momentarily when driving up and down asteep hill.
• If the vehicle speed increases above the set speed on a downhill, youmay want to apply the brakes to reduce the speed.
• If the vehicle speed decreases more than 10 mph (16 km/h) belowyour set speed on an uphill, your speed control will disengage.
2006 Navigator (nav)Owners Guide (post-2002-fmt)USA (fus)
Driver Controls
144
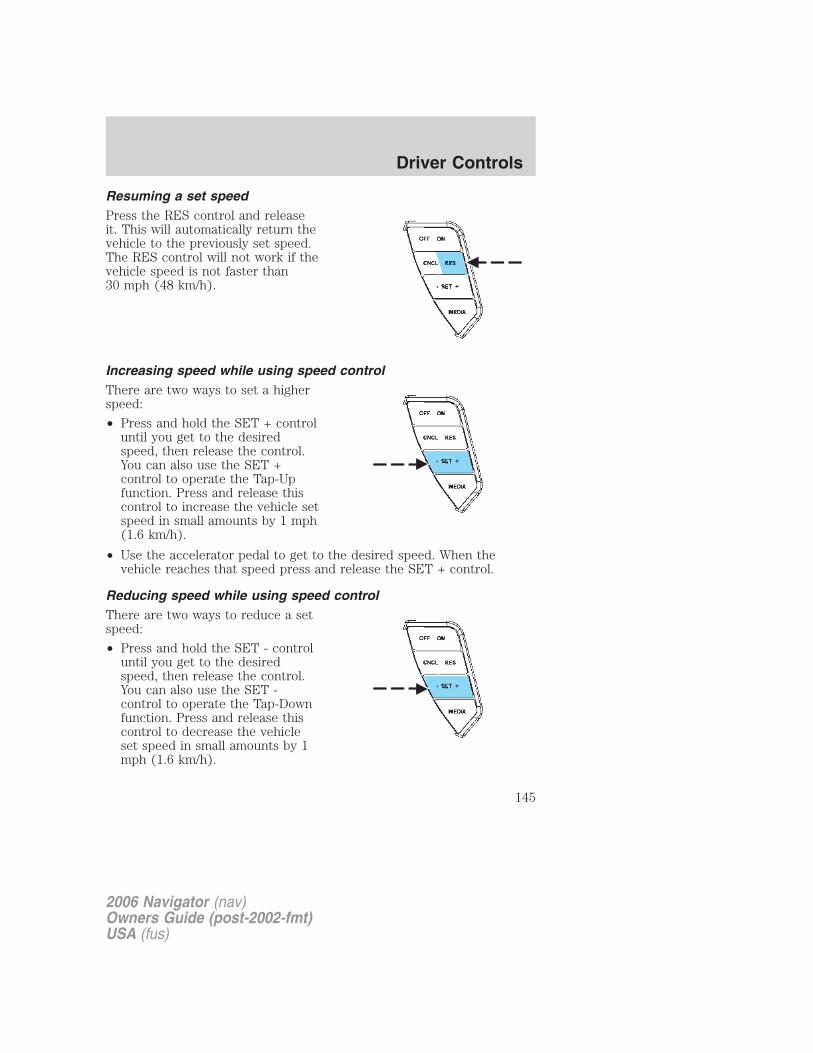
Resuming a set speedPress the RES control and releaseit. This will automatically return thevehicle to the previously set speed.The RES control will not work if thevehicle speed is not faster than30 mph (48 km/h).
Increasing speed while using speed controlThere are two ways to set a higherspeed:
• Press and hold the SET + controluntil you get to the desiredspeed, then release the control.You can also use the SET +control to operate the Tap-Upfunction. Press and release thiscontrol to increase the vehicle setspeed in small amounts by 1 mph(1.6 km/h).
• Use the accelerator pedal to get to the desired speed. When thevehicle reaches that speed press and release the SET + control.
Reducing speed while using speed controlThere are two ways to reduce a setspeed:
• Press and hold the SET - controluntil you get to the desiredspeed, then release the control.You can also use the SET -control to operate the Tap-Downfunction. Press and release thiscontrol to decrease the vehicleset speed in small amounts by 1mph (1.6 km/h).
2006 Navigator (nav)Owners Guide (post-2002-fmt)USA (fus)
Driver Controls
145
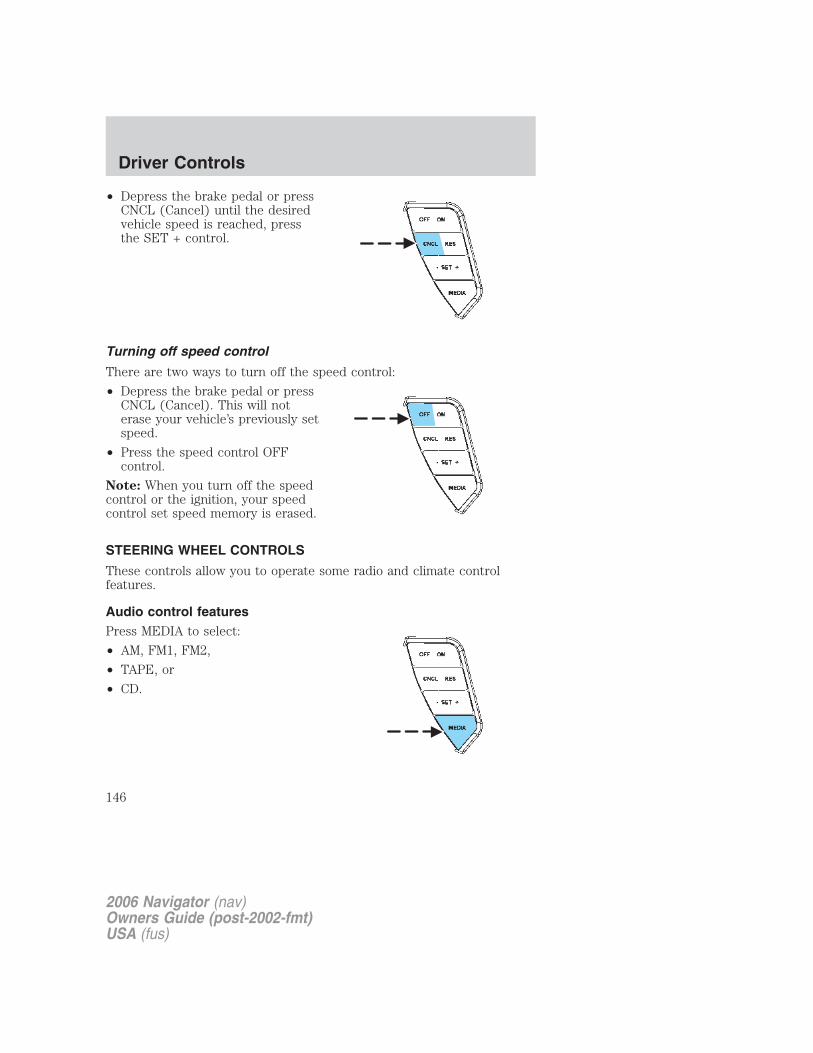
• Depress the brake pedal or pressCNCL (Cancel) until the desiredvehicle speed is reached, pressthe SET + control.
Turning off speed control
There are two ways to turn off the speed control:
• Depress the brake pedal or pressCNCL (Cancel). This will noterase your vehicle’s previously setspeed.
• Press the speed control OFFcontrol.
Note: When you turn off the speedcontrol or the ignition, your speedcontrol set speed memory is erased.
STEERING WHEEL CONTROLS
These controls allow you to operate some radio and climate controlfeatures.
Audio control featuresPress MEDIA to select:
• AM, FM1, FM2,
• TAPE, or
• CD.
2006 Navigator (nav)Owners Guide (post-2002-fmt)USA (fus)
Driver Controls
146

In AM, FM1, or FM2 mode:
• Press MEM to select presetstations within the selected radioband.
In Tape mode:
• Press MEM to select the nextselection on the tape.
In CD mode:
• Press MEM to select the next selection on the CD.
In any mode:
• Press VOL + or − to adjustvolume.
Climate control featuresPress TEMP + or - to adjusttemperature.
Press FAN + or - to adjust fanspeed.
2006 Navigator (nav)Owners Guide (post-2002-fmt)USA (fus)
Driver Controls
147
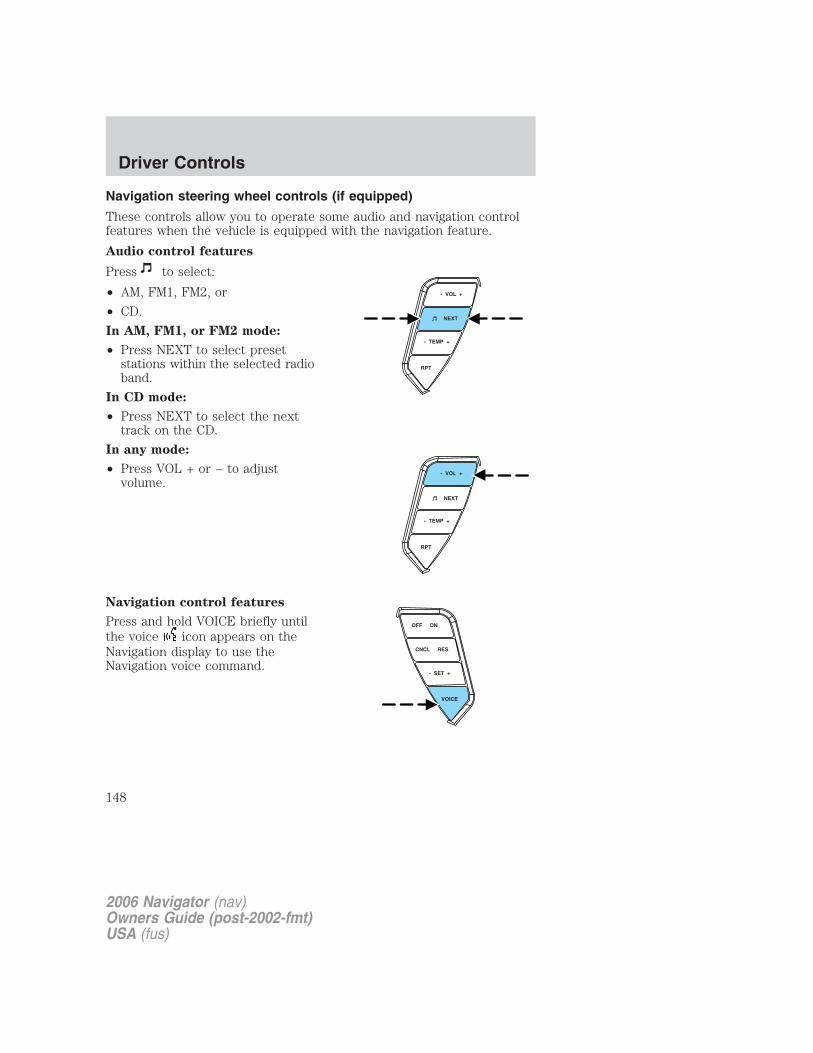
Navigation steering wheel controls (if equipped)
These controls allow you to operate some audio and navigation controlfeatures when the vehicle is equipped with the navigation feature.
Audio control features
Press to select:
• AM, FM1, FM2, or
• CD.
In AM, FM1, or FM2 mode:
• Press NEXT to select presetstations within the selected radioband.
In CD mode:
• Press NEXT to select the nexttrack on the CD.
In any mode:
• Press VOL + or − to adjustvolume.
Navigation control features
Press and hold VOICE briefly untilthe voice icon appears on theNavigation display to use theNavigation voice command.
2006 Navigator (nav)Owners Guide (post-2002-fmt)USA (fus)
Driver Controls
148
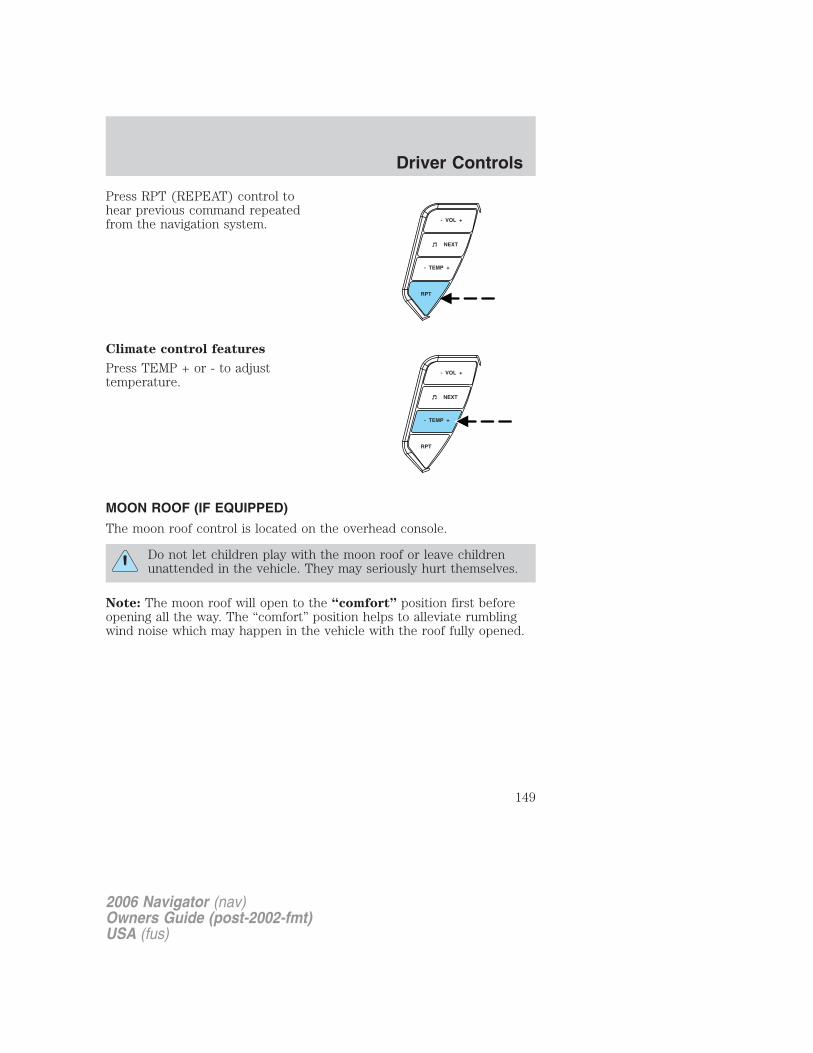
Press RPT (REPEAT) control tohear previous command repeatedfrom the navigation system.
Climate control features
Press TEMP + or - to adjusttemperature.
MOON ROOF (IF EQUIPPED)
The moon roof control is located on the overhead console.
Do not let children play with the moon roof or leave childrenunattended in the vehicle. They may seriously hurt themselves.
Note: The moon roof will open to the “comfort” position first beforeopening all the way. The “comfort” position helps to alleviate rumblingwind noise which may happen in the vehicle with the roof fully opened.
2006 Navigator (nav)Owners Guide (post-2002-fmt)USA (fus)
Driver Controls
149

To open the moon roof: The moonroof is equipped with a one-touchopen feature. Press and releasethe control. The moon roofwill open to the “comfort” position.Press and release the control againto fully open. To stop the one-touchopen feature press either theor control again.
To close the moon roof: Press andhold the control until the glass panel stops at the “comfort” position.Press and hold the control again until the glass stops moving. When fullyclosed, the rear portion of the glass panel will appear higher than thefront portion.
To vent the moon roof: Press and hold the control. The moon
roof must be in the closed position in order to move it into the
vent position. To close, press and hold the control until the glasspanel stops moving.
The moon roof has a built-in sliding shade that can be manually openedor closed when the glass panel is shut. To close the shade, pull it towardthe front of the vehicle.
When closing the moon roof, you should verify that it is free ofobstructions and ensure that children and/or pets are not in the
proximity of the moon roof opening.
HOMELINK� WIRELESS CONTROL SYSTEMThe HomeLink� Wireless Control System, located on the driver’s visor,provides a convenient way to replace up to three hand-held transmitterswith a single built-in device. This feature will learn the radio frequencycodes of most transmitters to operate garage doors, entry gate operators,security systems, entry door locks, and home or office lighting.
When programming your HomeLink� Wireless Control System toa garage door or gate, be sure that people and objects are out of
the way to prevent potential harm or damage.
Do not use the HomeLink� Wireless Control System with any garagedoor opener that lacks safety stop and reverse features as required by
ROOF
VENT
LIFTGATE
2006 Navigator (nav)Owners Guide (post-2002-fmt)USA (fus)
Driver Controls
150
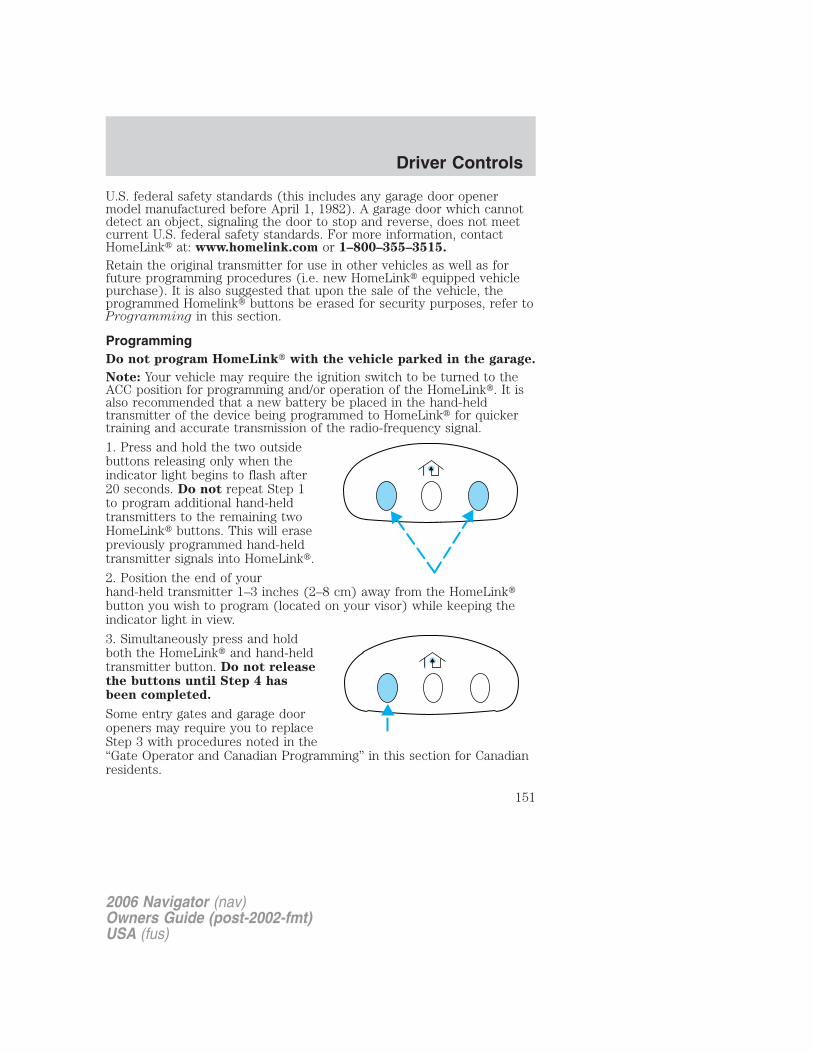
U.S. federal safety standards (this includes any garage door openermodel manufactured before April 1, 1982). A garage door which cannotdetect an object, signaling the door to stop and reverse, does not meetcurrent U.S. federal safety standards. For more information, contactHomeLink� at: www.homelink.com or 1–800–355–3515.
Retain the original transmitter for use in other vehicles as well as forfuture programming procedures (i.e. new HomeLink� equipped vehiclepurchase). It is also suggested that upon the sale of the vehicle, theprogrammed Homelink� buttons be erased for security purposes, refer toProgramming in this section.
ProgrammingDo not program HomeLink� with the vehicle parked in the garage.
Note: Your vehicle may require the ignition switch to be turned to theACC position for programming and/or operation of the HomeLink�. It isalso recommended that a new battery be placed in the hand-heldtransmitter of the device being programmed to HomeLink� for quickertraining and accurate transmission of the radio-frequency signal.
1. Press and hold the two outsidebuttons releasing only when theindicator light begins to flash after20 seconds. Do not repeat Step 1to program additional hand-heldtransmitters to the remaining twoHomeLink� buttons. This will erasepreviously programmed hand-heldtransmitter signals into HomeLink�.
2. Position the end of yourhand-held transmitter 1–3 inches (2–8 cm) away from the HomeLink�button you wish to program (located on your visor) while keeping theindicator light in view.
3. Simultaneously press and holdboth the HomeLink� and hand-heldtransmitter button. Do not releasethe buttons until Step 4 hasbeen completed.
Some entry gates and garage dooropeners may require you to replaceStep 3 with procedures noted in the“Gate Operator and Canadian Programming” in this section for Canadianresidents.
2006 Navigator (nav)Owners Guide (post-2002-fmt)USA (fus)
Driver Controls
151
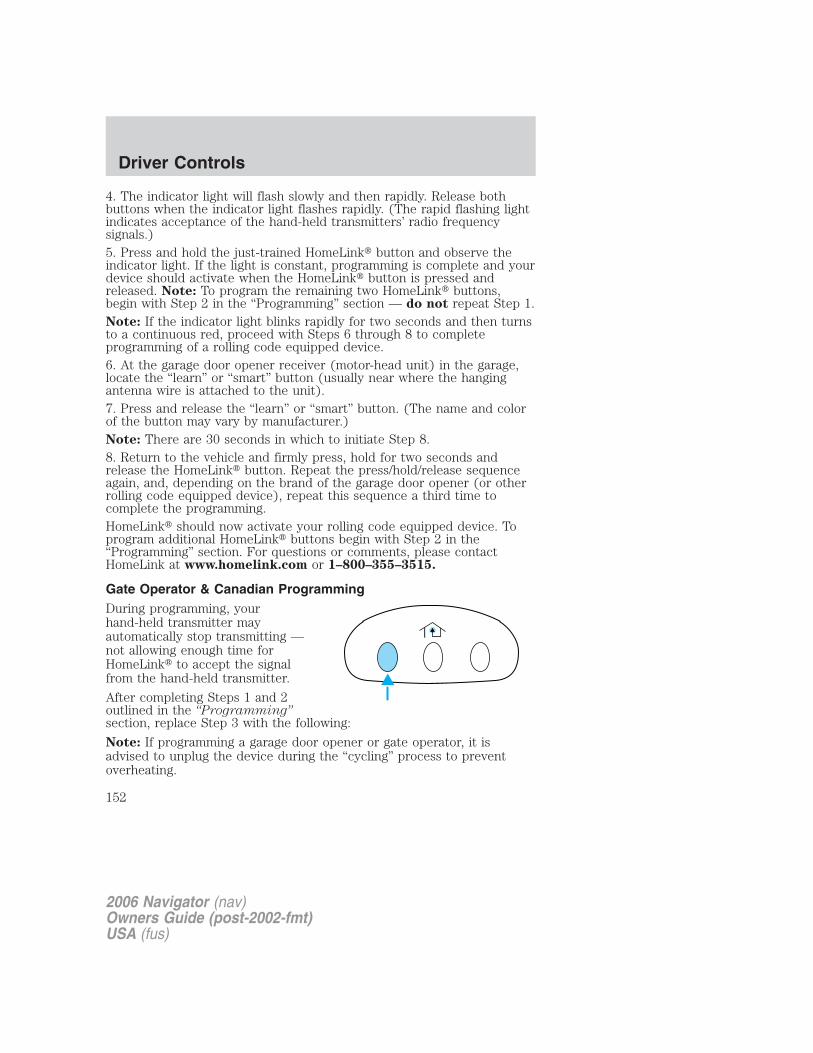
4. The indicator light will flash slowly and then rapidly. Release bothbuttons when the indicator light flashes rapidly. (The rapid flashing lightindicates acceptance of the hand-held transmitters’ radio frequencysignals.)5. Press and hold the just-trained HomeLink� button and observe theindicator light. If the light is constant, programming is complete and yourdevice should activate when the HomeLink� button is pressed andreleased. Note: To program the remaining two HomeLink� buttons,begin with Step 2 in the “Programming” section — do not repeat Step 1.Note: If the indicator light blinks rapidly for two seconds and then turnsto a continuous red, proceed with Steps 6 through 8 to completeprogramming of a rolling code equipped device.6. At the garage door opener receiver (motor-head unit) in the garage,locate the “learn” or “smart” button (usually near where the hangingantenna wire is attached to the unit).7. Press and release the “learn” or “smart” button. (The name and colorof the button may vary by manufacturer.)Note: There are 30 seconds in which to initiate Step 8.8. Return to the vehicle and firmly press, hold for two seconds andrelease the HomeLink� button. Repeat the press/hold/release sequenceagain, and, depending on the brand of the garage door opener (or otherrolling code equipped device), repeat this sequence a third time tocomplete the programming.HomeLink� should now activate your rolling code equipped device. Toprogram additional HomeLink� buttons begin with Step 2 in the“Programming” section. For questions or comments, please contactHomeLink at www.homelink.com or 1–800–355–3515.
Gate Operator & Canadian ProgrammingDuring programming, yourhand-held transmitter mayautomatically stop transmitting —not allowing enough time forHomeLink� to accept the signalfrom the hand-held transmitter.
After completing Steps 1 and 2outlined in the “Programming”section, replace Step 3 with the following:
Note: If programming a garage door opener or gate operator, it isadvised to unplug the device during the “cycling” process to preventoverheating.
2006 Navigator (nav)Owners Guide (post-2002-fmt)USA (fus)
Driver Controls
152

• Continue to press and hold the HomeLink� button (note Step 3 in the“Programming” section) while you press and release — every twoseconds (“cycle”) your hand-held transmitter until the frequencysignal has been accepted by the HomeLink�. The indicator light willflash slowly and then rapidly after HomeLink� accepts the radiofrequency signal.
• Proceed with Step 4 in the “Programming” section.
Operating the HomeLink� Wireless Control SystemTo operate, simply press and releasethe appropriate HomeLink� button.Activation will now occur for thetrained product (garage door, gateoperator, security system, entrydoor lock, or home or office lightingetc.). For convenience, thehand-held transmitter of the devicemay also be used at any time. In the event that there are stillprogramming difficulties, contact HomeLink� at www.homelink.com or1–800–355–3515.
Erasing HomeLink� buttonsTo erase the three programmedbuttons (individual buttons cannotbe erased):
• Press and hold the two outerHomeLink� buttons until theindicator light begins toflash-after 20 seconds. Releaseboth buttons. Do not hold forlonger that 30 seconds.
HomeLink� is now in the train (orlearning) mode and can be programmed at any time beginning with Step2 in the “Programming” section.
Reprogramming a single HomeLink� buttonTo program a device to HomeLink� using a HomeLink� button previouslytrained, follow these steps:
1. Press and hold the desired HomeLink� button. Do NOT release thebutton.
2006 Navigator (nav)Owners Guide (post-2002-fmt)USA (fus)
Driver Controls
153
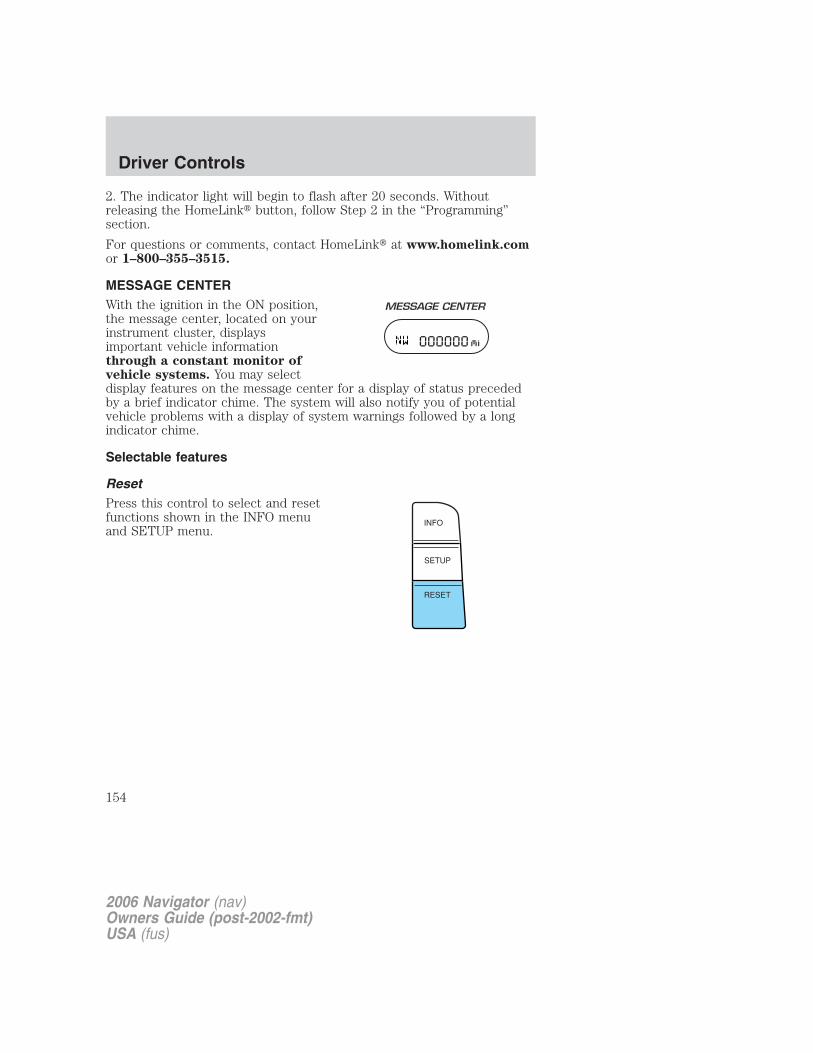
2. The indicator light will begin to flash after 20 seconds. Withoutreleasing the HomeLink� button, follow Step 2 in the “Programming”section.
For questions or comments, contact HomeLink� at www.homelink.comor 1–800–355–3515.
MESSAGE CENTERWith the ignition in the ON position,the message center, located on yourinstrument cluster, displaysimportant vehicle informationthrough a constant monitor ofvehicle systems. You may selectdisplay features on the message center for a display of status precededby a brief indicator chime. The system will also notify you of potentialvehicle problems with a display of system warnings followed by a longindicator chime.
Selectable features
ResetPress this control to select and resetfunctions shown in the INFO menuand SETUP menu.
2006 Navigator (nav)Owners Guide (post-2002-fmt)USA (fus)
Driver Controls
154
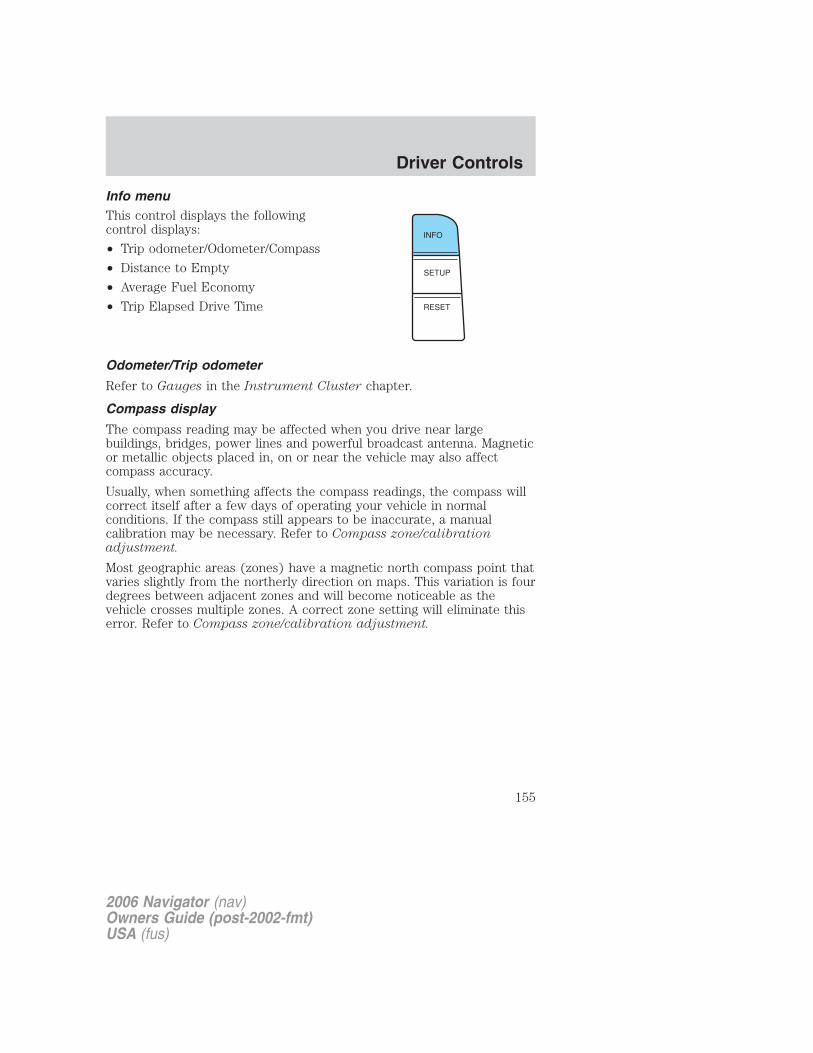
Info menuThis control displays the followingcontrol displays:
• Trip odometer/Odometer/Compass
• Distance to Empty
• Average Fuel Economy
• Trip Elapsed Drive Time
Odometer/Trip odometer
Refer to Gauges in the Instrument Cluster chapter.
Compass display
The compass reading may be affected when you drive near largebuildings, bridges, power lines and powerful broadcast antenna. Magneticor metallic objects placed in, on or near the vehicle may also affectcompass accuracy.
Usually, when something affects the compass readings, the compass willcorrect itself after a few days of operating your vehicle in normalconditions. If the compass still appears to be inaccurate, a manualcalibration may be necessary. Refer to Compass zone/calibrationadjustment.
Most geographic areas (zones) have a magnetic north compass point thatvaries slightly from the northerly direction on maps. This variation is fourdegrees between adjacent zones and will become noticeable as thevehicle crosses multiple zones. A correct zone setting will eliminate thiserror. Refer to Compass zone/calibration adjustment.
2006 Navigator (nav)Owners Guide (post-2002-fmt)USA (fus)
Driver Controls
155
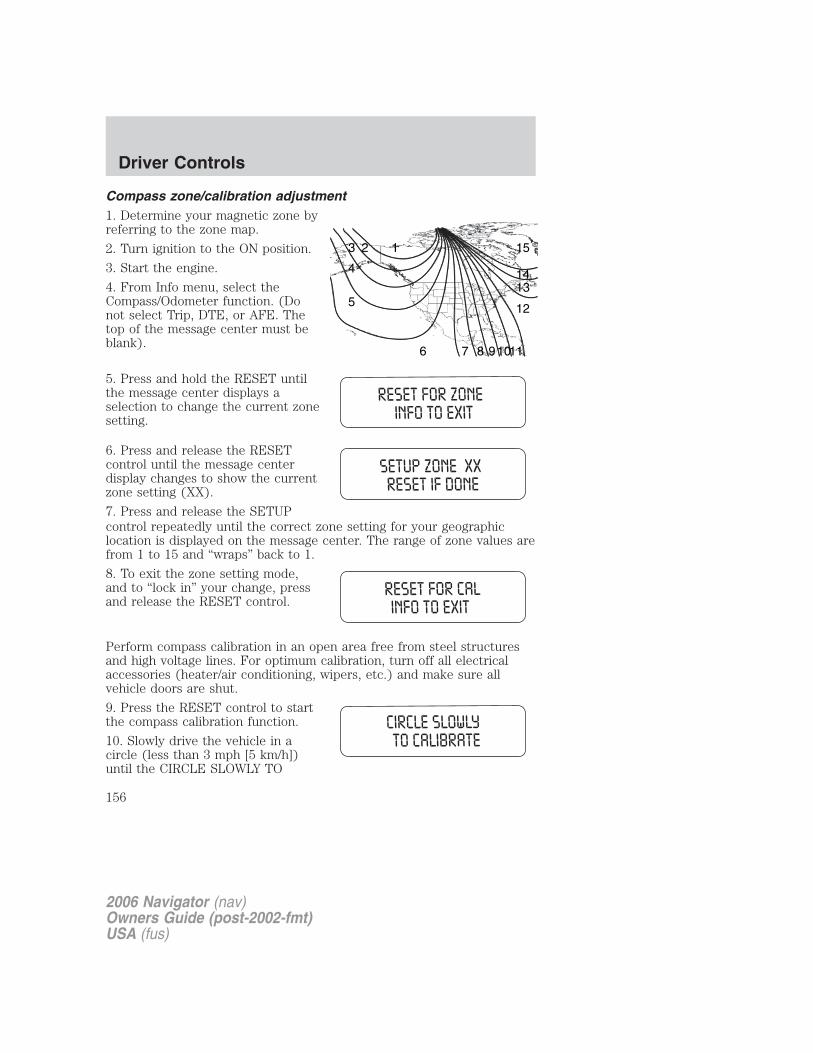
Compass zone/calibration adjustment1. Determine your magnetic zone byreferring to the zone map.
2. Turn ignition to the ON position.
3. Start the engine.
4. From Info menu, select theCompass/Odometer function. (Donot select Trip, DTE, or AFE. Thetop of the message center must beblank).
5. Press and hold the RESET untilthe message center displays aselection to change the current zonesetting.
6. Press and release the RESETcontrol until the message centerdisplay changes to show the currentzone setting (XX).
7. Press and release the SETUPcontrol repeatedly until the correct zone setting for your geographiclocation is displayed on the message center. The range of zone values arefrom 1 to 15 and “wraps” back to 1.
8. To exit the zone setting mode,and to “lock in” your change, pressand release the RESET control.
Perform compass calibration in an open area free from steel structuresand high voltage lines. For optimum calibration, turn off all electricalaccessories (heater/air conditioning, wipers, etc.) and make sure allvehicle doors are shut.
9. Press the RESET control to startthe compass calibration function.
10. Slowly drive the vehicle in acircle (less than 3 mph [5 km/h])until the CIRCLE SLOWLY TO
123
4
5
6 7 8 91011
12
1314
15
2006 Navigator (nav)Owners Guide (post-2002-fmt)USA (fus)
Driver Controls
156
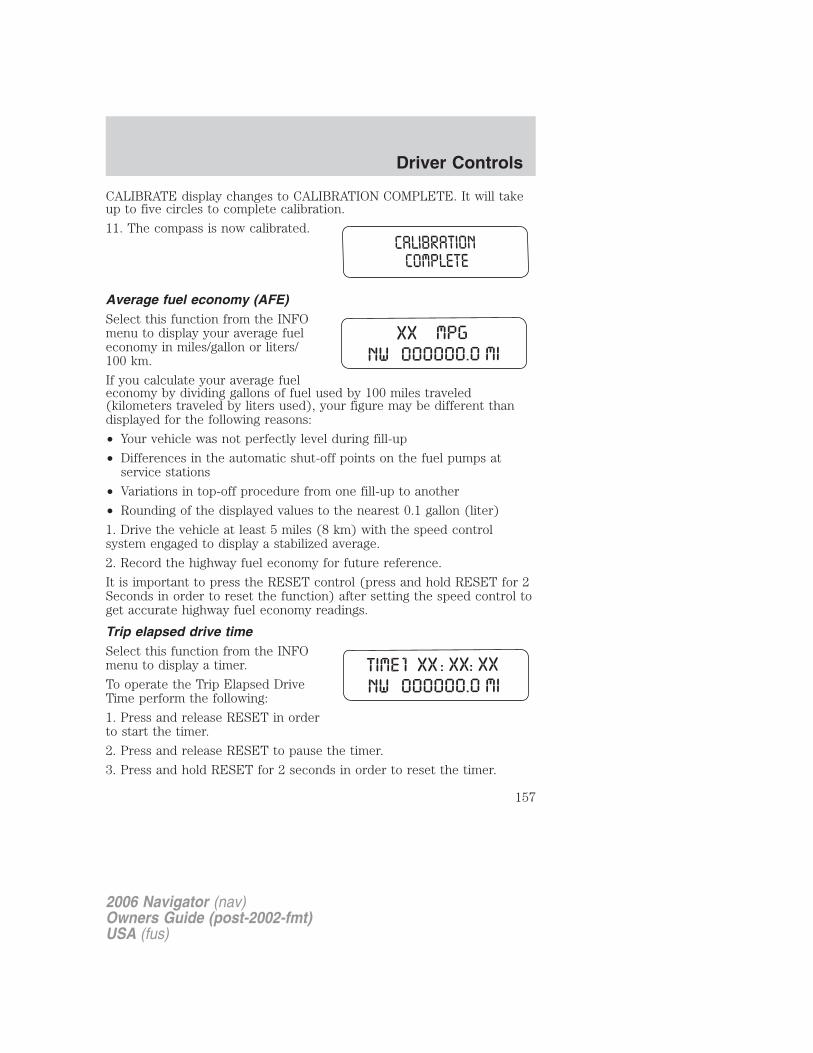
CALIBRATE display changes to CALIBRATION COMPLETE. It will takeup to five circles to complete calibration.
11. The compass is now calibrated.
Average fuel economy (AFE)Select this function from the INFOmenu to display your average fueleconomy in miles/gallon or liters/100 km.
If you calculate your average fueleconomy by dividing gallons of fuel used by 100 miles traveled(kilometers traveled by liters used), your figure may be different thandisplayed for the following reasons:
• Your vehicle was not perfectly level during fill-up
• Differences in the automatic shut-off points on the fuel pumps atservice stations
• Variations in top-off procedure from one fill-up to another
• Rounding of the displayed values to the nearest 0.1 gallon (liter)
1. Drive the vehicle at least 5 miles (8 km) with the speed controlsystem engaged to display a stabilized average.
2. Record the highway fuel economy for future reference.
It is important to press the RESET control (press and hold RESET for 2Seconds in order to reset the function) after setting the speed control toget accurate highway fuel economy readings.
Trip elapsed drive timeSelect this function from the INFOmenu to display a timer.
To operate the Trip Elapsed DriveTime perform the following:
1. Press and release RESET in orderto start the timer.
2. Press and release RESET to pause the timer.
3. Press and hold RESET for 2 seconds in order to reset the timer.
2006 Navigator (nav)Owners Guide (post-2002-fmt)USA (fus)
Driver Controls
157
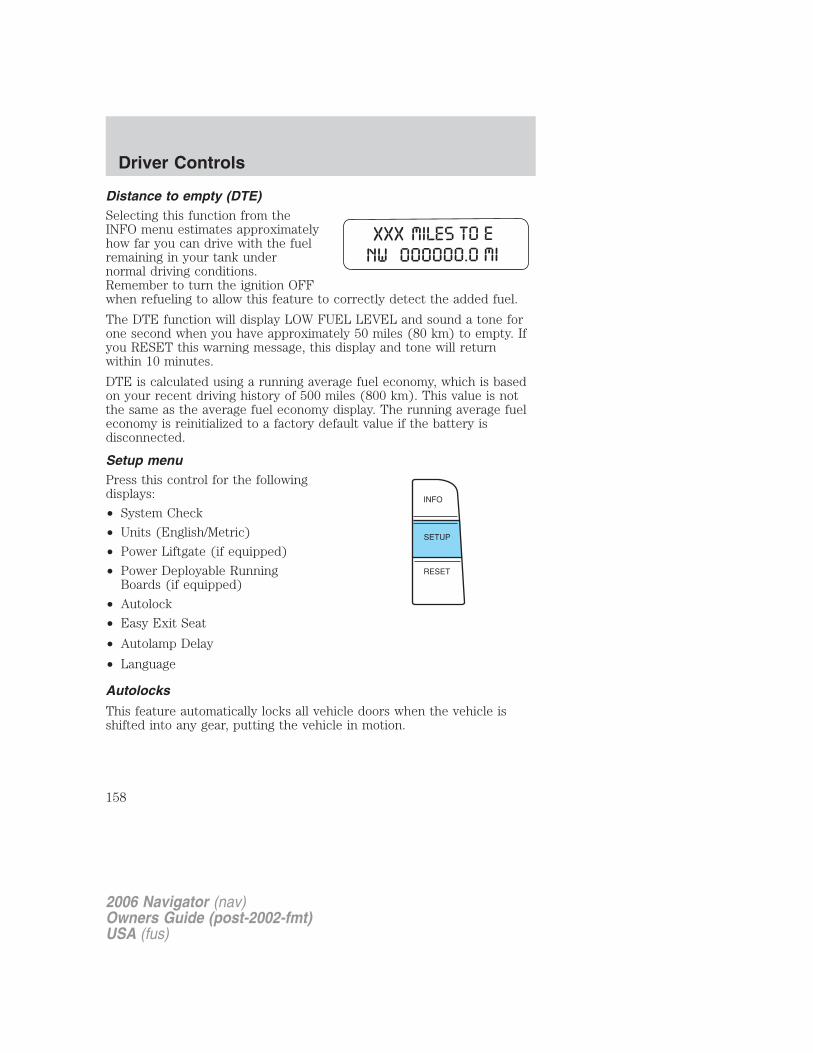
Distance to empty (DTE)Selecting this function from theINFO menu estimates approximatelyhow far you can drive with the fuelremaining in your tank undernormal driving conditions.Remember to turn the ignition OFFwhen refueling to allow this feature to correctly detect the added fuel.
The DTE function will display LOW FUEL LEVEL and sound a tone forone second when you have approximately 50 miles (80 km) to empty. Ifyou RESET this warning message, this display and tone will returnwithin 10 minutes.
DTE is calculated using a running average fuel economy, which is basedon your recent driving history of 500 miles (800 km). This value is notthe same as the average fuel economy display. The running average fueleconomy is reinitialized to a factory default value if the battery isdisconnected.
Setup menuPress this control for the followingdisplays:
• System Check
• Units (English/Metric)
• Power Liftgate (if equipped)
• Power Deployable RunningBoards (if equipped)
• Autolock
• Easy Exit Seat
• Autolamp Delay
• Language
Autolocks
This feature automatically locks all vehicle doors when the vehicle isshifted into any gear, putting the vehicle in motion.
2006 Navigator (nav)Owners Guide (post-2002-fmt)USA (fus)
Driver Controls
158

1. To disable/enable the autolockfeature, select this function from theSETUP control for the currentdisplay mode.
2. Press the RESET control to turnthe autolocks ON or OFF.
Easy exit seatThis feature automatically moves the drivers seat backwards for easy exitfrom the vehicle.
1. To disable/enable the easy exitseat feature, select this functionfrom the SETUP control for thecurrent display mode.
2. Press the RESET control to turnthe easy entry exit seat ON or OFF.
Autolamp delayThis feature keeps your headlights on for up to three minutes after theignition is switched off.
1. To disable/enable the autolampdelay feature, select this functionfrom the SETUP control for thecurrent display mode.
2. Press the RESET control to selectthe new Autolamp delay values of >0, >10, >20, >30, >60, >90, >120 or>180.
Reverse Sensing SystemThis feature sounds a warning tone to warn the driver of obstacles nearthe rear bumper, and functions only when R (Reverse) gear is selected.
1. To disable/enable the reversingsensing system feature, put thevehicle in R (Reverse).
2. Press the RESET control to turnthe rear park assist ON or OFF.
Power Liftgate (if equipped)This feature allows users to open/close the rear liftgate at the touch of abutton.
2006 Navigator (nav)Owners Guide (post-2002-fmt)USA (fus)
Driver Controls
159

1. To disable/enable the powerliftgate feature, select this functionfrom the SETUP control for thecurrent display mode.
2. Press the RESET control to turnthe power liftgate ON or OFF. If disabled, the button on the overheadconsole will not respond when pressed.
Power Deployable Running Boards (if equipped)
This feature automatically deploys the side running boards for easyentry/exit from the vehicle or for cleaning.
1. To disable/enable the powerrunning board feature, select thisfunction from the SETUP control forthe current display mode.
2. Press the RESET control to selectthe running boards setting as follows:• AUTO: the running boards will automatically deploy when a door isopened and automatically retract when the door is closed,• OUT: the running boards will remain OUT regardless of the doorsbeing open/closed. For example, use this setting when washing thevehicle, or• IN: the running boards will remain IN regardless of the doors beingopen/closed.
Language1. Select this function from theSETUP menu for the currentlanguage to be displayed.
2. Pressing the RESET controlcycles the message center througheach of the language choices.
3. Press and hold the RESETcontrol to set the language choice.
2006 Navigator (nav)Owners Guide (post-2002-fmt)USA (fus)
Driver Controls
160
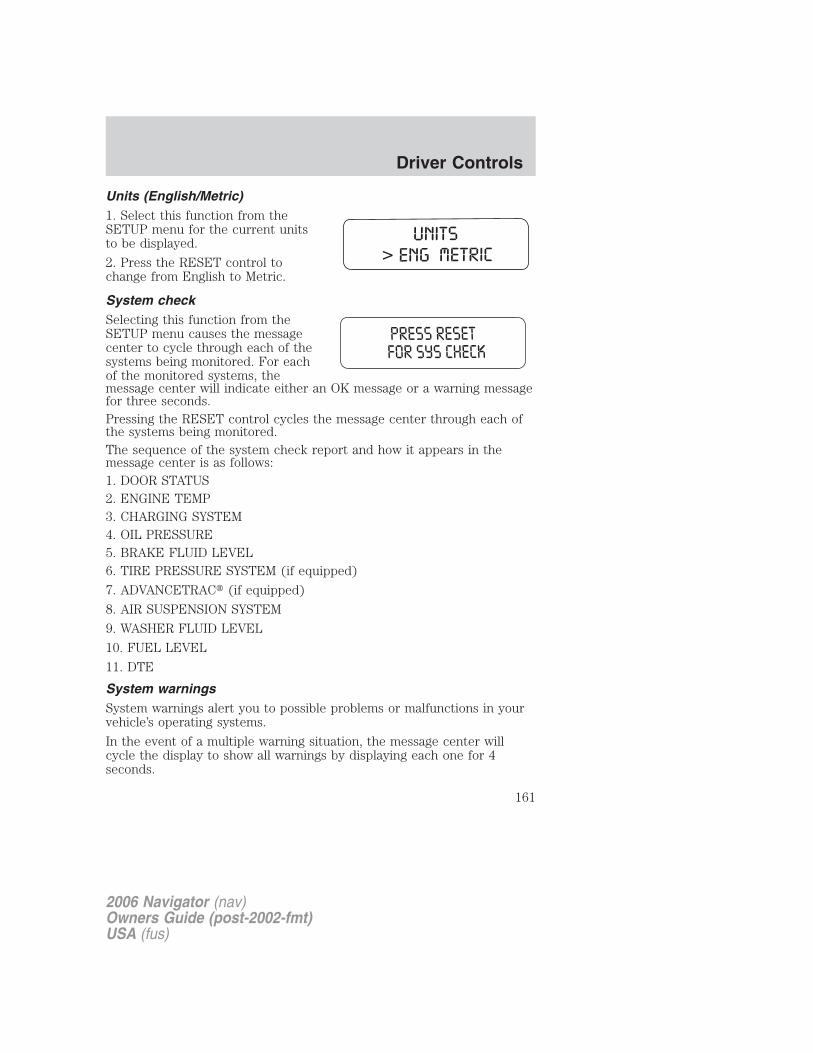
Units (English/Metric)1. Select this function from theSETUP menu for the current unitsto be displayed.
2. Press the RESET control tochange from English to Metric.
System checkSelecting this function from theSETUP menu causes the messagecenter to cycle through each of thesystems being monitored. For eachof the monitored systems, themessage center will indicate either an OK message or a warning messagefor three seconds.Pressing the RESET control cycles the message center through each ofthe systems being monitored.The sequence of the system check report and how it appears in themessage center is as follows:1. DOOR STATUS2. ENGINE TEMP3. CHARGING SYSTEM4. OIL PRESSURE5. BRAKE FLUID LEVEL6. TIRE PRESSURE SYSTEM (if equipped)
7. ADVANCETRAC� (if equipped)
8. AIR SUSPENSION SYSTEM
9. WASHER FLUID LEVEL
10. FUEL LEVEL
11. DTE
System warningsSystem warnings alert you to possible problems or malfunctions in yourvehicle’s operating systems.
In the event of a multiple warning situation, the message center willcycle the display to show all warnings by displaying each one for 4seconds.
2006 Navigator (nav)Owners Guide (post-2002-fmt)USA (fus)
Driver Controls
161
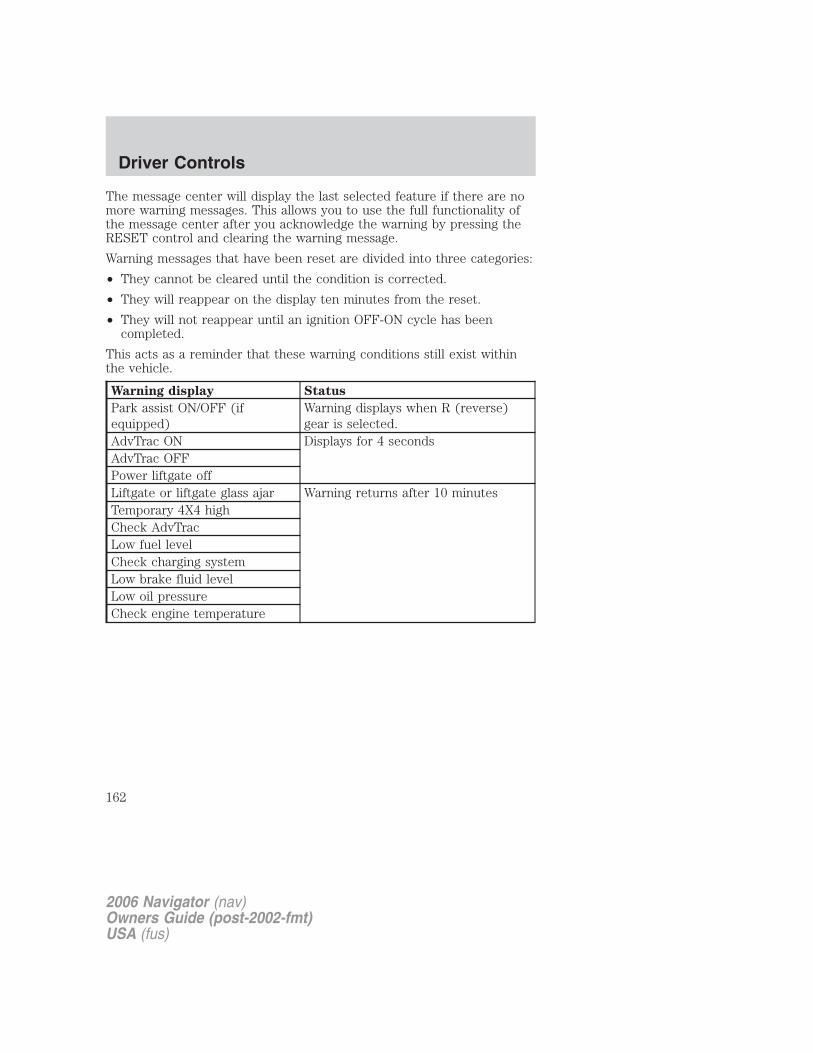
The message center will display the last selected feature if there are nomore warning messages. This allows you to use the full functionality ofthe message center after you acknowledge the warning by pressing theRESET control and clearing the warning message.
Warning messages that have been reset are divided into three categories:
• They cannot be cleared until the condition is corrected.
• They will reappear on the display ten minutes from the reset.
• They will not reappear until an ignition OFF-ON cycle has beencompleted.
This acts as a reminder that these warning conditions still exist withinthe vehicle.
Warning display Status
Park assist ON/OFF (ifequipped)
Warning displays when R (reverse)gear is selected.
AdvTrac ON Displays for 4 secondsAdvTrac OFFPower liftgate offLiftgate or liftgate glass ajar Warning returns after 10 minutesTemporary 4X4 highCheck AdvTracLow fuel levelCheck charging systemLow brake fluid levelLow oil pressureCheck engine temperature
2006 Navigator (nav)Owners Guide (post-2002-fmt)USA (fus)
Driver Controls
162
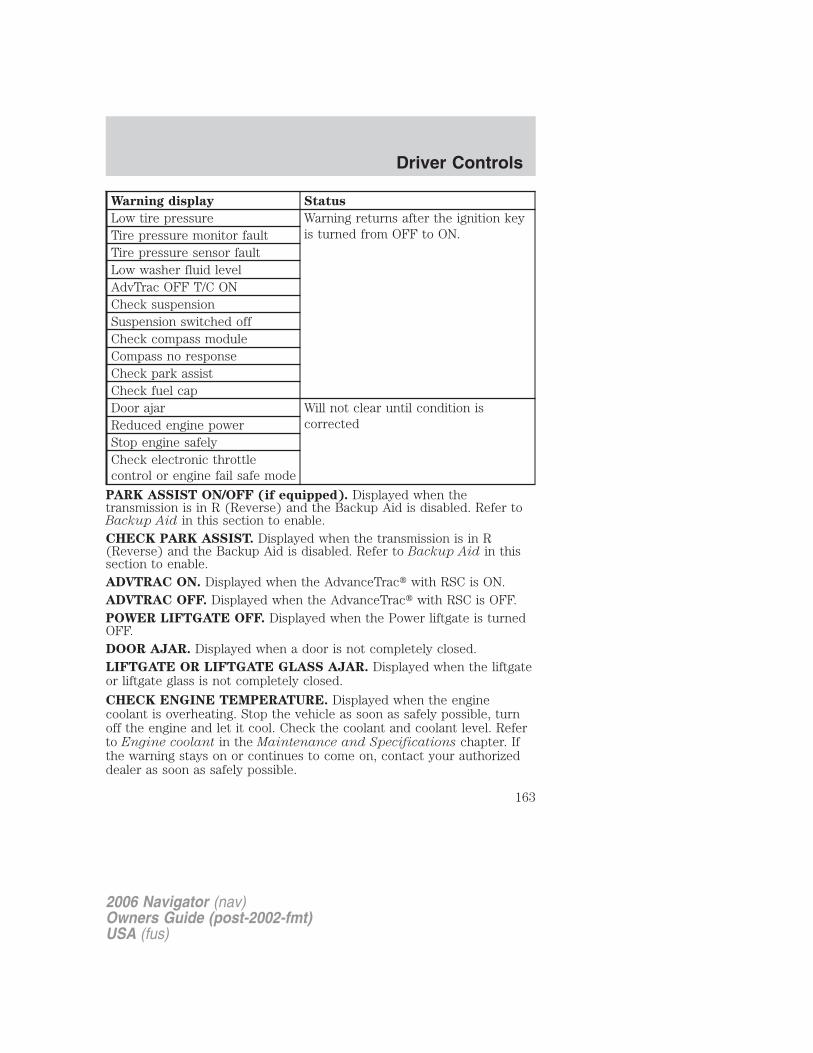
Warning display Status
Low tire pressure Warning returns after the ignition keyis turned from OFF to ON.Tire pressure monitor fault
Tire pressure sensor faultLow washer fluid levelAdvTrac OFF T/C ONCheck suspensionSuspension switched offCheck compass moduleCompass no responseCheck park assistCheck fuel capDoor ajar Will not clear until condition is
correctedReduced engine powerStop engine safelyCheck electronic throttlecontrol or engine fail safe mode
PARK ASSIST ON/OFF (if equipped). Displayed when thetransmission is in R (Reverse) and the Backup Aid is disabled. Refer toBackup Aid in this section to enable.CHECK PARK ASSIST. Displayed when the transmission is in R(Reverse) and the Backup Aid is disabled. Refer to Backup Aid in thissection to enable.ADVTRAC ON. Displayed when the AdvanceTrac� with RSC is ON.ADVTRAC OFF. Displayed when the AdvanceTrac� with RSC is OFF.POWER LIFTGATE OFF. Displayed when the Power liftgate is turnedOFF.DOOR AJAR. Displayed when a door is not completely closed.LIFTGATE OR LIFTGATE GLASS AJAR. Displayed when the liftgateor liftgate glass is not completely closed.
CHECK ENGINE TEMPERATURE. Displayed when the enginecoolant is overheating. Stop the vehicle as soon as safely possible, turnoff the engine and let it cool. Check the coolant and coolant level. Referto Engine coolant in the Maintenance and Specifications chapter. Ifthe warning stays on or continues to come on, contact your authorizeddealer as soon as safely possible.
2006 Navigator (nav)Owners Guide (post-2002-fmt)USA (fus)
Driver Controls
163
REDUCED ENGINE POWER. Displayed when the engine isoverheating. Stop the vehicle as soon as safely possible, turn off theengine. If the warning stays on or continues to come on, contact yourauthorized dealer as soon as safely possible.
CHECK ELECTRONIC THROTTLE CONTROL or ENGINE FAILSAFE MODE. Displayed when the engine has defaulted to a“limp-home” operation. If the warning stays on or continues to come on,contact your authorized dealer as soon as possible.
STOP ENGINE SAFELY. Displayed when the engine is overheating.Stop the vehicle as soon as safely possible, turn off the engine. If thewarning stays on or continues to come on, contact your authorizeddealer as soon as safely possible.
LOW TIRE PRESSURE. Displayed when one or more tires on yourvehicle have low tire pressure. Refer to Inspecting and Inflating YourTires in the Tires, Wheels and Loading chapter.
TIRE PRESSURE MONITOR FAULT. Displayed when the TirePressure Monitoring System is malfunctioning. If the warning stays on orcontinues to come on, have the system inspected by your servicingdealer
TIRE PRESSURE SENSOR FAULT. Displayed when a tire pressuresensor is malfunctioning, or your spare tire is in use. For moreinformation on how the system operates under these conditions, refer toUnderstanding Your Tire Pressure Monitoring System in the Tires,Wheels and Loading chapter. If the warning stays on or continues tocome on, have the system inspected by your servicing dealer
LOW FUEL LEVEL. Displayed as an early reminder of a low fuelcondition.
CHECK CHARGING SYSTEM. Displayed when the electrical system isnot maintaining proper voltage. If you are operating electrical accessorieswhen the engine is idling at a low speed, turn off as many of theelectrical loads as soon as possible. If the warning stays on or comes onwhen the engine is operating at normal speeds, have the electricalsystem checked as soon as possible.
LOW BRAKE FLUID LEVEL. Indicates the brake fluid level is low andthe brake system should be inspected immediately. Refer to Brake fluidreservoir in the Maintenance and Specifications chapter.
LOW OIL PRESSURE. Displayed when the engine oil pressure is low. Ifthis warning message is displayed, check the level of the engine oil.Refer to Engine oil in the Maintenance and Specifications chapter for
2006 Navigator (nav)Owners Guide (post-2002-fmt)USA (fus)
Driver Controls
164
information about adding engine oil. If the oil level is OK and thiswarning persists, shut down the engine immediately and contact yourauthorized dealer for service.LOW WASHER FLUID LEVEL. Indicates the washer fluid reservoir isless than one quarter full. Check the washer fluid level. Refer toWindshield washer fluid in the Maintenance and Specificationschapter.CHECK ADVTRAC. Displayed when the AdvanceTrac� with RSCsystem is not operating properly. If this message is displayed on themessage center the AdvanceTrac� with RSC system may be partiallyoperable. If this warning stays on while the engine is running, contactyour authorized dealer for service as soon as possible. For furtherinformation, refer to AdvanceTrac� with RSC stability enhancementsystem in the Driving chapter.
ADVTRAC OFF T/C ON. Displayed on 4x4 vehicles only when 4x4 LowRange is selected. In this mode, the stability enhancement portion of theAdvanceTrac� with RSC is disabled, but the traction enhancementfeature remains enabled. For further information, refer to AdvanceTrac�with RSC stability enhancement system in the Driving chapter.
TEMPORARY 4X4 HIGH. Displayed when the 4X4 systemautomatically locks to prevent damage from overheating.
CHECK SUSPENSION. Displayed when the air suspension system isnot operating properly. If this message is displayed while driving, pull offthe road as soon as safely possible. For more information, refer to Airsuspension in the Driving chapter.
SUSPENSION SWITCHED OFF. Displayed when the air suspensionswitch is in the OFF position. For more information, refer to Airsuspension in the Driving chapter.
CHECK FUEL CAP. Displayed when the fuel filler cap is not properlyinstalled. Check the fuel filler cap for proper installation. Refer to Fuelfiller cap in the Maintenance and Specifications chapter.
CHECK COMPASS MODULE. Displayed when the compass is notoperating properly. If the warning stays on or continues to come on,contact your authorized dealer as soon as possible.
COMPASS NO RESPONSE. Displayed when the compass is notoperating properly. If the warning stays on or continues to come on,contact your authorized dealer as soon as possible.
DATA ERR. These messages indicate improper operation of the vehiclenetwork communication between electronic modules.
2006 Navigator (nav)Owners Guide (post-2002-fmt)USA (fus)
Driver Controls
165
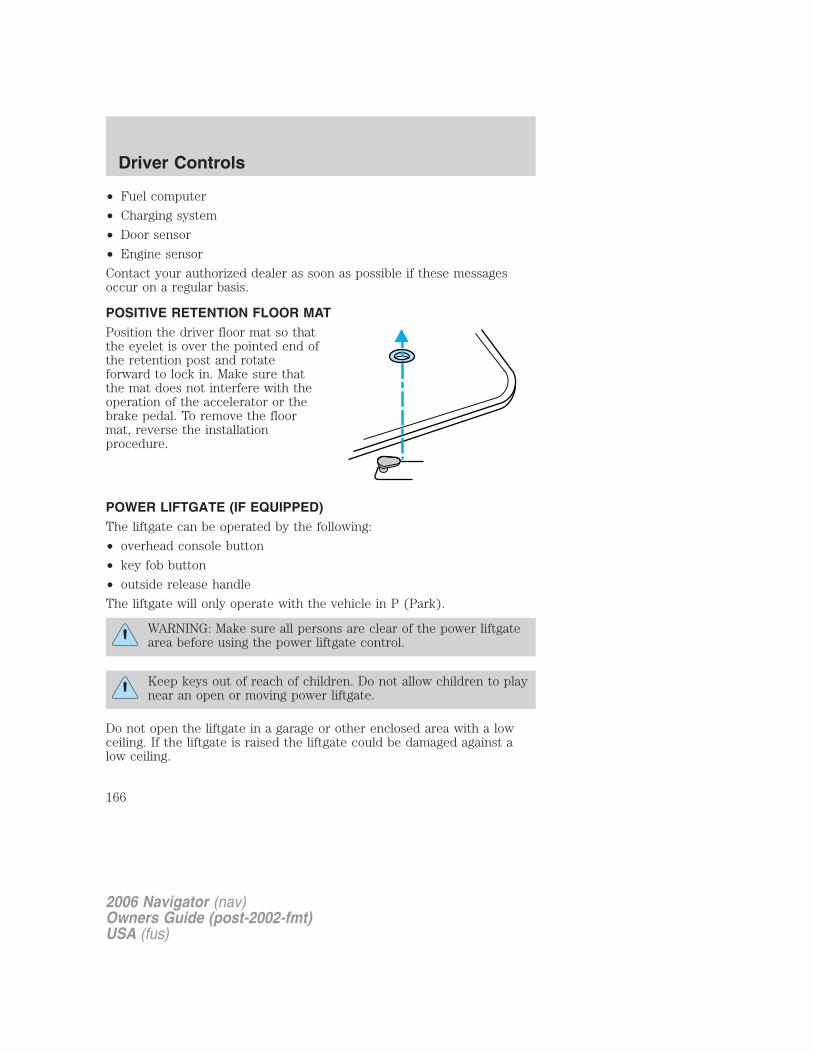
• Fuel computer
• Charging system
• Door sensor
• Engine sensor
Contact your authorized dealer as soon as possible if these messagesoccur on a regular basis.
POSITIVE RETENTION FLOOR MATPosition the driver floor mat so thatthe eyelet is over the pointed end ofthe retention post and rotateforward to lock in. Make sure thatthe mat does not interfere with theoperation of the accelerator or thebrake pedal. To remove the floormat, reverse the installationprocedure.
POWER LIFTGATE (IF EQUIPPED)The liftgate can be operated by the following:
• overhead console button
• key fob button
• outside release handle
The liftgate will only operate with the vehicle in P (Park).
WARNING: Make sure all persons are clear of the power liftgatearea before using the power liftgate control.
Keep keys out of reach of children. Do not allow children to playnear an open or moving power liftgate.
Do not open the liftgate in a garage or other enclosed area with a lowceiling. If the liftgate is raised the liftgate could be damaged against alow ceiling.
2006 Navigator (nav)Owners Guide (post-2002-fmt)USA (fus)
Driver Controls
166
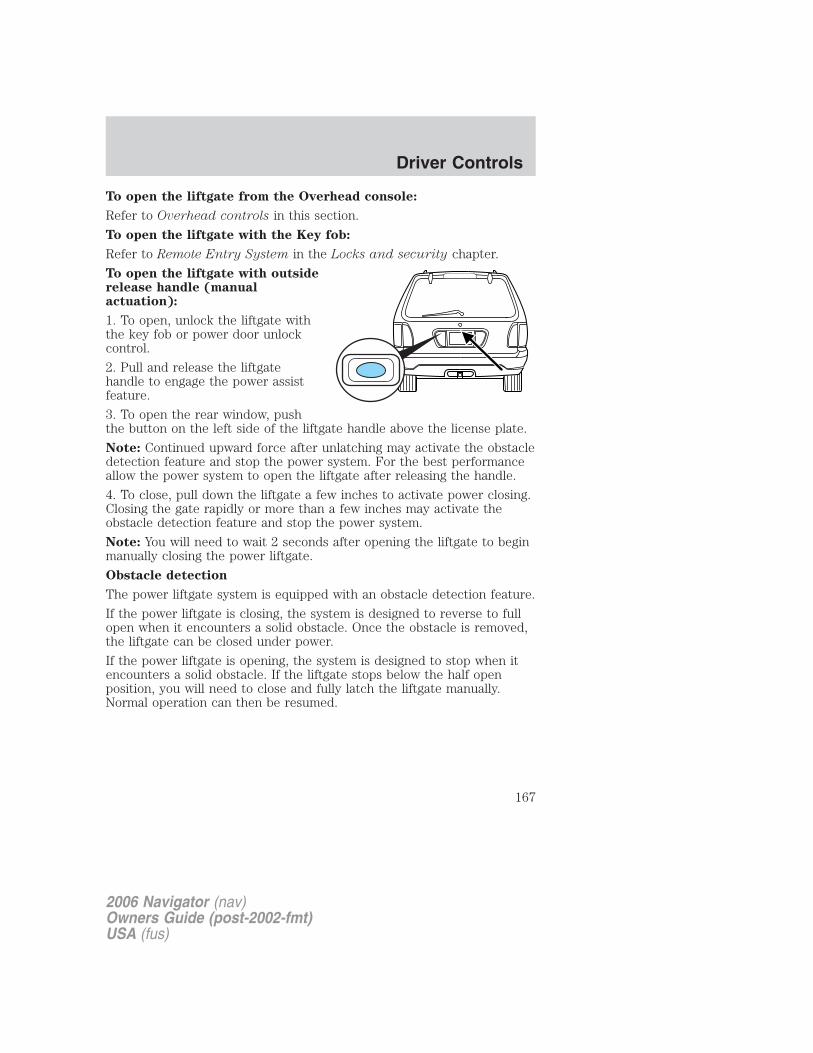
To open the liftgate from the Overhead console:
Refer to Overhead controls in this section.
To open the liftgate with the Key fob:
Refer to Remote Entry System in the Locks and security chapter.
To open the liftgate with outsiderelease handle (manualactuation):
1. To open, unlock the liftgate withthe key fob or power door unlockcontrol.
2. Pull and release the liftgatehandle to engage the power assistfeature.
3. To open the rear window, pushthe button on the left side of the liftgate handle above the license plate.
Note: Continued upward force after unlatching may activate the obstacledetection feature and stop the power system. For the best performanceallow the power system to open the liftgate after releasing the handle.
4. To close, pull down the liftgate a few inches to activate power closing.Closing the gate rapidly or more than a few inches may activate theobstacle detection feature and stop the power system.
Note: You will need to wait 2 seconds after opening the liftgate to beginmanually closing the power liftgate.
Obstacle detection
The power liftgate system is equipped with an obstacle detection feature.
If the power liftgate is closing, the system is designed to reverse to fullopen when it encounters a solid obstacle. Once the obstacle is removed,the liftgate can be closed under power.
If the power liftgate is opening, the system is designed to stop when itencounters a solid obstacle. If the liftgate stops below the half openposition, you will need to close and fully latch the liftgate manually.Normal operation can then be resumed.
2006 Navigator (nav)Owners Guide (post-2002-fmt)USA (fus)
Driver Controls
167
Resetting the power liftgate:
The power liftgate may not operate under these conditions. If any ofthese conditions occur, the power liftgate must be reset.
• a low voltage or dead battery
• disconnected battery
• the liftgate has been left open, or in the partially latched position, formore than six (6) hours.
• the liftgate is manually closed and left ajar (unlatched)
To reset the power liftgate:
1. Manually close and fully latch the liftgate.
2. Power open the liftgate by using the keyfob or overhead consolebutton.
3. Once the liftgate is fully open, close the liftgate using the keyfob oroverhead console button.
Note: If the power liftgate system is turned <OFF> in the messagecenter, the system cannot be activated with any switches or with theliftgate handle. The system will need to be turned <ON> for any poweroperation to occur.
Liftgate ajar signal
If the liftgate or liftgate glass are not fully latched, you will receive a“LIFTGATE or LIFTGLASS AJAR” message on the instrument panel. Ifyou see this message, check both the liftgate glass and liftgate door toinsure they are fully latched.
Make sure the liftgate is closed to prevent exhaust fumes frombeing drawn into the vehicle. If you must drive with the liftgate
open, keep the vents open so outside air comes into the vehicle.
2006 Navigator (nav)Owners Guide (post-2002-fmt)USA (fus)
Driver Controls
168

MANUAL LIFTGATE (IF EQUIPPED)To open the rear window, push thebutton on the left side of the liftgatehandle above the license plate.
To open the liftgate, pull the liftgatehandle.
• Do not open the liftgate orliftgate glass in a garage or otherenclosed area with a low ceiling.If the liftgate glass is raised andthe liftgate is also opened, bothliftgate and glass could be damaged against a low ceiling.
• Do not leave the liftgate or liftgate glass open while driving. Doing socould cause serious damage to the liftgate and its components as wellas allowing carbon monoxide to enter the vehicle.
Make sure that the liftgate door and/or window are closed toprevent exhaust fumes from being drawn into the vehicle. This
will also prevent passengers and cargo from falling out. If you mustdrive with the liftgate door or window open, keep the vents open sooutside air comes into the vehicle.
LUGGAGE RACKThe rear cross-bar can be adjusted to fit the item being carried. Thefront cross-bar does not move.To adjust cross-bar position:
1. Loosen the thumbscrews at bothends of the rear cross-bar.
2. Slide the cross-bar to the desiredlocation.
3. Firmly tighten the thumbscrewsat both ends of the cross-bar.
Load luggage at the front cross-bar and adjust the rear cross-bar asnecessary.• Do not exceed 200 lb (90.7 kg) of luggage if the weight is placed
directly on the cross-bars.
2006 Navigator (nav)Owners Guide (post-2002-fmt)USA (fus)
Driver Controls
169
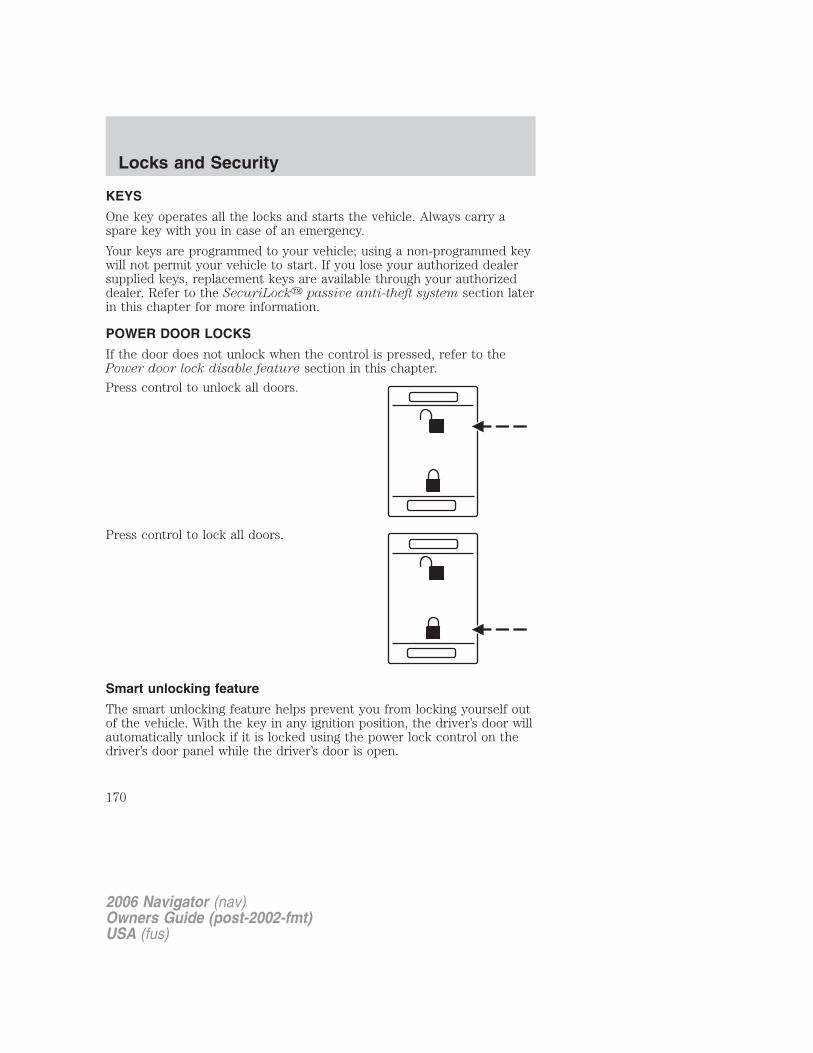
KEYS
One key operates all the locks and starts the vehicle. Always carry aspare key with you in case of an emergency.
Your keys are programmed to your vehicle; using a non-programmed keywill not permit your vehicle to start. If you lose your authorized dealersupplied keys, replacement keys are available through your authorizeddealer. Refer to the SecuriLock� passive anti-theft system section laterin this chapter for more information.
POWER DOOR LOCKS
If the door does not unlock when the control is pressed, refer to thePower door lock disable feature section in this chapter.
Press control to unlock all doors.
Press control to lock all doors.
Smart unlocking feature
The smart unlocking feature helps prevent you from locking yourself outof the vehicle. With the key in any ignition position, the driver’s door willautomatically unlock if it is locked using the power lock control on thedriver’s door panel while the driver’s door is open.
2006 Navigator (nav)Owners Guide (post-2002-fmt)USA (fus)
Locks and Security
170
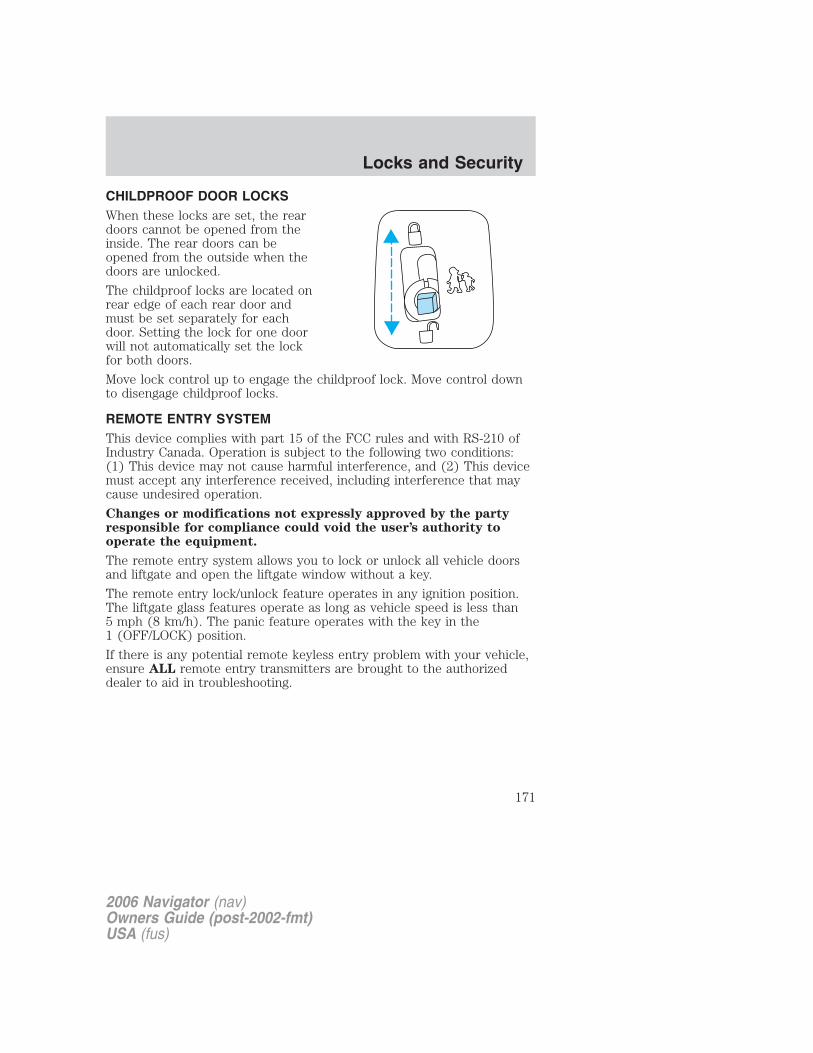
CHILDPROOF DOOR LOCKSWhen these locks are set, the reardoors cannot be opened from theinside. The rear doors can beopened from the outside when thedoors are unlocked.
The childproof locks are located onrear edge of each rear door andmust be set separately for eachdoor. Setting the lock for one doorwill not automatically set the lockfor both doors.
Move lock control up to engage the childproof lock. Move control downto disengage childproof locks.
REMOTE ENTRY SYSTEMThis device complies with part 15 of the FCC rules and with RS-210 ofIndustry Canada. Operation is subject to the following two conditions:(1) This device may not cause harmful interference, and (2) This devicemust accept any interference received, including interference that maycause undesired operation.
Changes or modifications not expressly approved by the partyresponsible for compliance could void the user’s authority tooperate the equipment.
The remote entry system allows you to lock or unlock all vehicle doorsand liftgate and open the liftgate window without a key.
The remote entry lock/unlock feature operates in any ignition position.The liftgate glass features operate as long as vehicle speed is less than5 mph (8 km/h). The panic feature operates with the key in the1 (OFF/LOCK) position.
If there is any potential remote keyless entry problem with your vehicle,ensure ALL remote entry transmitters are brought to the authorizeddealer to aid in troubleshooting.
2006 Navigator (nav)Owners Guide (post-2002-fmt)USA (fus)
Locks and Security
171
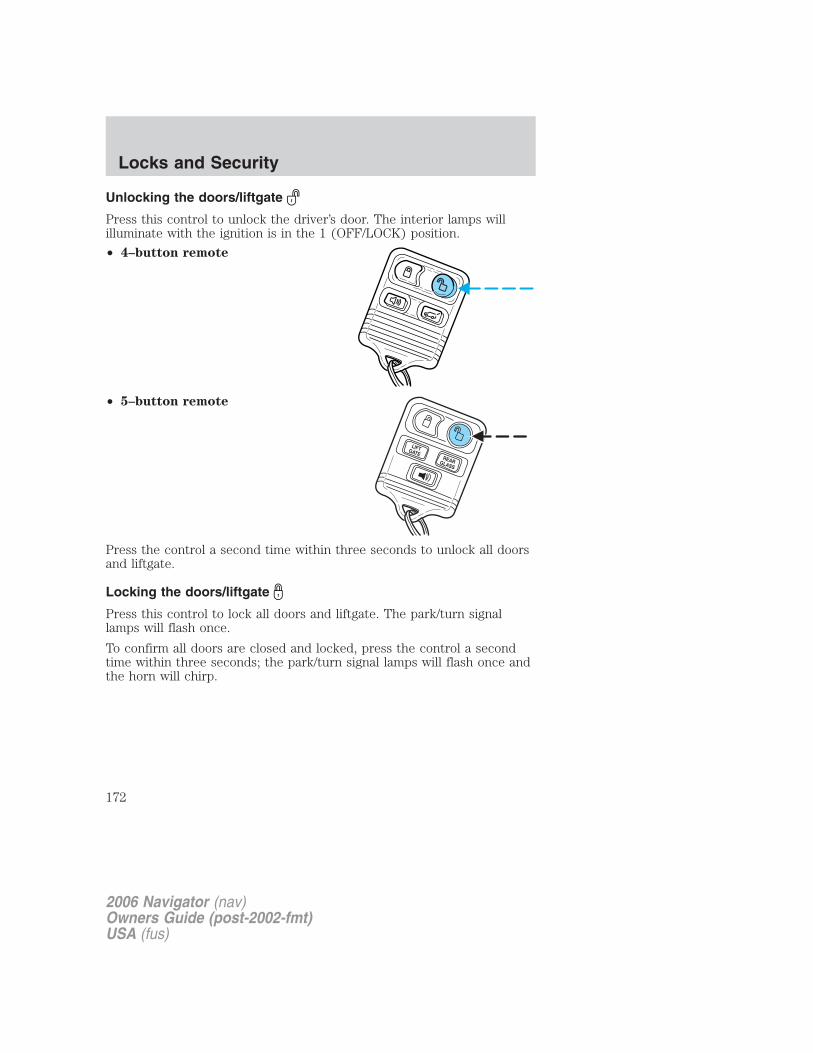
Unlocking the doors/liftgate
Press this control to unlock the driver’s door. The interior lamps willilluminate with the ignition is in the 1 (OFF/LOCK) position.
• 4–button remote
• 5–button remote
Press the control a second time within three seconds to unlock all doorsand liftgate.
Locking the doors/liftgate
Press this control to lock all doors and liftgate. The park/turn signallamps will flash once.
To confirm all doors are closed and locked, press the control a secondtime within three seconds; the park/turn signal lamps will flash once andthe horn will chirp.
2006 Navigator (nav)Owners Guide (post-2002-fmt)USA (fus)
Locks and Security
172
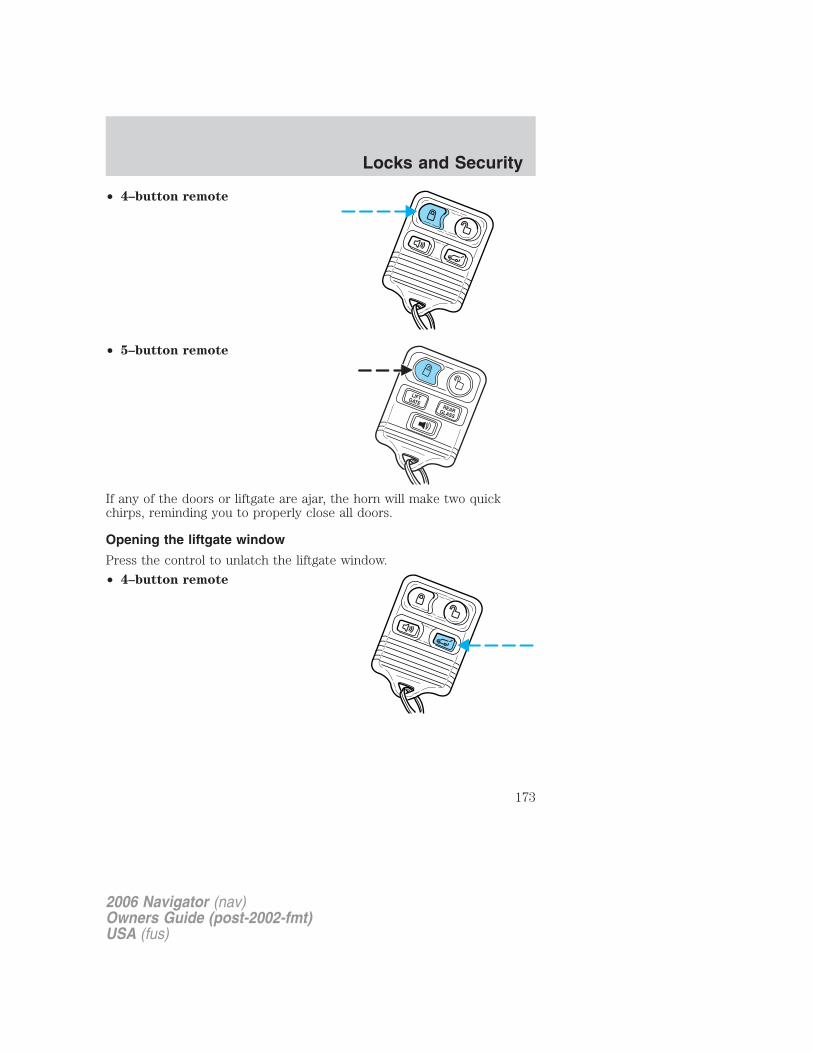
• 4–button remote
• 5–button remote
If any of the doors or liftgate are ajar, the horn will make two quickchirps, reminding you to properly close all doors.
Opening the liftgate window
Press the control to unlatch the liftgate window.
• 4–button remote
2006 Navigator (nav)Owners Guide (post-2002-fmt)USA (fus)
Locks and Security
173

• 5–button remote
Opening the power liftgate (if equipped)Press the control twice to fullyunlatch and open the liftgate.
Make sure all persons are clear of the liftgate area before usingpower liftgate control.
In order to fully lower and latch the liftgate, press the control twice.If the liftgate stops mid travel, it may have detected an obstacle, Checkto ensure the liftgate swing zone is free from obstruction and reset thepower assist by manually closing the liftgate. Normal operation can thenbe resumed.
Make sure the liftgate is closed to prevent exhaust fumes frombeing drawn into the vehicle. This will also prevent passengers
and cargo from falling out. If you must drive with the liftgate open,keep the vents open so outside air comes into the vehicle.
Sounding a panic alarmPress this control to activate the alarm.The personal panic alarm will cycle the horn and parking lamps on/off.
2006 Navigator (nav)Owners Guide (post-2002-fmt)USA (fus)
Locks and Security
174
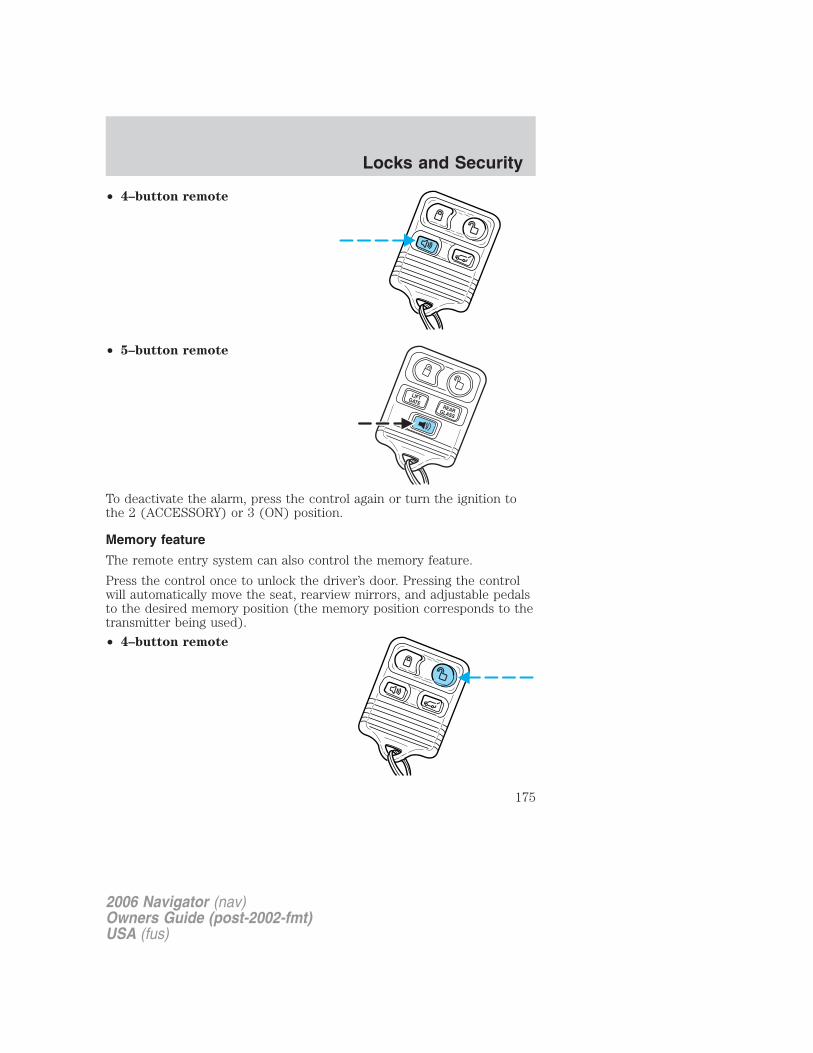
• 4–button remote
• 5–button remote
To deactivate the alarm, press the control again or turn the ignition tothe 2 (ACCESSORY) or 3 (ON) position.
Memory feature
The remote entry system can also control the memory feature.
Press the control once to unlock the driver’s door. Pressing the controlwill automatically move the seat, rearview mirrors, and adjustable pedalsto the desired memory position (the memory position corresponds to thetransmitter being used).
• 4–button remote
2006 Navigator (nav)Owners Guide (post-2002-fmt)USA (fus)
Locks and Security
175
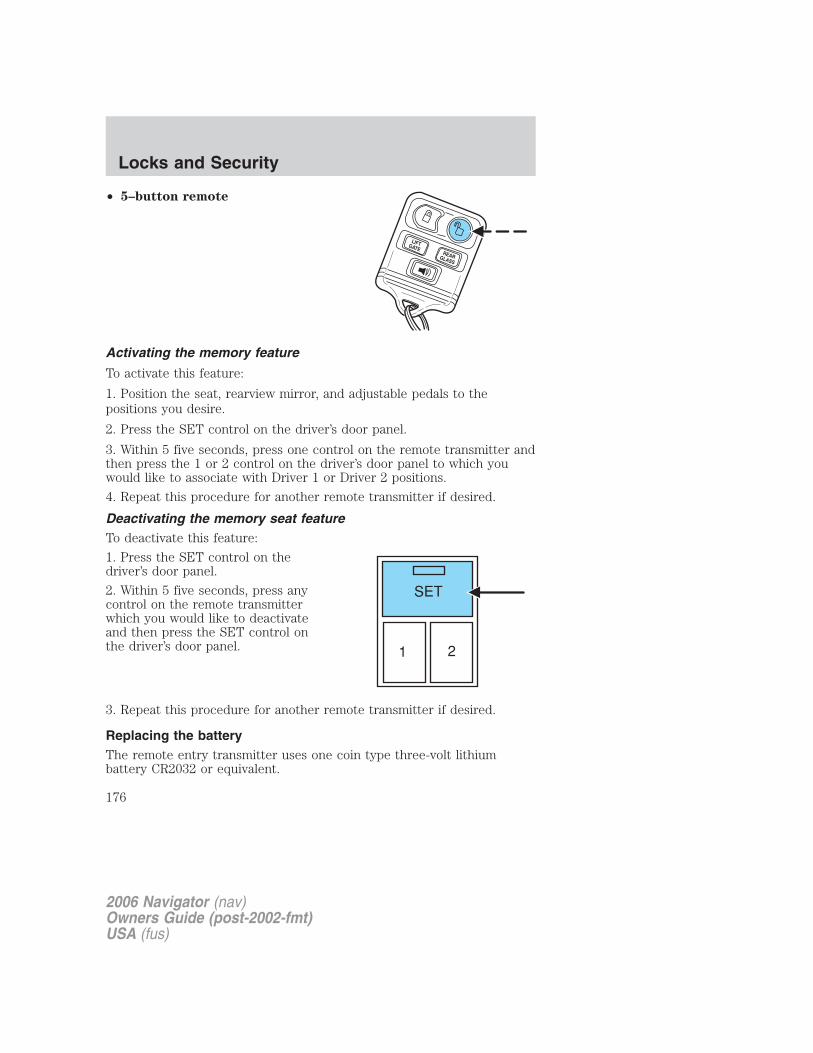
• 5–button remote
Activating the memory feature
To activate this feature:
1. Position the seat, rearview mirror, and adjustable pedals to thepositions you desire.
2. Press the SET control on the driver’s door panel.
3. Within 5 five seconds, press one control on the remote transmitter andthen press the 1 or 2 control on the driver’s door panel to which youwould like to associate with Driver 1 or Driver 2 positions.
4. Repeat this procedure for another remote transmitter if desired.
Deactivating the memory seat featureTo deactivate this feature:
1. Press the SET control on thedriver’s door panel.
2. Within 5 five seconds, press anycontrol on the remote transmitterwhich you would like to deactivateand then press the SET control onthe driver’s door panel.
3. Repeat this procedure for another remote transmitter if desired.
Replacing the batteryThe remote entry transmitter uses one coin type three-volt lithiumbattery CR2032 or equivalent.
2006 Navigator (nav)Owners Guide (post-2002-fmt)USA (fus)
Locks and Security
176

To replace the battery:
1. Twist a thin coin between the twohalves of the remote entrytransmitter near the key ring. DONOT TAKE THE RUBBER COVERAND CIRCUIT BOARD OFF THEFRONT HOUSING OF THEREMOTE ENTRY TRANSMITTER.
2. Do not wipe off any grease on thebattery terminals on the backsurface of the circuit board.
3. Remove the old battery. Note: Please refer to local regulations whendisposing of transmitter batteries.
4. Insert the new battery. Refer to the diagram inside the remote entrytransmitter for the correct orientation of the battery. Press the batterydown to ensure that the battery is fully seated in the battery housingcavity.
5. Snap the two halves back together.
Note: Replacement of the battery will not cause the remote transmitterto become deprogrammed from your vehicle. The remote transmittershould operate normally after battery replacement.
Replacing lost transmittersIf a remote transmitter has been lost and you would like to remove itfrom the vehicle’s memory, or you would like to purchase additionalremote transmitters and have them programmed to your vehicle:
• Take all your vehicle’s transmitters to your dealer for programming, or
• Perform the programming procedure yourself.
2006 Navigator (nav)Owners Guide (post-2002-fmt)USA (fus)
Locks and Security
177
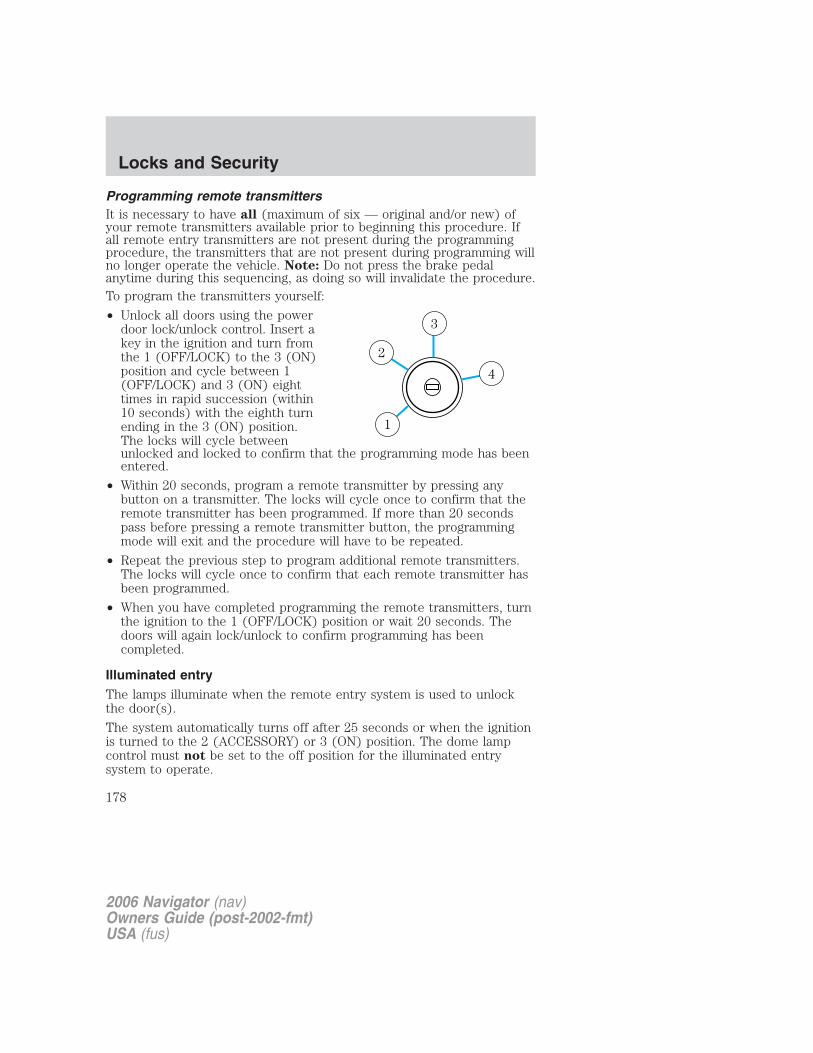
Programming remote transmittersIt is necessary to have all (maximum of six — original and/or new) ofyour remote transmitters available prior to beginning this procedure. Ifall remote entry transmitters are not present during the programmingprocedure, the transmitters that are not present during programming willno longer operate the vehicle. Note: Do not press the brake pedalanytime during this sequencing, as doing so will invalidate the procedure.To program the transmitters yourself:
• Unlock all doors using the powerdoor lock/unlock control. Insert akey in the ignition and turn fromthe 1 (OFF/LOCK) to the 3 (ON)position and cycle between 1(OFF/LOCK) and 3 (ON) eighttimes in rapid succession (within10 seconds) with the eighth turnending in the 3 (ON) position.The locks will cycle betweenunlocked and locked to confirm that the programming mode has beenentered.
• Within 20 seconds, program a remote transmitter by pressing anybutton on a transmitter. The locks will cycle once to confirm that theremote transmitter has been programmed. If more than 20 secondspass before pressing a remote transmitter button, the programmingmode will exit and the procedure will have to be repeated.
• Repeat the previous step to program additional remote transmitters.The locks will cycle once to confirm that each remote transmitter hasbeen programmed.
• When you have completed programming the remote transmitters, turnthe ignition to the 1 (OFF/LOCK) position or wait 20 seconds. Thedoors will again lock/unlock to confirm programming has beencompleted.
Illuminated entryThe lamps illuminate when the remote entry system is used to unlockthe door(s).
The system automatically turns off after 25 seconds or when the ignitionis turned to the 2 (ACCESSORY) or 3 (ON) position. The dome lampcontrol must not be set to the off position for the illuminated entrysystem to operate.
4
3
2
1
2006 Navigator (nav)Owners Guide (post-2002-fmt)USA (fus)
Locks and Security
178

Smart unlocking featureThe smart unlocking feature prevents you from locking yourself out ofthe vehicle by unlocking the doors if the key is in the ignition and thedriver’s door is open/ajar when the vehicle doors were locked using thepower lock/unlock control.The smart unlocking feature operates independent of the position of theignition.
Autolocking featureThe autolocking feature locks all vehicle doors when the followingconditions are met:• All doors, including the liftgate, are closed.• The brake is pressed while the ignition is in the 3 (ON) position.• The transmission is in either a forward or reverse gear.• The vehicle has a speed of 5 mph (8 km/h) or greater.This feature relocks all doors if any door is opened, the brake is pressedafter all doors are closed again and the vehicle has a speed of 5 mph(8 km/h) or greater.
Deactivating/activating the autolocking featureFor vehicles equipped with a message center, the autolocking featuremay be deactivated/activated by selecting the autolock function(accessed by pressing the SETUP control). Press the RESET control toturn the autolock function on or off. Refer to the Message center sectionin the Driver Controls chapter for additional information.
For vehicles not equipped with a message center, the feature may bedeactivated by taking your vehicle to an authorized Ford dealer.
KEYLESS ENTRY SYSTEMWith the keyless entry keypad, you can:
• lock or unlock the vehicle doors without using the key,
• release the liftgate glass,
• enable or disable the autolock function, and
• add or delete a 5–digit personal user code.
Your vehicle has a factory set 5–digit code that operates the keylessentry system. You can also program your own 5–digit personal entrycode. The factory-set code is located:
• on the owner’s wallet card in the glove compartment,
2006 Navigator (nav)Owners Guide (post-2002-fmt)USA (fus)
Locks and Security
179
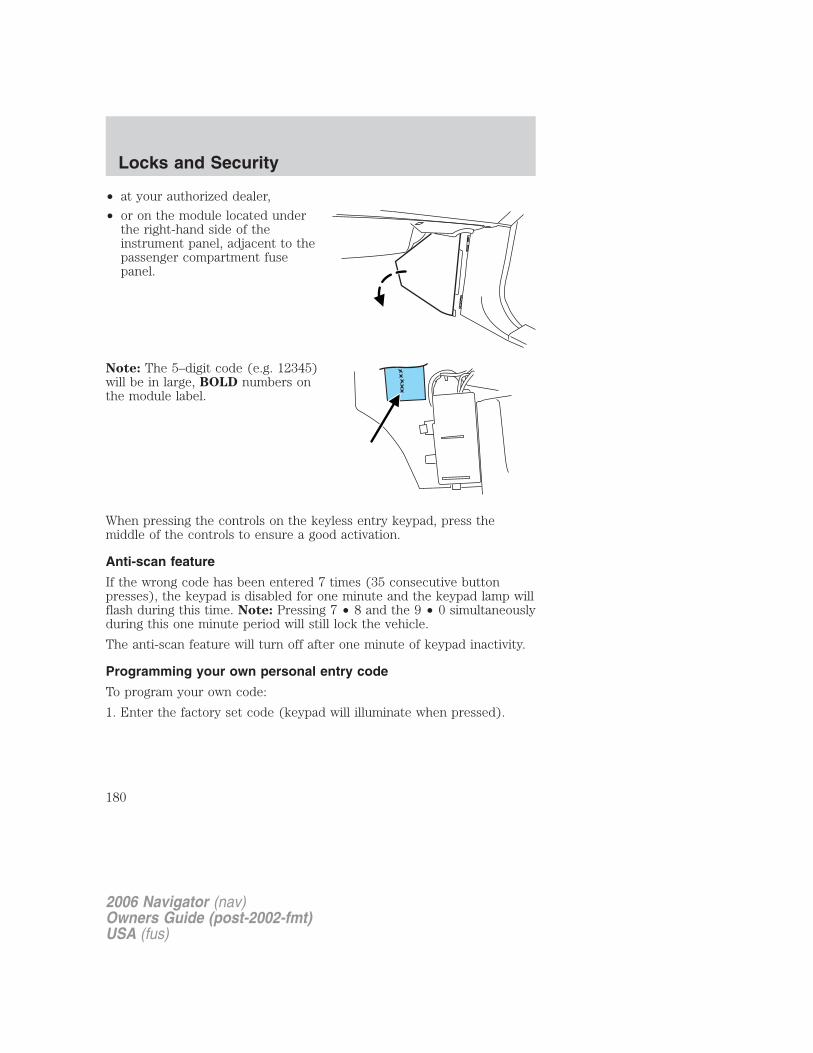
• at your authorized dealer,
• or on the module located underthe right-hand side of theinstrument panel, adjacent to thepassenger compartment fusepanel.
Note: The 5–digit code (e.g. 12345)will be in large, BOLD numbers onthe module label.
When pressing the controls on the keyless entry keypad, press themiddle of the controls to ensure a good activation.
Anti-scan feature
If the wrong code has been entered 7 times (35 consecutive buttonpresses), the keypad is disabled for one minute and the keypad lamp willflash during this time. Note: Pressing 7 • 8 and the 9 • 0 simultaneouslyduring this one minute period will still lock the vehicle.
The anti-scan feature will turn off after one minute of keypad inactivity.
Programming your own personal entry code
To program your own code:
1. Enter the factory set code (keypad will illuminate when pressed).
2006 Navigator (nav)Owners Guide (post-2002-fmt)USA (fus)
Locks and Security
180
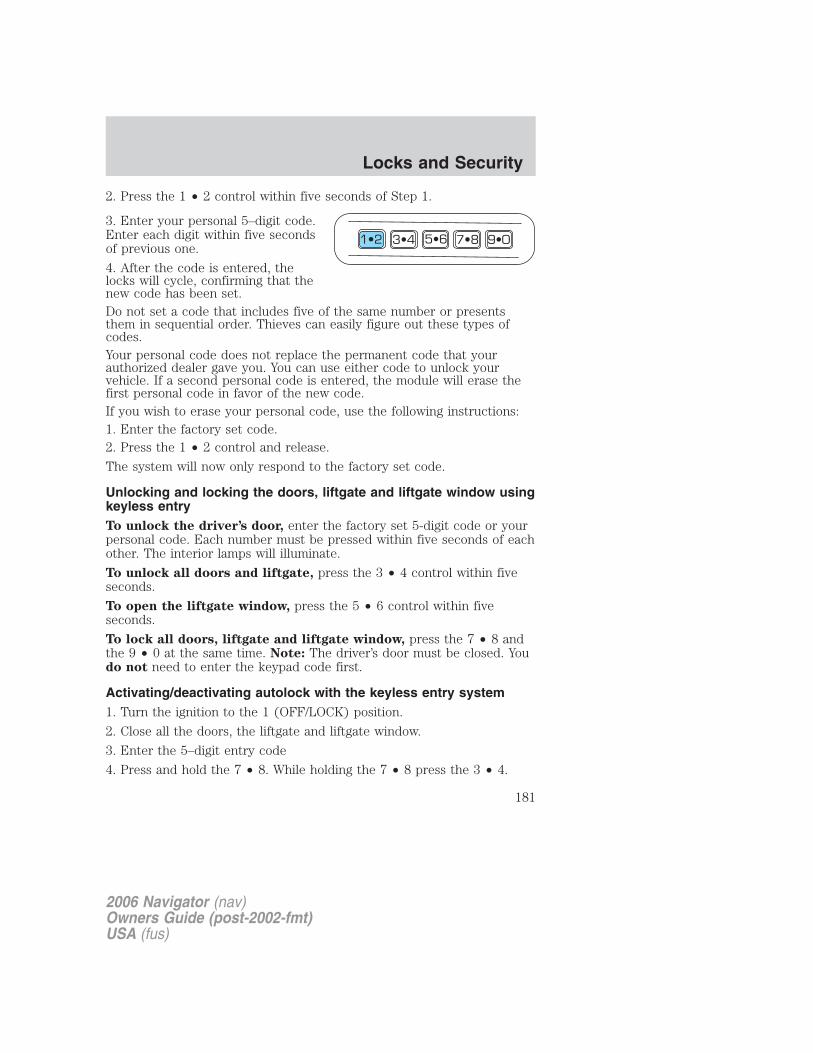
2. Press the 1 • 2 control within five seconds of Step 1.
3. Enter your personal 5–digit code.Enter each digit within five secondsof previous one.
4. After the code is entered, thelocks will cycle, confirming that thenew code has been set.Do not set a code that includes five of the same number or presentsthem in sequential order. Thieves can easily figure out these types ofcodes.Your personal code does not replace the permanent code that yourauthorized dealer gave you. You can use either code to unlock yourvehicle. If a second personal code is entered, the module will erase thefirst personal code in favor of the new code.If you wish to erase your personal code, use the following instructions:1. Enter the factory set code.2. Press the 1 • 2 control and release.
The system will now only respond to the factory set code.
Unlocking and locking the doors, liftgate and liftgate window usingkeyless entryTo unlock the driver’s door, enter the factory set 5-digit code or yourpersonal code. Each number must be pressed within five seconds of eachother. The interior lamps will illuminate.
To unlock all doors and liftgate, press the 3 • 4 control within fiveseconds.
To open the liftgate window, press the 5 • 6 control within fiveseconds.
To lock all doors, liftgate and liftgate window, press the 7 • 8 andthe 9 • 0 at the same time. Note: The driver’s door must be closed. Youdo not need to enter the keypad code first.
Activating/deactivating autolock with the keyless entry system1. Turn the ignition to the 1 (OFF/LOCK) position.
2. Close all the doors, the liftgate and liftgate window.
3. Enter the 5–digit entry code
4. Press and hold the 7 • 8. While holding the 7 • 8 press the 3 • 4.
2006 Navigator (nav)Owners Guide (post-2002-fmt)USA (fus)
Locks and Security
181

5. Release the 3 • 4.6. Release the 7 • 8.The user should receive a horn chirp to indicate the system has beendisabled or a chirp followed by a honk to indicate the system has beenenabled.
SECURILOCK� PASSIVE ANTI-THEFT SYSTEMSecuriLock� passive anti-theft system is an engine immobilizationsystem. This system is designed to help prevent the engine from beingstarted unless a coded key programmed to your vehicle is used.The SecuriLock� passive anti-theft system is not compatible withnon-Ford aftermarket remote start systems. Use of these systems mayresult in vehicle starting problems and a loss of security protection.
THEFT INDICATORThe theft indicator is the flashing red indicator located on the dashpanel.• When the ignition is in the 1 (OFF/LOCK) position, the indicator will
flash once every 2 seconds to indicate the SecuriLock� system isfunctioning as a theft deterrent.
• When the ignition is in the 3 (ON) position, the indicator will glow for3 seconds to indicate normal system functionality.
If a problem occurs with the SecuriLock� system, the indicator will flashrapidly or glow steadily when the ignition is in the 3 (ON) position. Ifthis occurs, the vehicle should be taken to an authorized dealer forservice.
Automatic armingThe vehicle is armed immediatelyafter switching the ignition to the 1(OFF/LOCK) position.
Automatic disarmingSwitching the ignition to the 3 (ON) position with a coded key disarmsthe vehicle.
4
3
2
1
2006 Navigator (nav)Owners Guide (post-2002-fmt)USA (fus)
Locks and Security
182
Key informationYour vehicle is supplied with two coded keys. Only a coded key willstart your vehicle. Spare coded keys can be purchased from yourauthorized dealer. Your authorized dealer can program your key or youcan “do it yourself.” Refer to the Programming spare keys section inthis chapter.The following items may prevent the vehicle from starting:• Large metallic objects• Electronic devices on the key chain that can be used to purchase
gasoline or similar items• A second key on the same key ring as the coded key
If any of these items are present, you need to keep these objects fromtouching the coded key while starting the engine. These objects anddevices cannot damage the coded key, but can cause a momentary “nostart” condition if they are too close to the key during engine start. If aproblem occurs, turn ignition to the OFF position and restart the enginewith all other objects on the key ring held away from the ignition key.Check to make sure the coded key is an approved Lincoln coded key.
If your keys are lost or stolen you will need to do the following:• Use your spare key to start the vehicle, or• Have your vehicle towed to a authorized dealer or a locksmith. The
key codes will need to be erased from your vehicle and new key codeswill need to be re-coded.
Replacing coded keys can be very costly and you may want to store anextra programmed key away from the vehicle in a safe place to preventan unforeseen inconvenience.The correct coded key must be used for your vehicle. The use of thewrong type of coded key may lead to a “no start” condition.If an unprogrammed key is used in the ignition it will cause a “nostart” condition.
Programming spare keysA maximum of eight keys can be coded to your vehicle. OnlySecuriLock� keys can be used. To program a coded key yourself, youwill need two previously programmed coded keys (keys that alreadyoperate your vehicle’s engine) and the new unprogrammed key(s) readilyaccessible for timely implementation of each step in the procedure.If two previously programmed coded keys are not available, you mustbring your vehicle to your authorized dealer to have the spare codedkey(s) programmed.
2006 Navigator (nav)Owners Guide (post-2002-fmt)USA (fus)
Locks and Security
183
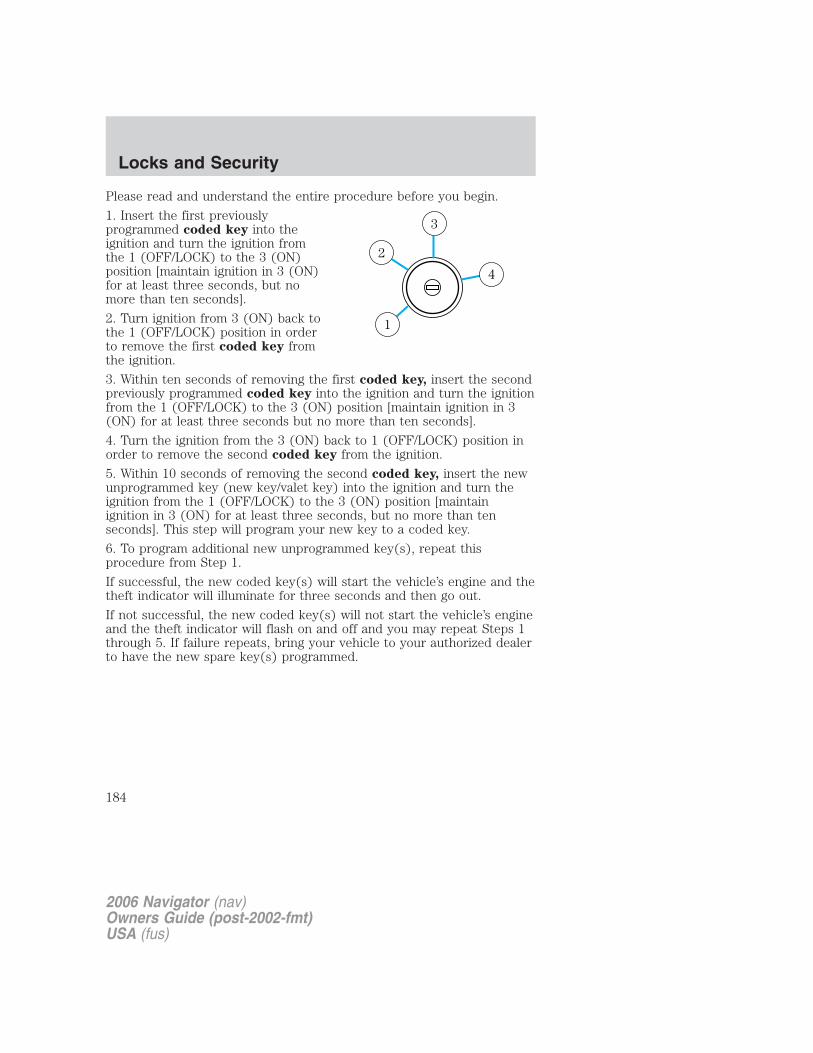
Please read and understand the entire procedure before you begin.
1. Insert the first previouslyprogrammed coded key into theignition and turn the ignition fromthe 1 (OFF/LOCK) to the 3 (ON)position [maintain ignition in 3 (ON)for at least three seconds, but nomore than ten seconds].
2. Turn ignition from 3 (ON) back tothe 1 (OFF/LOCK) position in orderto remove the first coded key fromthe ignition.
3. Within ten seconds of removing the first coded key, insert the secondpreviously programmed coded key into the ignition and turn the ignitionfrom the 1 (OFF/LOCK) to the 3 (ON) position [maintain ignition in 3(ON) for at least three seconds but no more than ten seconds].
4. Turn the ignition from the 3 (ON) back to 1 (OFF/LOCK) position inorder to remove the second coded key from the ignition.
5. Within 10 seconds of removing the second coded key, insert the newunprogrammed key (new key/valet key) into the ignition and turn theignition from the 1 (OFF/LOCK) to the 3 (ON) position [maintainignition in 3 (ON) for at least three seconds, but no more than tenseconds]. This step will program your new key to a coded key.
6. To program additional new unprogrammed key(s), repeat thisprocedure from Step 1.
If successful, the new coded key(s) will start the vehicle’s engine and thetheft indicator will illuminate for three seconds and then go out.
If not successful, the new coded key(s) will not start the vehicle’s engineand the theft indicator will flash on and off and you may repeat Steps 1through 5. If failure repeats, bring your vehicle to your authorized dealerto have the new spare key(s) programmed.
4
3
2
1
2006 Navigator (nav)Owners Guide (post-2002-fmt)USA (fus)
Locks and Security
184
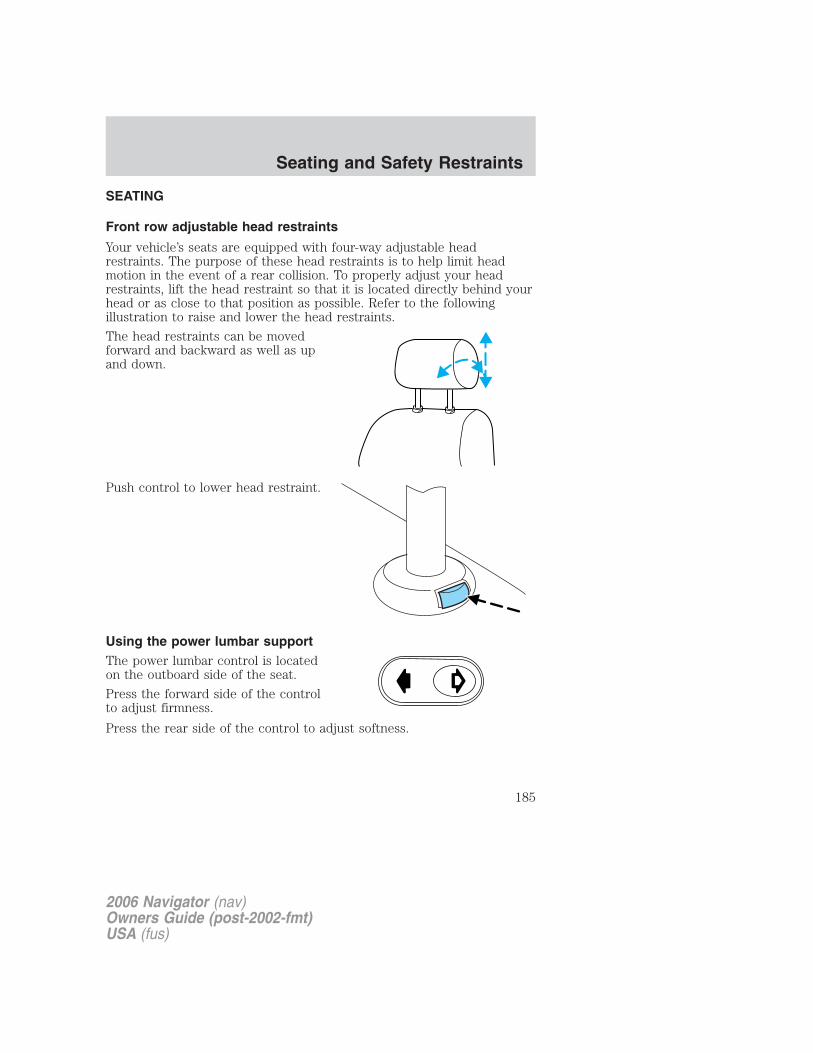
SEATING
Front row adjustable head restraints
Your vehicle’s seats are equipped with four-way adjustable headrestraints. The purpose of these head restraints is to help limit headmotion in the event of a rear collision. To properly adjust your headrestraints, lift the head restraint so that it is located directly behind yourhead or as close to that position as possible. Refer to the followingillustration to raise and lower the head restraints.
The head restraints can be movedforward and backward as well as upand down.
Push control to lower head restraint.
Using the power lumbar supportThe power lumbar control is locatedon the outboard side of the seat.
Press the forward side of the controlto adjust firmness.
Press the rear side of the control to adjust softness.
2006 Navigator (nav)Owners Guide (post-2002-fmt)USA (fus)
Seating and Safety Restraints
185
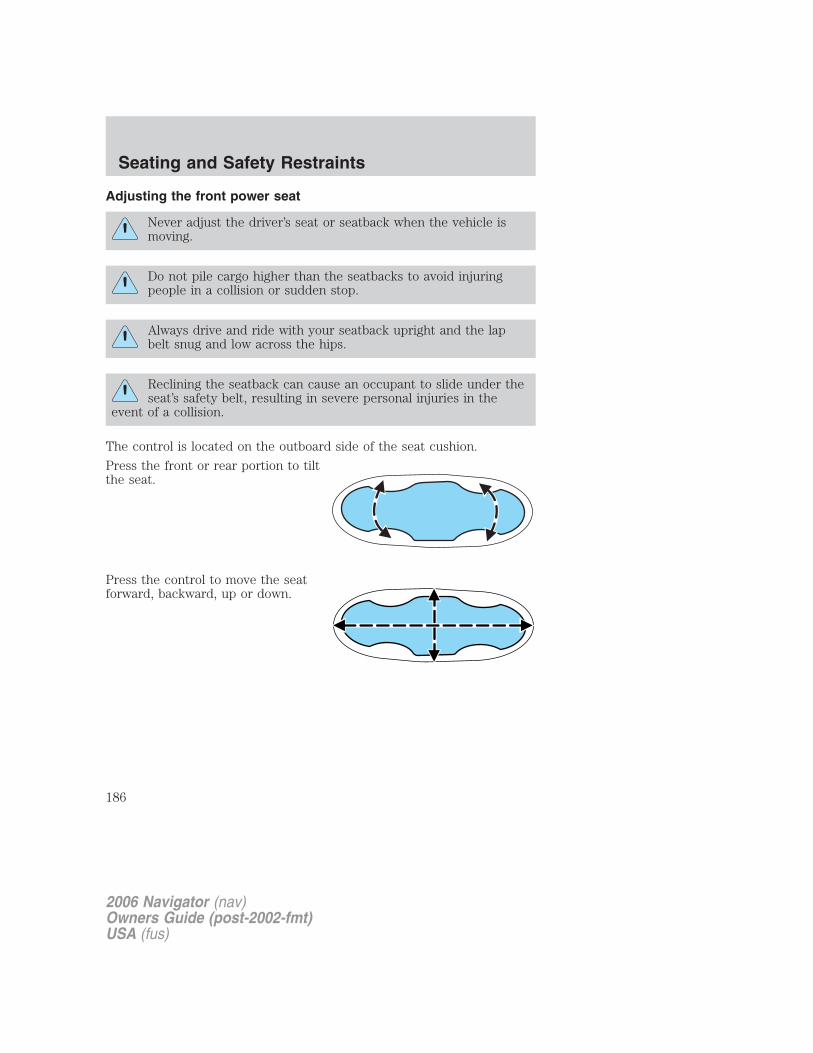
Adjusting the front power seat
Never adjust the driver’s seat or seatback when the vehicle ismoving.
Do not pile cargo higher than the seatbacks to avoid injuringpeople in a collision or sudden stop.
Always drive and ride with your seatback upright and the lapbelt snug and low across the hips.
Reclining the seatback can cause an occupant to slide under theseat’s safety belt, resulting in severe personal injuries in the
event of a collision.
The control is located on the outboard side of the seat cushion.
Press the front or rear portion to tiltthe seat.
Press the control to move the seatforward, backward, up or down.
2006 Navigator (nav)Owners Guide (post-2002-fmt)USA (fus)
Seating and Safety Restraints
186
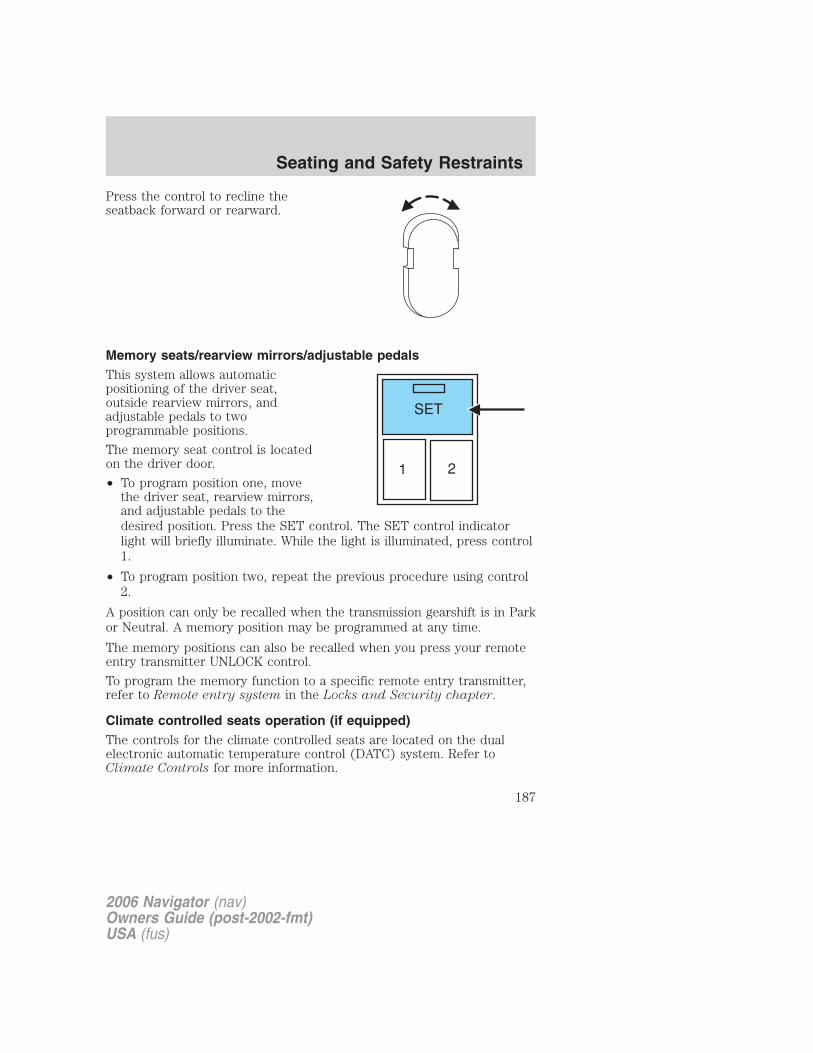
Press the control to recline theseatback forward or rearward.
Memory seats/rearview mirrors/adjustable pedalsThis system allows automaticpositioning of the driver seat,outside rearview mirrors, andadjustable pedals to twoprogrammable positions.
The memory seat control is locatedon the driver door.
• To program position one, movethe driver seat, rearview mirrors,and adjustable pedals to thedesired position. Press the SET control. The SET control indicatorlight will briefly illuminate. While the light is illuminated, press control1.
• To program position two, repeat the previous procedure using control2.
A position can only be recalled when the transmission gearshift is in Parkor Neutral. A memory position may be programmed at any time.
The memory positions can also be recalled when you press your remoteentry transmitter UNLOCK control.
To program the memory function to a specific remote entry transmitter,refer to Remote entry system in the Locks and Security chapter.
Climate controlled seats operation (if equipped)The controls for the climate controlled seats are located on the dualelectronic automatic temperature control (DATC) system. Refer toClimate Controls for more information.
2006 Navigator (nav)Owners Guide (post-2002-fmt)USA (fus)
Seating and Safety Restraints
187

Climate controlled seats air filter replacement
The climate controlled seat system includes an air filter that has to bereplaced periodically. Refer to the scheduled maintenance informationfor more information.
• There is a filter located underboth front seats.
• It can be accessed from thesecond row seat. Move the frontseat all the way forward and upto ease access.
To remove climate controlled seatair filter:
• Remove key from ignition.
• Push on the outside rigid edge ofthe air filter at the center androtate downward once tab isreleased.
����
����
2006 Navigator (nav)Owners Guide (post-2002-fmt)USA (fus)
Seating and Safety Restraints
188
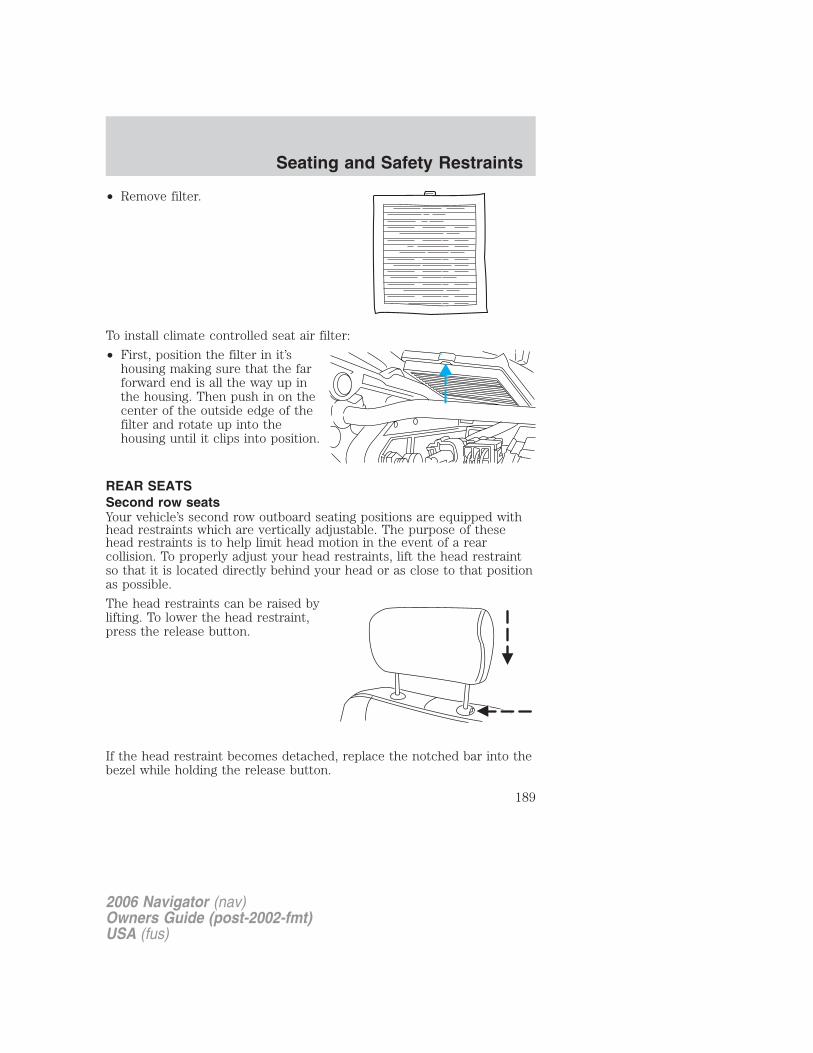
• Remove filter.
To install climate controlled seat air filter:
• First, position the filter in it’shousing making sure that the farforward end is all the way up inthe housing. Then push in on thecenter of the outside edge of thefilter and rotate up into thehousing until it clips into position.
REAR SEATSSecond row seatsYour vehicle’s second row outboard seating positions are equipped withhead restraints which are vertically adjustable. The purpose of thesehead restraints is to help limit head motion in the event of a rearcollision. To properly adjust your head restraints, lift the head restraintso that it is located directly behind your head or as close to that positionas possible.
The head restraints can be raised bylifting. To lower the head restraint,press the release button.
If the head restraint becomes detached, replace the notched bar into thebezel while holding the release button.
2006 Navigator (nav)Owners Guide (post-2002-fmt)USA (fus)
Seating and Safety Restraints
189
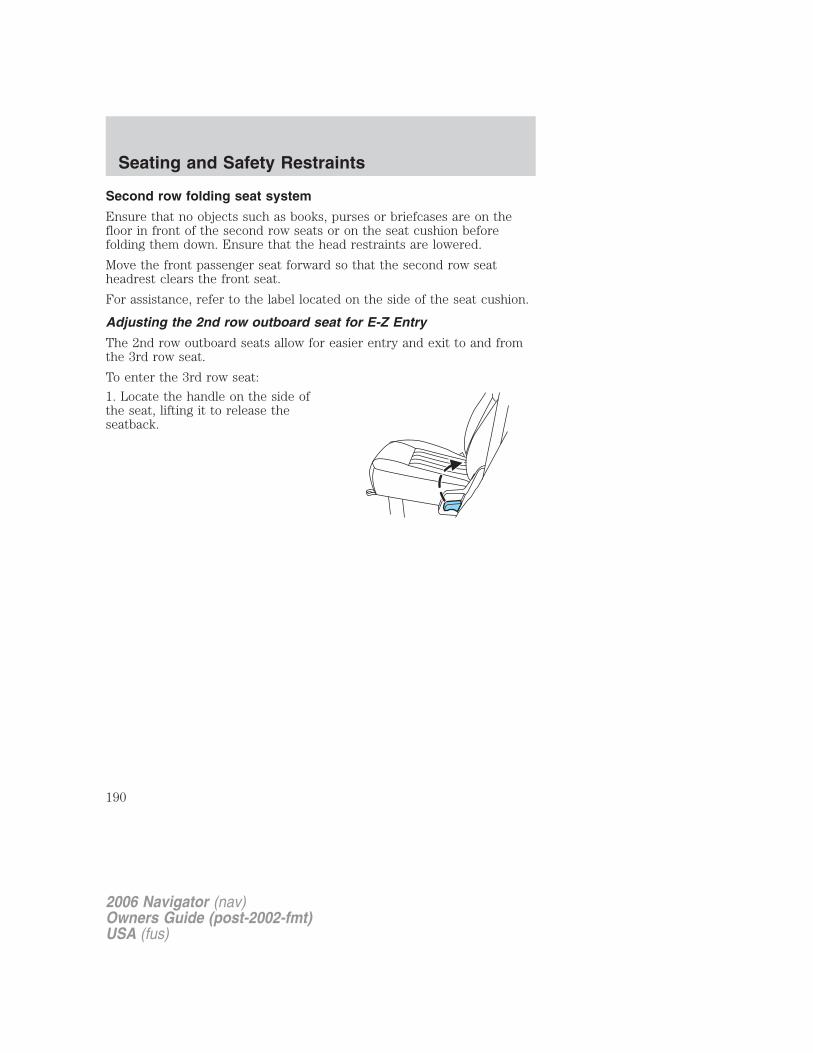
Second row folding seat system
Ensure that no objects such as books, purses or briefcases are on thefloor in front of the second row seats or on the seat cushion beforefolding them down. Ensure that the head restraints are lowered.
Move the front passenger seat forward so that the second row seatheadrest clears the front seat.
For assistance, refer to the label located on the side of the seat cushion.
Adjusting the 2nd row outboard seat for E-Z Entry
The 2nd row outboard seats allow for easier entry and exit to and fromthe 3rd row seat.
To enter the 3rd row seat:
1. Locate the handle on the side ofthe seat, lifting it to release theseatback.
2006 Navigator (nav)Owners Guide (post-2002-fmt)USA (fus)
Seating and Safety Restraints
190

2. Pull up on the handle located at the back of the seat. The seat will flipforward.
2006 Navigator (nav)Owners Guide (post-2002-fmt)USA (fus)
Seating and Safety Restraints
191
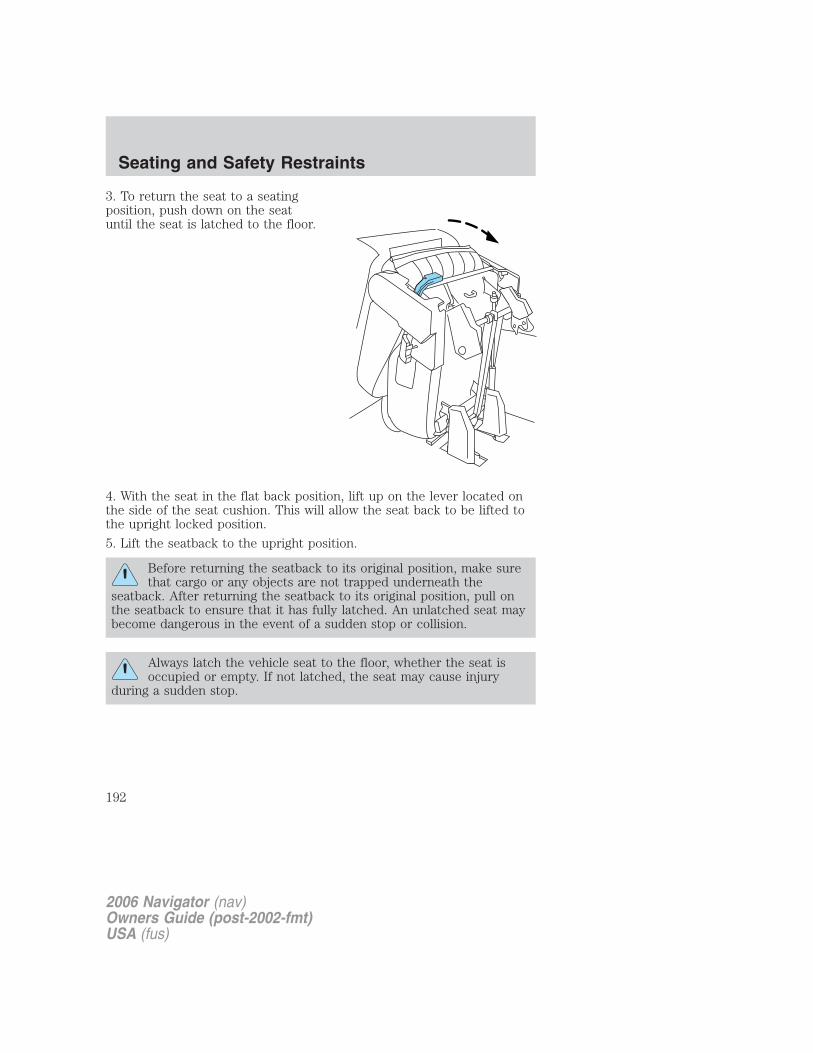
3. To return the seat to a seatingposition, push down on the seatuntil the seat is latched to the floor.
4. With the seat in the flat back position, lift up on the lever located onthe side of the seat cushion. This will allow the seat back to be lifted tothe upright locked position.
5. Lift the seatback to the upright position.
Before returning the seatback to its original position, make surethat cargo or any objects are not trapped underneath the
seatback. After returning the seatback to its original position, pull onthe seatback to ensure that it has fully latched. An unlatched seat maybecome dangerous in the event of a sudden stop or collision.
Always latch the vehicle seat to the floor, whether the seat isoccupied or empty. If not latched, the seat may cause injury
during a sudden stop.
2006 Navigator (nav)Owners Guide (post-2002-fmt)USA (fus)
Seating and Safety Restraints
192
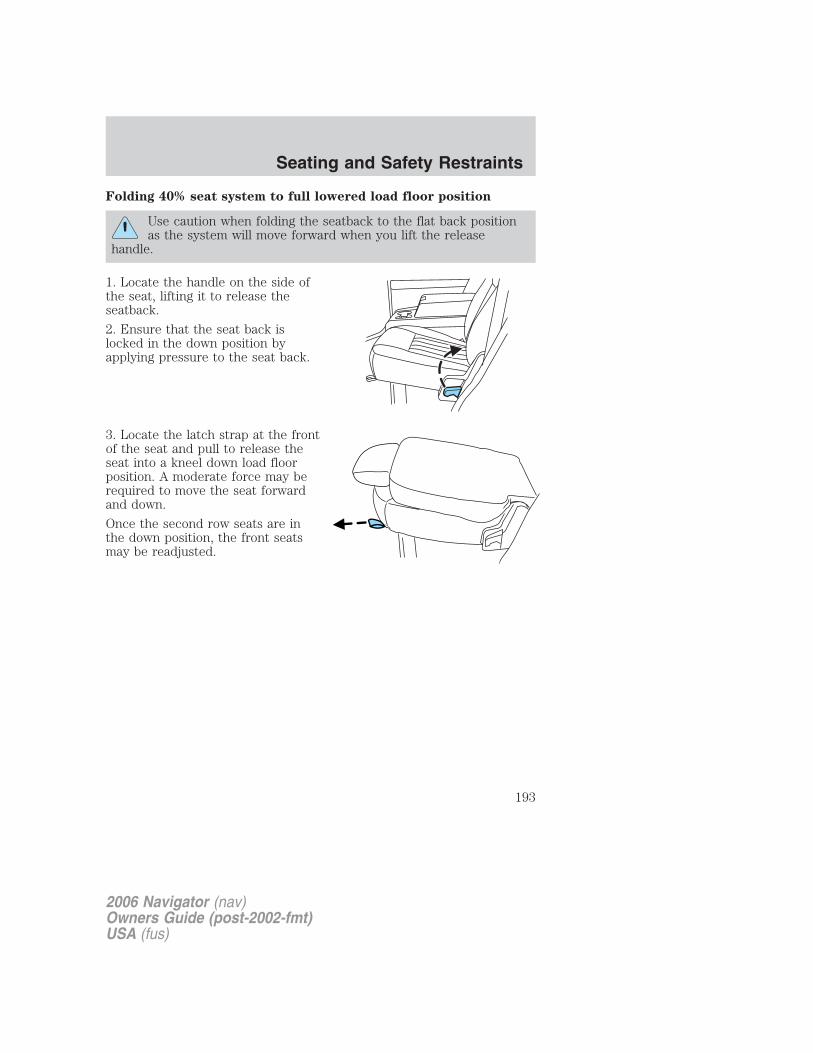
Folding 40% seat system to full lowered load floor position
Use caution when folding the seatback to the flat back positionas the system will move forward when you lift the release
handle.
1. Locate the handle on the side ofthe seat, lifting it to release theseatback.
2. Ensure that the seat back islocked in the down position byapplying pressure to the seat back.
3. Locate the latch strap at the frontof the seat and pull to release theseat into a kneel down load floorposition. A moderate force may berequired to move the seat forwardand down.
Once the second row seats are inthe down position, the front seatsmay be readjusted.
2006 Navigator (nav)Owners Guide (post-2002-fmt)USA (fus)
Seating and Safety Restraints
193

Returning to the upright position from full lowered load floorposition
The seatback cannot be returned to the upright position until the seat isreturned from the kneel down position. To return the seat to the uprightposition:
From the full lowered position:
1. Lift and pull the seat rearwarduntil the latch is engaged.
Do not attempt to un-latch therear floor hooks while the seatis in the kneel down position.
The rear latch hooks mustbe properly engaged with
the floor striker. Position the rearlegs of the seat over the floorstrikers and engage.
2. With the seat in the flat back
position, lift up on the lever locatedon the side of the seat cushion. Thiswill allow the seat back to be liftedto the upright locked position.
2006 Navigator (nav)Owners Guide (post-2002-fmt)USA (fus)
Seating and Safety Restraints
194
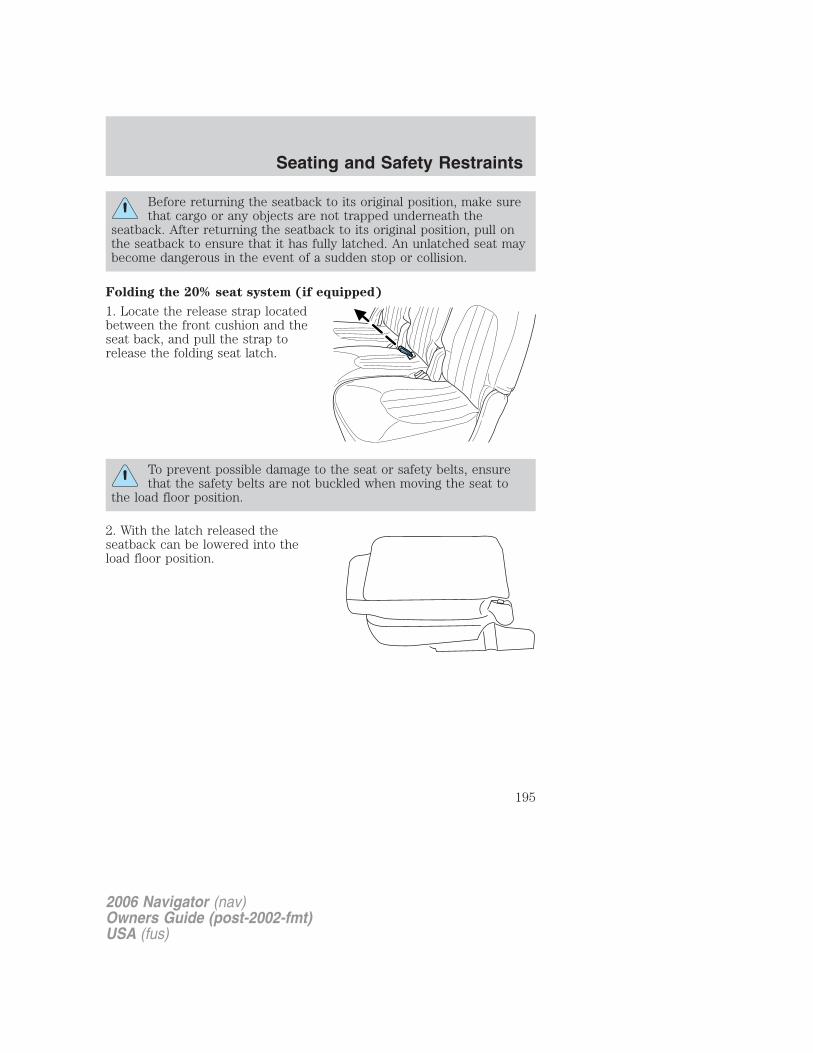
Before returning the seatback to its original position, make surethat cargo or any objects are not trapped underneath the
seatback. After returning the seatback to its original position, pull onthe seatback to ensure that it has fully latched. An unlatched seat maybecome dangerous in the event of a sudden stop or collision.
Folding the 20% seat system (if equipped)
1. Locate the release strap locatedbetween the front cushion and theseat back, and pull the strap torelease the folding seat latch.
To prevent possible damage to the seat or safety belts, ensurethat the safety belts are not buckled when moving the seat to
the load floor position.
2. With the latch released theseatback can be lowered into theload floor position.
2006 Navigator (nav)Owners Guide (post-2002-fmt)USA (fus)
Seating and Safety Restraints
195

3. To return the seat to the uprightposition, lift the seatback until thelatch is fully engaged.
Before returning theseatback to its original
position, make sure that cargo orany objects are not trappedunderneath the seatback. Afterreturning the seatback to itsoriginal position, pull on theseatback to ensure that it has fullylatched. An unlatched seat maybecome dangerous in the event ofa sudden stop or collision.
Adjusting the second row 20% seat (if equipped)Lift the handle to move the seatforward or backward.
Note: This seat can be moved forward to keep a child in a childrestraint close to the front seat occupants. The seat should bemoved to the full rearward position when it is occupied by olderchildren or adults.
2006 Navigator (nav)Owners Guide (post-2002-fmt)USA (fus)
Seating and Safety Restraints
196
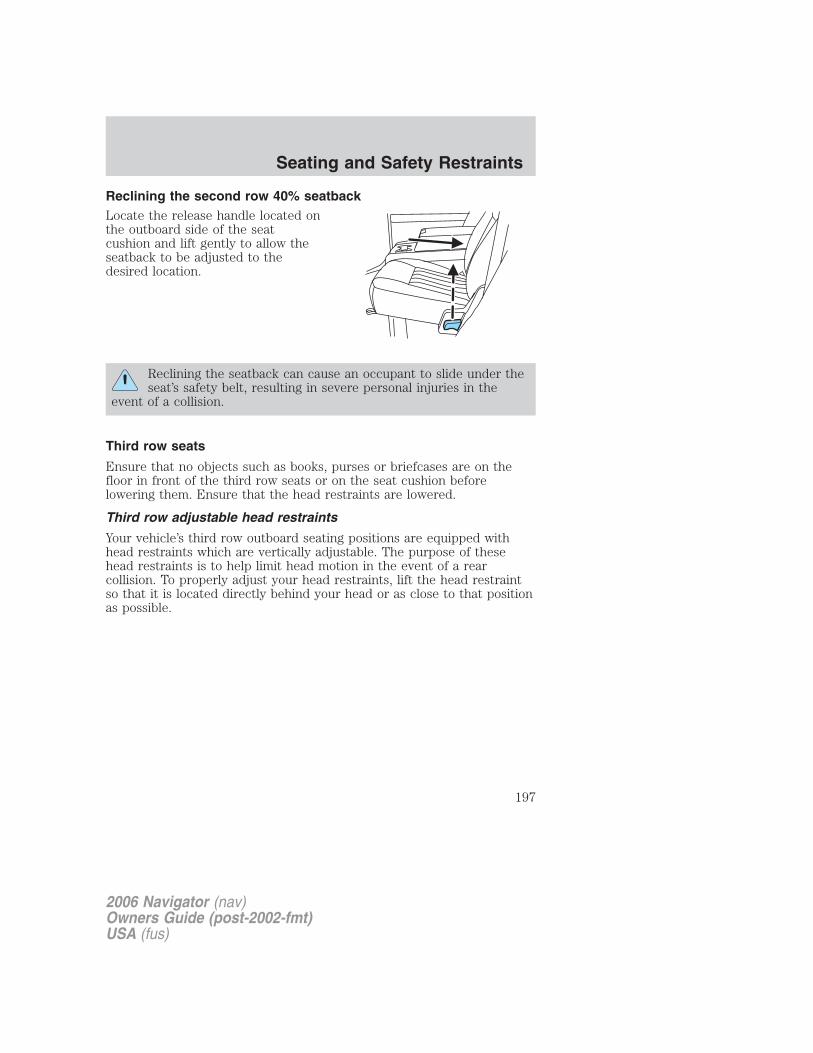
Reclining the second row 40% seatbackLocate the release handle located onthe outboard side of the seatcushion and lift gently to allow theseatback to be adjusted to thedesired location.
Reclining the seatback can cause an occupant to slide under theseat’s safety belt, resulting in severe personal injuries in the
event of a collision.
Third row seats
Ensure that no objects such as books, purses or briefcases are on thefloor in front of the third row seats or on the seat cushion beforelowering them. Ensure that the head restraints are lowered.
Third row adjustable head restraints
Your vehicle’s third row outboard seating positions are equipped withhead restraints which are vertically adjustable. The purpose of thesehead restraints is to help limit head motion in the event of a rearcollision. To properly adjust your head restraints, lift the head restraintso that it is located directly behind your head or as close to that positionas possible.
2006 Navigator (nav)Owners Guide (post-2002-fmt)USA (fus)
Seating and Safety Restraints
197
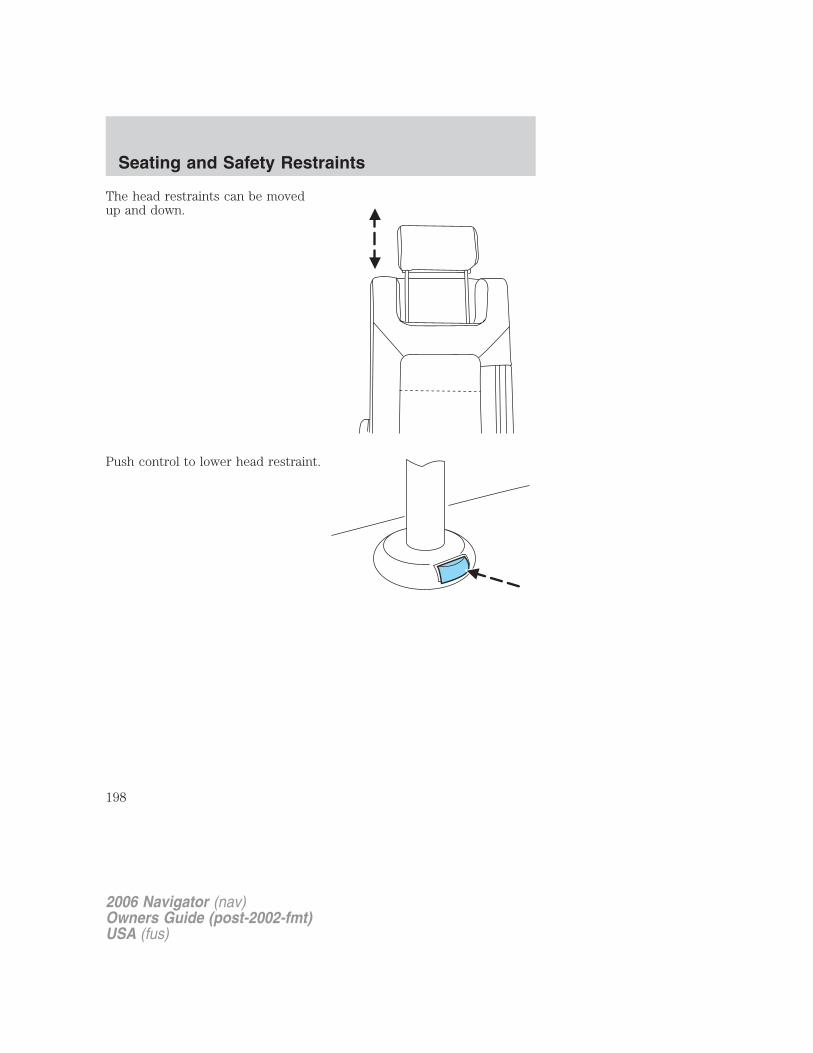
The head restraints can be movedup and down.
Push control to lower head restraint.
2006 Navigator (nav)Owners Guide (post-2002-fmt)USA (fus)
Seating and Safety Restraints
198
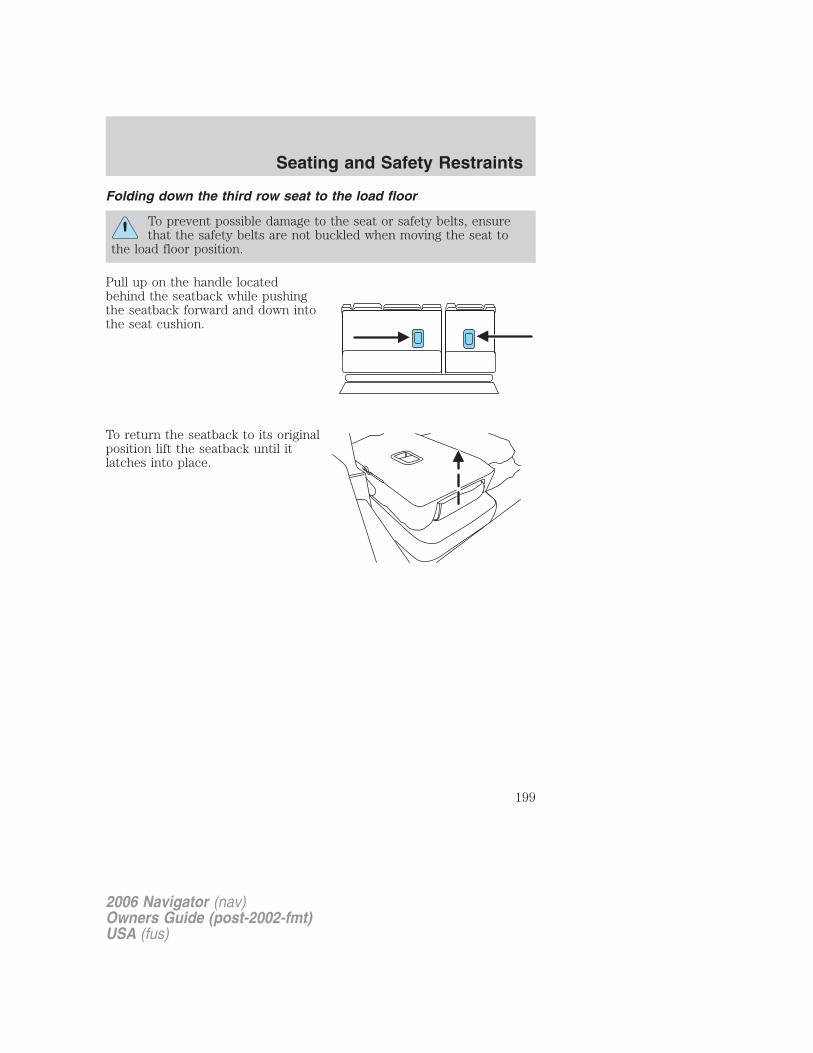
Folding down the third row seat to the load floor
To prevent possible damage to the seat or safety belts, ensurethat the safety belts are not buckled when moving the seat to
the load floor position.
Pull up on the handle locatedbehind the seatback while pushingthe seatback forward and down intothe seat cushion.
To return the seatback to its originalposition lift the seatback until itlatches into place.
2006 Navigator (nav)Owners Guide (post-2002-fmt)USA (fus)
Seating and Safety Restraints
199
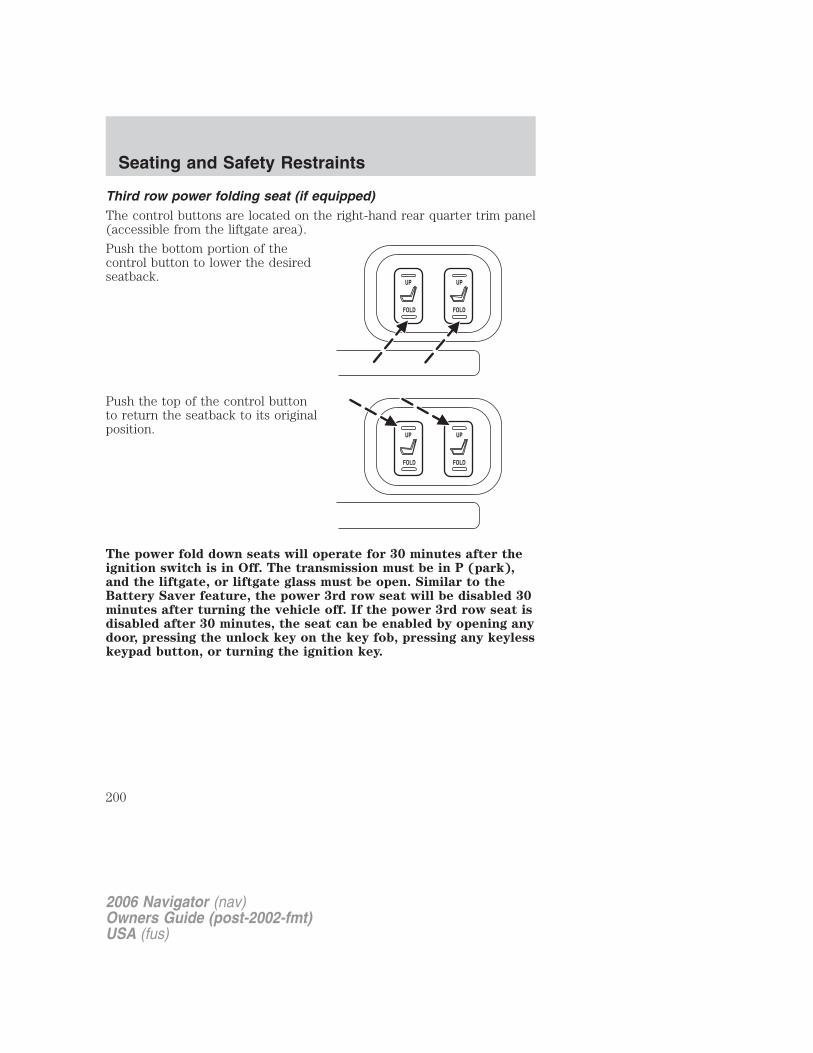
Third row power folding seat (if equipped)The control buttons are located on the right-hand rear quarter trim panel(accessible from the liftgate area).
Push the bottom portion of thecontrol button to lower the desiredseatback.
Push the top of the control buttonto return the seatback to its originalposition.
The power fold down seats will operate for 30 minutes after theignition switch is in Off. The transmission must be in P (park),and the liftgate, or liftgate glass must be open. Similar to theBattery Saver feature, the power 3rd row seat will be disabled 30minutes after turning the vehicle off. If the power 3rd row seat isdisabled after 30 minutes, the seat can be enabled by opening anydoor, pressing the unlock key on the key fob, pressing any keylesskeypad button, or turning the ignition key.
2006 Navigator (nav)Owners Guide (post-2002-fmt)USA (fus)
Seating and Safety Restraints
200
SAFETY RESTRAINTS
Personal Safety System�
The Personal Safety System� provides an improved overall level offrontal crash protection to front seat occupants and is designed to helpfurther reduce the risk of airbag-related injuries. The system is able toanalyze different occupant conditions and crash severity before activatingthe appropriate safety devices to help better protect a range ofoccupants in a variety of frontal crash situations.
Your vehicle’s Personal Safety System� consists of:
• Driver and passenger dual-stage airbag supplemental restraints.
• Front safety belts with pretensioners, energy management retractors,and safety belt usage sensors.
• Driver’s seat position sensor.
• Front crash severity sensor.
• Restraints Control Module (RCM).
• Restraint system warning light and back-up tone.
• The electrical wiring for the airbags, crash sensor(s), safety beltpretensioners, front safety belt usage sensors, driver seat positionsensor, and indicator lights.
How does the Personal Safety System� work?The Personal Safety System� can adapt the deployment strategy of yourvehicle’s safety devices according to crash severity and occupantconditions. A collection of crash and occupant sensors providesinformation to the Restraints Control Module (RCM). During a crash, theRCM activates the safety belt pretensioners and/or either one or bothstages of the dual-stage airbag supplemental restraints based on crashseverity and occupant conditions.
The fact that the pretensioners or airbags did not activate for both frontseat occupants in a collision does not mean that something is wrong withthe system. Rather, it means the Personal Safety System� determinedthe accident conditions (crash severity, belt usage, etc.) were notappropriate to activate these safety devices. Front airbags are designedto activate only in frontal and near-frontal collisions, not rollovers,side-impacts, or rear-impacts unless the collision causes sufficientlongitudinal deceleration.
2006 Navigator (nav)Owners Guide (post-2002-fmt)USA (fus)
Seating and Safety Restraints
201
Driver and passenger dual-stage airbag supplemental restraintsThe dual-stage airbags offer the capability to tailor the level of airbaginflation energy. A lower, less forceful energy level is provided for morecommon, moderate-severity impacts. A higher energy level is used forthe most severe impacts. Refer to Airbag supplemental restraintssection in this chapter.
Front crash severity sensorThe front crash severity sensor enhances the ability to detect theseverity of an impact. Positioned up front, it provides valuableinformation early in the crash event on the severity of the impact. Thisallows your Personal Safety System� to distinguish between differentlevels of crash severity and modify the deployment strategy of thedual-stage airbags and safety belt pretensioners.
Driver’s seat position sensorThe driver’s seat position sensor allows your Personal Safety System� totailor the deployment level of the driver dual-stage airbag based on seatposition. The system is designed to help protect smaller drivers sittingclose to the driver airbag by providing a lower airbag output level.
Front safety belt usage sensorsThe front safety belt usage sensors detect whether or not the driver andfront outboard passenger safety belts are fastened. This informationallows your Personal Safety System� to tailor the airbag deployment andsafety belt pretensioner activation depending upon safety belt usage.Refer to Safety restraints section in this chapter.
Front safety belt pretensionersThe safety belt pretensioners at the front outboard seating positions aredesigned to tighten the safety belts firmly against the occupant’s bodyduring frontal collisions, and in side collisions and rollovers when thevehicle is equipped with the Safety Canopy� system. This maximizes theeffectiveness of the safety belts. In frontal collisions, the safety beltpretensioners can be activated alone or, if the collision is of sufficientseverity, together with the front airbags.
Front safety belt energy management retractorsThe front outboard safety belt energy management retractors allowwebbing to be pulled out of the retractor in a gradual and controlledmanner in response to the occupant’s forward momentum. This helpsreduce the risk of force-related injuries to the occupant’s chest bylimiting the load on the occupant. Refer to Safety restraints section inthis chapter.
2006 Navigator (nav)Owners Guide (post-2002-fmt)USA (fus)
Seating and Safety Restraints
202
Determining if the Personal Safety System� is operationalThe Personal Safety System� uses a warning light in the instrumentcluster or a back-up tone to indicate the condition of the system. Referto the Warning lights and chimes section in the Instrument Clusterchapter. Routine maintenance of the Personal Safety System� is notrequired.
The Restraints Control Module (RCM) monitors its own internal circuitsand the circuits for the airbag supplemental restraints, crash sensor(s),safety belt pretensioners, front safety belt buckle sensors, and the driverseat position sensor. In addition, the RCM also monitors the restraintswarning light in the instrument cluster. A difficulty with the system isindicated by one or more of the following:
• The warning light will either flash or stay lit.
• The warning light will not illuminate immediately after the ignition isturned on.
• A series of five beeps will be heard. The tone pattern will repeatperiodically until the problem and warning light are repaired.
If any of these things happen, even intermittently, have the PersonalSafety System� serviced at an authorized dealer immediately. Unlessserviced, the system may not function properly in the event of acollision.
Safety restraints precautions
Always drive and ride with your seatback upright and the lapbelt snug and low across the hips.
To reduce the risk of injury, make sure children sit in the backseat where they can be properly restrained.
Never let a passenger hold a child on his or her lap while thevehicle is moving. The passenger cannot protect the child from
injury in a collision.
All occupants of the vehicle, including the driver, should alwaysproperly wear their safety belts, even when an airbag
supplemental restraint system (SRS) is provided.
2006 Navigator (nav)Owners Guide (post-2002-fmt)USA (fus)
Seating and Safety Restraints
203
It is extremely dangerous to ride in a cargo area, inside oroutside of a vehicle. In a collision, people riding in these areas
are more likely to be seriously injured or killed. Do not allow people toride in any area of your vehicle that is not equipped with seats andsafety belts. Be sure everyone in your vehicle is in a seat and using asafety belt properly.
In a rollover crash, an unbelted person is significantly more likelyto die than a person wearing a safety belt.
Each seating position in your vehicle has a specific safety beltassembly which is made up of one buckle and one tongue that
are designed to be used as a pair. 1) Use the shoulder belt on theoutside shoulder only. Never wear the shoulder belt under the arm. 2)Never swing the safety belt around your neck over the inside shoulder.3) Never use a single belt for more than one person.
Always transport children 12 years old and under in the backseat and always properly use appropriate child restraints.
Safety belts and seats can become hot in a vehicle that has beenclosed up in sunny weather; they could burn a small child. Check
seat covers and buckles before you place a child anywhere near them.
Combination lap and shoulder belts
1. Insert the belt tongue into the proper buckle (the buckle closest tothe direction the tongue is coming from) until you hear a snap and feel itlatch. Make sure the tongue is securely fastened in the buckle.
2006 Navigator (nav)Owners Guide (post-2002-fmt)USA (fus)
Seating and Safety Restraints
204

• Front and rear seats
2. To unfasten, push the release button and remove the tongue from thebuckle.
• Front and rear seats
All safety restraints in the vehicle are combination lap and shoulderbelts. All of the passenger combination lap and shoulder belts have twotypes of locking modes described below:
Vehicle sensitive mode
This is the normal retractor mode, which allows free shoulder belt lengthadjustment to your movements and locking in response to vehiclemovement. For example, if the driver brakes suddenly or turns a cornersharply, or the vehicle receives an impact of approximately 5 mph (8 km/h)or more, the combination safety belts will lock to help reduce forwardmovement of the driver and passengers.
Automatic locking mode
In this mode, the shoulder belt is pre-locked. The belt will still retract toremove any slack in the shoulder belt.
The automatic locking mode is not available on the driver safety belt.
2006 Navigator (nav)Owners Guide (post-2002-fmt)USA (fus)
Seating and Safety Restraints
205
When to use the automatic locking mode• Anytime a child safety seat (except a booster) is installed in the
vehicle. Children 12 years old and under should be properly restrainedin the rear seat whenever possible. Refer to Safety restraints forchildren or Safety seats for children later in this chapter.
How to use the automatic locking mode1. Buckle the combination lap andshoulder belt.
2. Grasp the shoulder portion andpull downward until the entire beltis pulled out.
3. Allow the belt to retract. As the belt retracts, you will hear a clickingsound. This indicates the safety belt is now in the automatic lockingmode.How to disengage the automatic locking modeUnbuckle the combination lap and shoulder belt and allow it to retractcompletely to disengage the automatic locking mode and return to thevehicle sensitive (emergency) locking mode.
After any vehicle collision, the combination lap and shoulder beltsystem at all passenger seating positions must be checked by an
authorized dealer to verify that the “automatic locking retractor”feature for child seats is still functioning properly, in addition to otherchecks for proper seat belt system function.
2006 Navigator (nav)Owners Guide (post-2002-fmt)USA (fus)
Seating and Safety Restraints
206
BELT AND RETRACTOR ASSEMBLY MUST BE REPLACED ifthe safety belt assembly “automatic locking retractor” feature or
any other safety belt function is not operating properly. In addition, allsafety belts should be checked for proper function. Failure to replacethe belt and retractor assembly could increase the risk of injury incollisions.
Safety belt pretensioner
Your vehicle is equipped with safety belt pretensioners at the driver andright front passenger seating positions.
The safety belt pretensioner removes some slack from the safety beltsystem at the start of a crash. The safety belt pretensioner uses thesame crash sensor system as the front airbags and Safety Canopy�system. When the safety belt pretensioner deploys, the lap and shoulderbelt are tightened.
When the Safety Canopy� system and/or the front airbags are activated,the safety belt pretensioners for the driver and right front passengerseating positions will be activated when the respective seatbelt isproperly buckled.
The driver and the right front passenger seat belt system(including retractors, buckles and height adjusters) must be
replaced if the vehicle is involved in a collision that results indeployment of front airbags or Safety Canopy� and safety beltpretensioners.
Refer to the Safety belt maintenance section in this chapter.
2006 Navigator (nav)Owners Guide (post-2002-fmt)USA (fus)
Seating and Safety Restraints
207
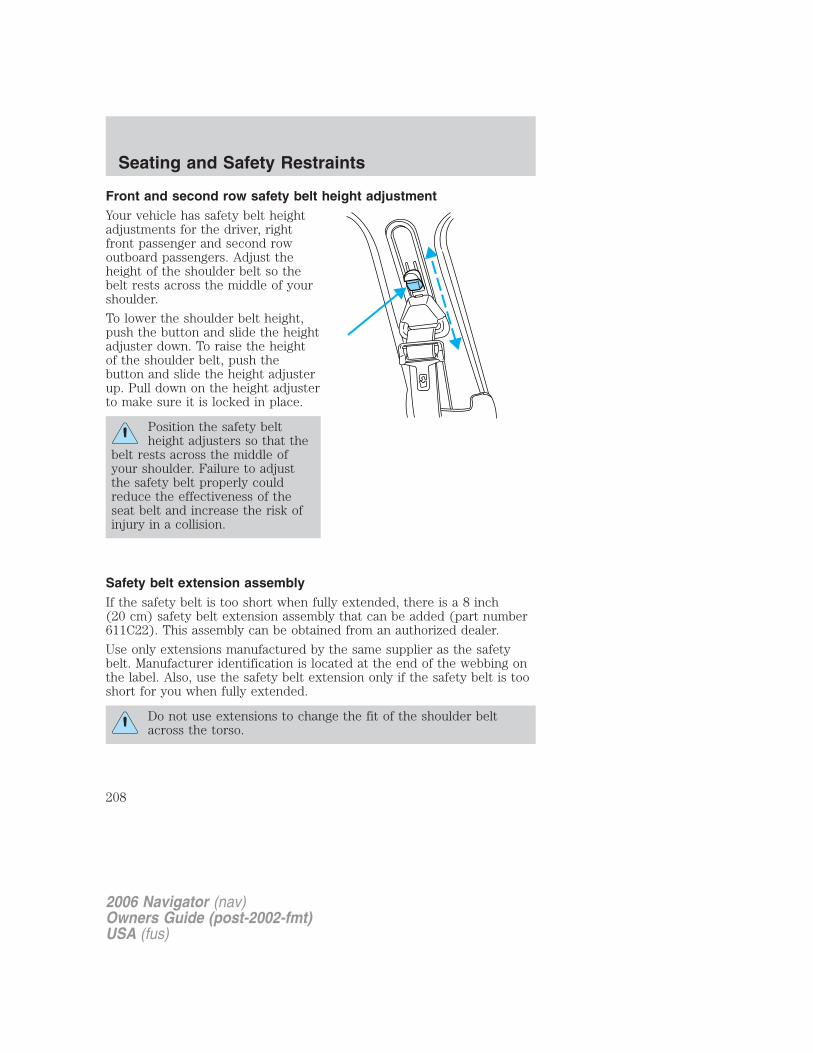
Front and second row safety belt height adjustmentYour vehicle has safety belt heightadjustments for the driver, rightfront passenger and second rowoutboard passengers. Adjust theheight of the shoulder belt so thebelt rests across the middle of yourshoulder.
To lower the shoulder belt height,push the button and slide the heightadjuster down. To raise the heightof the shoulder belt, push thebutton and slide the height adjusterup. Pull down on the height adjusterto make sure it is locked in place.
Position the safety beltheight adjusters so that the
belt rests across the middle ofyour shoulder. Failure to adjustthe safety belt properly couldreduce the effectiveness of theseat belt and increase the risk ofinjury in a collision.
Safety belt extension assemblyIf the safety belt is too short when fully extended, there is a 8 inch(20 cm) safety belt extension assembly that can be added (part number611C22). This assembly can be obtained from an authorized dealer.
Use only extensions manufactured by the same supplier as the safetybelt. Manufacturer identification is located at the end of the webbing onthe label. Also, use the safety belt extension only if the safety belt is tooshort for you when fully extended.
Do not use extensions to change the fit of the shoulder beltacross the torso.
2006 Navigator (nav)Owners Guide (post-2002-fmt)USA (fus)
Seating and Safety Restraints
208
Safety belt maintenanceInspect the safety belt systems periodically to make sure they workproperly and are not damaged. Inspect the safety belts to make surethere are no nicks, tears or cuts. Replace if necessary. All safety beltassemblies, including retractors, buckles, front seat belt buckleassemblies, buckle support assemblies (slide bar-if equipped), shoulderbelt height adjusters, shoulder belt guide on seatback (if equipped), childsafety seat LATCH and tether anchors, and attaching hardware, shouldbe inspected after a collision. Ford Motor Company recommends that allsafety belt assemblies in use in vehicles involved in a collision bereplaced. However, if the collision was minor and an authorized dealerfinds that the belts do not show damage and continue to operateproperly, they do not need to be replaced. Safety belt assemblies not inuse during a collision should also be inspected and replaced if eitherdamage or improper operation is noted.
Refer to Interior in the Cleaning chapter.
Safety belt warning light and indicator chime
The safety belt warning light illuminates in the instrument cluster and achime sounds to remind the occupants to fasten their safety belts.
Conditions of operation
If... Then...
The driver safety belt is notbuckled before the ignitionswitch is turned to the ONposition...
The safety belt warning lightilluminates 1-2 minutes and thewarning chime sounds 4-8 seconds.
The driver safety belt isbuckled while the indicatorlight is illuminated and thewarning chime is sounding...
The safety belt warning light andwarning chime turn off.
The driver safety belt isbuckled before the ignitionswitch is turned to the ONposition...
The safety belt warning light andindicator chime remain off.
2006 Navigator (nav)Owners Guide (post-2002-fmt)USA (fus)
Seating and Safety Restraints
209
BeltMinder�The BeltMinder� feature is a supplemental warning to the safety beltwarning function. This feature provides additional reminders to thedriver that the driver’s safety belt is unbuckled by intermittentlysounding a chime and illuminating the safety belt warning lamp in theinstrument cluster.
If... Then...
The driver’s safety belt is notbuckled approximately 5seconds after the safety beltwarning light has turned off...
The BeltMinder� feature is activated -the safety belt warning lightilluminates and the warning chimesounds for 6 seconds every 30seconds, repeating for approximately5 minutes or until safety belt isbuckled.
The driver’s safety belt isbuckled while the safety beltindicator light is illuminatedand the safety belt warningchime is sounding...
The BeltMinder� feature will notactivate.
The driver’s safety belt isbuckled before the ignitionswitch is turned to the ONposition...
The BeltMinder� feature will notactivate.
The purpose of the BeltMinder� is to remind occasional wearers to wearsafety belts all of the time.
2006 Navigator (nav)Owners Guide (post-2002-fmt)USA (fus)
Seating and Safety Restraints
210
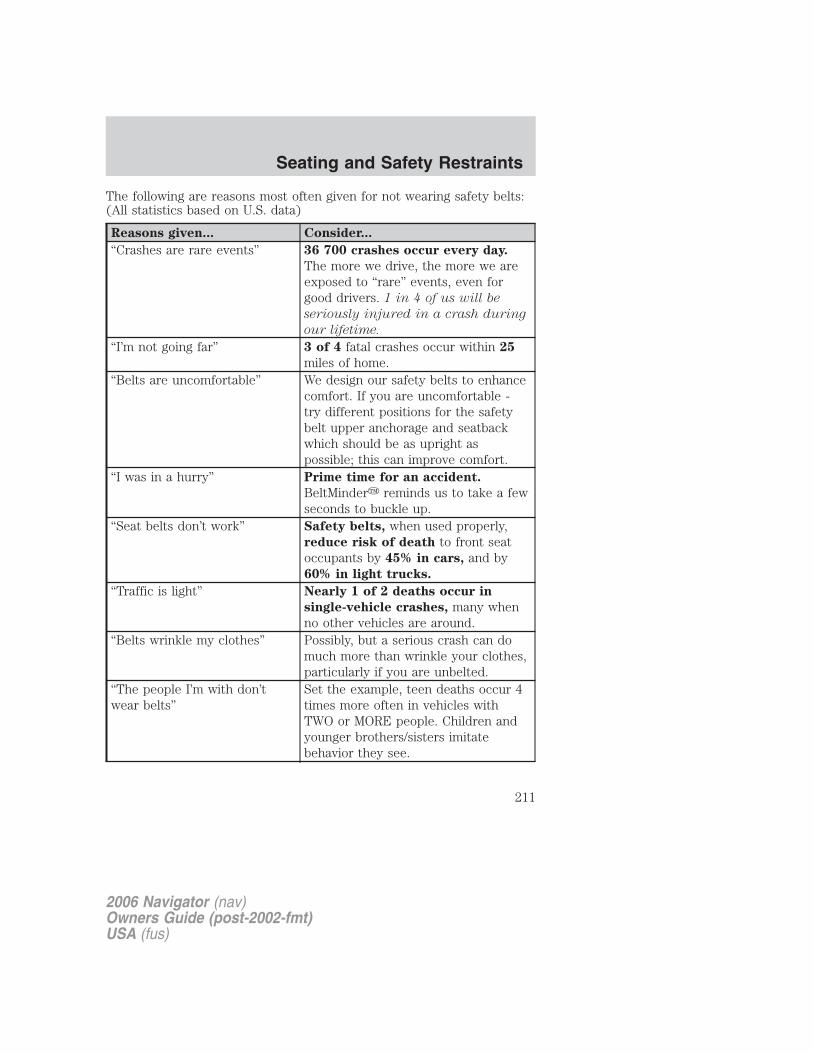
The following are reasons most often given for not wearing safety belts:(All statistics based on U.S. data)
Reasons given... Consider...
“Crashes are rare events” 36 700 crashes occur every day.
The more we drive, the more we areexposed to “rare” events, even forgood drivers. 1 in 4 of us will be
seriously injured in a crash during
our lifetime.
“I’m not going far” 3 of 4 fatal crashes occur within 25
miles of home.“Belts are uncomfortable” We design our safety belts to enhance
comfort. If you are uncomfortable -try different positions for the safetybelt upper anchorage and seatbackwhich should be as upright aspossible; this can improve comfort.
“I was in a hurry” Prime time for an accident.
BeltMinder� reminds us to take a fewseconds to buckle up.
“Seat belts don’t work” Safety belts, when used properly,reduce risk of death to front seatoccupants by 45% in cars, and by60% in light trucks.
“Traffic is light” Nearly 1 of 2 deaths occur in
single-vehicle crashes, many whenno other vehicles are around.
“Belts wrinkle my clothes” Possibly, but a serious crash can domuch more than wrinkle your clothes,particularly if you are unbelted.
“The people I’m with don’twear belts”
Set the example, teen deaths occur 4times more often in vehicles withTWO or MORE people. Children andyounger brothers/sisters imitatebehavior they see.
2006 Navigator (nav)Owners Guide (post-2002-fmt)USA (fus)
Seating and Safety Restraints
211
Reasons given... Consider...
“I have an airbag” Airbags offer greater protection whenused with safety belts. Frontal airbagsare not designed to inflate in rear andside crashes or rollovers.
“I’d rather be thrown clear” Not a good idea. People who areejected are 40 times more likely
to DIE. Safety belts help preventejection, WE CAN’T “PICK OURCRASH”.
Do not sit on top of a buckled safety belt to avoid theBeltMinder� chime. Sitting on the safety belt will increase the
risk of injury in an accident. To disable (one-time) or deactivate theBeltMinder� feature please follow the directions stated below.
One time disableAny time the safety belt is buckled and then unbuckled during anignition ON cycle, BeltMinder� will be disabled for that ignition cycleonly.Deactivating/activating the BeltMinder� featureRead Steps 1 - 4 thoroughly before proceeding with thedeactivation/activation programming procedure.
The driver BeltMinder� feature can be deactivated/activated byperforming the following procedure:Before following the procedure, make sure that:• The parking brake is set• The gearshift is in P (Park) (automatic transmission)• The ignition switch is in the OFF position• The driver safety belt is unbuckled
To reduce the risk of injury, do not deactivate/activate theBeltMinder� feature while driving the vehicle.
1. Turn the ignition switch to the RUN (or ON) position. (DO NOTSTART THE ENGINE)2. Wait until the safety belt warning light turns off. (Approximately 1minute)
2006 Navigator (nav)Owners Guide (post-2002-fmt)USA (fus)
Seating and Safety Restraints
212

• Step 3 must be completed within 50 seconds after the safety beltwarning light turns off.
3. At a moderate speed, buckle then unbuckle the safety belt 9 times,ending in the unbuckled state. (Step 3 must be completed within 50seconds after the safety belt warning light turns off.)
• After Step 3, the restraint system warning light (airbag light) will beturned on for three seconds.
4. Within 10 seconds of the light turning on, at a moderate speed, bucklethen unbuckle the safety belt.
• This will disable the BeltMinder� feature for that seating position if itis currently enabled. As confirmation, the restraint system warninglight will flash 4 times per second for 3 seconds.
• This will enable the BeltMinder� feature for that seating position if itis currently disabled. As confirmation, the restraint system warninglight will flash 4 times per second for 3 seconds, followed by 3seconds with the light off, then followed by the restraint systemwarning light flashing 4 times per second for 3 seconds again.
AIRBAG SUPPLEMENTAL RESTRAINT SYSTEM (SRS)
2006 Navigator (nav)Owners Guide (post-2002-fmt)USA (fus)
Seating and Safety Restraints
213
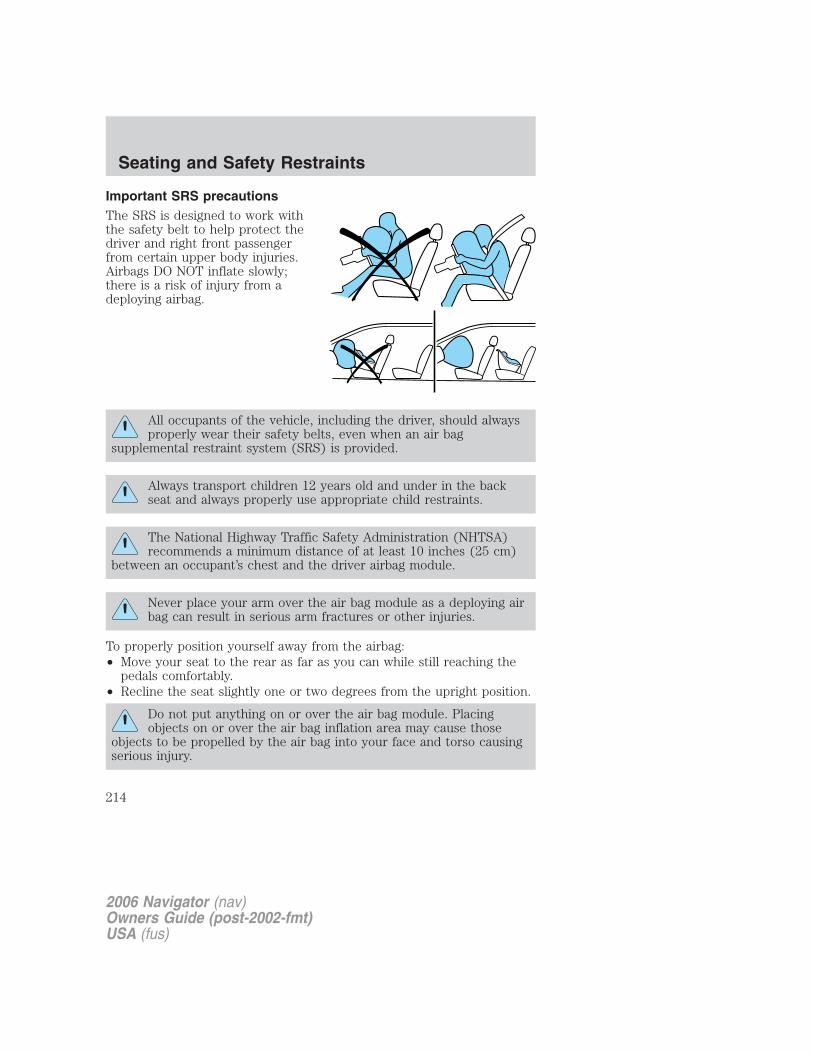
Important SRS precautionsThe SRS is designed to work withthe safety belt to help protect thedriver and right front passengerfrom certain upper body injuries.Airbags DO NOT inflate slowly;there is a risk of injury from adeploying airbag.
All occupants of the vehicle, including the driver, should alwaysproperly wear their safety belts, even when an air bag
supplemental restraint system (SRS) is provided.
Always transport children 12 years old and under in the backseat and always properly use appropriate child restraints.
The National Highway Traffic Safety Administration (NHTSA)recommends a minimum distance of at least 10 inches (25 cm)
between an occupant’s chest and the driver airbag module.
Never place your arm over the air bag module as a deploying airbag can result in serious arm fractures or other injuries.
To properly position yourself away from the airbag:• Move your seat to the rear as far as you can while still reaching the
pedals comfortably.• Recline the seat slightly one or two degrees from the upright position.
Do not put anything on or over the air bag module. Placingobjects on or over the air bag inflation area may cause those
objects to be propelled by the air bag into your face and torso causingserious injury.
2006 Navigator (nav)Owners Guide (post-2002-fmt)USA (fus)
Seating and Safety Restraints
214

Do not attempt to service, repair, or modify the airbagsupplemental restraint systems or its fuses. See your authorized
dealer.
The front passenger airbag is not designed to offer protection toan occupant in the center front seating position.
Modifying or adding equipment to the front end of the vehicle(including frame, bumper, front end body structure and tow
hooks) may affect the performance of the airbag system, increasing therisk of injury. Do not modify the front end of the vehicle.
Additional equipment may affect the performance of the airbagsensors increasing the risk of injury. Please refer to the Body
Builders Layout Book for instructions about the appropriateinstallation of additional equipment.
Children and airbagsChildren must always be properlyrestrained. Accident statisticssuggest that children are safer whenproperly restrained in the rearseating positions than in the frontseating position. Failure to followthese instructions may increase therisk of injury in a collision.
Airbags can kill or injure achild in a child seat.
NEVER place a rear-facing childseat in front of an active airbag. Ifyou must use a forward-facingchild seat in the front seat, movethe seat all the way back.
2006 Navigator (nav)Owners Guide (post-2002-fmt)USA (fus)
Seating and Safety Restraints
215

How does the airbag supplemental restraint system work?The airbag SRS is designed toactivate when the vehicle sustainslongitudinal deceleration sufficientto cause the sensors to close anelectrical circuit that initiates airbaginflation.
The fact that the airbags did notinflate in a collision does not meanthat something is wrong with thesystem. Rather, it means the forceswere not of the type sufficient tocause activation. The driver and passenger airbags are designed to inflatein frontal and near-frontal collisions, not rollover, side-impact, orrear-impacts unless the collision causes sufficient longitudinaldeceleration.
The airbags inflate and deflaterapidly upon activation. After airbagdeployment, it is normal to notice asmoke-like, powdery residue orsmell the burnt propellant. This mayconsist of cornstarch, talcumpowder (to lubricate the bag) orsodium compounds (e.g., bakingsoda) that result from thecombustion process that inflates theairbag. Small amounts of sodiumhydroxide may be present whichmay irritate the skin and eyes, butnone of the residue is toxic.
While the system is designed to helpreduce serious injuries, contact witha deploying airbag may also cause abrasions, swelling or temporaryhearing loss. Because airbags must inflate rapidly and with considerableforce, there is the risk of death or serious injuries such as fractures,facial and eye injuries or internal injuries, particularly to occupants whoare not properly restrained or are otherwise out of position at the timeof airbag deployment. Thus, it is extremely important that occupants beproperly restrained as far away from the airbag module as possible whilemaintaining vehicle control.
2006 Navigator (nav)Owners Guide (post-2002-fmt)USA (fus)
Seating and Safety Restraints
216
Several air bag system components get hot after inflation. Do nottouch them after inflation.
If the airbag has deployed, the airbag will not function againand must be replaced immediately. If the airbag is not
replaced, the unrepaired area will increase the risk of injury in acollision.
The SRS consists of:
• driver and passenger airbag modules (which include the inflators andairbags),
• one or more impact and safing sensors and diagnostic monitor (RCM),
• a readiness light and tone
• the electrical wiring which connects the components.
The RCM (restraints control module) monitors its own internal circuitsand the supplemental airbag electrical system wiring (including theimpact sensors, the system wiring, the airbag system readiness light, theairbag back up power and the airbag ignitors).
Determining if the system is operational
The SRS uses a readiness light in the instrument cluster or a tone toindicate the condition of the system. Refer to Airbag readiness sectionin the Instrument Cluster chapter. Routine maintenance of the airbag isnot required.
A difficulty with the system is indicated by one or more of the following:
• The readiness light will eitherflash or stay lit.
• The readiness light will notilluminate immediately after ignition is turned on.
• A series of five beeps will be heard. The tone pattern will repeatperiodically until the problem and/or light are repaired.
If any of these things happen, even intermittently, have the SRS servicedat an authorized dealer immediately. Unless serviced, the system may notfunction properly in the event of a collision.
2006 Navigator (nav)Owners Guide (post-2002-fmt)USA (fus)
Seating and Safety Restraints
217
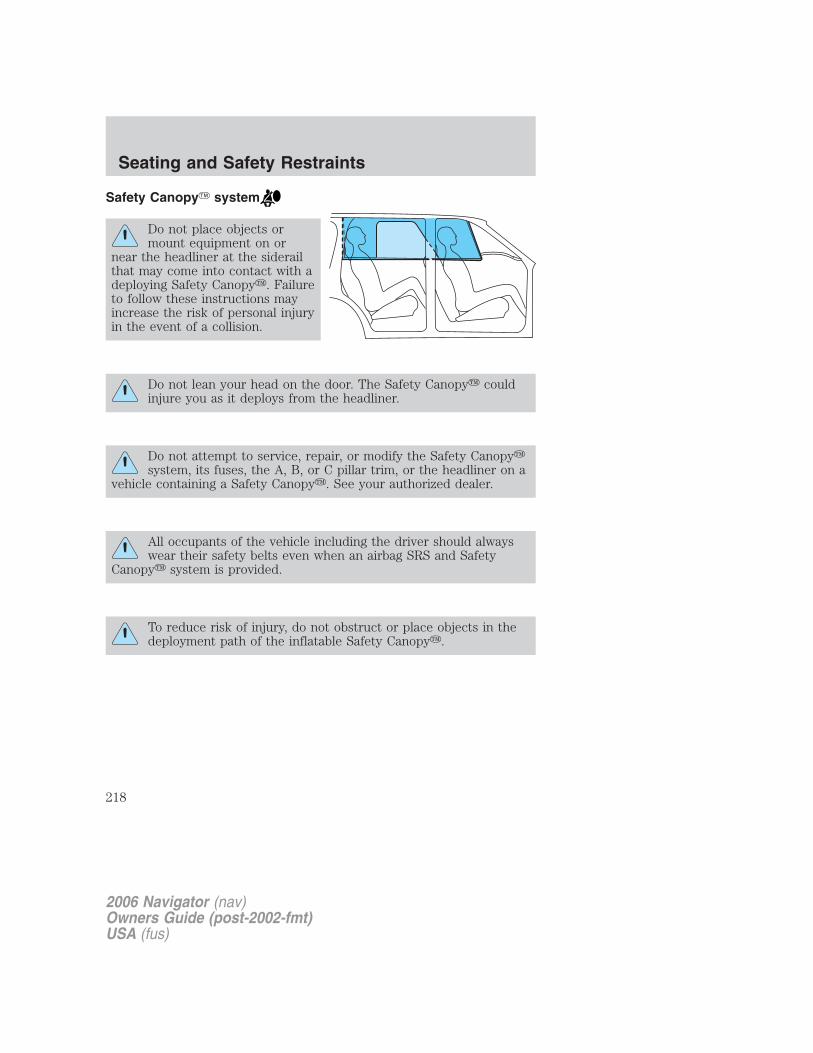
Safety Canopy� system
Do not place objects ormount equipment on or
near the headliner at the siderailthat may come into contact with adeploying Safety Canopy�. Failureto follow these instructions mayincrease the risk of personal injuryin the event of a collision.
Do not lean your head on the door. The Safety Canopy� couldinjure you as it deploys from the headliner.
Do not attempt to service, repair, or modify the Safety Canopy�system, its fuses, the A, B, or C pillar trim, or the headliner on a
vehicle containing a Safety Canopy�. See your authorized dealer.
All occupants of the vehicle including the driver should alwayswear their safety belts even when an airbag SRS and Safety
Canopy� system is provided.
To reduce risk of injury, do not obstruct or place objects in thedeployment path of the inflatable Safety Canopy�.
2006 Navigator (nav)Owners Guide (post-2002-fmt)USA (fus)
Seating and Safety Restraints
218

How does the Safety Canopy� system work?The design and development of theSafety Canopy� system includedrecommended testing proceduresthat were developed by a group ofautomotive safety experts known asthe Side Airbag Technical WorkingGroup. These recommended testingprocedures help reduce the risk ofinjuries related to the deployment ofside airbags (including the SafetyCanopy�).
The Safety Canopy� systemconsists of the following:
• An inflatable nylon curtain with agas generator concealed behindthe headliner and above the doors(one on each side of vehicle).
• A headliner designed to flex openabove the side doors to allow Safety Canopy� deployment.
• The same warning light, electronic control and diagnostic unit as usedfor the front airbags.
• Two crash sensors mounted in the front doors (one on each side ofthe vehicle).
• Two crash sensors located at the c-pillar behind the rear doors (oneon each side of the vehicle).
• Rollover sensor in the restraints control module (RCM).The Safety Canopy� system, in combination with seat belts, can helpreduce the risk of severe injuries in the event of a significant side impactcollision or rollover event.Children 12 years old and under should always be properly restrained inthe second or third row seats. The Safety Canopy� will not interferewith children restrained using a properly installed child or booster seatbecause it is designed to inflate downward from the headliner above thedoors along the side window opening.
The Safety Canopy� system is designed to activate when the vehiclesustains lateral deceleration sufficient to cause the side crash sensor toclose an electrical circuit that initiates Safety Canopy� inflation or whena certain likelihood of a rollover event is detected by the rollover sensor.
2006 Navigator (nav)Owners Guide (post-2002-fmt)USA (fus)
Seating and Safety Restraints
219
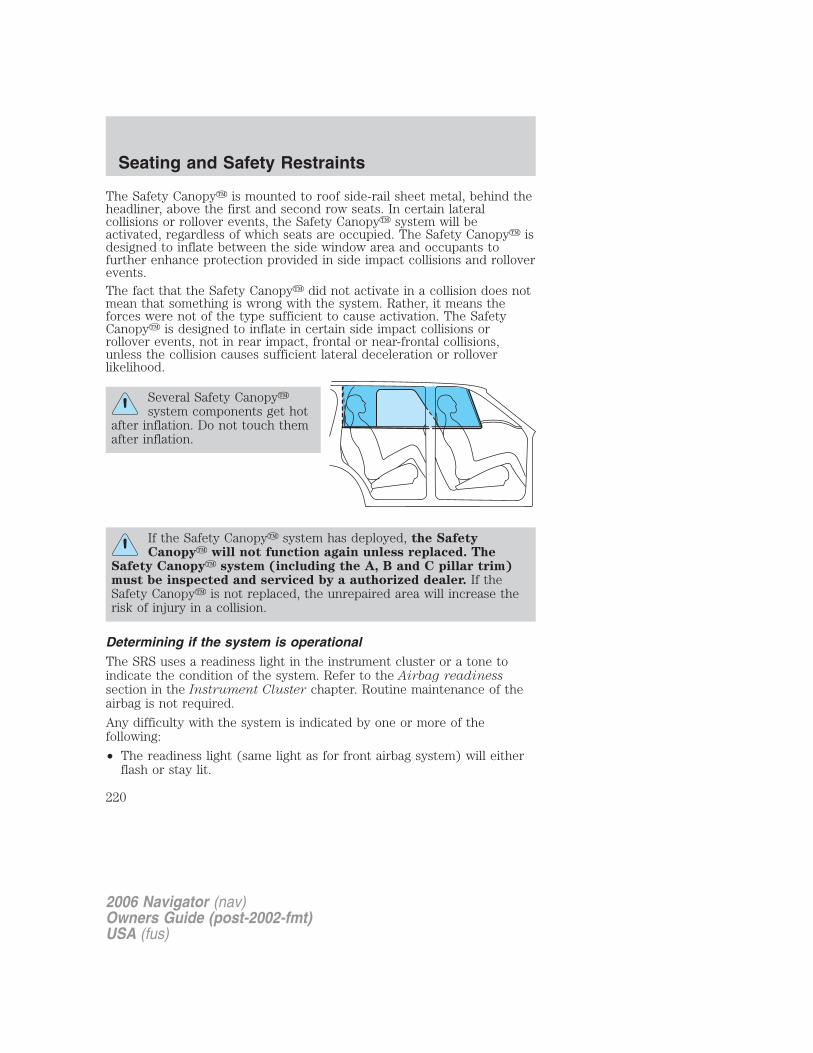
The Safety Canopy� is mounted to roof side-rail sheet metal, behind theheadliner, above the first and second row seats. In certain lateralcollisions or rollover events, the Safety Canopy� system will beactivated, regardless of which seats are occupied. The Safety Canopy� isdesigned to inflate between the side window area and occupants tofurther enhance protection provided in side impact collisions and rolloverevents.The fact that the Safety Canopy� did not activate in a collision does notmean that something is wrong with the system. Rather, it means theforces were not of the type sufficient to cause activation. The SafetyCanopy� is designed to inflate in certain side impact collisions orrollover events, not in rear impact, frontal or near-frontal collisions,unless the collision causes sufficient lateral deceleration or rolloverlikelihood.
Several Safety Canopy�system components get hot
after inflation. Do not touch themafter inflation.
If the Safety Canopy� system has deployed, the SafetyCanopy� will not function again unless replaced. The
Safety Canopy� system (including the A, B and C pillar trim)must be inspected and serviced by a authorized dealer. If theSafety Canopy� is not replaced, the unrepaired area will increase therisk of injury in a collision.
Determining if the system is operationalThe SRS uses a readiness light in the instrument cluster or a tone toindicate the condition of the system. Refer to the Airbag readinesssection in the Instrument Cluster chapter. Routine maintenance of theairbag is not required.
Any difficulty with the system is indicated by one or more of thefollowing:
• The readiness light (same light as for front airbag system) will eitherflash or stay lit.
2006 Navigator (nav)Owners Guide (post-2002-fmt)USA (fus)
Seating and Safety Restraints
220

• The readiness light will not illuminate immediately after ignition isturned on.
• A series of five beeps will be heard. The tone pattern will repeatperiodically until the problem and light are repaired.
If any of these things happen, even intermittently, have the SRS servicedat authorized dealer immediately. Unless serviced, the system may notfunction properly in the event of a collision or rollover event.
Disposal of airbags and airbag equipped vehicles (includingpretensioners)See your authorized dealer. Airbags MUST BE disposed of by qualifiedpersonnel.
SAFETY RESTRAINTS FOR CHILDRENSee the following sections for directions on how to properly use safetyrestraints for children. Also see Airbag supplemental restraint system(SRS) in this chapter for special instructions about using airbags.
Important child restraint precautionsYou are required by law to use safety restraints for children in the U.S.and Canada. If small children (generally children who are four years oldor younger and who weigh 40 lb. [18 kg] or less) ride in your vehicle, youmust put them in safety seats made especially for children. Many statesrequire that children use approved booster seats until they are eightyears old. Check your local and state or provincial laws for specificrequirements regarding the safety of children in your vehicle. Whenpossible, always place children under age 12 in the rear seat of yourvehicle. Accident statistics suggest that children are safer when properlyrestrained in the rear seating positions than in the front seating position.
Never let a passenger hold a child on his or her lap while thevehicle is moving. The passenger cannot protect the child from
injury in a collision.
Always follow the instructions and warnings that come with any infant orchild restraint you might use.
Children and safety beltsIf the child is the proper size, restrain the child in a safety seat.
Children who are too large for child safety seats (as specified by yourchild safety seat manufacturer) should always wear safety belts.
2006 Navigator (nav)Owners Guide (post-2002-fmt)USA (fus)
Seating and Safety Restraints
221
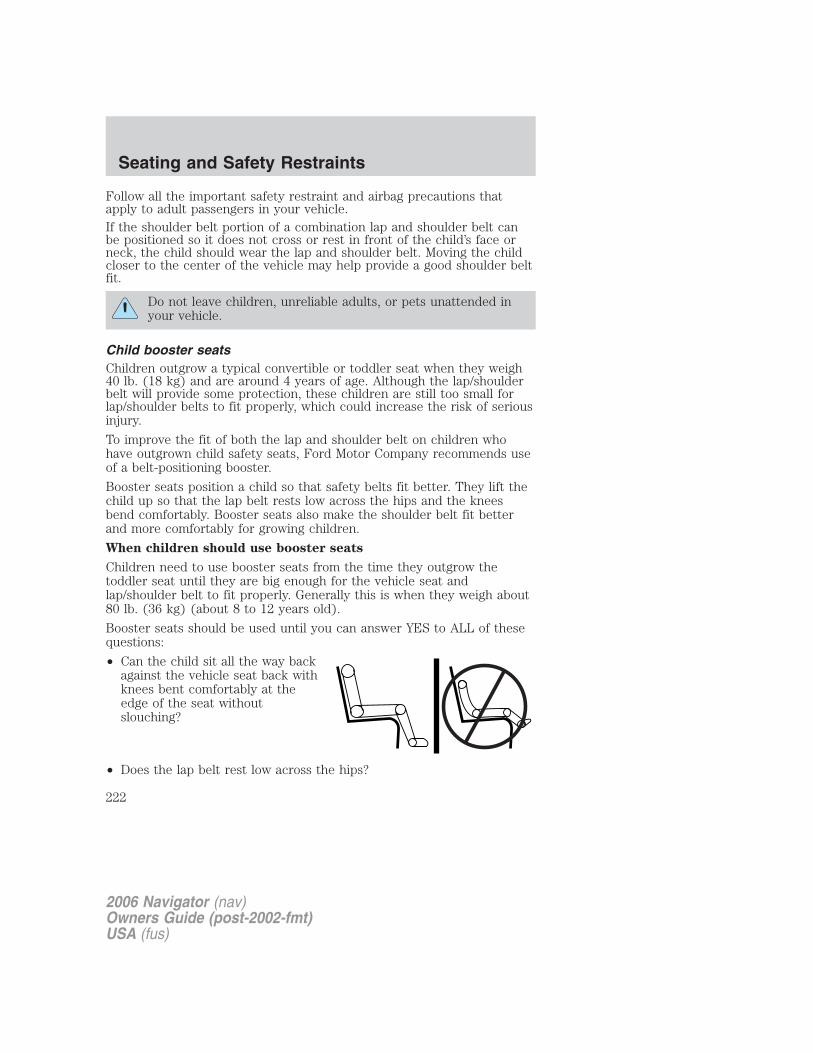
Follow all the important safety restraint and airbag precautions thatapply to adult passengers in your vehicle.If the shoulder belt portion of a combination lap and shoulder belt canbe positioned so it does not cross or rest in front of the child’s face orneck, the child should wear the lap and shoulder belt. Moving the childcloser to the center of the vehicle may help provide a good shoulder beltfit.
Do not leave children, unreliable adults, or pets unattended inyour vehicle.
Child booster seatsChildren outgrow a typical convertible or toddler seat when they weigh40 lb. (18 kg) and are around 4 years of age. Although the lap/shoulderbelt will provide some protection, these children are still too small forlap/shoulder belts to fit properly, which could increase the risk of seriousinjury.
To improve the fit of both the lap and shoulder belt on children whohave outgrown child safety seats, Ford Motor Company recommends useof a belt-positioning booster.
Booster seats position a child so that safety belts fit better. They lift thechild up so that the lap belt rests low across the hips and the kneesbend comfortably. Booster seats also make the shoulder belt fit betterand more comfortably for growing children.
When children should use booster seats
Children need to use booster seats from the time they outgrow thetoddler seat until they are big enough for the vehicle seat andlap/shoulder belt to fit properly. Generally this is when they weigh about80 lb. (36 kg) (about 8 to 12 years old).
Booster seats should be used until you can answer YES to ALL of thesequestions:
• Can the child sit all the way backagainst the vehicle seat back withknees bent comfortably at theedge of the seat withoutslouching?
• Does the lap belt rest low across the hips?
2006 Navigator (nav)Owners Guide (post-2002-fmt)USA (fus)
Seating and Safety Restraints
222
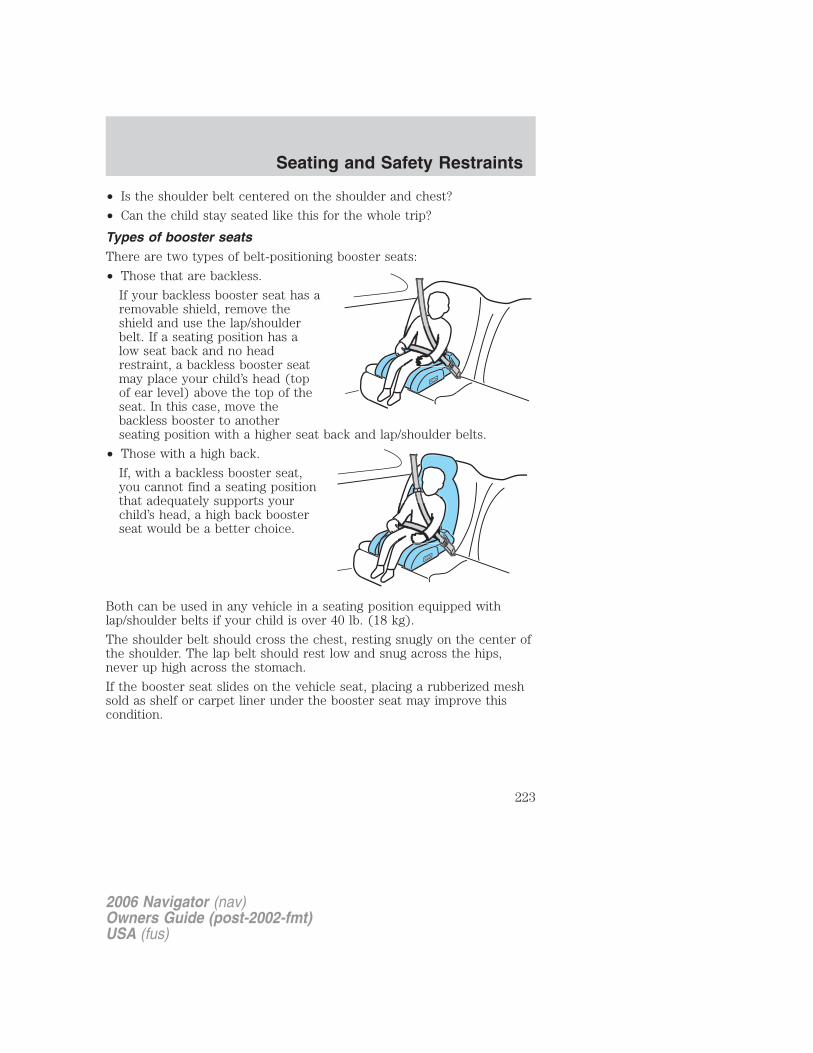
• Is the shoulder belt centered on the shoulder and chest?
• Can the child stay seated like this for the whole trip?
Types of booster seatsThere are two types of belt-positioning booster seats:
• Those that are backless.
If your backless booster seat has aremovable shield, remove theshield and use the lap/shoulderbelt. If a seating position has alow seat back and no headrestraint, a backless booster seatmay place your child’s head (topof ear level) above the top of theseat. In this case, move thebackless booster to anotherseating position with a higher seat back and lap/shoulder belts.
• Those with a high back.
If, with a backless booster seat,you cannot find a seating positionthat adequately supports yourchild’s head, a high back boosterseat would be a better choice.
Both can be used in any vehicle in a seating position equipped withlap/shoulder belts if your child is over 40 lb. (18 kg).
The shoulder belt should cross the chest, resting snugly on the center ofthe shoulder. The lap belt should rest low and snug across the hips,never up high across the stomach.
If the booster seat slides on the vehicle seat, placing a rubberized meshsold as shelf or carpet liner under the booster seat may improve thiscondition.
2006 Navigator (nav)Owners Guide (post-2002-fmt)USA (fus)
Seating and Safety Restraints
223
The importance of shoulder belts
Using a booster without a shoulder belt increases the risk of a child’shead hitting a hard surface in a collision. For this reason, you shouldnever use a booster seat with a lap belt only. It is best to use a boosterseat with lap/shoulder belts in the back seat- the safest place for childrento ride.
Follow all instructions provided by the manufacturer of thebooster seat.
Never put the shoulder belt under a child’s arm or behind theback because it eliminates the protection for the upper part of
the body and may increase the risk of injury or death in a collision.
Never use pillows, books, or towels to boost a child. They canslide around and increase the likelihood of injury or death in a
collision.
SAFETY SEATS FOR CHILDREN
Child and infant or child safety seats
Use a safety seat that is recommended for the size and weight of thechild. Carefully follow all of the manufacturer’s instructions with thesafety seat you put in your vehicle. If you do not install and use thesafety seat properly, the child may be injured in a sudden stop orcollision.
When installing a child safety seat:
2006 Navigator (nav)Owners Guide (post-2002-fmt)USA (fus)
Seating and Safety Restraints
224
• Review and follow the informationpresented in the airbagsupplemental restraint system(SRS) section in this chapter.
• Use the correct safety belt bucklefor that seating position (thebuckle closest to the direction thetongue is coming from).
• Insert the belt tongue into theproper buckle until you hear asnap and feel it latch. Make surethe tongue is securely fastened inthe buckle.
• Place seat back in upright position.• Put the safety belt in the automatic locking mode. Refer to Automatic
locking mode section in this chapter.• The second row center seat can be moved forward to keep a child in a
child restraint close to the front seat occupants. The seat should bemoved to the full rearward position when it is occupied by olderchildren or adults.
• LATCH lower anchors are recommended for use by children up to 48pounds (22 kg) in a child restraint. Top tether anchors can be usedfor children up to 60 pounds (27 kg) in a child restraint, and toprovide upper torso restraint for children up to 80 pounds (36 kg)using an upper torso harness and a belt-positioning booster.
Ford recommends the use of a child safety seat having a top tetherstrap. Install the child safety seat in a seating position with LATCH andtether anchors. For more information on top tether straps and anchors,refer to Attaching safety seats with tether straps in this chapter. Formore information of LATCH anchors refer to Attaching safety seats withLATCH (Lower Anchors and Tethers for Children) attachments in thischapter.
Carefully follow all of the manufacturer’s instructions includedwith the safety seat you put in your vehicle. If you do not install
and use the safety seat properly, the child may be injured in a suddenstop or collision.
2006 Navigator (nav)Owners Guide (post-2002-fmt)USA (fus)
Seating and Safety Restraints
225
Installing child safety seats with combination lap and shoulderbelts
Airbags can kill or injure a child in a child seat. NEVER place arear-facing child seat in front of an active airbag. If you must use
a forward-facing child seat in the front seat, move the seat all the wayback.
Children 12 and under should be properly restrained in the rearseat whenever possible.
1. Position the child safety seat in aseat with a combination lap andshoulder belt.
2. Pull down on the shoulder beltand then grasp the shoulder beltand lap belt together.
2006 Navigator (nav)Owners Guide (post-2002-fmt)USA (fus)
Seating and Safety Restraints
226
3. While holding the shoulder andlap belt portions together, route thetongue through the child seataccording to the child seatmanufacturer’s instructions. Be surethe belt webbing is not twisted.
4. Insert the belt tongue into theproper buckle (the buckle closest tothe direction the tongue is comingfrom) for that seating position untilyou hear a snap and feel the latchengage. Make sure the tongue islatched securely by pulling on it.
5. To put the retractor in theautomatic locking mode, grasp theshoulder portion of the belt and pulldownward until all of the belt ispulled out and a click is heard.
6. Allow the belt to retract. The belt will click as it retracts to indicate itis in the automatic locking mode.
2006 Navigator (nav)Owners Guide (post-2002-fmt)USA (fus)
Seating and Safety Restraints
227
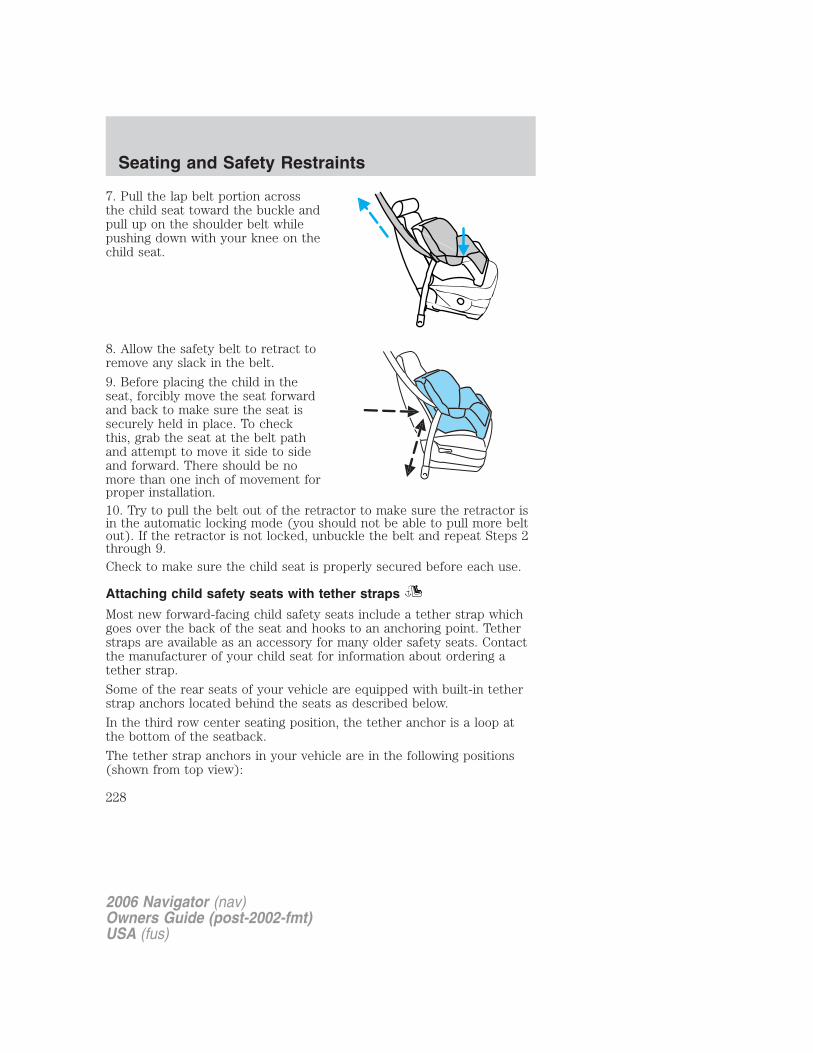
7. Pull the lap belt portion acrossthe child seat toward the buckle andpull up on the shoulder belt whilepushing down with your knee on thechild seat.
8. Allow the safety belt to retract toremove any slack in the belt.
9. Before placing the child in theseat, forcibly move the seat forwardand back to make sure the seat issecurely held in place. To checkthis, grab the seat at the belt pathand attempt to move it side to sideand forward. There should be nomore than one inch of movement forproper installation.10. Try to pull the belt out of the retractor to make sure the retractor isin the automatic locking mode (you should not be able to pull more beltout). If the retractor is not locked, unbuckle the belt and repeat Steps 2through 9.Check to make sure the child seat is properly secured before each use.
Attaching child safety seats with tether straps
Most new forward-facing child safety seats include a tether strap whichgoes over the back of the seat and hooks to an anchoring point. Tetherstraps are available as an accessory for many older safety seats. Contactthe manufacturer of your child seat for information about ordering atether strap.
Some of the rear seats of your vehicle are equipped with built-in tetherstrap anchors located behind the seats as described below.
In the third row center seating position, the tether anchor is a loop atthe bottom of the seatback.
The tether strap anchors in your vehicle are in the following positions(shown from top view):
2006 Navigator (nav)Owners Guide (post-2002-fmt)USA (fus)
Seating and Safety Restraints
228
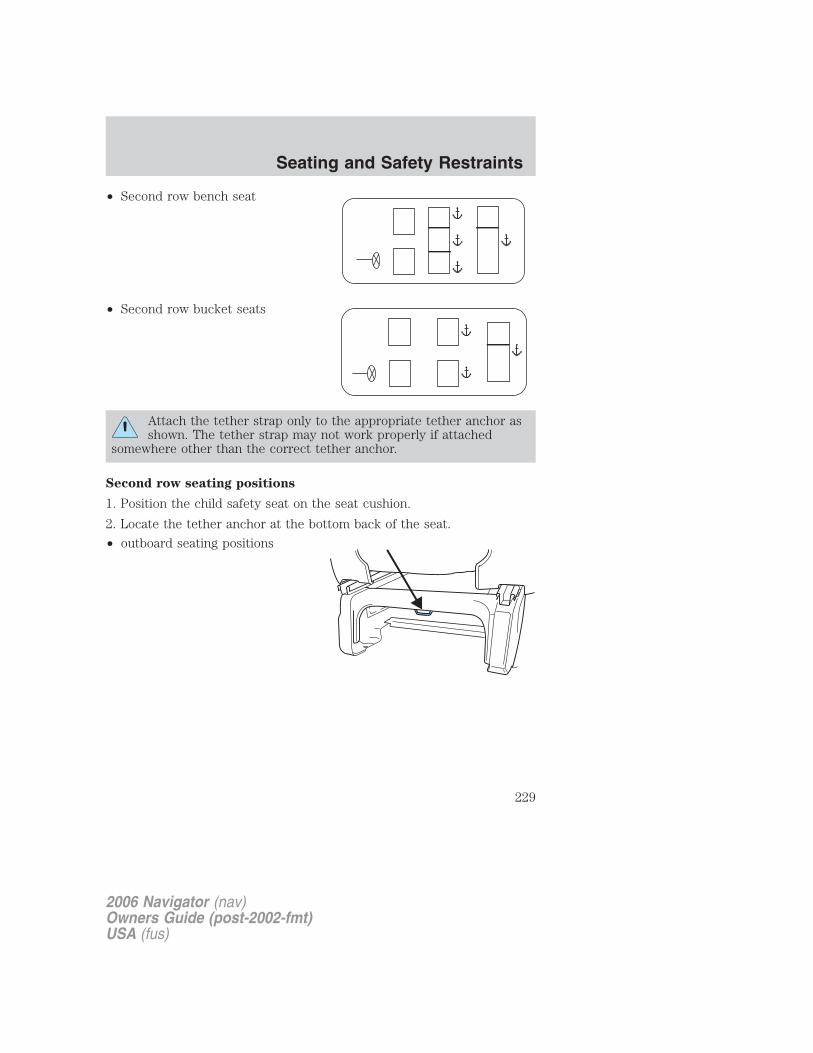
• Second row bench seat
• Second row bucket seats
Attach the tether strap only to the appropriate tether anchor asshown. The tether strap may not work properly if attached
somewhere other than the correct tether anchor.
Second row seating positions
1. Position the child safety seat on the seat cushion.
2. Locate the tether anchor at the bottom back of the seat.
• outboard seating positions
2006 Navigator (nav)Owners Guide (post-2002-fmt)USA (fus)
Seating and Safety Restraints
229

• center seating position (ifequipped)
3. Route the child safety seat tether strap under the head restraint(outboard seats) and over the back of the seat.
4. Grasp the tether strap andposition it to the seat frame.
5. Rotate the tether strap, and clipthe tether strap to the anchor onthe seat frame.
6. Rotate the tether strap clip.
2006 Navigator (nav)Owners Guide (post-2002-fmt)USA (fus)
Seating and Safety Restraints
230
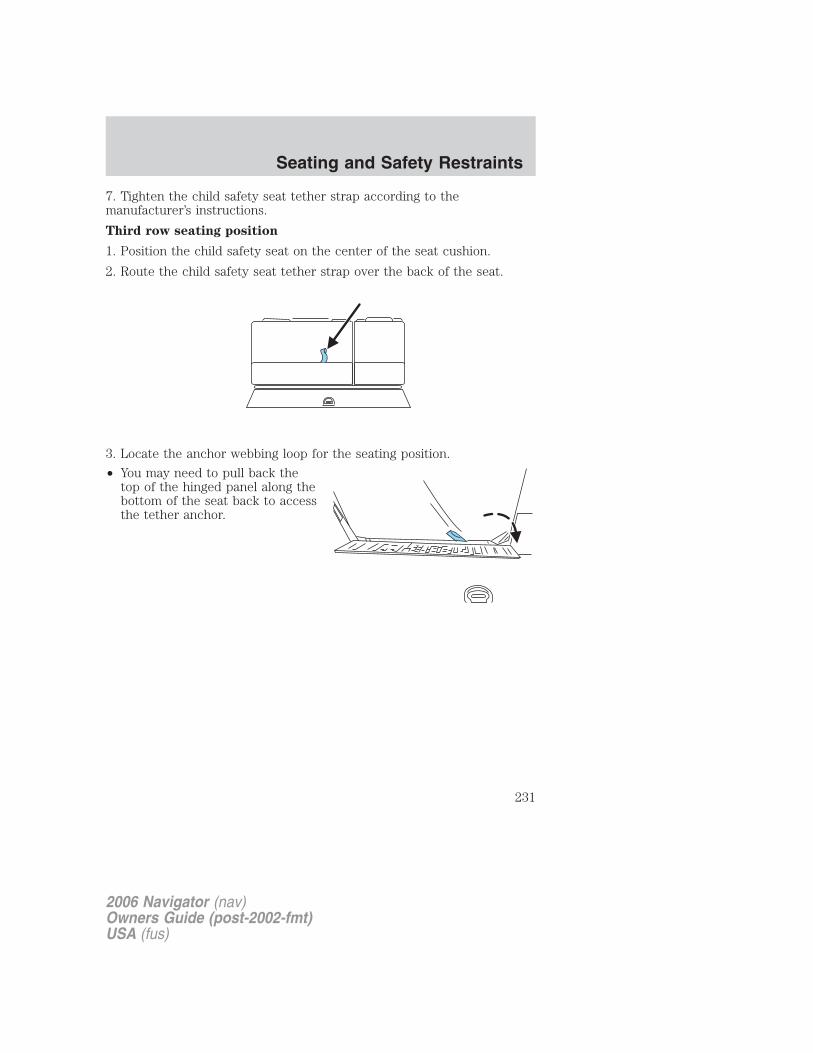
7. Tighten the child safety seat tether strap according to themanufacturer’s instructions.
Third row seating position
1. Position the child safety seat on the center of the seat cushion.
2. Route the child safety seat tether strap over the back of the seat.
3. Locate the anchor webbing loop for the seating position.
• You may need to pull back thetop of the hinged panel along thebottom of the seat back to accessthe tether anchor.
2006 Navigator (nav)Owners Guide (post-2002-fmt)USA (fus)
Seating and Safety Restraints
231
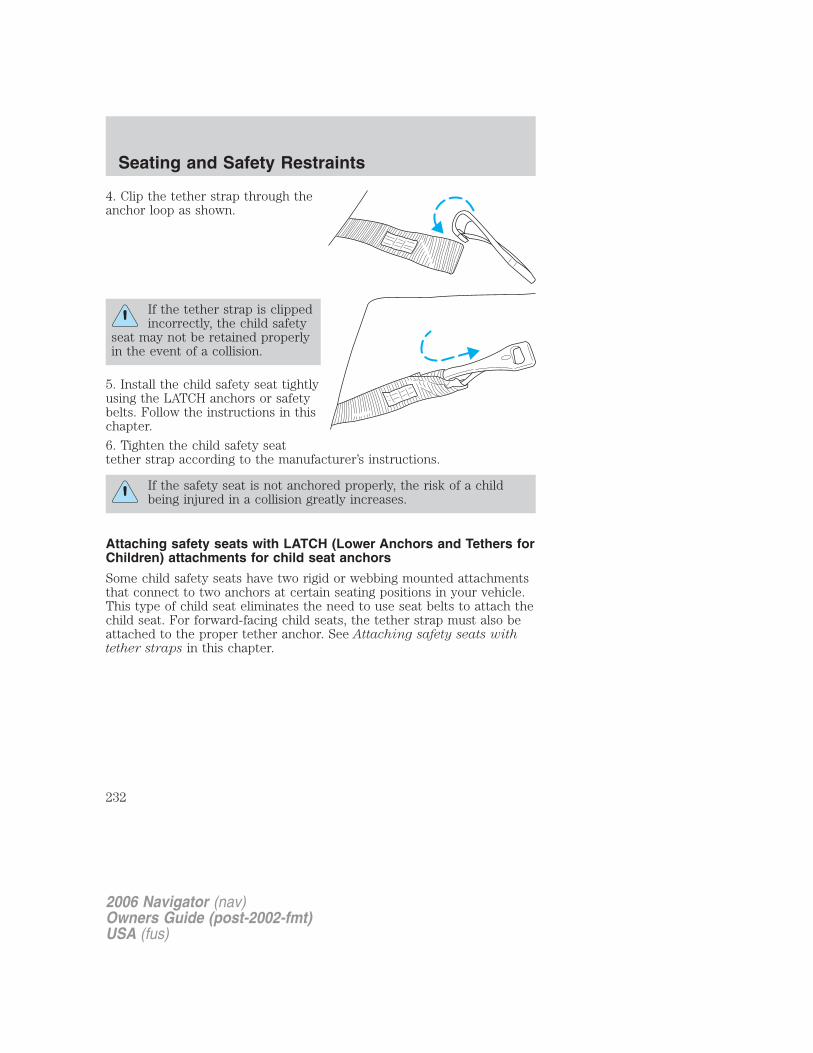
4. Clip the tether strap through theanchor loop as shown.
If the tether strap is clippedincorrectly, the child safety
seat may not be retained properlyin the event of a collision.
5. Install the child safety seat tightlyusing the LATCH anchors or safetybelts. Follow the instructions in thischapter.
6. Tighten the child safety seattether strap according to the manufacturer’s instructions.
If the safety seat is not anchored properly, the risk of a childbeing injured in a collision greatly increases.
Attaching safety seats with LATCH (Lower Anchors and Tethers forChildren) attachments for child seat anchors
Some child safety seats have two rigid or webbing mounted attachmentsthat connect to two anchors at certain seating positions in your vehicle.This type of child seat eliminates the need to use seat belts to attach thechild seat. For forward-facing child seats, the tether strap must also beattached to the proper tether anchor. See Attaching safety seats withtether straps in this chapter.
2006 Navigator (nav)Owners Guide (post-2002-fmt)USA (fus)
Seating and Safety Restraints
232
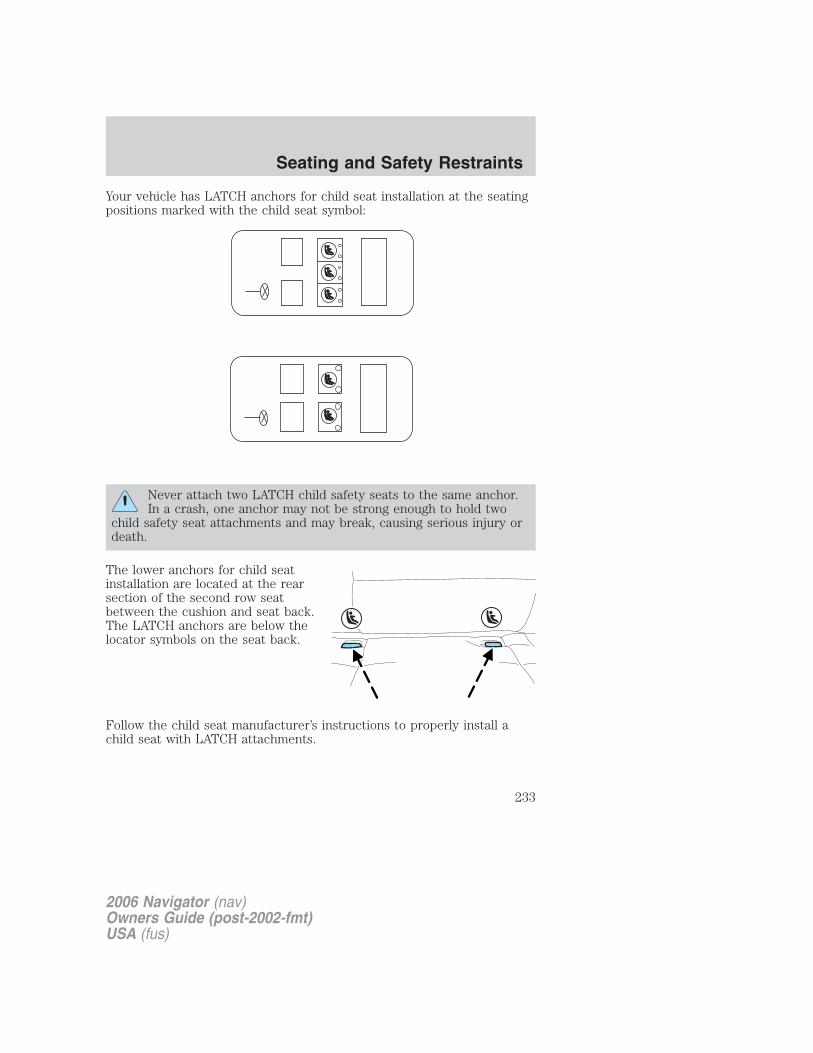
Your vehicle has LATCH anchors for child seat installation at the seatingpositions marked with the child seat symbol:
Never attach two LATCH child safety seats to the same anchor.In a crash, one anchor may not be strong enough to hold two
child safety seat attachments and may break, causing serious injury ordeath.
The lower anchors for child seatinstallation are located at the rearsection of the second row seatbetween the cushion and seat back.The LATCH anchors are below thelocator symbols on the seat back.
Follow the child seat manufacturer’s instructions to properly install achild seat with LATCH attachments.
2006 Navigator (nav)Owners Guide (post-2002-fmt)USA (fus)
Seating and Safety Restraints
233

Attach LATCH lower attachments of the child seat only to theanchors shown.
If you install a child seat with rigid LATCH attachments, do not tightenthe tether strap enough to lift the child seat off the vehicle seat cushionwhen the child is seated in it. Keep the tether strap just snug withoutlifting the front of the child seat. Keeping the child seat just touching thevehicle seat gives the best protection in a severe crash.
Each time you use the safety seat, check that the seat is properlyattached to the lower anchors and tether anchor. Try to move the childseat from side to side. Also try to tug the seat forward. Check to see ifthe anchors hold the seat in place.
If the safety seat is not anchored properly, the risk of a childbeing injured in a crash greatly increases.
2006 Navigator (nav)Owners Guide (post-2002-fmt)USA (fus)
Seating and Safety Restraints
234

NOTICE TO UTILITY VEHICLE AND TRUCK OWNERSUtility vehicles and trucks handledifferently than passenger cars inthe various driving conditions thatare encountered on streets,highways and off-road. Utilityvehicles and trucks are not designedfor cornering at speeds as high aspassenger cars any more thanlow-slung sports cars are designedto perform satisfactorily underoff-road conditions.
Utility vehicles have a significantly higher rollover rate thanother types of vehicles. To reduce the risk of serious injury or
death from a rollover or other crash you must:
• Avoid sharp turns and abrupt maneuvers;
• Drive at safe speeds for the conditions;
• Keep tires properly inflated;
• Never overload or improperly load your vehicle; and
• Make sure every passenger is properly restrained.
In a rollover crash, an unbelted person is significantly more likelyto die than a person wearing a seat belt. All occupants must
wear safety belts and children/infants must use appropriate restraintsto minimize the risk of injury or ejection.
Study your Owner’s Guide and any supplements for specific informationabout equipment features, instructions for safe driving and additionalprecautions to reduce the risk of an accident or serious injury.
VEHICLE CHARACTERISTICS
4WD and AWD Systems (if equipped)A vehicle equipped with AWD or 4WD (when selected) has the ability touse all four wheels to power itself. This increases traction which mayenable you to safely drive over terrain and road conditions that aconventional two-wheel drive vehicle cannot.
2006 Navigator (nav)Owners Guide (post-2002-fmt)USA (fus)
Tires, Wheels and Loading
235
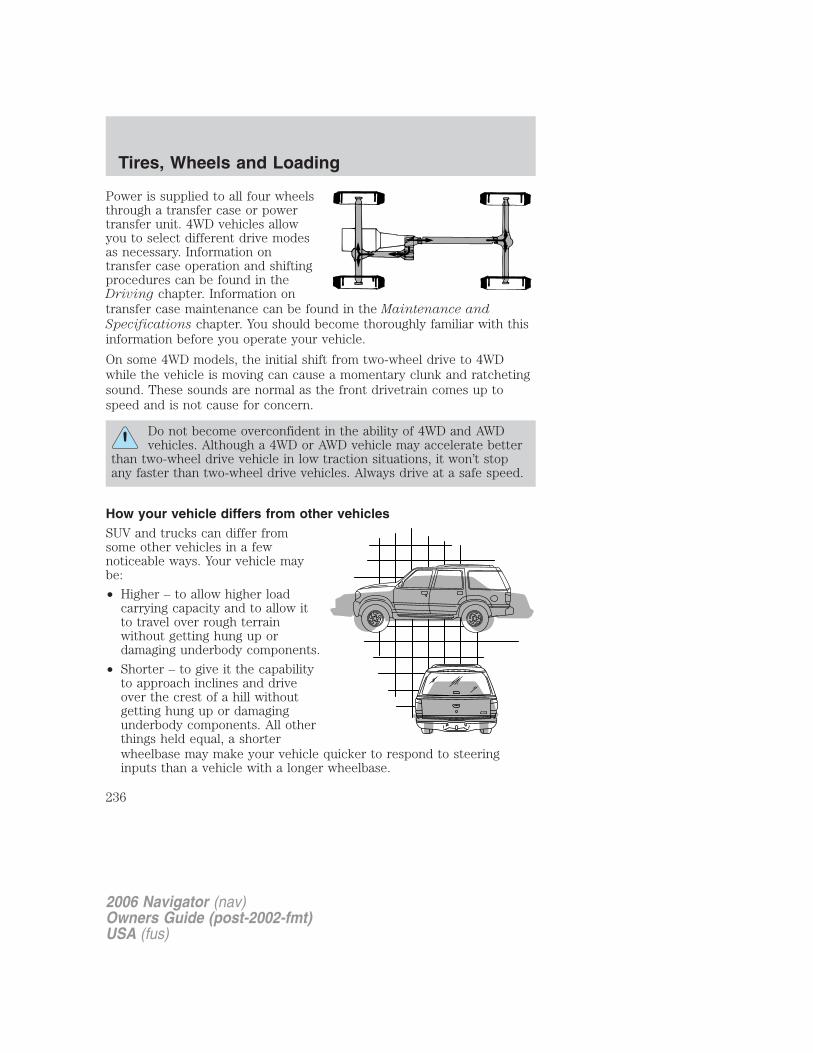
Power is supplied to all four wheelsthrough a transfer case or powertransfer unit. 4WD vehicles allowyou to select different drive modesas necessary. Information ontransfer case operation and shiftingprocedures can be found in theDriving chapter. Information ontransfer case maintenance can be found in the Maintenance and
Specifications chapter. You should become thoroughly familiar with thisinformation before you operate your vehicle.
On some 4WD models, the initial shift from two-wheel drive to 4WDwhile the vehicle is moving can cause a momentary clunk and ratchetingsound. These sounds are normal as the front drivetrain comes up tospeed and is not cause for concern.
Do not become overconfident in the ability of 4WD and AWDvehicles. Although a 4WD or AWD vehicle may accelerate better
than two-wheel drive vehicle in low traction situations, it won’t stopany faster than two-wheel drive vehicles. Always drive at a safe speed.
How your vehicle differs from other vehiclesSUV and trucks can differ fromsome other vehicles in a fewnoticeable ways. Your vehicle maybe:
• Higher – to allow higher loadcarrying capacity and to allow itto travel over rough terrainwithout getting hung up ordamaging underbody components.
• Shorter – to give it the capabilityto approach inclines and driveover the crest of a hill withoutgetting hung up or damagingunderbody components. All otherthings held equal, a shorterwheelbase may make your vehicle quicker to respond to steeringinputs than a vehicle with a longer wheelbase.
2006 Navigator (nav)Owners Guide (post-2002-fmt)USA (fus)
Tires, Wheels and Loading
236
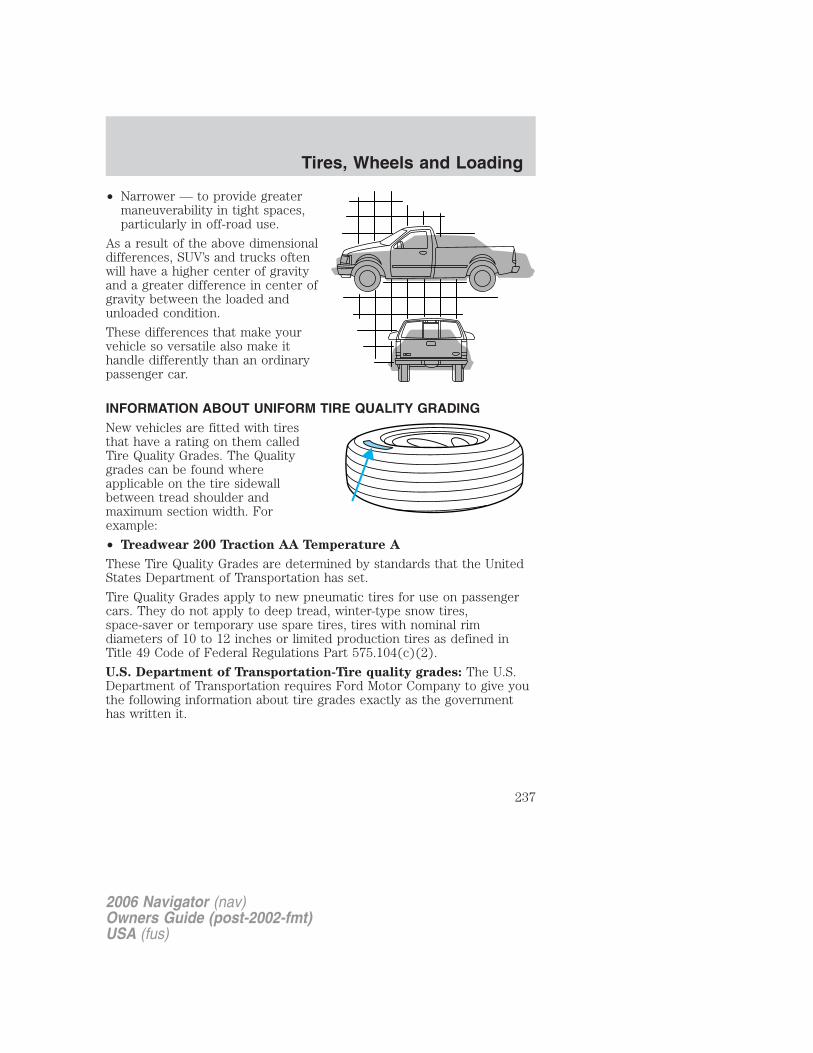
• Narrower — to provide greatermaneuverability in tight spaces,particularly in off-road use.
As a result of the above dimensionaldifferences, SUV’s and trucks oftenwill have a higher center of gravityand a greater difference in center ofgravity between the loaded andunloaded condition.
These differences that make yourvehicle so versatile also make ithandle differently than an ordinarypassenger car.
INFORMATION ABOUT UNIFORM TIRE QUALITY GRADINGNew vehicles are fitted with tiresthat have a rating on them calledTire Quality Grades. The Qualitygrades can be found whereapplicable on the tire sidewallbetween tread shoulder andmaximum section width. Forexample:
• Treadwear 200 Traction AA Temperature A
These Tire Quality Grades are determined by standards that the UnitedStates Department of Transportation has set.
Tire Quality Grades apply to new pneumatic tires for use on passengercars. They do not apply to deep tread, winter-type snow tires,space-saver or temporary use spare tires, tires with nominal rimdiameters of 10 to 12 inches or limited production tires as defined inTitle 49 Code of Federal Regulations Part 575.104(c)(2).
U.S. Department of Transportation-Tire quality grades: The U.S.Department of Transportation requires Ford Motor Company to give youthe following information about tire grades exactly as the governmenthas written it.
2006 Navigator (nav)Owners Guide (post-2002-fmt)USA (fus)
Tires, Wheels and Loading
237

TreadwearThe treadwear grade is a comparative rating based on the wear rate ofthe tire when tested under controlled conditions on a specifiedgovernment test course. For example, a tire graded 150 would wear oneand one-half (1 1/2) times as well on the government course as a tiregraded 100. The relative performance of tires depends upon the actualconditions of their use, however, and may depart significantly from thenorm due to variations in driving habits, service practices, anddifferences in road characteristics and climate.
Traction AA A B CThe traction grades, from highest to lowest are AA, A, B, and C. Thegrades represent the tire’s ability to stop on wet pavement as measuredunder controlled conditions on specified government test surfaces ofasphalt and concrete. A tire marked C may have poor tractionperformance.
The traction grade assigned to this tire is based onstraight-ahead braking traction tests, and does not include
acceleration, cornering, hydroplaning or peak traction characteristics.
Temperature A B CThe temperature grades are A (the highest), B and C, representing thetire’s resistance to the generation of heat and its ability to dissipate heatwhen tested under controlled conditions on a specified indoor laboratorytest wheel. Sustained high temperature can cause the material of the tireto degenerate and reduce tire life, and excessive temperature can lead tosudden tire failure. The grade C corresponds to a level of performancewhich all passenger car tires must meet under the Federal Motor VehicleSafety Standard No. 109. Grades B and A represent higher levels ofperformance on the laboratory test wheel than the minimum required bylaw.
The temperature grade for this tire is established for a tire thatis properly inflated and not overloaded. Excessive speed,
underinflation, or excessive loading, either separately or incombination, can cause heat buildup and possible tire failure.
2006 Navigator (nav)Owners Guide (post-2002-fmt)USA (fus)
Tires, Wheels and Loading
238
TIRESTires are designed to give many thousands of miles of service, but theymust be maintained in order to get the maximum benefit from them.
Glossary of tire terminology• Tire label: A label showing the OE (Original Equipment) tire sizes,
recommended inflation pressure and the maximum weight the vehiclecan carry.
• Tire Identification Number (TIN): A number on the sidewall ofeach tire providing information about the tire brand andmanufacturing plant, tire size and date of manufacture.
• Inflation pressure: A measure of the amount of air in a tire.• Standard load: A class of P-metric or Metric tires designed to carry a
maximum load at 35 psi [37 psi (2.5 bar) for Metric tires]. Increasingthe inflation pressure beyond this pressure will not increase the tire’sload carrying capability.
• Extra load: A class of P-metric or Metric tires designed to carry aheavier maximum load at 41 psi [43 psi (2.9 bar) for Metric tires].Increasing the inflation pressure beyond this pressure will not increasethe tire’s load carrying capability.
• kPa: Kilopascal, a metric unit of air pressure.• PSI: Pounds per square inch, a standard unit of air pressure.• Cold inflation pressure: The tire pressure when the vehicle has
been stationary and out of direct sunlight for an hour or more andprior to the vehicle being driven for 1 mile (1.6 km).
• Recommended inflation pressure: The cold inflation pressure foundon the Safety Compliance Certification Label located on the B-Pillar orthe edge of the driver’s door.
• B-pillar: The structural member at the side of the vehicle behind thefront door.
• Bead area of the tire: Area of the tire next to the rim.• Sidewall of the tire: Area between the bead area and the tread.• Tread area of the tire: Area of the perimeter of the tire that
contacts the road when mounted on the vehicle.• Rim: The metal support (wheel) for a tire or a tire and tube assembly
upon which the tire beads are seated.
INSPECTING AND INFLATING YOUR TIRESSafe operation of your vehicle requires that your tires are properlyinflated. Remember that a tire can lose up to half of its air pressurewithout appearing flat.
2006 Navigator (nav)Owners Guide (post-2002-fmt)USA (fus)
Tires, Wheels and Loading
239

Every day before you drive, checkyour tires. If one looks lower thanthe others, use a tire gauge to checkpressure of all tires and adjust ifrequired.
At least once a month and beforelong trips, inspect each tire andcheck the tire pressure with a tiregauge (including spare, if equipped).Inflate all tires to the inflationpressure recommended by FordMotor Company.Inspecting your tiresPeriodically inspect the tire treads for uneven or excessive wear andremove stones, nails, glass or other objects that may be wedged in thetread grooves. Check for holes or cuts that may permit air leakage fromthe tire and make necessary repairs.Also inspect the tire sidewalls for cuts, bruises and other damage. Ifinternal damage to the tire is suspected, have the tire demounted andinspected in case it needs to be repaired or replaced. For your safety,tires that are damaged should not be used because they are more likelyto blow out or fail. Tires can be damaged during off-road use, soinspection after off-road use is also recommended.Inflating your tiresUse a tire gauge to check the tire inflation pressure, including the spare(if equipped), at least monthly and before long trips. You are stronglyurged to buy a reliable tire pressure gauge, as automatic service stationgauges may be inaccurate. Ford recommends the use of a digital or dialtype tire pressure gauge rather than a stick type tire pressure gauge.Use the recommended cold inflation pressure for optimum tireperformance and wear. Under-inflation or over-inflation may causeuneven treadwear patterns.
Under-inflation is the most common cause of tire failures andmay result in severe tire cracking, tread separation or �blowout�,
with unexpected loss of vehicle control and increased risk of injury.Under-inflation increases sidewall flexing and rolling resistance,resulting in heat buildup and internal damage to the tire. It also mayresult in unnecessary tire stress, irregular wear, loss of vehicle controland accidents. A tire can lose up to half of its air pressure and notappear to be flat!
2006 Navigator (nav)Owners Guide (post-2002-fmt)USA (fus)
Tires, Wheels and Loading
240
Always inflate your tires to the Ford recommended inflation pressureeven if it is less than the maximum inflation pressure information foundon the tire. The Ford recommended tire inflation pressure is found onthe Safety Compliance Certification Label which is located on the B-Pillaror the edge of the driver’s door. Failure to follow the tire pressurerecommendations can cause uneven treadwear patterns and adverselyaffect the way your vehicle handles.Maximum Permissible Inflation Pressure is the tire manufactures’maximum permissible pressure and/or the pressure at which themaximum load can be carried by the tire. This pressure is normallyhigher than the manufacturer’s recommended cold inflation pressurewhich can be found on the Safety Compliance Certification Label whichis located on the B-Pillar or the edge of the driver’s door. The coldinflation pressure should never be set lower than the recommendedpressure on the Safety Compliance Certification Label.
When weather temperature changes occur, tire inflation pressures alsochange. A 10° F (6° C) temperature drop can cause a correspondingdrop of 1 psi (7 kPa) in inflation pressure. Check your tire pressuresfrequently and adjust them to the proper pressure which can be foundon the Safety Compliance Certification Label.
If you are checking tire pressure when the tire is hot, (i.e. driven morethan 1 mile [1.6 km]), never “bleed” or reduce air pressure. The tires arehot from driving and it is normal for pressures to increase aboverecommended cold pressures. A hot tire at or below recommended coldinflation pressure could be significantly under-inflated.
To check the pressure in your tire(s):
1. Make sure the tires are cool, meaning they are not hot from drivingeven a mile.
Note: If you have to drive a distance to get air for your tire(s), checkand record the tire pressure first and add the appropriate air pressurewhen you get to the pump. It is normal for tires to heat up and the airpressure inside to go up as you drive. Never “bleed” or reduce airpressure when tires are hot.
2. Remove the cap from the valve on one tire, then firmly press the tiregauge onto the valve and measure the pressure.
3. Add enough air to reach the recommended air pressure
Note: If you overfill the tire, release air by pushing on the metal stem inthe center of the valve. Then recheck the pressure with your tire gauge.
4. Replace the valve cap.
2006 Navigator (nav)Owners Guide (post-2002-fmt)USA (fus)
Tires, Wheels and Loading
241
5. Repeat this procedure for each tire, including the spare.Note: Some spare tires operate at a higher inflation pressure than theother tires. For T-type/mini-spare tires (see T-Type/Mini-Spare TireInformation section for description): Store and maintain at 60psi (4.15bars). For Full Size and Dissimilar spare tires (see Dissimilar SpareTire/Wheel Information section for description): Store and maintain atthe higher of the front and rear inflation pressure as shown on the SafetyCompliance Certification Label.
6. Visually inspect the tires to make sure there are no nails or otherobjects embedded that could poke a hole in the tire and cause an airleak.
7. Check the sidewalls to make sure there are no gouges, cuts or bulges.
TIRE REPLACEMENT REQUIREMENTSYour vehicle is equipped with tires designed to provide a safe ride andhandling capability.
Only use replacement tires and wheels that are the same sizeand type (such as P-metric versus LT-metric or all-season versus
all-terrain) as those originally provided by Ford Motor Company. Use ofany tire or wheel not recommended by Ford Motor Company can affectthe safety and performance of your vehicle, which could result in anincreased risk of loss of vehicle control, vehicle rollover, personal injuryand death. Additionally the use of non-recommended tires and wheelscould cause steering, suspension, axle or transfer case/power transferunit failure. If you have questions regarding tire replacement, see anauthorized dealer.
Make sure all tires and wheels on the vehicle are of the same size, type,tread design, brand, load-carrying capacity and speed rating because itcan affect the safety and performance of your vehicle, which could resultin an increased risk of loss of vehicle control, vehicle rollover, personalinjury and death.
The tire pressure monitoring sensors mounted in the wheels (originallyinstalled on your vehicle) are not designed to be used in after-marketwheels.
The installation of replacement tires with steel cord body plies in the tiresidewall may cause malfunction of the Tire Pressure Monitoring System(TPMS), and is not recommended (cord material information is moldedon the tire sidewall). Additionally, if your vehicle was originally equipped
2006 Navigator (nav)Owners Guide (post-2002-fmt)USA (fus)
Tires, Wheels and Loading
242
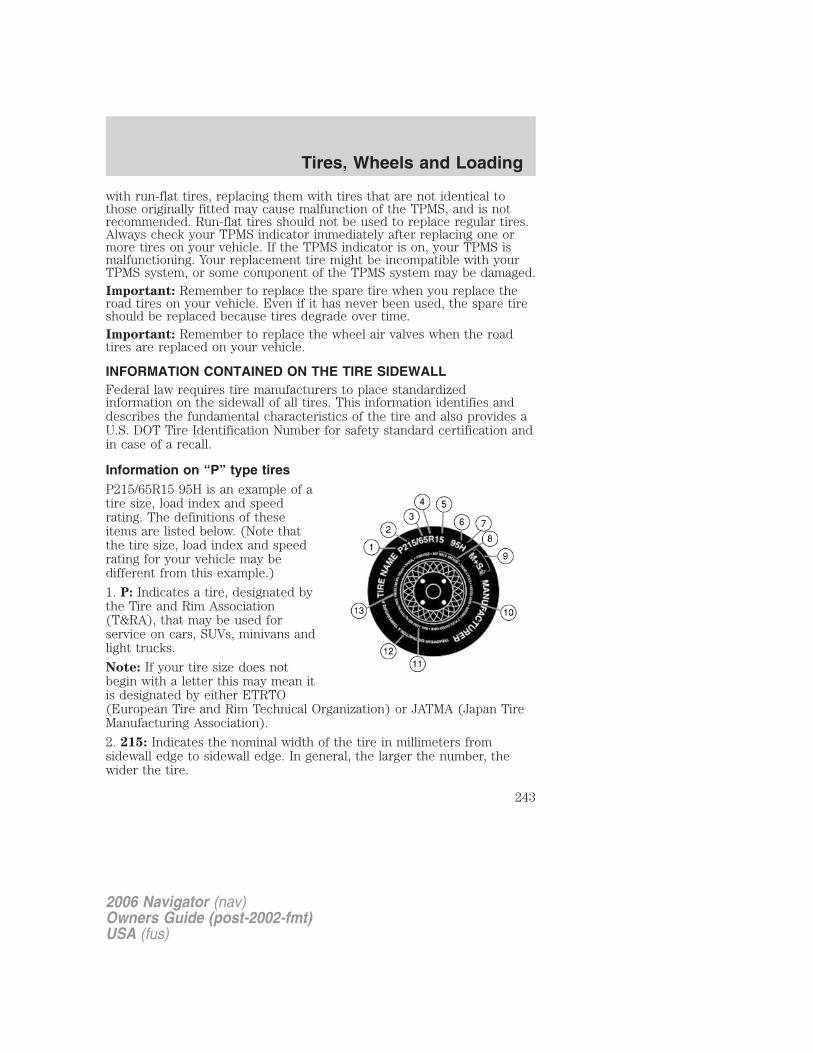
with run-flat tires, replacing them with tires that are not identical tothose originally fitted may cause malfunction of the TPMS, and is notrecommended. Run-flat tires should not be used to replace regular tires.Always check your TPMS indicator immediately after replacing one ormore tires on your vehicle. If the TPMS indicator is on, your TPMS ismalfunctioning. Your replacement tire might be incompatible with yourTPMS system, or some component of the TPMS system may be damaged.Important: Remember to replace the spare tire when you replace theroad tires on your vehicle. Even if it has never been used, the spare tireshould be replaced because tires degrade over time.Important: Remember to replace the wheel air valves when the roadtires are replaced on your vehicle.
INFORMATION CONTAINED ON THE TIRE SIDEWALLFederal law requires tire manufacturers to place standardizedinformation on the sidewall of all tires. This information identifies anddescribes the fundamental characteristics of the tire and also provides aU.S. DOT Tire Identification Number for safety standard certification andin case of a recall.
Information on “P” type tiresP215/65R15 95H is an example of atire size, load index and speedrating. The definitions of theseitems are listed below. (Note thatthe tire size, load index and speedrating for your vehicle may bedifferent from this example.)
1. P: Indicates a tire, designated bythe Tire and Rim Association(T&RA), that may be used forservice on cars, SUVs, minivans andlight trucks.
Note: If your tire size does notbegin with a letter this may mean itis designated by either ETRTO(European Tire and Rim Technical Organization) or JATMA (Japan TireManufacturing Association).
2. 215: Indicates the nominal width of the tire in millimeters fromsidewall edge to sidewall edge. In general, the larger the number, thewider the tire.
2006 Navigator (nav)Owners Guide (post-2002-fmt)USA (fus)
Tires, Wheels and Loading
243
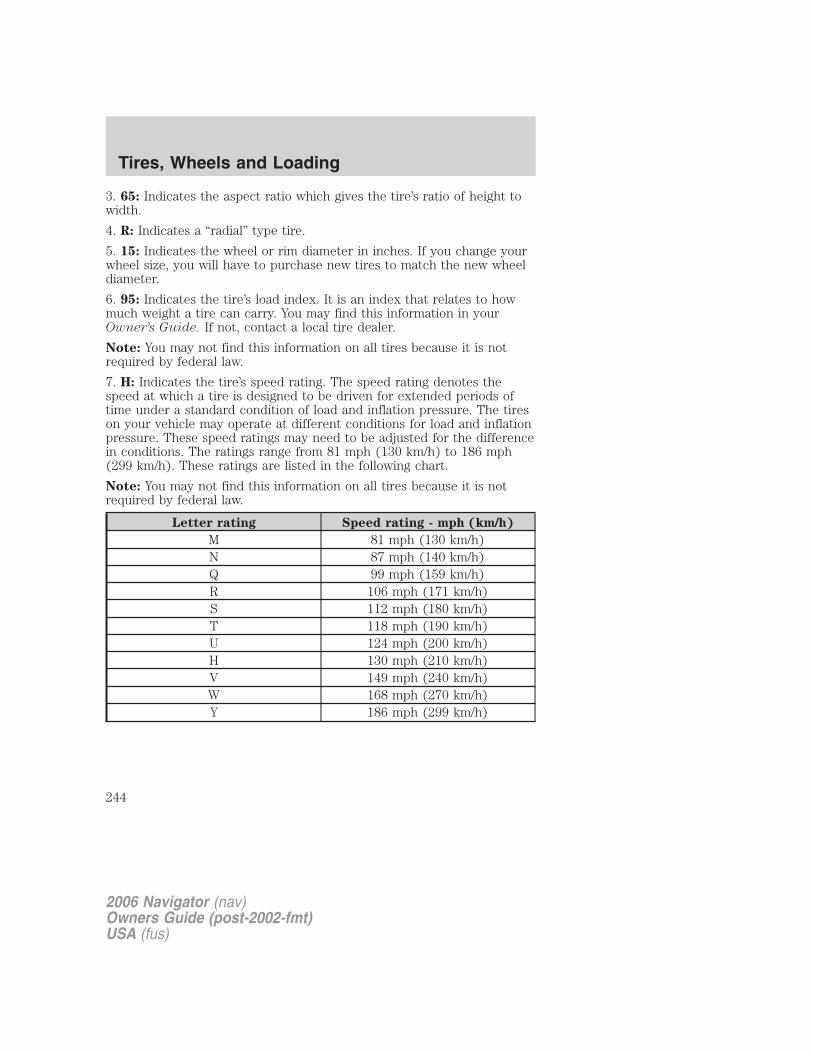
3. 65: Indicates the aspect ratio which gives the tire’s ratio of height towidth.
4. R: Indicates a “radial” type tire.
5. 15: Indicates the wheel or rim diameter in inches. If you change yourwheel size, you will have to purchase new tires to match the new wheeldiameter.
6. 95: Indicates the tire’s load index. It is an index that relates to howmuch weight a tire can carry. You may find this information in yourOwner’s Guide. If not, contact a local tire dealer.
Note: You may not find this information on all tires because it is notrequired by federal law.
7. H: Indicates the tire’s speed rating. The speed rating denotes thespeed at which a tire is designed to be driven for extended periods oftime under a standard condition of load and inflation pressure. The tireson your vehicle may operate at different conditions for load and inflationpressure. These speed ratings may need to be adjusted for the differencein conditions. The ratings range from 81 mph (130 km/h) to 186 mph(299 km/h). These ratings are listed in the following chart.
Note: You may not find this information on all tires because it is notrequired by federal law.
Letter rating Speed rating - mph (km/h)
M 81 mph (130 km/h)N 87 mph (140 km/h)Q 99 mph (159 km/h)R 106 mph (171 km/h)S 112 mph (180 km/h)T 118 mph (190 km/h)U 124 mph (200 km/h)H 130 mph (210 km/h)V 149 mph (240 km/h)W 168 mph (270 km/h)Y 186 mph (299 km/h)
2006 Navigator (nav)Owners Guide (post-2002-fmt)USA (fus)
Tires, Wheels and Loading
244
Letter rating Speed rating - mph (km/h)
Note: For tires with a maximum speed capability over 149 mph(240 km/h), tire manufacturers sometimes use the letters ZR. Forthose with a maximum speed capability over 186 mph (299 km/h),tire manufacturers always use the letters ZR.
8. U.S. DOT Tire Identification Number (TIN): This begins with theletters “DOT” and indicates that the tire meets all federal standards. Thenext two numbers or letters are the plant code designating where it wasmanufactured, the next two are the tire size code and the last fournumbers represent the week and year the tire was built. For example,the numbers 317 mean the 31st week of 1997. After 2000 the numbersgo to four digits. For example, 2501 means the 25th week of 2001. Thenumbers in between are identification codes used for traceability. Thisinformation is used to contact customers if a tire defect requires a recall.
9. M+S or M/S: Mud and Snow, orAT: All Terrain, orAS: All Season.
10. Tire Ply Composition and Material Used: Indicates the number ofplies or the number of layers of rubber-coated fabric in the tire tread andsidewall. Tire manufacturers also must indicate the ply materials in thetire and the sidewall, which include steel, nylon, polyester, and others.
11. Maximum Load: Indicates the maximum load in kilograms andpounds that can be carried by the tire. Refer to the Safety ComplianceCertification Label, which is located on the B-Pillar or the edge of thedriver’s door, for the correct tire pressure for your vehicle.
12. Treadwear, Traction and Temperature Grades
• Treadwear: The treadwear grade is a comparative rating based on thewear rate of the tire when tested under controlled conditions on aspecified government test course. For example, a tire graded 150would wear one and one-half (11⁄2) times as well on the governmentcourse as a tire graded 100.
• Traction: The traction grades, from highest to lowest are AA, A, B,and C. The grades represent the tire’s ability to stop on wet pavementas measured under controlled conditions on specified government testsurfaces of asphalt and concrete. A tire marked C may have poortraction performance.
2006 Navigator (nav)Owners Guide (post-2002-fmt)USA (fus)
Tires, Wheels and Loading
245
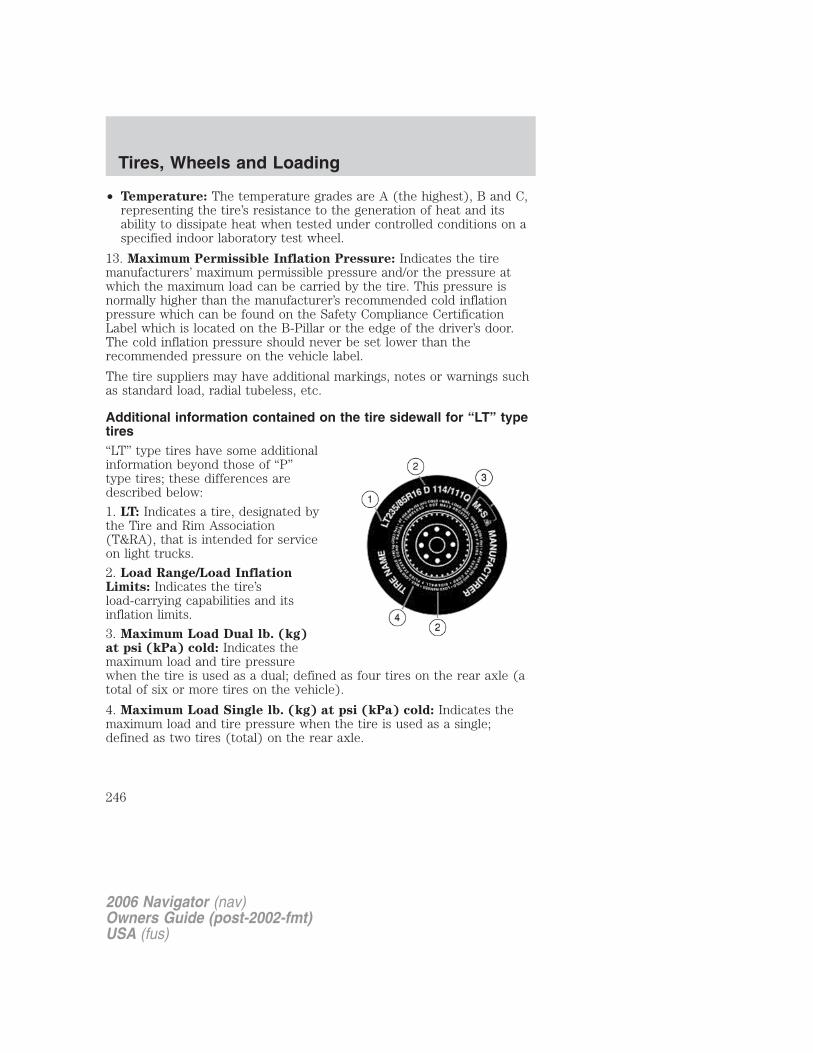
• Temperature: The temperature grades are A (the highest), B and C,representing the tire’s resistance to the generation of heat and itsability to dissipate heat when tested under controlled conditions on aspecified indoor laboratory test wheel.
13. Maximum Permissible Inflation Pressure: Indicates the tiremanufacturers’ maximum permissible pressure and/or the pressure atwhich the maximum load can be carried by the tire. This pressure isnormally higher than the manufacturer’s recommended cold inflationpressure which can be found on the Safety Compliance CertificationLabel which is located on the B-Pillar or the edge of the driver’s door.The cold inflation pressure should never be set lower than therecommended pressure on the vehicle label.
The tire suppliers may have additional markings, notes or warnings suchas standard load, radial tubeless, etc.
Additional information contained on the tire sidewall for “LT” typetires“LT” type tires have some additionalinformation beyond those of “P”type tires; these differences aredescribed below:
1. LT: Indicates a tire, designated bythe Tire and Rim Association(T&RA), that is intended for serviceon light trucks.
2. Load Range/Load InflationLimits: Indicates the tire’sload-carrying capabilities and itsinflation limits.
3. Maximum Load Dual lb. (kg)at psi (kPa) cold: Indicates themaximum load and tire pressurewhen the tire is used as a dual; defined as four tires on the rear axle (atotal of six or more tires on the vehicle).
4. Maximum Load Single lb. (kg) at psi (kPa) cold: Indicates themaximum load and tire pressure when the tire is used as a single;defined as two tires (total) on the rear axle.
2006 Navigator (nav)Owners Guide (post-2002-fmt)USA (fus)
Tires, Wheels and Loading
246
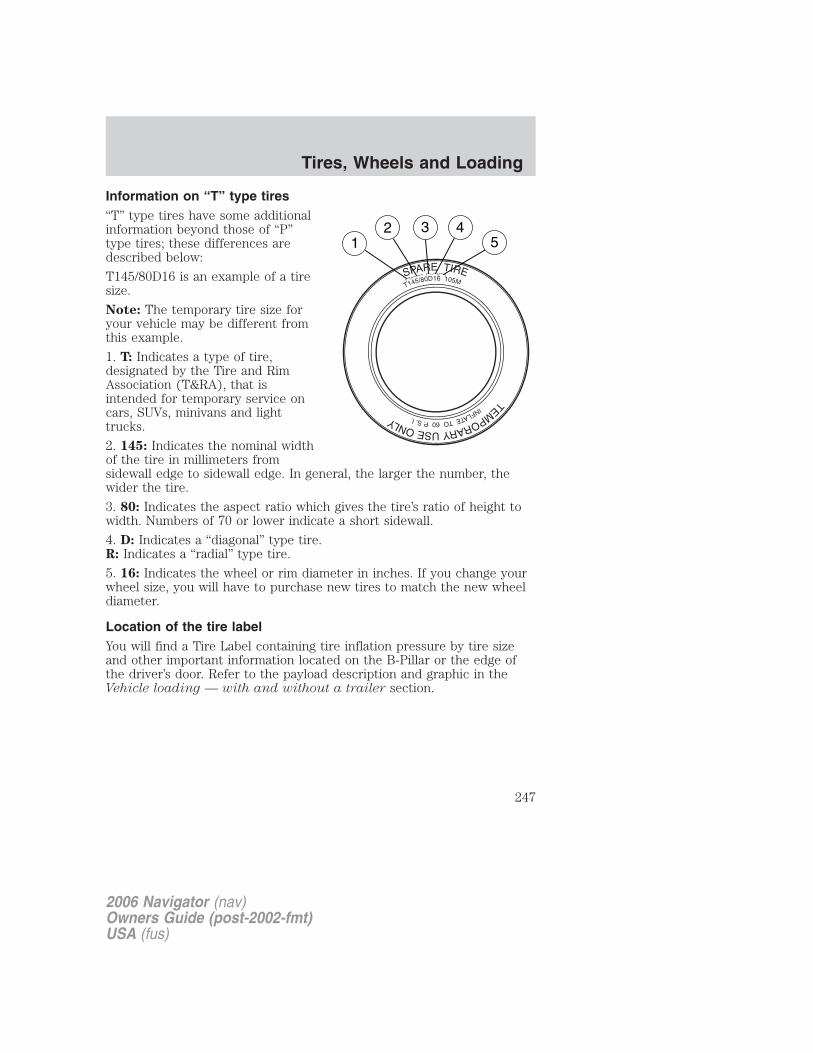
Information on “T” type tires“T” type tires have some additionalinformation beyond those of “P”type tires; these differences aredescribed below:
T145/80D16 is an example of a tiresize.
Note: The temporary tire size foryour vehicle may be different fromthis example.
1. T: Indicates a type of tire,designated by the Tire and RimAssociation (T&RA), that isintended for temporary service oncars, SUVs, minivans and lighttrucks.
2. 145: Indicates the nominal widthof the tire in millimeters fromsidewall edge to sidewall edge. In general, the larger the number, thewider the tire.
3. 80: Indicates the aspect ratio which gives the tire’s ratio of height towidth. Numbers of 70 or lower indicate a short sidewall.
4. D: Indicates a “diagonal” type tire.R: Indicates a “radial” type tire.
5. 16: Indicates the wheel or rim diameter in inches. If you change yourwheel size, you will have to purchase new tires to match the new wheeldiameter.
Location of the tire labelYou will find a Tire Label containing tire inflation pressure by tire sizeand other important information located on the B-Pillar or the edge ofthe driver’s door. Refer to the payload description and graphic in theVehicle loading — with and without a trailer section.
2006 Navigator (nav)Owners Guide (post-2002-fmt)USA (fus)
Tires, Wheels and Loading
247
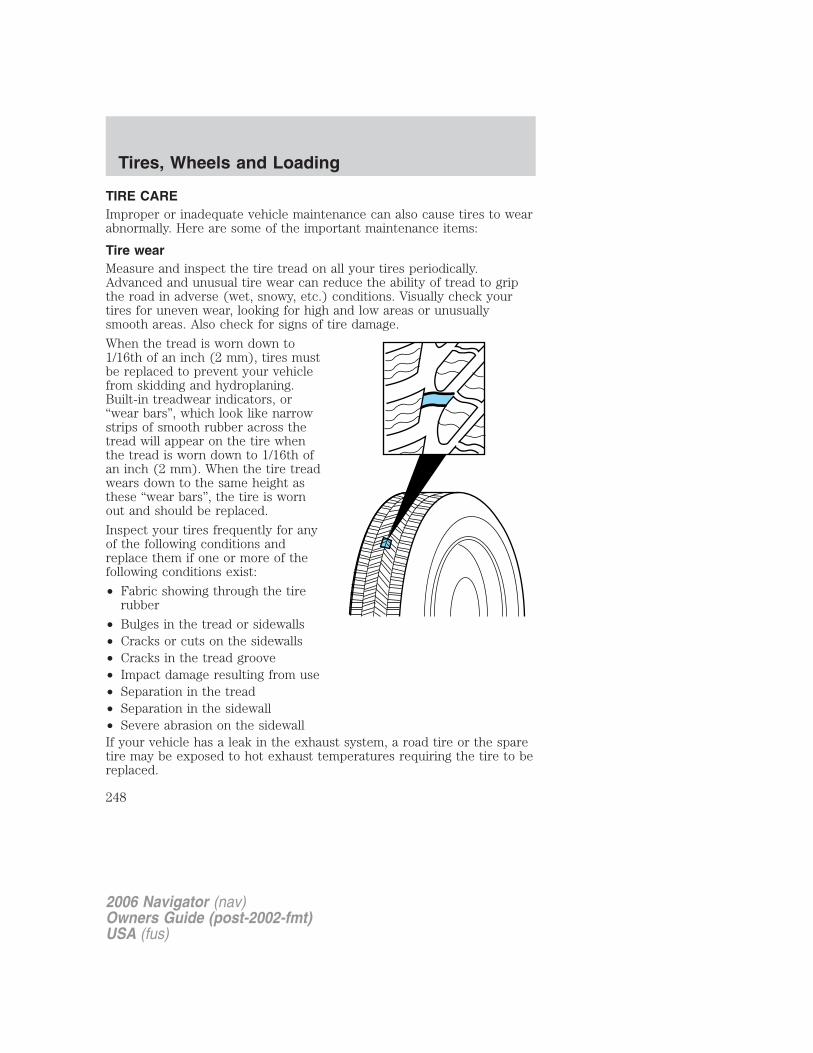
TIRE CAREImproper or inadequate vehicle maintenance can also cause tires to wearabnormally. Here are some of the important maintenance items:
Tire wearMeasure and inspect the tire tread on all your tires periodically.Advanced and unusual tire wear can reduce the ability of tread to gripthe road in adverse (wet, snowy, etc.) conditions. Visually check yourtires for uneven wear, looking for high and low areas or unusuallysmooth areas. Also check for signs of tire damage.
When the tread is worn down to1/16th of an inch (2 mm), tires mustbe replaced to prevent your vehiclefrom skidding and hydroplaning.Built-in treadwear indicators, or“wear bars”, which look like narrowstrips of smooth rubber across thetread will appear on the tire whenthe tread is worn down to 1/16th ofan inch (2 mm). When the tire treadwears down to the same height asthese “wear bars”, the tire is wornout and should be replaced.
Inspect your tires frequently for anyof the following conditions andreplace them if one or more of thefollowing conditions exist:
• Fabric showing through the tirerubber
• Bulges in the tread or sidewalls• Cracks or cuts on the sidewalls• Cracks in the tread groove• Impact damage resulting from use• Separation in the tread• Separation in the sidewall• Severe abrasion on the sidewallIf your vehicle has a leak in the exhaust system, a road tire or the sparetire may be exposed to hot exhaust temperatures requiring the tire to bereplaced.
2006 Navigator (nav)Owners Guide (post-2002-fmt)USA (fus)
Tires, Wheels and Loading
248
Safety practicesDriving habits have a great deal to do with your tire mileage and safety.• Observe posted speed limits• Avoid fast starts, stops and turns• Avoid potholes and objects on the road• Do not run over curbs or hit the tire against a curb when parking
If your vehicle is stuck in snow, mud, sand, etc., do not rapidlyspin the tires; spinning the tires can tear the tire and cause an
explosion. A tire can explode in as little as three to five seconds.
Never spin the tires in excess of the 35 mph (55 km/h) pointindicated on the speedometer.
Highway hazardsNo matter how carefully you drive there’s always the possibility that youmay eventually have a flat tire on the highway. Drive slowly to theclosest safe area out of traffic. This may further damage the flat tire, butyour safety is more important.If you feel a sudden vibration or ride disturbance while driving, or yoususpect your tire or vehicle has been damaged, immediately reduce yourspeed. Drive with caution until you can safely pull off the road. Stop andinspect the tires for damage. If a tire is under-inflated or damaged,deflate it, remove wheel and replace it with your spare tire and wheel. Ifyou cannot detect a cause, have the vehicle towed to the nearest repairfacility or tire dealer to have the vehicle inspected.
Tire and wheel alignmentA bad jolt from hitting a curb or pothole can cause the front end of yourvehicle to become misaligned or cause damage to your tires. If yourvehicle seems to pull to one side when you’re driving, the wheels may beout of alignment. Have an authorized dealer check the wheel alignmentperiodically.
Wheel misalignment in the front or the rear can cause uneven and rapidtreadwear of your tires and should be corrected by an authorized dealer.Front wheel drive (FWD) vehicles and those with an independent rearsuspension (if equipped) may require alignment of all four wheels.
The tires should also be balanced periodically. An unbalanced tire andwheel assembly may result in irregular tire wear.
2006 Navigator (nav)Owners Guide (post-2002-fmt)USA (fus)
Tires, Wheels and Loading
249

Tire rotation
Rotating your tires at the recommended interval (as indicated in thescheduled maintenance information that comes with your vehicle) willhelp your tires wear more evenly, providing better tire performance andlonger tire life. Unless otherwise specified, rotate the tires approximatelyevery 5,000 miles (8,000 km).
• Rear Wheel Drive (RWD)vehicles/Four Wheel Drive(4WD)/ All Wheel Drive (AWD)vehicles (front tires at top ofdiagram)
Sometimes irregular tire wear can be corrected by rotating the tires.
Note: If your tires show uneven wear ask an authorized dealer to checkfor and correct any wheel misalignment, tire imbalance or mechanicalproblem involved before tire rotation.
Note: Your vehicle may be equipped with a dissimilar spare tire/wheel. Adissimilar spare tire/wheel is defined as a spare tire and/or wheel that isdifferent in brand, size or appearance from the road tires and wheels. Ifyou have a dissimilar spare tire/wheel it is intended for temporary useonly and should not be used in a tire rotation.
Note: After having your tires rotated, inflation pressure must be checkedand adjusted to the vehicle requirements.
2006 Navigator (nav)Owners Guide (post-2002-fmt)USA (fus)
Tires, Wheels and Loading
250
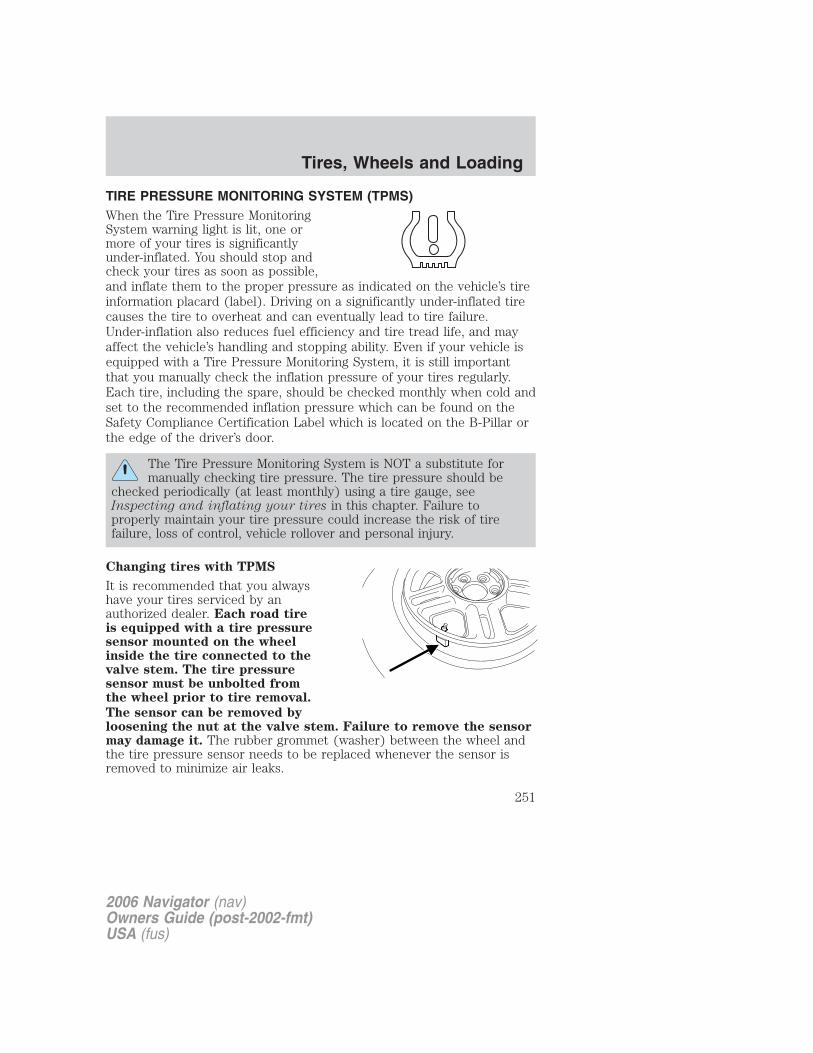
TIRE PRESSURE MONITORING SYSTEM (TPMS)When the Tire Pressure MonitoringSystem warning light is lit, one ormore of your tires is significantlyunder-inflated. You should stop andcheck your tires as soon as possible,and inflate them to the proper pressure as indicated on the vehicle’s tireinformation placard (label). Driving on a significantly under-inflated tirecauses the tire to overheat and can eventually lead to tire failure.Under-inflation also reduces fuel efficiency and tire tread life, and mayaffect the vehicle’s handling and stopping ability. Even if your vehicle isequipped with a Tire Pressure Monitoring System, it is still importantthat you manually check the inflation pressure of your tires regularly.Each tire, including the spare, should be checked monthly when cold andset to the recommended inflation pressure which can be found on theSafety Compliance Certification Label which is located on the B-Pillar orthe edge of the driver’s door.
The Tire Pressure Monitoring System is NOT a substitute formanually checking tire pressure. The tire pressure should be
checked periodically (at least monthly) using a tire gauge, seeInspecting and inflating your tires in this chapter. Failure toproperly maintain your tire pressure could increase the risk of tirefailure, loss of control, vehicle rollover and personal injury.
Changing tires with TPMS
It is recommended that you alwayshave your tires serviced by anauthorized dealer. Each road tireis equipped with a tire pressuresensor mounted on the wheelinside the tire connected to thevalve stem. The tire pressuresensor must be unbolted fromthe wheel prior to tire removal.
The sensor can be removed byloosening the nut at the valve stem. Failure to remove the sensormay damage it. The rubber grommet (washer) between the wheel andthe tire pressure sensor needs to be replaced whenever the sensor isremoved to minimize air leaks.
2006 Navigator (nav)Owners Guide (post-2002-fmt)USA (fus)
Tires, Wheels and Loading
251
The tire pressure should be checked periodically (at least monthly) usingan accurate tire gauge, refer to Inspecting and inflating your tires inthis chapter.
Understanding your Tire Pressure Monitoring System (TPMS)
The Tire Pressure Monitoring System measures pressure in your fourroad tires and sends the tire pressure readings to your vehicle everyminute while you are driving and once an hour when your vehicle isparked. The Low Tire Warning Lamp will turn ON if the tire pressure is25% below the pressure listed on the Safety Compliance CertificationLabel (approximately 6 to 9 psi below the manufacturer’s recommendtire pressure). If the tire pressure increases 2 psi above the “Light ON”threshold, then the TPMS light will turn OFF. Once the light isilluminated, your tires are under inflated and need to be inflated to themanufacturer’s recommended tire pressure. Even if the light turns ONand a short time later turns OFF, your tire pressure still needs to bechecked.
In short, once the light has turned ON, at least one tire may be underinflated.
When your temporary spare tire is installed
When one of your road tires needs to be replaced with the temporaryspare, the TPMS system will continue to identify an issue to remind youthat the damaged road wheel/tire needs to be repaired and put back onyour vehicle. During this time, the low tire warning light can periodicallyreturn or stay on, depending on the state of the damaged roadwheel/tire. This will include the message center messages (if equipped).
To restore the full functionality of the Tire Pressure Monitoring System,have the damaged road wheel/tire repaired and remounted on yourvehicle. For additional information, refer to Changing tires with TPMS
in this section.
When you believe your system is not operating properly
The main function of the Tire Pressure Monitoring System is to warn youwhen your tires need air. It can also warn you in the event the system isno longer capable of functioning as intended. Please refer to thefollowing chart for information concerning your Tire Pressure MonitoringSystem:
2006 Navigator (nav)Owners Guide (post-2002-fmt)USA (fus)
Tires, Wheels and Loading
252

Low Tire Warning
Light
Customer Action Required
Solid Warning Light 1. Check your tire pressure to ensure they areproperly inflated, refer to Inspecting and
inflating your tires in this chapter. Fordrecommends the use of a digital or dial typetire pressure gauge rather than a stick typetire pressure gauge for increased accuracy.2. After inflating your tires to themanufacturer’s recommended air pressure asshown on the Safety Compliance CertificationLabel (located on the driver’s door or theB-Pillar), the vehicle must be driven for atleast two minutes at 20 mph (32 km/h) toguarantee that the light will turn off.3. If the light remains on even after thesesteps have been taken, have the systeminspected by your authorized dealer.
Flashing Warning Light(flashes for 20 to 30seconds either atstart-up or whiledriving)
1. Your spare tire is in use. Repair thedamaged road wheel and re-mount it on thevehicle to restore system functionality. For adescription of how the system functions underthese conditions, refer to When You Have a
Flat Tire in this section.2. If your tires are inflated to themanufacturer’s recommended tire pressure,and your spare tire is not in use, and aflashing low time warning light is still present,have the system inspected by your authorizeddealer.
2006 Navigator (nav)Owners Guide (post-2002-fmt)USA (fus)
Tires, Wheels and Loading
253
When inflating your tiresWhen putting air into your tires (such as at a gas station or in yourgarage), the Tire Pressure Monitoring System may not respondimmediately to the air added to your tires. Here are the details:• The tire pressure monitor sensors mounted in your wheels updates
your vehicle with tire pressure information only once every minute,therefore it may take up to a minute for the light to turn off after youhave filled your tires to the recommended tire pressure.
• If your vehicle has been parked for over 15 minutes, the sensors gointo a low power mode to conserve battery life and therefore onlytransmit about once an hour. If you inflate your tires under theseconditions, the light could take up to an hour to turn off after youhave filled your tires to the recommended tire pressure.
For these reasons, the low tire warning light is NOT a substitute forusing an accurate tire gauge when checking and filling your tires. Thebest way to turn off the low tire warning light is to fill your tires to therecommended tire pressure and drive your vehicle — the tire pressuresensors in your wheels will update your vehicle with the updated tirepressure when your vehicle reaches a speed of 20 mph (32 km/h) for atleast a minute.
How temperature affects your tire pressureThe Tire Pressure Monitoring System (TPMS) monitors tire pressure ineach pneumatic tire. The pressure in each tire is dependent upon severalfactors, one of them being the contained air temperature (temperature ofthe air inside the tire). As the contained air temperature increases, thetire pressure also increases. While driving in a normal manner, a typicalpassenger tire inflation pressure may increase approximately 2 to 4 psi(14 to 28 kPa) from a cold start situation. This increase in tire pressureis due to an increase in the contained air temperature. Contained airtemperature is dependent upon several factors such as rate of tirerotation, tire deflection, amount of braking, etc. In similar manner, thetire pressure will decrease if the contained air temperature decreases.For example, if the vehicle is stationary over night with the outsidetemperature significantly lower than the daytime temperature, the tirepressure may decrease approximately 3 psi (20.7 kPa) for a drop of 30°F (16.6° C) in ambient temperature. This lower pressure value may bedetected by the TPMS as being significantly lower than the cold pressureindicated on your vehicles Safety Compliance Certification Label, andactivate the TPMS warning for low tire pressure. If the low warning lightis on, visually check each tire to verify that no tire is flat. If one or more
2006 Navigator (nav)Owners Guide (post-2002-fmt)USA (fus)
Tires, Wheels and Loading
254
tires are flat, repair as necessary. If all tires appear to be inflated,carefully drive the vehicle to the nearest location where air can be addedto the tires. Turn the ignition to the “off” position. Inflate all the tires tothe recommended cold pressure.The Tire Pressure Monitoring System complies with part 15 of the FCCrules and with RS-210 of Industry Canada. Operation is subject to thefollowing two conditions: (1) This device may not cause harmfulinterference, and (2) This device must accept any interference received,including interference that may cause undesired operation.
The Tire Pressure Monitoring System is NOT a substitute formanually checking tire pressure. The tire pressure should be
checked periodically (at least monthly) using a tire gauge, seeInspecting and inflating your tires in this chapter. Failure toproperly maintain your tire pressure could increase the risk of tirefailure, loss of control, vehicle rollover and personal injury.
SNOW TIRES AND CHAINS
Snow tires must be the same size and grade as the tires youcurrently have on your vehicle.
The tires on your vehicle have all weather treads to provide traction inrain and snow. However, in some climates, you may need to use snowtires and chains.Follow these guidelines when using snow tires and chains:• Use only cable type chains or chains offered by Ford as an accessory
or equivalent. Other conventional link type chains may contact andcause damage to the vehicle’s wheel house and/or body.
• Do not install chains on the front wheels. Chains on the front wheelsmay interfere with suspension components.
• Chains are not recommended for use on the optional P275/65R18 tire.• Install chains securely, verifying that the chains do not touch any
wiring, brake lines or fuel lines.• Drive cautiously. If you hear the chains rub or bang against your
vehicle, stop and re-tighten the chains. If this does not work, removethe chains to prevent damage to your vehicle.
• If possible, avoid fully loading your vehicle.
• Remove the tire chains when they are no longer needed. Do not usetire chains on dry roads.
2006 Navigator (nav)Owners Guide (post-2002-fmt)USA (fus)
Tires, Wheels and Loading
255

• The suspension insulation and bumpers will help prevent vehicledamage. Do not remove these components from your vehicle whenusing snow tires and chains.
• Do not exceed 30 mph (48 km/h) with tire chains on your vehicle.
VEHICLE LOADING – WITH AND WITHOUT A TRAILER
This section will guide you in the proper loading of your vehicle and/ortrailer, to keep your loaded vehicle weight within its design ratingcapability, with or without a trailer. Properly loading your vehicle willprovide maximum return of vehicle design performance. Before loadingyour vehicle, familiarize yourself with the following terms for determiningyour vehicle’s weight ratings, with or without a trailer, from the vehicle’sSafety Compliance Certification Label:
Base Curb Weight – is the weight of the vehicle including a full tank offuel and all standard equipment. It does not include passengers, cargo, oroptional equipment.
Vehicle Curb Weight – is the weight of your new vehicle when youpicked it up from your authorized dealer plus any aftermarketequipment.
2006 Navigator (nav)Owners Guide (post-2002-fmt)USA (fus)
Tires, Wheels and Loading
256
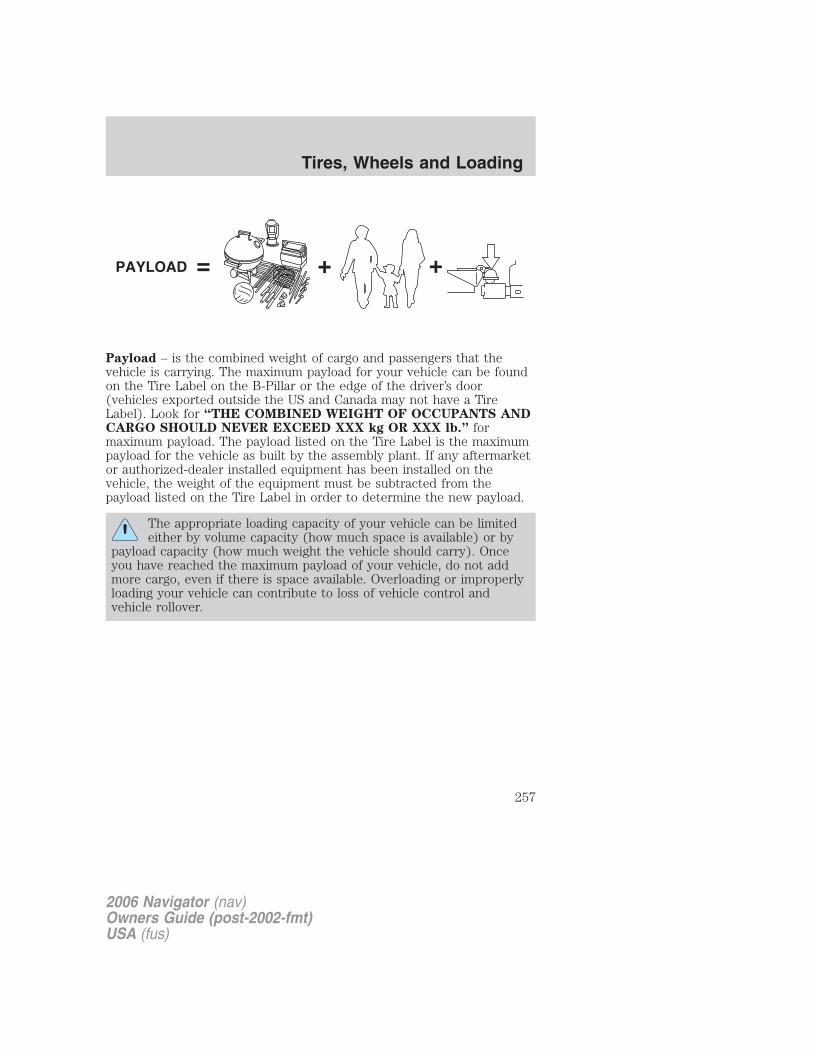
Payload – is the combined weight of cargo and passengers that thevehicle is carrying. The maximum payload for your vehicle can be foundon the Tire Label on the B-Pillar or the edge of the driver’s door(vehicles exported outside the US and Canada may not have a TireLabel). Look for “THE COMBINED WEIGHT OF OCCUPANTS ANDCARGO SHOULD NEVER EXCEED XXX kg OR XXX lb.” formaximum payload. The payload listed on the Tire Label is the maximumpayload for the vehicle as built by the assembly plant. If any aftermarketor authorized-dealer installed equipment has been installed on thevehicle, the weight of the equipment must be subtracted from thepayload listed on the Tire Label in order to determine the new payload.
The appropriate loading capacity of your vehicle can be limitedeither by volume capacity (how much space is available) or by
payload capacity (how much weight the vehicle should carry). Onceyou have reached the maximum payload of your vehicle, do not addmore cargo, even if there is space available. Overloading or improperlyloading your vehicle can contribute to loss of vehicle control andvehicle rollover.
2006 Navigator (nav)Owners Guide (post-2002-fmt)USA (fus)
Tires, Wheels and Loading
257
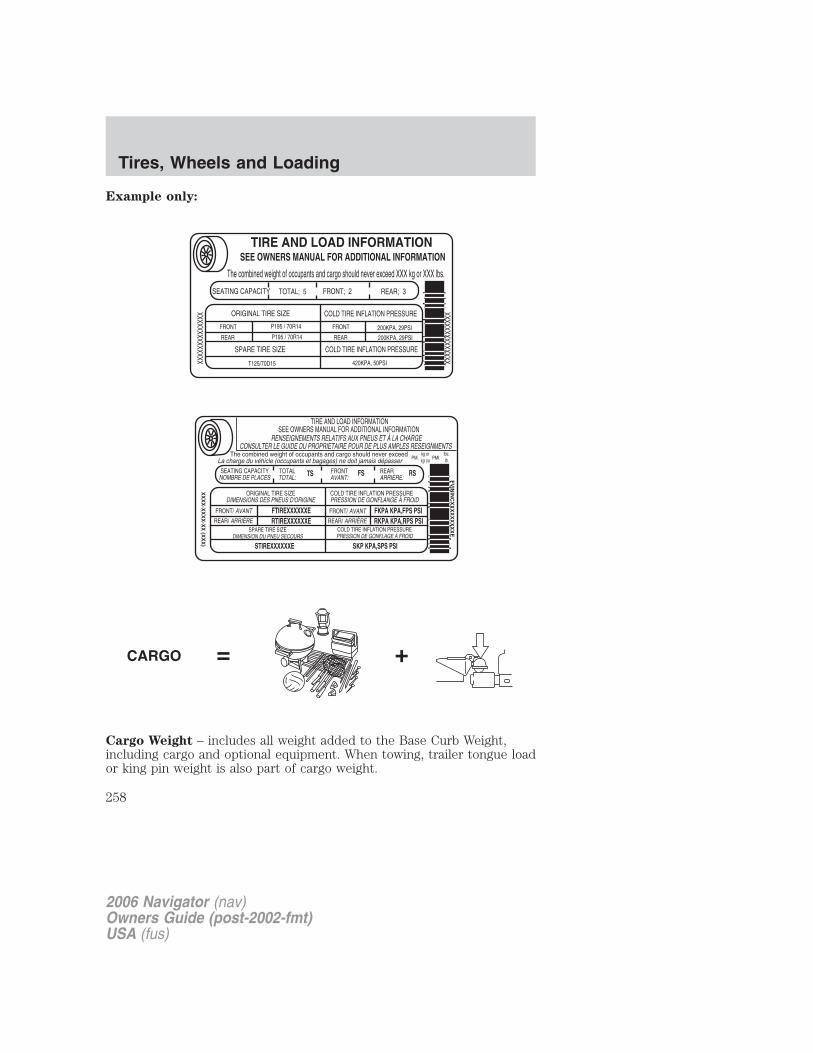
Example only:
Cargo Weight – includes all weight added to the Base Curb Weight,including cargo and optional equipment. When towing, trailer tongue loador king pin weight is also part of cargo weight.
2006 Navigator (nav)Owners Guide (post-2002-fmt)USA (fus)
Tires, Wheels and Loading
258
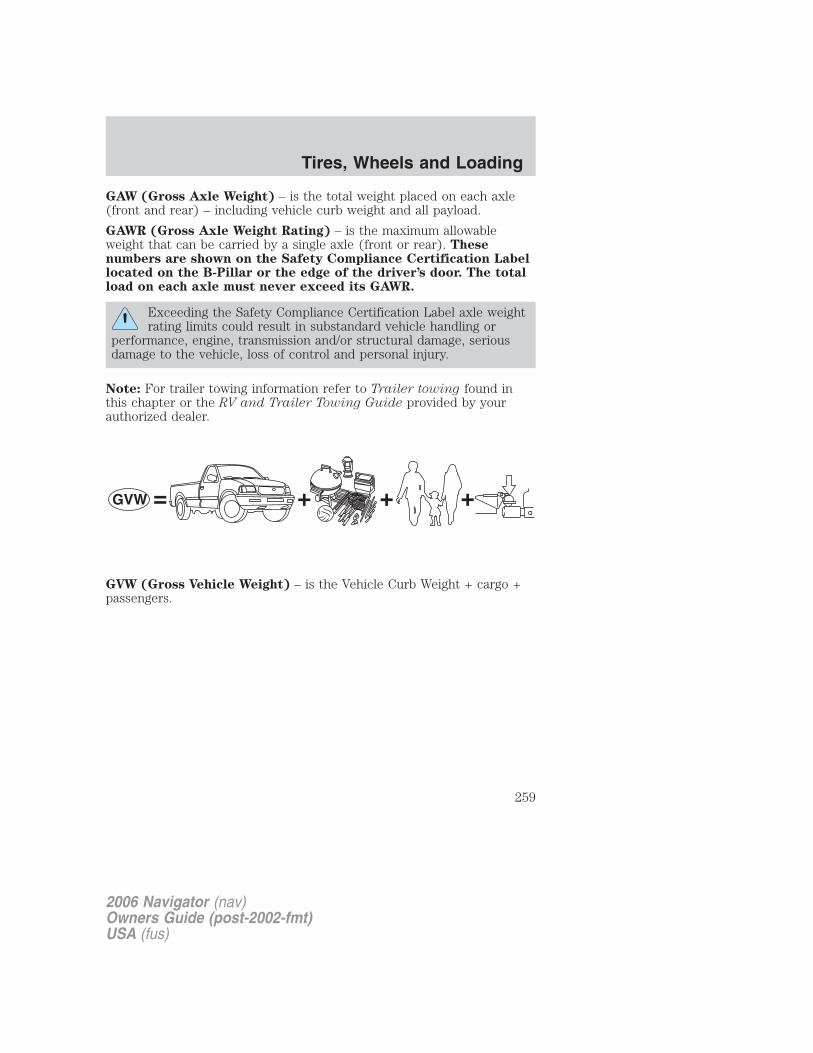
GAW (Gross Axle Weight) – is the total weight placed on each axle(front and rear) – including vehicle curb weight and all payload.
GAWR (Gross Axle Weight Rating) – is the maximum allowableweight that can be carried by a single axle (front or rear). Thesenumbers are shown on the Safety Compliance Certification Labellocated on the B-Pillar or the edge of the driver’s door. The totalload on each axle must never exceed its GAWR.
Exceeding the Safety Compliance Certification Label axle weightrating limits could result in substandard vehicle handling or
performance, engine, transmission and/or structural damage, seriousdamage to the vehicle, loss of control and personal injury.
Note: For trailer towing information refer to Trailer towing found inthis chapter or the RV and Trailer Towing Guide provided by yourauthorized dealer.
GVW (Gross Vehicle Weight) – is the Vehicle Curb Weight + cargo +passengers.
2006 Navigator (nav)Owners Guide (post-2002-fmt)USA (fus)
Tires, Wheels and Loading
259
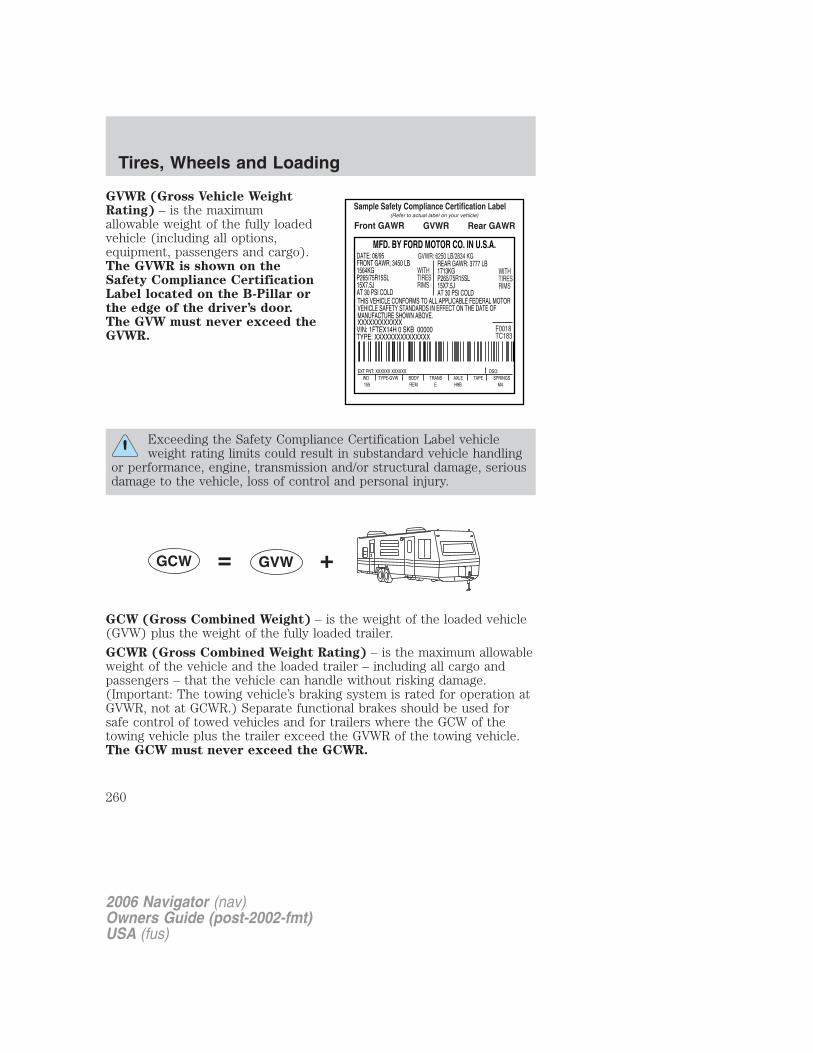
GVWR (Gross Vehicle WeightRating) – is the maximumallowable weight of the fully loadedvehicle (including all options,equipment, passengers and cargo).The GVWR is shown on theSafety Compliance CertificationLabel located on the B-Pillar orthe edge of the driver’s door.The GVW must never exceed theGVWR.
Exceeding the Safety Compliance Certification Label vehicleweight rating limits could result in substandard vehicle handling
or performance, engine, transmission and/or structural damage, seriousdamage to the vehicle, loss of control and personal injury.
GCW (Gross Combined Weight) – is the weight of the loaded vehicle(GVW) plus the weight of the fully loaded trailer.
GCWR (Gross Combined Weight Rating) – is the maximum allowableweight of the vehicle and the loaded trailer – including all cargo andpassengers – that the vehicle can handle without risking damage.(Important: The towing vehicle’s braking system is rated for operation atGVWR, not at GCWR.) Separate functional brakes should be used forsafe control of towed vehicles and for trailers where the GCW of thetowing vehicle plus the trailer exceed the GVWR of the towing vehicle.The GCW must never exceed the GCWR.
2006 Navigator (nav)Owners Guide (post-2002-fmt)USA (fus)
Tires, Wheels and Loading
260

Maximum Loaded Trailer Weight – is the highest possible weight of afully loaded trailer the vehicle can tow. It assumes a vehicle with onlymandatory options, no cargo (internal or external), a tongue load of10–15% (conventional trailer) or king pin weight of 15–25% (fifth wheeltrailer), and driver only (150 lb. [68 kg]). Consult your authorizeddealer (or the RV and Trailer Towing Guide provided by yourauthorized dealer) for more detailed information.
Tongue Load or Fifth Wheel King Pin Weight – refers to the amountof the weight that a trailer pushes down on a trailer hitch.
Examples: For a 5,000 lb. (2,268 kg) conventional trailer, multiply 5,000by 0.10 and 0.15 to obtain a proper tongue load range of 500 to 750 lb.(227 to 340 kg). For an 11,500 lb. (5,216 kg) fifth wheel trailer, multiplyby 0.15 and 0.25 to obtain a proper king pin load range of 1,725 to 2,875lb. (782 to 1,304 kg)
Do not exceed the GVWR or the GAWR specified on the SafetyCompliance Certification Label.
Do not use replacement tires with lower load carrying capacitiesthan the originals because they may lower the vehicle’s GVWR
and GAWR limitations. Replacement tires with a higher limit than theoriginals do not increase the GVWR and GAWR limitations.
Exceeding any vehicle weight rating limitation could result inserious damage to the vehicle and/or personal injury.
Steps for determining the correct load limit:
1. Locate the statement “The combined weight of occupants and cargoshould never exceed XXX kg or XXX lbs.” on your vehicle’s placard.
2. Determine the combined weight of the driver and passengers that willbe riding in your vehicle.
3. Subtract the combined weight of the driver and passengers from XXXkg or XXX lbs.
4. The resulting figure equals the available amount of cargo and luggageload capacity. For example, if the “XXX” amount equals 1,400 lbs. andthere will be five 150 lb. passengers in your vehicle, the amount ofavailable cargo and luggage load capacity is 650 lbs. (1400–750 (5 x 150)= 650 lb.). In metric units (635–340 (5 x 68) = 295 kg.)
2006 Navigator (nav)Owners Guide (post-2002-fmt)USA (fus)
Tires, Wheels and Loading
261
5. Determine the combined weight of luggage and cargo being loaded onthe vehicle. That weight may not safely exceed the available cargo andluggage load capacity calculated in Step 4.
6. If your vehicle will be towing a trailer, load from your trailer will betransferred to your vehicle. Consult this manual to determine how thisreduces the available cargo and luggage load capacity of your vehicle.
The following gives you a few examples on how to calculate the availableamount of cargo and luggage load capacity:
• Another example for your vehicle with 1400 lb. (635 kg) of cargo andluggage capacity. You decide to go golfing. Is there enough loadcapacity to carry you, 4 of your friends and all the golf bags? You andfour friends average 220 lb. (99 kg) each and the golf bags weighapproximately 30 lb. (13.5 kg) each. The calculation would be: 1400 –(5 x 220) – (5 x 30) = 1400 – 1100 – 150 = 150 lb. Yes, you haveenough load capacity in your vehicle to transport four friends andyour golf bags. In metric units, the calculation would be: 635 kg — (5x 99 kg) — (5 x 13.5 kg) = 635 — 495 — 67.5 = 72.5 kg.
• A final example for your vehicle with 1400 lb. (635 kg) of cargo andluggage capacity. You and one of your friends decide to pick upcement from the local home improvement store to finish that patioyou have been planning for the past 2 years. Measuring the inside ofthe vehicle with the rear seat folded down, you have room for 12-100lb. (45 kg) bags of cement. Do you have enough load capacity totransport the cement to your home? If you and your friend each weigh220 lb. (99 kg), the calculation would be: 1400 – (2 x 220) – (12 x100) = 1400 – 440 – 1200 = – 240 lb. No, you do not have enoughcargo capacity to carry that much weight. In metric units, thecalculation would be: 635 kg — (2 x 99 kg) — (12 x 45 kg) = 635 —198 — 540 = —103 kg. You will need to reduce the load weight by atleast 240 lb. (104 kg). If you remove 3-100 lb. (45 kg) cement bags,then the load calculation would be:
1400 – (2 x 220) – (9 x 100) = 1400 – 440 – 900 = 60 lb. Now youhave the load capacity to transport the cement and your friend home. .In metric units, the calculation would be: 635 kg — (2 x 99 kg) — (9x 45 kg) = 635 — 198 — 405 = 32 kg.
The above calculations also assume that the loads are positioned in yourvehicle in a manner that does not overload the Front or the Rear GrossAxle Weight Rating specified for your vehicle on the Safety ComplianceCertification Label found on the edge of the driver’s door.
2006 Navigator (nav)Owners Guide (post-2002-fmt)USA (fus)
Tires, Wheels and Loading
262
Special loading instructions for owners of pickup trucks andutility-type vehicles
For important information regarding safe operation of this typeof vehicle, see the Preparing to drive your vehicle section in
the Driving chapter of this owner guide.
Loaded vehicles, with a higher center of gravity, may handledifferently than unloaded vehicles. Extra precautions, such as
slower speeds and increased stopping distance, should be taken whendriving a heavily loaded vehicle.
Your vehicle has the capability to haul more cargo and people than mostpassenger cars. Depending upon the type and placement of the load,hauling cargo and people may raise the center of gravity of the vehicle.
TRAILER TOWINGTrailer towing puts additional loads on your vehicle’s engine,transmission, axle, brakes, tires, and suspension. For your safety and tomaximize vehicle performance, be sure to use the proper equipmentwhile towing.
Follow these guidelines to ensure safe towing:
• Stay within your vehicle’s load limits.
• Thoroughly prepare your vehicle for towing. Refer to Preparing totow in this chapter.
• Use extra caution when driving while trailer towing. Refer to Drivingwhile you tow in this chapter.
• Service your vehicle more frequently if you tow a trailer. Refer to thesevere duty schedule in the scheduled maintenance guide.
• Do not tow a trailer until your vehicle has been driven at least500 miles (800 km). Additionally, during the first 500 miles (800 km)that you tow a trailer, do not drive over 70 mph (112 km/h) and donot make starts at full throttle.
• Refer to the instructions included with towing accessories for theproper installation and adjustment specifications.
2006 Navigator (nav)Owners Guide (post-2002-fmt)USA (fus)
Tires, Wheels and Loading
263
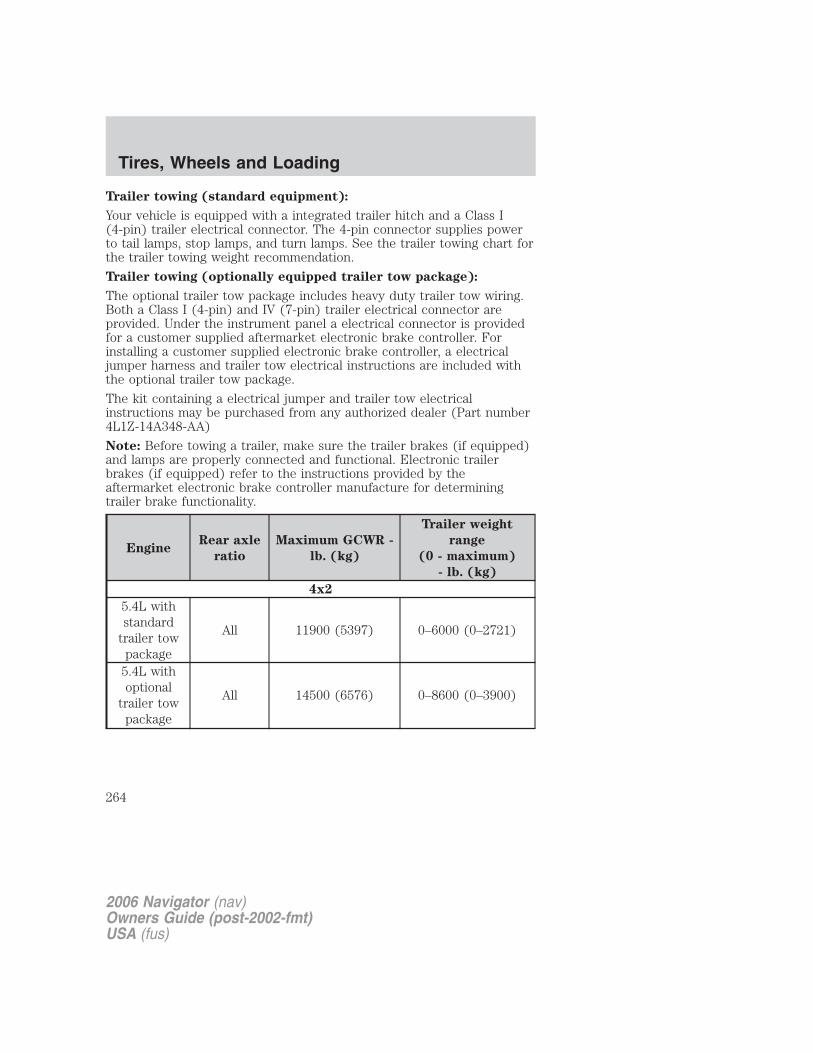
Trailer towing (standard equipment):
Your vehicle is equipped with a integrated trailer hitch and a Class I(4-pin) trailer electrical connector. The 4-pin connector supplies powerto tail lamps, stop lamps, and turn lamps. See the trailer towing chart forthe trailer towing weight recommendation.
Trailer towing (optionally equipped trailer tow package):
The optional trailer tow package includes heavy duty trailer tow wiring.Both a Class I (4-pin) and IV (7-pin) trailer electrical connector areprovided. Under the instrument panel a electrical connector is providedfor a customer supplied aftermarket electronic brake controller. Forinstalling a customer supplied electronic brake controller, a electricaljumper harness and trailer tow electrical instructions are included withthe optional trailer tow package.
The kit containing a electrical jumper and trailer tow electricalinstructions may be purchased from any authorized dealer (Part number4L1Z-14A348-AA)
Note: Before towing a trailer, make sure the trailer brakes (if equipped)and lamps are properly connected and functional. Electronic trailerbrakes (if equipped) refer to the instructions provided by theaftermarket electronic brake controller manufacture for determiningtrailer brake functionality.
EngineRear axle
ratio
Maximum GCWR -
lb. (kg)
Trailer weight
range
(0 - maximum)
- lb. (kg)
4x2
5.4L withstandard
trailer towpackage
All 11900 (5397) 0–6000 (0–2721)
5.4L withoptional
trailer towpackage
All 14500 (6576) 0–8600 (0–3900)
2006 Navigator (nav)Owners Guide (post-2002-fmt)USA (fus)
Tires, Wheels and Loading
264
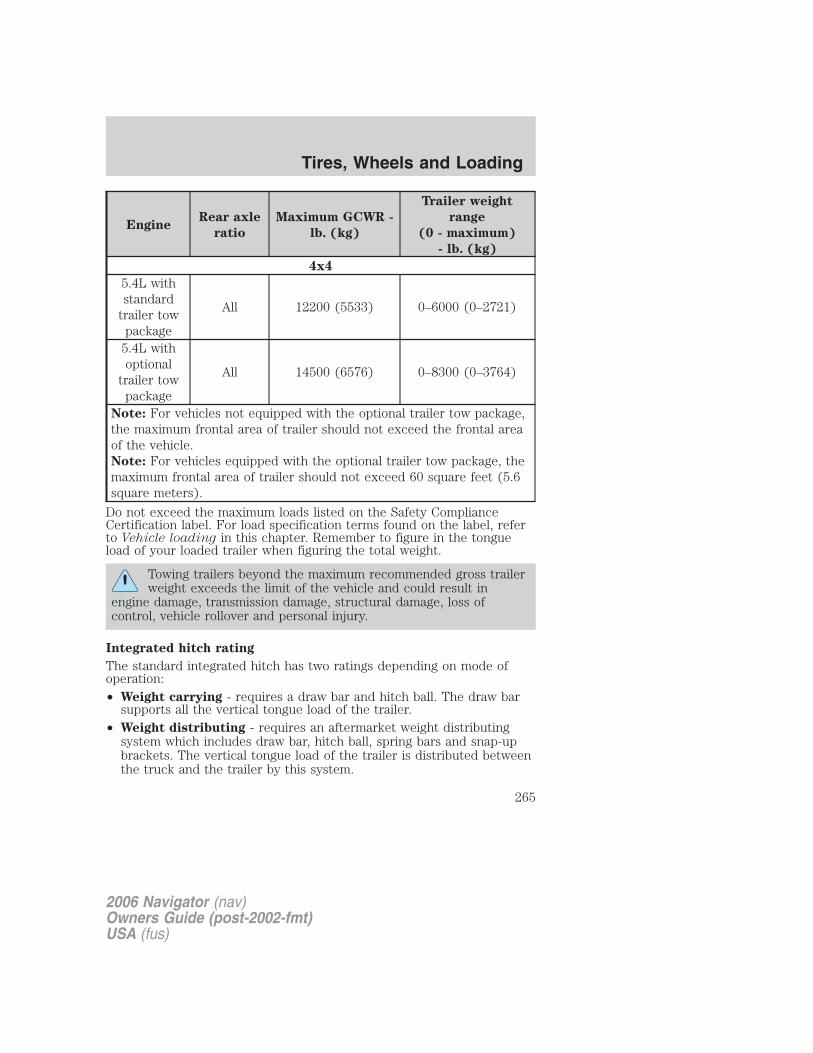
EngineRear axle
ratio
Maximum GCWR -
lb. (kg)
Trailer weight
range
(0 - maximum)
- lb. (kg)
4x4
5.4L withstandard
trailer towpackage
All 12200 (5533) 0–6000 (0–2721)
5.4L withoptional
trailer towpackage
All 14500 (6576) 0–8300 (0–3764)
Note: For vehicles not equipped with the optional trailer tow package,the maximum frontal area of trailer should not exceed the frontal areaof the vehicle.Note: For vehicles equipped with the optional trailer tow package, themaximum frontal area of trailer should not exceed 60 square feet (5.6square meters).
Do not exceed the maximum loads listed on the Safety ComplianceCertification label. For load specification terms found on the label, referto Vehicle loading in this chapter. Remember to figure in the tongueload of your loaded trailer when figuring the total weight.
Towing trailers beyond the maximum recommended gross trailerweight exceeds the limit of the vehicle and could result in
engine damage, transmission damage, structural damage, loss ofcontrol, vehicle rollover and personal injury.
Integrated hitch rating
The standard integrated hitch has two ratings depending on mode ofoperation:• Weight carrying - requires a draw bar and hitch ball. The draw bar
supports all the vertical tongue load of the trailer.• Weight distributing - requires an aftermarket weight distributing
system which includes draw bar, hitch ball, spring bars and snap-upbrackets. The vertical tongue load of the trailer is distributed betweenthe truck and the trailer by this system.
2006 Navigator (nav)Owners Guide (post-2002-fmt)USA (fus)
Tires, Wheels and Loading
265

Mode Maximum Gross Trailer
Weight - lb. (kg)
Maximum Tongue
Weight - lb. (kg)
Weightcarrying
6000 (2721) 600 (272)
Weightdistributing
8850 (4014) 885 (401)
These are hitch ratings only; actual vehicle ratings are dependent onengine, transmission and axle combinations.
Towing trailers beyond the maximum tongue weight exceeds thelimit of the towing system and could result in vehicle structural
damage, loss of vehicle control and personal injury.
Trailer hitch cover
Your vehicle is equipped with a removable trailer hitch trim cover. Toremove the trim cover:
1. Loosen the two 1⁄4-turn fastenersin the bottom of the cover byturning them counterclockwise. Pullthe cover downward to remove it;the fasteners will remain attached tothe cover.
2. To reinstall the cover, insert thethree plastic tabs on top of thecover into the corresponding slots,as shown in the illustration andpush the cover up into the bumpertrim.
3. Hold the cover against the bumper trim and reinstall the two 1⁄4-turnfasteners by turning them clockwise.
2006 Navigator (nav)Owners Guide (post-2002-fmt)USA (fus)
Tires, Wheels and Loading
266
Preparing to towUse the proper equipment for towing a trailer and make sure it isproperly attached to your vehicle. See your authorized dealer or areliable trailer dealer if you require assistance.
HitchesDo not use hitches that clamp onto the vehicle’s bumper or attach to theaxle. You must distribute the load in your trailer so that 10%–15% of thetotal weight of the trailer is on the tongue.
Load equalizing hitchWhen hooking up a trailer using a load equalizing hitch, always use thefollowing procedure:
1. Park the unloaded vehicle on a level surface. With the ignition in theON position, apply the brake and place the gearshift lever in the D6position for 10 seconds, then return the gearshift lever to P (Park) andrelease the brake. With the ignition still in the ON position, and all doorsclosed, allow the vehicle to stand (without passengers) for severalminutes so that it can level.
2. Turn the air suspension (if equipped) control to OFF.
3. Measure the height of a reference point on the front and rear bumpersat the center of the vehicle.
4. Attach the trailer to the vehicle and adjust the hitch equalizers so thatthe front bumper height is within a 1⁄2” (13 mm) of the reference point.After proper adjustment, the rear bumper should be no higher than inStep 3.
5. Turn the air suspension (if equipped) control to ON.
Note: Adjusting an equalizing hitch so the rear bumper of the vehicle ishigher than it was unloaded will defeat the function of the loadequalizing hitch and may cause unpredictable handling.
Safety chainsAlways connect the trailer’s safety chains to the frame or hook retainersof the vehicle hitch. To connect the trailer’s safety chains, cross thechains under the trailer tongue and allow slack for turning corners.
If you use a rental trailer, follow the instructions that the rental agencygives to you.
Do not attach safety chains to the bumper.
2006 Navigator (nav)Owners Guide (post-2002-fmt)USA (fus)
Tires, Wheels and Loading
267

Trailer brakesElectric brakes and manual, automatic or surge-type trailer brakes aresafe if installed properly and adjusted to the manufacturer’sspecifications. The trailer brakes must meet local and Federalregulations.
Do not connect a trailer’s hydraulic brake system directly to yourvehicle’s brake system. Your vehicle may not have enough
braking power and your chances of having a collision greatly increase.
The braking system of the tow vehicle is rated for operation at theGVWR not GCWR.
Trailer lampsTrailer lamps are required on most towed vehicles. Make sure all runninglights, brake lights, turn signals and hazard lights are working. See yourauthorized dealer or trailer rental agency for proper instructions andequipment for hooking up trailer lamps.
Driving while you towWhen towing a trailer:
• Turn off the speed control. The speed control may shut offautomatically when you are towing on long, steep grades.
• Consult your local motor vehicle speed regulations for towing a trailer.
• To eliminate excessive shifting, use a lower gear. This will also assistin transmission cooling. (For additional information, refer to theUnderstanding the positions of the 6–speed automatictransmission section in this chapter.
• Anticipate stops and brake gradually.
• Do not exceed the GCWR rating or transmission damage may occur.
If your vehicle is equipped with AdvanceTrac� with RSC, you mayexperience AdvanceTrac� with RSC activations during typical corneringmaneuvers with a heavily loaded trailer; this is normal. Cornering at aslower speed while towing will reduce the tendency of the AdvanceTrac�stability enhancement system to activate.
Servicing after towingIf you tow a trailer for long distances, your vehicle will require morefrequent service intervals. Refer to your Scheduled Maintenance Guidefor more information.
2006 Navigator (nav)Owners Guide (post-2002-fmt)USA (fus)
Tires, Wheels and Loading
268
Trailer towing tips• Practice turning, stopping and backing up before starting on a trip to
get the feel of the vehicle trailer combination. When turning, makewider turns so the trailer wheels will clear curbs and other obstacles.
• Allow more distance for stopping with a trailer attached.• If you are driving down a long or steep hill, shift to a lower gear. Do
not apply the brakes continuously, as they may overheat and becomeless effective.
• The trailer tongue weight should be 10–15% of the loaded trailerweight.
• After you have traveled 50 miles (80 km), thoroughly check yourhitch, electrical connections and trailer wheel lug nuts.
• To aid in engine/transmission cooling and A/C efficiency during hotweather while stopped in traffic, place the gearshift lever in P (Park).
• Vehicles with trailers should not be parked on a grade. If you mustpark on a grade, place wheel chocks under the trailer’s wheels.
Launching or retrieving a boatDisconnect the wiring to the trailer before backing the trailerinto the water. Reconnect the wiring to the trailer after thetrailer is removed from the water.
When backing down a ramp during boat launching or retrieval:• do not allow the static water level to rise above the bottom edge of
the rear bumper.• do not allow waves to break higher than 6 inches (15 cm) above the
bottom edge of the rear bumper.Exceeding these limits may allow water to enter vehicle components:• causing internal damage to the components.• affecting driveability, emissions and reliability.Replace the rear axle lubricant any time the axle has been submerged inwater. Rear axle lubricant quantities are not to be checked or changedunless a leak is suspected or repair required.
RECREATIONAL TOWING (ALL WHEELS ON THE GROUND)An example of recreational towing would be towing your vehicle behinda motorhome. Follow these guidelines if you have the need forrecreational towing your vehicle with all four wheels on the ground.These guidelines are designed to ensure that your transmission is notdamaged.
2006 Navigator (nav)Owners Guide (post-2002-fmt)USA (fus)
Tires, Wheels and Loading
269
2WD vehicles (with automatic transmissions):
• Place the transmission in N (Neutral)
• Maximum speed is 35 mph (56 km/h)
• Maximum distance is 50 miles (80 km)
If a distance of 50 miles (80 km) or a speed of 35 mph (56 km/h) mustbe exceeded, the drive shaft will have to be removed before the vehicleis towed.
Ford recommends the driveshaft be removed/installed only by a qualifiedtechnician at an authorized dealer. See your authorized dealer fordriveshaft removal/installation.
Improper removal/installation of the driveshaft can causetransmission fluid loss, damage to the driveshaft and internaltransmission components.
Vehicles equipped with Control Trac four-wheel drive system:
Vehicles equipped with the Control Trac four-wheel drive system cannotbe towed with any wheels on the ground. See your authorized dealer ifyou must flat-tow a vehicle equipped with the Control Trac four-wheeldrive system.
2006 Navigator (nav)Owners Guide (post-2002-fmt)USA (fus)
Tires, Wheels and Loading
270
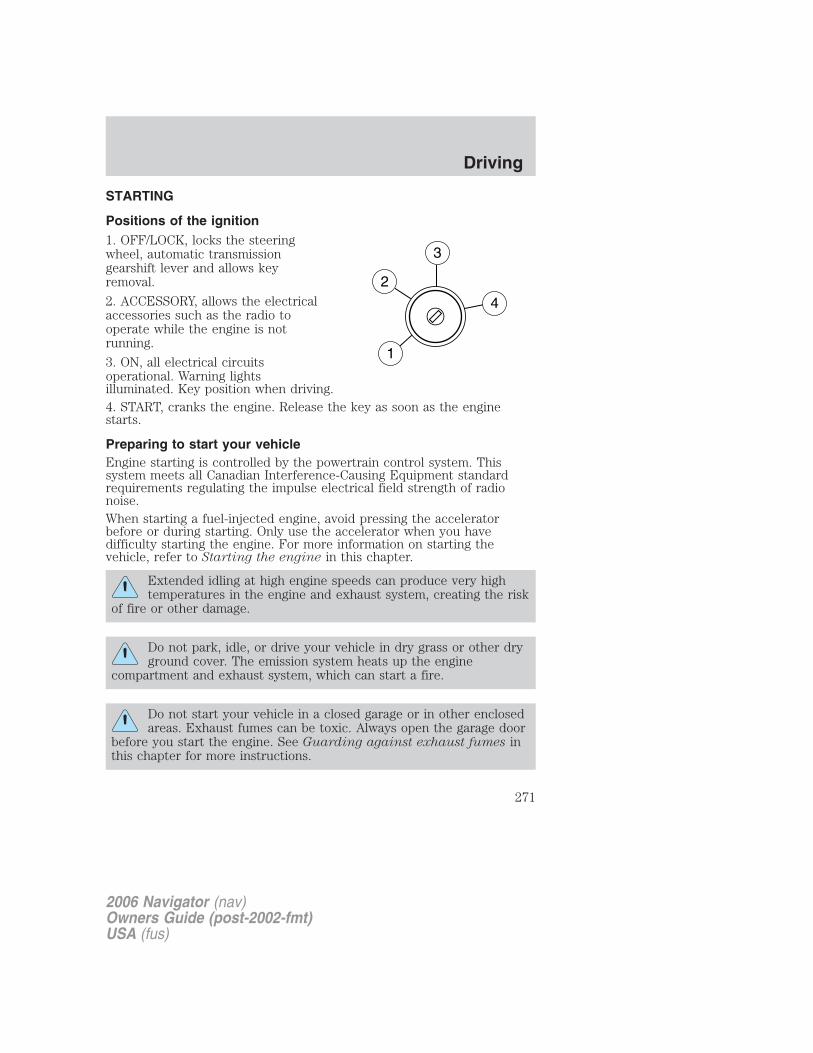
STARTING
Positions of the ignition1. OFF/LOCK, locks the steeringwheel, automatic transmissiongearshift lever and allows keyremoval.
2. ACCESSORY, allows the electricalaccessories such as the radio tooperate while the engine is notrunning.
3. ON, all electrical circuitsoperational. Warning lightsilluminated. Key position when driving.4. START, cranks the engine. Release the key as soon as the enginestarts.
Preparing to start your vehicleEngine starting is controlled by the powertrain control system. Thissystem meets all Canadian Interference-Causing Equipment standardrequirements regulating the impulse electrical field strength of radionoise.When starting a fuel-injected engine, avoid pressing the acceleratorbefore or during starting. Only use the accelerator when you havedifficulty starting the engine. For more information on starting thevehicle, refer to Starting the engine in this chapter.
Extended idling at high engine speeds can produce very hightemperatures in the engine and exhaust system, creating the risk
of fire or other damage.
Do not park, idle, or drive your vehicle in dry grass or other dryground cover. The emission system heats up the engine
compartment and exhaust system, which can start a fire.
Do not start your vehicle in a closed garage or in other enclosedareas. Exhaust fumes can be toxic. Always open the garage door
before you start the engine. See Guarding against exhaust fumes inthis chapter for more instructions.
2006 Navigator (nav)Owners Guide (post-2002-fmt)USA (fus)
Driving
271
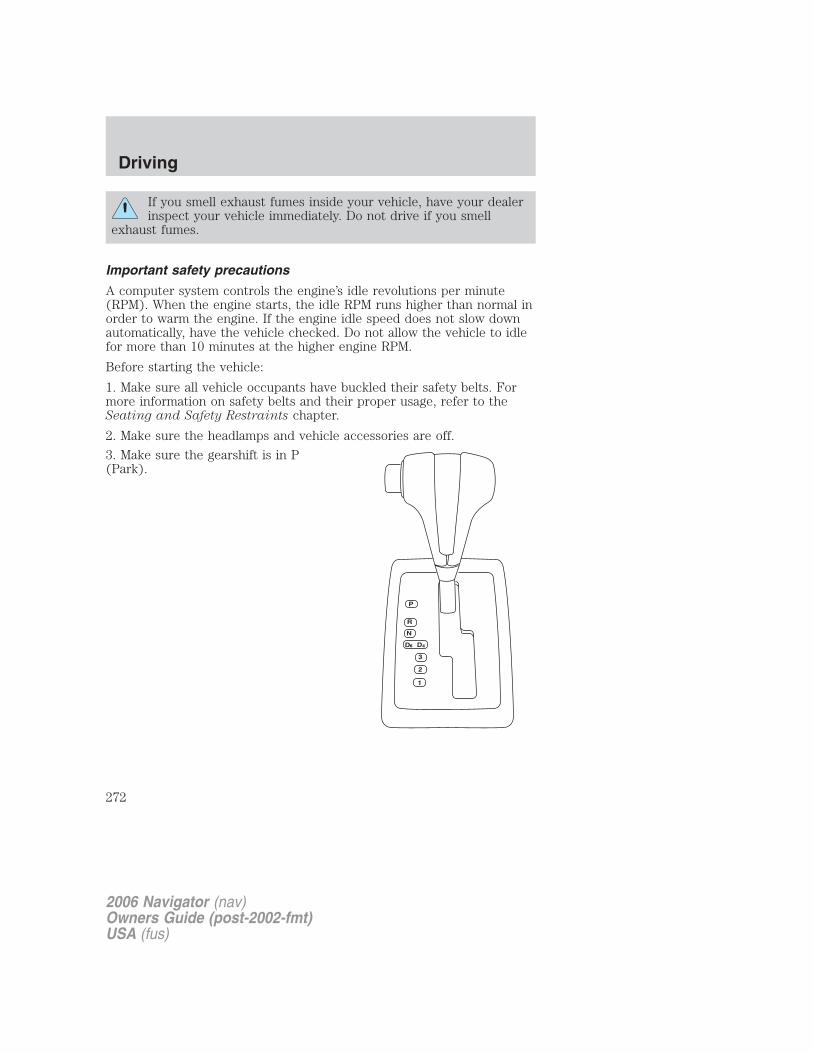
If you smell exhaust fumes inside your vehicle, have your dealerinspect your vehicle immediately. Do not drive if you smell
exhaust fumes.
Important safety precautions
A computer system controls the engine’s idle revolutions per minute(RPM). When the engine starts, the idle RPM runs higher than normal inorder to warm the engine. If the engine idle speed does not slow downautomatically, have the vehicle checked. Do not allow the vehicle to idlefor more than 10 minutes at the higher engine RPM.
Before starting the vehicle:
1. Make sure all vehicle occupants have buckled their safety belts. Formore information on safety belts and their proper usage, refer to theSeating and Safety Restraints chapter.
2. Make sure the headlamps and vehicle accessories are off.
3. Make sure the gearshift is in P(Park).
2006 Navigator (nav)Owners Guide (post-2002-fmt)USA (fus)
Driving
272
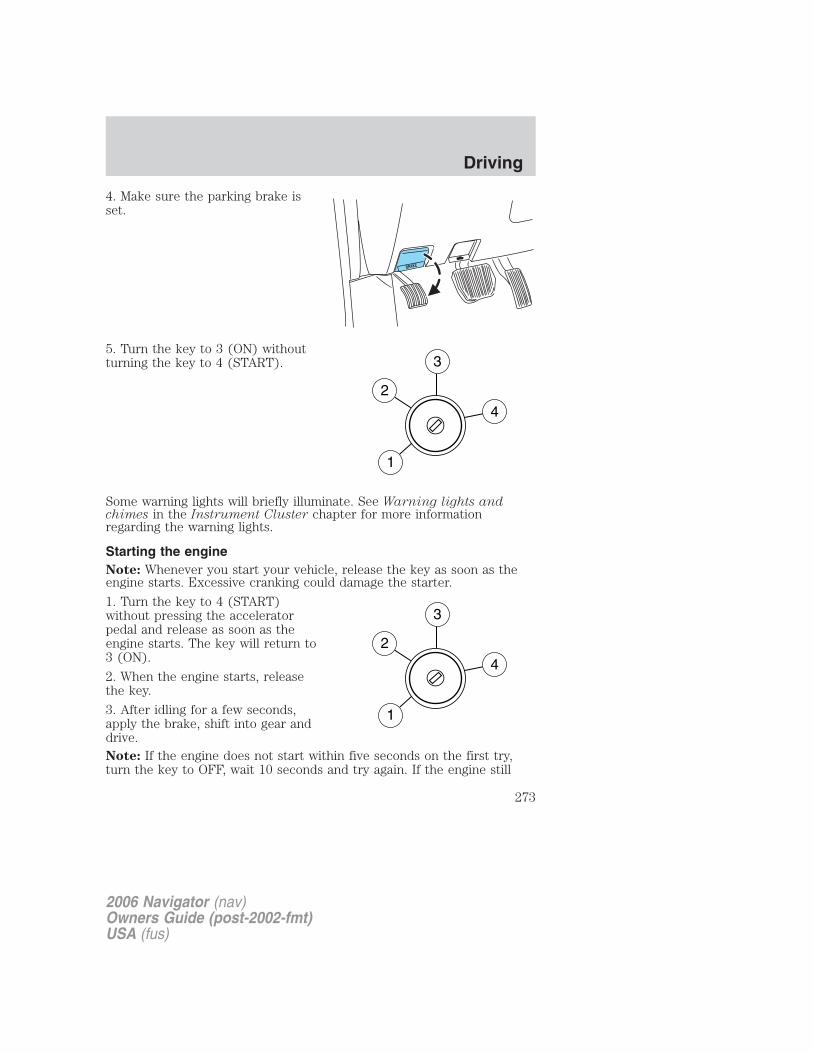
4. Make sure the parking brake isset.
5. Turn the key to 3 (ON) withoutturning the key to 4 (START).
Some warning lights will briefly illuminate. See Warning lights andchimes in the Instrument Cluster chapter for more informationregarding the warning lights.
Starting the engineNote: Whenever you start your vehicle, release the key as soon as theengine starts. Excessive cranking could damage the starter.
1. Turn the key to 4 (START)without pressing the acceleratorpedal and release as soon as theengine starts. The key will return to3 (ON).
2. When the engine starts, releasethe key.
3. After idling for a few seconds,apply the brake, shift into gear anddrive.Note: If the engine does not start within five seconds on the first try,turn the key to OFF, wait 10 seconds and try again. If the engine still
2006 Navigator (nav)Owners Guide (post-2002-fmt)USA (fus)
Driving
273

fails to start, press the accelerator to the floor and try again; this willallow the engine to crank with the fuel shut off in case the engine isflooded with fuel.
Guarding against exhaust fumesCarbon monoxide is present in exhaust fumes. Take precautions to avoidits dangerous effects.
If you smell exhaust fumes inside your vehicle, have your dealerinspect your vehicle immediately. Do not drive if you smell
exhaust fumes.
Important ventilating informationIf the engine is idling while the vehicle is stopped for a long period oftime, open the windows at least one inch (2.5 cm) or adjust the heatingor air conditioning to bring in fresh air.
USING THE ENGINE BLOCK HEATER (IF EQUIPPED)If your vehicle is factory-equippedwith an engine block heater, arubber cap/plug assembly will bevisibly attached to the grille on thefront of the vehicle. For factoryequipped, this assembly is looseshipped in-vehicle for authorizeddealer installation. If notfactory-equipped, the engine blockheater can be purchased throughauthorized dealer accessories.Replacement rubber caps areavailable through the authorizeddealer, 3L1Z-6E088-AA.
Use of an engine block heater is strongly recommended if you live in aregion where temperatures reach -10°F (-23°C) or below. For bestresults, plug the heater in at least three hours before starting the vehicle(the heater can be plugged in the night before starting the vehicle). Toplug the heater in, remove the cap from the plug and insert the plug intoa 110 volt grounded outlet. Be sure to re-attach the cap onto the plugwhen the heater is not in use.
2006 Navigator (nav)Owners Guide (post-2002-fmt)USA (fus)
Driving
274

Note: Make sure you disconnect the cap from the plug when openingthe hood.
To reduce the risk of electrical shock, do not use your heaterwith ungrounded electrical systems or two-pronged (cheater)
adapters.
BRAKESYour service brakes are self-adjusting. Refer to the scheduledmaintenance information for scheduled maintenance.Occasional brake noise is normal and often does not indicate aperformance concern with the vehicle’s brake system. In normaloperation, automotive brake systems may emit occasional or intermittentsqueal or groan noises when the brakes are applied. Such noises areusually heard during the first few brake applications in the morning;however, they may be heard at any time while braking and can beaggravated by environmental conditions such as cold, heat, moisture,road dust, salt or mud. If a “metal-to-metal,” “continuous grinding” or“continuous squeal” sound is present while braking, the brake liningsmay be worn-out and should be inspected by an authorized dealer.
Refer to Brake system warninglight in the Instrument Clusterchapter for information on the brakesystem warning light.
If you are driving down a long or steep hill, shift to a lower gear.Do not apply your brakes continuously, as they may overheat
and become less effective.
Anti-lock brake system (ABS)On ABS-equipped vehicles, a noise from the hydraulic pump motor andpulsation in the pedal may be observed during ABS braking events. Pedalpulsation coupled with noise while braking under panic conditions or onloose gravel, bumps, wet or snowy roads is normal and indicates properfunctioning of the vehicle’s anti-lock brake system. The ABS performs aself-check after you start the engine and begin to drive away. A briefmechanical noise may be heard during this test. This is normal. If amalfunction is found, the ABS warning light will come on. If the vehiclehas continuous vibration or shudder in the steering wheel while braking,the vehicle should be inspected by an authorized dealer.
P!BRAKE
2006 Navigator (nav)Owners Guide (post-2002-fmt)USA (fus)
Driving
275

The ABS operates by detecting the onset of wheel lockup during brakeapplications and compensates for this tendency. The wheels areprevented from locking even when the brakes are firmly applied.
Using ABS• In an emergency or when maximum efficiency from the four-wheel
ABS is required, apply continuous force on the brake. The four wheelABS will be activated immediately, thus allowing you to retain steeringcontrol of your vehicle and, providing there is sufficient space, willenable you to avoid obstacles and bring the vehicle to a controlledstop.
• The anti-lock system does not always reduce stopping distance.Always leave enough room between your vehicle and the vehicle infront of you to stop.
• We recommend that you familiarize yourself with this brakingtechnique. However, avoid taking any unnecessary risks.
ABS warning lampThe ABS warning lamp in theinstrument cluster momentarilyilluminates when the ignition isturned on. If the light does notilluminate momentarily at start up,remains on or continues to flash, the ABS needs to be serviced.
With the ABS light on, the anti-lockbrake system is disabled and normalbraking is still effective unless thebrake warning light also remainsilluminated with parking brakereleased. (If your brake warning lamp illuminates, have your vehicleserviced immediately.)
Brake Assist (if equipped)The Brake Assist system provides full braking force during panic brakingsituations. It detects a rapid application of the brake pedal andmaximizes the amount of brake booster assist, helping the driver toachieve maximum braking pressure. Once a panic brake application isdetected, the system will remain activated as long as the brake pedal isdepressed. The system is deactivated by releasing the brake pedal.
When the system activates, the brake pedal will travel with very littleeffort; this is normal.
ABS
P!BRAKE
2006 Navigator (nav)Owners Guide (post-2002-fmt)USA (fus)
Driving
276

Parking brake with auto-release (if equipped)Apply the parking brake wheneverthe vehicle is parked. To set theparking brake, press the parkingbrake pedal down until the pedalstops.
The BRAKE warning lamp in theinstrument cluster illuminates andremains illuminated (when theignition is turned ON) until theparking brake is released.
Always set the parking brake fully and make sure that thegearshift is securely latched in P (Park).
The parking brake is not recommended to stop a moving vehicle.However, if the normal brakes fail, the parking brake can be used to stopyour vehicle in an emergency. Since the parking brake applies only therear brakes, the vehicle’s stopping distance will increase greatly and thehandling of your vehicle will be adversely affected.
Your vehicle has an automatic parking brake release. To release theparking brake:
1. Turn the ignition to the ON position.
2. Press the brake pedal.
3. Move the gearshift out of the P (Park) position (the parking brake willrelease automatically when you shift into reverse). The brake pedal mustremain pressed while the gearshift is moved.
P!BRAKE
2006 Navigator (nav)Owners Guide (post-2002-fmt)USA (fus)
Driving
277
If the parking brake fails to releaseafter completing this procedure, usethe manual parking brake releaselever.
Pull the release lever to release thebrake. Driving with the parkingbrake on will cause the brakes towear out quickly and reduce fueleconomy.
ADVANCETRAC� WITH ROLL STABILITY CONTROL� (RSC)STABILITY ENHANCEMENT SYSTEM (IF EQUIPPED)AdvanceTrac� with RSC is an integrated system with four majorcomponents: Anti-lock Brake System (ABS), Traction Control, yawcontrol and a vehicle-roll motion sensor. It automatically utilizes theseelements in varying combinations to help give the driver optimum controlat all times. AdvanceTrac�, which includes ABS, Traction Control andyaw control, helps your vehicle maintain traction when driving onslippery and/or hilly road surfaces, by detecting and controlling wheelspin. Excessive wheel spin is controlled by momentarily reducing enginepower and rapidly applying the anti-lock brakes. The system is a driveraid which makes your vehicle easier to handle primarily on snow andice-covered roads. RSC detects potential rollover type situations andquickly engages AdvanceTrac� to help keep your tires firmly planted onthe ground.
If your vehicle should become stuck in deep snow or mud, try switchingthe AdvanceTrac� with RSC system off by pressing the AdvanceTrac�with RSC button located on the center console. This will allow your tiresto “dig” for traction.
If the AdvanceTrac� with RSC system is activated and deactivatedexcessively in a short period of time, the brake portion of the system willshut down to allow the brakes to cool down. A limited AdvanceTrac�with RSC function using only engine power reduction will still helpcontrol the wheels from over-spinning. When the brakes have cooleddown, the system will again function normally. Anti-lock braking is notaffected by this condition and will function normally during thecool-down period.
The AdvanceTrac� with RSC system enhances your vehicle’s stabilityduring maneuvers that require all available tire traction, like inwet/snowy/icy road conditions and/or when performing emergency
2006 Navigator (nav)Owners Guide (post-2002-fmt)USA (fus)
Driving
278

maneuvers. In an emergency lane-change, the driver will experiencebetter overall vehicle traction, and have better control of the vehicle.The AdvanceTrac� with RSC system helps the driver maintain steeringcontrol if the vehicle begins to slide excessively left or right or spin out.AdvanceTrac� with RSC will attempt to correct the sliding motion byapplying brake force at individual tires and, if necessary, by reducingengine power.
Driving conditions, which may activate the AdvanceTrac� with RSCsystem, include:
• Taking a turn too fast
• Maneuvering quickly to avoid an accident, pedestrian or obstacle
• Hitting a patch of ice
• Changing lanes on a snow-rutted road
• Entering a snow-free road from a snow-covered side street, or viceversa
• Entering a paved road from a gravel road, or vice versa
• Hitting a curb while turning
• Driving on slick surfaces
• Cornering while towing a heavily loaded trailer (refer to TrailerTowing in this chapter)
The RSC feature works to further enhance the vehicle’s overall stabilityduring aggressive maneuvers. The RSC feature helps maintain rollstability of the vehicle during aggressive maneuvers by applying brakeforce to one or more wheels.
The AdvanceTrac� with RSC system automatically turns on when theengine is started. However, the system does not function when thevehicle is traveling in R (Reverse) or, if equipped with four-wheel drive,in 4L (4X4 LOW). In R (Reverse) or in 4L (4X4 LOW), ABS and thetraction enhancement feature will continue to function.
The AdvanceTrac� with RSC button,located on the center console,allows the driver to control theavailability of the AdvanceTrac�with RSC system. The RSC systemstatus is indicated by a warningindicator light with a “sliding car” icon in the instrument cluster that willflash when the system is activated and an indicator light in the control
OFF
2006 Navigator (nav)Owners Guide (post-2002-fmt)USA (fus)
Driving
279
button that will illuminate when the system is turned off. In vehicles witha message center, the message “ADVANCETRAC OFF” will be displayed.If a failure is detected in the AdvanceTrac� with RSC system, thewarning indicator light in the instrument cluster will stay on. If thewarning indicator light in the instrument cluster remains on while theengine is running, have the system serviced by an authorized dealerimmediately.Pressing the button once will disable the AdvanceTrac� with RSCstability enhancement system and the engine power reduction portion ofthe traction enhancement feature; the brake portion of the tractionenhancement feature will still function normally. Pressing and holdingthe button for more than five seconds will disable the AdvanceTrac� withRSC stability enhancement and traction enhancement feature. If thevehicle is stuck in snow or mud or when driving in deep sand, switchingoff the AdvanceTrac� with RSC system may be beneficial so the wheelsare allowed to spin. If your vehicle seems to lose engine power whiledriving in deep sand or very deep snow, switching off the AdvanceTrac�with RSC stability enhancement system will restore full engine powerand will enhance momentum through the obstacle.Some drivers may notice a slight movement of the brake pedal when theAdvanceTrac� with RSC performs a system self-check. DuringAdvanceTrac� with RSC system operation you may experience thefollowing:• A rumble or grinding noise• A slight deceleration of the vehicle• The AdvanceTrac� with RSC indicator light will flash• If your foot is on the brake pedal, you will feel a vibration in the
pedal.• If the driving condition is severe and your foot is not on the brake, the
brake pedal will move to apply higher brake forces. You may also heara whoosh of air from under the instrument panel during this severecondition.
All these conditions are normal during AdvanceTrac� with RSCoperation.
Do not alter or modify your vehicle’s suspension or steering; theresulting changes to the vehicle’s handling can adversely affectthe AdvanceTrac� with Roll Stability Control� system. Also, donot install a stereo loudspeaker near the front center console orunder either front seat. The speaker vibrations can adverselyaffect the AdvanceTrac� with Roll Stability Control� sensorslocated in this area.
2006 Navigator (nav)Owners Guide (post-2002-fmt)USA (fus)
Driving
280
Note: Pressing the AdvanceTrac� with RSC button will disable theAdvanceTrac� with RSC system.
Aggressive driving in any road conditions can cause you to losecontrol of your vehicle increasing the risk of severe personal
injury or property damage. The occurrence of an AdvanceTrac� withRoll Stability Control� event is an indication that at least some of thetires have exceeded their ability to grip the road; this may lead to anincreased risk of loss of vehicle control, vehicle rollover, personal injuryand death. If you experience a severe road event, SLOW DOWN.
STEERINGYour vehicle is equipped with power steering. Power steering uses energyfrom the engine to decrease the driver’s effort in steering the vehicle.To prevent damage to the power steering pump:• Never hold the steering wheel to the extreme right or the extreme left
for more than a few seconds when the engine is running.
• Do not operate the vehicle with the power steering pump fluid levelbelow the MIN mark on the reservoir.
If the power steering system breaks down (or if the engine is turnedoff), you can steer the vehicle manually, but it takes more effort.
If the steering wanders or pulls, check for:
• Underinflated tire(s) on any wheel(s)
• Uneven vehicle loading
• High crown in center of road
• High crosswinds
• Wheels out of alignment
• Loose or worn suspension components
Speed sensitive steeringYour vehicle is equipped with speed sensitive, variable assist powersteering. At low speeds, steering assist will adjust to reduce efforts andimprove low speed maneuverability and at high speeds, the assist willadjust to improve steering feel.
If the amount of effort required to steer your vehicle changes whiledriving at a constant vehicle speed, have the power steering systemchecked by your authorized dealer.
2006 Navigator (nav)Owners Guide (post-2002-fmt)USA (fus)
Driving
281
AIR SUSPENSION SYSTEMThe air suspension system is designed to improve ride comfort, vehiclehandling and general vehicle performance by adjusting the vehicle’s rideheight according to vehicle speed, weight added to or removed from thevehicle and four-wheel drive (if equipped) operation. Normal vehicleoperation does not require any action by the driver.When you enter the vehicle and the ignition is off, the air suspension willhave automatically lowered the vehicle to its lowest height to provideeasier entry. When a door or the liftgate is opened, the systemmemorizes and maintains that height until either all doors are closed orthe vehicle’s speed exceeds 15 mph (24 km/h). The air suspensionsystem will then raise the vehicle’s height to its normal position when theignition is turned on, all doors are closed and the transmission is shiftedfrom P (Park).When the vehicle is in motion, the air suspension will adjust the vehicleride height to normal operating position to maximize your ride comfort.If your vehicle is equipped with four-wheel drive and you shift into 4WDLOW, the air suspension will not move to it’s lowest position; instead, theride height is raised above the normal ride height position (at speedsbelow 35 mph [56 km/h]) to improve ground clearance.If a load is added to, or removed from the vehicle, the load levelingfeature of the air suspension system will adjust the suspension to keepthe vehicle at a constant level.When exiting the vehicle, the air suspension will automatically lower thevehicle to its lowest height to provide easier exit. You may hear a buzz orclick from the air suspension system when the ignition is turned off. Theair suspension system will stay active for 40 minutes after the ignition isturned off to accommodate any load changes. (The air compressor mayrun when the vehicle is off; this is normal.)
The air suspension shut-off switch islocated behind an access panel onthe left rear quarter trim panel, nearthe liftgate. To remove the panel,turn the control counterclockwise.
On vehicles equipped withair suspension, turn the air
suspension and the ignition switchoff prior to jacking, hoisting ortowing your vehicle.
2006 Navigator (nav)Owners Guide (post-2002-fmt)USA (fus)
Driving
282
Press the bottom portion of theswitch to turn off the airsuspension.
PREPARING TO DRIVE
Utility vehicles have a significantly higher rollover rate thanother types of vehicles.
In a rollover crash, an unbelted person is significantly more likelyto die than a person wearing a seat belt.
Your vehicle has special design and equipment features to make itcapable of performing in a wide variety of circumstances. These specialdesign features, such as larger tires and increased ground clearance, givethe vehicle a higher center of gravity than a passenger car.
Vehicles with a higher center of gravity such as utility andfour-wheel drive vehicles handle differently than vehicles with a
lower center of gravity. Utility and four-wheel drive vehicles are notdesigned for cornering at speeds as high as passenger cars any morethan low-slung sports cars are designed to perform satisfactorily underoff-road conditions. Avoid sharp turns, excessive speed and abruptmaneuvers in these vehicles. Failure to drive cautiously could result inan increased risk of loss of vehicle control, vehicle rollover, personalinjury and death.
2006 Navigator (nav)Owners Guide (post-2002-fmt)USA (fus)
Driving
283
Loaded vehicles, with a higher center of gravity, may handledifferently than unloaded vehicles. Extra precautions, such as
slower speeds and increased stopping distance, should be taken whendriving a heavily loaded vehicle.
Your vehicle has the capability to haul more cargo and people than mostpassenger cars. Depending upon the type and placement of the load,hauling people and cargo may raise the center of gravity of the vehicle.
Use extra caution while becoming familiar with your vehicle. Know thecapabilities and limitations of both you as a driver and your vehicle.
AUTOMATIC TRANSMISSION OPERATION
Brake-shift interlock
This vehicle is equipped with a brake-shift interlock feature that preventsthe gearshift lever from being moved from P (Park) when the ignition isin the ON position unless brake pedal is depressed.
If you cannot move the gearshift lever out of P (Park) with ignition inthe ON position and the brake pedal depressed, it is possible that a fusehas blown or the vehicle’s brakelamps are not operating properly. Referto Fuses and relays in the Roadside Emergencies chapter.
If the fuse is not blown, perform the following procedure:
1. Apply the parking brake, turn the ignition to LOCK, then remove thekey.
2006 Navigator (nav)Owners Guide (post-2002-fmt)USA (fus)
Driving
284
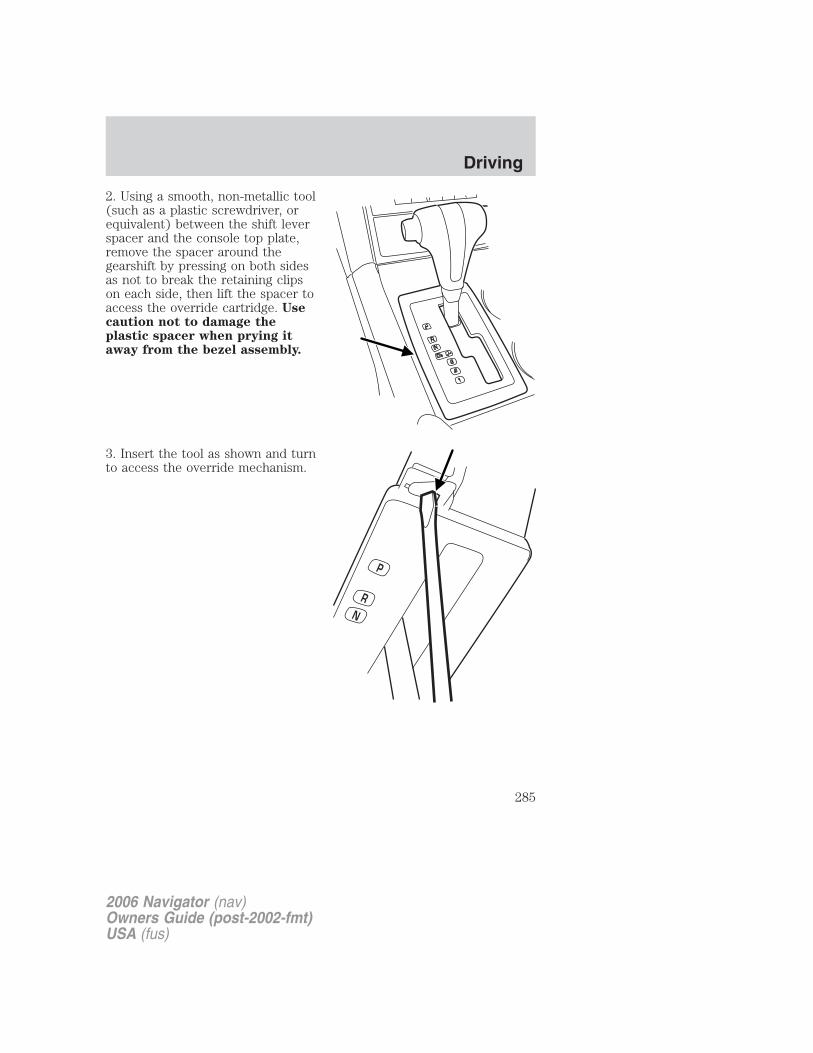
2. Using a smooth, non-metallic tool(such as a plastic screwdriver, orequivalent) between the shift leverspacer and the console top plate,remove the spacer around thegearshift by pressing on both sidesas not to break the retaining clipson each side, then lift the spacer toaccess the override cartridge. Usecaution not to damage theplastic spacer when prying itaway from the bezel assembly.
3. Insert the tool as shown and turnto access the override mechanism.
2006 Navigator (nav)Owners Guide (post-2002-fmt)USA (fus)
Driving
285
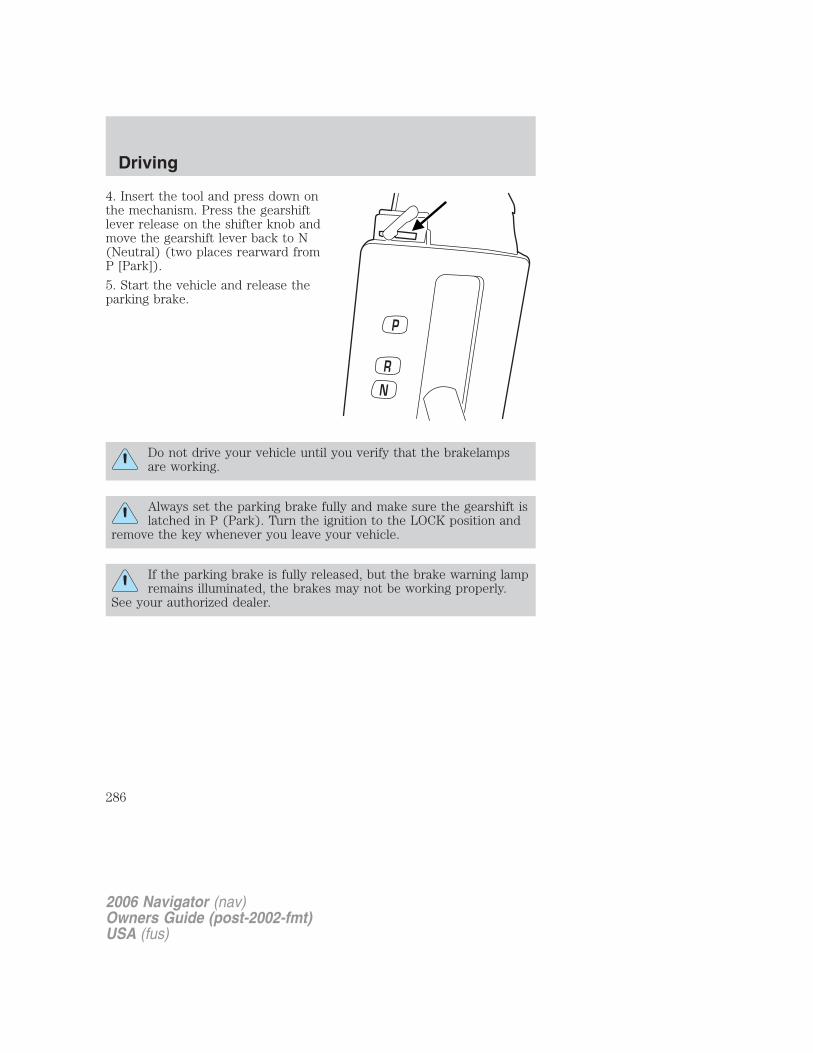
4. Insert the tool and press down onthe mechanism. Press the gearshiftlever release on the shifter knob andmove the gearshift lever back to N(Neutral) (two places rearward fromP [Park]).
5. Start the vehicle and release theparking brake.
Do not drive your vehicle until you verify that the brakelampsare working.
Always set the parking brake fully and make sure the gearshift islatched in P (Park). Turn the ignition to the LOCK position and
remove the key whenever you leave your vehicle.
If the parking brake is fully released, but the brake warning lampremains illuminated, the brakes may not be working properly.
See your authorized dealer.
2006 Navigator (nav)Owners Guide (post-2002-fmt)USA (fus)
Driving
286
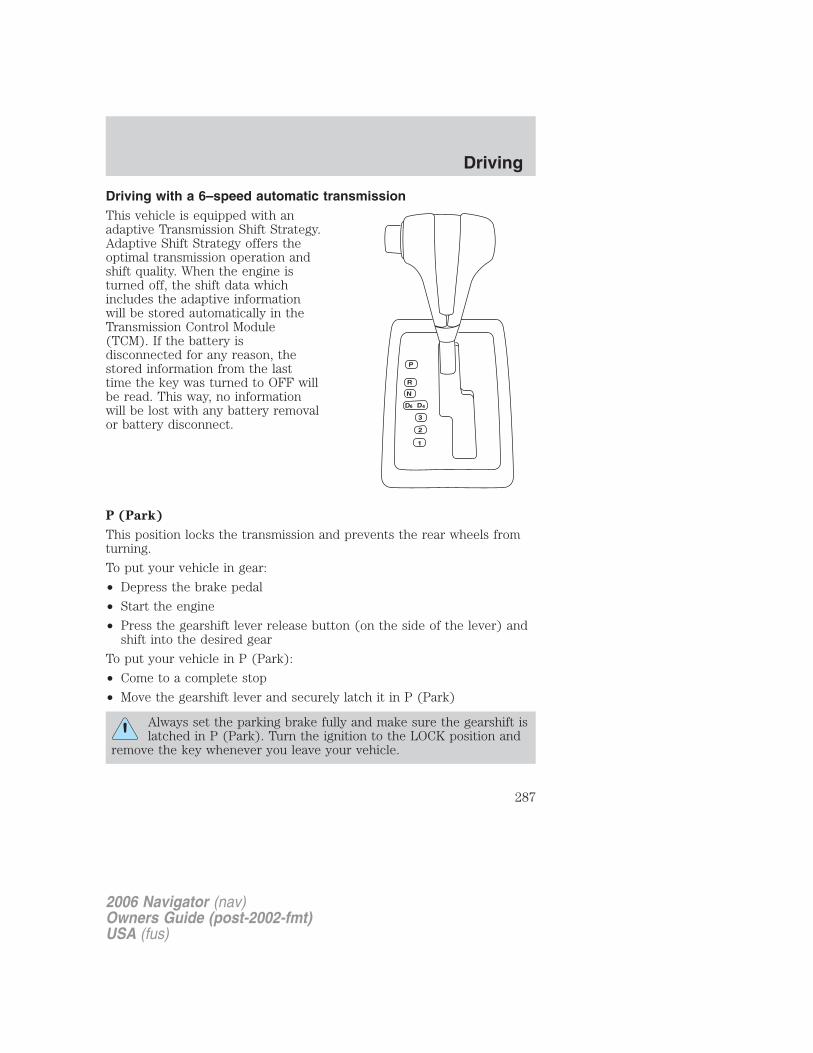
Driving with a 6–speed automatic transmissionThis vehicle is equipped with anadaptive Transmission Shift Strategy.Adaptive Shift Strategy offers theoptimal transmission operation andshift quality. When the engine isturned off, the shift data whichincludes the adaptive informationwill be stored automatically in theTransmission Control Module(TCM). If the battery isdisconnected for any reason, thestored information from the lasttime the key was turned to OFF willbe read. This way, no informationwill be lost with any battery removalor battery disconnect.
P (Park)
This position locks the transmission and prevents the rear wheels fromturning.
To put your vehicle in gear:
• Depress the brake pedal
• Start the engine
• Press the gearshift lever release button (on the side of the lever) andshift into the desired gear
To put your vehicle in P (Park):
• Come to a complete stop
• Move the gearshift lever and securely latch it in P (Park)
Always set the parking brake fully and make sure the gearshift islatched in P (Park). Turn the ignition to the LOCK position and
remove the key whenever you leave your vehicle.
2006 Navigator (nav)Owners Guide (post-2002-fmt)USA (fus)
Driving
287
R (Reverse)
With the gearshift lever in R (Reverse), the vehicle will move backward.Always come to a complete stop before shifting into and out of R(Reverse).N (Neutral)
With the gearshift lever in N (Neutral), the vehicle can be started and isfree to roll. Hold the brake pedal down while in this position.D6 (Drive, 6th gear)
The normal driving position for the best fuel economy. Transmissionoperates in gears one through six except in 4L where transmissionoperates in gears two through six.D4 (Drive, 4th gear)
Transmission operates in gears one through four except in 4L wheretransmission operates in gears two through six.This position:• Allows for all forward gears, 1–4; 5th and 6th gear are not available.• Provides engine braking.• Use when driving conditions cause excessive shifting from D6 to other
gears. Examples: city traffic, hilly terrain, heavy loads, trailer towingand when engine braking is required.
• Selecting D4 at higher speeds will cause the transmission to downshiftinto fourth gear.
• Upshifts to 5th and 6th gears are allowed by moving the gearshiftlever to D6.
3 (Third)
Transmission operates in third gear only.
Used for improved traction on slippery roads. Selecting 3 (Third)provides engine braking.
To return to D6 or D4, move the transmission shift lever into the D6 orD4 position.
2 (Second)
Transmission operates in 2nd gear only.
Use 2 (Second) to start-up on slippery roads or to provide additionalengine braking on downgrades.
To return to D6, D4 or 3 (Third), move the transmission shift lever intothe D6, D4 or 3 (Third) position.
2006 Navigator (nav)Owners Guide (post-2002-fmt)USA (fus)
Driving
288
1 (First)
• Transmission operates in 1st gear only.
• Provides maximum engine braking.
• Allows upshifts by moving gearshift lever.
• Will not downshift into 1 (First) at high speeds; allows for 1 (First)when vehicle reaches slower speeds.
Forced downshifts
• Allowed in D6 (Drive, 6th gear) or D4 (Drive, 4th gear) only.
• Depress the accelerator to the floor.
• Allows transmission to select an appropriate gear.
If your vehicle gets stuck in mud or snowIf your vehicle gets stuck in mud or snow, it may be rocked out byshifting between forward and reverse gears, stopping between shifts in asteady pattern. Press lightly on the accelerator in each gear.
Do not rock the vehicle if the engine is not at normal operatingtemperature or damage to the transmission may occur.
Do not rock the vehicle for more than a minute or damage to thetransmission and tires may occur, or the engine may overheat.
If your vehicle is equipped with AdvanceTrac� with RSC, it may bebeneficial to turn the system off so the wheels are allowed to spin.
EXTENDED REAR PARK ASSISTThe extended rear park assist system sounds a tone to warn the driverof obstacles near the rear bumper when R (Reverse) gear is selected.
To help avoid personal injury, please read and understand thelimitations of the extended rear park assist system as contained
in this section. The park assist is only an aid for some (generally largeand fixed) objects when moving in reverse on a flat surface at “parkingspeeds”. Inclement weather may also affect the function of the system;this may include reduced performance or a false activation.
To help avoid personal injury, always use caution when in R(Reverse) and when using the extended rear park assist.
2006 Navigator (nav)Owners Guide (post-2002-fmt)USA (fus)
Driving
289
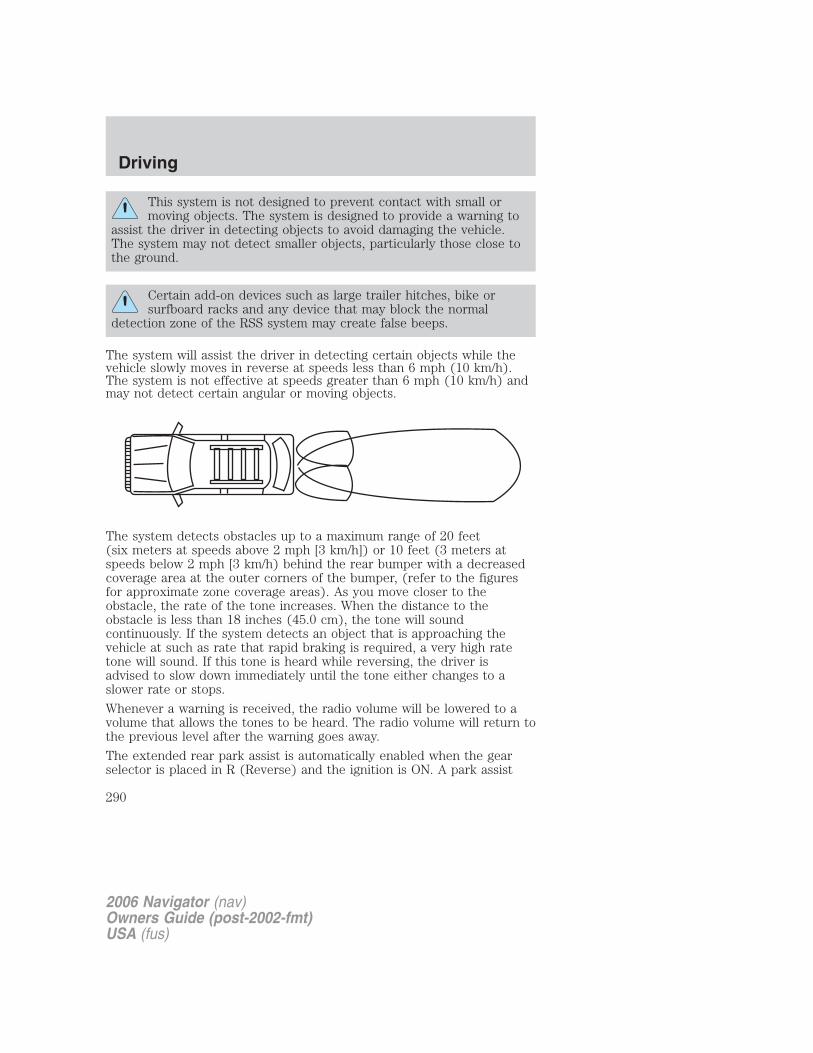
This system is not designed to prevent contact with small ormoving objects. The system is designed to provide a warning to
assist the driver in detecting objects to avoid damaging the vehicle.The system may not detect smaller objects, particularly those close tothe ground.
Certain add-on devices such as large trailer hitches, bike orsurfboard racks and any device that may block the normal
detection zone of the RSS system may create false beeps.
The system will assist the driver in detecting certain objects while thevehicle slowly moves in reverse at speeds less than 6 mph (10 km/h).The system is not effective at speeds greater than 6 mph (10 km/h) andmay not detect certain angular or moving objects.
The system detects obstacles up to a maximum range of 20 feet(six meters at speeds above 2 mph [3 km/h]) or 10 feet (3 meters atspeeds below 2 mph [3 km/h) behind the rear bumper with a decreasedcoverage area at the outer corners of the bumper, (refer to the figuresfor approximate zone coverage areas). As you move closer to theobstacle, the rate of the tone increases. When the distance to theobstacle is less than 18 inches (45.0 cm), the tone will soundcontinuously. If the system detects an object that is approaching thevehicle at such as rate that rapid braking is required, a very high ratetone will sound. If this tone is heard while reversing, the driver isadvised to slow down immediately until the tone either changes to aslower rate or stops.
Whenever a warning is received, the radio volume will be lowered to avolume that allows the tones to be heard. The radio volume will return tothe previous level after the warning goes away.
The extended rear park assist is automatically enabled when the gearselector is placed in R (Reverse) and the ignition is ON. A park assist
2006 Navigator (nav)Owners Guide (post-2002-fmt)USA (fus)
Driving
290

control in the message center allows the driver to disable the extendedrear park aid only when the ignition is ON, and the gear selector is in R(Reverse).
Always keep the sensors (located on the rear bumper/fascia) freefrom snow, ice and large accumulations of dirt (do not clean thesensors with sharp objects). These elements may cause thesystem to operate inaccurately.
If the vehicle sustains damage to the rear bumper/fascia, leavingit misaligned or bent, the sensing zone may be altered causinginaccurate measurement of obstacles or false alarms.
CONTROL TRAC FOUR-WHEEL DRIVE (4X4) OPERATION(IF EQUIPPED)
For important information regarding safe operation of this typeof vehicle, see Preparing to drive your vehicle in this chapter.
If equipped with the Control Trac 4x4 System, and 4L (4x4 LOW)is selected while the vehicle is moving, the system will notengage. This is normal and should be no reason for concern.Before 4L (4x4 LOW) can be engaged, the vehicle must bebrought to a complete stop, the brake pedal depressed and thetransmission placed in N (Neutral).
The vehicle should not be operated in 4H (4x4 HIGH) or 4L (4x4 LOW)on dry pavement. Doing so could result in difficult disengagement of thetransfer case, increased tire wear, decreased fuel economy and maydamage driveline components.
Your 4x4 features the heavy-duty Control Trac system which includes acomputer-operated transfer case. This unique system is interactive withthe road, continually monitoring and adjusting torque delivery to thefront and rear wheels to optimize vehicle control.
System indicator lightsThe Control Trac system indicator lights illuminate only under thefollowing conditions. If these lights illuminate when driving in 2H orA4WD, contact your authorized dealer as soon as possible.
• 4X4 HIGH - momentarilyilluminates when the vehicle isstarted. Illuminates when 4H isselected.
4x4HIGH
2006 Navigator (nav)Owners Guide (post-2002-fmt)USA (fus)
Driving
291
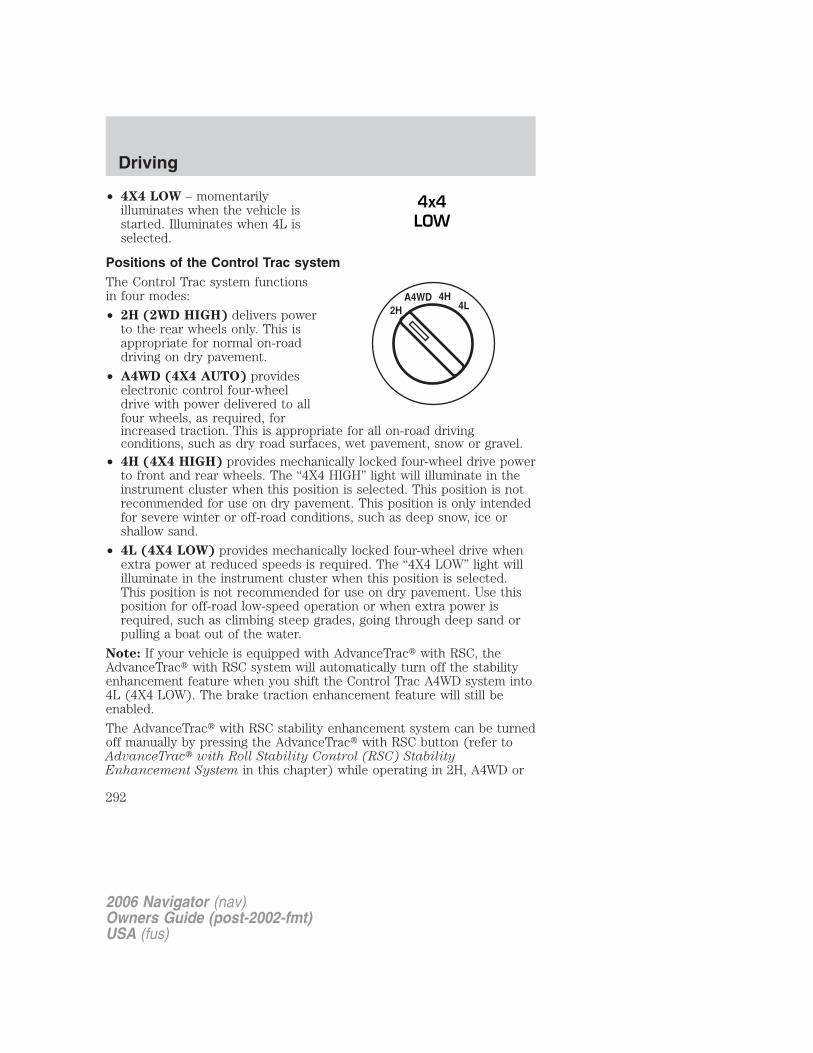
• 4X4 LOW – momentarilyilluminates when the vehicle isstarted. Illuminates when 4L isselected.
Positions of the Control Trac systemThe Control Trac system functionsin four modes:
• 2H (2WD HIGH) delivers powerto the rear wheels only. This isappropriate for normal on-roaddriving on dry pavement.
• A4WD (4X4 AUTO) provideselectronic control four-wheeldrive with power delivered to allfour wheels, as required, forincreased traction. This is appropriate for all on-road drivingconditions, such as dry road surfaces, wet pavement, snow or gravel.
• 4H (4X4 HIGH) provides mechanically locked four-wheel drive powerto front and rear wheels. The “4X4 HIGH” light will illuminate in theinstrument cluster when this position is selected. This position is notrecommended for use on dry pavement. This position is only intendedfor severe winter or off-road conditions, such as deep snow, ice orshallow sand.
• 4L (4X4 LOW) provides mechanically locked four-wheel drive whenextra power at reduced speeds is required. The “4X4 LOW” light willilluminate in the instrument cluster when this position is selected.This position is not recommended for use on dry pavement. Use thisposition for off-road low-speed operation or when extra power isrequired, such as climbing steep grades, going through deep sand orpulling a boat out of the water.
Note: If your vehicle is equipped with AdvanceTrac� with RSC, theAdvanceTrac� with RSC system will automatically turn off the stabilityenhancement feature when you shift the Control Trac A4WD system into4L (4X4 LOW). The brake traction enhancement feature will still beenabled.
The AdvanceTrac� with RSC stability enhancement system can be turnedoff manually by pressing the AdvanceTrac� with RSC button (refer toAdvanceTrac� with Roll Stability Control (RSC) StabilityEnhancement System in this chapter) while operating in 2H, A4WD or
4x4LOW
2006 Navigator (nav)Owners Guide (post-2002-fmt)USA (fus)
Driving
292
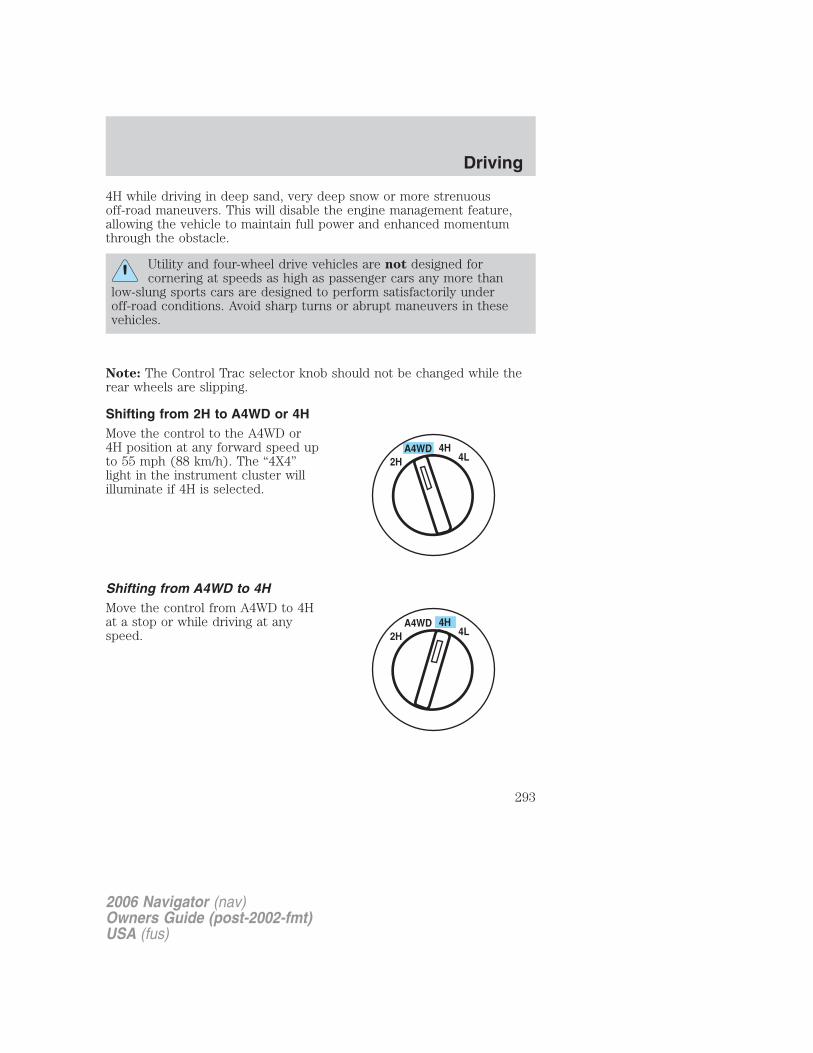
4H while driving in deep sand, very deep snow or more strenuousoff-road maneuvers. This will disable the engine management feature,allowing the vehicle to maintain full power and enhanced momentumthrough the obstacle.
Utility and four-wheel drive vehicles are not designed forcornering at speeds as high as passenger cars any more than
low-slung sports cars are designed to perform satisfactorily underoff-road conditions. Avoid sharp turns or abrupt maneuvers in thesevehicles.
Note: The Control Trac selector knob should not be changed while therear wheels are slipping.
Shifting from 2H to A4WD or 4HMove the control to the A4WD or4H position at any forward speed upto 55 mph (88 km/h). The “4X4”light in the instrument cluster willilluminate if 4H is selected.
Shifting from A4WD to 4HMove the control from A4WD to 4Hat a stop or while driving at anyspeed.
2006 Navigator (nav)Owners Guide (post-2002-fmt)USA (fus)
Driving
293
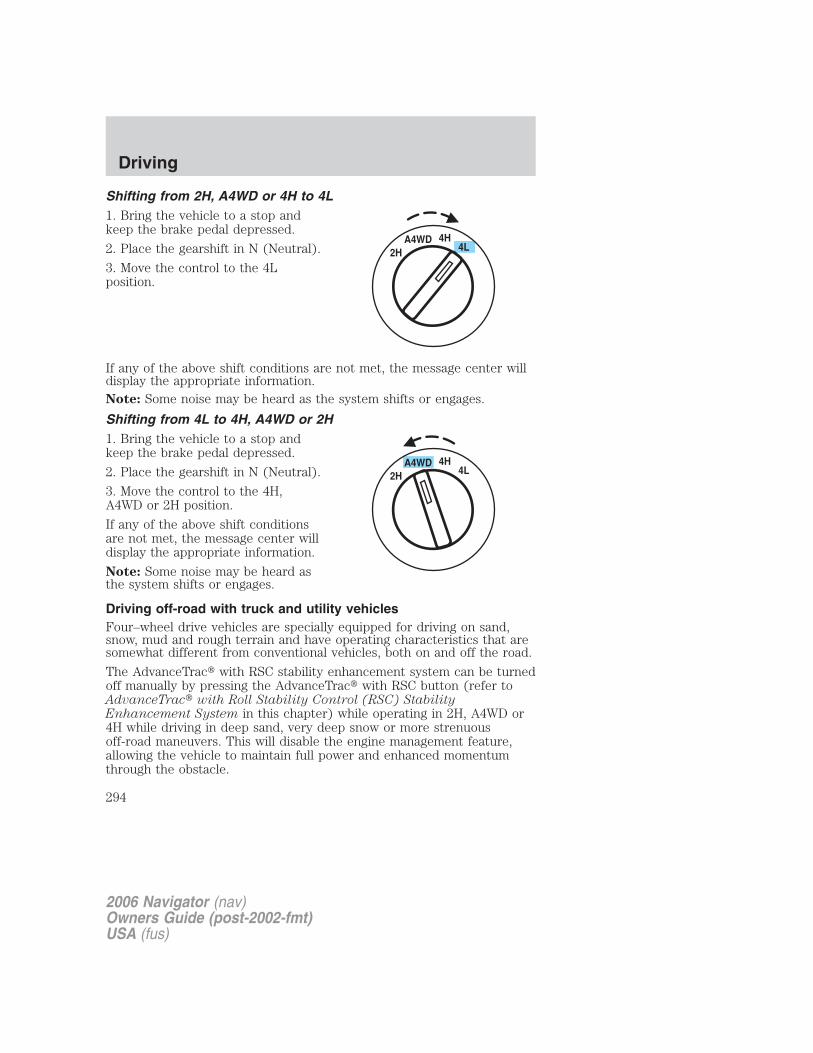
Shifting from 2H, A4WD or 4H to 4L1. Bring the vehicle to a stop andkeep the brake pedal depressed.
2. Place the gearshift in N (Neutral).
3. Move the control to the 4Lposition.
If any of the above shift conditions are not met, the message center willdisplay the appropriate information.Note: Some noise may be heard as the system shifts or engages.
Shifting from 4L to 4H, A4WD or 2H1. Bring the vehicle to a stop andkeep the brake pedal depressed.
2. Place the gearshift in N (Neutral).
3. Move the control to the 4H,A4WD or 2H position.
If any of the above shift conditionsare not met, the message center willdisplay the appropriate information.
Note: Some noise may be heard asthe system shifts or engages.
Driving off-road with truck and utility vehiclesFour–wheel drive vehicles are specially equipped for driving on sand,snow, mud and rough terrain and have operating characteristics that aresomewhat different from conventional vehicles, both on and off the road.
The AdvanceTrac� with RSC stability enhancement system can be turnedoff manually by pressing the AdvanceTrac� with RSC button (refer toAdvanceTrac� with Roll Stability Control (RSC) StabilityEnhancement System in this chapter) while operating in 2H, A4WD or4H while driving in deep sand, very deep snow or more strenuousoff-road maneuvers. This will disable the engine management feature,allowing the vehicle to maintain full power and enhanced momentumthrough the obstacle.
2006 Navigator (nav)Owners Guide (post-2002-fmt)USA (fus)
Driving
294

How your vehicle differs from other vehiclesTruck and utility vehicles can differ from some other vehicles. Yourvehicle may be higher to allow it to travel over rough terrain withoutgetting hung up or damaging underbody components.
The differences that make your vehicle so versatile also make it handledifferently than an ordinary passenger car.
Maintain steering wheel control at all times, especially in rough terrain.Since sudden changes in terrain can result in abrupt steering wheelmotion, make sure you grip the steering wheel from the outside. Do notgrip the spokes.
Drive cautiously to avoid vehicle damage from concealed objects such asrocks and stumps.
You should either know the terrain or examine maps of the area beforedriving. Map out your route before driving in the area. To maintainsteering and braking control of your vehicle, you must have all fourwheels on the ground and they must be rolling, not sliding or spinning.
Basic operating principles• Do not use 4H (4x4 HIGH) or 4L (4x4 LOW) on dry, hard surfaced
roads. This may damage the drivelines and axles.
• Drive slower in strong crosswinds which can affect the normal steeringcharacteristics of your vehicle.
• Be extremely careful when driving on pavement made slippery byloose sand, water, gravel, snow or ice.
If your vehicle goes off the edge of the pavement• If your vehicle goes off the edge of the pavement, slow down, but
avoid severe brake application. Ease the vehicle back onto thepavement only after reducing your speed. Do not turn the steeringwheel too sharply while returning to the road surface.
• It may be safer to stay on the apron or shoulder of the road and slowdown gradually before returning to the pavement. You may losecontrol if you do not slow down or if you turn the steering wheel toosharply or abruptly.
• It often may be less risky to strike small objects, such as highwayreflectors, with minor damage to your vehicle rather than attempt asudden return to the pavement which could cause the vehicle to slidesideways out of control or roll over. Remember, your safety and thesafety of others should be your primary concern.
2006 Navigator (nav)Owners Guide (post-2002-fmt)USA (fus)
Driving
295

Vehicles with a higher center of gravity such as utility andfour-wheel drive vehicles handle differently than vehicles with a
lower center of gravity. Utility and four-wheel drive vehicles are notdesigned for cornering at speeds as high as passenger cars any morethan low-slung sports cars are designed to perform satisfactorily underoff-road conditions. Avoid sharp turns, excessive speed and abruptmaneuvers in these vehicles. Failure to drive cautiously could result inan increased risk of loss of vehicle control, vehicle rollover, personalinjury and death.
If your vehicle gets stuckIf your vehicle gets stuck in mud or snow it may be rocked out byshifting between forward and reverse gears, stopping between shifts, in asteady pattern. Press lightly on the accelerator in each gear.
Do not rock the vehicle if the engine is not at normal operatingtemperature or damage to the transmission may occur.
Do not rock the vehicle for more than a few minutes or damageto the transmission and tires may occur or the engine mayoverheat.
Always set the parking brake fully and make sure the gearshift islatched in P (Park). Turn the ignition to the LOCK position and
remove the key whenever you leave your vehicle.
If the parking brake is fully released, but the brake warning lampremains illuminated, the brakes may not be working properly.
See your authorized dealer.
Do not spin the wheels at over 35 mph (56 km/h). The tires mayfail and injure a passenger or bystander.
Emergency maneuvers• In an unavoidable emergency situation where a sudden sharp turn
must be made, remember to avoid “over-driving” your vehicle, i.e.,turn the steering wheel only as rapidly and as far as required to avoidthe emergency. Excessive steering will result in less vehicle control,not more. Additionally, smooth variations of the accelerator and/orbrake pedal pressure should be utilized if changes in vehicle speed are
2006 Navigator (nav)Owners Guide (post-2002-fmt)USA (fus)
Driving
296

called for. Avoid abrupt steering, acceleration or braking which couldresult in an increased risk of loss of vehicle control, vehicle rolloverand/or personal injury. Use all available road surface to return thevehicle to a safe direction of travel.
• In the event of an emergency stop, avoid skidding the tires and do notattempt any sharp steering wheel movements.
Vehicles with a higher center of gravity such as utility andfour-wheel drive vehicles handle differently than vehicles with a
lower center of gravity. Utility and four-wheel drive vehicles are notdesigned for cornering at speeds as high as passenger cars any morethan low-slung sports cars are designed to perform satisfactorily underoff-road conditions. Avoid sharp turns, excessive speed and abruptmaneuvers in these vehicles. Failure to drive cautiously could result inan increased risk of loss of vehicle control, vehicle rollover, personalinjury and death.
• If the vehicle goes from one type of surface to another (i.e., fromconcrete to gravel) there will be a change in the way the vehicleresponds to a maneuver (steering, acceleration or braking). Again,avoid these abrupt inputs.
Control Trac four–wheel drive system (if equipped)When a four–wheel drive mode is selected, the Control Trac system usesall four wheels to power the vehicle. This increases traction, enablingyou to drive over terrain and road conditions that a conventionaltwo-wheel drive vehicle cannot.
Power is supplied to all four wheelsthrough a transfer case. Onfour–wheel drive vehicles, thetransfer case allows you to selectfour–wheel drive when necessary.Information on transfer caseoperation and shifting procedurescan be found in this chapter.Information on transfer case maintenance can be found in theMaintenance and Specifications chapter. You should becomethoroughly familiar with this information before you operate your vehicle.
Normal characteristicsOn some four–wheel drive models, the initial shift from two-wheel driveto four–wheel drive while the vehicle is moving can cause some
2006 Navigator (nav)Owners Guide (post-2002-fmt)USA (fus)
Driving
297

momentary clunk and ratcheting sounds. This is the front drivetraincoming up to speed and engaging the front wheels, and is not cause forconcern.
SandWhen driving over sand, try to keep all four wheels on the most solidarea of the trail. Avoid reducing the tire pressures but shift to a lowergear and drive steadily through the terrain. Apply the accelerator slowlyand avoid spinning the wheels.
Note: If your vehicle is equipped with the Tire Pressure MonitoringSystem (TPMS), the system indicator light may illuminate depending onhow much air is released from your tires and/or how long you drive thevehicle under these conditions.
Avoid excessive speed because vehicle momentum can work against youand cause the vehicle to become stuck to the point that assistance maybe required from another vehicle. Remember, you may be able to backout the way you came if you proceed with caution.
If your vehicle is equipped with AdvanceTrac� with RSC, press theAdvanceTrac� with RSC button (refer to AdvanceTrac� with RollStability Control (RSC) Stability Enhancement System in thischapter) while driving in deep sand if you experience excessive enginepower reduction.
Mud and waterIf you must drive through highwater, drive slowly. Traction orbrake capability may be limited.
When driving through water,determine the depth; avoid waterhigher than the bottom of the hubs(if possible) and proceed slowly. Ifthe ignition system gets wet, thevehicle may stall.
Once through water, always try the brakes. Wet brakes do not stop thevehicle as effectively as dry brakes. Drying can be improved by movingyour vehicle slowly while applying light pressure on the brake pedal.
Be cautious of sudden changes in vehicle speed or direction when youare driving in mud. Even four–wheel drive vehicles can lose traction inslick mud. As when you are driving over sand, apply the accelerator
2006 Navigator (nav)Owners Guide (post-2002-fmt)USA (fus)
Driving
298

slowly and avoid spinning your wheels. If the vehicle does slide, steer inthe direction of the slide until you regain control of the vehicle.If the transmission, transfer case or front axle are submerged in water,their fluids should be checked and changed, if necessary.Driving through deep water may damage the transmission.
If the front or rear axle is submerged in water, the axle lubricant shouldbe replaced.After driving through mud, clean off residue stuck to rotating driveshaftsand tires. Excess mud stuck on tires and rotating driveshafts causes animbalance that could damage drive components.
“Tread Lightly” is an educationalprogram designed to increase publicawareness of land-use regulationsand responsibilities in our nationswilderness areas. Ford MotorCompany joins the U.S. Forest Service and the Bureau of LandManagement in encouraging you to help preserve our national forest andother public and private lands by “treading lightly.”
Driving on hilly or sloping terrainAlthough natural obstacles may make it necessary to travel diagonally upor down a hill or steep incline, you should always try to drive straight upor straight down. Avoid driving crosswise or turning on steepslopes or hills. A danger lies in losing traction, slipping sideways andpossibly rolling over. Whenever driving on a hill, determine beforehandthe route you will use. Do not drive over the crest of a hill withoutseeing what conditions are on the other side. Do not drive in reverseover a hill without the aid of an observer.
When climbing a steep slope or hill,start in a lower gear rather thandownshifting to a lower gear from ahigher gear once the ascent hasstarted. This reduces strain on theengine and the possibility of stalling.
If you do stall out, do not try toturn around because you might rollover. It is better to back down to asafe location.Apply just enough power to the wheels to climb the hill. Too muchpower will cause the tires to slip, spin or lose traction, resulting in loss ofvehicle control.
2006 Navigator (nav)Owners Guide (post-2002-fmt)USA (fus)
Driving
299
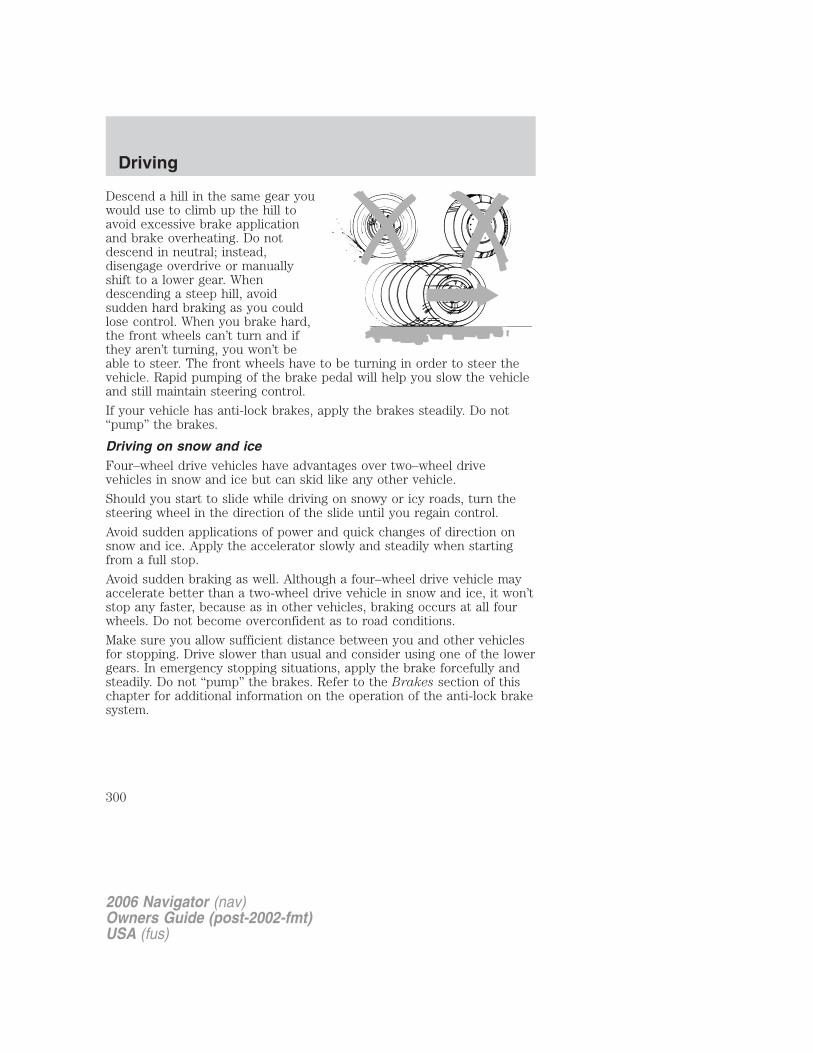
Descend a hill in the same gear youwould use to climb up the hill toavoid excessive brake applicationand brake overheating. Do notdescend in neutral; instead,disengage overdrive or manuallyshift to a lower gear. Whendescending a steep hill, avoidsudden hard braking as you couldlose control. When you brake hard,the front wheels can’t turn and ifthey aren’t turning, you won’t beable to steer. The front wheels have to be turning in order to steer thevehicle. Rapid pumping of the brake pedal will help you slow the vehicleand still maintain steering control.
If your vehicle has anti-lock brakes, apply the brakes steadily. Do not“pump” the brakes.
Driving on snow and iceFour–wheel drive vehicles have advantages over two–wheel drivevehicles in snow and ice but can skid like any other vehicle.
Should you start to slide while driving on snowy or icy roads, turn thesteering wheel in the direction of the slide until you regain control.
Avoid sudden applications of power and quick changes of direction onsnow and ice. Apply the accelerator slowly and steadily when startingfrom a full stop.
Avoid sudden braking as well. Although a four–wheel drive vehicle mayaccelerate better than a two-wheel drive vehicle in snow and ice, it won’tstop any faster, because as in other vehicles, braking occurs at all fourwheels. Do not become overconfident as to road conditions.
Make sure you allow sufficient distance between you and other vehiclesfor stopping. Drive slower than usual and consider using one of the lowergears. In emergency stopping situations, apply the brake forcefully andsteadily. Do not “pump” the brakes. Refer to the Brakes section of thischapter for additional information on the operation of the anti-lock brakesystem.
2006 Navigator (nav)Owners Guide (post-2002-fmt)USA (fus)
Driving
300
Maintenance and ModificationsThe suspension and steering systems on your vehicle have been designedand tested to provide predictable performance whether loaded or emptyand durable load carrying capability. For this reason, Ford MotorCompany strongly recommends that you do not make modifications suchas adding or removing parts (such as lift kits or stabilizer bars) or byusing replacement parts not equivalent to the original factory equipment.
Any modifications to a vehicle that raise the center of gravity can makeit more likely the vehicle will roll over as a result of a loss of control.Ford Motor Company recommends that caution be used with any vehicleequipped with a high load or device (such as ladder racks or pickup boxcover).
Failure to maintain your vehicle properly may void the warranty, increaseyour repair cost, reduce vehicle performance and operational capabilitiesand adversely affect driver and passenger safety. Frequent inspection ofvehicle chassis components is recommended if the vehicle is subjected toheavy off-road usage.
DRIVING THROUGH WATERIf driving through deep or standingwater is unavoidable, proceed veryslowly especially when the depth isnot known. Never drive throughwater that is higher than the bottomof the wheel rims (for cars) or thebottom of the hubs (for trucks).
When driving through water, traction or brake capability may be limited.Also, water may enter your engine’s air intake and severely damage yourengine or your vehicle may stall. Driving through deep water wherethe transmission vent tube is submerged may allow water into thetransmission and cause internal transmission damage.
Once through the water, always dry the brakes by moving yourvehicle slowly while applying light pressure on the brake pedal.Wet brakes do not stop the vehicle as quickly as dry brakes.
2006 Navigator (nav)Owners Guide (post-2002-fmt)USA (fus)
Driving
301
ROADSIDE ASSISTANCE
Getting roadside assistanceTo fully assist you should you have a vehicle concern, Ford MotorCompany offers a complimentary roadside assistance program. Thisprogram is separate from the New Vehicle Limited Warranty. The serviceis available:• 24–hours, seven days a week• for the New Vehicle Limited Warranty period of three years or
36,000 miles (60,000 km), whichever occurs first on Ford and Mercuryvehicles, and four years or 50,000 miles (80,000 km) on Lincolnvehicles.
Roadside assistance will cover:• a flat tire change with a good spare (except Ford GT which has a tire
inflation kit)• battery jump start• lock-out assistance (key replacement cost is the customer’s
responsibility)• fuel delivery (2.0 gallons [7.5L], maximum two occurrences within
12 month period)• towing of your disabled vehicle to the nearest authorized dealer, or
your selling authorized dealer if within 35 miles (56.3 km) of thenearest authorized dealer (one tow per disablement). Evennon-warranty related tows, like accidents, are covered (someexclusions apply, such as impound towing or repossession).
Canadian customers refer to your Owner Information Guide forinformation on:
• coverage period
• exact fuel amounts
• towing of your disabled vehicle
• emergency travel expense reimbursement
• travel planning benefits
Using roadside assistanceComplete the roadside assistance identification card and place it in yourwallet for quick reference. In the United States, this card is found in theOwner Guide portfolio in the glove compartment. In Canada, the card isfound in the Owner Information Guide in the glove compartment.
2006 Navigator (nav)Owners Guide (post-2002-fmt)USA (fus)
Roadside Emergencies
302
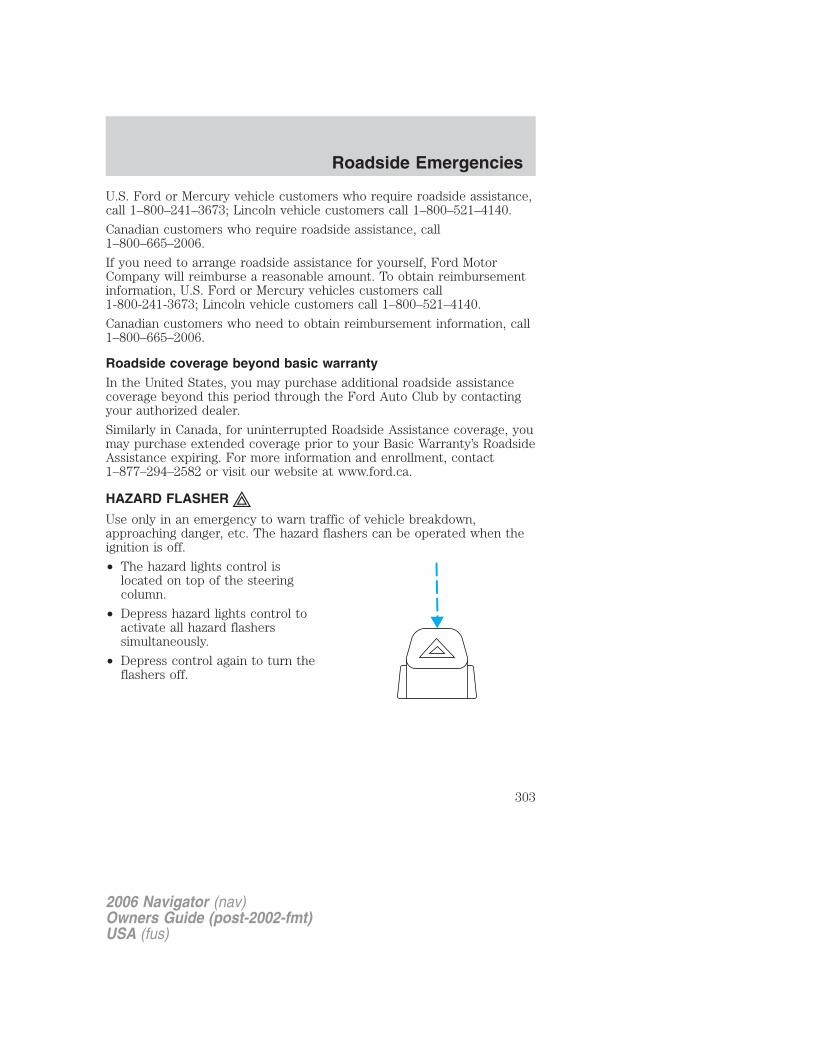
U.S. Ford or Mercury vehicle customers who require roadside assistance,call 1–800–241–3673; Lincoln vehicle customers call 1–800–521–4140.
Canadian customers who require roadside assistance, call1–800–665–2006.
If you need to arrange roadside assistance for yourself, Ford MotorCompany will reimburse a reasonable amount. To obtain reimbursementinformation, U.S. Ford or Mercury vehicles customers call1-800-241-3673; Lincoln vehicle customers call 1–800–521–4140.
Canadian customers who need to obtain reimbursement information, call1–800–665–2006.
Roadside coverage beyond basic warrantyIn the United States, you may purchase additional roadside assistancecoverage beyond this period through the Ford Auto Club by contactingyour authorized dealer.
Similarly in Canada, for uninterrupted Roadside Assistance coverage, youmay purchase extended coverage prior to your Basic Warranty’s RoadsideAssistance expiring. For more information and enrollment, contact1–877–294–2582 or visit our website at www.ford.ca.
HAZARD FLASHER
Use only in an emergency to warn traffic of vehicle breakdown,approaching danger, etc. The hazard flashers can be operated when theignition is off.
• The hazard lights control islocated on top of the steeringcolumn.
• Depress hazard lights control toactivate all hazard flasherssimultaneously.
• Depress control again to turn theflashers off.
2006 Navigator (nav)Owners Guide (post-2002-fmt)USA (fus)
Roadside Emergencies
303

FUEL PUMP SHUT-OFF SWITCH FUELRESET
The fuel pump shut-off switch is a device intended to stop the electricfuel pump when your vehicle has been involved in a substantial jolt.
After a collision, if the engine cranks but does not start, the fuel pumpshut-off switch may have been activated.
The fuel pump shut-off switch is located in the left rear quarter trimpanel, near the liftgate. The switch is located behind an access panel.
The fuel pump shut-off switch has ared reset button on top of it and islocated beneath the air suspensionswitch (if equipped).
Use the following procedure to reset the fuel pump shut-off switch.
1. Turn the ignition to the OFF position.
2. Check the fuel system for leaks.
3. If no fuel leak is apparent, reset the fuel pump shut-off switch bypushing in on the reset button.
4. Turn the ignition to the ON position. Pause for a few seconds andreturn the key to the OFF position.
5. Make a further check for leaks in the fuel system.
2006 Navigator (nav)Owners Guide (post-2002-fmt)USA (fus)
Roadside Emergencies
304

FUSES AND RELAYS
FusesIf electrical components in thevehicle are not working, a fuse mayhave blown. Blown fuses areidentified by a broken wire withinthe fuse. Check the appropriatefuses before replacing any electricalcomponents.
Note: Always replace a fuse with one that has the specified amperagerating. Using a fuse with a higher amperage rating can cause severe wiredamage and could start a fire.
Standard fuse amperage rating and color
COLOR
Fuse
rating
Mini
fuses
Standard
fuses
Maxi
fuses
Cartridge
maxi
fuses
Fuse link
cartridge
2A Grey Grey — — —3A Violet Violet — — —4A Pink Pink — — —5A Tan Tan — — —
7.5A Brown Brown — — —10A Red Red — — —15A Blue Blue — — —20A Yellow Yellow Yellow Blue Blue25A Natural Natural — — —30A Green Green Green Pink Pink40A — — Orange Green Green50A — — Red Red Red60A — — Blue — Yellow70A — — Tan — Brown80A — — Natural — Black
15
2006 Navigator (nav)Owners Guide (post-2002-fmt)USA (fus)
Roadside Emergencies
305
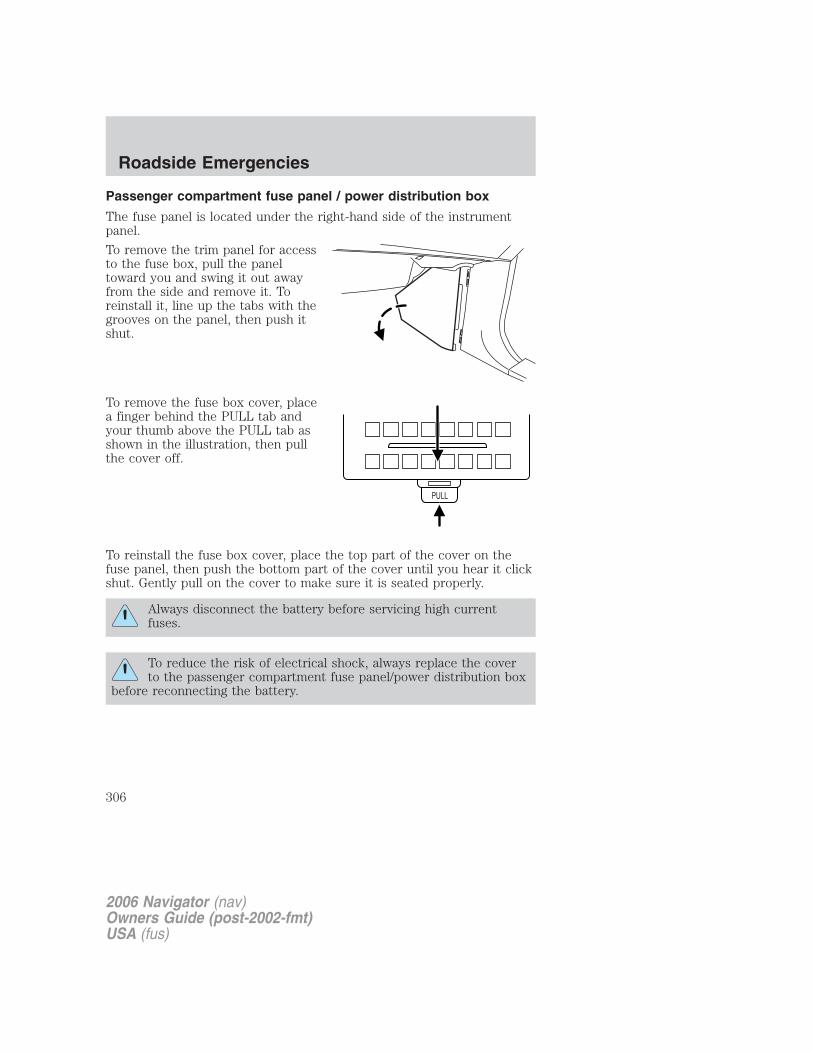
Passenger compartment fuse panel / power distribution box
The fuse panel is located under the right-hand side of the instrumentpanel.
To remove the trim panel for accessto the fuse box, pull the paneltoward you and swing it out awayfrom the side and remove it. Toreinstall it, line up the tabs with thegrooves on the panel, then push itshut.
To remove the fuse box cover, placea finger behind the PULL tab andyour thumb above the PULL tab asshown in the illustration, then pullthe cover off.
To reinstall the fuse box cover, place the top part of the cover on thefuse panel, then push the bottom part of the cover until you hear it clickshut. Gently pull on the cover to make sure it is seated properly.
Always disconnect the battery before servicing high currentfuses.
To reduce the risk of electrical shock, always replace the coverto the passenger compartment fuse panel/power distribution box
before reconnecting the battery.
2006 Navigator (nav)Owners Guide (post-2002-fmt)USA (fus)
Roadside Emergencies
306
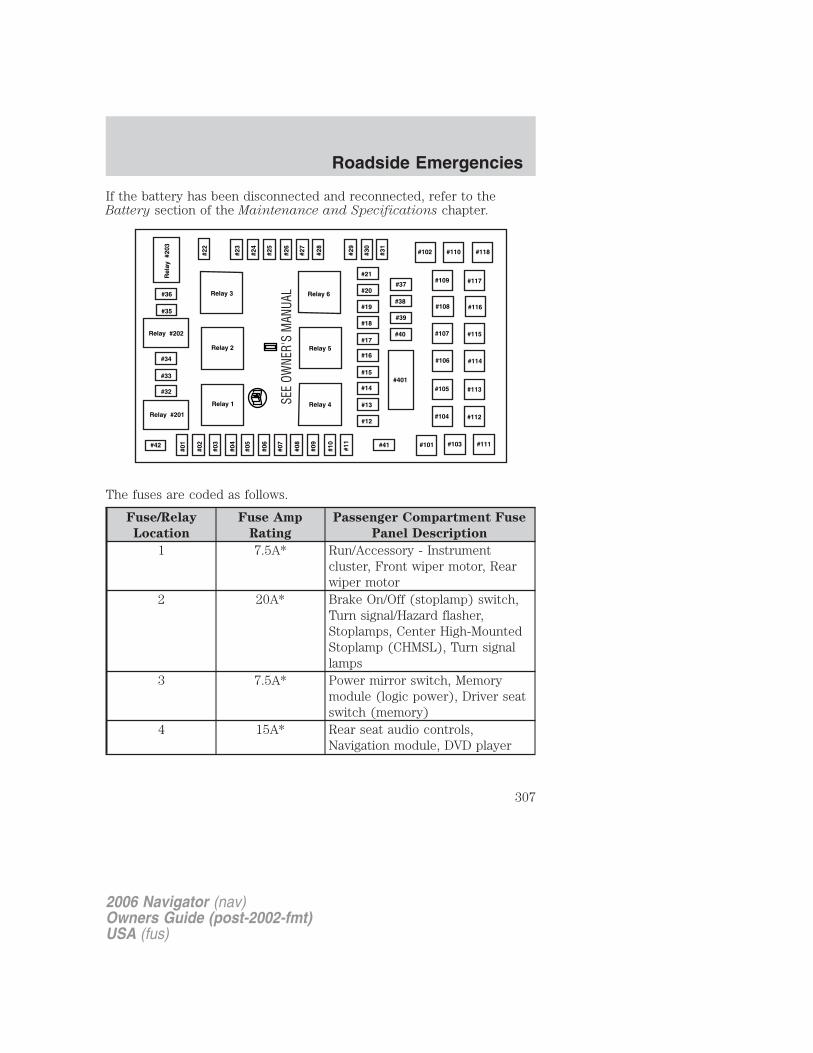
If the battery has been disconnected and reconnected, refer to theBattery section of the Maintenance and Specifications chapter.
The fuses are coded as follows.
Fuse/Relay
Location
Fuse Amp
Rating
Passenger Compartment Fuse
Panel Description
1 7.5A* Run/Accessory - Instrumentcluster, Front wiper motor, Rearwiper motor
2 20A* Brake On/Off (stoplamp) switch,Turn signal/Hazard flasher,Stoplamps, Center High-MountedStoplamp (CHMSL), Turn signallamps
3 7.5A* Power mirror switch, Memorymodule (logic power), Driver seatswitch (memory)
4 15A* Rear seat audio controls,Navigation module, DVD player
2006 Navigator (nav)Owners Guide (post-2002-fmt)USA (fus)
Roadside Emergencies
307

Fuse/Relay
Location
Fuse Amp
Rating
Passenger Compartment Fuse
Panel Description
5 7.5A* Brake On/Off (stoplamp) switch,Powertrain Control Module (PCM)(keep alive power), EATC controlhead, Body Security Module(BSM) (keep alive power), Speedcontrol deactivation switch,SecuriLock LED, 3rd row seatrelay coils, Power liftgate module,Clock, Brake Shift Interlock (BSI)solenoid
6 15A* Headlamp switch (parklamps andswitch backlighting feed),Parklamps, License lamps,Foglamp relay coil, Trailer towelectric brake controller(illumination), BSM (autolampparklamps), Floor console gearselector lighting, Foglampindicator
7 5A* Radio (Start signal)8 10A* Rear window defroster switch,
Heated outside mirrors, Rearwindow defroster indicator(climate control head)
9 15A* Transmission control module10 20A* Trailer tow back-up lamps relay,
Trailer tow 7–wire connector(back-up lamps), Trailer towparklamps relay, Trailer tow 7–and 4–wire connectors(parklamps)
2006 Navigator (nav)Owners Guide (post-2002-fmt)USA (fus)
Roadside Emergencies
308
Fuse/Relay
Location
Fuse Amp
Rating
Passenger Compartment Fuse
Panel Description
11 10A* A/C compressor clutch relay, A/Ccompressor clutch solenoid, 4x4Integrated Wheel Ends (IWE)solenoid
12 15A* Fuel pump relay, Fuel pumpshut-off switch, Fuel pump drivermodule, Fuel pump motor
13 10A* Rear window defroster relay coil,A/C refrigerant containmentswitch, A/C de-icing switch, A/Clow pressure switch, DATCcontrol head, DATC solenoids,DATC blower controller, Trailertow battery charge relay coil
14 10A* Daytime Running Lamps (DRL)ignition relay coil, Trailer towback-up lamps relay coil,Electrochromatic mirror, Back-uplamps relay, Back-up lamps
15 5A* AdvanceTrac� with RSC switch,Instrument cluster (Run/Startfeed)
16 10A* ABS/AdvanceTrac� with RSCmodule (Run/Start feed)
17 15A* Foglamps18 10A* Auxiliary A/C temperature blend
door actuator, Auxiliary A/C frontauxiliary control, Park brakerelease relay coils, Turn signalflasher, Electrochromatic mirror,Auxiliary mode motor
19 10A* Restraints Control Module (RCM)
2006 Navigator (nav)Owners Guide (post-2002-fmt)USA (fus)
Roadside Emergencies
309
Fuse/Relay
Location
Fuse Amp
Rating
Passenger Compartment Fuse
Panel Description
20 30A* BSM (door locks, liftgate glassrelease relay), Liftgate glassrelease motor, Left front windowmotor, Door/Liftgate lock motors
21 15A* Instrument cluster (B+), Interior(courtesy) lamps, Park brakerelease relays, Park brake releasemotor, Puddle lamps (outsidemirrors)
22 10A* Moonroof switch illumination, Flipwindow switch, Flip windowrelays, Flip window motors,Electronic hidden antennaamplifier (navigation radio), Radio(delayed accessory feed), Leftfront window motor, Navigationmodule
23 10A* RH low beam24 15A* Interior demand lamps (front
map/dome lamps, glovecompartment lamp, cargo lamp,roof rail lamps, vanity mirrorlamps), Battery saver relay coil,Battery saver relay power, HeatedPositive Crankcase Ventilation(PCV) valve, Heated PCV valverelay
25 10A* LH low beam26 20A* Horn relay, Horns27 5A* Brake Shift Interlock solenoid,
Reverse park aid system module,Air suspension module(Run/Start), Compass module
2006 Navigator (nav)Owners Guide (post-2002-fmt)USA (fus)
Roadside Emergencies
310
Fuse/Relay
Location
Fuse Amp
Rating
Passenger Compartment Fuse
Panel Description
28 5A* PCM relay coil, SecuriLocktransceiver, Heated PCV valverelay coil
29 30A* Trailer tow electric brakecontroller, Trailer tow 7–wireconnector (electric brake)
30 25A* PCM (4x4 transfer case clutch),Air suspension module (air springsolenoids and height sensors)
31 20A* Radio (B+), Subwoofer,Navigation radio audio amplifier
32 15A* Catalyst Monitor Sensors (CMS),6–speed transmission (ignitionsense), HEGO sensors, Canistervent solenoid, Vapor Managementvalve (VMV) solenoid, A/Ccompressor clutch relay coil,CMCV, VCT actuators
33 — Not used34 15A* PCM, Mass Air Flow (MAF)
sensor, Fuel injectors35 20A* High beam headlamps, Instrument
cluster high beam indicator36 10A* Trailer tow right turn/stop lamps37 20A* Cargo area power point38 25A* Rear wiper motor, Washer pump
(rear window wash)39 20A* Console power points
2006 Navigator (nav)Owners Guide (post-2002-fmt)USA (fus)
Roadside Emergencies
311
Fuse/Relay
Location
Fuse Amp
Rating
Passenger Compartment Fuse
Panel Description
40 20A* DRL relays, DRL foglamps, DRLheadlamp relay coil, Headlampswitch (headlamps), Multifunctionswitch (flash-to-pass), BSM(autolamp headlamps relay), Highbeam relay coil, Fuse 25 (LH lowbeam), Fuse 23 (RH low beam)
41 20A* Cigarette lighter, OBD IIdiagnostic connector
42 10A* Trailer tow left turn/stop lamps101 30A** Starter motor relay, Starter motor
solenoid102 30A** Ignition switch power103 30A** ABS/AdvanceTrac� with RSC
module (pump motor)104 30A** LH 3rd row seat relay, LH 3rd row
seat switch, LH 3rd row seatmotor
105 30A** Power liftgate module, Powerliftgate motors, Power runningboards control
106 30A** Trailer tow battery charge relay,Trailer tow 7–wire connector(battery charge)
107 30A** Auxiliary A/C blower relay,Auxiliary A/C blower motor
108 30A** Passenger seat motor switch,Passenger seat lumbar switch andmotor
109 30A** Driver seat lumbar switch andmotor, Memory module, Powermemory mirrors, Adjustablepedals switch and motor
2006 Navigator (nav)Owners Guide (post-2002-fmt)USA (fus)
Roadside Emergencies
312
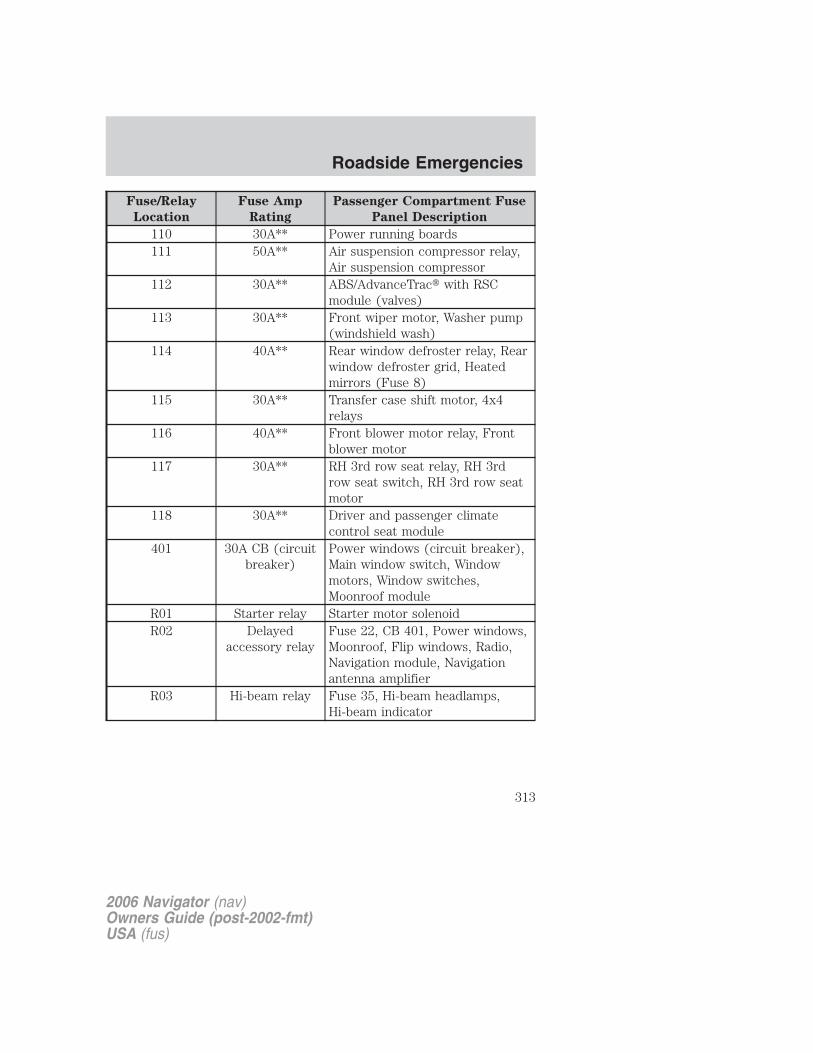
Fuse/Relay
Location
Fuse Amp
Rating
Passenger Compartment Fuse
Panel Description
110 30A** Power running boards111 50A** Air suspension compressor relay,
Air suspension compressor112 30A** ABS/AdvanceTrac� with RSC
module (valves)113 30A** Front wiper motor, Washer pump
(windshield wash)114 40A** Rear window defroster relay, Rear
window defroster grid, Heatedmirrors (Fuse 8)
115 30A** Transfer case shift motor, 4x4relays
116 40A** Front blower motor relay, Frontblower motor
117 30A** RH 3rd row seat relay, RH 3rdrow seat switch, RH 3rd row seatmotor
118 30A** Driver and passenger climatecontrol seat module
401 30A CB (circuitbreaker)
Power windows (circuit breaker),Main window switch, Windowmotors, Window switches,Moonroof module
R01 Starter relay Starter motor solenoidR02 Delayed
accessory relayFuse 22, CB 401, Power windows,Moonroof, Flip windows, Radio,Navigation module, Navigationantenna amplifier
R03 Hi-beam relay Fuse 35, Hi-beam headlamps,Hi-beam indicator
2006 Navigator (nav)Owners Guide (post-2002-fmt)USA (fus)
Roadside Emergencies
313
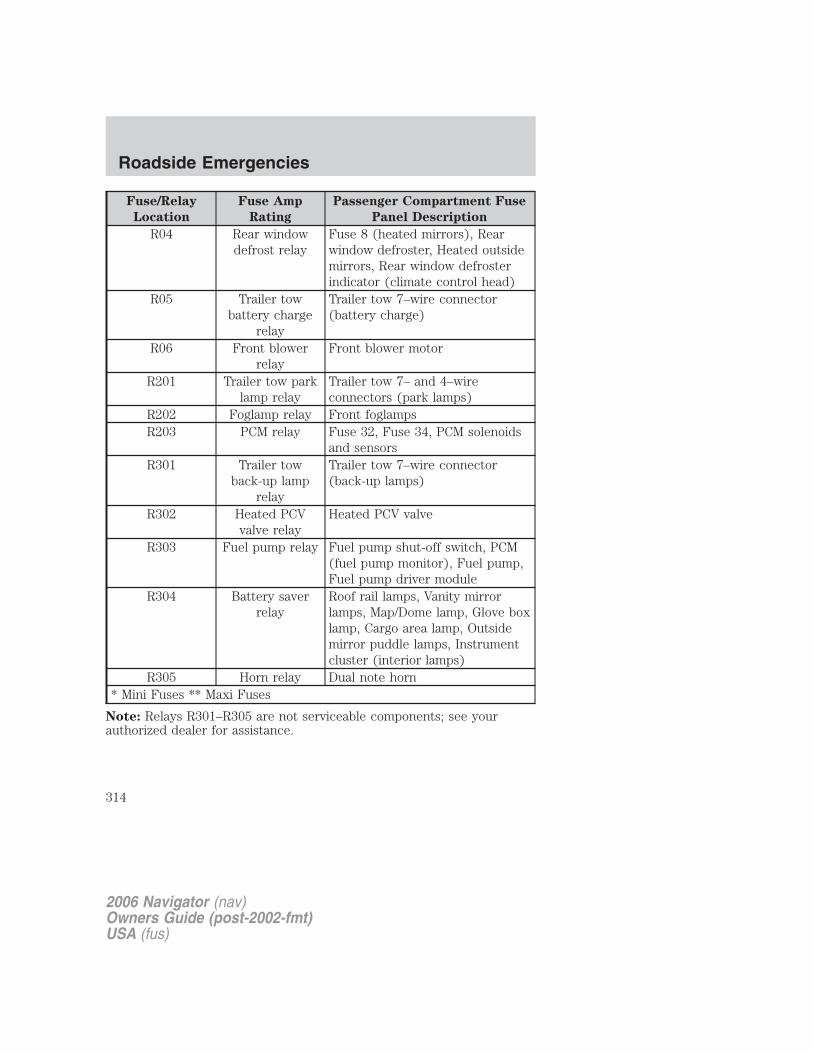
Fuse/Relay
Location
Fuse Amp
Rating
Passenger Compartment Fuse
Panel Description
R04 Rear windowdefrost relay
Fuse 8 (heated mirrors), Rearwindow defroster, Heated outsidemirrors, Rear window defrosterindicator (climate control head)
R05 Trailer towbattery charge
relay
Trailer tow 7–wire connector(battery charge)
R06 Front blowerrelay
Front blower motor
R201 Trailer tow parklamp relay
Trailer tow 7– and 4–wireconnectors (park lamps)
R202 Foglamp relay Front foglampsR203 PCM relay Fuse 32, Fuse 34, PCM solenoids
and sensorsR301 Trailer tow
back-up lamprelay
Trailer tow 7–wire connector(back-up lamps)
R302 Heated PCVvalve relay
Heated PCV valve
R303 Fuel pump relay Fuel pump shut-off switch, PCM(fuel pump monitor), Fuel pump,Fuel pump driver module
R304 Battery saverrelay
Roof rail lamps, Vanity mirrorlamps, Map/Dome lamp, Glove boxlamp, Cargo area lamp, Outsidemirror puddle lamps, Instrumentcluster (interior lamps)
R305 Horn relay Dual note horn* Mini Fuses ** Maxi Fuses
Note: Relays R301–R305 are not serviceable components; see yourauthorized dealer for assistance.
2006 Navigator (nav)Owners Guide (post-2002-fmt)USA (fus)
Roadside Emergencies
314
CHANGING THE TIRESIf you get a flat tire while driving, do not apply the brake heavily.Instead, gradually decrease your speed. Hold the steering wheel firmlyand slowly move to a safe place on the side of the road.Your vehicle may be equipped with a conventional spare tire that isdifferent in one or more of the following: type, brand, size, speed ratingand tread design. If this is the case, this dissimilar spare tire is still ratedfor your vehicle loads (GAWR and GVWR). Your vehicle may be equippedwith a spare wheel that may not match the road wheels and is notequipped with a Tire Pressure Monitor System (TPMS) sensor.
The use of tire sealants may damage your tires. The use of tiresealants may also damage your Tire Pressure Monitoring System.
If your vehicle is equipped with a Tire Pressure MonitoringSystem, refer to Tire Pressure Monitoring System (TPMS) in
the Tires, Wheels and Loading chapter for important information. Ifthe tire pressure monitor sensor becomes damaged, it will no longerfunction.
Dissimilar spare tire/wheel information (if equipped)
Failure to follow these guidelines could result in an increasedrisk of loss of vehicle control, injury or death.
Your vehicle may be equipped with a dissimilar spare tire/wheel. Adissimilar spare tire/wheel is defined as a spare tire and/or wheel that isdifferent in brand, size or appearance from the road tires and wheels. Ifyou have a dissimilar spare tire/wheel, then it is intended for temporaryuse only. This means that if you need to use it, you should replace it assoon as possible with a road tire/wheel that is the same size and type asthe road tires and wheels that were originally provided by Ford. If thedissimilar spare tire or wheel is damaged, it should be replaced ratherthan repaired.When driving with the dissimilar spare tire/wheel, do not:
• Exceed 70 mph (113 km/h)• Use more than one dissimilar spare tire/wheel at a time
• Use commercial car washing equipment
• Use snow chains on the end of the vehicle with the dissimilar sparetire/wheel
2006 Navigator (nav)Owners Guide (post-2002-fmt)USA (fus)
Roadside Emergencies
315

The usage of a dissimilar spare tire/wheel can lead to impairment of thefollowing:
• Handling, stability and braking performance
• Comfort and noise
• Ground clearance and parking at curbs
• Winter weather driving capability
• Wet weather driving capability
• All-Wheel driving capability (if applicable)
• Load leveling adjustment (if applicable)
When driving with the dissimilar spare tire/wheel additional cautionshould be given to:
• Towing a trailer
• Driving vehicles equipped with a camper body
• Driving vehicles with a load on the cargo rack
Drive cautiously when using a dissimilar spare tire/wheel and seekservice as soon as possible.
Spare tire informationNote: If your vehicle is equipped with the tire pressure monitoringsystem (TPMS), the system indicator light will illuminate when the spareis in use. To restore the full functionality of the TPMS system, all roadwheels equipped with the tire pressure monitoring sensors must bemounted on the vehicle
If your vehicle is equipped with TPMS, have a flat tire serviced by anauthorized dealer in order to prevent damage to the TPMS sensor, referto Tire Pressure Monitoring System (TPMS) in the Tires, Wheels andLoading chapter. Replace the spare tire with a road tire as soon aspossible.
2006 Navigator (nav)Owners Guide (post-2002-fmt)USA (fus)
Roadside Emergencies
316
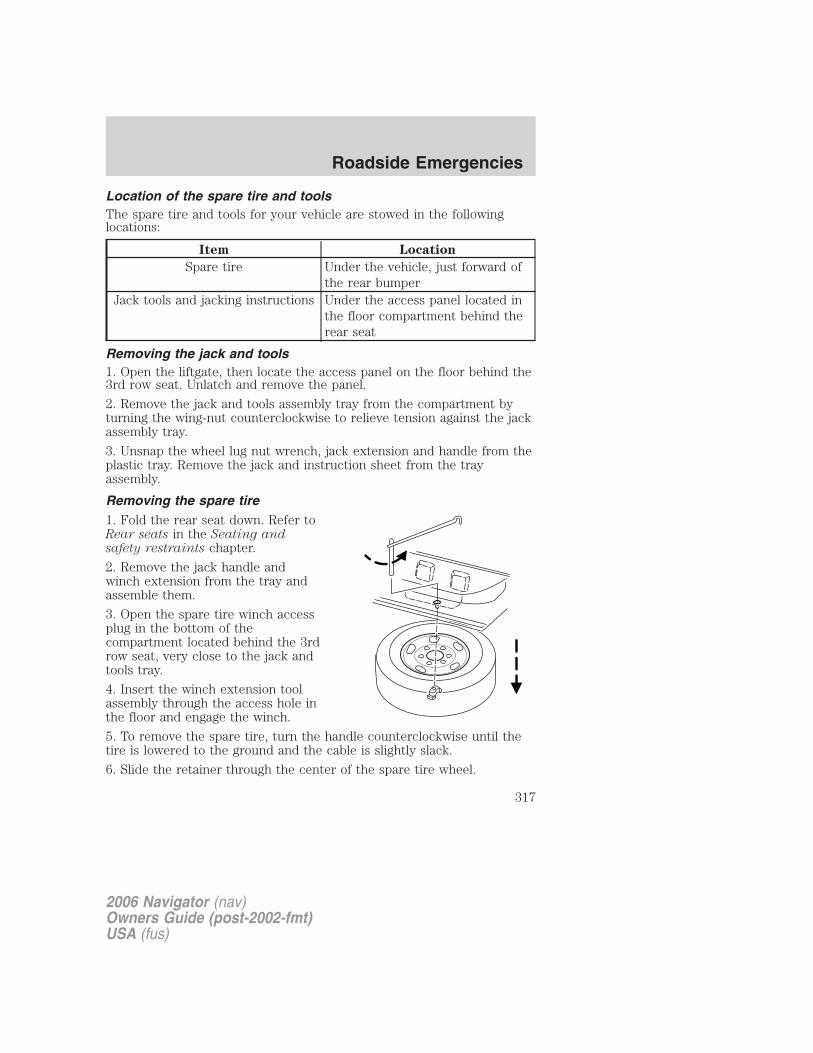
Location of the spare tire and toolsThe spare tire and tools for your vehicle are stowed in the followinglocations:
Item Location
Spare tire Under the vehicle, just forward ofthe rear bumper
Jack tools and jacking instructions Under the access panel located inthe floor compartment behind therear seat
Removing the jack and tools1. Open the liftgate, then locate the access panel on the floor behind the3rd row seat. Unlatch and remove the panel.
2. Remove the jack and tools assembly tray from the compartment byturning the wing-nut counterclockwise to relieve tension against the jackassembly tray.
3. Unsnap the wheel lug nut wrench, jack extension and handle from theplastic tray. Remove the jack and instruction sheet from the trayassembly.
Removing the spare tire1. Fold the rear seat down. Refer toRear seats in the Seating andsafety restraints chapter.
2. Remove the jack handle andwinch extension from the tray andassemble them.
3. Open the spare tire winch accessplug in the bottom of thecompartment located behind the 3rdrow seat, very close to the jack andtools tray.
4. Insert the winch extension toolassembly through the access hole inthe floor and engage the winch.
5. To remove the spare tire, turn the handle counterclockwise until thetire is lowered to the ground and the cable is slightly slack.
6. Slide the retainer through the center of the spare tire wheel.
2006 Navigator (nav)Owners Guide (post-2002-fmt)USA (fus)
Roadside Emergencies
317
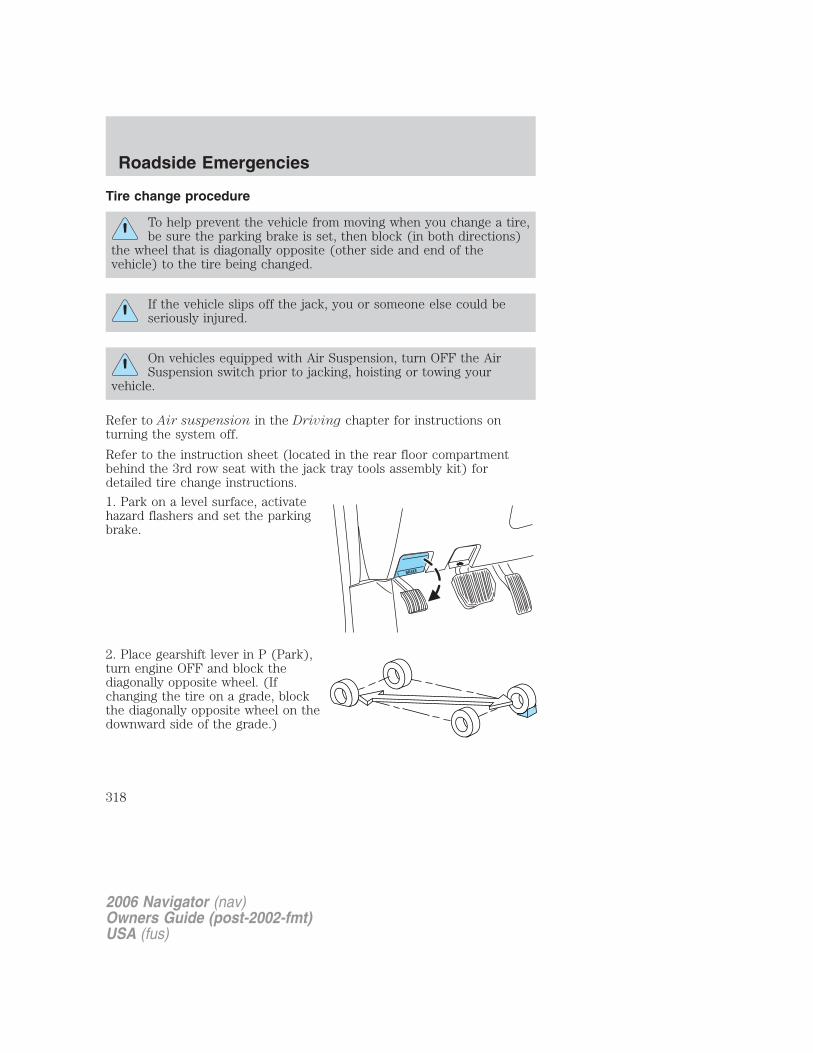
Tire change procedure
To help prevent the vehicle from moving when you change a tire,be sure the parking brake is set, then block (in both directions)
the wheel that is diagonally opposite (other side and end of thevehicle) to the tire being changed.
If the vehicle slips off the jack, you or someone else could beseriously injured.
On vehicles equipped with Air Suspension, turn OFF the AirSuspension switch prior to jacking, hoisting or towing your
vehicle.
Refer to Air suspension in the Driving chapter for instructions onturning the system off.
Refer to the instruction sheet (located in the rear floor compartmentbehind the 3rd row seat with the jack tray tools assembly kit) fordetailed tire change instructions.
1. Park on a level surface, activatehazard flashers and set the parkingbrake.
2. Place gearshift lever in P (Park),turn engine OFF and block thediagonally opposite wheel. (Ifchanging the tire on a grade, blockthe diagonally opposite wheel on thedownward side of the grade.)
2006 Navigator (nav)Owners Guide (post-2002-fmt)USA (fus)
Roadside Emergencies
318

3. Obtain the spare tire and jackfrom their storage locations. Turnoff the air suspension switch (theair suspension switch is locatedbehind a trim panel on the left rearquarter trim panel. Refer to AirSuspension System in the Drivingsection for more information.). Also,turn OFF the deployable runningboards (if equipped. See Messagecenter in the Driver controlssection).
4. Use the tip of the jack handle toremove any wheel trim. Loosen eachwheel lug nut one-half turncounterclockwise but do not removethem until the wheel is raised offthe ground.
5. Position the jack according to thejack locator arrows found on theframe and turn the jack handle andextension tool assembly clockwise.Note: Use the frame rail as thejacking point, NOT the control arm.
6. Lift the vehicle so the tire is nofurther than 1 inch (2.5 cm) off theground when installing the spare tire.
2006 Navigator (nav)Owners Guide (post-2002-fmt)USA (fus)
Roadside Emergencies
319
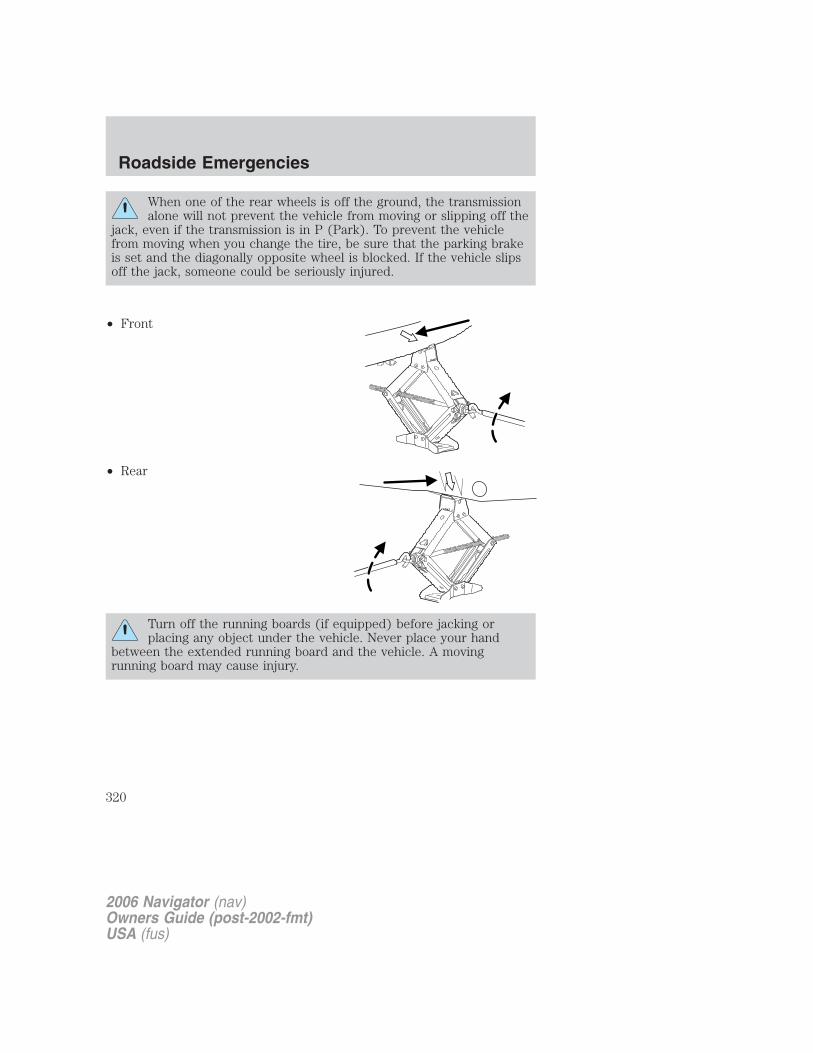
When one of the rear wheels is off the ground, the transmissionalone will not prevent the vehicle from moving or slipping off the
jack, even if the transmission is in P (Park). To prevent the vehiclefrom moving when you change the tire, be sure that the parking brakeis set and the diagonally opposite wheel is blocked. If the vehicle slipsoff the jack, someone could be seriously injured.
• Front
• Rear
Turn off the running boards (if equipped) before jacking orplacing any object under the vehicle. Never place your hand
between the extended running board and the vehicle. A movingrunning board may cause injury.
2006 Navigator (nav)Owners Guide (post-2002-fmt)USA (fus)
Roadside Emergencies
320
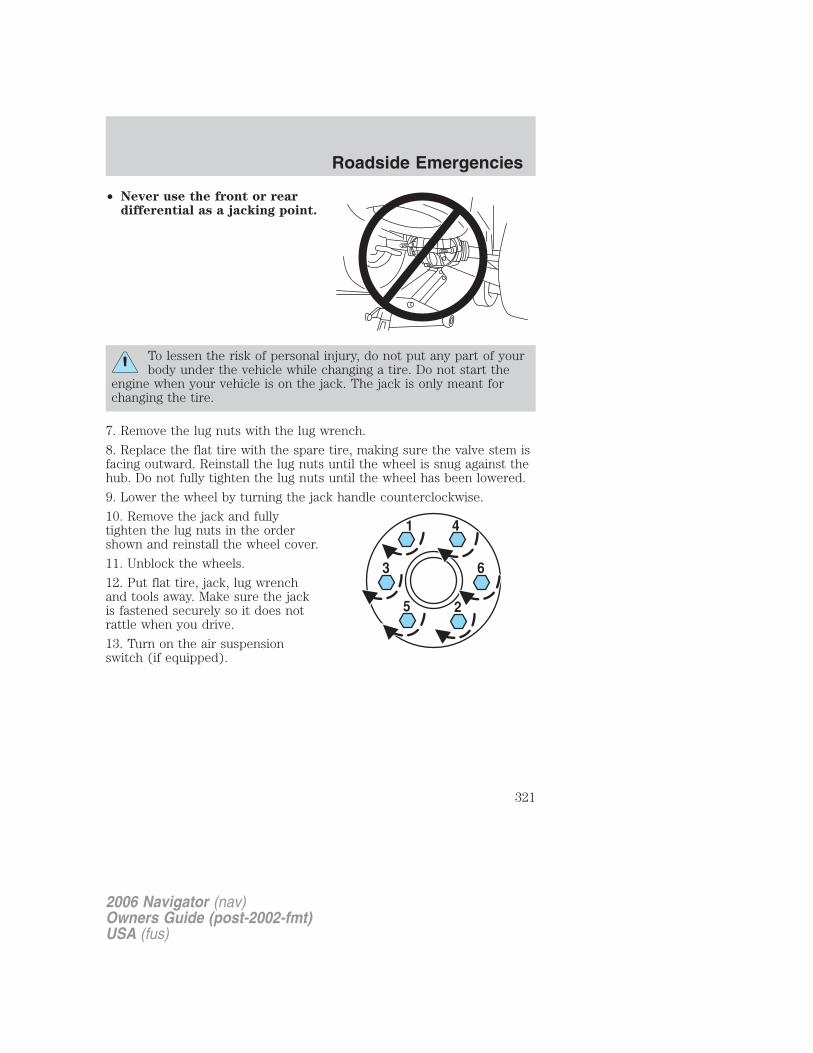
• Never use the front or reardifferential as a jacking point.
To lessen the risk of personal injury, do not put any part of yourbody under the vehicle while changing a tire. Do not start the
engine when your vehicle is on the jack. The jack is only meant forchanging the tire.
7. Remove the lug nuts with the lug wrench.
8. Replace the flat tire with the spare tire, making sure the valve stem isfacing outward. Reinstall the lug nuts until the wheel is snug against thehub. Do not fully tighten the lug nuts until the wheel has been lowered.
9. Lower the wheel by turning the jack handle counterclockwise.
10. Remove the jack and fullytighten the lug nuts in the ordershown and reinstall the wheel cover.
11. Unblock the wheels.
12. Put flat tire, jack, lug wrenchand tools away. Make sure the jackis fastened securely so it does notrattle when you drive.
13. Turn on the air suspensionswitch (if equipped).
2006 Navigator (nav)Owners Guide (post-2002-fmt)USA (fus)
Roadside Emergencies
321

Stowing the spare tire
1. Lay the tire on the ground, near the rear of the vehicle, with the valvestem side facing up.
2. Slide the wheel partially underthe vehicle and install the retainerthrough the wheel center. Afterdoing so, pull on the cable to alignthe components at the end of thecable.
3. Assemble the jack handle andwinch extension (as shown inillustration), then insert the winchextension through the access holebehind the 3rd row seat and engagethe winch.
4. Turn the jack handle clockwiseuntil the tire is raised to its stowedposition underneath the vehicle. Thewrench will become harder to turn and the spare tire winch will ratchetor slip when the tire is raised to maximum tightness. A clicking soundwill be heard from the winch indicating that the tire is properly stowed.
5. Disassemble the tools and snap them back into the tool tray. Close theaccess hole with the rubber plug. Reinstall the tray into the vehicle andsecure it with the wing nut (turn clockwise until tight).
WHEEL LUG NUT TORQUE SPECIFICATIONS
Retighten the lug nuts to the specified torque at 500 miles (800 km)after any wheel disturbance (tire rotation, changing a flat tire, wheelremoval, etc.).
Bolt size Wheel lug nut torque*
lb.ft. N•m
M14 x 2.0 150 200* Torque specifications are for nut and bolt threads free of dirt andrust. Use only Ford recommended replacement fasteners.
2006 Navigator (nav)Owners Guide (post-2002-fmt)USA (fus)
Roadside Emergencies
322

When a wheel is installed, always remove any corrosion, dirt orforeign materials present on the mounting surfaces of the wheel
or the surface of the wheel hub, brake drum or brake disc thatcontacts the wheel. Ensure that any fasteners that attach the rotor tothe hub are secured so they do not interfere with the mountingsurfaces of the wheel. Installing wheels without correct metal-to-metalcontact at the wheel mounting surfaces can cause the wheel nuts toloosen and the wheel to come off while the vehicle is in motion,resulting in loss of control.
JUMP STARTING
The gases around the battery can explode if exposed to flames,sparks, or lit cigarettes. An explosion could result in injury or
vehicle damage.
Batteries contain sulfuric acid which can burn skin, eyes andclothing, if contacted.
Do not attempt to push-start your vehicle. Automatictransmissions do not have push-start capability; doing so maydamage the catalytic converter.
Preparing your vehicleWhen the battery is disconnected or a new battery is installed, thetransmission must relearn its shift strategy. As a result, the transmissionmay have firm and/or soft shifts. This operation is considered normal andwill not affect function or durability of the transmission. Over time, theadaptive learning process will fully update transmission operation.1. Use only a 12–volt supply to start your vehicle.
2. Do not disconnect the battery of the disabled vehicle as this coulddamage the vehicle’s electrical system.3. Park the booster vehicle close to the hood of the disabled vehiclemaking sure the two vehicles do not touch. Set the parking brake onboth vehicles and stay clear of the engine cooling fan and other movingparts.4. Check all battery terminals and remove any excessive corrosion beforeyou attach the battery cables. Ensure that vent caps are tight and level.5. Turn the heater fan on in both vehicles to protect any electricalsurges. Turn all other accessories off.
2006 Navigator (nav)Owners Guide (post-2002-fmt)USA (fus)
Roadside Emergencies
323
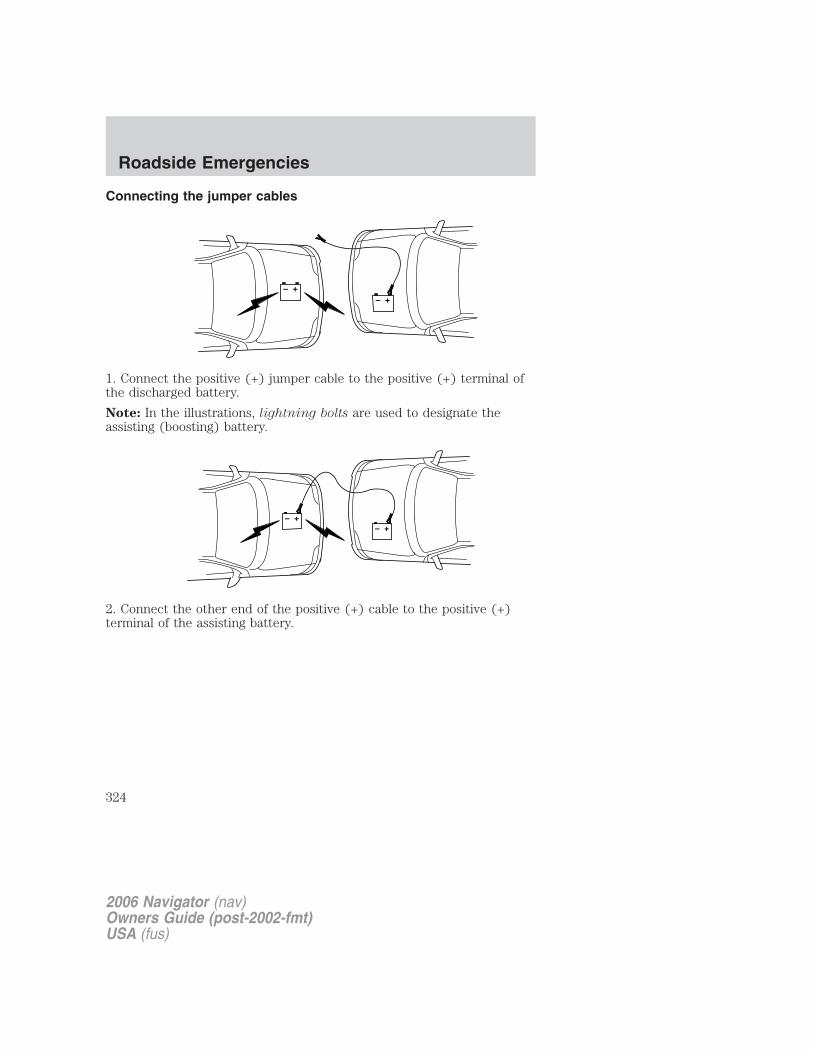
Connecting the jumper cables
1. Connect the positive (+) jumper cable to the positive (+) terminal ofthe discharged battery.
Note: In the illustrations, lightning bolts are used to designate theassisting (boosting) battery.
2. Connect the other end of the positive (+) cable to the positive (+)terminal of the assisting battery.
+–
+–
+–+–
2006 Navigator (nav)Owners Guide (post-2002-fmt)USA (fus)
Roadside Emergencies
324

3. Connect the negative (-) cable to the negative (-) terminal of theassisting battery.
4. Make the final connection of the negative (-) cable to the jumpstarting stud located in the rear of the engine compartment, near thebattery. Do not use fuel lines, engine rocker covers or the intakemanifold as grounding points.
+–
+–
+–
+–
2006 Navigator (nav)Owners Guide (post-2002-fmt)USA (fus)
Roadside Emergencies
325
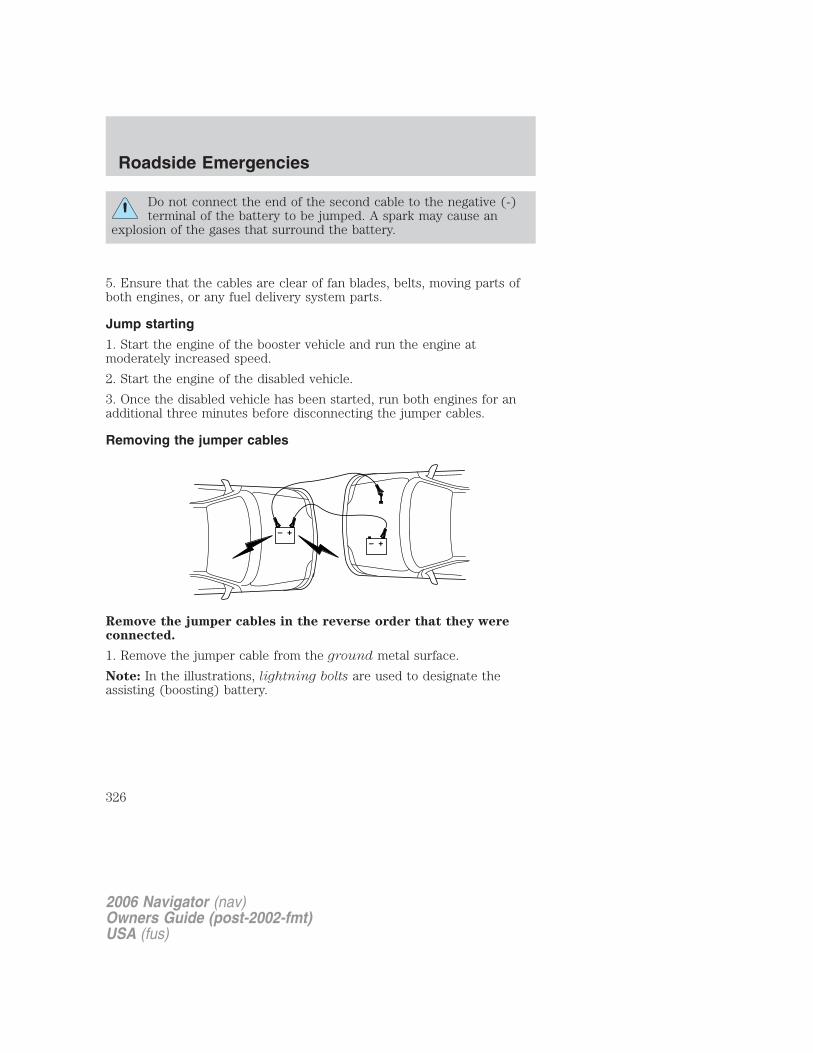
Do not connect the end of the second cable to the negative (-)terminal of the battery to be jumped. A spark may cause an
explosion of the gases that surround the battery.
5. Ensure that the cables are clear of fan blades, belts, moving parts ofboth engines, or any fuel delivery system parts.
Jump starting
1. Start the engine of the booster vehicle and run the engine atmoderately increased speed.
2. Start the engine of the disabled vehicle.
3. Once the disabled vehicle has been started, run both engines for anadditional three minutes before disconnecting the jumper cables.
Removing the jumper cables
Remove the jumper cables in the reverse order that they wereconnected.
1. Remove the jumper cable from the ground metal surface.
Note: In the illustrations, lightning bolts are used to designate theassisting (boosting) battery.
+–
+–
2006 Navigator (nav)Owners Guide (post-2002-fmt)USA (fus)
Roadside Emergencies
326

2. Remove the jumper cable on the negative (-) connection of thebooster vehicle’s battery.
3. Remove the jumper cable from the positive (+) terminal of the boostervehicle’s battery.
+–
+–
+–
+–
2006 Navigator (nav)Owners Guide (post-2002-fmt)USA (fus)
Roadside Emergencies
327
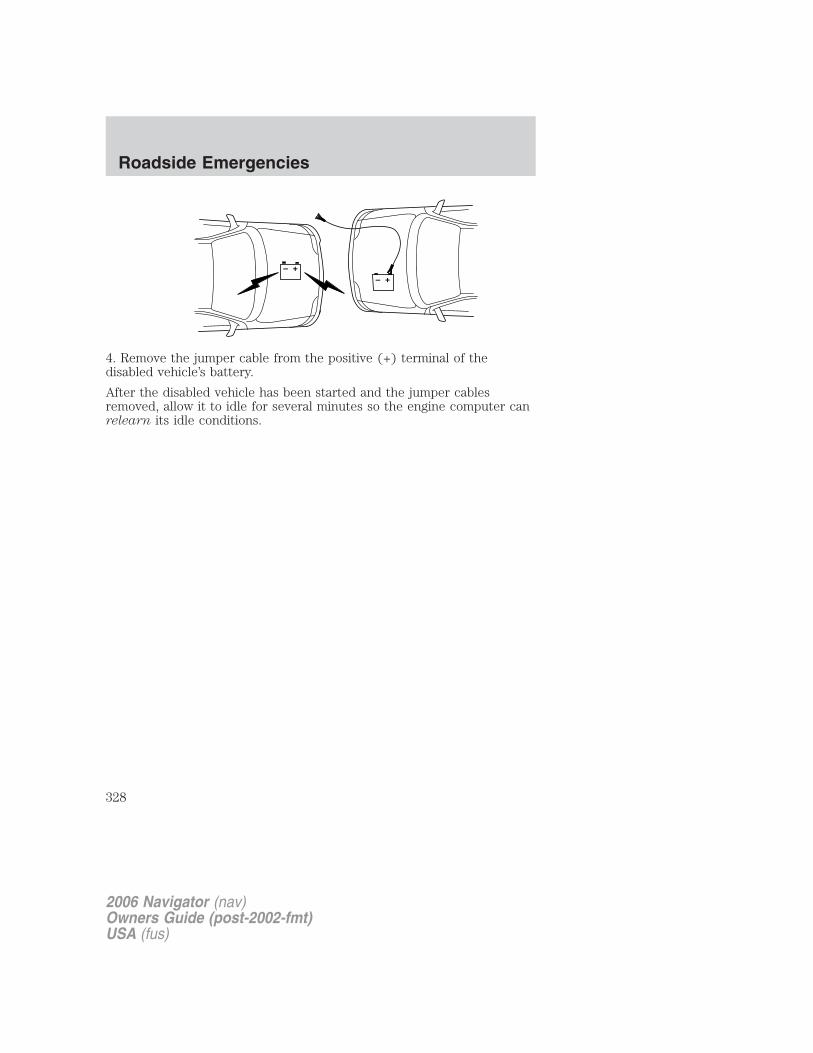
4. Remove the jumper cable from the positive (+) terminal of thedisabled vehicle’s battery.
After the disabled vehicle has been started and the jumper cablesremoved, allow it to idle for several minutes so the engine computer canrelearn its idle conditions.
+–
+–
2006 Navigator (nav)Owners Guide (post-2002-fmt)USA (fus)
Roadside Emergencies
328
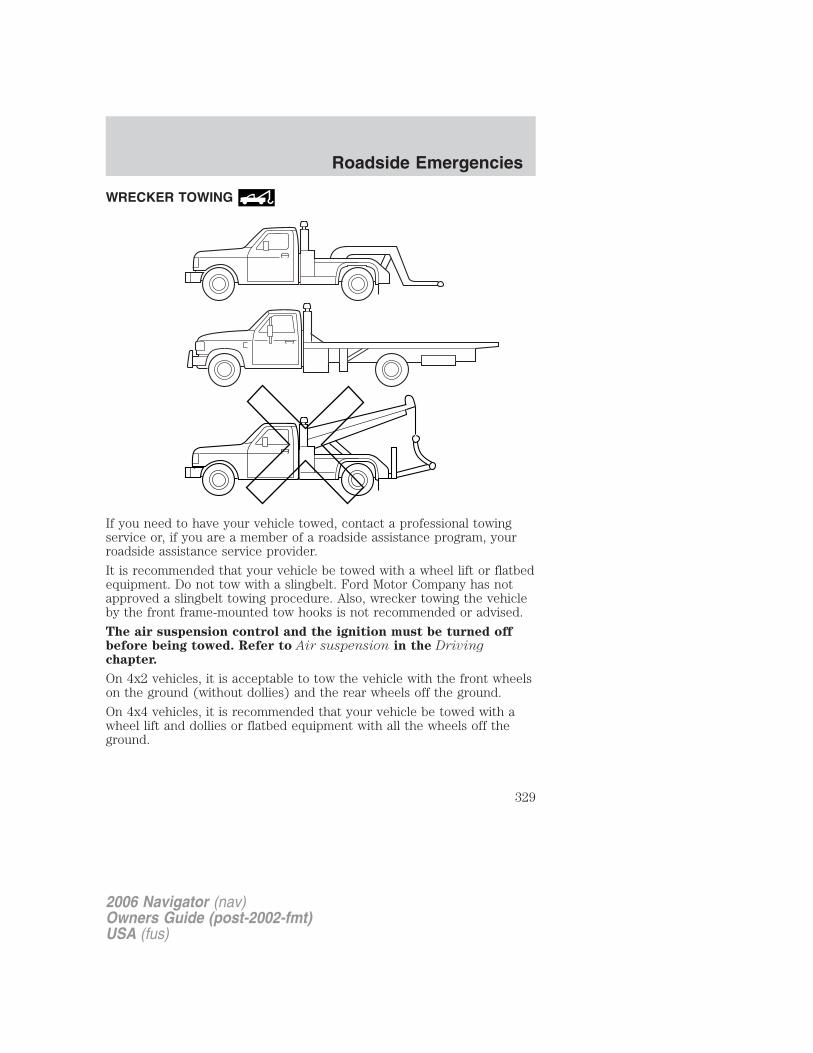
WRECKER TOWING
If you need to have your vehicle towed, contact a professional towingservice or, if you are a member of a roadside assistance program, yourroadside assistance service provider.
It is recommended that your vehicle be towed with a wheel lift or flatbedequipment. Do not tow with a slingbelt. Ford Motor Company has notapproved a slingbelt towing procedure. Also, wrecker towing the vehicleby the front frame-mounted tow hooks is not recommended or advised.
The air suspension control and the ignition must be turned offbefore being towed. Refer to Air suspension in the Drivingchapter.
On 4x2 vehicles, it is acceptable to tow the vehicle with the front wheelson the ground (without dollies) and the rear wheels off the ground.
On 4x4 vehicles, it is recommended that your vehicle be towed with awheel lift and dollies or flatbed equipment with all the wheels off theground.
2006 Navigator (nav)Owners Guide (post-2002-fmt)USA (fus)
Roadside Emergencies
329
If the vehicle is towed by other means or incorrectly, vehicledamage may occur.
With a disabled vehicle (without access to wheel dollies, car haulingtrailer or flatbed transport vehicle) your vehicle can be towed (all wheelson the ground) under the following conditions:
Special Conditions:
• Release the parking brake.
• Turn the air suspension control to OFF.
• Turn the ignition to the OFF/UNLOCKED position.
• Place the transmission in N (Neutral).
If the vehicle’s battery is discharged, refer to Automatic transmissionoperation in the Driving chapter for directions on how to move thegearshift lever out of the P (Park) position, for proper towing.
• Do not exceed a distance of 50 miles (80 km).
• Do not exceed 35 mph (56 km/h) vehicle speed.
Ford Motor Company produces a towing manual for all authorized towtruck operators. Have your tow truck operator refer to this manual forproper hook-up and towing procedures for your vehicle.
2006 Navigator (nav)Owners Guide (post-2002-fmt)USA (fus)
Roadside Emergencies
330
GETTING THE SERVICES YOU NEED
At homeYou must take your Lincoln or Mercury vehicle to an authorized dealerfor warranty repairs. While any authorized dealer handling your vehicleline will provide warranty service, we recommend you return to yourselling authorized dealer who wants to ensure your continuedsatisfaction. Please note that certain warranty repairs require specialtraining and/or equipment, so not all authorized dealers are authorized toperform all warranty repairs. This means that, depending on thewarranty repair needed, you may have to take your vehicle to anotherauthorized dealer. A reasonable time must be allowed to perform a repairafter taking your vehicle to the authorized dealer. Repairs will be madeusing Ford or Motorcraft parts, or remanufactured or other parts that areauthorized by Ford.
If you have questions or concerns, or are unsatisfied with the service youare receiving, follow these steps:
1. Contact your Sales Representative or Service Advisor at yourselling/servicing authorized dealer.
2. If your inquiry or concern remains unresolved, contact the SalesManager, Service Manager or Customer Relations Manager.
3. If you require assistance or clarification on Ford Motor Companypolicies or procedures, please contact the Lincoln Mercury CustomerRelationship Center at 1-800-521-4140.
Away from homeIf you own a Ford or Mercury vehicle and are away from home whenyour vehicle needs service, or if you need more help than the authorizeddealer could provide, after following the steps described above, contactthe Ford Customer Relationship Center to find an authorized dealer tohelp you.
In the United States:
Ford Motor CompanyCustomer Relationship CenterP.O. Box 6248Dearborn, MI 481211-800-392-3673 (FORD)(TDD for the hearing impaired: 1-800-232-5952)www.customersaskford.com
2006 Navigator (nav)Owners Guide (post-2002-fmt)USA (fus)
Customer Assistance
331

In Canada:Customer Relationship CentreFord Motor Company of Canada, LimitedP.O. Box 2000Oakville, Ontario L6J 5E41-800-565-3673 (FORD)www.ford.caIf you own a Lincoln vehicle and are away from home when your vehicleneeds service, or if you need more help than the authorized dealer couldprovide, after following the steps described above, contact the FordCustomer Relationship Center to find an authorized dealer to help you.
In the United States:Ford Motor CompanyCustomer Relationship CenterP.O. Box 6248Dearborn, MI 481211-800-521-4140(TDD for the hearing impaired: 1-800-232-5952)www.customersaskford.com
In Canada:Lincoln CentreFord Motor Company of Canada, LimitedP.O. Box 2000Oakville, Ontario L6J 5E41-800-387-9333www.lincolncanada.com
In order to help you service your Lincoln vehicle, please have thefollowing information available when contacting the Lincoln Centre:
• Your telephone number (home and business)
• The name of the authorized dealer and the city where the authorizeddealer is located
• The year and make of your vehicle
• The date of vehicle purchase
• The current odometer reading
• The vehicle identification number (VIN)
Additional AssistanceIf you still have a complaint involving a warranty dispute, you may wishto contact the Dispute Settlement Board (U.S.).
2006 Navigator (nav)Owners Guide (post-2002-fmt)USA (fus)
Customer Assistance
332

In some states (in the U.S.) you must directly notify Ford in writingbefore pursuing remedies under your state’s warranty laws. Ford is alsoallowed a final repair attempt in some states.In the United States, a warranty dispute must be submitted to theDispute Settlement Board before taking action under the Magnuson-MossWarranty Act, or to the extent allowed by state law, before pursuingreplacement or repurchase remedies provided by certain state laws. Thisdispute handling procedure is not required prior to enforcing statecreated rights or other rights which are independent of theMagnuson-Moss Warranty Act or state replacement or repurchase laws.
IN CALIFORNIA (U.S. ONLY)California Civil Code Section 1793.2(d) requires that, if a manufactureror its representative is unable to repair a motor vehicle to conform to thevehicle’s applicable express warranty after a reasonable number ofattempts, the manufacturer shall be required to either replace thevehicle with one substantially identical or repurchase the vehicle andreimburse the buyer in an amount equal to the actual price paid orpayable by the consumer (less a reasonable allowance for consumeruse). The consumer has the right to choose whether to receive a refundor replacement vehicle.
California Civil Code Section 1793.22(b) presumes that the manufacturerhas had a reasonable number of attempts to conform the vehicle to itsapplicable express warranties if, within the first 18 months of ownershipof a new vehicle or the first 18,000 miles (29,000 km), whichever occursfirst:
1. Two or more repair attempts are made on the same non-conformitylikely to cause death or serious bodily injury OR
2. Four or more repair attempts are made on the same nonconformity (adefect or condition that substantially impairs the use, value or safety ofthe vehicle) OR
3. The vehicle is out of service for repair of nonconformities for a total ofmore than 30 calendar days (not necessarily all at one time)
In the case of 1 or 2 above, the consumer must also notify themanufacturer of the need for the repair of the nonconformity at thefollowing address:
Ford Motor Company16800 Executive Plaza DriveMail Drop 3NE-BDearborn, MI 48126
2006 Navigator (nav)Owners Guide (post-2002-fmt)USA (fus)
Customer Assistance
333
THE DISPUTE SETTLEMENT BOARD (U.S. ONLY)
The Dispute Settlement Board is:
• an independent, third-party arbitration program for warranty disputes.
• available free to owners and lessees of qualifying Ford Motor Companyvehicles.
The Dispute Settlement Board may not be available in all states. FordMotor Company reserves the right to change eligibility limitations, modifyprocedures and/or to discontinue this service without notice and withoutincurring obligations per applicable state law.
What kinds of cases does the Board review?Unresolved warranty repair concerns or vehicle performance concerns ason Ford and Lincoln Mercury cars and Ford and Lincoln Mercury lighttrucks which are within the terms of any applicable written new vehiclewarranty are eligible for review, except those involving:
• a non-Ford product
• a non-authorized dealership
• sales disputes between customer and authorized dealer except thoseassociated with warranty repairs or concerns with the vehicle’sperformance as designed
• a request for reimbursement of consequential expenses unless aservice or product concern is being reviewed
• items not covered by the New Vehicle Limited Warranty (includingmaintenance and wear items)
• alleged personal injury/property damage claims
• cases currently in litigation
• vehicles not used primarily for family, personal or household purposes(except in states where the Dispute Settlement Board is required toreview commercial vehicles)
• vehicles with non-U.S. warranties
Concerns are ineligible for review if the New Vehicle Limited Warrantyhas expired at receipt of your application and, in certain states eligibilityis dependent upon the customer’s possession of the vehicle.
Eligibility may differ according to state law. For example, see the uniquebrochures for California, West Virginia, Georgia and Wisconsinpurchasers/lessees.
2006 Navigator (nav)Owners Guide (post-2002-fmt)USA (fus)
Customer Assistance
334
Board membershipThe Board consists of:• Three consumer representatives• An authorized dealer representativeConsumer candidates for Board membership are recruited and trained byan independent consulting firm. The dealership Board member is chosenfrom authorized dealer management, recognized for their businessleadership qualities.
What the Board needsTo have your case reviewed you must complete the application in theDSB brochure and mail it to the address provided on the applicationform. Some states will require you to use certified mail, with returnreceipt requested.Your application is reviewed and, if it is determined to be eligible, youwill receive an acknowledgment indicating:• The file number assigned to your application.• The toll-free phone number of the DSB’s independent administrator.Your authorized dealer and a Ford Motor Company representative willthen be asked to submit statements.To properly review your case, the Board needs the following information:• Legible copies of all documents and maintenance or repair orders
relevant to the case.• The year, make, model, and Vehicle Identification Number (VIN) listed
on your vehicle ownership license.• The date of repair(s) and mileage at the time of occurrence(s).
• The current mileage.
• The name of the authorized dealer(s) who sold or serviced thevehicle.
• A brief description of your unresolved concern.
• A brief summary of the action taken by the authorized dealer(s) andFord Motor Company.
• The names (if known) of all the people you contacted at theauthorized dealer(s).
• A description of the action you expect to resolve your concern.
You will receive a letter of explanation if your application does notqualify for Board review.
2006 Navigator (nav)Owners Guide (post-2002-fmt)USA (fus)
Customer Assistance
335
Oral presentationsIf you would like to make an oral presentation, indicate YES to question6 on the application. While it is your right to make an oral presentationbefore the Board, this is not a requirement and the Board will decide thecase whether or not an oral presentation is made. An oral presentationmay be requested by the Board as well.
Making a decisionBoard members review all available information related to eachcomplaint, including oral presentations, and arrive at a fair and impartialdecision. Board review may be terminated at any time by either party.
Every effort is made to decide the case within 40 days of the date thatall requested information is received by the Board. Since the Boardgenerally meets once a month, it may take longer for the Board toconsider some cases.
After a case is reviewed, the Board mails you a decision letter and aform on which to accept or reject the Board’s decision. The decisions ofthe Board are binding on Ford (and, in some cases, on the authorizeddealer) but not on consumers who are free to pursue other remediesavailable to them under state or federal law.
To request a DSB Brochure/ApplicationFor a brochure/application, speak to your authorized dealer or write/callthe Board at the following address/phone number:
Dispute Settlement BoardP.O. Box 1424Waukesha, WI 53187–14241–800–428–3718
You may also contact the North American Customer Relationship Centerat 1-800-392-3673 (Ford), TDD for the hearing impaired: 1-800-232-5952or by writing to the Center at the following address:
Ford Motor CompanyCustomer Relationship CenterP.O. Box 6248Dearborn, Michigan 48121
2006 Navigator (nav)Owners Guide (post-2002-fmt)USA (fus)
Customer Assistance
336
UTILIZING THE MEDIATION/ARBITRATION PROGRAM(CANADA ONLY)For vehicles delivered to authorized Canadian dealers. In those caseswhere you continue to feel that the efforts by Ford of Canada and theauthorized dealer to resolve a factory-related vehicle service concernhave been unsatisfactory, Ford of Canada participates in an impartialthird party mediation/arbitration program administered by the CanadianMotor Vehicle Arbitration Plan (CAMVAP).The CAMVAP program is a straight-forward and relatively speedyalternative to resolve a disagreement when all other efforts to produce asettlement have failed. This procedure is without cost to you and isdesigned to eliminate the need for lengthy and expensive legalproceedings.In the CAMVAP program, impartial third-party arbitrators conducthearings at mutually convenient times and places in an informalenvironment. These impartial arbitrators review the positions of theparties, make decisions and, when appropriate, render awards to resolvedisputes. CAMVAP decisions are fast, fair, and final as the arbitrator’saward is binding both to you and Ford of Canada.
CAMVAP services are available in all territories and provinces. For moreinformation, without charge or obligation, call your CAMVAP ProvincialAdministrator directly at 1-800-207-0685.
FORD EXTENDED SERVICE PLANYou can get more protection for your new car or light truck bypurchasing Ford Extended Service Plan (Ford ESP) coverage. It providesthe following:
• Benefits during the warranty period depending on the plan youpurchase (such as: reimbursement for rentals; coverage for certainmaintenance and wear items).
• Protection against covered repair costs after your Bumper-to-BumperWarranty expires.
You may purchase Ford ESP from any participating authorized Canadiandealer. There are several plans available in various time, distance anddeductible combinations which can be tailored to fit your own drivingneeds. Ford ESP also offers reimbursement benefits for towing andrental coverage.
When you buy Ford ESP, you receive Peace-of-Mind protectionthroughout the United States and Canada, provided by a network ofmore than 4,600 participating authorized Canadian dealers.
2006 Navigator (nav)Owners Guide (post-2002-fmt)USA (fus)
Customer Assistance
337

If you did not take advantage of the Ford Extended Service Plan at thetime of purchasing your vehicle, you may still be eligible. Since thisinformation is subject to change, please ask your authorized dealer forcomplete details about Ford Extended Service Plan coverage options, orvisit the Ford ESP website at www.ford-esp.com.
GETTING ASSISTANCE OUTSIDE THE U.S. AND CANADABefore exporting your vehicle to a foreign country, contact theappropriate foreign embassy or consulate. These officials can inform youof local vehicle registration regulations and where to find unleaded fuel.
If you cannot find unleaded fuel or can only get fuel with an anti-knockindex lower than is recommended for your vehicle, contact a regionaloffice or owner relations/customer relationship office.
The use of leaded fuel in your vehicle without proper conversion maydamage the effectiveness of your emission control system and may causeengine knocking or serious engine damage. Ford Motor Company/Ford ofCanada is not responsible for any damage caused by use of improperfuel. Using leaded fuel may also result in difficulty importing your vehicleback into the U.S.
If your vehicle must be serviced while you are traveling or living inCentral America, the Caribbean, or the Middle East, contact the nearestauthorized dealer. If the authorized dealer cannot help you, write or call:
FORD MOTOR COMPANYWORLDWIDE DIRECT MARKET OPERATIONS1555 Fairlane DriveFairlane Business Park #3Allen Park, Michigan 48101U.S.A.Telephone: (313) 594-4857FAX: (313) 390-0804
If you are in another foreign country, contact the nearest authorizeddealer. If the authorized dealer employees cannot help you, they candirect you to the nearest Ford affiliate office.
If you buy your vehicle in North America and then relocate outside ofthe U.S. or Canada, register your vehicle identification number (VIN) andnew address with Ford Motor Company Worldwide Direct MarketOperations.
Customers in the U.S. should call 1–800–392–3673.
2006 Navigator (nav)Owners Guide (post-2002-fmt)USA (fus)
Customer Assistance
338
ORDERING ADDITIONAL OWNER’S LITERATURETo order the publications in this portfolio, contact Helm, Incorporated at:
HELM, INCORPORATEDP.O. Box 07150Detroit, Michigan 48207
Or call:
For a free publication catalog, order toll free: 1-800-782-4356
Monday-Friday 8:00 a.m. - 6:00 p.m. EST
Helm, Incorporated can also be reached by their website:www.helminc.com.
(Items in this catalog may be purchased by credit card, check ormoney order.)
Obtaining a French owner’s guideFrench Owner’s Guides can be obtained from your authorized dealer orby writing to Ford Motor Company of Canada, Limited, ServicePublications, P.O. Box 1580, Station B, Mississauga, Ontario L4Y 4G3.
REPORTING SAFETY DEFECTS (U.S. ONLY)If you believe that your vehicle hasa defect which could cause a crashor could cause injury or death, youshould immediately inform theNational Highway Traffic SafetyAdministration (NHTSA) in addition to notifying Ford Motor Company.
If NHTSA receives similar complaints, it may open an investigation, andif it finds that a safety defect exists in a group of vehicles, it may order arecall and remedy campaign. However, NHTSA cannot become involvedin individual problems between you, your dealer, or Ford MotorCompany.
To contact NHTSA, you may either call the Auto Safety Hotline toll-freeat 1–800–424–9393 (or 366–0123 in the Washington D.C. area) or writeto:
NHTSA400 Seventh StreetU.S. Department of TransportationWashington, D.C. 20590
You can also obtain other information about motor vehicle safety fromthe Hotline.
2006 Navigator (nav)Owners Guide (post-2002-fmt)USA (fus)
Customer Assistance
339
WASHING THE EXTERIORWash your vehicle regularly with cool or lukewarm water and a neutralpH shampoo, such as Motorcraft Detail Wash (ZC-3–A), which isavailable from your authorized dealer.• Never use strong household detergents or soap, such as dish washing
or laundry liquid. These products can discolor and spot paintedsurfaces.
• Never wash a vehicle that is “hot to the touch” or during exposure tostrong, direct sunlight.
• Always use a clean sponge or car wash mitt with plenty of water forbest results.
• Dry the vehicle with a chamois or soft terry cloth towel in order toeliminate water spotting.
• It is especially important to wash the vehicle regularly during thewinter months, as dirt and road salt are difficult to remove and causedamage to the vehicle.
• Immediately remove items such as gasoline, diesel fuel, bird droppingsand insect deposits because they can cause damage to the vehicle’spaintwork and trim over time.
• Remove any exterior accessories, such as antennas, before entering acar wash.
• Suntan lotions and insect repellents can damage any paintedsurface; if these substances come in contact with your vehicle,wash off as soon as possible.
• If your vehicle is equipped with running boards, do not userubber, plastic and vinyl protectant products on the runningboard surface, as the area may become slippery.
• If your vehicle is equipped with power deployable runningboards, you may experience noise while deploying the systemdue to excessive grit and grime buildup. While the system isunaffected by this buildup, it is important to wash the arearegularly in order to maintain the system’s optimal operation.
WAXINGApplying Motorcraft Paint Sealant (ZC-45) to your vehicle every sixmonths will assist in reducing minor scratches and paint damage.• Wash the vehicle first.• Do not use waxes that contain abrasives; use Motorcraft Premium
Liquid Wax (ZC-53-A), which is available from your authorized dealer,or an equivalent quality product.
2006 Navigator (nav)Owners Guide (post-2002-fmt)USA (fus)
Cleaning
340
• Do not allow paint sealant to come in contact with any non-body(low-gloss black) colored trim, such as grained body-side cladding,roof racks, bumper step surfaces, mirror housings or the windshieldcowl area. The paint sealant will “gray” or stain the parts over time.
PAINT CHIPSYour authorized dealer has touch-up paint and sprays to match yourvehicle’s color. Take your color code (printed on a sticker in the driver’sdoor jamb) to your authorized dealer to ensure you get the correct color.• Remove particles such as bird droppings, tree sap, insect deposits, tar
spots, road salt and industrial fallout before repairing paint chips.• Always read the instructions before using the products.
ALUMINUM WHEELS AND WHEEL COVERSAluminum wheels and wheel covers are coated with a clearcoat paintfinish. In order to maintain their shine:
• Clean weekly with Motorcraft Wheel and Tire Cleaner (ZC-37–A),which is available from your authorized dealer. Heavy dirt and brakedust accumulation may require agitation with a sponge. Rinsethoroughly with a strong stream of water.
• Never apply any cleaning chemical to hot or warm wheel rims orcovers.
• Some automatic car washes may cause damage to the finish on yourwheel rims or covers. Chemical-strength cleaners, or cleaningchemicals, in combination with brush agitation to remove brake dustand dirt, could wear away the clearcoat finish over time.
• Do not use hydrofluoric acid-based or high caustic-based wheelcleaners, steel wool, fuels or strong household detergent.
• To remove tar and grease, use Motorcraft Bug and Tar Remover(ZC-42), available from your authorized dealer.
ENGINEEngines are more efficient when they are clean because grease and dirtbuildup keep the engine warmer than normal. When washing:
• Take care when using a power washer to clean the engine. Thehigh-pressure fluid could penetrate the sealed parts and causedamage.
• Do not spray a hot engine with cold water to avoid cracking theengine block or other engine components.
2006 Navigator (nav)Owners Guide (post-2002-fmt)USA (fus)
Cleaning
341
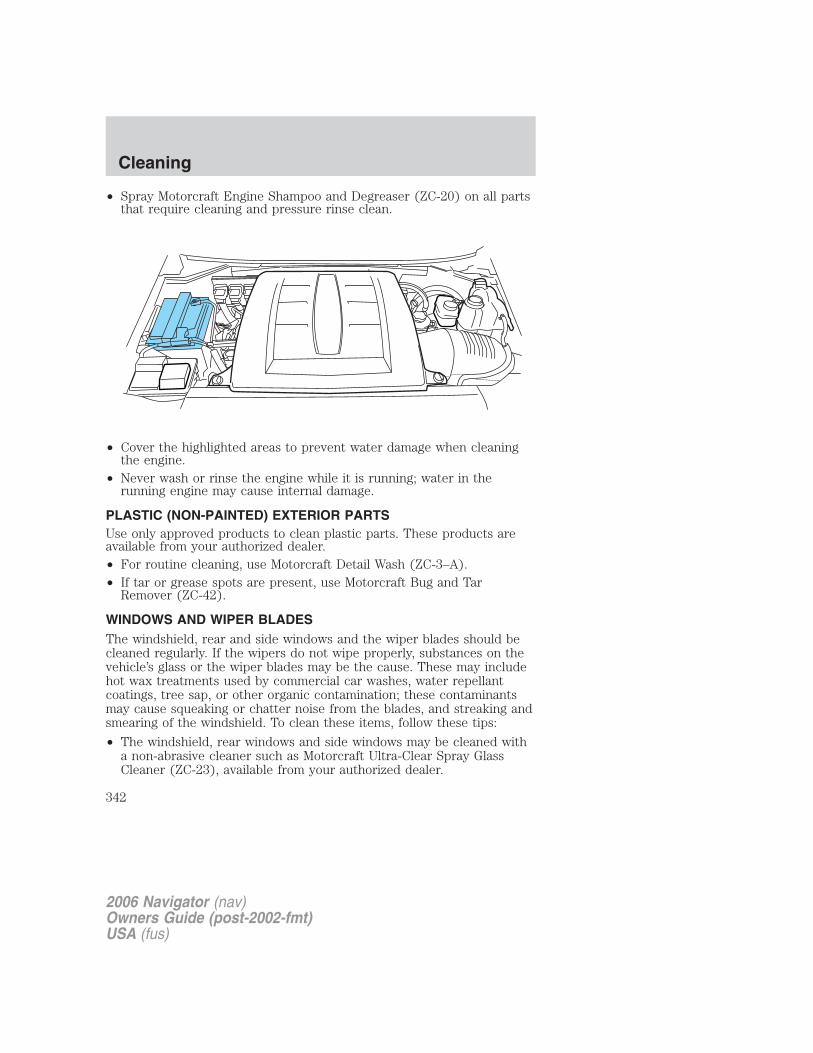
• Spray Motorcraft Engine Shampoo and Degreaser (ZC-20) on all partsthat require cleaning and pressure rinse clean.
• Cover the highlighted areas to prevent water damage when cleaningthe engine.
• Never wash or rinse the engine while it is running; water in therunning engine may cause internal damage.
PLASTIC (NON-PAINTED) EXTERIOR PARTSUse only approved products to clean plastic parts. These products areavailable from your authorized dealer.• For routine cleaning, use Motorcraft Detail Wash (ZC-3–A).• If tar or grease spots are present, use Motorcraft Bug and Tar
Remover (ZC-42).
WINDOWS AND WIPER BLADESThe windshield, rear and side windows and the wiper blades should becleaned regularly. If the wipers do not wipe properly, substances on thevehicle’s glass or the wiper blades may be the cause. These may includehot wax treatments used by commercial car washes, water repellantcoatings, tree sap, or other organic contamination; these contaminantsmay cause squeaking or chatter noise from the blades, and streaking andsmearing of the windshield. To clean these items, follow these tips:
• The windshield, rear windows and side windows may be cleaned witha non-abrasive cleaner such as Motorcraft Ultra-Clear Spray GlassCleaner (ZC-23), available from your authorized dealer.
2006 Navigator (nav)Owners Guide (post-2002-fmt)USA (fus)
Cleaning
342
• The wiper blades can be cleaned with Motorcraft Premium WindshieldWasher Concentrate (ZC-32–A), available from your authorized dealer.This washer fluid contains special solution in addition to alcohol whichhelps to remove the hot wax deposited on the wiper blade andwindshield from automated car wash facilities.
• Do not use abrasives, as they may cause scratches.• Do not use fuel, kerosene, or paint thinner to clean any parts.• Wiper blades can be cleaned with isopropyl (rubbing) alcohol or
windshield washer solution. Be sure to replace wiper blades when theyappear worn or do not function properly.
Do not use sharp objects, such as a razor blade, to clean theinside of the rear window or to remove decals, as it may causedamage to the rear window defroster’s heated grid lines.
INSTRUMENT PANEL AND CLUSTER LENSClean the instrument panel with a damp cloth, then with a clean, drycloth, or use Motorcraft Dash & Vinyl Cleaner (ZC-38-A).
• Avoid cleaners or polish that increase the gloss of the upper portion ofthe instrument panel. The dull finish in this area helps protect thedriver from undesirable windshield reflection.
Do not use chemical solvents or strong detergents when cleaningthe steering wheel or instrument panel to avoid contamination of
the air bag system.
• Be certain to wash or wipe your hands clean if you have been incontact with certain products such as insect repellent and suntanlotion in order to avoid possible damage to the interior paintedsurfaces.
INTERIORFor fabric, carpets, cloth seats and safety belts:
• Remove dust and loose dirt with a vacuum cleaner.
• Remove light stains and soil with Motorcraft Professional StrengthCarpet & Upholstery Cleaner (ZC-54).
• If grease or tar is present on the material, spot-clean the area firstwith Motorcraft Spot and Stain Remover (ZC-14).
• If a ring forms on the fabric after spot cleaning, clean the entire areaimmediately (but do not oversaturate) or the ring will set.
2006 Navigator (nav)Owners Guide (post-2002-fmt)USA (fus)
Cleaning
343
• Do not use household cleaning products or glass cleaners, which canstain and discolor the fabric and affect the flame retardant abilities ofthe seat materials.
Do not use cleaning solvents, bleach or dye on the vehicle’sseatbelts, as these actions may weaken the belt webbing.
CLEANING THE CLIMATE CONTROLLED SEATS (IF EQUIPPED)Remove dust and loose dirt with a whisk broom or a vacuum cleaner.Remove fresh spots immediately. Clean the seat with a damp cloth, usinga mild soap and water solution, if necessary.
LEATHER SEATSYour leather seating surfaces have a clear, protective coating over theleather.• To clean, use a soft cloth with Motorcraft Deluxe Leather and Vinyl
Cleaner (ZC-11–A). Dry the area with a soft cloth.• To help maintain its resiliency and color, use the Motorcraft Deluxe
Leather Care Kit (ZC-11–D), available from your authorized dealer.• Do not use household cleaning products, alcohol solutions, solvents or
cleaners intended for rubber, vinyl and plastics, or oil/petroleum-basedleather conditioners. These products may cause premature wearing ofthe clear, protective coating.
Note: In some instances, color or dye transfer can occur when wetclothing comes in contact with leather upholstery. If this occurs, theleather should be cleaned immediately to avoid permanent staining.
INTERIOR TRIM• Clean the interior trim areas with a damp cloth, then with a clean, dry
cloth; you may also use Motorcraft Dash & Vinyl Cleaner (ZC-38-A).
• Do not use household or glass cleaners as these may damage thefinish.
UNDERBODYFlush the complete underside of your vehicle frequently. Keep body anddoor drain holes free from packed dirt.
FORD AND LINCOLN MERCURY CAR CARE PRODUCTSYour Ford or Lincoln Mercury authorized dealer has many qualityproducts available to clean your vehicle and protect its finishes. These
2006 Navigator (nav)Owners Guide (post-2002-fmt)USA (fus)
Cleaning
344
quality products have been specifically engineered to fulfill yourautomotive needs; they are custom designed to complement the styleand appearance of your vehicle. Each product is made from high qualitymaterials that meet or exceed rigid specifications. For best results, usethe following products or products of equivalent quality:
Motorcraft Bug and Tar Remover (ZC-42)
Motorcraft Car Care Kit (ZC-26)
Motorcraft Car Wash (Canada only) (CXC-21)
Motorcraft Custom Bright Metal Cleaner (ZC-15)
Motorcraft Custom Clear Coat Polish (ZC–8–A)
Motorcraft Custom Vinyl Protectant (U.S. only) (ZC-40-A)
Motorcraft Dash and Vinyl Cleaner (ZC-38–A)
Motorcraft Deluxe Leather and Vinyl Cleaner (U.S. only) (ZC-11–A)
Motorcraft Detail Wash (ZC-3–A)
Motorcraft Dusting Cloth (ZC-24)
Motorcraft Engine Shampoo and Degreaser (U.S. only) (ZC-20)
Motorcraft Engine Shampoo (Canada only) (CXC-66-A)
Motorcraft One Step Wash and Wax Concentrate (ZC-6-A)
Motorcraft Paint Sealant (ZC-45)
Motorcraft Premium Car Wash Concentrate (U.S. only) (ZC-17-B)
Motorcraft Premium Glass Cleaner (Canada only) (CXC-100)
Motorcraft Premium Liquid Wax (ZC-53-A)
Motorcraft Premium Windshield Washer Concentrate (ZC-32–A)
Motorcraft Professional Strength Carpet & Upholstery Cleaner (ZC-54)
Motorcraft Spot and Stain Remover (U.S. only) (ZC-14)
Motorcraft Tire Clean and Shine (ZC-28)
Motorcraft Triple Clean (U.S. only) (ZC-13)
Motorcraft Ultra-Clear Spray Glass Cleaner (ZC-23)
Motorcraft Vinyl Cleaner (Canada only) (CXC-93)
Motorcraft Vinyl Conditioner (Canada only) (CXC-94)
Motorcraft Wheel and Tire Cleaner (ZC-37–A)
2006 Navigator (nav)Owners Guide (post-2002-fmt)USA (fus)
Cleaning
345
SERVICE RECOMMENDATIONS
To help you service your vehicle:
• We highlight do-it-yourself items in the engine compartment for easylocation.
• We provide scheduled maintenance information which makestracking routine service easy.
If your vehicle requires professional service, your authorized dealer canprovide the necessary parts and service. Check your WarrantyGuide/Owner Information Guide to find out which parts and servicesare covered.
Use only recommended fuels, lubricants, fluids and service partsconforming to specifications. Motorcraft parts are designed and built toprovide the best performance in your vehicle.
PRECAUTIONS WHEN SERVICING YOUR VEHICLE
• Do not work on a hot engine.
• Make sure that nothing gets caught in moving parts.
• Do not work on a vehicle with the engine running in an enclosedspace, unless you are sure you have enough ventilation.
• Keep all open flames and other lit material away from the battery andall fuel related parts.
Working with the engine off
1. Set the parking brake and shift to P (Park).
2. Turn off the engine and remove the key.
3. Block the wheels.
Working with the engine on
1. Set the parking brake and shift to P (Park).
2. Block the wheels.
Note: Do not start your engine with the air cleaner removed and do notremove it while the engine is running.
2006 Navigator (nav)Owners Guide (post-2002-fmt)USA (fus)
Maintenance and Specifications
346
OPENING THE HOOD
1. Inside the vehicle, pull the hoodrelease handle located under thebottom left corner of the instrumentpanel.
2. Go to the front of the vehicle andrelease the auxiliary latch locatedunder the front of the hood, justabove the passenger side headlamp.Slide the yellow handle to releasethe auxiliary latch.
3. Lift the hood until the liftcylinders hold it open.
2006 Navigator (nav)Owners Guide (post-2002-fmt)USA (fus)
Maintenance and Specifications
347
IDENTIFYING COMPONENTS IN THE ENGINE COMPARTMENT
5.4L 3V V8 engine
1. Battery
2. Air filter assembly (located under appearance cover)
3. Engine oil dipstick
4. Brake fluid reservoir
5. Power steering fluid reservoir
6. Engine coolant reservoir
7. Engine appearance cover
8. Engine oil filler cap
9. Windshield washer fluid reservoir
2006 Navigator (nav)Owners Guide (post-2002-fmt)USA (fus)
Maintenance and Specifications
348
WINDSHIELD WASHER FLUID
Add fluid to fill the reservoir if thelevel is low. In very cold weather, donot fill the reservoir completely.
Only use a washer fluid that meetsFord specification WSB-M8B16–A2.Do not use any special washer fluidsuch as windshield water repellenttype fluid or bug wash. They maycause squeaking, chatter noise,streaking and smearing. Refer toLubricant specifications in thischapter.
State or local regulations on volatile organic compounds may restrict theuse of methanol, a common windshield washer antifreeze additive.Washer fluids containing non-methanol antifreeze agents should be usedonly if they provide cold weather protection without damaging thevehicle’s paint finish, wiper blades or washer system.
If you operate your vehicle in temperatures below 40° F (4.5°C),use washer fluid with antifreeze protection. Failure to use
washer fluid with antifreeze protection in cold weather could result inimpaired windshield vision and increase the risk of injury or accident.
Note: Do not put washer fluid in the engine coolant reservoir. Washerfluid placed in the cooling system may harm engine and cooling systemcomponents.
Checking and adding washer fluid for the liftgate
Washer fluid for the liftgate is supplied by the same reservoir as thewindshield.
2006 Navigator (nav)Owners Guide (post-2002-fmt)USA (fus)
Maintenance and Specifications
349
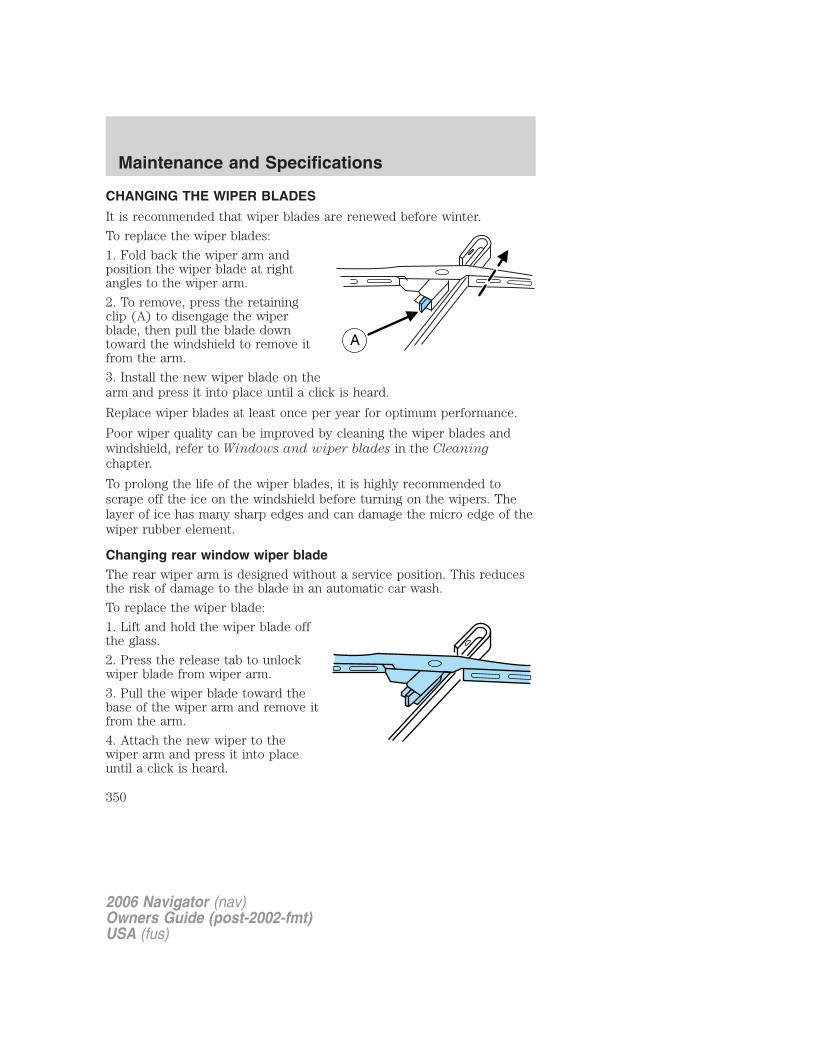
CHANGING THE WIPER BLADES
It is recommended that wiper blades are renewed before winter.
To replace the wiper blades:
1. Fold back the wiper arm andposition the wiper blade at rightangles to the wiper arm.
2. To remove, press the retainingclip (A) to disengage the wiperblade, then pull the blade downtoward the windshield to remove itfrom the arm.
3. Install the new wiper blade on thearm and press it into place until a click is heard.
Replace wiper blades at least once per year for optimum performance.
Poor wiper quality can be improved by cleaning the wiper blades andwindshield, refer to Windows and wiper blades in the Cleaning
chapter.
To prolong the life of the wiper blades, it is highly recommended toscrape off the ice on the windshield before turning on the wipers. Thelayer of ice has many sharp edges and can damage the micro edge of thewiper rubber element.
Changing rear window wiper bladeThe rear wiper arm is designed without a service position. This reducesthe risk of damage to the blade in an automatic car wash.
To replace the wiper blade:
1. Lift and hold the wiper blade offthe glass.
2. Press the release tab to unlockwiper blade from wiper arm.
3. Pull the wiper blade toward thebase of the wiper arm and remove itfrom the arm.
4. Attach the new wiper to thewiper arm and press it into placeuntil a click is heard.
2006 Navigator (nav)Owners Guide (post-2002-fmt)USA (fus)
Maintenance and Specifications
350
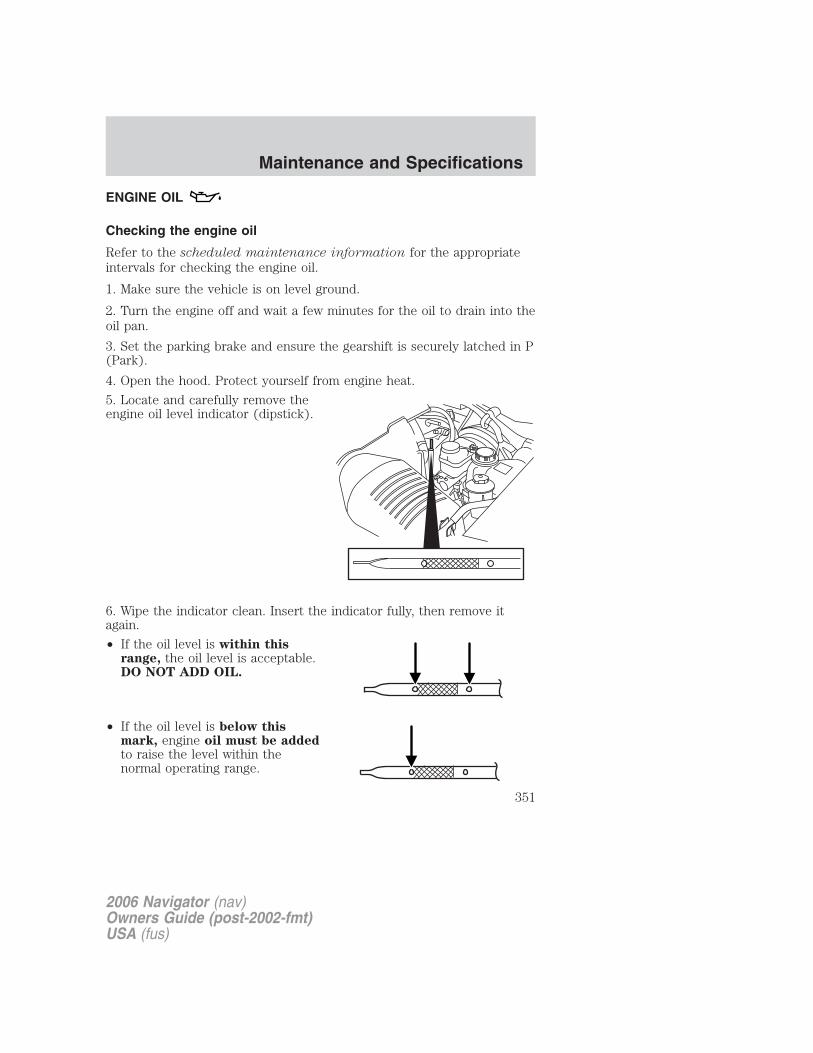
ENGINE OIL
Checking the engine oil
Refer to the scheduled maintenance information for the appropriateintervals for checking the engine oil.
1. Make sure the vehicle is on level ground.
2. Turn the engine off and wait a few minutes for the oil to drain into theoil pan.
3. Set the parking brake and ensure the gearshift is securely latched in P(Park).
4. Open the hood. Protect yourself from engine heat.
5. Locate and carefully remove theengine oil level indicator (dipstick).
6. Wipe the indicator clean. Insert the indicator fully, then remove itagain.
• If the oil level is within thisrange, the oil level is acceptable.DO NOT ADD OIL.
• If the oil level is below thismark, engine oil must be addedto raise the level within thenormal operating range.
2006 Navigator (nav)Owners Guide (post-2002-fmt)USA (fus)
Maintenance and Specifications
351

• If required, add engine oil to theengine. Refer to Adding engineoil in this chapter.
• Do not overfill the enginewith oil. Oil levels above thismark may cause enginedamage. If the engine isoverfilled, some oil must beremoved from the engine by anauthorized dealer.
7. Put the indicator back in and ensure it is fully seated.
Adding engine oil
1. Check the engine oil. For instructions, refer to Checking the engineoil in this chapter.
2. If the engine oil level is not within the normal range, add only certifiedengine oil of the recommended viscosity. Remove the engine oil filler capand use a funnel to pour the engine oil into the opening.
3. Recheck the engine oil level. Make sure the oil level is not above theupper hole or the MAX mark on the engine oil level indicator (dipstick).
4. Install the indicator and ensure it is fully seated.
5. Fully install the engine oil filler cap by turning the filler cap clockwise1/4 of a turn until the cap is fully seated.
To avoid possible oil loss, DO NOT operate the vehicle with theengine oil level indicator and/or the engine oil filler cap removed.
2006 Navigator (nav)Owners Guide (post-2002-fmt)USA (fus)
Maintenance and Specifications
352
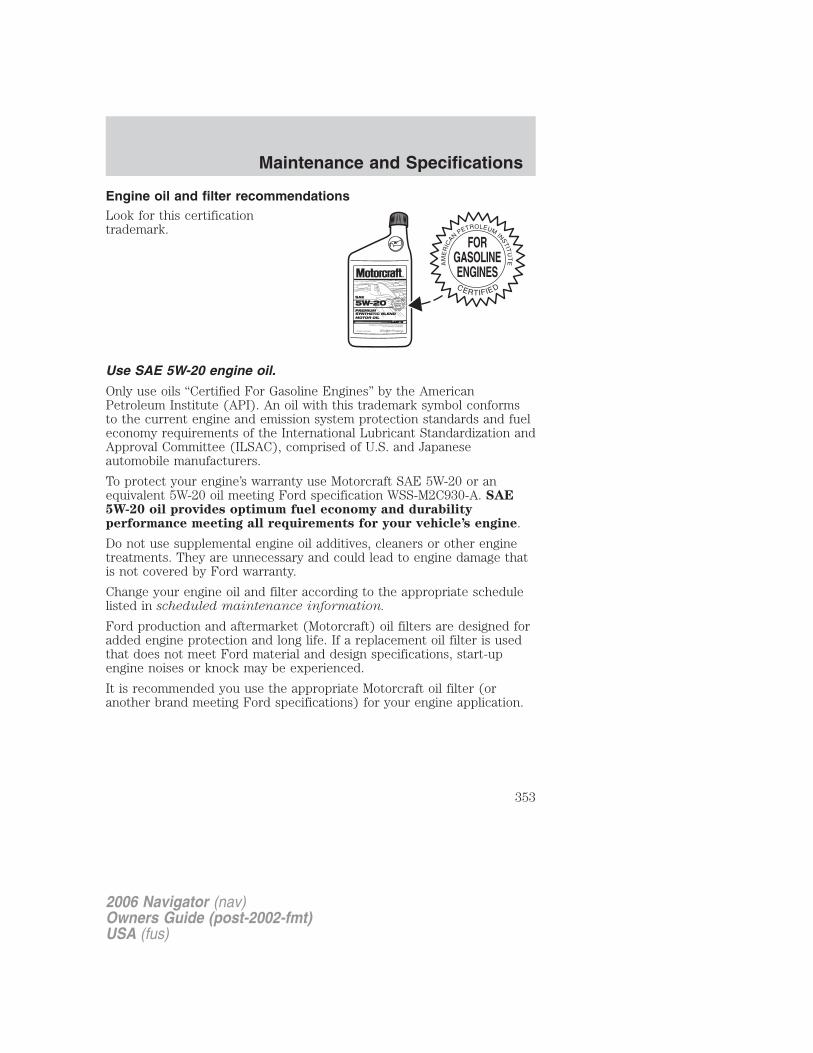
Engine oil and filter recommendationsLook for this certificationtrademark.
Use SAE 5W-20 engine oil.
Only use oils “Certified For Gasoline Engines” by the AmericanPetroleum Institute (API). An oil with this trademark symbol conformsto the current engine and emission system protection standards and fueleconomy requirements of the International Lubricant Standardization andApproval Committee (ILSAC), comprised of U.S. and Japaneseautomobile manufacturers.
To protect your engine’s warranty use Motorcraft SAE 5W-20 or anequivalent 5W-20 oil meeting Ford specification WSS-M2C930-A. SAE5W-20 oil provides optimum fuel economy and durabilityperformance meeting all requirements for your vehicle’s engine.
Do not use supplemental engine oil additives, cleaners or other enginetreatments. They are unnecessary and could lead to engine damage thatis not covered by Ford warranty.
Change your engine oil and filter according to the appropriate schedulelisted in scheduled maintenance information.
Ford production and aftermarket (Motorcraft) oil filters are designed foradded engine protection and long life. If a replacement oil filter is usedthat does not meet Ford material and design specifications, start-upengine noises or knock may be experienced.
It is recommended you use the appropriate Motorcraft oil filter (oranother brand meeting Ford specifications) for your engine application.
2006 Navigator (nav)Owners Guide (post-2002-fmt)USA (fus)
Maintenance and Specifications
353

BATTERY
Your vehicle is equipped with aMotorcraft maintenance-free batterywhich normally does not requireadditional water during its life ofservice.
However, for severe usage or in high temperature climates, check thebattery electrolyte level. Refer to the scheduled maintenance
information for the service interval schedules.
Keep the electrolyte level in each cell up to the “level indicator”.
Do not overfill the battery cells.
If the electrolyte level in the battery is low, you can add plain tap waterto the battery, as long as you do not use hard water (water with a highmineral or alkali content). If possible, however, try to only fill the batterycells with distilled water. If the battery needs water often, have thecharging system checked.
If your battery has a cover/shield, make sure it is reinstalled
after the battery has been cleaned or replaced.
For longer, trouble-free operation, keep the top of the battery clean anddry. Also, make certain the battery cables are always tightly fastened tothe battery terminals.
If you see any corrosion on the battery or terminals, remove the cablesfrom the terminals and clean with a wire brush. You can neutralize theacid with a solution of baking soda and water.
When the battery is disconnected or a new battery installed, thetransmission must learn its adaptive strategy. As a result of this, thetransmission may shift firmly. This operation is considered normal andwill fully update transmission operation to its optimum shift feel.
Note: Electrical or electronic accessories or components added tothe vehicle by the dealer or the owner may adversely affectbattery performance and durability.
2006 Navigator (nav)Owners Guide (post-2002-fmt)USA (fus)
Maintenance and Specifications
354
Batteries normally produce explosive gases which can causepersonal injury. Therefore, do not allow flames, sparks or lighted
substances to come near the battery. When working near the battery,always shield your face and protect your eyes. Always provide properventilation.
When lifting a plastic-cased battery, excessive pressure on theend walls could cause acid to flow through the vent caps,
resulting in personal injury and/or damage to the vehicle or battery.Lift the battery with a battery carrier or with your hands on oppositecorners.
Keep batteries out of reach of children. Batteries contain sulfuricacid. Avoid contact with skin, eyes or clothing. Shield your eyes
when working near the battery to protect against possible splashing ofacid solution. In case of acid contact with skin or eyes, flushimmediately with water for a minimum of 15 minutes and get promptmedical attention. If acid is swallowed, call a physician immediately.
Battery posts, terminals and related accessories contain lead andlead compounds. Wash hands after handling.
For information on transmission operation after the battery has beendisconnected, refer to Shift strategy in the Driving chapter.Because your vehicle’s engine is electronically controlled by a computer,some control conditions are maintained by power from the battery. Whenthe battery is disconnected or a new battery is installed, the engine mustrelearn its idle and fuel trim strategy for optimum driveability andperformance. To begin this process:1. With the vehicle at a complete stop, set the parking brake.2. Put the gearshift in P (Park), turn off all accessories and start theengine.3. Run the engine until it reaches normal operating temperature.4. Allow the engine to idle for at least one minute.5. Turn the A/C on and allow the engine to idle for at least one minute.6. Release the parking brake. With your foot on the brake pedal and withthe A/C on, put the vehicle in D (Drive) and allow the engine to idle forat least one minute.
2006 Navigator (nav)Owners Guide (post-2002-fmt)USA (fus)
Maintenance and Specifications
355
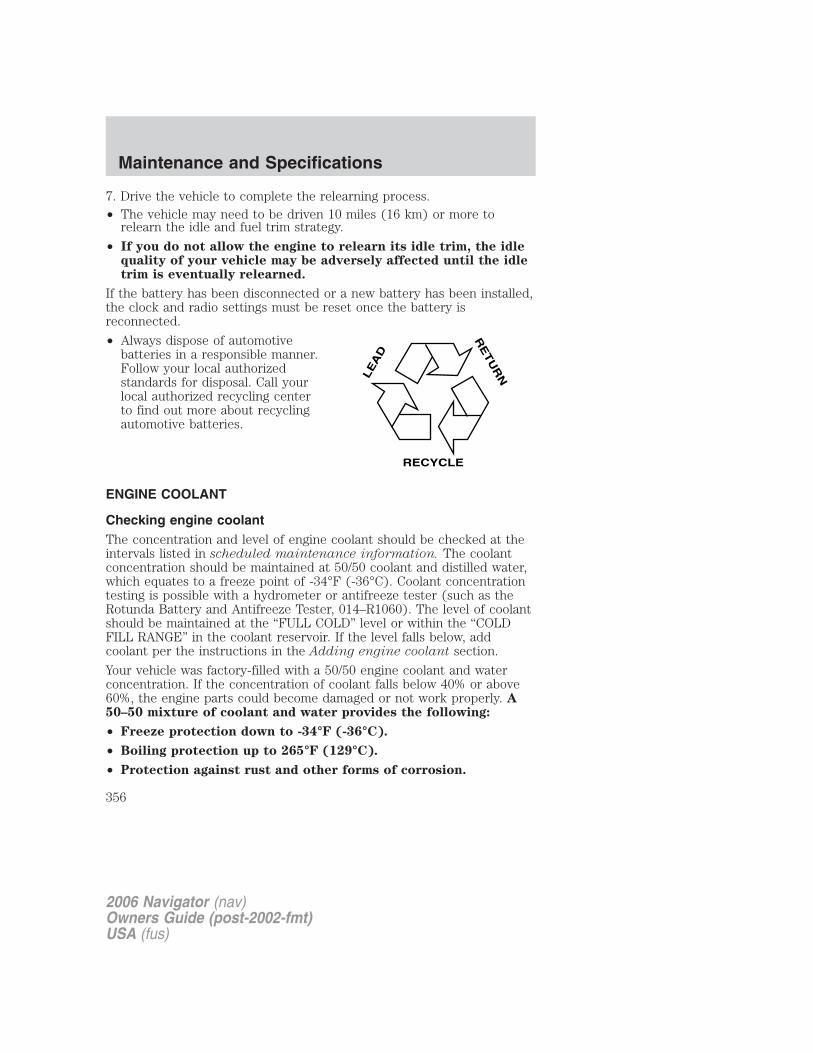
7. Drive the vehicle to complete the relearning process.• The vehicle may need to be driven 10 miles (16 km) or more to
relearn the idle and fuel trim strategy.
• If you do not allow the engine to relearn its idle trim, the idlequality of your vehicle may be adversely affected until the idletrim is eventually relearned.
If the battery has been disconnected or a new battery has been installed,the clock and radio settings must be reset once the battery isreconnected.
• Always dispose of automotivebatteries in a responsible manner.Follow your local authorizedstandards for disposal. Call yourlocal authorized recycling centerto find out more about recyclingautomotive batteries.
ENGINE COOLANT
Checking engine coolantThe concentration and level of engine coolant should be checked at theintervals listed in scheduled maintenance information. The coolantconcentration should be maintained at 50/50 coolant and distilled water,which equates to a freeze point of -34°F (-36°C). Coolant concentrationtesting is possible with a hydrometer or antifreeze tester (such as theRotunda Battery and Antifreeze Tester, 014–R1060). The level of coolantshould be maintained at the “FULL COLD” level or within the “COLDFILL RANGE” in the coolant reservoir. If the level falls below, addcoolant per the instructions in the Adding engine coolant section.
Your vehicle was factory-filled with a 50/50 engine coolant and waterconcentration. If the concentration of coolant falls below 40% or above60%, the engine parts could become damaged or not work properly. A50–50 mixture of coolant and water provides the following:
• Freeze protection down to -34°F (-36°C).
• Boiling protection up to 265°F (129°C).
• Protection against rust and other forms of corrosion.
LE
AD
RE
TU
RN
RECYCLE
2006 Navigator (nav)Owners Guide (post-2002-fmt)USA (fus)
Maintenance and Specifications
356
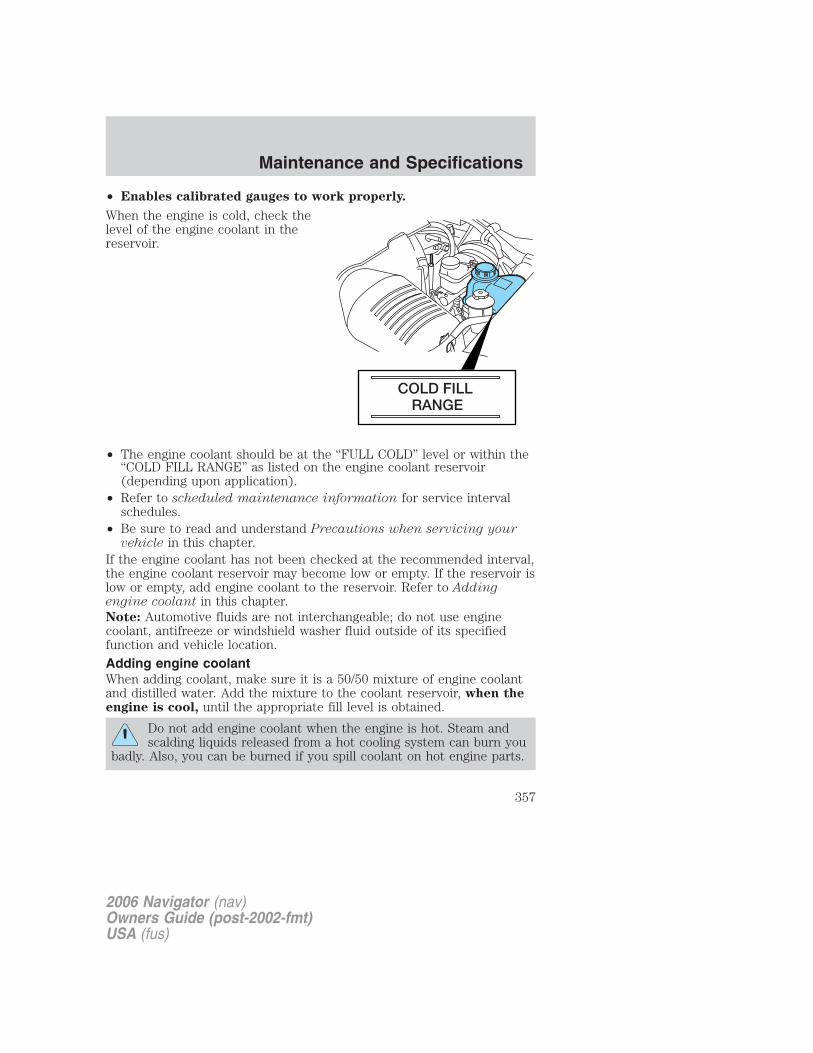
• Enables calibrated gauges to work properly.
When the engine is cold, check thelevel of the engine coolant in thereservoir.
• The engine coolant should be at the “FULL COLD” level or within the“COLD FILL RANGE” as listed on the engine coolant reservoir(depending upon application).
• Refer to scheduled maintenance information for service intervalschedules.
• Be sure to read and understand Precautions when servicing yourvehicle in this chapter.
If the engine coolant has not been checked at the recommended interval,the engine coolant reservoir may become low or empty. If the reservoir islow or empty, add engine coolant to the reservoir. Refer to Addingengine coolant in this chapter.Note: Automotive fluids are not interchangeable; do not use enginecoolant, antifreeze or windshield washer fluid outside of its specifiedfunction and vehicle location.
Adding engine coolantWhen adding coolant, make sure it is a 50/50 mixture of engine coolantand distilled water. Add the mixture to the coolant reservoir, when theengine is cool, until the appropriate fill level is obtained.
Do not add engine coolant when the engine is hot. Steam andscalding liquids released from a hot cooling system can burn you
badly. Also, you can be burned if you spill coolant on hot engine parts.
2006 Navigator (nav)Owners Guide (post-2002-fmt)USA (fus)
Maintenance and Specifications
357
Do not put engine coolant in the windshield washer fluidcontainer. If sprayed on the windshield, engine coolant could
make it difficult to see through the windshield.
• Add Motorcraft Premium Gold Engine Coolant
(yellow-colored), VC-7–A (U.S., except CA, OR and NM),
VC-7–B (CA, OR and NM), meeting Ford Specification
WSS-M97B51–A1.
Note: Use of Motorcraft Cooling System Stop Leak Pellets, VC-6, maydarken the color of Motorcraft Premium Gold Engine Coolant fromyellow to golden tan.
• Do not add/mix an orange-colored, extended life coolant such
as Motorcraft Specialty Orange Engine Coolant, VC-2 and VC-3
(US) or CXC-209 (Canada), meeting Ford specification
WSS-M97B44–D with the factory-filled coolant. Mixing MotorcraftSpecialty Orange Engine Coolant or any orange-colored extended lifeproduct with your factory filled coolant can result in degradedcorrosion protection.
• A large amount of water without engine coolant may be added, in caseof emergency, to reach a vehicle service location. In this instance, thecooling system must be drained and refilled with a 50/50 mixture ofengine coolant and distilled water as soon as possible. Water alone(without engine coolant) can cause engine damage from corrosion,overheating or freezing.
• Do not use alcohol, methanol, brine or any engine coolantsmixed with alcohol or methanol antifreeze (coolant). Alcoholand other liquids can cause engine damage from overheating orfreezing.
• Do not add extra inhibitors or additives to the coolant. Thesecan be harmful and compromise the corrosion protection of the enginecoolant.
For vehicles with overflow coolant systems with a non-pressurized capon the coolant recovery system, add coolant to the coolant recoveryreservoir when the engine is cool. Add the proper mixture of coolant andwater to the “FULL COLD” level. For all other vehicles which have acoolant degas system with a pressurized cap, or if it is necessary toremove the coolant pressure relief cap on the radiator of a vehicle withan overflow system, follow these steps to add engine coolant.
2006 Navigator (nav)Owners Guide (post-2002-fmt)USA (fus)
Maintenance and Specifications
358
To reduce the risk of personal injury, make sure the engine iscool before unscrewing the coolant pressure relief cap. The
cooling system is under pressure; steam and hot liquid can come outforcefully when the cap is loosened slightly.
1. Before you begin, turn the engine off and let it cool.
2. When the engine is cool, wrap a thick cloth around the coolantpressure relief cap on the coolant reservoir (a translucent plastic bottle).Slowly turn cap counterclockwise (left) until pressure begins to release.
3. Step back while the pressure releases.
4. When you are sure that all the pressure has been released, use thecloth to turn it counterclockwise and remove the cap.
5. Fill the coolant reservoir slowly with the proper coolant mixture (seeabove), to within the “COLD FILL RANGE” or the “FULL COLD” level onthe reservoir. If you removed the radiator cap in an overflow system, fillthe radiator until the coolant is visible and radiator is almost full.
6. Replace the cap. Turn until tightly installed. (Cap must be tightlyinstalled to prevent coolant loss.)
After any coolant has been added, check the coolant concentration (referto Checking engine coolant). If the concentration is not 50/50(protection to –34° F/–36° C), drain some coolant and adjust theconcentration. It may take several drains and additions to obtain a 50/50coolant concentration.
Whenever coolant has been added, the coolant level in the coolantreservoir should be checked the next few times you drive the vehicle. Ifnecessary, add enough 50/50 concentration of engine coolant anddistilled water to bring the liquid level to the proper level.
If you have to add more than 1.0 quart (1.0 liter) of engine coolant permonth, have your authorized dealer check the engine cooling system.Your cooling system may have a leak. Operating an engine with a lowlevel of coolant can result in engine overheating and possible enginedamage.
Recycled engine coolantFord Motor Company does NOT recommend the use of recycled enginecoolant in vehicles originally equipped with Motorcraft Premium GoldEngine Coolant since a Ford-approved recycling process is not yetavailable.
2006 Navigator (nav)Owners Guide (post-2002-fmt)USA (fus)
Maintenance and Specifications
359
Used engine coolant should be disposed of in an appropriatemanner. Follow your community’s regulations and standards for recyclingand disposing of automotive fluids.
Coolant refill capacityTo find out how much fluid your vehicle’s cooling system can hold, referto Refill capacities in this section.Fill your engine coolant reservoir as outlined in Adding engine coolantin this section.
Severe climatesIf you drive in extremely cold climates (less than –34° F [–36° C ]):• It may be necessary to increase the coolant concentration
above 50%.
• NEVER increase the coolant concentration above 60%.
• Increased engine coolant concentrations above 60% willdecrease the overheat protection characteristics of the enginecoolant and may cause engine damage.
• Refer to the chart on the coolant container to ensure thecoolant concentration in your vehicle will provide adequatefreeze protection at the temperatures in which you drive in thewinter months.
If you drive in extremely hot climates:
• It is still necessary to maintain the coolant concentrationabove 40%.
• NEVER decrease the coolant concentration below 40%.
• Decreased engine coolant concentrations below 40% willdecrease the corrosion protection characteristics of the enginecoolant and may cause engine damage.
• Decreased engine coolant concentrations below 40% willdecrease the freeze protection characteristics of the enginecoolant and may cause engine damage.
• Refer to the chart on the coolant container to ensure thecoolant concentration in your vehicle will provide adequateprotection at the temperatures in which you drive.
Vehicles driven year-round in non-extreme climates should use a 50/50mixture of engine coolant and distilled water for optimum cooling systemand engine protection.
2006 Navigator (nav)Owners Guide (post-2002-fmt)USA (fus)
Maintenance and Specifications
360
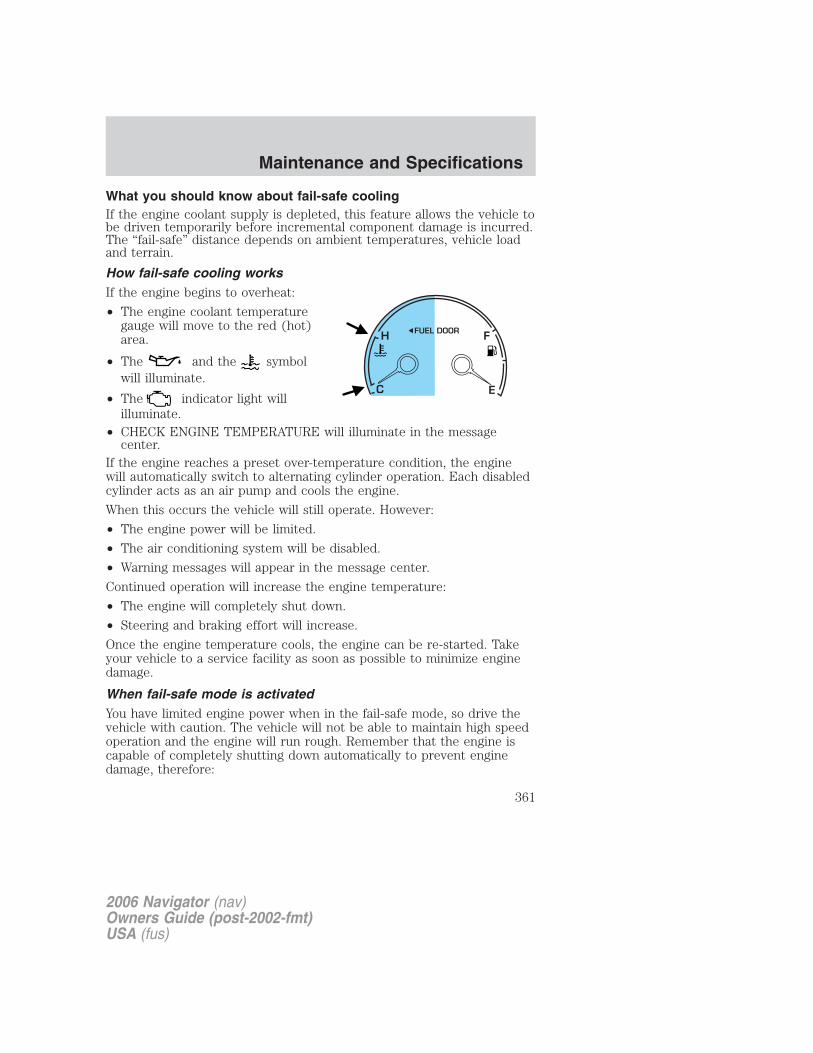
What you should know about fail-safe coolingIf the engine coolant supply is depleted, this feature allows the vehicle tobe driven temporarily before incremental component damage is incurred.The “fail-safe” distance depends on ambient temperatures, vehicle loadand terrain.
How fail-safe cooling worksIf the engine begins to overheat:
• The engine coolant temperaturegauge will move to the red (hot)area.
• The and the symbolwill illuminate.
• The indicator light willilluminate.
• CHECK ENGINE TEMPERATURE will illuminate in the messagecenter.
If the engine reaches a preset over-temperature condition, the enginewill automatically switch to alternating cylinder operation. Each disabledcylinder acts as an air pump and cools the engine.
When this occurs the vehicle will still operate. However:
• The engine power will be limited.
• The air conditioning system will be disabled.
• Warning messages will appear in the message center.
Continued operation will increase the engine temperature:
• The engine will completely shut down.
• Steering and braking effort will increase.
Once the engine temperature cools, the engine can be re-started. Takeyour vehicle to a service facility as soon as possible to minimize enginedamage.
When fail-safe mode is activatedYou have limited engine power when in the fail-safe mode, so drive thevehicle with caution. The vehicle will not be able to maintain high speedoperation and the engine will run rough. Remember that the engine iscapable of completely shutting down automatically to prevent enginedamage, therefore:
2006 Navigator (nav)Owners Guide (post-2002-fmt)USA (fus)
Maintenance and Specifications
361
1. Pull off the road as soon as safely possible and turn off the engine.
2. Arrange for the vehicle to be taken to a service facility.
3. If this is not possible, wait a short period for the engine to cool.
4. Check the coolant level and replenish if low.
Never remove the coolant reservoir cap while the engine isrunning or hot.
5. Restart the engine and take your vehicle to a service facility.
Driving the vehicle without repairing the engine problemincreases the chance of engine damage. Take your vehicle to aservice facility as soon as possible.
FUEL FILTERFor fuel filter replacement, see your authorized dealer. Refer toscheduled maintenance information for the appropriate intervals forchanging the fuel filter.
Replace the fuel filter with an authorized Motorcraft part. Thecustomer warranty may be void for any damage to the fuel systemif an authorized Motorcraft fuel filter is not used.
WHAT YOU SHOULD KNOW ABOUT AUTOMOTIVE FUELS
Important safety precautions
Do not overfill the fuel tank. The pressure in an overfilled tankmay cause leakage and lead to fuel spray and fire.
The fuel system may be under pressure. If the fuel filler cap isventing vapor or if you hear a hissing sound, wait until it stops
before completely removing the fuel filler cap. Otherwise, fuel mayspray out and injure you or others.
If you do not use the proper fuel filler cap, excessive pressure orvacuum in the fuel tank may damage the fuel system or cause
the fuel cap to disengage in a collision, which may result in possiblepersonal injury.
2006 Navigator (nav)Owners Guide (post-2002-fmt)USA (fus)
Maintenance and Specifications
362
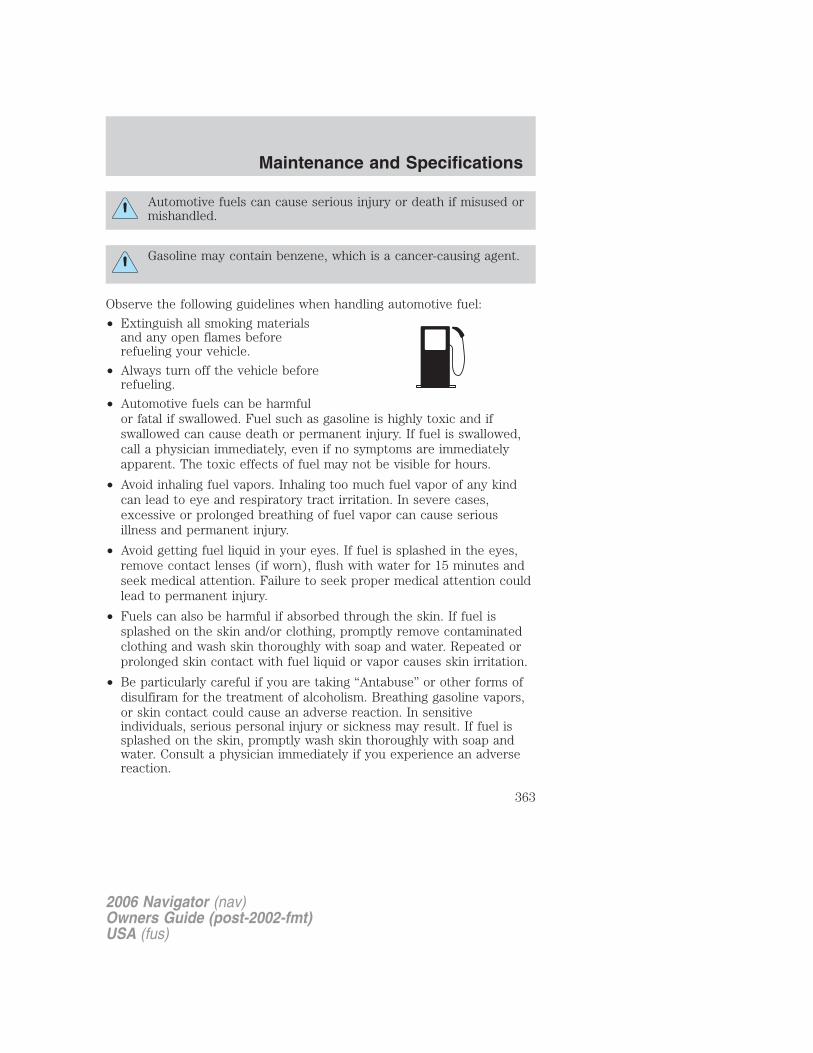
Automotive fuels can cause serious injury or death if misused ormishandled.
Gasoline may contain benzene, which is a cancer-causing agent.
Observe the following guidelines when handling automotive fuel:
• Extinguish all smoking materialsand any open flames beforerefueling your vehicle.
• Always turn off the vehicle beforerefueling.
• Automotive fuels can be harmfulor fatal if swallowed. Fuel such as gasoline is highly toxic and ifswallowed can cause death or permanent injury. If fuel is swallowed,call a physician immediately, even if no symptoms are immediatelyapparent. The toxic effects of fuel may not be visible for hours.
• Avoid inhaling fuel vapors. Inhaling too much fuel vapor of any kindcan lead to eye and respiratory tract irritation. In severe cases,excessive or prolonged breathing of fuel vapor can cause seriousillness and permanent injury.
• Avoid getting fuel liquid in your eyes. If fuel is splashed in the eyes,remove contact lenses (if worn), flush with water for 15 minutes andseek medical attention. Failure to seek proper medical attention couldlead to permanent injury.
• Fuels can also be harmful if absorbed through the skin. If fuel issplashed on the skin and/or clothing, promptly remove contaminatedclothing and wash skin thoroughly with soap and water. Repeated orprolonged skin contact with fuel liquid or vapor causes skin irritation.
• Be particularly careful if you are taking “Antabuse” or other forms ofdisulfiram for the treatment of alcoholism. Breathing gasoline vapors,or skin contact could cause an adverse reaction. In sensitiveindividuals, serious personal injury or sickness may result. If fuel issplashed on the skin, promptly wash skin thoroughly with soap andwater. Consult a physician immediately if you experience an adversereaction.
2006 Navigator (nav)Owners Guide (post-2002-fmt)USA (fus)
Maintenance and Specifications
363

When refueling always shut the engine off and never allowsparks or open flames near the filler neck. Never smoke while
refueling. Fuel vapor is extremely hazardous under certain conditions.Care should be taken to avoid inhaling excess fumes.
The flow of fuel through a fuel pump nozzle can produce staticelectricity, which can cause a fire if fuel is pumped into an
ungrounded fuel container.
Refueling
Fuel vapor burns violently and a fuel fire can cause severeinjuries. To help avoid injuries to you and others:
• Read and follow all the instructions on the pump island;
• Turn off your engine when you are refueling;
• Do not smoke if you are near fuel or refueling your vehicle;
• Keep sparks, flames and smoking materials away from fuel;
• Stay outside your vehicle and do not leave the fuel pump unattendedwhen refueling your vehicle — this is against the law in some places;
• Keep children away from the fuel pump; never let children pump fuel
Use the following guidelines to avoid static build-up when filling anungrounded fuel container:• Place approved fuel container on the ground.• DO NOT fill a fuel container while it is in the vehicle (including the
cargo area).
• Keep the fuel pump nozzle in contact with the fuel container whilefilling.
• DO NOT use a device that would hold the fuel pump handle in the fillposition.
Fuel Filler CapYour fuel tank filler cap has an indexed design with a 1/4 turn on/offfeature.
When fueling your vehicle:
1. Turn the engine off.
2006 Navigator (nav)Owners Guide (post-2002-fmt)USA (fus)
Maintenance and Specifications
364
2. Carefully turn the filler cap counterclockwise 1/4 turn to remove it.3. Pull to remove the cap from the fuel filler pipe.4. To install the cap, align the tabs on the cap with the notches on thefiller pipe.5. Turn the filler cap clockwise 1/4 turn until it clicks at least once.“CHECK FUEL CAP”will display in the message center when the fuelfiller cap is not properly installed. Proper fuel filler cap installation ischecked automatically as the vehicle is driven, but not until after somefuel is used (fuel gauge drops below full). Once the fuel filler cap isproperly secured, “CHECK FUEL CAP” will turn off after a short periodof driving.If you must replace the fuel filler cap, replace it with a fuel fillercap that is designed for your vehicle. The customer warranty maybe void for any damage to the fuel tank or fuel system if thecorrect genuine Ford or Motorcraft fuel filler cap is not used.
The fuel system may be under pressure. If the fuel filler cap isventing vapor or if you hear a hissing sound, wait until it stops
before completely removing the fuel filler cap. Otherwise, fuel mayspray out and injure you or others.
If you do not use the proper fuel filler cap, excessive pressure orvacuum in the fuel tank may damage the fuel system or cause
the fuel cap to disengage in a collision, which may result in possiblepersonal injury.
Choosing the right fuelUse only UNLEADED FUEL. The use of leaded fuel is prohibited by lawand could damage your vehicle.Your vehicle was not designed to use fuel or fuel additives with metalliccompounds, including manganese-based additives. Studies indicate thatthese additives can cause your vehicle’s emission control system todeteriorate more rapidly. In Canada, many fuels contain metallicadditives, but fuels free of such additives may be available; check withyour local fuel dealer.
Do not use fuel containing methanol. It can damage critical fuel systemcomponents.
Repairs to correct the effects of using a fuel for which your vehicle wasnot designed may not be covered by your warranty.
2006 Navigator (nav)Owners Guide (post-2002-fmt)USA (fus)
Maintenance and Specifications
365
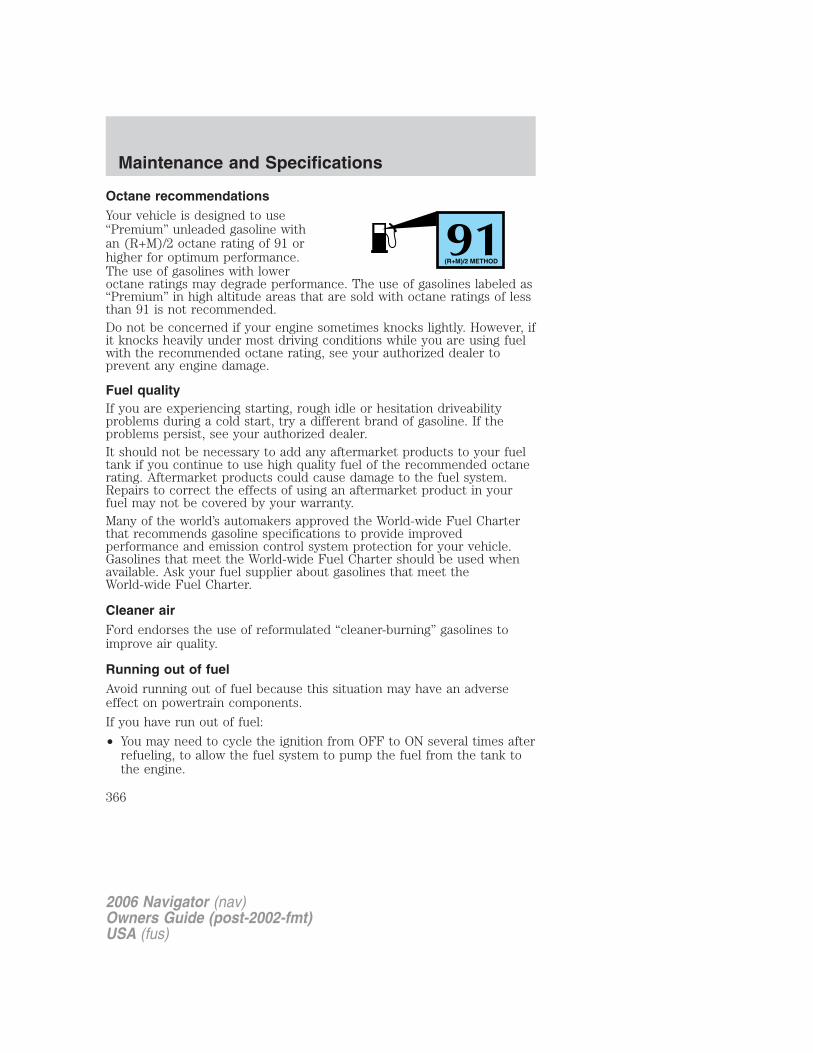
Octane recommendationsYour vehicle is designed to use“Premium” unleaded gasoline withan (R+M)/2 octane rating of 91 orhigher for optimum performance.The use of gasolines with loweroctane ratings may degrade performance. The use of gasolines labeled as“Premium” in high altitude areas that are sold with octane ratings of lessthan 91 is not recommended.Do not be concerned if your engine sometimes knocks lightly. However, ifit knocks heavily under most driving conditions while you are using fuelwith the recommended octane rating, see your authorized dealer toprevent any engine damage.
Fuel qualityIf you are experiencing starting, rough idle or hesitation driveabilityproblems during a cold start, try a different brand of gasoline. If theproblems persist, see your authorized dealer.It should not be necessary to add any aftermarket products to your fueltank if you continue to use high quality fuel of the recommended octanerating. Aftermarket products could cause damage to the fuel system.Repairs to correct the effects of using an aftermarket product in yourfuel may not be covered by your warranty.Many of the world’s automakers approved the World-wide Fuel Charterthat recommends gasoline specifications to provide improvedperformance and emission control system protection for your vehicle.Gasolines that meet the World-wide Fuel Charter should be used whenavailable. Ask your fuel supplier about gasolines that meet theWorld-wide Fuel Charter.
Cleaner airFord endorses the use of reformulated “cleaner-burning” gasolines toimprove air quality.
Running out of fuelAvoid running out of fuel because this situation may have an adverseeffect on powertrain components.
If you have run out of fuel:
• You may need to cycle the ignition from OFF to ON several times afterrefueling, to allow the fuel system to pump the fuel from the tank tothe engine.
91(R+M)/2 METHOD
2006 Navigator (nav)Owners Guide (post-2002-fmt)USA (fus)
Maintenance and Specifications
366
• The indicator may come on. For more information on the “CheckEngine” or the “Service engine soon” indicator, refer to theInstrument Cluster chapter.
ESSENTIALS OF GOOD FUEL ECONOMY
Measuring techniquesYour best source of information about actual fuel economy is you, thedriver. You must gather information as accurately and consistently aspossible. Fuel expense, frequency of fill-ups or fuel gauge readings areNOT accurate as a measure of fuel economy. We do not recommendtaking fuel economy measurements during the first 1,000 miles (1,600 km)of driving (engine break-in period). You will get a more accuratemeasurement after 2,000 miles-3,000 miles (3,000 km–5,000 km).
Filling the tankThe advertised fuel capacity of the fuel tank on your vehicle is equal tothe rated refill capacity of the fuel tank as listed in the Refill capacitiessection of this chapter.
The advertised capacity is the amount of the indicated capacity and theempty reserve combined. Indicated capacity is the difference in theamount of fuel in a full tank and a tank when the fuel gauge indicatesempty. Empty reserve is the small amount of fuel remaining in the fueltank after the fuel gauge indicates empty.
The amount of usable fuel in the empty reserve varies and shouldnot be relied upon to increase driving range. When refueling yourvehicle after the fuel gauge indicates empty, you might not beable to refuel the full amount of the advertised capacity of thefuel tank due to the empty reserve still present in the tank.
For consistent results when filling the fuel tank:
• Turn the engine/ignition switch to the off position prior to refueling,an error in the reading will result if the engine is left running.
• Use the same filling rate setting (low — medium — high) each timethe tank is filled.
• Allow no more than two automatic click-offs when filling.
• Always use fuel with the recommended octane rating.
• Use a known quality gasoline, preferably a national brand.
• Use the same side of the same pump and have the vehicle facing thesame direction each time you fill up.
2006 Navigator (nav)Owners Guide (post-2002-fmt)USA (fus)
Maintenance and Specifications
367

• Have the vehicle loading and distribution the same every time.Your results will be most accurate if your filling method is consistent.
Calculating fuel economy1. Fill the fuel tank completely and record the initial odometer reading(in miles or kilometers).2. Each time you fill the tank, record the amount of fuel added (ingallons or liters).3. After at least three to five tank fill-ups, fill the fuel tank and recordthe current odometer reading.4. Subtract your initial odometer reading from the current odometerreading.5. Follow one of the simple calculations in order to determine fueleconomy:
Calculation 1: Divide total miles traveled by total gallons used.
Calculation 2: Multiply liters used by 100, then divide by totalkilometers traveled.
Keep a record for at least one month and record the type of driving (cityor highway). This will provide an accurate estimate of the vehicle’s fueleconomy under current driving conditions. Additionally, keeping recordsduring summer and winter will show how temperature impacts fueleconomy. In general, lower temperatures give lower fuel economy.
Driving style — good driving and fuel economy habitsGive consideration to the lists that follow and you may be able to changea number of variables and improve your fuel economy.
Habits• Smooth, moderate operation can yield up to 10% savings in fuel.
• Steady speeds without stopping will usually give the best fueleconomy.
• Idling for long periods of time (greater than one minute) may wastefuel.
• Anticipate stopping; slowing down may eliminate the need to stop.
• Sudden or hard accelerations may reduce fuel economy.
• Slow down gradually.
• Driving at reasonable speeds (traveling at 55 mph [88 km/h] uses 15%less fuel than traveling at 65 mph [105 km/h]).
2006 Navigator (nav)Owners Guide (post-2002-fmt)USA (fus)
Maintenance and Specifications
368
• Revving the engine before turning it off may reduce fuel economy.• Using the air conditioner or defroster may reduce fuel economy.
• You may want to turn off the speed control in hilly terrain ifunnecessary shifting between third and fourth gear occurs.Unnecessary shifting of this type could result in reduced fueleconomy.
• Warming up a vehicle on cold mornings is not required and mayreduce fuel economy.
• Resting your foot on the brake pedal while driving may reduce fueleconomy.
• Combine errands and minimize stop-and-go driving.
Maintenance• Keep tires properly inflated and use only recommended size.
• Operating a vehicle with the wheels out of alignment will reduce fueleconomy.
• Use recommended engine oil. Refer to Lubricant specifications inthis chapter.
• Perform all regularly scheduled maintenance items. Follow therecommended maintenance schedule and owner maintenance checksfound in scheduled maintenance information.
Conditions• Heavily loading a vehicle or towing a trailer may reduce fuel economy
at any speed.
• Carrying unnecessary weight may reduce fuel economy (as much as1 mpg [0.4 km/L] is lost for every 400 lb [180 kg] of weight carried).
• Adding certain accessories to your vehicle (for example bugdeflectors, rollbars/light bars, running boards, ski/luggage racks) mayreduce fuel economy.
• Using fuel blended with alcohol may lower fuel economy.
• Fuel economy may decrease with lower temperatures during the first8–10 miles (12–16 km) of driving.
• Driving on flat terrain offers improved fuel economy as compared todriving on hilly terrain.
• Transmissions give their best fuel economy when operated in the topcruise gear and with steady pressure on the gas pedal.
2006 Navigator (nav)Owners Guide (post-2002-fmt)USA (fus)
Maintenance and Specifications
369

• Four-wheel-drive operation (if equipped) is less fuel efficient thantwo-wheel-drive operation.
• Close windows for high speed driving.
EPA window sticker
The characteristics of the four wheel drive vehicle, like those of many,similar competitive products, fit within categories where the fueleconomy labeling regulations do not apply. Therefore, the followinginformation applies only to the two wheel drive vehicle.
Every new vehicle should have the EPA window sticker. Contact yourauthorized dealer if the window sticker is not supplied with your vehicle.The EPA window sticker should be your guide for the fuel economycomparisons with other vehicles.
It is important to note the box in the lower left corner of the windowsticker. These numbers represent the range of fuel economy expected onthe vehicle under optimum conditions. Your fuel economy may varydepending upon the method of operation and conditions.
EMISSION CONTROL SYSTEM
Your vehicle is equipped with various emission control components and acatalytic converter which will enable your vehicle to comply withapplicable exhaust emission standards. To make sure that the catalyticconverter and other emission control components continue to workproperly:
• Use only the specified fuel listed.
• Avoid running out of fuel.
• Do not turn off the ignition while your vehicle is moving, especially athigh speeds.
• Have the items listed in scheduled maintenance informationperformed according to the specified schedule.
The scheduled maintenance items listed in scheduled maintenanceinformation are essential to the life and performance of your vehicleand to its emissions system.
If other than Ford, Motorcraft or Ford-authorized parts are used formaintenance replacements or for service of components affectingemission control, such non-Ford parts should be equivalent to genuineFord Motor Company parts in performance and durability.
2006 Navigator (nav)Owners Guide (post-2002-fmt)USA (fus)
Maintenance and Specifications
370

Do not park, idle, or drive your vehicle in dry grass or other dryground cover. The emission system heats up the engine
compartment and exhaust system, which can start a fire.
Illumination of the indicator, charging system warning light or thetemperature warning light, fluid leaks, strange odors, smoke or loss ofengine power could indicate that the emission control system is notworking properly.
Exhaust leaks may result in entry of harmful and potentiallylethal fumes into the passenger compartment.
Do not make any unauthorized changes to your vehicle or engine. Bylaw, vehicle owners and anyone who manufactures, repairs, services,sells, leases, trades vehicles, or supervises a fleet of vehicles are notpermitted to intentionally remove an emission control device or preventit from working. Information about your vehicle’s emission system is onthe Vehicle Emission Control Information Decal located on or near theengine. This decal identifies engine displacement and gives some tune upspecifications.
Please consult your Warranty Guide for complete emission warrantyinformation.
On board diagnostics (OBD-II)Your vehicle is equipped with a computer that monitors the engine’semission control system. This system is commonly known as the OnBoard Diagnostics System (OBD-II). This OBD-II system protects theenvironment by ensuring that your vehicle continues to meetgovernment emission standards. The OBD-II system also assists yourauthorized dealer in properly servicing your vehicle. When theindicator illuminates, the OBD-II system has detected a malfunction.Temporary malfunctions may cause your indicator to illuminate.Examples are:
1. The vehicle has run out of fuel—the engine may misfire or run poorly.
2. Poor fuel quality or water in the fuel.
3. The fuel cap may not have been securely tightened. See Fuel fillercap in this chapter.
These temporary malfunctions can be corrected by filling the fuel tankwith good quality fuel and/or properly tightening the fuel cap. After three
2006 Navigator (nav)Owners Guide (post-2002-fmt)USA (fus)
Maintenance and Specifications
371

driving cycles without these or any other temporary malfunctionspresent, the indicator should turn off—A driving cycle consists of acold engine startup followed by mixed city/highway driving. No additionalvehicle service is required.
If the indicator remains on, have your vehicle serviced at the firstavailable opportunity.
Readiness for Inspection/Maintenance (I/M) testingIn some localities, it may be a legal requirement to pass an I/M test ofthe on-board diagnostics system. If your indicator is on, refer tothe description in the Warning lights and chimes section of theInstrument Cluster chapter. Your vehicle may not pass the I/M test withthe indicator on.
If the vehicle’s powertrain system or its battery has just been serviced,the on-board diagnostics system is reset to a “not ready for I/M test”condition. To ready the on-board diagnostics system for I/M testing, aminimum of 30 minutes of city and highway driving is necessary asdescribed below:
• First, at least 10 minutes of driving on an expressway or highway.
• Next, at least 20 minutes driving in stop-and-go, city-type traffic withat least four idle periods.
Allow the vehicle to sit for at least eight hours without starting theengine. Then, start the engine and complete the above driving cycle. Theengine must warm up to its normal operating temperature. Once started,do not turn off the engine until the above driving cycle is complete.
2006 Navigator (nav)Owners Guide (post-2002-fmt)USA (fus)
Maintenance and Specifications
372

POWER STEERING FLUIDCheck the power steering fluid. Refer to the scheduled maintenanceinformation for the service interval schedules. If adding fluid isnecessary, use only Ford Premium Power Steering Fluid or MERCON�ATF.
1. Start the engine and let it rununtil it reaches normal operatingtemperature (the engine coolanttemperature gauge indicator will benear the center of the normal areabetween H and C).
2. While the engine idles, turn thesteering wheel left and right severaltimes.
3. Turn the engine off.
4. Check the fluid level in the reservoir. It should be between the MINand MAX lines. Do not add fluid if the level is in this range.
5. If the fluid is low, add fluid in small amounts, continuously checkingthe level until it reaches the range between the MIN and MAX lines. Besure to put the cap back on the reservoir.
BRAKE FLUID
The fluid level will drop slowly asthe brakes wear, and will rise whenthe brake components are replaced.Fluid levels between the “MIN” and“MAX” lines are within the normaloperating range; there is no need toadd fluid. If the fluid levels areoutside of the normal operatingrange the performance of yourbrake system could becompromised; seek service fromyour authorized dealer immediately.
2006 Navigator (nav)Owners Guide (post-2002-fmt)USA (fus)
Maintenance and Specifications
373
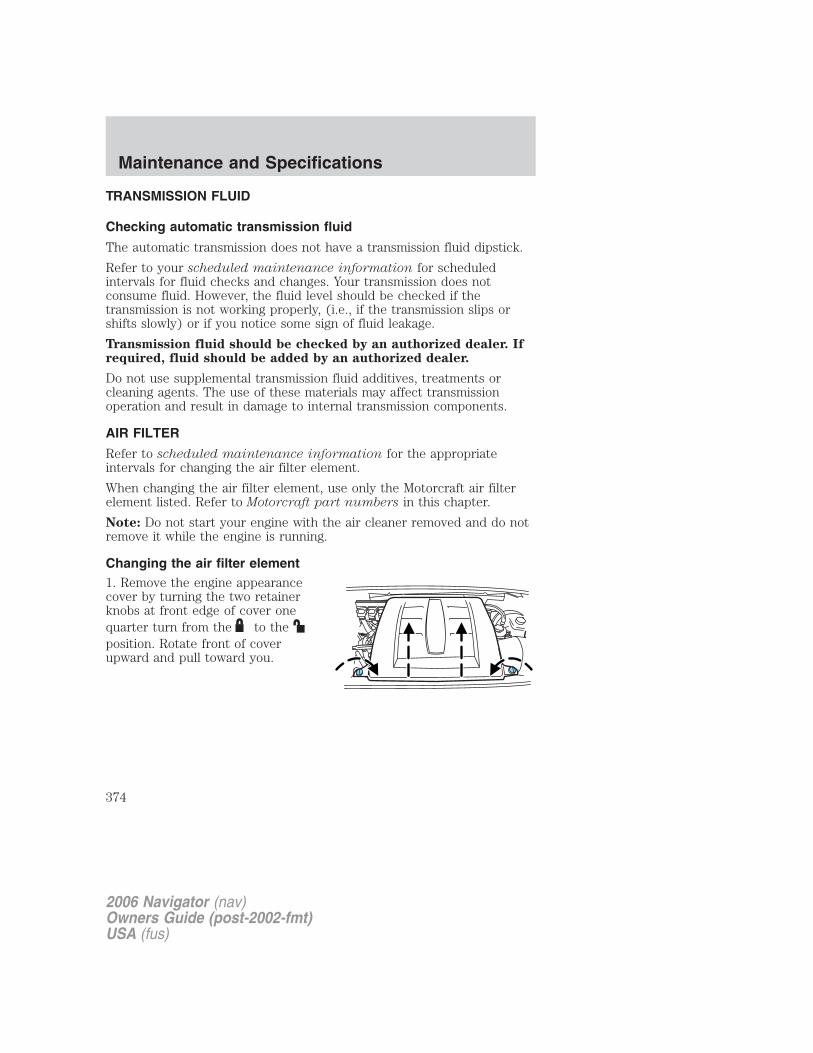
TRANSMISSION FLUID
Checking automatic transmission fluid
The automatic transmission does not have a transmission fluid dipstick.
Refer to your scheduled maintenance information for scheduledintervals for fluid checks and changes. Your transmission does notconsume fluid. However, the fluid level should be checked if thetransmission is not working properly, (i.e., if the transmission slips orshifts slowly) or if you notice some sign of fluid leakage.
Transmission fluid should be checked by an authorized dealer. Ifrequired, fluid should be added by an authorized dealer.
Do not use supplemental transmission fluid additives, treatments orcleaning agents. The use of these materials may affect transmissionoperation and result in damage to internal transmission components.
AIR FILTER
Refer to scheduled maintenance information for the appropriateintervals for changing the air filter element.
When changing the air filter element, use only the Motorcraft air filterelement listed. Refer to Motorcraft part numbers in this chapter.
Note: Do not start your engine with the air cleaner removed and do notremove it while the engine is running.
Changing the air filter element1. Remove the engine appearancecover by turning the two retainerknobs at front edge of cover onequarter turn from the to theposition. Rotate front of coverupward and pull toward you.
2006 Navigator (nav)Owners Guide (post-2002-fmt)USA (fus)
Maintenance and Specifications
374
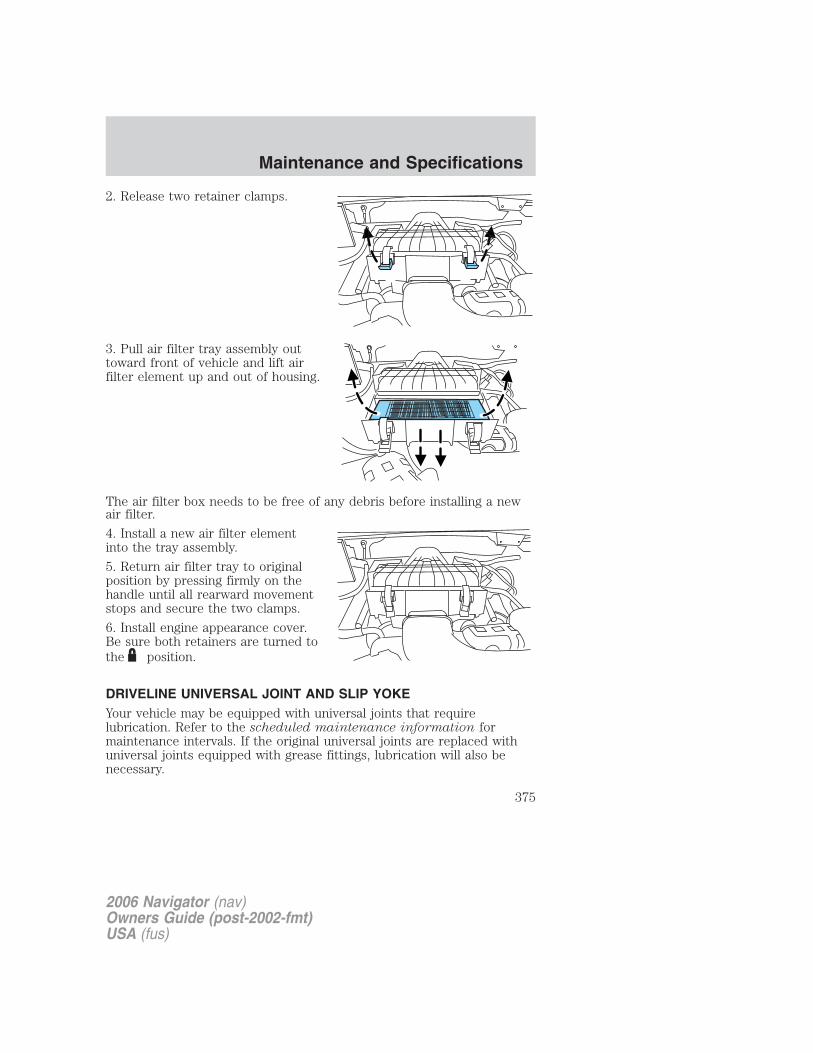
2. Release two retainer clamps.
3. Pull air filter tray assembly outtoward front of vehicle and lift airfilter element up and out of housing.
The air filter box needs to be free of any debris before installing a newair filter.
4. Install a new air filter elementinto the tray assembly.
5. Return air filter tray to originalposition by pressing firmly on thehandle until all rearward movementstops and secure the two clamps.
6. Install engine appearance cover.Be sure both retainers are turned tothe position.
DRIVELINE UNIVERSAL JOINT AND SLIP YOKEYour vehicle may be equipped with universal joints that requirelubrication. Refer to the scheduled maintenance information formaintenance intervals. If the original universal joints are replaced withuniversal joints equipped with grease fittings, lubrication will also benecessary.
2006 Navigator (nav)Owners Guide (post-2002-fmt)USA (fus)
Maintenance and Specifications
375

MOTORCRAFT PART NUMBERS
Component 5.4L 3V V8 engine
Air filter element FA-1754Battery BXT-65-650Fuel filter FG-986BOil filter FL-820-SPCV valve 1
Spark plugs 2
1The PCV valve is a critical emission component. It is one of the itemslisted in scheduled maintenance information and is essential to thelife and performance of your vehicle and to its emissions system.
For PCV valve replacement, see your authorized dealer. Refer toscheduled maintenance information for the appropriate intervals forchanging the PCV valve.
Replace the PCV valve with one that meets Ford material anddesign specifications for your vehicle, such as a Motorcraft orequivalent replacement part. The customer warranty may be voidfor any damage to the emissions system if such a PCV valve is notused.
2For spark plug replacement, see your authorized dealer. Refer toscheduled maintenance information for the appropriate intervals forchanging the spark plugs.
Replace the spark plugs with ones that meet Ford material anddesign specifications for your vehicle, such as Motorcraft orequivalent replacement parts. The customer warranty may bevoid for any damage to the engine if such spark plugs are notused.
2006 Navigator (nav)Owners Guide (post-2002-fmt)USA (fus)
Maintenance and Specifications
376
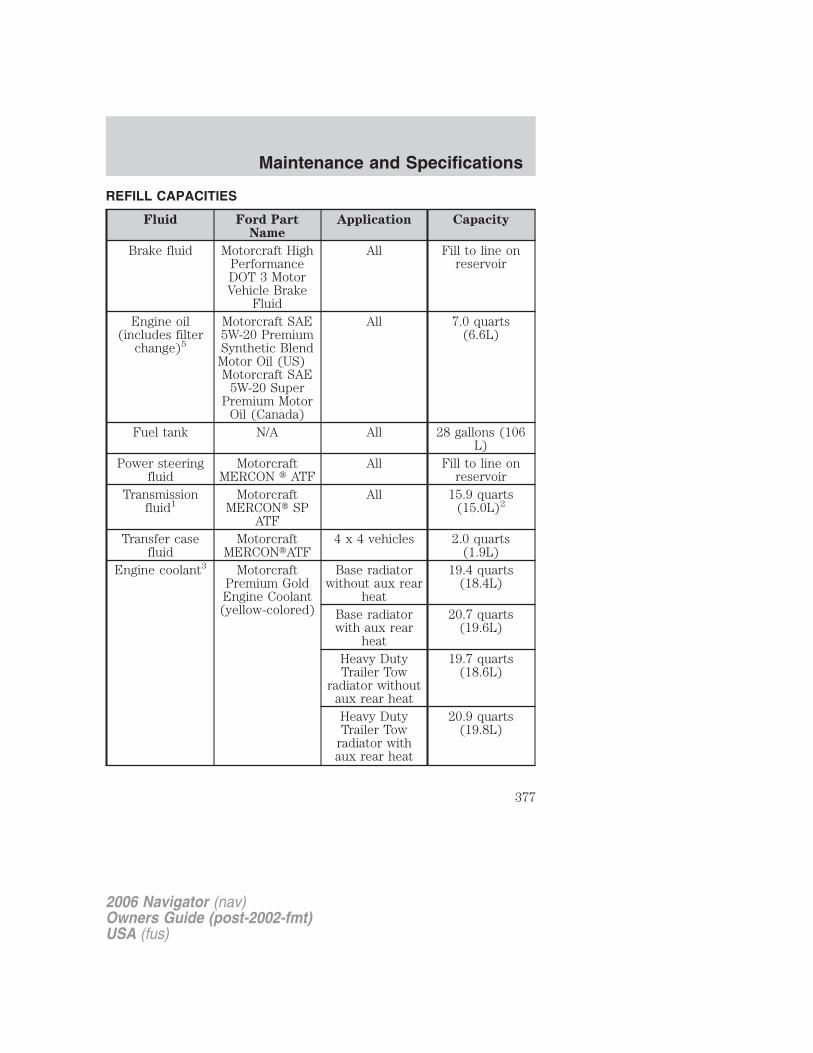
REFILL CAPACITIES
Fluid Ford PartName
Application Capacity
Brake fluid Motorcraft HighPerformanceDOT 3 MotorVehicle Brake
Fluid
All Fill to line onreservoir
Engine oil(includes filter
change)5
Motorcraft SAE5W-20 PremiumSynthetic BlendMotor Oil (US)Motorcraft SAE
5W-20 SuperPremium Motor
Oil (Canada)
All 7.0 quarts(6.6L)
Fuel tank N/A All 28 gallons (106L)
Power steeringfluid
MotorcraftMERCON � ATF
All Fill to line onreservoir
Transmissionfluid1
MotorcraftMERCON� SP
ATF
All 15.9 quarts(15.0L)2
Transfer casefluid
MotorcraftMERCON�ATF
4 x 4 vehicles 2.0 quarts(1.9L)
Engine coolant3 MotorcraftPremium GoldEngine Coolant(yellow-colored)
Base radiatorwithout aux rear
heat
19.4 quarts(18.4L)
Base radiatorwith aux rear
heat
20.7 quarts(19.6L)
Heavy DutyTrailer Tow
radiator withoutaux rear heat
19.7 quarts(18.6L)
Heavy DutyTrailer Tow
radiator withaux rear heat
20.9 quarts(19.8L)
2006 Navigator (nav)Owners Guide (post-2002-fmt)USA (fus)
Maintenance and Specifications
377

Fluid Ford PartName
Application Capacity
Front axlelubricant
Motorcraft SAE80W-90
Premium RearAxle Lubricant
4 x 4 vehicles 3.5-3.7 pints(1.8-2.0L)
Rear axlelubricant4
Motorcraft SAE75W-140
Synthetic RearAxle Lubricant
Conventionaldifferential(9.75 inch axle)
4.5 pints (2.13L)
Windshieldwasher fluid
MotorcraftPremium
WindshieldWasher
Concentrate
All 4.5 quarts(4.1L)
1Ensure the correct automatic transmission fluid is used. Check thecontainer to verify the fluid being added is of the correct type. Refer toyour scheduled maintenance information to determine the correctservice interval.
MERCON�, MERCON� V and MERCON� SP are not
interchangeable. DO NOT mix MERCON� MERCON� V and
MERCON� SP. Use of dual usage fluids in an automatic
transmission application requiring MERCON� SP may cause
transmission damage. Use of any fluid other than the
recommended fluid may cause transmission damage.
2Indicates only approximate dry-fill capacity. Some applications may varybased on cooler size and if equipped with an in-tank cooler. The amountof transmission fluid and fluid level should be set by the indication onthe dipstick’s normal operating range.3Add the coolant type originally equipped in your vehicle.4Your vehicle’s rear axle is filled with a synthetic rear axle lubricant andis considered lubricated for life. These lubricants are not to be checkedor changed unless a leak is suspected, service is required or the axle hasbeen submerged in water. The axle lubricant should be changed any timethe axle has been submerged in water.5Use of synthetic or synthetic blend motor oil is not mandatory. Engineoil need only meet the requirements of Ford specificationWSS-M2C930-A and the API Certification mark.
2006 Navigator (nav)Owners Guide (post-2002-fmt)USA (fus)
Maintenance and Specifications
378
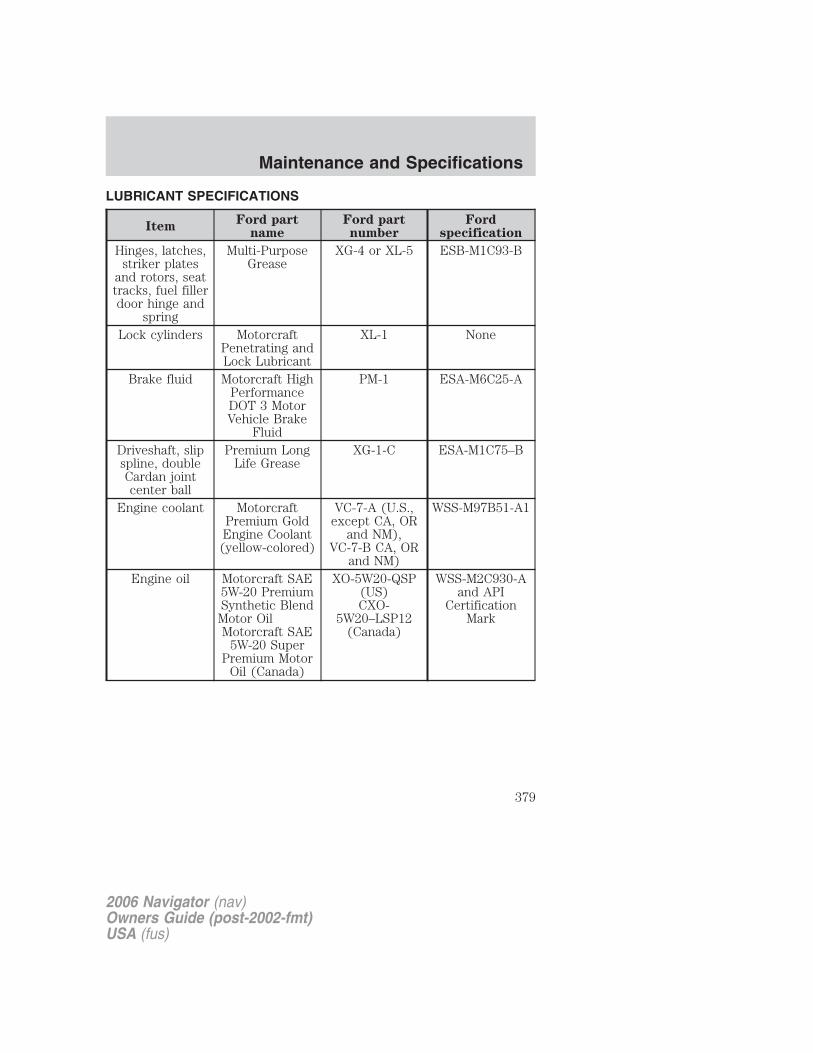
LUBRICANT SPECIFICATIONS
ItemFord part
nameFord partnumber
Fordspecification
Hinges, latches,striker plates
and rotors, seattracks, fuel fillerdoor hinge and
spring
Multi-PurposeGrease
XG-4 or XL-5 ESB-M1C93-B
Lock cylinders MotorcraftPenetrating andLock Lubricant
XL-1 None
Brake fluid Motorcraft HighPerformanceDOT 3 MotorVehicle Brake
Fluid
PM-1 ESA-M6C25-A
Driveshaft, slipspline, doubleCardan jointcenter ball
Premium LongLife Grease
XG-1-C ESA-M1C75–B
Engine coolant MotorcraftPremium GoldEngine Coolant(yellow-colored)
VC-7-A (U.S.,except CA, OR
and NM),VC-7-B CA, OR
and NM)
WSS-M97B51-A1
Engine oil Motorcraft SAE5W-20 PremiumSynthetic BlendMotor OilMotorcraft SAE
5W-20 SuperPremium Motor
Oil (Canada)
XO-5W20-QSP(US)CXO-
5W20–LSP12(Canada)
WSS-M2C930-Aand API
CertificationMark
2006 Navigator (nav)Owners Guide (post-2002-fmt)USA (fus)
Maintenance and Specifications
379
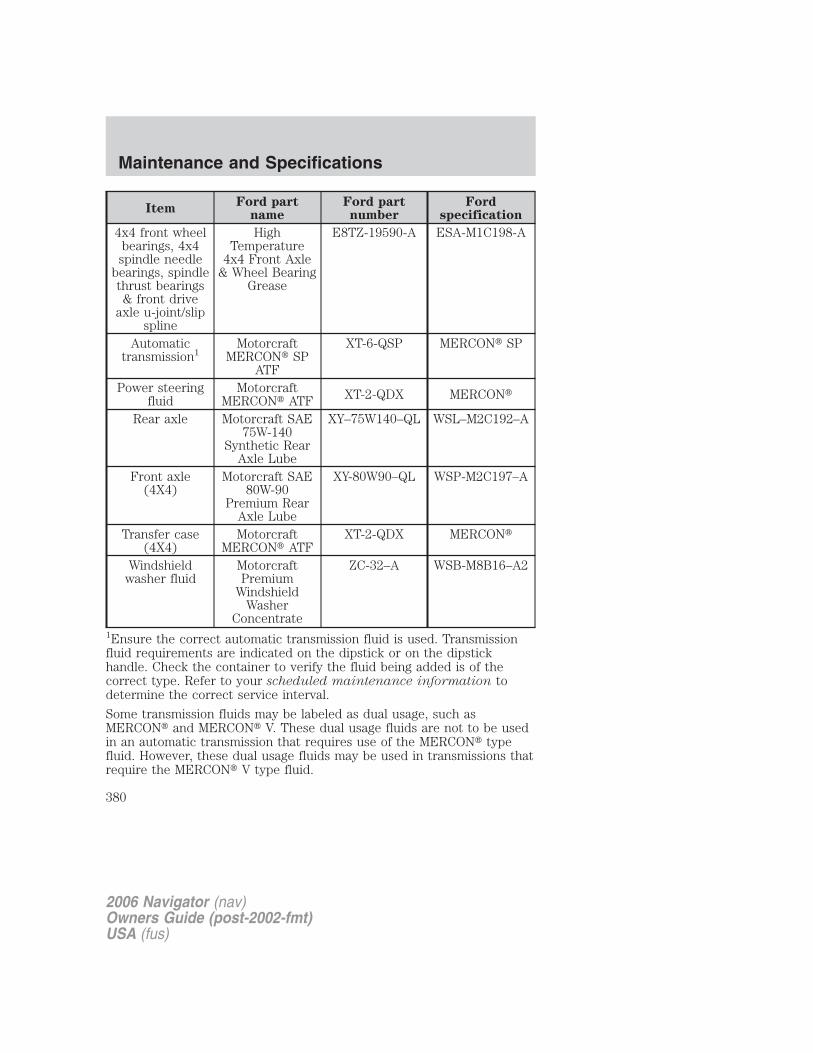
ItemFord part
nameFord partnumber
Fordspecification
4x4 front wheelbearings, 4x4spindle needle
bearings, spindlethrust bearings& front drive
axle u-joint/slipspline
HighTemperature
4x4 Front Axle& Wheel Bearing
Grease
E8TZ-19590-A ESA-M1C198-A
Automatictransmission1
MotorcraftMERCON� SP
ATF
XT-6-QSP MERCON� SP
Power steeringfluid
MotorcraftMERCON� ATF XT-2-QDX MERCON�
Rear axle Motorcraft SAE75W-140
Synthetic RearAxle Lube
XY–75W140–QL WSL–M2C192–A
Front axle(4X4)
Motorcraft SAE80W-90
Premium RearAxle Lube
XY-80W90–QL WSP-M2C197–A
Transfer case(4X4)
MotorcraftMERCON� ATF
XT-2-QDX MERCON�
Windshieldwasher fluid
MotorcraftPremium
WindshieldWasher
Concentrate
ZC-32–A WSB-M8B16–A2
1Ensure the correct automatic transmission fluid is used. Transmissionfluid requirements are indicated on the dipstick or on the dipstickhandle. Check the container to verify the fluid being added is of thecorrect type. Refer to your scheduled maintenance information todetermine the correct service interval.
Some transmission fluids may be labeled as dual usage, such asMERCON� and MERCON� V. These dual usage fluids are not to be usedin an automatic transmission that requires use of the MERCON� typefluid. However, these dual usage fluids may be used in transmissions thatrequire the MERCON� V type fluid.
2006 Navigator (nav)Owners Guide (post-2002-fmt)USA (fus)
Maintenance and Specifications
380

MERCON�, MERCON� V and MERCON� SP are notinterchangeable. DO NOT mix MERCON�, MERCON� V andMERCON� SP. Use of dual usage fluids in automatic transmissionapplications requiring MERCON� SP may cause transmissiondamage. Use of any fluid other than the recommended fluid maycause transmission damage.
ENGINE DATA
Engine 5.4L 3V V8 engine
Cubic inches 330Required fuel 91 octaneFiring order 1-3-7-2-6-5-4-8Ignition system Coil on plugSpark plug gap1 0.040–0.050 inch (1.02–1.27mm)Compression ratio 9.85:11Spark plug gap not adjustable
VEHICLE DIMENSIONS
Vehicle dimensions 4x2 and 4x4 – inches (mm)
(1) Overall length 207.5 (5270)(2) Vehicle width(Body)
78.7 (2000)
(2) Vehicle widthwith power running boards,mirrors folded
79.9 (2029)
(2) Vehicle widthwith fixed running boards
82.2 (2088)
(3) Overall height 77.8 (1975)(4) Wheelbase 118.8 (3018)(5) Track - Front 66.9 (1701)(5) Track - Rear 67.1 (1704)
2006 Navigator (nav)Owners Guide (post-2002-fmt)USA (fus)
Maintenance and Specifications
381
5
2
3
2006 Navigator (nav)Owners Guide (post-2002-fmt)USA (fus)
Maintenance and Specifications
382
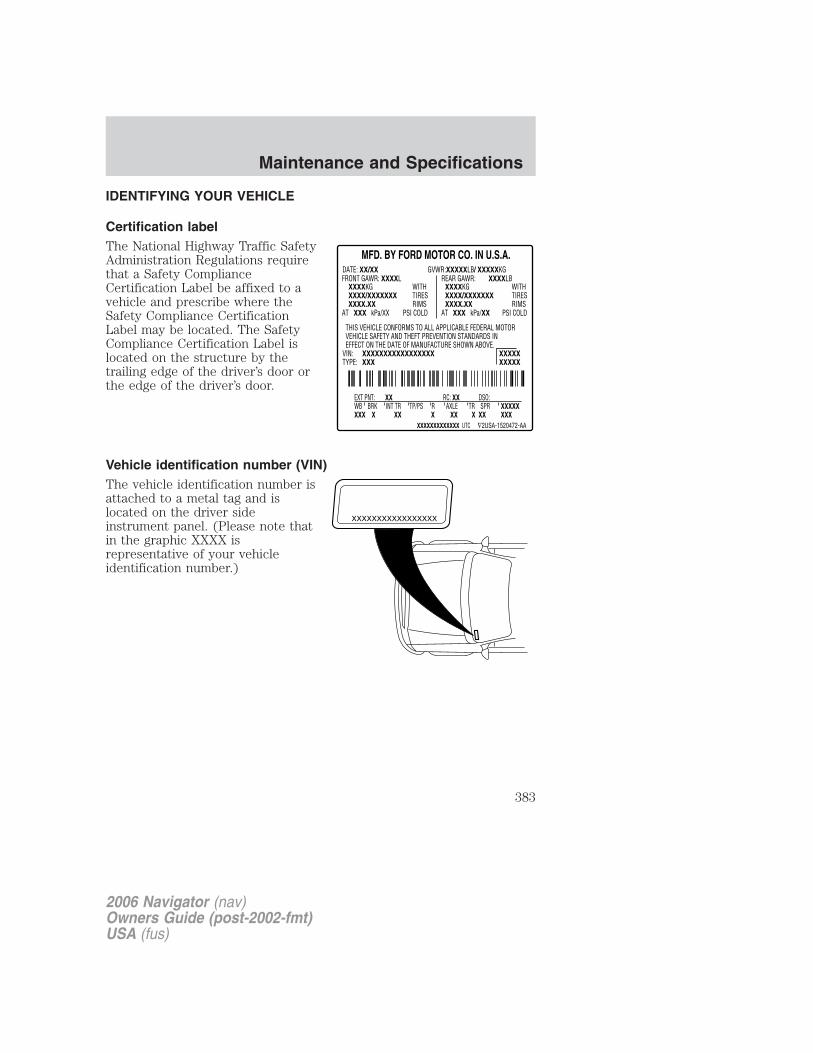
IDENTIFYING YOUR VEHICLE
Certification labelThe National Highway Traffic SafetyAdministration Regulations requirethat a Safety ComplianceCertification Label be affixed to avehicle and prescribe where theSafety Compliance CertificationLabel may be located. The SafetyCompliance Certification Label islocated on the structure by thetrailing edge of the driver’s door orthe edge of the driver’s door.
Vehicle identification number (VIN)The vehicle identification number isattached to a metal tag and islocated on the driver sideinstrument panel. (Please note thatin the graphic XXXX isrepresentative of your vehicleidentification number.)
XXXXXXXXXXXXXXXXX
2006 Navigator (nav)Owners Guide (post-2002-fmt)USA (fus)
Maintenance and Specifications
383
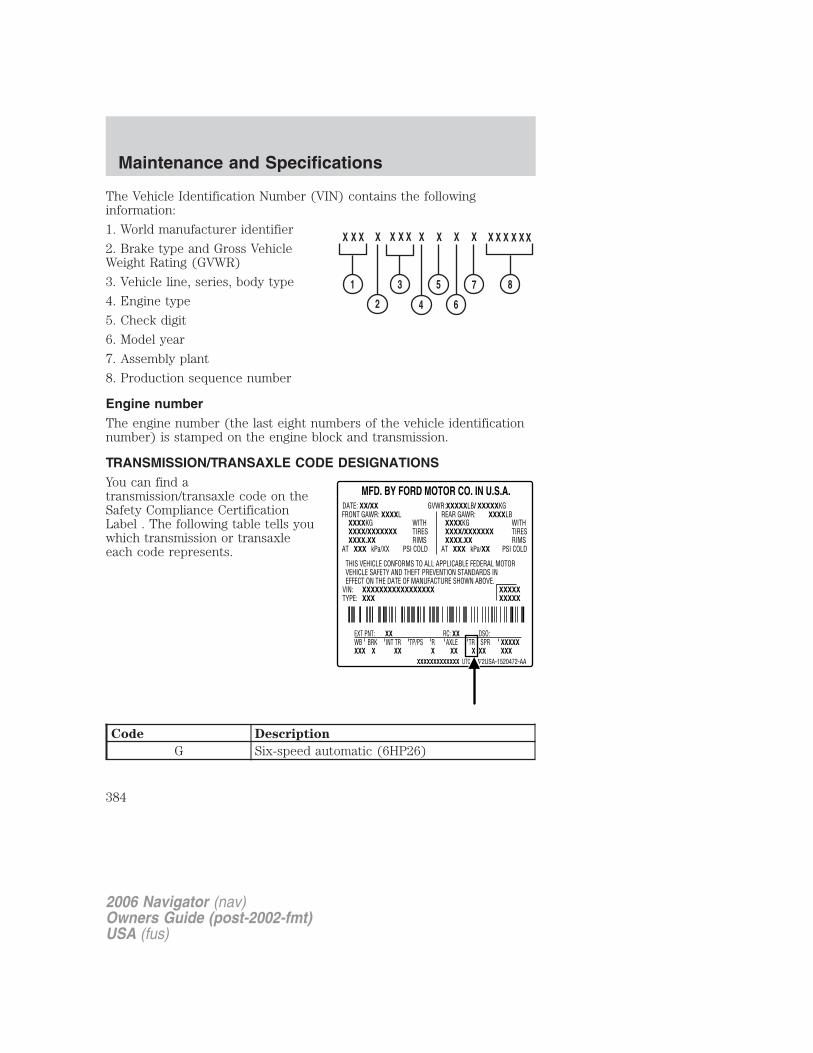
The Vehicle Identification Number (VIN) contains the followinginformation:
1. World manufacturer identifier
2. Brake type and Gross VehicleWeight Rating (GVWR)
3. Vehicle line, series, body type
4. Engine type
5. Check digit
6. Model year
7. Assembly plant
8. Production sequence number
Engine numberThe engine number (the last eight numbers of the vehicle identificationnumber) is stamped on the engine block and transmission.
TRANSMISSION/TRANSAXLE CODE DESIGNATIONSYou can find atransmission/transaxle code on theSafety Compliance CertificationLabel . The following table tells youwhich transmission or transaxleeach code represents.
Code Description
G Six-speed automatic (6HP26)
2006 Navigator (nav)Owners Guide (post-2002-fmt)USA (fus)
Maintenance and Specifications
384
LINCOLN ACCESSORIES FOR YOUR VEHICLEA wide selection of Genuine Lincoln Accessories are available for yourvehicle through your local authorized Lincoln or Ford of Canada dealer.These quality accessories have been specifically engineered to fulfill yourautomotive needs; they are custom designed to complement the styleand aerodynamic appearance of your vehicle. In addition, each accessoryis made from high quality materials and meets or exceeds Lincoln’srigorous engineering and safety specifications. Ford Motor Company willrepair or replace any properly dealer-installed Genuine Lincoln Accessoryfound to be defective in factory-supplied materials or workmanshipduring the warranty period, as well as any component damaged by thedefective accessory. The accessory will be warranted for whicheverprovides you the greatest benefit:• 12 months or 12,000 miles (20,000 km) (whichever occurs first), or• the remainder of your new vehicle limited warranty.This means that Genuine Lincoln Accessories purchased along with yournew vehicle and installed by the authorized dealer are covered for thefull length of your New Vehicle’s Limited Warranty — 4 years or50,000 miles (80,000 km) (whichever occurs first). Contact yourauthorized dealer for details and a copy of the warranty.Not all accessories are available for all models.
Following is a list of several Genuine Lincoln Accessory products. Not allaccessories are available for all models. To find out what accessories areavailable for your vehicle, please contact your authorized dealer or visitour online store at: www.lincolnaccessories.com.
Exterior styleBug shieldsDeflectorsFront end coversHeadlamps, fog lights and Daytime Running Lamps (DRLs)Splash guardsWheels
Interior styleFloor mats
LifestyleBike racksCargo organization and management
2006 Navigator (nav)Owners Guide (post-2002-fmt)USA (fus)
Accessories
385
Rear seat entertainment systems
Mobile-Ease� hands-free communication system
Trailer hitches, wiring harnesses and accessories
Peace of mindFirst aid and highway safety kits
Full vehicle covers
Locking gas cap
Remote start
Vehicle security systems
For maximum vehicle performance, keep the following information inmind when adding accessories or equipment to your vehicle:
• When adding accessories, equipment, passengers and luggage to yourvehicle, do not exceed the total weight capacity of the vehicle or ofthe front or rear axle (GVWR or GAWR as indicated on the SafetyCompliance Certification label). Consult your authorized dealer forspecific weight information.
• The Federal Communications Commission (FCC) and Canadian RadioTelecommunications Commission (CRTC) regulate the use of mobilecommunications systems — such as two-way radios, telephones andtheft alarms - that are equipped with radio transmitters. Any suchequipment installed in your vehicle should comply with FCC or CRTCregulations and should be installed only by a qualified servicetechnician.
• Mobile communications systems may harm the operation of yourvehicle, particularly if they are not properly designed for automotiveuse.
• To avoid interference with other vehicle functions, such as anti-lockbraking systems, amateur radio users who install radios and antennasonto their vehicle should not locate the Amateur Radio Antennas inthe area of the driver’s side hood.
• Electrical or electronic accessories or components that are added tothe vehicle by the authorized dealer or the owner may adversely affectbattery performance and durability.
2006 Navigator (nav)Owners Guide (post-2002-fmt)USA (fus)
Accessories
386

A
ABS (see Brakes) .....................275
Accessory delay ........................140
Air cleaner filter ...............374, 376
Air conditioning ........................111auxiliary heater and airconditioner ..............................115
Air suspension ...........................282description ..............................282
Airbag supplementalrestraint system ........213–214, 218
and child safety seats ............215description ......................214, 218disposal ....................................221driver airbag ....................216, 219indicator light .................218, 220operation .........................216, 219passenger airbag .............216, 219
Antifreeze(see Engine coolant) ................356
Anti-lock brake system(see Brakes) ......................275–276
Audio system (see Radio) ...18, 23
Automatic transmissiondriving an automaticoverdrive .................................287fluid, adding ............................374fluid, checking ........................374fluid, refill capacities ..............377fluid, specification ..................381
Auxiliary power point ...............135
Axlelubricantspecifications ..................379, 381refill capacities ........................377
B
Battery .......................................354acid, treating emergencies .....354jumping a disabled battery ....323maintenance-free ....................354replacement, specifications ...376servicing ..................................354
BeltMinder .................................210
Brakes ........................................275anti-lock ...........................275–276anti-lock brake system(ABS) warning light ...............276fluid, checking and adding ....373fluid, refill capacities ..............377fluid, specifications .........379, 381lubricantspecifications ..................379, 381parking ....................................277shift interlock ..........................284
Bulbs ..........................................122
C
Capacities for refilling fluids ....377
CD-single premium .....................18
Cell phone use ..............................9
Changing a tire .........................315
Child safety restraints ..............221child safety belts ....................221
Child safety seats ......................224in front seat ............................226in rear seat ..............................226
Cleaning your vehicleengine compartment ..............341instrument panel ....................343interior .............................343–344interior trim ............................344plastic parts ............................342safety belts ..............................343
2006 Navigator (nav)Owners Guide (post-2002-fmt)USA (fus)
Index
387
washing ....................................340waxing .....................................340wheels ......................................341wiper blades ............................342
Climate control (see Airconditioning or Heating) ..........111
Clock ..........................................134
Clock adjust6-CD in dash .............................25
Compass, electronicset zone adjustment ...............156
Console ......................................136overhead ..........................132–133rear ..........................................136
Controlspower seat ...............................186steering column ......................146
Coolantchecking and adding ..............356refill capacities ................360, 377specifications ..................379, 381
Cruise control(see Speed control) ..................144
Customer Assistance ................302Ford Extended ServicePlan ..........................................337Getting assistance outsidethe U.S. and Canada ..............338Getting roadside assistance ...302Getting the serviceyou need .................................331Ordering additional owner’sliterature .................................339The Dispute SettlementBoard .......................................334Utilizing the Mediation/Arbitration Program ...............337
D
Daytime running lamps(see Lamps) ..............................118Defrost
rear window ............................116Dipstick
automatic transmissionfluid ..........................................374engine oil .................................351
Doorslubricant specifications ..........379
Driveline universal joint andslip yoke ....................................375
Driving under specialconditions ..................289, 296, 299
sand .........................................298snow and ice ...........................300through water .................298, 301
E
Electronic message center .......154
Emergencies, roadsidejump-starting ..........................323
Emission control system ..........370
Engine ........................................381cleaning ...................................341coolant .....................................356fail-safe cooling .......................361idle speed control ...................354lubricationspecifications ..................379, 381refill capacities ........................377service points ..........................348starting after a collision .........304
Engine block heater .................274
Engine oil ..................................351change oil soon warning,message center .......................351
2006 Navigator (nav)Owners Guide (post-2002-fmt)USA (fus)
Index
388
checking and adding ..............351dipstick ....................................351filter, specifications ........353, 376recommendations ...................353refill capacities ........................377specifications ..................379, 381
Exhaust fumes ..........................274Extended Rear Park Assist ......289
F
Fail safe cooling ........................361Floor mats .................................166Fluid capacities .........................377
Foglamps ...................................118
Four-Wheel Drive vehicles .......291control trac .............................291description ..............................292driving off road .......................294indicator light .........................291preparing to drive yourvehicle .....................................283
Fuel ............................................362calculating fueleconomy ..........................157, 367cap ...........................................364capacity ...................................377choosing the right fuel ...........365comparisons with EPA fueleconomy estimates .................370detergent in fuel .....................366filling your vehiclewith fuel ..................362, 364, 367filter, specifications ........362, 376fuel pump shut-off switch .....304improving fuel economy ........367octane rating ...................366, 381quality ......................................366running out of fuel .................366safety information relatingto automotive fuels ................362
Fuses ..................................305–306
G
Garage Door Opener(see Homelink wirelesscontrol system) .........................150Gas cap (see Fuel cap) ............364Gas mileage(see Fuel economy) .................367Gauges .........................................15
H
Hazard flashers .........................303Headlamps .................................117
aiming ......................................119autolamp system .....................117bulb specifications ..................122daytime running lights ...........118flash to pass ............................118high beam ...............................117replacing bulbs .......................123turning on and off ..................117
Heatingheating and air conditioningsystem .....................................111
Homelink wireless controlsystem ........................................150
Hood ..........................................347
I
Ignition ...............................271, 381
Infant seats(see Safety seats) .....................224
Inspection/maintenance(I/M) testing ..............................372
Instrument panelcleaning ...................................343cluster ........................................12
2006 Navigator (nav)Owners Guide (post-2002-fmt)USA (fus)
Index
389
lighting up panel andinterior .....................................119
J
Jack ............................................315positioning ...............................315storage .....................................315
Jump-starting your vehicle ......323
K
Keyless entry systemautolock ...................................179programming entry code .......180
Keys ...................................182–183positions of the ignition .........271
L
Lampsautolamp system .....................117bulb replacementspecifications chart ................122daytime running light .............118fog lamps .................................118headlamps ...............................117headlamps, flash to pass ........118instrument panel, dimming ...119interior lamps .................121, 123replacing bulbs ...............122–128
Lane change indicator(see Turn signal) ......................120
Liftgate ..............166, 169, 173–174
Lights,warning and indicator ................12
anti-lock brakes (ABS) ..........276
Load limits .................................256
Loading instructions .................263
Locksautolock ...................................179
childproof ................................171doors ........................................170
Lubricantspecifications .....................379, 381
Lug nuts ....................................322
Luggage rack .............................169
Lumbar support, seats .............185
M
Message center .........................154english/metric button .............161system check button ..............161warning messages ...................161
Mirrors ...............................131, 140automatic dimmingrearview mirror .......................140fold away .................................141heated ......................................141programmable memory ..175, 187side view mirrors (power) .....141signal .......................................142
Moon roof ..................................149
Motorcraft parts ........344, 362, 376
N
Navigation system .......................46cd functions ..............................63destination mode ......................86DVD location ...........................108map mode .................................67quick start .................................48radio functions ..........................55
O
Octane rating ............................366
Oil (see Engine oil) ..................351
2006 Navigator (nav)Owners Guide (post-2002-fmt)USA (fus)
Index
390
P
Panic alarm feature, remoteentry system ..............................174
Parking brake ............................277
Parts (see Motorcraft parts) ....376
Pedals (see Poweradjustable foot pedals) .............142
Power adjustable foot pedals ...142
Power deployable runningboards ........................................142
Power distribution box(see Fuses) ...............................306
Power door locks ..............170, 179
Power liftgate ............................166
Power mirrors ...........................141
Power point ...............................135
Power steering ..........................281fluid, checking and adding ....373fluid, refill capacity ................377fluid, specifications .........379, 381
Power Windows .........................137
Preparing to driveyour vehicle ...............................283
R
Radio ......................................18, 23
Rear window defroster .............116
Relays ........................................305
Remote entry system .......171, 174illuminated entry ....................178locking/unlocking doors .........172opening the trunk ...........173–174panic alarm .............................174replacement/additionaltransmitters .............................177
Roadside assistance ..................302Roof rack ...................................169
S
Safety Belt Maintenance ..........209Safety belts (see Safetyrestraints) ..........201, 203–206, 208
Safety Canopy ...........................218
Safety defects, reporting ..........339
Safety restraints ........201, 203–208belt minder .............................210extension assembly ................208for adults .........................204–206for children .............................221safety belt maintenance .........209warning light and chime ........209
Safety seats for children ..........224
Safety ComplianceCertification Label ....................383
Seat belts(see Safety restraints) .............201
Seats ..........................................185child safety seats ....................224memory seat ...................175, 187
SecuriLock passiveanti-theft system ...............182–183
Servicing your vehicle ..............346
Setting the clockAM/FM/In-dash 6 CD ................25
Snowplowing .................................8
Spare tire (seeChanging the Tire) ...................316
Spark plugs,specifications .....................376, 381
Special noticeutility-type vehicles ....................8
2006 Navigator (nav)Owners Guide (post-2002-fmt)USA (fus)
Index
391
Specification chart,lubricants ...........................379, 381Speed control ............................144Starting your vehicle ........271–273
jump starting ..........................323Steering
speed sensitive .......................281Steering wheel
controls ....................................146tilting .......................................131
T
Tire Pressure MonitoringSystem (TPMS)
Driving .....................................298Roadside Emergencies ...........315Tires, Wheels and Loading ....251Warning Displays ..............15, 161
Tires ...........................237–239, 315alignment ................................249care ..........................................248changing ..................315–316, 318checking the pressure ............240inspecting and inflating .........239label .........................................247replacing ..................................242rotating ....................................250safety practices .......................249sidewall information ...............243snow tires and chains ............255spare tire .................................315terminology .............................239tire grades ...............................238treadwear ........................238, 248
Tonneau cover ...........................134
Towing .......................................263
recreational towing .................269trailer towing ..........................263wrecker ....................................329
Transmission .............................284brake-shift interlock (BSI) ....284fluid, checking and adding(automatic) .............................374fluid, refill capacities ..............377lubricantspecifications ..................379, 381
Trunk .................................173–174
Turn signal ................................120
V
Vehicle dimensions ...................381
Vehicle Identification Number(VIN) ..........................................383
Vehicle loading ..........................256
Ventilating your vehicle ...........274
W
Warning lights (see Lights) .......12
Washer fluid ..............................349
Water, Driving through .............301
Windowspower .......................................137rear wiper/washer ...................131
Windshield washer fluid andwipers ........................................130
checking and adding fluid .....349liftgate reservoir .....................349replacing wiper blades ...........350
Wrecker towing .........................329
2006 Navigator (nav)Owners Guide (post-2002-fmt)USA (fus)
Index
392