shower head alcachofa de ducha - graff-designs.com
TRANSCRIPT
IOG 5013.04
SHOWER HEADALCACHOFA DE DUCHA
Dear Customer Estimado ClienteThank you for selecting our product. We are confident we can fully satisfy Muchas gracias por elegir nuestro producto. Estamos seguros que podemos your expectations by offering you a wide range of technologically advanced satisfacer completamente sus expectativas ofreciéndole una amplia variedad products which directly result from our many years of experience in faucet de productos tecnológicamente avanzados que resultan directamente de and fitting production. muchos años de experiencia en grifos y su producción apropiada.
ENGLISH~
ESPANOL
For care, use soft towel with soap and water only! Under nocircumstances should you use any chemicals. ATTENTION! ATENCIÓN! Para el cuidado, utilice solamente una toalla suave con jabón
y aqua! Bajo ninguna circunstancia no use productos químicos.
Installation Instructions Instrucciones de Instalación
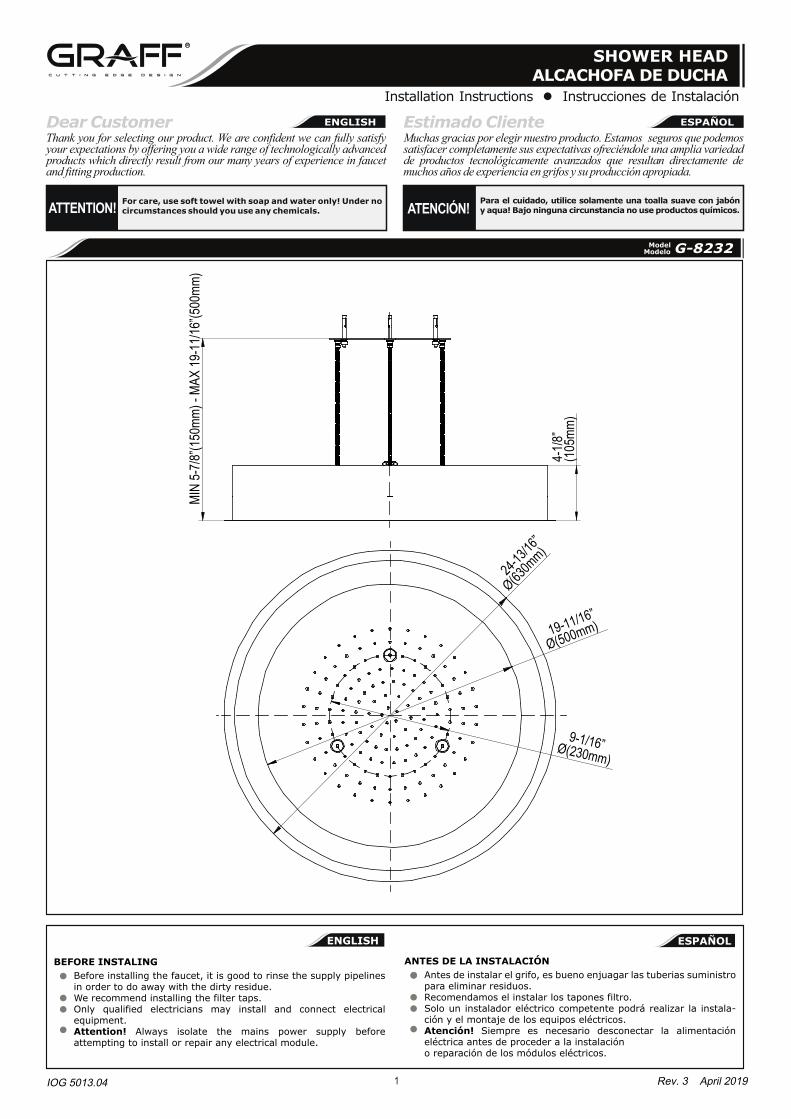
ModelModelo G-8232
1
Ø(630m
m)
Ø(500mm)
Ø(230mm)
(105
mm)
MIN
5-7/8
”(150
mm) -
MAX
19-1
1/16”
(500
mm)
4-1/8
”
9-1/16”
19-11/16”
24-13/
16”
ANTES DE LA INSTALACIÓN• Antes de instalar el grifo, es bueno enjuagar las tuberias suministro
para eliminar residuos.Recomendamos el instalar los tapones filtro.Solo un instalador eléctrico competente podrá realizar la instala-ción y el montaje de los equipos eléctricos.Atención! Siempre es necesario desconectar la alimentación eléctrica antes de proceder a la instalacióno reparación de los módulos eléctricos.
BEFORE INSTALING• Before installing the faucet, it is good to rinse the supply pipelines
in order to do away with the dirty residue.We recommend installing the filter taps.Only qualified electricians may install and connect electrical equipment.Attention! Always isolate the mains power supply before attempting to install or repair any electrical module.
• • •
• • • •
~ESPANOLENGLISH
Rev. 3 April 2019
2
~ESPANOL
For easy installation of your GRAFF faucet you will need:
To complete the project, you should:gather the tools and all the parts you will need,prepare the mounting area,mount the faucet,connect the supply lines,finally test and flush the faucet.
You should have the following tools:an adjustable spanner,
Para terminar el proyecto, usted debe:rprepare el área para el montaje,monte el grifo,conecte las líneas de fuente,finalmente pruebe y limpie el grifo con un chorro de agua.
Usted debe tener las herramientas siguientes:
ENGLISH
to READ ALL the instructions completely before beginning,to READ ALL the warnings, care and maintenance information.
Para la instalación fácil de su grifo de la GRAFF ustednecesitará:
LEER TODAS las instrucciones completamente antes decomenzar,LEER TODA la información sobre las advertencias, cuidado ymantenimiento.
recolectar las herramientas y todas las piezas que usted necesitará,
drill,screwdriver,hammer,band tape,pencil.
destornillador,máquina de perforacióndestornillador,martillo,cinta métrica,lápiz.
8
3
1 11
12
13
14
1
4
2
7
9
6
5
10
K
15
POWER CABLE
MOUNTING PLATE
SCREWNUT
FLEXIBLE HOSE
STUD BOLT
POWER SUPPLY
GASKETNUT
HEX KEY
GASKET WITH STRAINER
REMOTE CONTROLLER
CABLE DEL ALIMENTADOR
CHAPA DE MONTAJE
TORNILLOTUERCA
MANGUERA FLEXIBLE
TORNILLO
BLOQUE DE ALIMENTACIÓN
EMPAQUETADORATUERCA
LLAVE ALLEN
JUNTA CON COLADOR
MANDO A DISTANCIA
ENGLISHŸ
ESPANOL123456789
1011121314
K
SHOWER HEAD ALCACHOFA DE DUCHA
DOWEL PASADOR
THREADED STUB PIPE TUBO ROSCADO
15 ELECTRICAL EXTENSION 5M EXTENSIÓN ELÉCTRICA 5M
IOG 5013.04
SHOWER HEADALCACHOFA DE DUCHA
Installation Instructions Instrucciones de Instalación
Rev. 3 April 2019
3
INSTALLATION MONTAJE
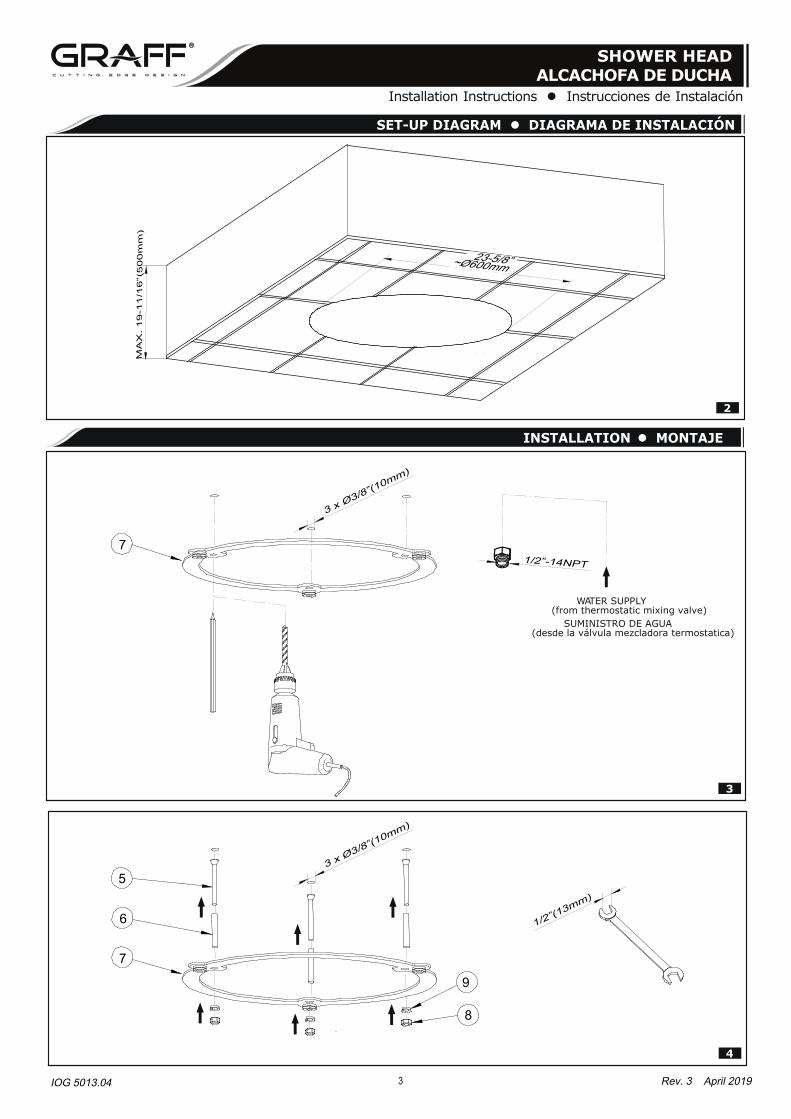
SET-UP DIAGRAM DIAGRAMA DE INSTALACIÓN
2
)m
m0
05(”
61/
11-
91 .
XA
M
3 x Ø3/8”(10mm)
3
71/2”-14NPT
3 x Ø3/8”(10mm)
4
7
1/2”(13mm)
6
5
9
8
WATER SUPPLY(from thermostatic mixing valve)
SUMINISTRO DE AGUA (desde la válvula mezcladora termostatica)
23-5/8”~Ø600mm
IOG 5013.04
SHOWER HEADALCACHOFA DE DUCHA
Installation Instructions Instrucciones de Instalación
Rev. 3 April 2019
4
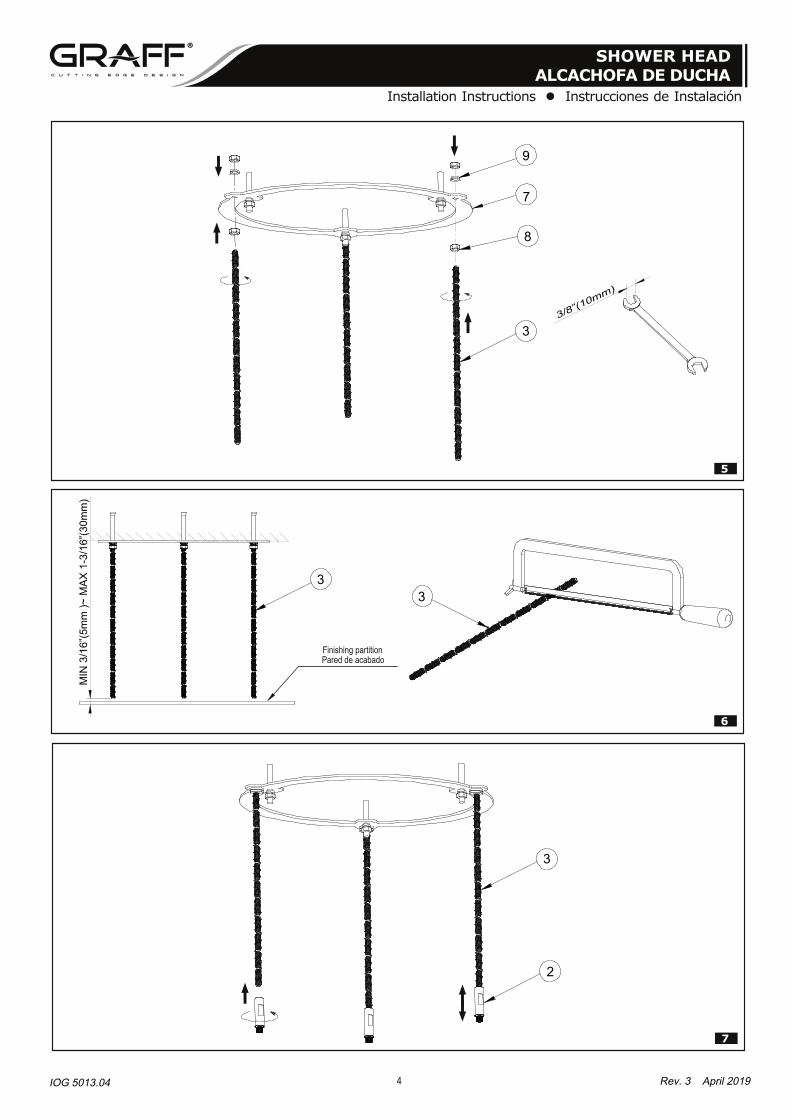
MIN
3/1
6”(5
mm
)~ M
AX
1-3
/16”
(30m
m)
6
33
7
3
2
5
3/8”(10mm)
3
7
8
9
IOG 5013.04
SHOWER HEADALCACHOFA DE DUCHA
Installation Instructions Instrucciones de Instalación
Rev. 3 April 2019
5
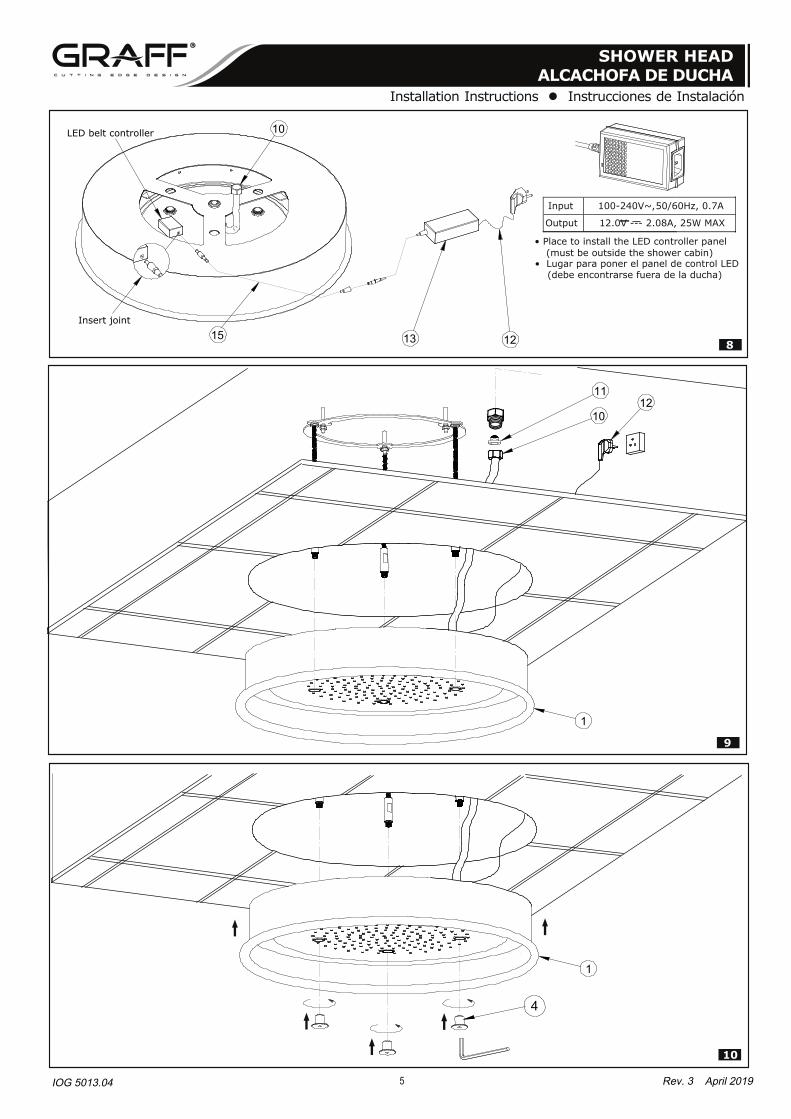
LED belt controller
Insert joint
10
1581213
• Place to install the LED controller panel(must be outside the shower cabin)
• Lugar para poner el panel de control LED(debe encontrarse fuera de la ducha)
Input 100-240V~, 50/60Hz, 0.7A
Output 12.0V --- 2.08A, 25W MAX
9
11
1012
1
10
4
1
IOG 5013.04
SHOWER HEADALCACHOFA DE DUCHA
Installation Instructions Instrucciones de Instalación
Rev. 3 April 2019
ENGLISH~
ESPANOL
6
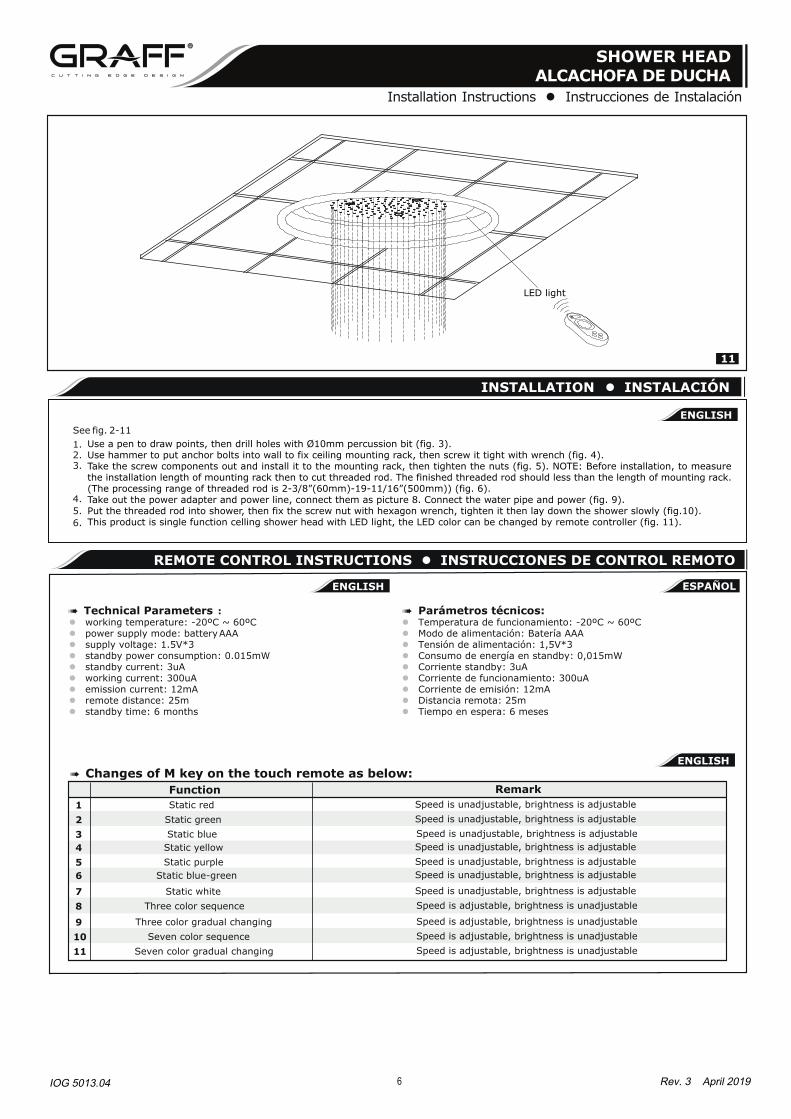
11
LED light
See fig. 2-11ENGLISH
INSTALLATION INSTALACIÓN
1.2.3.
4.5.6.
Use a pen to draw points, then drill holes with Ø10mm percussion bit (fig. 3).Use hammer to put anchor bolts into wall to fix ceiling mounting rack, then screw it tight with wrench (fig. 4).Take the screw components out and install it to the mounting rack, then tighten the nuts (fig. 5). NOTE: Before installation, to measure the installation length of mounting rack then to cut threaded rod. The finished threaded rod should less than the length of mounting rack. (The processing range of threaded rod is 2-3/8”(60mm)-19-11/16”(500mm)) (fig. 6).Take out the power adapter and power line, connect them as picture 8. Connect the water pipe and power (fig. 9).Put the threaded rod into shower, then fix the screw nut with hexagon wrench, tighten it then lay down the shower slowly (fig.10).This product is single function celling shower head with LED light, the LED color can be changed by remote controller (fig. 11).
IOG 5013.04
SHOWER HEADALCACHOFA DE DUCHA
Installation Instructions Instrucciones de Instalación
Technical Parameters : working temperature: -20ºC ~ 60ºC power supply mode: AAA battery supply voltage: 1.5V*3 standby power consumption: 0.015mW standby current: 3uA working current: 300uA emission current: 12mA remote distance: 25m standby time: 6 months
REMOTE CONTROL INSTRUCTIONS INSTRUCCIONES DE CONTROL REMOTO
Parámetros técnicos: Temperatura de funcionamiento: -20ºC ~ 60ºC Modo de alimentación: Batería AAA Tensión de alimentación: 1,5V*3 Consumo de energía en standby: 0,015mW Corriente standby: 3uA Corriente de funcionamiento: 300uA Corriente de emisión: 12mA Distancia remota: 25m Tiempo en espera: 6 meses
FunctionStatic red
Static greenStatic blue
Static yellowStatic purple
Static blue-green
Static whiteThree color sequence
Three color gradual changingSeven color sequence
Seven color gradual changing
1234567891011
Remark
Speed is unadjustable, brightness is adjustableSpeed is unadjustable, brightness is adjustableSpeed is unadjustable, brightness is adjustableSpeed is unadjustable, brightness is adjustableSpeed is unadjustable, brightness is adjustableSpeed is unadjustable, brightness is adjustable
Speed is unadjustable, brightness is adjustableSpeed is adjustable, brightness is unadjustable
Speed is adjustable, brightness is unadjustableSpeed is adjustable, brightness is unadjustableSpeed is adjustable, brightness is unadjustable
Changes of M key on the touch remote as below:ENGLISH
Rev. 3 April 2019
SHOWER HEADALCACHOFA DE DUCHA
Installation Instructions Instrucciones de Instalación
1234567891011
Función Comentario
Cambios de tecla M en el remoto táctil como se indica a continuación:
La velocidad no se puede ajustar, el brillo es ajustable.
La velocidad es ajustable, el brillo no se puede ajustar.
Rojo estáticoVerde estáticoAzul estático
Amarillo estáticoPúrpura estático
Verde azulado estático
Blanco estáticoSecuencia tricolor
Cambio gradual tricolorSecuencia de siete colores
Cambio gradual de siete colores
La velocidad no se puede ajustar, el brillo es ajustable.La velocidad no se puede ajustar, el brillo es ajustable.La velocidad no se puede ajustar, el brillo es ajustable.La velocidad no se puede ajustar, el brillo es ajustable.La velocidad no se puede ajustar, el brillo es ajustable.
La velocidad no se puede ajustar, el brillo es ajustable.
La velocidad es ajustable, el brillo no se puede ajustar.La velocidad es ajustable, el brillo no se puede ajustar.La velocidad es ajustable, el brillo no se puede ajustar.
~ESPANOL
Remote instruction:
7IOG 5013.04
turn on/off remote controll at any time;
pause key: on the dynamic mode, it allows to pause on the current function;
select the light mode: color change in a loop or static shade of one color;
brightness control: every time it's pressed, the brightness series adds 1 level, altogether 100 levels - in static shade of one color;brightness control: every time it's pressed, the brightness series lowers 1 level, altogether 100 levels - in static shade of one color;
speed control: every time the button is pressed, the speed series adds 1 level, altogether 100 levels;
speed control: every time the button is pressed, the speed series lowers 1 level, altogether 100 levels;
Power supply management:
Indicator light instruction:
Instructions for wireless remote control coding:
Remarks:
Multicolor pulley touch key, static mode choose key, more than 55 touch points.The button has two functions:
It allows to choose one static color (if pressed when the M- is on static mode)It allows to switch from one color to the next by rotating the finger on top of the colour ring.
Touch remote has 64 touch keys, each key function is described below:
If the remote is not used for more than 20 seconds, it enters the standby state (powersaving), to extend the battery life; when slightly shaken, the remote comes back to the normal working state.
When the light is on, it is possible to choose a button; when the light is off, it's not possible to activat any command.
Pleace the remote control close to the showerhead, and at the same time, press the ON/OFF key on the remote control for a few seconds.Keep the key pressed for 3s to match code. The load light will flicker when the code has been matched successfully.
If the remote control is not used for a long time, it is advisable to take the batteries out.
ENGLISH~
ESPANOL
Instrucción a distancia:
Activar/desactivar el control remoto en cualquier momento;
Tecla de pausa: en el modo dinámico, permite pausar en la función actual.
Seleccione el modo de luz: cambio de color en un bucle o estática de un color de sombra.
Control de brillo: cada vez que se pulsa, la serie de brillo agrega 1 nivel, en total 100 niveles - estática de un color de sombra;Control de brillo: cada vez que se pulsa, la serie de brillo baja 1 nivel, en total 100 niveles - estática de un color de sombra;
Control de velocidad: cada vez que se pulsa el botón, la serie de velocidad agrega 1 nivel, en total 100 niveles;
Control de velocidad: cada vez que se pulsa el botón, la serie de velocidad disminuye 1 nivel, en total 100 niveles;
Gestión de alimentación:
Instrucción de luz indicadora:
Comentarios:
Tecla táctil de polea multicolor, elija la tecla de modo estático, más de 55 puntos de contacto.El botón tiene dos funciones:
Permite elegir un color estático (si se presiona cuando la M- está en modo estático)Permite cambiar de un color al siguiente girando el dedo sobre la parte superior del anillo de color.
Toque remoto tiene 64 teclas, cada tecla de función se describe a continuación:
Si el control remoto no se utiliza durante más de 20 segundos, entra en el estado de espera (ahorro de energía), para extender la vida útil de la batería; cuando es ligeramente sacudida, el control remoto vuelve al estado normal de trabajo.
Cuando la luz está encendida, es posible elegir un botón; cuando la luz está apagada, no es posible activar ningún comando.
Coloque el control remoto próximo al cabezal de la ducha y, al mismo tiempo, presione la tecla ON/OFF en el control remoto durante unos segundos.Mantenga pulsada la tecla durante 3 s para que coincida con el código. La luz de carga parpadeará cuando el código se ha concilia-do correctamente.
Si el control remoto no se utiliza durante un largo periodo de tiempo, es aconsejable cambiar las pilas.
Instrucciones para la codificación de control remoto inalámbrico:
Rev. 3 April 2019
ENGLISH~
ESPANOL
CARE AND MAINTENANCE CUIDADO Y MANTENIMIENTO
Your Graff faucet is designed and engineered in accordance with the highest quality and performance standards. Be sure not to damage the finish during installation. Care should be given to the cleaning of this product. Although its finish is extremely durable, it can be damaged by harsh abrasives or polish. Never use abrasive cleaners, acids, solvents, etc. to clean any Graff product. To clean, simply wipe gently with a damp cloth and blot dry with a soft towel. Regularly wipe the lower part of the rainshower head thorough-ly (with your palm or a soft cloth), once every 1-2 months, in order to remove any dirt from the nozzles. Failing to do so may result in damage to the casing of the rain shower head.
Su grifo de la Graff esta diseńado y dirigido acuerdo con los estándares de funcionamiento y calidad más altos. Este seguro no dańar las terminaciones del grifo durante la instalación. Cuide el producto manteniendolo siempre limpio. Aunque su acabado es extremadamen-te durable, puede ser dańado por los abrasivos o pulientes ásperos. Nunca utilice limpiadores abrasivos, ácidos, solventes, el etc. para limpiar cualquier producto de la Graff. Para limpiar, simplemente use un pańo húmedo y seque con una toalla suave.Periódicamente (1-2 veces al mes), limpie la parte inferior del rociador de ducha (con la mano o con un paño suave) para eliminar la suciedad acumulada en las boquillas. La falta de limpieza periódica puede provocar el deterioro de su suerficie.
ENGLISH~
ESPANOL
WARRANTY GARANTÍA
Warranty conditions and warranty registration card are outlined on a separate sheet.
Las condiciones de la garantía y la tarjeta del registro de la garantía se encuentran en una pagina separada.
8IOG 5013.04
SHOWER HEADALCACHOFA DE DUCHA
Installation Instructions Instrucciones de Instalación
ENVIRONMENTAL PROTECTION • PROTECCIÓN DEL MEDIO AMBIENTE
ENGLISH ~ESPANOL
In the interest of environmental protection, electric and electronic equipment must not be thrown away with unsorted household and commercial waste. To ensure correct disposal, the user is obligated to bring used equipment to a designated collection point.
Para proteger el medio ambiente, l los aparatos eléctricos y electrónicos no deben ser eliminados con residuos domésticos y comerciales sin clasificar. Para garantizar una correcta eliminación, el usuario está obligado a llevar el equipo usado a un punto de recogida autorizado.
Rev. 3 April 2019
www.graff-designs.com