monitorización de copias de seguridad y...
TRANSCRIPT

Monitorizaciónde copias de seguridad
y recursos
Nombre: Alberto Cárdenas JiménezFecha: 21/06/2013Proyecto integrado Administración de sistemas informáticos en red.
Página 1
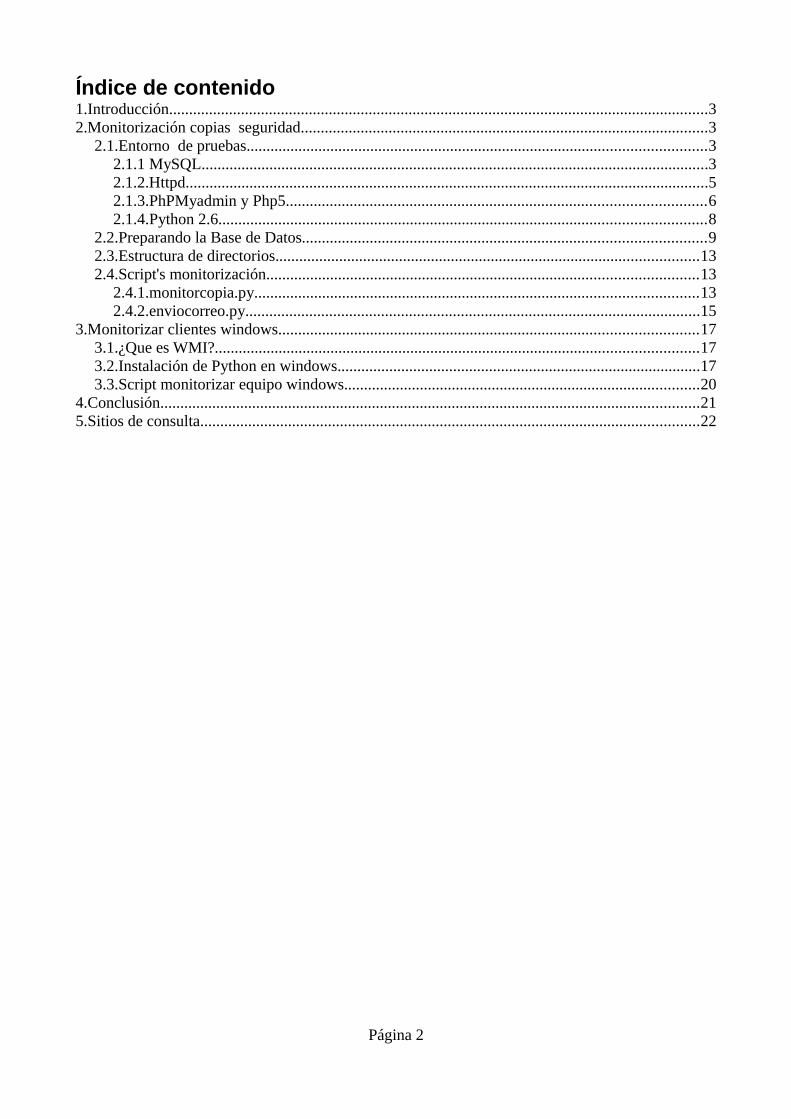
Índice de contenido1.Introducción.......................................................................................................................................32.Monitorización copias seguridad......................................................................................................3
2.1.Entorno de pruebas...................................................................................................................32.1.1 MySQL...............................................................................................................................32.1.2.Httpd...................................................................................................................................52.1.3.PhPMyadmin y Php5.........................................................................................................62.1.4.Python 2.6..........................................................................................................................8
2.2.Preparando la Base de Datos.....................................................................................................92.3.Estructura de directorios..........................................................................................................132.4.Script's monitorización............................................................................................................13
2.4.1.monitorcopia.py...............................................................................................................132.4.2.enviocorreo.py..................................................................................................................15
3.Monitorizar clientes windows.........................................................................................................173.1.¿Que es WMI?.........................................................................................................................173.2.Instalación de Python en windows...........................................................................................173.3.Script monitorizar equipo windows.........................................................................................20
4.Conclusión.......................................................................................................................................215.Sitios de consulta.............................................................................................................................22
Página 2

1.Introducción.
El proyecto tiene como objetivo la monitorización de las copias de seguridad que realiza una empresa, las copias se envían desde los clientes hacia una estructura de directorios en el servidor, actualmente no existe ningún sistemas que verifique si se han realizado o no dichas copias.
Se propone la solución del proyecto, que comprueba si se a realizado las copias y avisa en caso de que no sea así mediante correo electrónico.
Además se añadirá la monitorización de algunos componentes de los clientes windows remotos.
2.Monitorización copias seguridad.
Para monitorizar las copias de seguridad voy a instalar un entorno de pruebas igual al de producción para poder testear.
2.1.Entorno de pruebas.
En el entorno de pruebas voy a usar una maquina virtual Centos 6.4 en KVM ya que el servidor de la empresa usa este sistema. Necesito instalar los siguientes servicios:
2.1.1 MySQL
Comienzo instalando MySQL.
[root@localhost ~]# yum install mysqlserver
Le decimos que inicie MySQL en el arranque.
[root@localhost ~]# chkconfig levels 235 mysqld on
Reiniciamos MySQL.
[root@localhost ~]# /etc/init.d/mysqld start
Configuramos la contraseña de root.
[root@localhost ~]# mysql_secure_installation
NOTE: RUNNING ALL PARTS OF THIS SCRIPT IS RECOMMENDED FOR ALL MySQL SERVERS IN PRODUCTION USE! PLEASE READ EACH STEP CAREFULLY!
In order to log into MySQL to secure it, we'll need the current
Página 3
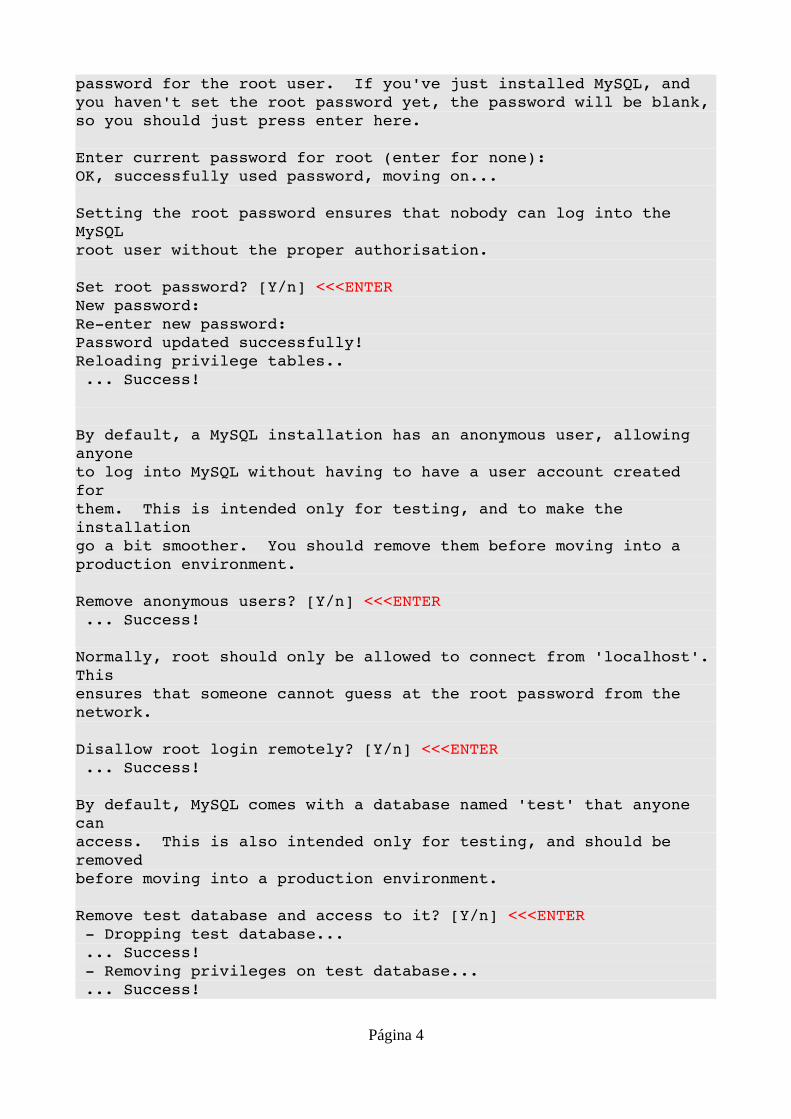
password for the root user. If you've just installed MySQL, and you haven't set the root password yet, the password will be blank, so you should just press enter here.
Enter current password for root (enter for none):OK, successfully used password, moving on...
Setting the root password ensures that nobody can log into the MySQL root user without the proper authorisation.
Set root password? [Y/n] <<<ENTERNew password: Reenter new password: Password updated successfully! Reloading privilege tables.. ... Success!
By default, a MySQL installation has an anonymous user, allowing anyone to log into MySQL without having to have a user account created for them. This is intended only for testing, and to make the installation go a bit smoother. You should remove them before moving into a production environment.
Remove anonymous users? [Y/n] <<<ENTER ... Success!
Normally, root should only be allowed to connect from 'localhost'. This ensures that someone cannot guess at the root password from the network.
Disallow root login remotely? [Y/n] <<<ENTER ... Success!
By default, MySQL comes with a database named 'test' that anyone can access. This is also intended only for testing, and should be removed before moving into a production environment.
Remove test database and access to it? [Y/n] <<<ENTER Dropping test database... ... Success! Removing privileges on test database... ... Success!
Página 4
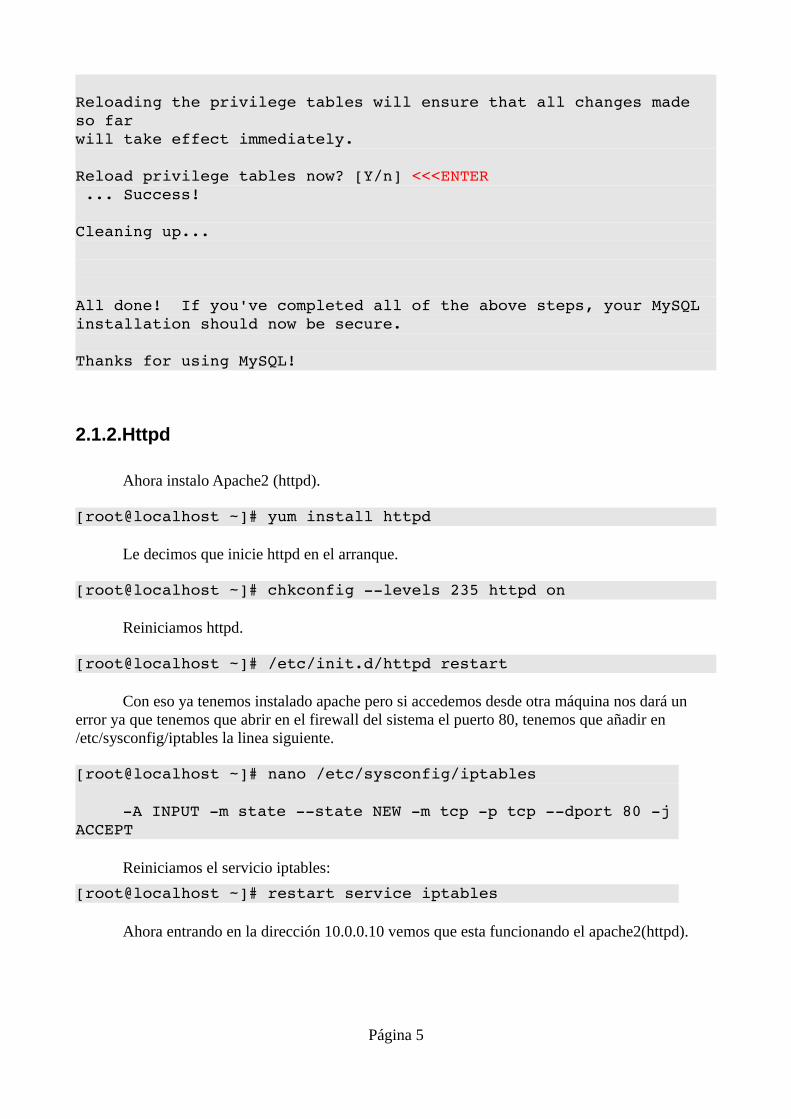
Reloading the privilege tables will ensure that all changes made so far will take effect immediately.
Reload privilege tables now? [Y/n] <<<ENTER ... Success!
Cleaning up...
All done! If you've completed all of the above steps, your MySQL installation should now be secure.
Thanks for using MySQL!
2.1.2.Httpd
Ahora instalo Apache2 (httpd).
[root@localhost ~]# yum install httpd
Le decimos que inicie httpd en el arranque.
[root@localhost ~]# chkconfig levels 235 httpd on
Reiniciamos httpd.
[root@localhost ~]# /etc/init.d/httpd restart
Con eso ya tenemos instalado apache pero si accedemos desde otra máquina nos dará un error ya que tenemos que abrir en el firewall del sistema el puerto 80, tenemos que añadir en /etc/sysconfig/iptables la linea siguiente.
[root@localhost ~]# nano /etc/sysconfig/iptables
A INPUT m state state NEW m tcp p tcp dport 80 j ACCEPT
Reiniciamos el servicio iptables:
[root@localhost ~]# restart service iptables
Ahora entrando en la dirección 10.0.0.10 vemos que esta funcionando el apache2(httpd).
Página 5

2.1.3.PhPMyadmin y Php5
Voy a instalar phpmyadmin para gestionar de forma mas clara la BD.
[root@localhost ~]# yum install php5 phpmyadmin
Instalamos la librería mcryp.
[root@localhost ~]# yum enablerepo=epel install phpmcrypt y
A continuación tenemos que modificar dos ficheros. El primero debemos dar acceso a todo
Página 6

el mundo, substituyendo “Deny from all” por “Allow from all”.
[root@localhost ~]# nano /etc/httpd/conf.d/phpmyadmin.conf
#
# Web application to manage MySQL
#
<Directory "/usr/share/phpmyadmin">
Order Deny,Allow
Allow from all
Allow from 127.0.0.1
</Directory>
Alias /phpmyadmin /usr/share/phpmyadmin
Alias /phpMyAdmin /usr/share/phpmyadmin
Alias /mysqladmin /usr/share/phpmyadmin
El segundo fichero a modificar es /usr/share/phpmyadmin/config.inc.php, tenemos que añadir un valor a la variable cfg['blowfish_secret'], podemos poner lo que queramos.
[root@localhost ~]# nano /usr/share/phpmyadmin/config.inc.php
$cfg['blowfish_secret'] = 'passwd'; /* YOU MUST FILL IN THIS FOR COOKIE AUTH! */
Ahora reiniciamos el servicio httpd.
[root@localhost ~]# /etc/init.d/httpd restart
Página 7

2.1.4.Python 2.6
Me muevo a /usr/src.
[root@localhost ~]# cd /usr/src
Me descargo Python-2.6.1.tgz de la web de Python.
[root@localhost src]# wget http://www.python.org/ftp/python/2.6.1/Python2.6.1.tgz
Descomprimo el paquete.
[root@localhost src]# tar zxvf Python2.6.1.tgz
Me muevo a la carpeta descomprimida.
[root@localhost src]# cd Python2.6.1
Página 8
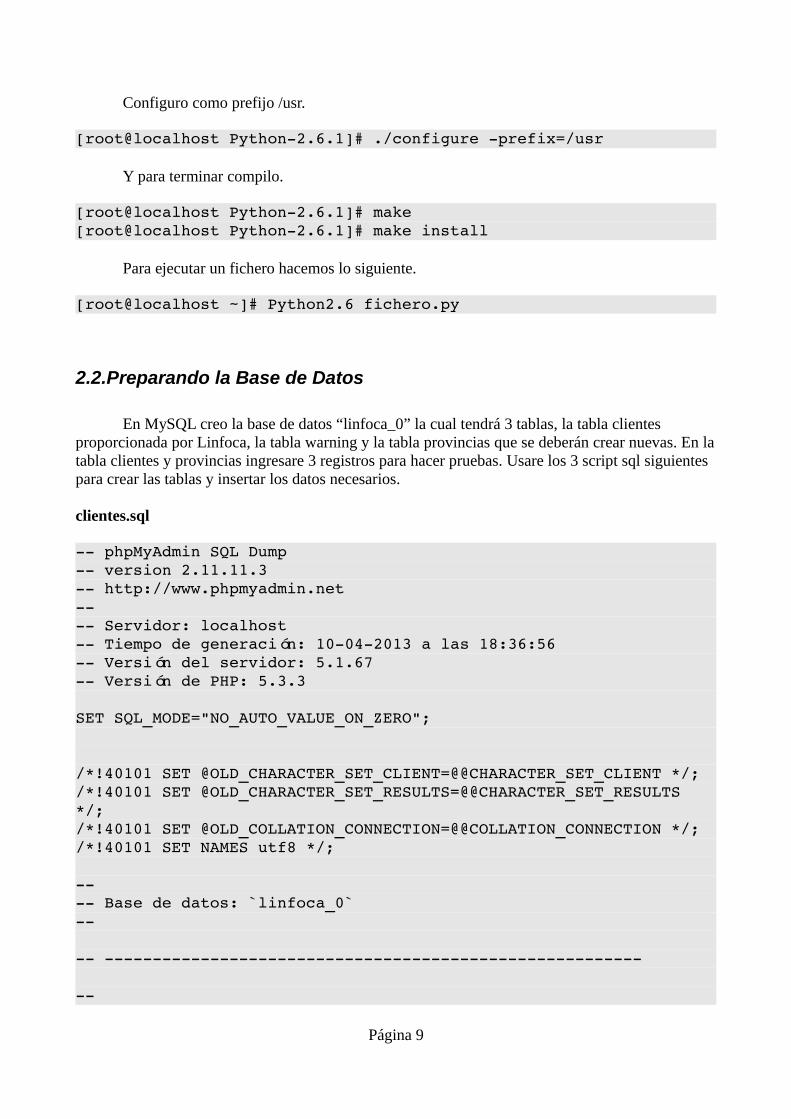
Configuro como prefijo /usr.
[root@localhost Python2.6.1]# ./configure prefix=/usr
Y para terminar compilo.
[root@localhost Python2.6.1]# make[root@localhost Python2.6.1]# make install
Para ejecutar un fichero hacemos lo siguiente.
[root@localhost ~]# Python2.6 fichero.py
2.2.Preparando la Base de Datos
En MySQL creo la base de datos “linfoca_0” la cual tendrá 3 tablas, la tabla clientes proporcionada por Linfoca, la tabla warning y la tabla provincias que se deberán crear nuevas. En la tabla clientes y provincias ingresare 3 registros para hacer pruebas. Usare los 3 script sql siguientes para crear las tablas y insertar los datos necesarios.
clientes.sql
phpMyAdmin SQL Dump version 2.11.11.3 http://www.phpmyadmin.net Servidor: localhost Tiempo de generación: 10042013 a las 18:36:56 Versión del servidor: 5.1.67 Versión de PHP: 5.3.3
SET SQL_MODE="NO_AUTO_VALUE_ON_ZERO";
/*!40101 SET @OLD_CHARACTER_SET_CLIENT=@@CHARACTER_SET_CLIENT */; /*!40101 SET @OLD_CHARACTER_SET_RESULTS=@@CHARACTER_SET_RESULTS */; /*!40101 SET @OLD_COLLATION_CONNECTION=@@COLLATION_CONNECTION */; /*!40101 SET NAMES utf8 */;
Base de datos: `linfoca_0`
Página 9

Estructura de tabla para la tabla `clientes`
CREATE TABLE IF NOT EXISTS `clientes` ( `idcliente` int(10) NOT NULL AUTO_INCREMENT, `codCliente` varchar(10) DEFAULT NULL, `referenciacliente` varchar(12) DEFAULT NULL, `nombrecliente` varchar(150) DEFAULT NULL, `razonsocial` varchar(150) DEFAULT NULL, `direccion` varchar(150) DEFAULT NULL, `cif` varchar(20) DEFAULT NULL, `localidad` varchar(50) DEFAULT NULL, `provincia` varchar(50) DEFAULT NULL, `cp` varchar(10) DEFAULT NULL, `contacto` varchar(250) DEFAULT NULL, `comercial` varchar(150) DEFAULT NULL, `prefijocomercial` varchar(9) DEFAULT NULL, `telefonocomercial` varchar(12) DEFAULT NULL, `prefijo` varchar(9) DEFAULT NULL, `moviles` varchar(50) DEFAULT NULL, `prefijo2` varchar(9) DEFAULT NULL, `telefono2` varchar(15) DEFAULT NULL, `prefijofax` varchar(9) DEFAULT NULL, `fax` varchar(12) DEFAULT NULL, `email` varchar(150) DEFAULT NULL, `emailcomercial` varchar(250) DEFAULT NULL, `fpago` varchar(20) DEFAULT NULL, `vencimiento` int(4) DEFAULT NULL, `diadepago` int(2) DEFAULT NULL, `cuentaBancaria` varchar(35) DEFAULT NULL, `archivo` varchar(50) DEFAULT NULL, `taller` int(10) DEFAULT NULL, `tipo` varchar(20) DEFAULT NULL, `marca` varchar(15) DEFAULT NULL, `proyecto` varchar(20) DEFAULT NULL, `idorden` int(10) DEFAULT NULL, `nivel` int(1) DEFAULT NULL, `emailmtto` varchar(150) DEFAULT NULL, `custdatacloud` tinyint(1) DEFAULT NULL, `idprovincia` int(10) NOT NULL, PRIMARY KEY (`idcliente`) ) ENGINE=MyISAM DEFAULT CHARSET=utf8 AUTO_INCREMENT=2535 ;
Volcar la base de datos para la tabla `clientes`
INSERT INTO `clientes` (`idcliente`, `codCliente`, `referenciacliente`, `nombrecliente`, `razonsocial`, `direccion`, `cif`, `localidad`, `provincia`, `cp`, `contacto`, `comercial`,
Página 10
`prefijocomercial`, `telefonocomercial`, `prefijo`, `moviles`, `prefijo2`, `telefono2`, `prefijofax`, `fax`, `email`, `emailcomercial`, `fpago`, `vencimiento`, `diadepago`, `cuentaBancaria`, `archivo`, `taller`, `tipo`, `marca`, `proyecto`, `idorden`, `nivel`, `emailmtto`, `custdatacloud`,`idprovincia`) VALUES (10, NULL, '150015', 'SUMINISTRO J.A. NOVOA S.L.', 'SUMINISTRO J.A. NOVOA S.L.', 'Ctra. de Pont, 24 Vfca,1 A', 'B34917987', 'PONT', 'PONT', '34151', 'Antonio Vazquez', NULL, NULL, NULL, NULL, '9608 236 172', NULL, '946 852 483', NULL, '916 832 463', '[email protected]', NULL, 'Recibo domiciliario', 30, NULL, '23898706615530654695', '', NULL, 'Distribuidor', 'Glasurit', 'basf', NULL, NULL, NULL, NULL, 33), (16, NULL, NULL, 'Productos del Automovil S.A. ', 'Productos del Automovil S.A. ', 'c/ Calle Isidro nº 16', 'A67076491', 'LUGO', 'LUGO', '26033', 'Jose Caba', 'Jose Caba', NULL, '659 738 492', NULL, '619746491', NULL, '932 314 783', NULL, '931 763 529', '[email protected]', NULL, 'Transferencia', 30, NULL, NULL, '', 0, 'Distribuidor', 'Glasurit', 'basf', NULL, NULL, NULL, NULL, 43), (2040, NULL, NULL, 'Amicar S.A. ', 'Amicar S.A. ', 'C/ AMI S/N ', NULL, 'SANTIAGO DE COMPOSTELA ', 'LA CORUÑA ', '12737', 'FRANCISCO GOLEZ YAZ ', NULL, NULL, NULL, NULL, '962528656 ', NULL, '964569682', NULL, NULL, NULL, NULL, NULL, NULL, NULL, NULL, NULL, 1389, 'Taller', 'Glasurit', NULL, 1, NULL, NULL, 1, 23);
warning.sql
phpMyAdmin SQL Dump version 2.11.11.3 http://www.phpmyadmin.net Servidor: localhost Tiempo de generación: 10042013 a las 18:36:56 Versión del servidor: 5.1.67 Versión de PHP: 5.3.3
SET SQL_MODE="NO_AUTO_VALUE_ON_ZERO";
/*!40101 SET @OLD_CHARACTER_SET_CLIENT=@@CHARACTER_SET_CLIENT */; /*!40101 SET @OLD_CHARACTER_SET_RESULTS=@@CHARACTER_SET_RESULTS */; /*!40101 SET @OLD_COLLATION_CONNECTION=@@COLLATION_CONNECTION */; /*!40101 SET NAMES utf8 */;
Base de datos: `linfoca_0`
Página 11

Estructura de tabla para la tabla `warning`
CREATE TABLE IF NOT EXISTS `warning` ( `idtaller` int(10) NOT NULL, `fecha` date NOT NULL, PRIMARY KEY (`idtaller`,`fecha`) ) ENGINE=MyISAM DEFAULT CHARSET=utf8;
provincias.sql
phpMyAdmin SQL Dump version 2.11.11.3 http://www.phpmyadmin.net Servidor: localhost Tiempo de generación: 10042013 a las 18:36:56 Versión del servidor: 5.1.67 Versión de PHP: 5.3.3
SET SQL_MODE="NO_AUTO_VALUE_ON_ZERO";
/*!40101 SET @OLD_CHARACTER_SET_CLIENT=@@CHARACTER_SET_CLIENT */; /*!40101 SET @OLD_CHARACTER_SET_RESULTS=@@CHARACTER_SET_RESULTS */; /*!40101 SET @OLD_COLLATION_CONNECTION=@@COLLATION_CONNECTION */; /*!40101 SET NAMES utf8 */;
Base de datos: `linfoca_0`
Estructura de tabla para la tabla `provincias`
CREATE TABLE IF NOT EXISTS `provincias` ( `idprovincia` int(10) NOT NULL, `provincia` varchar(20) NOT NULL, `pais` varchar(20) NOT NULL, `ruta` varchar(20) NOT NULL, PRIMARY KEY (`idprovincia`) ) ENGINE=MyISAM DEFAULT CHARSET=utf8;
Página 12
Volcar la base de datos para la tabla `provincias`
INSERT INTO `provincias` (`idprovincia`, `provincia`, `pais`, `ruta`) VALUES (33, 'PONTEVEDRA', 'ESPAÑA', 'PONTEVEDRA'),(43, 'LUGO', 'ESPAÑA', 'LUGO'),(23, 'LA CORUÑA', 'ESPAÑA', 'A_CORUNA');
2.3.Estructura de directorios.
El cliente esta configurado para hacer copias de seguridad a las 14:30 en
/home/linfoca/public_html/cs/cs/backup/BMWes/provincia/idtaller y cada vez que enciende el ordenador también realiza un copia pero en otra ruta
/home/linfoca/public_html/cs/cs/backupTMP/BMWes/provincia/idtaller
esta copia se realiza por si el equipo no se encuentra disponible a las 14:30.
2.4.Script's monitorización.
Voy a realizar dos script en Python, el primero llamado monitorcopia.py el cual comprobara si la copia esta en la ruta principal, si no buscara en la ruta temporal, si esta la copiara a la ruta principal y si no esta insertara una fila nueva en la base de datos. El segundo llamado enviocorreo.py el cual mirara si hay una entrada en la base de datos con el id del usuario y la fecha de hoy, si aparece entonces buscara con el mismo id de usuario y la fecha de ayer, si no no hace nada, si aparece entonces añadirá una linea a un fichero txt y al terminar de comprobar enviara un correo al administrador con los usuarios que no han realizado copias y borrara el fichero.
Para poder usar la base de datos MySQL en el script en Python necesito instalar MySQL-pyton.
[root@localhost pythonscript]# yum install MySQLpython
2.4.1.monitorcopia.py
#!/usr/bin/python# importsimport MySQLdbimport osimport os.pathimport refrom datetime import datetime
#Variables fijas.
Página 13

vf1 = "/home/linfoca/public_html/cs/cs/backup/BMWes/"vf2 = "/home/linfoca/public_html/cs/cs/backupTMP/BMWes/"today = datetime.now() # Fecha y hora actual.fecha = today.strftime("%Y%m%d") # Fecha actual en variable.hora = today.strftime("%H%M") # Hora actual en variable.
# Conexion a la base de datos.db = MySQLdb.connect(host='localhost', user='root', passwd='root', db='linfoca_0')
#Abro un cursor para el selectcursor=db.cursor()
#Seleccionar los datos de la BD.cursor.execute('select c.idcliente, p.ruta from clientes c, provincias p where c.idprovincia=p.idprovincia')
registro = cursor.fetchone()while (registro != None): idcliente = (str(registro[0])) # idcliente usado para formar la ruta y el fichero. ruta = (registro[1]+"/") # Carpeta usada para formar la ruta. rutafinal = vf1+ruta+idcliente+"/" # Ruta completa sin fichero. fichero = os.system('ls '+rutafinal+idcliente+'\ '+fecha+'\ * >& /dev/null') # Ruta completa asta el fichero con parte del nombre del fichero. if fichero == 0: # Si es 0 la copia esta, pasa al siguiente registro. ##print "Copia correcta" # Print de comprobacion registro = cursor.fetchone() else: # Si no otro if. rutafinaltmp = vf2+ruta+idcliente+"/" # Ruta completa temporal sin fichero. fichero2 = os.system('ls '+rutafinaltmp+idcliente+'\ '+fecha+'\ * >& /dev/null') ## Ruta temporal completa asta el fichero con parte del nombre del fichero. if fichero2 == 0: # Si existe en TMP moverlo a noTMP. os.system('cp '+rutafinaltmp+idcliente+'\ '+fecha+'\ * '+rutafinal) ##print "Movida de tmp a principal" # Print de comprobacion registro = cursor.fetchone() else: # Si no insertar un warning en la BD. ##print " Insertar un warning en la bd" # Print de comprobacion cursor2=db.cursor() idclienteint = (int(idcliente)) cursor2.execute(" INSERT INTO warning VALUES (%s, %s) ",(idclienteint,fecha)) # Insertar en la BD.
Página 14

db.commit() cursor2.close() registro = cursor.fetchone()
2.4.2.enviocorreo.py
#!/usr/bin/python#importimport MySQLdbimport datetimeimport osimport os.pathimport smtplibfrom email.MIMEText import MIMEText
hoy = datetime.datetime.today() # Fecha y hora de hoy.ayer = hoy + datetime.timedelta(days=1) # Fecha y hora de ayer.hoyformat = hoy.strftime('%Y%m%d') # Fecha de hoy con formato.ayerformat = ayer.strftime('%Y%m%d') # Fecha de ayer con formato.
# Conexion a la base de datos.db = MySQLdb.connect(host='localhost', user='root', passwd='root', db='linfoca_0')
#Abro un cursor para el selectcursor=db.cursor()
#Seleccionar los datos de la BD.cursor.execute('SELECT idcliente FROM `clientes`')
registro = cursor.fetchone()while (registro != None): idcliente = (registro[0])
cursor2 = db.cursor() cursor2.execute("SELECT DATE_FORMAT(fecha, '%%Y%%m%%d') AS fecha FROM `warning` WHERE idtaller=%s AND fecha=%s",(idcliente,hoyformat)) registro2 = cursor2.fetchone() cursor3 = db.cursor() cursor3.execute("SELECT DATE_FORMAT(fecha, '%%Y%%m%%d') AS fecha FROM `warning` WHERE idtaller=%s AND fecha=%s",(idcliente,ayerformat)) registro3 = cursor3.fetchone() if registro2 == None: ##print "Bien no hay alerta" # Print de
Página 15
comprobacion registro = cursor.fetchone() else: if registro3 == None: ##print "Bien no hay alerta" # Print de comprobacion registro = cursor.fetchone() else: ##print "Alerta envia correo!!!" # Print de comprobacion cursor4 = db.cursor() cursor4.execute("SELECT nombrecliente, email, telefono2 FROM `clientes` WHERE idcliente =%s",(idcliente)) registro4 = cursor4.fetchone() alerta = str(registro4[0]+" no ha realizado copia "+ayerformat+" y "+hoyformat+", email: "+registro4[1]+", tlf: "+registro4[2]) os.system('echo '+alerta+' >> /home/linfoca/alertas/alertas_'+hoyformat+'.txt') cursor4.close() cursor2.close() cursor3.close() registro = cursor.fetchone()
fichealerta = os.system('ls /home/linfoca/alertas/alertas_'+hoyformat+'.txt >& /dev/null')if fichealerta == 0: archivo = open('/home/linfoca/alertas/alertas_'+hoyformat+'.txt') try: contenido = archivo.read() finally: archivo.close( ) #print contenido server = smtplib.SMTP('mail.linfoca.com', 587)
#Conexion al servidor. server.login("[email protected]", "LFK020spt")
#Enviar email msg = contenido # The /n separates the message from the headers server.sendmail("[email protected]", "[email protected]", msg) os.system('rm f /home/linfoca/alertas/alertas_'+hoyformat+'.txt >& /dev/null')else: registro = cursor.fetchone()
Página 16
3.Monitorizar clientes windows.
Vamos a monitorizar la carga de CPU, el espacio total y libre de la memoria RAM y el espacio total y libre del disco duro, para esto vamos a usar Python en windows el cual usara la API de windows (WMI).
3.1.¿Que es WMI?
Windows Management Instrumentation (WMI) es un conjunto de extensiones del Modelo de controlador de Windows que proporciona una interfaz de sistema operativo a través del cual los componentes proporcionan información y notificaciones.
WMI permite a los lenguajes de scripting como VBScript, Windows PowerShell o Python para administrar Windows en ordenadores personales y servidores de Microsoft, tanto a nivel local como a distancia. WMI está preinstalado a partir de Windows 2000 en adelante.
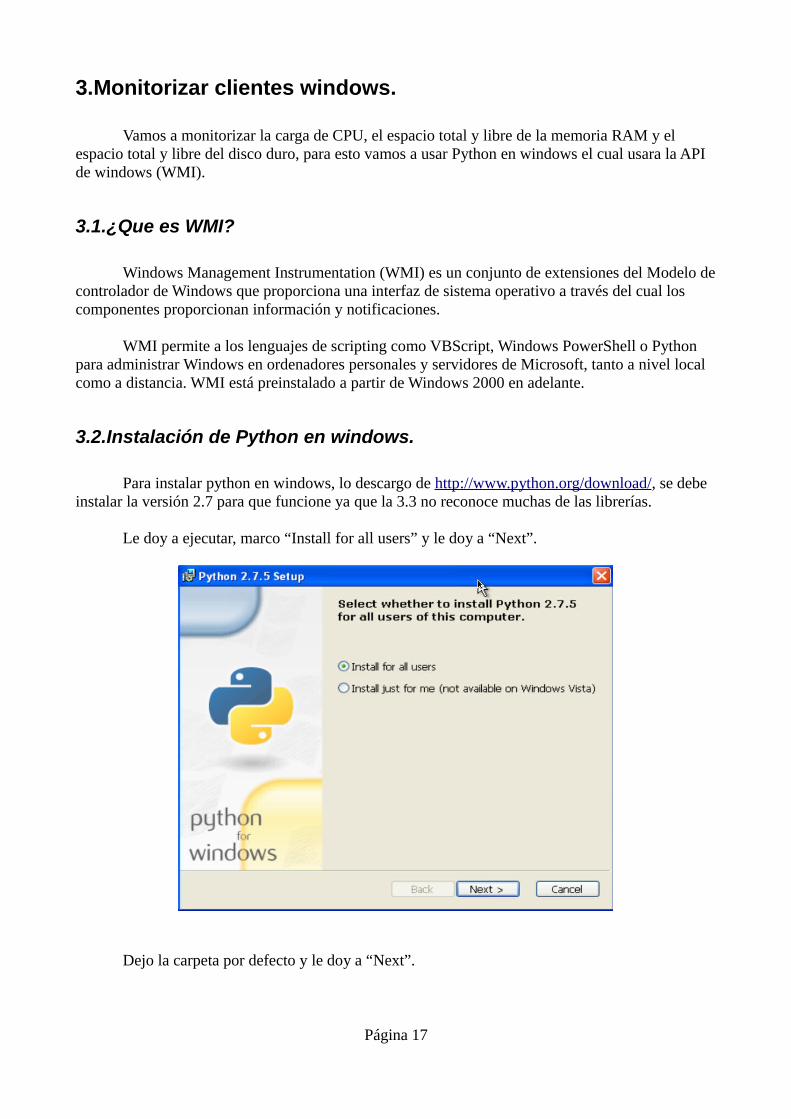
3.2.Instalación de Python en windows.
Para instalar python en windows, lo descargo de http://www.python.org/download/, se debe instalar la versión 2.7 para que funcione ya que la 3.3 no reconoce muchas de las librerías.
Le doy a ejecutar, marco “Install for all users” y le doy a “Next”.
Dejo la carpeta por defecto y le doy a “Next”.
Página 17
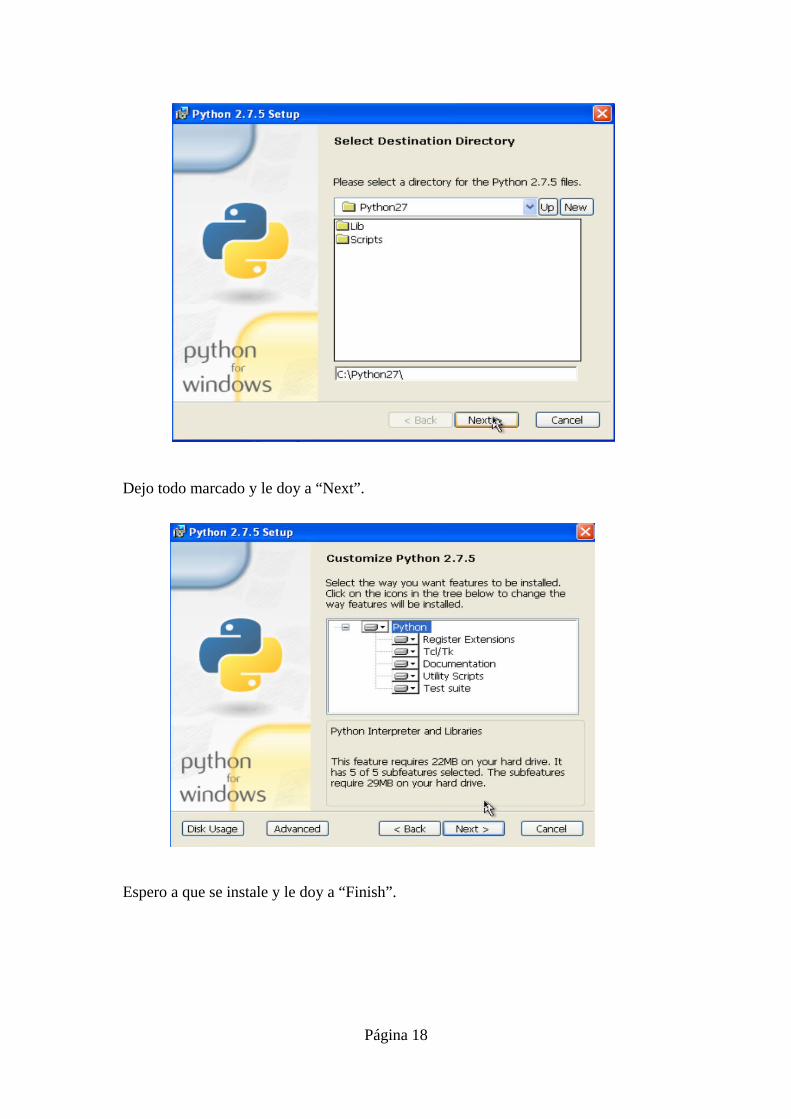
Dejo todo marcado y le doy a “Next”.
Espero a que se instale y le doy a “Finish”.
Página 18

También es necesario instalar el modulo WMI para python y la extensión pywin32.
Descarga WMI: http://www.python.org/getit/releases/2.7.5/Descarga pywin32: http://sourceforge.net/projects/pywin32/files/pywin32/
Una vez instalado para poder configurar y ejecutar python en windows tenemos que añadir la variable al Path, para ello le doy a inicio > equipo click derecho en “propiedades” y en la pestaña “Opciones avanzadas” le doy al botón “Variables de entorno”.
Página 19

En la nueva ventana buscamos “Path” le doy doble click y al final añado C:\Python27
Aquí podemos ver todas las funciones y clases que nos proporciona WMI.http://msdn.microsoft.com/en-us/library/windows/desktop/aa394493%28v=vs.85%29.aspx
3.3.Script monitorizar equipo windows.
Voy a realizar un script llamado monitorizarequipo.py el cual usando WMI va a sacar información de la CPU, RAM total y libre y espacio en disco duro total y libre, esto lo guardara en un fichero en “C:\monitordoc” con nombre “info fecha hora.txt” y contendrá 3 lineas con dicha información.
monitorizarequipo.py
import wmi from datetime import datetime
Página 20

import os
today = datetime.now() # Fecha y hora actual. fecha = today.strftime("%Y%m%d") # Fecha actual en variable. hora = today.strftime("%H%M") # Hora actual en variable.
c = wmi.WMI() for cpu in c.Win32_Processor(): cpu = '%s: %d %%' % (cpu.DeviceID, cpu.LoadPercentage)
for disk in c.Win32_LogicalDisk (DriveType=3): disklibre = str(int(disk.FreeSpace)/int(1000)) disktotal = str(int(disk.Size)/int(1000))
for i in c.Win32_ComputerSystem(): memtotal = str(int(i.TotalPhysicalMemory)/int(1000))
for os in c.Win32_OperatingSystem(): memfree = str(int(os.FreePhysicalMemory)/int(1000))
def creartxt(): archi=open('C:\monitordoc\info '+fecha+' '+hora+'.txt','w') archi.close()
def grabartxt(): archi=open('C:\monitordoc\info '+fecha+' '+hora+'.txt','a') archi.write(cpu+'\n') archi.write('Disco: ('+disklibre+', '+disktotal+') KB\n') archi.write('Ram: ('+memfree+', '+memtotal+') KB\n') archi.close()
creartxt() grabartxt()
4.Conclusión.
Con este proyecto se consigue monitorizar y tener un control de las copias realizadas por los clientes y el aviso por correo de los que no realicen la copia, de esta forma mejorar el servicio.
También podemos ver cierta información de la maquina del cliente y tener un control del uso que ese cliente le da a la maquina. De esto ultimo no se ha conseguido sacar la temperatura del procesador ya que dependemos de los fabricantes de las BIOS que desarrollen una dll para poder consultar la temperatura.
Página 21

5.Sitios de consulta
Instalación de servicios:http://www.howtoforge.com/installing-apache2-with-php5-and-mysql-support-on-centos-6.3-lamp
Instalación y configuración de phpmyadmin:http://tuxapuntes.com/instalar-phpmyadmin-en-centos-6-3/
Instalación de Python en centos:http://danubuntu.wordpress.com/2010/11/03/instalar-python-2-5-o-superior-en-centos/
Python interés:http://chuwiki.chuidiang.org/index.php?title=Python_y_MySQLhttp://mundogeek.net/archivos/2008/06/25/bases-de-datos-en-python/ http://tavoberry.com/blog/conexion-python-mysql-consulta/http://stackoverflow.com/questions/961632/converting-integer-to-string-in-pythonhttp://freepython.wordpress.com/2009/10/14/tutorial-python-ii-hola-mundo-y-tipos-de-variables/http://www.codigopython.com.ar/miniguias/tres-formas-de-comprobar-la-existencia-de-un-archivohttp://mundogeek.net/archivos/2008/03/03/python-funciones/http://www.holamundo.es/lenguaje/python/articulos/mostrar-la-fecha-y-hora-en-python.htmlhttp://gnustix.com/wordpress/2010/10/manejo-de-fecha-y-hora-actuales-en-python/http://www.posteet.com/view/1907http://stackoverflow.com/questions/5687718/python-mysql-insert-datahttp://www.tutorialspoint.com/python/python_database_access.htmhttp://lesthack.com.mx/2010/10/14/enviar-e-mail-con-python/http://chuwiki.chuidiang.org/index.php?title=Leer_y_escribir_ficheros_en_pythonhttp://www.elclubdelprogramador.com/2012/02/01/snippets-leyendo-archivos-en-python/http://crysol.org/es/node/1328http://stackoverflow.com/questions/10147455/trying-to-send-email-gmail-as-mail-provider-using-pythonhttp://wiki.synaptic.cl/wiki/HowTo_Codigo_Python_para_enviar_correos_con_Gmailhttp://www.pythonforbeginners.com/code-snippets-source-code/using-python-to-send-email/
Python 2.7 windows instalación:http://kernelinformatico.wordpress.com/?s=instalar+pythonhttp://www.python.org/getit/releases/2.7.5/
WMI:http://www.google.es/#gs_rn=17&gs_ri=psy-ab&suggest=p&pq=obtener%20temperatura%20pc%20con%20wmi%20python&cp=33&gs_id=1r2&xhr=t&q=obtener+temperatura+pc+con+python+wmi&es_nrs=true&pf=p&sclient=psy-ab&oq=obtener+temperatura+pc+con+python+wmi&gs_l=&pbx=1&bav=on.2,or.r_qf.&bvm=bv.47883778,d.Yms&fp=332924209c0c7106&biw=893&bih=488http://www.goldb.org/goldblog/2006/11/13/CPUMonitorWithPythonAndWMI.aspxhttp://stackoverflow.com/questions/3262603/accessing-cpu-temperature-in-pythonhttp://timgolden.me.uk/python/wmi/https://pypi.python.org/pypi/WMI/#downloads
Página 22

http://stackoverflow.com/questions/2440511/getting-cpu-temperature-using-pythonhttp://www.elotrolado.net/hilo_sacar-temperatura-por-python-en-windows_1808152http://sourceforge.net/projects/pywin32/files/pywin32/Build%20218/
Página 23