m5731 mccall's - printsewprintsew.com/instructions/mcc5731.pdf · abcd abcd abcd ac 1 4 5 11...
TRANSCRIPT
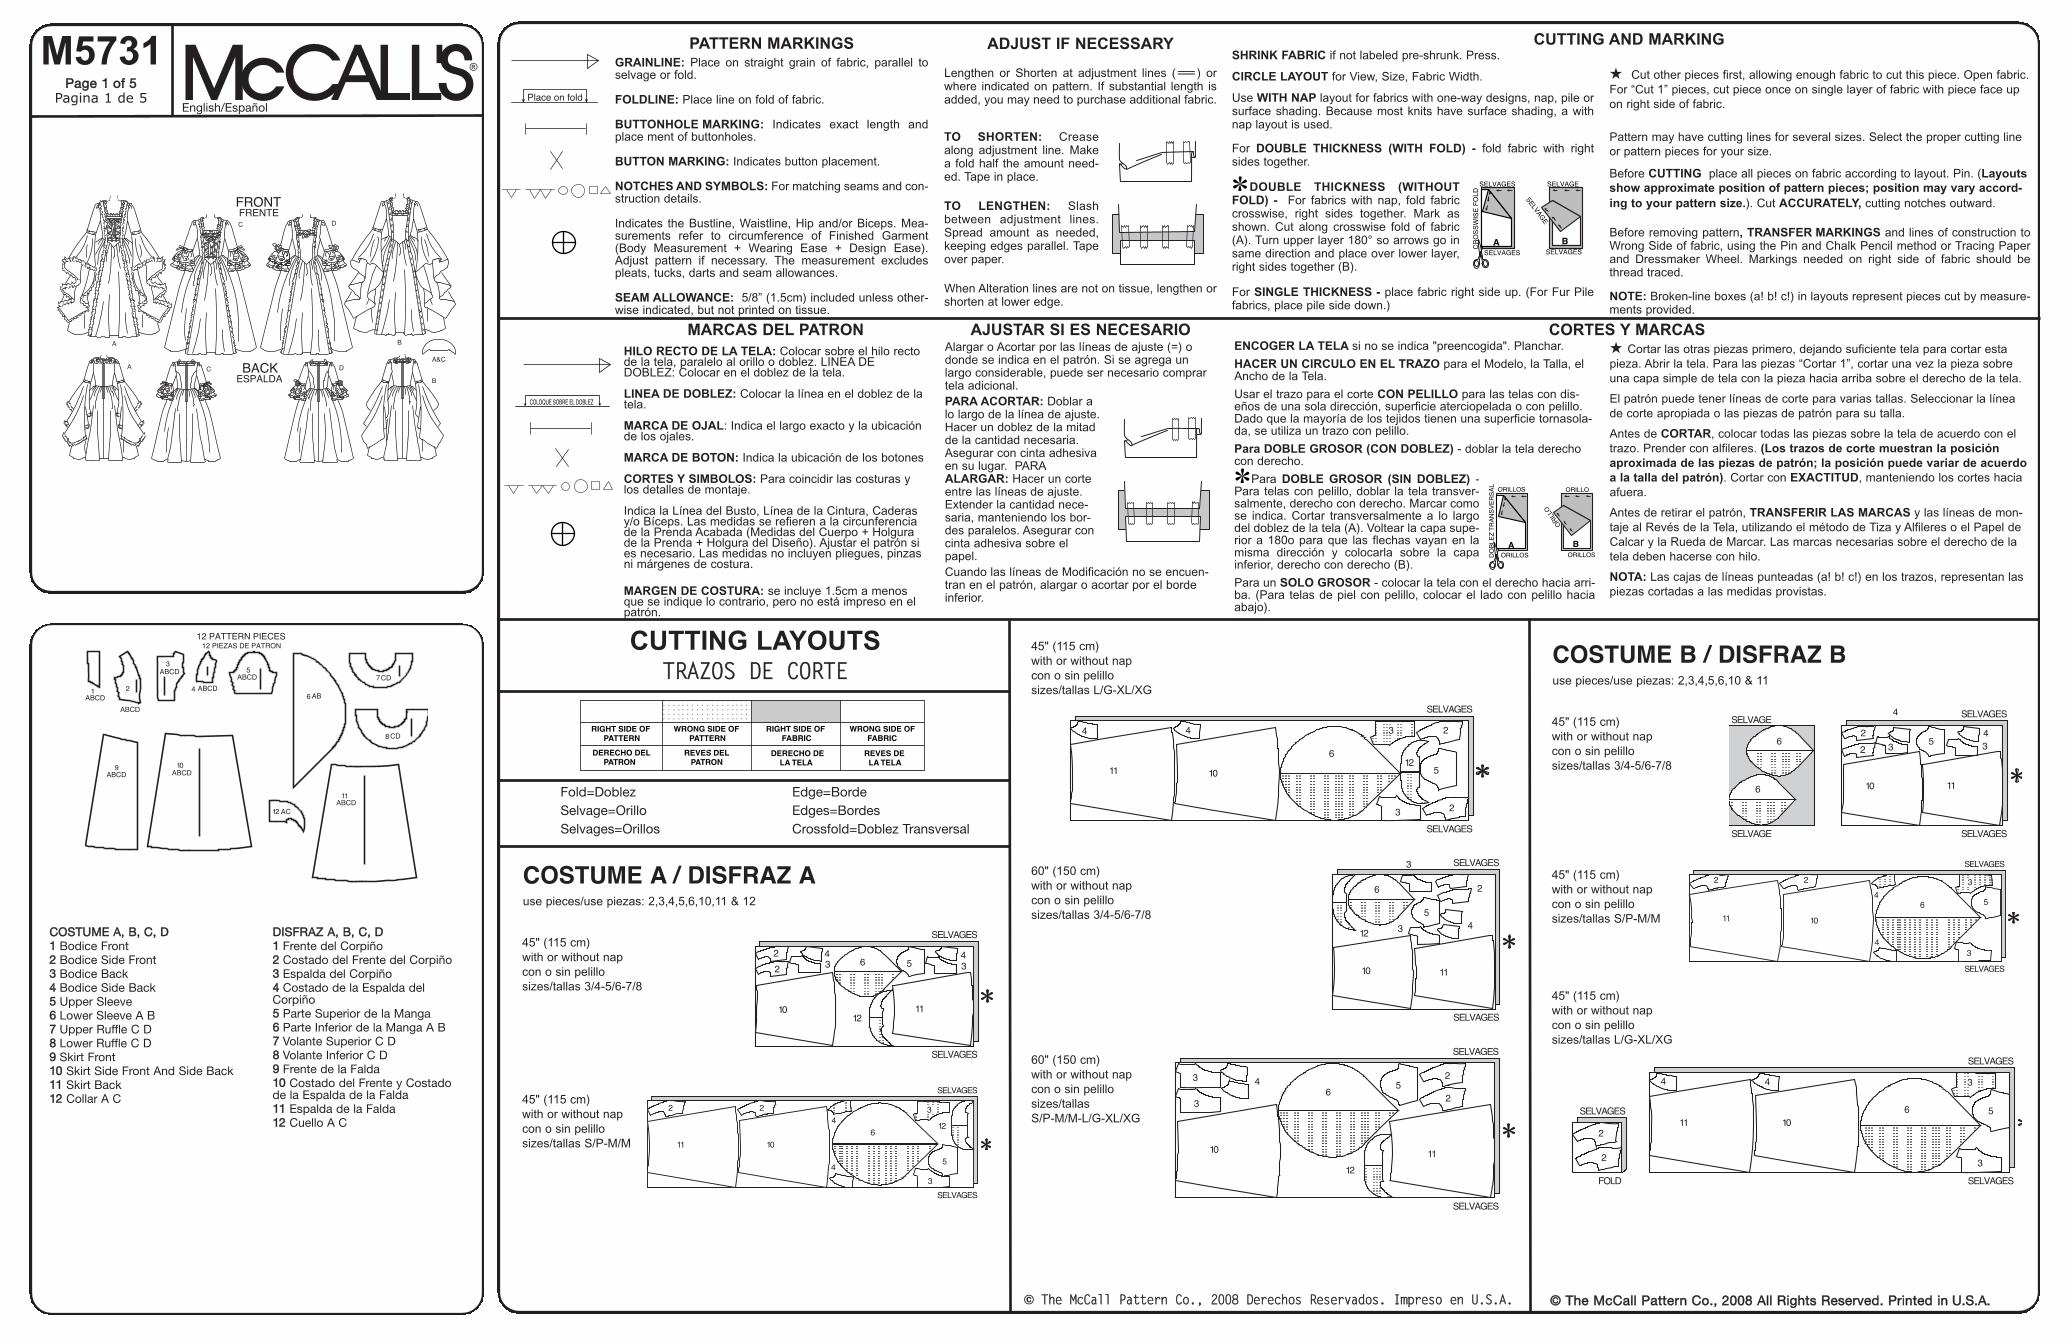
ADJUST IF NECESSARY
Lengthen or Shorten at adjustment lines (=) orwhere indicated on pattern. If substantial length isadded, you may need to purchase additional fabric.
TO SHORTEN: Creasealong adjustment line. Makea fold half the amount need-ed. Tape in place.
TO LENGTHEN: Slashbetween adjustment lines.Spread amount as needed,keeping edges parallel. Tapeover paper.
When Alteration lines are not on tissue, lengthen orshorten at lower edge.
PATTERN MARKINGSGRAINLINE: Place on straight grain of fabric, parallel toselvage or fold.
FOLDLINE: Place line on fold of fabric.
BUTTONHOLE MARKING: Indicates exact length andplace ment of buttonholes.
BUTTON MARKING: Indicates button placement.
NOTCHES AND SYMBOLS: For matching seams and con-struction details.
Indicates the Bustline, Waistline, Hip and/or Biceps. Mea-surements refer to circumference of Finished Garment(Body Measurement + Wearing Ease + Design Ease).Adjust pattern if necessary. The measurement excludespleats, tucks, darts and seam allowances.
SEAM ALLOWANCE: 5/8” (1.5cm) included unless other-wise indicated, but not printed on tissue.
SHRINK FABRIC if not labeled pre-shrunk. Press.
CIRCLE LAYOUT for View, Size, Fabric Width.
Use WITH NAP layout for fabrics with one-way designs, nap, pile orsurface shading. Because most knits have surface shading, a withnap layout is used.
For DOUBLE THICKNESS (WITH FOLD) - fold fabric with rightsides together.
DOUBLE THICKNESS (WITHOUTFOLD) - For fabrics with nap, fold fabriccrosswise, right sides together. Mark asshown. Cut along crosswise fold of fabric(A). Turn upper layer 180° so arrows go insame direction and place over lower layer,right sides together (B).
For SINGLE THICKNESS - place fabric right side up. (For Fur Pilefabrics, place pile side down.)
A B
� Cut other pieces first, allowing enough fabric to cut this piece. Open fabric.For “Cut 1” pieces, cut piece once on single layer of fabric with piece face upon right side of fabric.
Pattern may have cutting lines for several sizes. Select the proper cutting lineor pattern pieces for your size.
Before CUTTING place all pieces on fabric according to layout. Pin. (Layoutsshow approximate position of pattern pieces; position may vary accord-ing to your pattern size.). Cut ACCURATELY, cutting notches outward.
Before removing pattern, TRANSFER MARKINGS and lines of construction toWrong Side of fabric, using the Pin and Chalk Pencil method or Tracing Paperand Dressmaker Wheel. Markings needed on right side of fabric should bethread traced.
NOTE: Broken-line boxes (a! b! c!) in layouts represent pieces cut by measure-ments provided.
CUTTING AND MARKING
AJUSTAR SI ES NECESARIOAlargar o Acortar por las líneas de ajuste (=) odonde se indica en el patrón. Si se agrega unlargo considerable, puede ser necesario comprartela adicional. PARA ACORTAR: Doblar alo largo de la línea de ajuste.Hacer un doblez de la mitadde la cantidad necesaria.Asegurar con cinta adhesivaen su lugar. PARAALARGAR: Hacer un corteentre las líneas de ajuste.Extender la cantidad nece-saria, manteniendo los bor-des paralelos. Asegurar concinta adhesiva sobre elpapel. Cuando las líneas de Modificación no se encuen-tran en el patrón, alargar o acortar por el bordeinferior.
ENCOGER LA TELA si no se indica "preencogida". Planchar.
HACER UN CIRCULO EN EL TRAZO para el Modelo, la Talla, elAncho de la Tela.
Usar el trazo para el corte CON PELILLO para las telas con dis-eños de una sola dirección, superficie aterciopelada o con pelillo.Dado que la mayoría de los tejidos tienen una superficie tornasola-da, se utiliza un trazo con pelillo.
Para DOBLE GROSOR (CON DOBLEZ) - doblar la tela derechocon derecho.
Para DOBLE GROSOR (SIN DOBLEZ) -Para telas con pelillo, doblar la tela transver-salmente, derecho con derecho. Marcar comose indica. Cortar transversalmente a lo largodel doblez de la tela (A). Voltear la capa supe-rior a 180o para que las flechas vayan en lamisma dirección y colocarla sobre la capainferior, derecho con derecho (B).
Para un SOLO GROSOR - colocar la tela con el derecho hacia arri-ba. (Para telas de piel con pelillo, colocar el lado con pelillo haciaabajo).
A B
CORTES Y MARCAS� Cortar las otras piezas primero, dejando suficiente tela para cortar estapieza. Abrir la tela. Para las piezas “Cortar 1”, cortar una vez la pieza sobreuna capa simple de tela con la pieza hacia arriba sobre el derecho de la tela.
El patrón puede tener líneas de corte para varias tallas. Seleccionar la líneade corte apropiada o las piezas de patrón para su talla.
Antes de CORTAR, colocar todas las piezas sobre la tela de acuerdo con eltrazo. Prender con alfileres. (Los trazos de corte muestran la posiciónaproximada de las piezas de patrón; la posición puede variar de acuerdoa la talla del patrón). Cortar con EXACTITUD, manteniendo los cortes haciaafuera.
Antes de retirar el patrón, TRANSFERIR LAS MARCAS y las líneas de mon-taje al Revés de la Tela, utilizando el método de Tiza y Alfileres o el Papel deCalcar y la Rueda de Marcar. Las marcas necesarias sobre el derecho de latela deben hacerse con hilo.
NOTA: Las cajas de líneas punteadas (a! b! c!) en los trazos, representan laspiezas cortadas a las medidas provistas.
MARCAS DEL PATRONHILO RECTO DE LA TELA: Colocar sobre el hilo rectode la tela, paralelo al orillo o doblez. LINEA DEDOBLEZ: Colocar en el doblez de la tela.
LINEA DE DOBLEZ: Colocar la línea en el doblez de latela.
MARCA DE OJAL: Indica el largo exacto y la ubicaciónde los ojales.
MARCA DE BOTON: Indica la ubicación de los botones
CORTES Y SIMBOLOS: Para coincidir las costuras ylos detalles de montaje.
Indica la Línea del Busto, Línea de la Cintura, Caderasy/o Bíceps. Las medidas se refieren a la circunferenciade la Prenda Acabada (Medidas del Cuerpo + Holgurade la Prenda + Holgura del Diseño). Ajustar el patrón sies necesario. Las medidas no incluyen pliegues, pinzasni márgenes de costura.
MARGEN DE COSTURA: se incluye 1.5cm a menosque se indique lo contrario, pero no está impreso en elpatrón.
12 PATTERN PIECES 12 PIEZAS DE PATRON
ABCD
ABCD
ABCD
ABCD
ABCD
AB
CD
CD
ABCD ABCD
ABCDAC
1 4
5
11
12
6
7
8
9 10
2
3
FRONTFRENTE
BACKESPALDA
5731
A B
A&CA C D
B
C D
CCOOSSTTUUMMEE AA,, BB,, CC,, DD 11 Bodice Front22 Bodice Side Front33 Bodice Back44 Bodice Side Back55 Upper Sleeve66 Lower Sleeve A B77 Upper Ruffle C D88 Lower Ruffle C D99 Skirt Front1100 Skirt Side Front And Side Back1111 Skirt Back1122 Collar A C
DDIISSFFRRAAZZ AA,, BB,, CC,, DD11 Frente del Corpiño22 Costado del Frente del Corpiño33 Espalda del Corpiño44 Costado de la Espalda del Corpiño55 Parte Superior de la Manga66 Parte Inferior de la Manga A B77 Volante Superior C D88 Volante Inferior C D99 Frente de la Falda1100 Costado del Frente y Costadode la Espalda de la Falda1111 Espalda de la Falda1122 Cuello A C
MMccCCAALLLL''SS®M5731
©© TThhee MMccCCaallll PPaatttteerrnn CCoo..,, 22000088 AAllll RRiigghhttss RReesseerrvveedd.. PPrriinntteedd iinn UU..SS..AA..
COSTUME A / DISFRAZ Ause pieces/use piezas: 2,3,4,5,6,10,11 & 12
45" (115 cm) with or without napcon o sin pelillosizes/tallas 3/4-5/6-7/8
45" (115 cm) with or without napcon o sin pelillosizes/tallas S/P-M/M
*
11 10
2 2
4
4
6
3
3
12
5
SELVAGES
SELVAGES
*
10
6
1211
52
2 334 4
SELVAGES
SELVAGES
45" (115 cm) with or without napcon o sin pelillosizes/tallas L/G-XL/XG
60" (150 cm) with or without napcon o sin pelillosizes/tallas 3/4-5/6-7/8
60" (150 cm) with or without napcon o sin pelillosizes/tallas S/P-M/M-L/G-XL/XG
*
10
6
11
12
5
3
3 2
2
4
SELVAGES
SELVAGES
*
10 11
12
6
3
3
5
2
4
SELVAGES
SELVAGES
*
11 10
6
3
34 4 2
125
2
SELVAGES
SELVAGES
COSTUME B / DISFRAZ Buse pieces/use piezas: 2,3,4,5,6,10 & 11
45" (115 cm) with or without napcon o sin pelillosizes/tallas 3/4-5/6-7/8
45" (115 cm) with or without napcon o sin pelillosizes/tallas S/P-M/M
45" (115 cm) with or without napcon o sin pelillosizes/tallas L/G-XL/XG
45" */**5731 COSTUME [B]Size XL Plot 1016
2
2
*
11 106
4 4
3
3
5
FOLD
SELVAGES
SELVAGES
SELVAGES
*
11 10
2 2
4
46
3
3
5
SELVAGES
SELVAGES
6
6
*
10 11
2
2 35
4
34
SELVAGE
SELVAGESELVAGES
SELVAGES
Fold=DoblezSelvage=OrilloSelvages=Orillos
Edge=BordeEdges=BordesCrossfold=Doblez Transversal
CUTTING LAYOUTSTTRRAAZZOOSS DDEE CCOORRTTEE
English/Español
© TThhee MMccCCaallll PPaatttteerrnn CCoo..,, 22000088 DDeerreecchhooss RReesseerrvvaaddooss.. IImmpprreessoo eenn UU..SS..AA..
PPaaggee 11 ooff 55Pagina 1 de 5
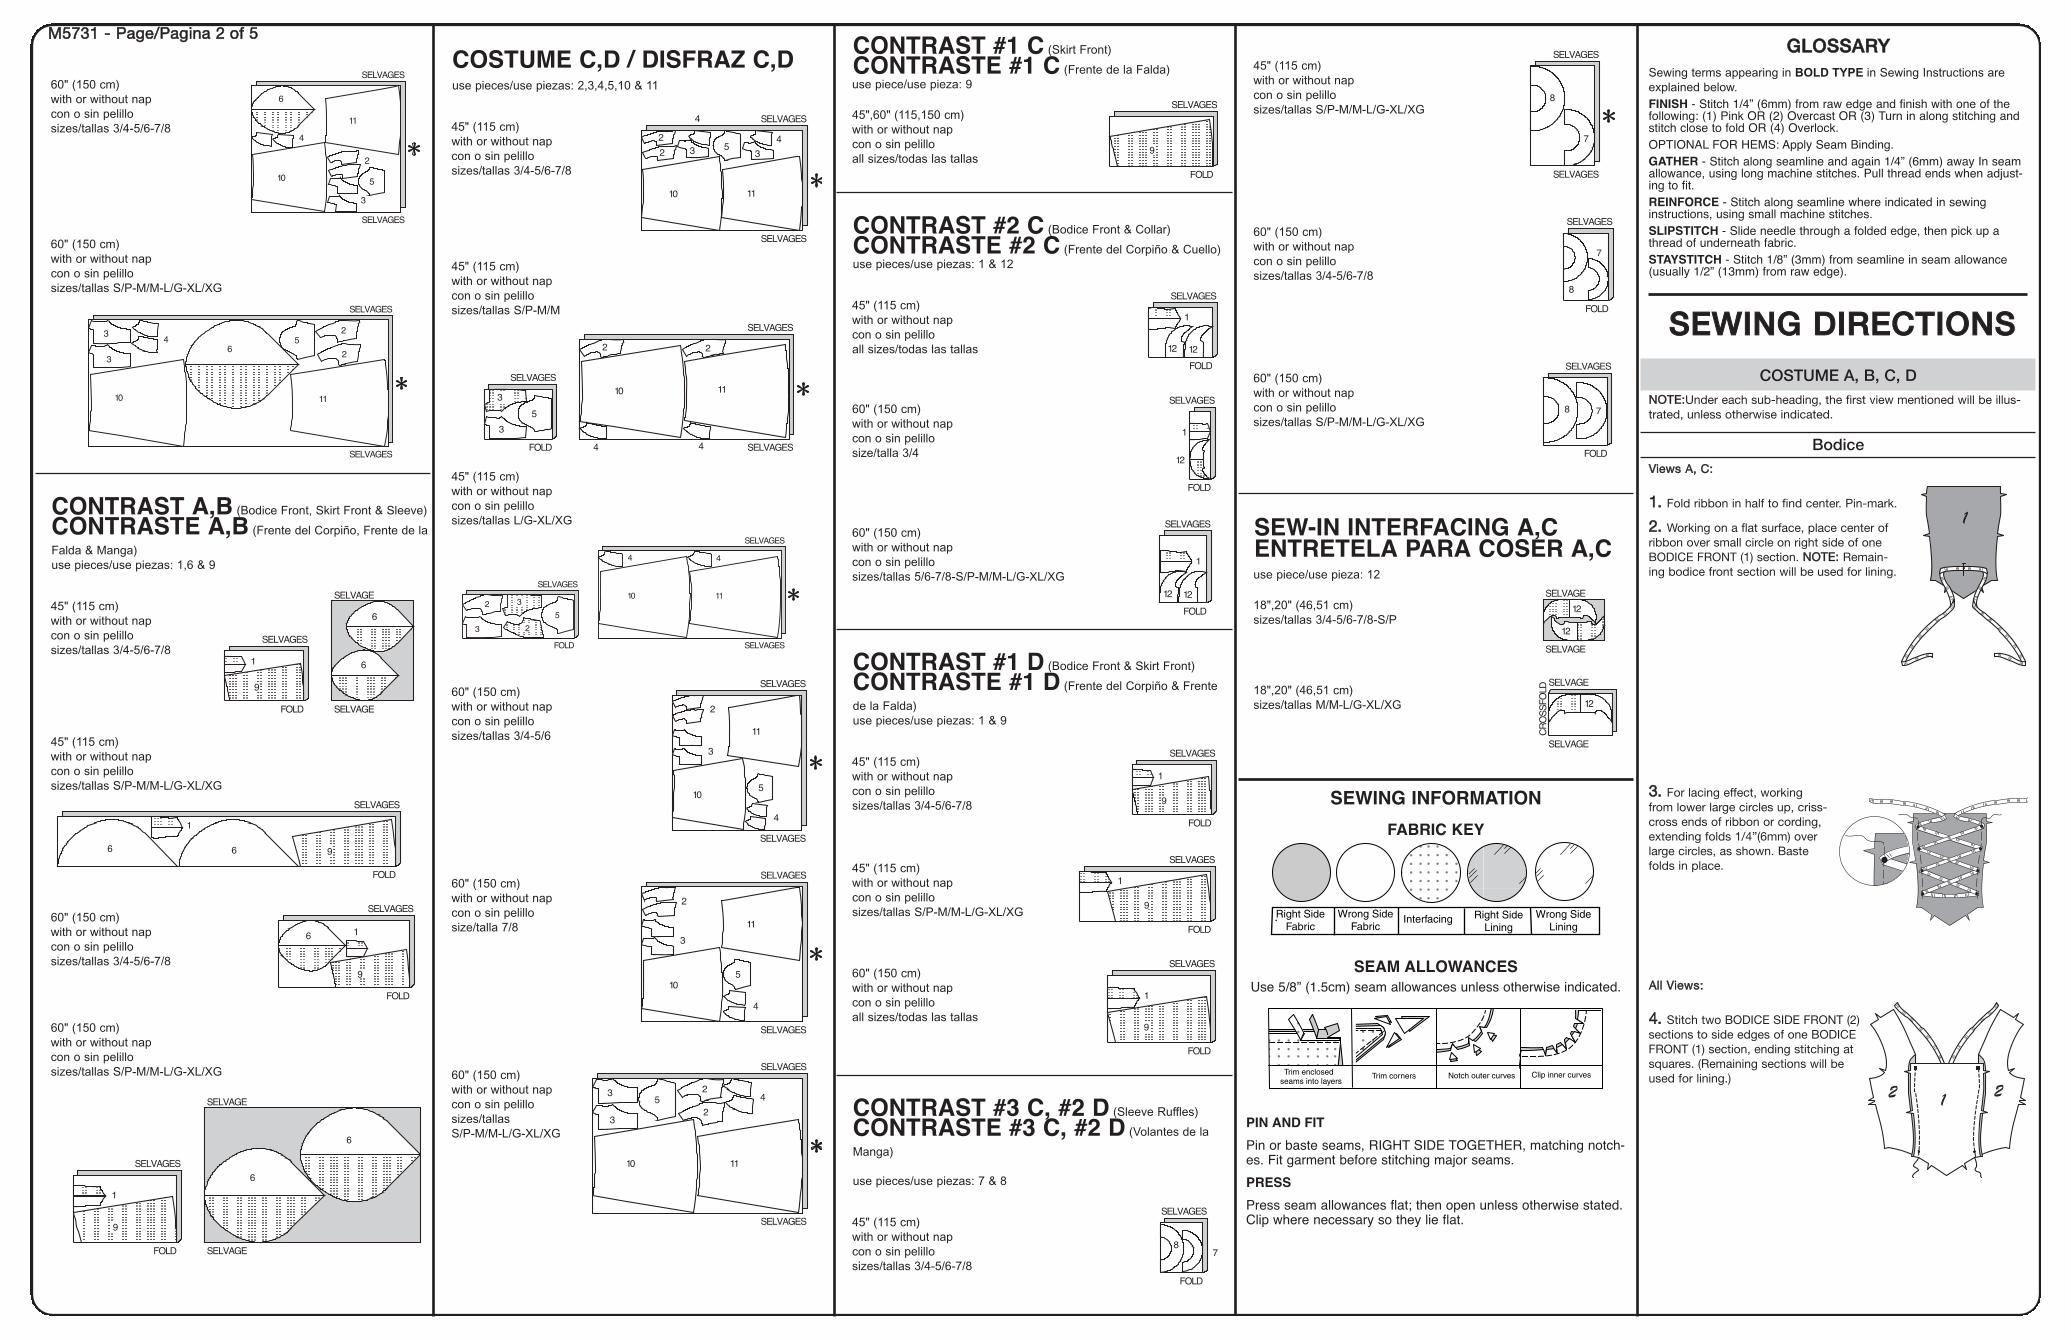
GGLLOOSSSSAARRYYSewing terms appearing in BOLD TYPE in Sewing Instructions areexplained below.FINISH - Stitch 1/4” (6mm) from raw edge and finish with one of thefollowing: (1) Pink OR (2) Overcast OR (3) Turn in along stitching andstitch close to fold OR (4) Overlock.OPTIONAL FOR HEMS: Apply Seam Binding.GATHER - Stitch along seamline and again 1/4” (6mm) away In seamallowance, using long machine stitches. Pull thread ends when adjust-ing to fit.REINFORCE - Stitch along seamline where indicated in sewinginstructions, using small machine stitches.SLIPSTITCH - Slide needle through a folded edge, then pick up athread of underneath fabric.STAYSTITCH - Stitch 1/8” (3mm) from seamline in seam allowance(usually 1/2” (13mm) from raw edge).
SSEEWWIINNGG DDIIRREECCTTIIOONNSSCOSTUME A, B, C, D
NNOOTTEE::Under each sub-heading, the first view mentioned will be illus-trated, unless otherwise indicated.
BodiceVViieewwss AA,, CC::
11.. Fold ribbon in half to find center. Pin-mark.
22.. Working on a flat surface, place center ofribbon over small circle on right side of oneBODICE FRONT (1) section. NNOOTTEE:: Remain-ing bodice front section will be used for lining.
33.. For lacing effect, workingfrom lower large circles up, criss-cross ends of ribbon or cording,extending folds 1/4”(6mm) overlarge circles, as shown. Bastefolds in place.
AAllll VViieewwss::
44.. Stitch two BODICE SIDE FRONT (2)sections to side edges of one BODICEFRONT (1) section, ending stitching atsquares. (Remaining sections will beused for lining.)
2 21
1
45" (115 cm) with or without napcon o sin pelillosizes/tallas S/P-M/M-L/G-XL/XG
60" (150 cm) with or without napcon o sin pelillosizes/tallas 3/4-5/6-7/8
60" (150 cm) with or without napcon o sin pelillosizes/tallas S/P-M/M-L/G-XL/XG
SEW-IN INTERFACING A,CENTRETELA PARA COSER A,Cuse piece/use pieza: 12
18",20" (46,51 cm) sizes/tallas 3/4-5/6-7/8-S/P
18",20" (46,51 cm) sizes/tallas M/M-L/G-XL/XG
SEWING INFORMATION
FABRIC KEY
SEAM ALLOWANCESUse 5/8” (1.5cm) seam allowances unless otherwise indicated.
PIN AND FIT
Pin or baste seams, RIGHT SIDE TOGETHER, matching notch-es. Fit garment before stitching major seams.
PRESS
Press seam allowances flat; then open unless otherwise stated.Clip where necessary so they lie flat.
12
CR
OS
SFO
LD
SELVAGE
SELVAGE
12
12
SELVAGE
SELVAGE
8 7
FOLD
SELVAGES
60"*/**
8
7
FOLD
SELVAGES
*
8
7
SELVAGES
SELVAGES
COSTUME C,D / DISFRAZ C,Duse pieces/use piezas: 2,3,4,5,10 & 11
45" (115 cm) with or without napcon o sin pelillosizes/tallas 3/4-5/6-7/8
45" (115 cm) with or without napcon o sin pelillosizes/tallas S/P-M/M
45" (115 cm) with or without napcon o sin pelillosizes/tallas L/G-XL/XG
60" (150 cm) with or without napcon o sin pelillosizes/tallas 3/4-5/6
60" (150 cm) with or without napcon o sin pelillosize/talla 7/8
60" (150 cm) with or without napcon o sin pelillosizes/tallas S/P-M/M-L/G-XL/XG
60" *5731 COSTUME [C]Size XL Plot 1046
*
10 11
3
35
2
2
4
SELVAGES
SELVAGES
*
10
11
3
2
4
5
SELVAGES
SELVAGES
*
10
11
4
5
2
3
SELVAGES
SELVAGES
2 3
3 2
5
*
10 11
4 4
FOLD
SELVAGES
SELVAGES
SELVAGES
3
3
5
*2 2
4 4
10 11
FOLD
SELVAGES
SELVAGES
SELVAGES
*
10 11
2
2 3
4
53
4
SELVAGES
SELVAGES
60" (150 cm) with or without napcon o sin pelillosizes/tallas 3/4-5/6-7/8
60" (150 cm) with or without napcon o sin pelillosizes/tallas S/P-M/M-L/G-XL/XG
CONTRAST A,B (Bodice Front, Skirt Front & Sleeve)
CONTRASTE A,B (Frente del Corpiño, Frente de la
Falda & Manga)use pieces/use piezas: 1,6 & 9
45" (115 cm) with or without napcon o sin pelillosizes/tallas 3/4-5/6-7/8
45" (115 cm) with or without napcon o sin pelillosizes/tallas S/P-M/M-L/G-XL/XG
60" (150 cm) with or without napcon o sin pelillosizes/tallas 3/4-5/6-7/8
60" (150 cm) with or without napcon o sin pelillosizes/tallas S/P-M/M-L/G-XL/XG
9
1
6
6
FOLD
SELVAGES
SELVAGE
SELVAGE
6
9
1
FOLD
SELVAGES
6 6 9
1
FOLD
SELVAGES
9
1 6
6
FOLD
SELVAGES
SELVAGE
SELVAGE
*
10
6
11
3
34 5
2
2
SELVAGES
SELVAGES
*
10
11
6
4
3
5
2
SELVAGES
SELVAGES
CONTRAST #1 C (Skirt Front)
CONTRASTE #1 C (Frente de la Falda)use piece/use pieza: 9
45",60" (115,150 cm) with or without napcon o sin pelilloall sizes/todas las tallas
CONTRAST #2 C (Bodice Front & Collar)
CONTRASTE #2 C (Frente del Corpiño & Cuello)use pieces/use piezas: 1 & 12
45" (115 cm) with or without napcon o sin pelilloall sizes/todas las tallas
60" (150 cm) with or without napcon o sin pelillosize/talla 3/4
60" (150 cm) with or without napcon o sin pelillosizes/tallas 5/6-7/8-S/P-M/M-L/G-XL/XG
CONTRAST #1 D (Bodice Front & Skirt Front)
CONTRASTE #1 D (Frente del Corpiño & Frente
de la Falda)use pieces/use piezas: 1 & 9
45" (115 cm) with or without napcon o sin pelillosizes/tallas 3/4-5/6-7/8
45" (115 cm) with or without napcon o sin pelillosizes/tallas S/P-M/M-L/G-XL/XG
60" (150 cm) with or without napcon o sin pelilloall sizes/todas las tallas
CONTRAST #3 C, #2 D (Sleeve Ruffles)
CONTRASTE #3 C, #2 D (Volantes de la
Manga)
use pieces/use piezas: 7 & 8
45" (115 cm) with or without napcon o sin pelillosizes/tallas 3/4-5/6-7/8
87
FOLD
SELVAGES
9
1
FOLD
SELVAGES
1
9
FOLD
SELVAGES
9
1
FOLD
SELVAGES
12 12
1
FOLD
SELVAGES
12
1
FOLD
SELVAGES
1
12 12
FOLD
SELVAGES
9
FOLD
SELVAGES
MM55773311 -- PPaaggee//PPaaggiinnaa 22 ooff 55
2255.. Pin ruffle to upper sleeve. Adjust gathers;baste. Stitch. Stitch again 1/4”(6mm) away inseam allowance. Trim close to stitching. Pressseam toward upper sleeve.
2266.. AAllll VViieewwss:: With right sides together,pin sleeve into armhole, matching sym-bols, placing large circle at shoulderseam. Adjust gathers; baste. Stitch, eas-ing sleeve slightly to fit below small cir-cles. Stitch again 1/4”(6mm) away inseam allowance. Trim close to stitching.Press seam allowances flat. Turn seamtoward sleeve.
Skirt and Zipper2277.. RREEIINNFFOORRCCEE inner corner of SKIRT FRONT (9), pivoting at largecircle. Clip to large circle.
2288.. Stitch SKIRT SIDE FRONT AND SIDE BACK (10) sections to sideedges of skirt front, as shown.
10
10
9
1188.. Pin lower sleeve to upper sleeve, lining side up, placing onenotch at sleeve seam, matching large circles and remaining notch,clipping lower sleeve where necessary; baste. Stitch. Stitch again1/4”(6mm) away in seam allowance. Trim close to stitching. Pressseam toward upper sleeve.
VViieewwss CC,,DD::
1199.. Stitch ends of UPPER RUFFLE (7)together. Stitch again 1/4”(6mm) away inseam allowance. Trim close to stitching.Press seam to one side.
2200.. On outside, pin lace trim to loweredge of upper ruffle, having scallop edgeeven with raw edge. Stitch along straightedge.
2211.. On inside, trim upper ruffle close tostitching, as shown, being careful not tocut lace trim.
2222.. Prepare LOWER RUFFLE (8) in same manner as upper ruffle.
2233.. With right side up, pin upper ruffleto lower ruffle, matching seams. Basteraw edges.
2244.. GGAATTHHEERR upper edge of ruffle.
7
1100.. Turn lining to inside; press. Bastearmhole edges together.
Sleeves
1111.. GGAATTHHEERR upper edge of UPPER SLEEVE(5) between small circles, as shown.
1122.. Stitch upper sleeve seam.
VViieewwss AA,, BB::
1133.. Cut each LOWER SLEEVE (6) and CONTRAST (6) along cuttingline, as shown. Transfer markings.
6
5
55.. SSTTAAYYSSTTIITTCCHH side edge of twoBODICE BACK (3) sections.(Remaining sections will be used forlining.)
66.. Pin one BODICE SIDE BACK (4)section to bodice back, clippingbodice back where necessary; baste.Stitch. (Remaining bodice side backsections will be used for lining.)
77.. Stitch bodice back sections tobodice front at shoulders and sides.
88.. Prepare LINING in same manner as bodice. Turn in seamallowance on lower edge of lining, folding in fullness at corner; press.Trim pressed seam allowance to 3/8”(1cm).
99.. With right sides together, pin lining tobodice. Stitch neck edge, pivoting atsmall circles and breaking stitching atsquares. Clip to small circles. Trim.
44
33
1144.. For lining, pin contrast to lower sleeve. Stitch outer edgestogether, pivoting at large circle. Trim.
1155.. Turn lower sleeve right side out; press. Baste raw edges together.
1166.. SSTTAAYYSSTTIITTCCHH lower sleeve, as shown.
1177.. VViieeww AA:: On outside, pin marabou trim slightly over finished edgeof lower sleeve, lapping ends. Sew in place by hand.
MM55773311 -- PPaaggee//PPaaggiinnaa 33 ooff 55
5511.. For Misses’ sizes: Sew hook and eye toneck edge above zipper, as shown.
VViieewwss AA,, CC::
5522.. Tie ribbon or cord lacing into bow atcenter front.
5533.. Sew socket sections of snaps to neckedge, as shown.
5544.. VViieeww CC:: Cut remainder of ribbon inhalf. Tie into bow. Tack bow to sleeves,as shown.
5555.. VViieeww DD:: Sew purchased flowers tofront neck edge and to sleeves, as shownon front of pattern envelope.
EEssppaaññooll
INFORMACION DE COSTURA
CLAVE DE LA TELA
MARGENES DE COSTURAUtilizar margenes de costura de 1.5cm a menos que se indique
lo contrario.
VViieeww BB::
4477.. Pin trim to skirt front, placing one edge 3”(7.5cm) above loweredge and extending ends 1/2”(1.3cm) over side front seams, asshown. Sew in place by hand.
4488.. Apply a second row of trim to skirt front 2”(5cm) above first rowin same manner.
AAllll VViieewwss::
4499.. VViieeww AA:: Pin marabou trim todress along neck edge and sidefront seams, as shown. Sew inplace by hand.
5500.. VViieewwss BB,,CC,,DD:: Pin trim todress along neck edge and sidefront seams, as shown, turningunder 1/4”(6mm) on ends. Sewin place by hand. SSLLIIPPSSTTIITTCCHHends.
3388.. Turn bodice lining down, turn-ing under ends to clear zipperteeth. SSLLIIPPSSTTIITTCCHH to zipper tapeand pressed edge over seam.
Finishing
3399.. Turn up 1-1/4”(3.2cm)hem. Baste close to fold. Trimhem to an even width. FFIINNIISSHHraw edge. Sew hem in place,easing in fullness, if necessary.Press.
VViieewwss AA,,CC::
4400.. Pin INTERFACING towrong side of each COLLAR(12) section. Trim corners, asshown. Baste along seam-lines.
4411.. Stitch upper edges of collarsections together along seamline.Stitch lower edges together in a3/8”(1cm) seam, leaving an open-ing, as shown. Trim corners andseam at upper edge.
4422.. Turn collar right side out; press.SSLLIIPPSSTTIITTCCHH opening.
12
12
2299.. Stitch SKIRT BACK (11) sections together at center back, leavingopen above large circle.
3300.. Stitch skirt back to skirt side front and side back, as shown.
3311.. GGAATTHHEERR upper edge of skirt between small circles.
3322.. Open out bodice lining. Withright sides together, pin skirt tobodice, matching symbols.Adjust gathers; baste. Stitch, piv-oting at large circle. Stitch again1/4”(6mm) away in seamallowance. Trim close to stitching.Press seam toward bodice.
3333.. (A) Baste back opening edges together along seamline abovelarge circle, as shown. Press.
3344.. (B) NNOOTTEE:: It may be necessary to shorten zipper. To make newzipper stop, place zipper along opening edge (with pull tab 3/8”(1cm)below seam). Mark placement of new zipper stop. Whipstitch acrossteeth at marking. Cut zipper 3/4”(2cm) below the new stop.
3355.. (C) Open zipper; place face down on extended seam allowance,placing zipper stop at large circle and zipper teeth on seamline. Bastein center of zipper tape, keeping garment free.
3366.. (D) Close zipper; turn pull tab up. Spread garment flat. Baste ascant 1/4”(6mm) from zipper teeth and across lower edge.
3377.. (E) On outside, stitch along basting through all thicknesses, asshown, using a zipper foot. Remove basting.
1111
4433.. Sew ball section of snaps to lower edge, spacing each snapapproximately 1-1/2”( 3.8cm) apart, as shown. (Socket sections ofsnaps will be applied to dress.)
4444.. AAllll VViieewwss:: Pin pregathered lace trim to neck edge, placing boundedge under finished edge, folding in fullness at corners and turningunder 1/2”(1.3cm) on ends. Stitch close to finished edge.
4455.. VViieeww BB:: Pin trim to bodice front, placing edge even with finishededge and extending ends 1/4”(6mm) over side front seams, as shown.Sew in place by hand.
4466.. AAllll VViieewwss:: Pin trim to sleeves, placing one edge along seam, asshown, turning under ends to meet at seam. Sew in place by hand.SSLLIIPPSSTTIITTCCHH ends.
MM55773311 -- PPaaggee//PPaaggiinnaa 44 ooff 55
4433.. Coser los broches machos al borde inferior, separando cada
broche aproximadamente 3.8cm, como se indica. (Los broches hem-
bras se aplicarán al vestido.)
4444.. TTooddooss llooss MMooddeellooss:: Prender con alfileres el adorno de encaje
prefruncido al borde del escote, colocando el borde ribeteado debajo
del borde acabado, doblando hacia adentro la amplitud en las
esquinas y doblando hacia el revés 1.3cm en los extremos. Coser
cerca al borde acabado.
4455.. MMooddeelloo BB:: Prender con alfileres el adorno al frente del corpiño,
colocando el borde parejo con el borde acabado y los extremos
sobresaliendo 6mm sobre las costuras del costado del frente, como
se indica. Coser a mano en su lugar.
4466.. TTooddooss llooss MMooddeellooss:: Prender con alfileres el adorno a las man-
gas, colocando un borde a lo largo de la costura, como se indica,
doblando hacia el revés los extremos para unirlos en la costura.
Coser a mano en su lugar. Coser los extremos con PPUUNNTTOO DDEE
DDOOBBLLAADDIILLLLOO.
MMooddeelloo BB::
4477.. Prender con alfileres el adorno al frente de la falda, colocando un
borde a 7.5cm sobre el borde inferior y los extremos sobresaliendo
1.3cm por las costuras del costado del frente, como se indica. Coser
a mano en su lugar.
4488.. Aplicar una segunda hilera de adorno al frente de la falda a 5cm
sobre la primera hilera de la misma forma.
TTooddooss llooss MMooddeellooss::
4499.. MMooddeelloo AA:: Prender con alfileres el adorno de marabú al vestido
a lo largo del borde del escote y de las costuras del costado del
frente, como se indica. Coser a mano en su lugar.
5500.. MMooddeellooss BB,,CC,,DD:: Prender con alfileres el adorno al vestido a lo
largo del borde del escote y de las costuras del costado del frente,
como se indica, doblando hacia el revés 6mm en los extremos. Coser
a mano en su lugar. Coser los extremos con PPUUNNTTOO DDEE DDOOBBLLAADDIILL--
LLOO.
5511.. PPaarraa llaass TTaallllaass ddee JJóóvveenneess yy SSeeññoorraass:: Coser un corchete al
borde del escote sobre la cremallera, como se indica.
MMooddeellooss AA,, CC::
5522.. Hacer un lazo con la cinta o el cordón en el centro del frente.
5533.. Coser los broches hembras al borde del escote, como se indica.
5544.. MMooddeelloo CC:: Cortar el resto de la cinta por la mitad. Hacer un lazo.
Hilvanar el lazo a las mangas, como se indica.
5555.. MMooddeelloo DD:: Coser las flores compradas al borde del escote del
frente y a las mangas, como se indica en el frente del sobre del
patrón.
3311.. FFRRUUNNCCIIRR el borde superior de la falda entre los círculos
pequeños.
3322.. Abrir el forro del corpiño. Derecho con derecho, prender con alfil-
eres la falda al corpiño, coincidiendo los símbolos. Ajustar los frunces;
hilvanar. Coser, girando en el círculo grande. Coser nuevamente a
6mm en el margen de costura. Recortar cerca al pespunte. Planchar
la costura hacia el corpiño.
3333.. (A) Hilvanar juntos los bordes de la abertura de la espalda a lo
largo de la línea de costura sobre el círculo grande, como se indica.
Planchar.
3344.. (B) NNOOTTAA:: Puede ser necesario acortar la cremallera. Para hacer
el nuevo tope de cremallera, colocar la cremallera a lo largo del borde
de la abertura (con el tirador a 1cm debajo de la costura). Marcar la
ubicación del nuevo tope de cremallera. Sobrehilar a través de los
dientes por la marca. Cortar la cremallera a 2cm debajo del nuevo
tope.
3355.. (C) Abrir la cremallera; colocarla boca abajo sobre el margen de
costura sobresalido, colocando el tope de cremallera en el círculo
grande y los dientes de la cremallera en la línea de costura. Hilvanar
por el centro de la cinta de la cremallera, manteniendo la prenda
suelta.
3366.. (D) Cerrar la cremallera; levantar el tirador. Extender la prenda.
Hilvanar a unos 6mm de los dientes de la cremallera y a través del
borde inferior.
3377.. (E) Por afuera, coser a lo largo del hilván a través de todo el
grosor, como se indica, utilizando un pie de cremallera. Sacar el hil-
ván.
3388.. Voltear el forro del corpiño hacia abajo, doblando hacia el revés
los extremos para despejar los dientes de la cremallera. Coser con
PPUUNNTTOO DDEE DDOOBBLLAADDIILLLLOO a la cinta de la cremallera y el borde plan-
chado sobre la costura.
Acabado
3399.. Hacer un dobladillo de 3.2cm. Hilvanar cerca al doblez. Recortar
el dobladillo a un ancho parejo. AACCAABBAARR el borde no terminado.
Coser el dobladillo en su lugar, embebiendo la amplitud, si es nece-
sario. Planchar.
MMooddeellooss AA,,CC::
4400.. Prender con alfileres la ENTRETELA por el revés de cada sección
del CUELLO (12). Recortar las esquinas, como se indica. Hilvanar a lo
largo de las líneas de costura.
4411.. Coser juntos los bordes superiores de las secciones del cuello a
lo largo de la línea de costura. Coser juntos los bordes inferiores con
una costura de 1cm, dejando una abertura, como se indica. Recortar
las esquinas y la costura por el borde superior.
4422.. Voltear el cuello al derecho; planchar. Coser la abertura con
PPUUNNTTOO DDEE DDOOBBLLAADDIILLLLOO.
33.. Para el efecto de cordón, trabajando desde los círculos grandes
inferiores hacia arriba, cruzar los extremos de la cinta o del cordón,
sobrepasando los dobleces 6mm sobre los círculos grandes, como se
indica. Hilvanar los dobleces en su lugar.
TTooddooss llooss MMooddeellooss::
44.. Coser dos secciones del COSTADO DEL FRENTE DEL CORPIÑO
(2) a los bordes del costado de una sección del FRENTE DEL COR-
PIÑO (1), terminando el pespunte en los cuadrados. (Las secciones
restantes servirán de forro.)
55.. Hacer un PPEESSPPUUNNTTEE DDEE RREEFFUUEERRZZOO en el borde del costado de
dos secciones de la ESPALDA DEL CORPIÑO (3). (Las secciones
restantes servirán de forro.)
66.. Prender con alfileres una sección del COSTADO DE LA ESPALDA
DEL CORPIÑO (4) a la espalda del corpiño, haciendo los piquetes
necesarios en la espalda del corpiño; hilvanar. Coser. (Las secciones
restantes del costado de la espalda del corpiño servirán de forro.)
77.. Coser las secciones de la espalda del corpiño al frente del corpiño
por los hombros y costados.
88.. Preparar el FORRO de la misma forma que el corpiño. Doblar
hacia adentro el margen de costura en el borde inferior del forro, dob-
lando la amplitud en la esquina; planchar. Recortar el margen de cos-
tura planchado a 1cm.
99.. Derecho con derecho, prender con alfileres el forro al corpiño.
Coser el borde del escote, girando en los círculos pequeños y termi-
nando el pespunte en los cuadrados. Hacer un piquete hacia los cír-
culos pequeños. Recortar.
1100.. Voltear el forro hacia adentro; planchar. Hilvanar juntos los bor-
des de la sisa.
Mangas
1111.. FFRRUUNNCCIIRR el borde superior de la PARTE SUPERIOR DE LA
MANGA (5) entre los círculos pequeños, como se indica.
1122.. Coser la costura de la parte superior de la manga.
MMooddeellooss AA,, BB::
1133.. Cortar cada PARTE INFERIOR DE LA MANGA (6) y CONTRASTE
(6) a lo largo de la línea de corte, como se indica. Transferir las mar-
cas.
1144.. Para el forro, prender con alfileres el contraste a la parte inferior
de la manga. Coser juntos los bordes exteriores, girando en el círculo
grande. Recortar.
1155.. Voltear la parte inferior de la manga al derecho; planchar. Hilva-
nar juntos los bordes no terminados.
1166.. Hacer un PPEESSPPUUNNTTEE DDEE RREEFFUUEERRZZOO en la parte inferior de la
manga, como se indica.
PRENDER CON ALFILERES Y ENTALLAR
Prender con alfileres o hilvanar las costuras. DERECHO CON
DERECHO, coincidiendo los cortes. Entallar la prenda antes de
coser las costuras principales.
PLANCHADO
Planchar los margenes de costura planos; luego abrirlos a
menos que se indique lo contrario. Hacer los piquetes necesar-
ios de modo que queden planos.
GLOSARIO
Los términos de costura que aparecen en NNEEGGRRIITTAASS en las Instruc-
ciones de Costura se explican a continuación.
ACABAR - Coser a 6mm del borde no terminado y acabar con una delas siguientes formas: cortar en zigzag, sobrehilar o doblar haciaadentro a lo largo del pespunte y coser cerca al doblez o remallar.
OPCIONAL PARA DOBLADILLOS: Aplicar cinta de extrafort.
FRUNCIR - Coser a lo largo de la línea de costura y nuevamente a6mm del margen de costura, utilizando puntadas largas a máquina.Jalar el hilo al ajustar para encajar.
REFORZAR - Coser a lo largo de la línea de costura donde se indicaen las instrucciones de costura, utilizando puntadas pequeñas amáquina.
PUNTO DE DOBLADILLO - (Este se utiliza para unir dos bordesdoblados o un borde doblado con una superficie plana). Deslizar laaguja a través del borde doblado; luego coger un hilo del doblez o dela superficie opuestos).
PESPUNTE DE REFUERZO - Coser a 3mm de la línea de costura enel margen de costura (por lo general a 1.3cm del borde no terminado).
INSTRUCCIONES DE COSTURA
DISFRAZ A, B, C, D
NNOOTTAA:: Debajo de cada subtítulo, se muestra el primer modelo, a
menos que se indique lo contrario.
Corpiño
MMooddeellooss AA,, CC::
11.. Doblar la cinta por la mitad para encontrar el centro. Marcar con
alfileres.
22.. Trabajando en una superficie plana, colocar el centro de la cinta
sobre el círculo pequeño en el derecho de una sección del FRENTE
DEL CORPIÑO (1). NNOOTTAA:: La sección restante del frente del corpiño
servirá para el forro.
1177.. MMooddeelloo AA:: Por afuera, prender con alfileres el adorno de marabú
ligeramente sobre el borde acabado de la parte inferior de la manga,
sobreponiendo los extremos. Coser a mano en su lugar.
1188.. Prender con alfileres la parte inferior de la manga a la parte
superior de la manga, lado con forro hacia arriba, colocando un corte
en la costura de la manga, coincidiendo los círculos grandes y el
corte restante, haciendo los piquetes necesarios en la parte inferior de
la manga; hilvanar. Coser. Coser nuevamente a 6mm en el margen de
costura. Recortar cerca al pespunte. Planchar la costura hacia la
parte superior de la manga.
MMooddeellooss CC,,DD::
1199.. Coser juntos los extremos del VOLANTE SUPERIOR (7). Coser
nuevamente a 6mm en el margen de costura. Recortar cerca al
pespunte. Planchar la costura hacia un costado.
2200.. Por afuera, prender con alfileres el adorno de encaje al borde
inferior del volante superior, manteniendo el borde del festón parejo
con el borde no terminado. Coser a lo largo del borde recto.
2211.. Por adentro, recortar el volante superior cerca al pespunte, como
se indica, evitando cortar el adorno de encaje.
2222.. Preparar el VOLANTE INFERIOR (8) igual que el volante superior.
2233.. Por el derecho, prender con alfileres el volante superior al
volante inferior, coincidiendo las costuras. Hilvanar los bordes no ter-
minados.
2244.. FFRRUUNNCCIIRR el borde superior del volante.
2255.. Prender con alfileres el volante a la parte superior de la manga.
Ajustar los frunces; hilvanar. Coser. Coser nuevamente a 6mm en el
margen de costura. Recortar cerca al pespunte. Planchar la costura
hacia la parte superior de la manga.
2266.. TTooddooss llooss MMooddeellooss:: Derecho con derecho, prender con alfileres
la manga a la sisa, coincidiendo los símbolos, colocando el círculo
grande en la costura del hombro. Ajustar los frunces; hilvanar. Coser,
embebiendo la manga ligeramente para encajar debajo de los círculos
pequeños. Coser nuevamente a 6mm en el margen de costura.
Recortar cerca al pespunte. Planchar los márgenes de costura planos.
Voltear la costura hacia la manga.
Falda y Cremallera
2277.. RREEFFOORRZZAARR la esquina interior del FRENTE DE LA FALDA (9),
girando en el círculo grande. Hacer un piquete hacia el círculo grande.
2288.. Coser las secciones del COSTADO DEL FRENTE Y COSTADO
DE LA ESPALDA DE LA FALDA (10) a los bordes del costado del
frente de la falda, como se indica.
2299.. Coser juntas las secciones de la ESPALDA DE LA FALDA (11)
por el centro de la espalda, dejando abierto sobre el círculo grande.
3300.. Coser la espalda de la falda al costado del frente y costado de la
espalda de la falda, como se indica.
MM55773311 -- PPaaggee//PPaaggiinnaa 55 ooff 55