gss professional - free instruction manuals
TRANSCRIPT
Robert Bosch GmbHPower Tools Division70764 Leinfelden-EchterdingenGERMANY
www.bosch-pt.com
1 609 92A 0VX (2015.07) O / 166 EURO
GSS Professional140-1 A | 160-1 A | 160-1 A Multi
de Originalbetriebsanleitungen Original instructionsfr Notice originalees Manual originalpt Manual originalit Istruzioni originalinl Oorspronkelijke gebruiksaanwijzingda Original brugsanvisningsv Bruksanvisning i originalno Original driftsinstruksfi Alkuperäiset ohjeetel Πρωτότυπο οδηγιών χρήσηςtr Orijinal işletme talimatı
pl Instrukcja oryginalnacs Původní návod k používánísk Pôvodný návod na použitiehu Eredeti használati utasításru Оригинальное руководство по
эксплуатацииuk Оригінальна інструкція з
експлуатаціїkk Пайдалану нұсқаулығының
түпнұсқасы ro Instrucţiuni originalebg Оригинална инструкцияmk Оригинално упатство за работа
sr Originalno uputstvo za radsl Izvirna navodilahr Originalne upute za radet Algupärane kasutusjuhendlv Instrukcijas oriģinālvalodālt Originali instrukcijako 사용 설명서 원본arfa
OBJ_DOKU-41186-001.fm Page 1 Wednesday, July 22, 2015 3:00 PM
3 |
1 609 92A 0VX | (22.7.15) Bosch Power Tools
3
6 6 6
6
6
2
1
3
4
5
4
GSS 140-1 A GSS 160-1 A
GSS 160-1 A Multi
7
GSS 140-1 AGSS 160-1 AGSS 160-1 A Multi
OBJ_BUCH-2247-001.book Page 3 Wednesday, July 22, 2015 3:01 PM
1 609 92A 0VX | (22.7.15) Bosch Power Tools
4 |
ED
CB
A
1112
10
6
9
11 910
12
96
GSS 140-1 A, GSS 160-1 A Multi
GSS 140-1A, GSS 160-1 A MultiGSS 140-1 A, GSS 160-1 A Multi
GSS 160-1 A Multi
3 4 5
6 6 6
8 8 8
OBJ_BUCH-2247-001.book Page 4 Wednesday, July 22, 2015 3:01 PM
5 |
1 609 92A 0VX | (22.7.15) Bosch Power Tools
K
15
J
IH
GF
GSS 140-1 A, GSS 160-1 A Multi
13
2
14
2
15
2
14
16
OBJ_BUCH-2247-001.book Page 5 Wednesday, July 22, 2015 3:01 PM
English | 11
Bosch Power Tools 1 609 92A 0VX | (22.7.15)
EnglishSafety NotesGeneral Power Tool Safety Warnings
Read all safety warnings and all instruc-tions. Failure to follow the warnings and
instructions may result in electric shock, fire and/or serious injury.Save all warnings and instructions for future reference.The term “power tool” in the warnings refers to your mains-operated (corded) power tool or battery-operated (cordless) power tool.
Work area safety Keep work area clean and well lit. Cluttered or dark areas
invite accidents. Do not operate power tools in explosive atmospheres,
such as in the presence of flammable liquids, gases or dust. Power tools create sparks which may ignite the dust or fumes.
Keep children and bystanders away while operating a power tool. Distractions can cause you to lose control.
Electrical safety Power tool plugs must match the outlet. Never modify
the plug in any way. Do not use any adapter plugs with earthed (grounded) power tools. Unmodified plugs and matching outlets will reduce risk of electric shock.
Avoid body contact with earthed or grounded surfaces, such as pipes, radiators, ranges and refrigerators. There is an increased risk of electric shock if your body is earthed or grounded.
Do not expose power tools to rain or wet conditions. Water entering a power tool will increase the risk of electric shock.
Do not abuse the cord. Never use the cord for carrying, pulling or unplugging the power tool. Keep cord away from heat, oil, sharp edges and moving parts. Damaged or entangled cords increase the risk of electric shock.
When operating a power tool outdoors, use an exten-sion cord suitable for outdoor use. Use of a cord suitable for outdoor use reduces the risk of electric shock.
If operating a power tool in a damp location is unavoid-able, use a residual current device (RCD) protected supply. Use of an RCD reduces the risk of electric shock.
Personal safety Stay alert, watch what you are doing and use common
sense when operating a power tool. Do not use a power tool while you are tired or under the influence of drugs, alcohol or medication. A moment of inattention while op-erating power tools may result in serious personal injury.
Use personal protective equipment. Always wear eye protection. Protective equipment such as dust mask, non-skid safety shoes, hard hat, or hearing protection used for appropriate conditions will reduce personal injuries.
Prevent unintentional starting. Ensure the switch is in the off-position before connecting to power source and/or battery pack, picking up or carrying the tool. Carrying power tools with your finger on the switch or en-ergising power tools that have the switch on invites acci-dents.
Remove any adjusting key or wrench before turning the power tool on. A wrench or a key left attached to a ro-tating part of the power tool may result in personal injury.
Do not overreach. Keep proper footing and balance at all times. This enables better control of the power tool in unexpected situations.
Dress properly. Do not wear loose clothing or jewel-lery. Keep your hair, clothing and gloves away from moving parts. Loose clothes, jewellery or long hair can be caught in moving parts.
If devices are provided for the connection of dust ex-traction and collection facilities, ensure these are con-nected and properly used. Use of dust collection can re-duce dust-related hazards.
Power tool use and care Do not force the power tool. Use the correct power tool
for your application. The correct power tool will do the job better and safer at the rate for which it was designed.
Do not use the power tool if the switch does not turn it on and off. Any power tool that cannot be controlled with the switch is dangerous and must be repaired.
Disconnect the plug from the power source and/or the battery pack from the power tool before making any adjustments, changing accessories, or storing power tools. Such preventive safety measures reduce the risk of starting the power tool accidentally.
Store idle power tools out of the reach of children and do not allow persons unfamiliar with the power tool or these instructions to operate the power tool. Power tools are dangerous in the hands of untrained users.
Maintain power tools. Check for misalignment or bind-ing of moving parts, breakage of parts and any other condition that may affect the power tool’s operation. If damaged, have the power tool repaired before use. Many accidents are caused by poorly maintained power tools.
Keep cutting tools sharp and clean. Properly maintained cutting tools with sharp cutting edges are less likely to bind and are easier to control.
Use the power tool, accessories and tool bits etc. in ac-cordance with these instructions, taking into account the working conditions and the work to be performed. Use of the power tool for operations different from those intended could result in a hazardous situation.
Service Have your power tool serviced by a qualified repair per-
son using only identical replacement parts. This will en-sure that the safety of the power tool is maintained.
WARNING
OBJ_BUCH-2247-001.book Page 11 Wednesday, July 22, 2015 3:01 PM
12 | English
1 609 92A 0VX | (22.7.15) Bosch Power Tools
Safety Warnings for Sander Use the machine only for dry sanding. Penetration of wa-
ter into the machine increases the risk of an electric shock. Caution, fire hazard! Avoid overheating the object be-
ing sanded as well as the sander. Always empty the dust collector before taking breaks. In unfavourable conditions, e. g., when sparks emit from sanding metals, sanding debris in the dust bag, micro filter or paper sack (or in the filter sack or filter of the vacuum cleaner) can self-ignite. Particularly when mixed with remainders of var-nish, polyurethane or other chemical materials and when the sanding debris is hot after long periods of working.
Secure the workpiece. A workpiece clamped with clamp-ing devices or in a vice is held more secure than by hand.
Products sold in GB only: Your product is fitted with a BS 1363/A approved electric plug with internal fuse (ASTA approved to BS 1362).If the plug is not suitable for your socket outlets, it should be cut off and an appropriate plug fitted in its place by an authorised customer service agent. The replacement plug should have the same fuse rating as the original plug.The severed plug must be disposed of to avoid a possible shock hazard and should never be inserted into a mains socket elsewhere.Products sold in AUS and NZ only: Use a residual current device (RCD) with a rated residual current of 30 mA or less.
Product Description and Specifica-tions
Read all safety warnings and all instruc-tions. Failure to follow the warnings and in-structions may result in electric shock, fire and/or serious injury.
While reading the operating instructions, unfold the graphics page for the machine and leave it open.
Intended UseThe machine is intended for dry sanding of wood, plastic, filler and coated surfaces.
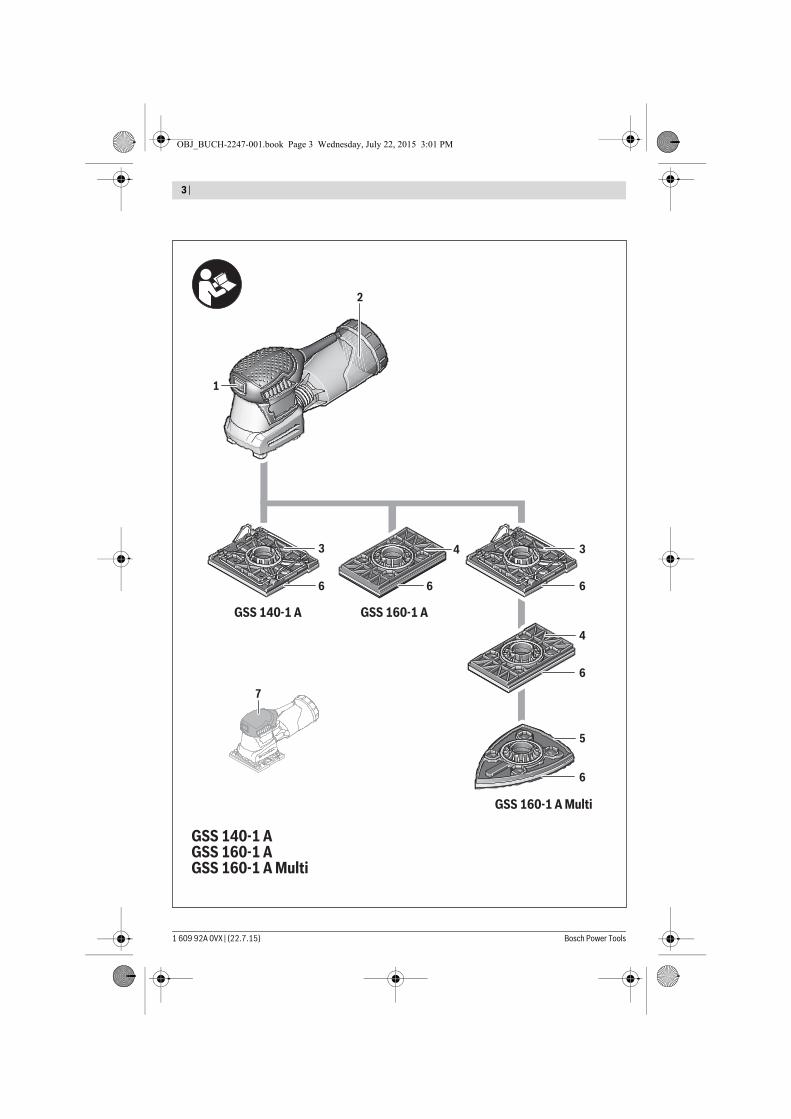
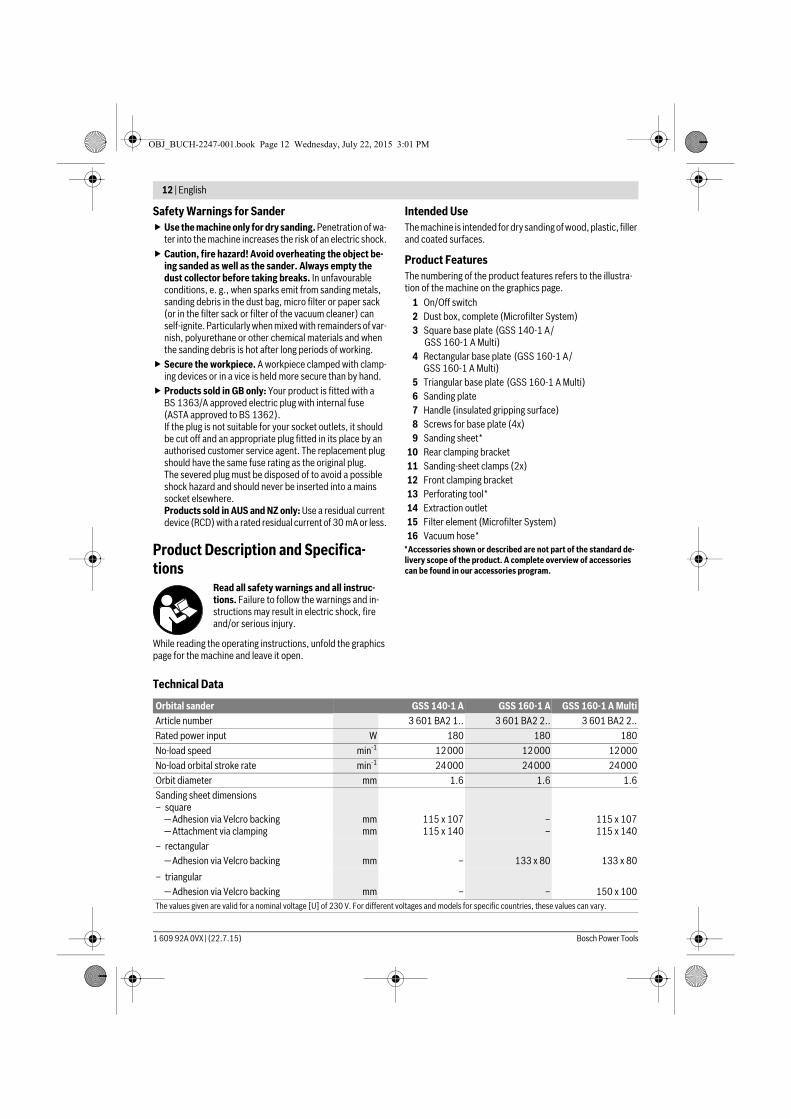
Product FeaturesThe numbering of the product features refers to the illustra-tion of the machine on the graphics page.
1 On/Off switch2 Dust box, complete (Microfilter System)3 Square base plate (GSS 140-1 A/
GSS 160-1 A Multi)4 Rectangular base plate (GSS 160-1 A/
GSS 160-1 A Multi)5 Triangular base plate (GSS 160-1 A Multi)6 Sanding plate7 Handle (insulated gripping surface)8 Screws for base plate (4x)9 Sanding sheet*
10 Rear clamping bracket11 Sanding-sheet clamps (2x)12 Front clamping bracket13 Perforating tool*14 Extraction outlet15 Filter element (Microfilter System)16 Vacuum hose*
* Accessories shown or described are not part of the standard de-livery scope of the product. A complete overview of accessories can be found in our accessories program.
Technical Data
Orbital sander GSS 140-1 A GSS 160-1 A GSS 160-1 A MultiArticle number 3 601 BA2 1.. 3 601 BA2 2.. 3 601 BA2 2..Rated power input W 180 180 180No-load speed min-1 12000 12000 12000No-load orbital stroke rate min-1 24000 24000 24000Orbit diameter mm 1.6 1.6 1.6Sanding sheet dimensions– square
— Adhesion via Velcro backing— Attachment via clamping
mmmm
115 x 107115 x 140
––
115 x 107115 x 140
– rectangular— Adhesion via Velcro backing mm – 133 x 80 133 x 80
– triangular— Adhesion via Velcro backing mm – – 150 x 100
The values given are valid for a nominal voltage [U] of 230 V. For different voltages and models for specific countries, these values can vary.
OBJ_BUCH-2247-001.book Page 12 Wednesday, July 22, 2015 3:01 PM
English | 13
Bosch Power Tools 1 609 92A 0VX | (22.7.15)
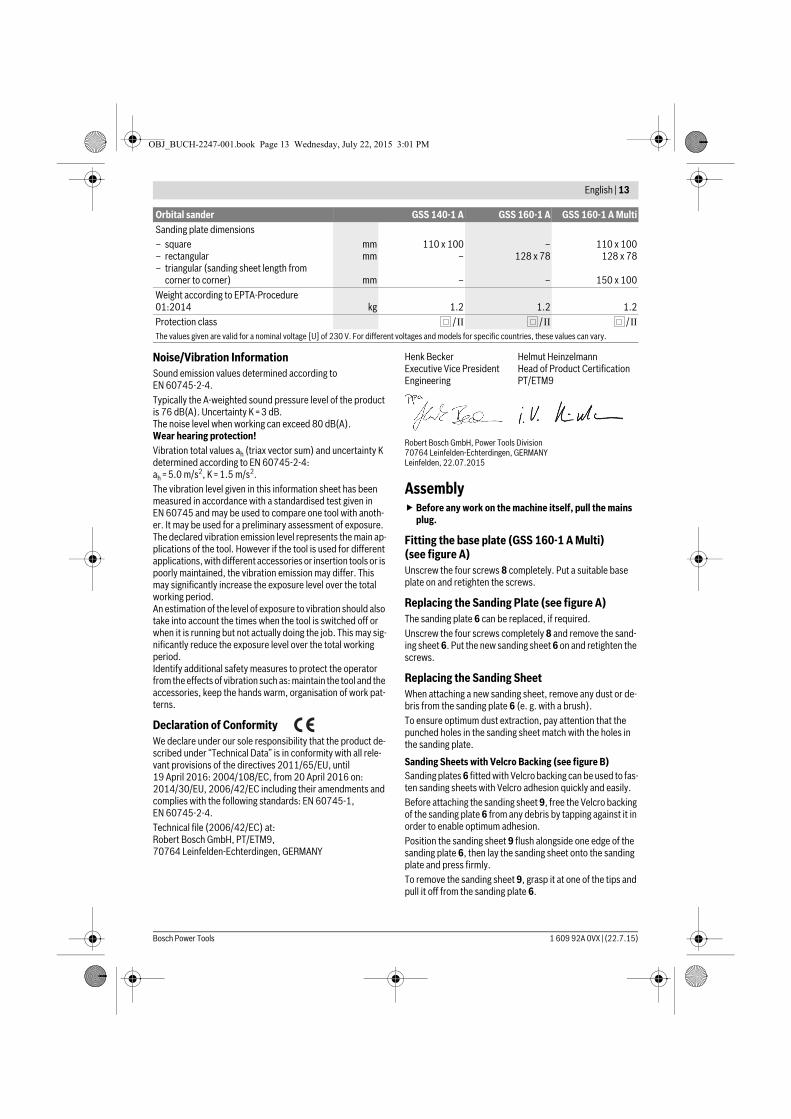
Noise/Vibration InformationSound emission values determined according to EN 60745-2-4.Typically the A-weighted sound pressure level of the product is 76 dB(A). Uncertainty K =3 dB.The noise level when working can exceed 80 dB(A).Wear hearing protection!Vibration total values ah (triax vector sum) and uncertainty K determined according to EN 60745-2-4: ah =5.0 m/s2, K=1.5 m/s2.The vibration level given in this information sheet has been measured in accordance with a standardised test given in EN 60745 and may be used to compare one tool with anoth-er. It may be used for a preliminary assessment of exposure.The declared vibration emission level represents the main ap-plications of the tool. However if the tool is used for different applications, with different accessories or insertion tools or is poorly maintained, the vibration emission may differ. This may significantly increase the exposure level over the total working period.An estimation of the level of exposure to vibration should also take into account the times when the tool is switched off or when it is running but not actually doing the job. This may sig-nificantly reduce the exposure level over the total working period.Identify additional safety measures to protect the operator from the effects of vibration such as: maintain the tool and the accessories, keep the hands warm, organisation of work pat-terns.
Declaration of ConformityWe declare under our sole responsibility that the product de-scribed under “Technical Data” is in conformity with all rele-vant provisions of the directives 2011/65/EU, until 19 April 2016: 2004/108/EC, from 20 April 2016 on: 2014/30/EU, 2006/42/EC including their amendments and complies with the following standards: EN 60745-1, EN 60745-2-4.Technical file (2006/42/EC) at:Robert Bosch GmbH, PT/ETM9,70764 Leinfelden-Echterdingen, GERMANY
Robert Bosch GmbH, Power Tools Division70764 Leinfelden-Echterdingen, GERMANYLeinfelden, 22.07.2015
Assembly Before any work on the machine itself, pull the mains
plug.
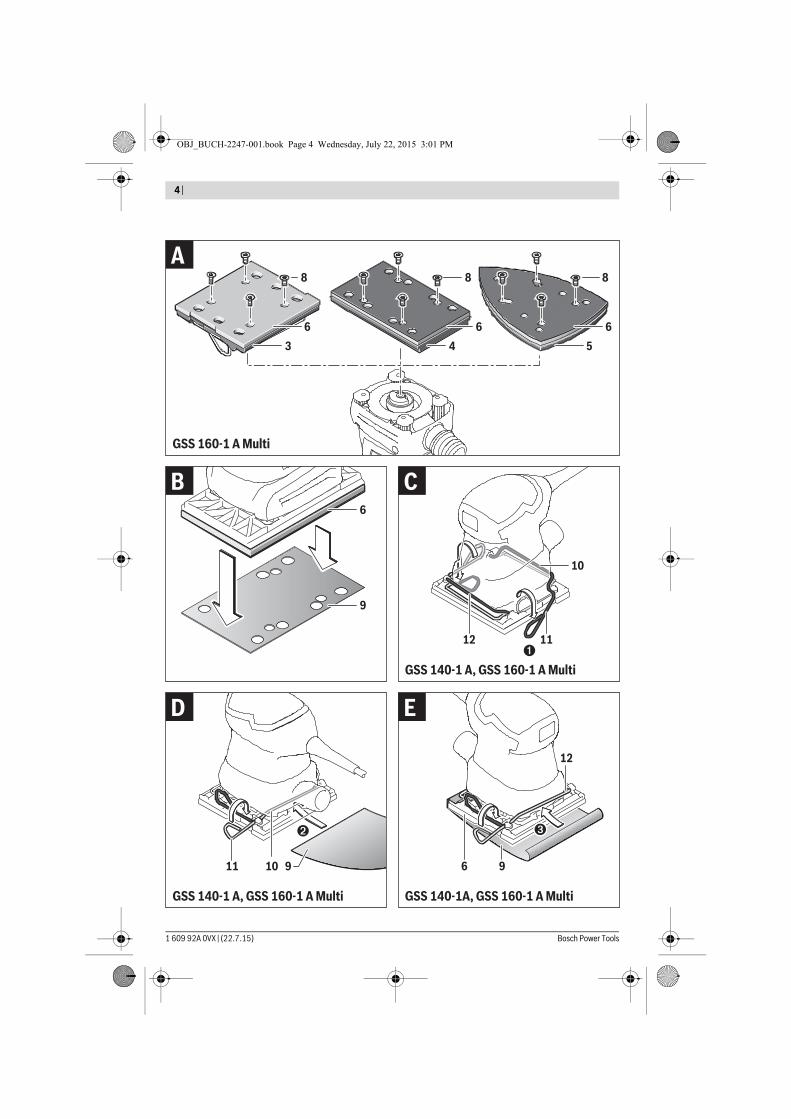
Fitting the base plate (GSS 160-1 A Multi) (see figure A)Unscrew the four screws 8 completely. Put a suitable base plate on and retighten the screws.
Replacing the Sanding Plate (see figure A)The sanding plate 6 can be replaced, if required.Unscrew the four screws completely 8 and remove the sand-ing sheet 6. Put the new sanding sheet 6 on and retighten the screws.
Replacing the Sanding SheetWhen attaching a new sanding sheet, remove any dust or de-bris from the sanding plate 6 (e. g. with a brush).To ensure optimum dust extraction, pay attention that the punched holes in the sanding sheet match with the holes in the sanding plate.
Sanding Sheets with Velcro Backing (see figure B)Sanding plates 6 fitted with Velcro backing can be used to fas-ten sanding sheets with Velcro adhesion quickly and easily.Before attaching the sanding sheet 9, free the Velcro backing of the sanding plate 6 from any debris by tapping against it in order to enable optimum adhesion.Position the sanding sheet 9 flush alongside one edge of the sanding plate 6, then lay the sanding sheet onto the sanding plate and press firmly.To remove the sanding sheet 9, grasp it at one of the tips and pull it off from the sanding plate 6.
Sanding plate dimensions– square– rectangular– triangular (sanding sheet length from
corner to corner)
mmmm
mm
110 x 100–
–
–128 x 78
–
110 x 100128 x 78
150 x 100Weight according to EPTA-Procedure 01:2014 kg 1.2 1.2 1.2Protection class /II /II /II
Orbital sander GSS 140-1 A GSS 160-1 A GSS 160-1 A Multi
The values given are valid for a nominal voltage [U] of 230 V. For different voltages and models for specific countries, these values can vary.
Henk BeckerExecutive Vice PresidentEngineering
Helmut HeinzelmannHead of Product CertificationPT/ETM9
OBJ_BUCH-2247-001.book Page 13 Wednesday, July 22, 2015 3:01 PM
14 | English
1 609 92A 0VX | (22.7.15) Bosch Power Tools
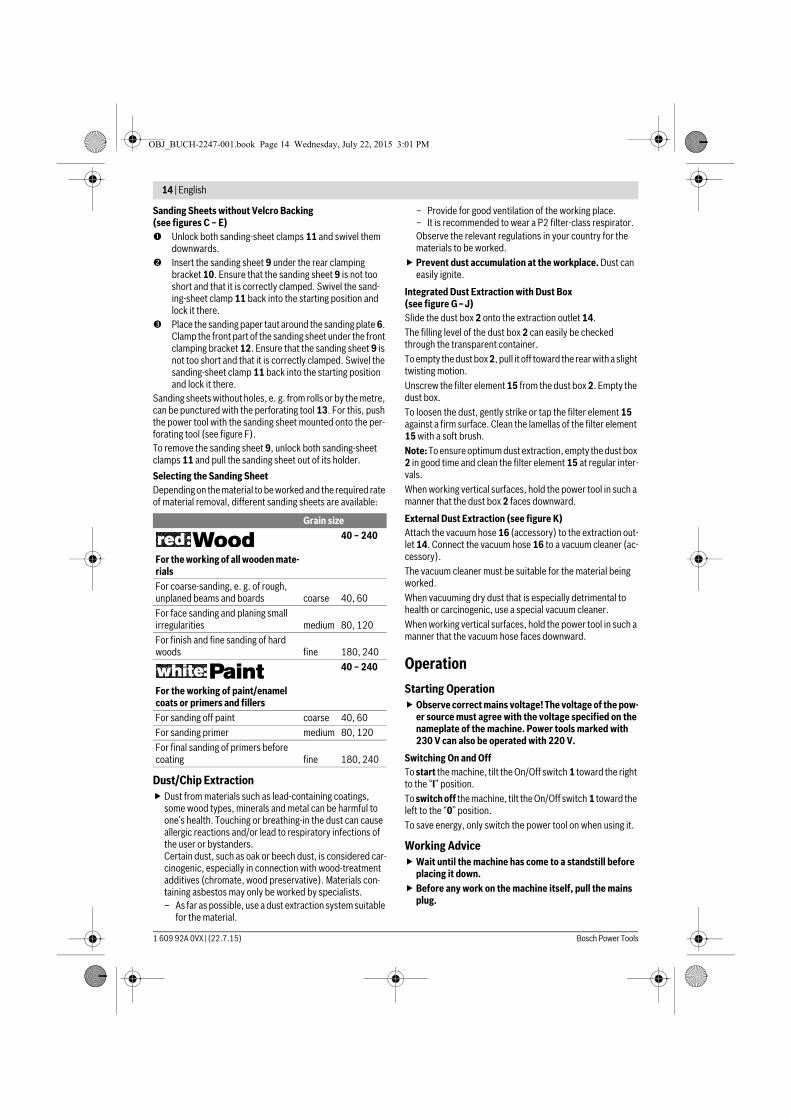
Sanding Sheets without Velcro Backing (see figures C – E) Unlock both sanding-sheet clamps 11 and swivel them
downwards. Insert the sanding sheet 9 under the rear clamping
bracket 10. Ensure that the sanding sheet 9 is not too short and that it is correctly clamped. Swivel the sand-ing-sheet clamp 11 back into the starting position and lock it there.
Place the sanding paper taut around the sanding plate 6. Clamp the front part of the sanding sheet under the front clamping bracket 12. Ensure that the sanding sheet 9 is not too short and that it is correctly clamped. Swivel the sanding-sheet clamp 11 back into the starting position and lock it there.
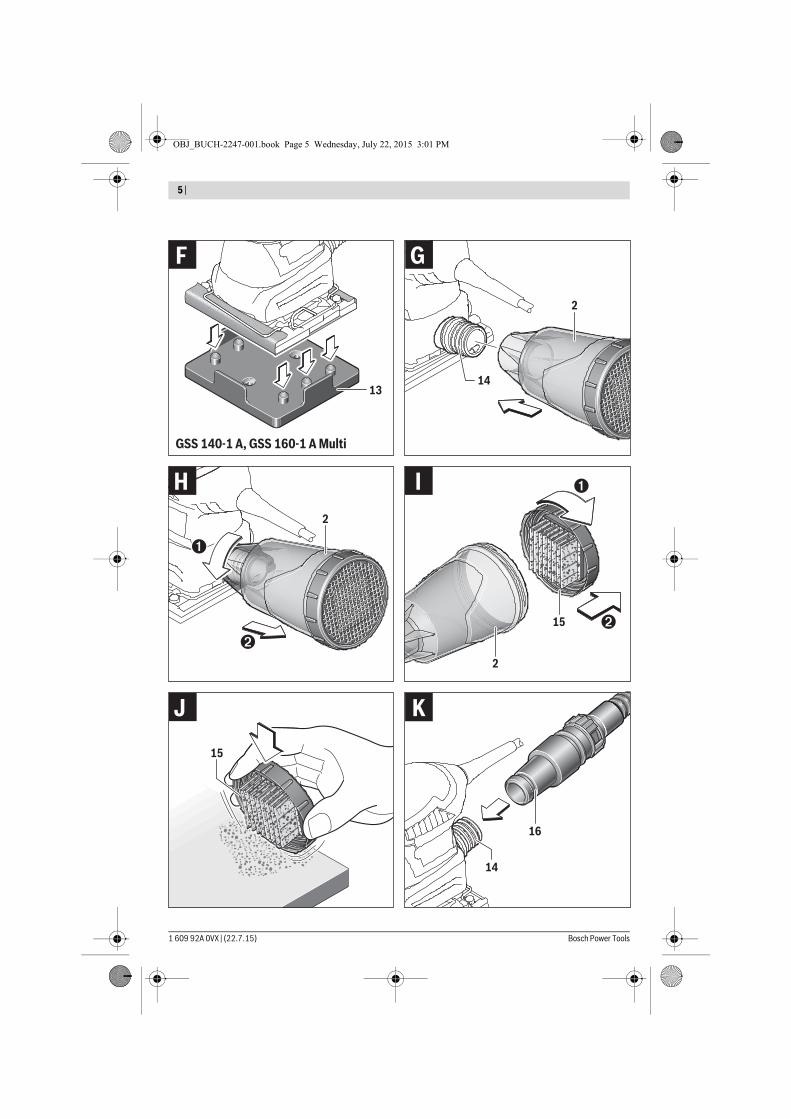
Sanding sheets without holes, e. g. from rolls or by the metre, can be punctured with the perforating tool 13. For this, push the power tool with the sanding sheet mounted onto the per-forating tool (see figure F).To remove the sanding sheet 9, unlock both sanding-sheet clamps 11 and pull the sanding sheet out of its holder.Selecting the Sanding SheetDepending on the material to be worked and the required rate of material removal, different sanding sheets are available:
Dust/Chip Extraction Dust from materials such as lead-containing coatings,
some wood types, minerals and metal can be harmful to one’s health. Touching or breathing-in the dust can cause allergic reactions and/or lead to respiratory infections of the user or bystanders.Certain dust, such as oak or beech dust, is considered car-cinogenic, especially in connection with wood-treatment additives (chromate, wood preservative). Materials con-taining asbestos may only be worked by specialists.– As far as possible, use a dust extraction system suitable
for the material.
– Provide for good ventilation of the working place.– It is recommended to wear a P2 filter-class respirator.Observe the relevant regulations in your country for the materials to be worked.
Prevent dust accumulation at the workplace. Dust can easily ignite.
Integrated Dust Extraction with Dust Box (see figure G–J)Slide the dust box 2 onto the extraction outlet 14.The filling level of the dust box 2 can easily be checked through the transparent container.To empty the dust box 2, pull it off toward the rear with a slight twisting motion.Unscrew the filter element 15 from the dust box 2. Empty the dust box.To loosen the dust, gently strike or tap the filter element 15 against a firm surface. Clean the lamellas of the filter element 15 with a soft brush.Note: To ensure optimum dust extraction, empty the dust box 2 in good time and clean the filter element 15 at regular inter-vals.When working vertical surfaces, hold the power tool in such a manner that the dust box 2 faces downward.
External Dust Extraction (see figure K)Attach the vacuum hose 16 (accessory) to the extraction out-let 14. Connect the vacuum hose 16 to a vacuum cleaner (ac-cessory).The vacuum cleaner must be suitable for the material being worked.When vacuuming dry dust that is especially detrimental to health or carcinogenic, use a special vacuum cleaner.When working vertical surfaces, hold the power tool in such a manner that the vacuum hose faces downward.
OperationStarting Operation Observe correct mains voltage! The voltage of the pow-
er source must agree with the voltage specified on the nameplate of the machine. Power tools marked with 230 V can also be operated with 220 V.
Switching On and OffTo start the machine, tilt the On/Off switch 1 toward the right to the “I” position.To switch off the machine, tilt the On/Off switch 1 toward the left to the “0” position.To save energy, only switch the power tool on when using it.
Working AdviceWait until the machine has come to a standstill before
placing it down. Before any work on the machine itself, pull the mains
plug.
Grain size
For the working of all wooden mate-rials
40 – 240
For coarse-sanding, e. g. of rough, unplaned beams and boards coarse 40, 60For face sanding and planing small irregularities medium 80, 120For finish and fine sanding of hard woods fine 180, 240
For the working of paint/enamel coats or primers and fillers
40 – 240
For sanding off paint coarse 40, 60For sanding primer medium 80, 120For final sanding of primers before coating fine 180, 240
OBJ_BUCH-2247-001.book Page 14 Wednesday, July 22, 2015 3:01 PM
English | 15
Bosch Power Tools 1 609 92A 0VX | (22.7.15)
The removal capacity during sanding is mainly determined by the selection of the sanding sheet.Only flawless sanding sheets achieve good sanding capacity and extend the service life of the machine.Pay attention to apply uniform sanding pressure; this increas-es the working life of the sanding sheets.Intensifiying the sanding pressure does not lead to an in-crease of the sanding capacity, but to increased wear of the machine and the sanding sheet.A sanding sheet that has been used for metal should not be used for other materials.Use only original Bosch sanding accessories.
Maintenance and ServiceMaintenance and Cleaning Before any work on the machine itself, pull the mains
plug. For safe and proper working, always keep the machine
and ventilation slots clean.If the replacement of the supply cord is necessary, this has to be done by Bosch or an authorized Bosch service agent in or-der to avoid a safety hazard.
After-sales Service and Application ServiceOur after-sales service responds to your questions concern-ing maintenance and repair of your product as well as spare parts. Exploded views and information on spare parts can al-so be found under:www.bosch-pt.comBosch’s application service team will gladly answer questions concerning our products and their accessories.In all correspondence and spare parts orders, please always include the 10-digit article number given on the nameplate of the product.
Great BritainRobert Bosch Ltd. (B.S.C.)P.O. Box 98Broadwater ParkNorth Orbital RoadDenhamUxbridgeUB 9 5HJAt www.bosch-pt.co.uk you can order spare parts or arrange the collection of a product in need of servicing or repair. Tel. Service: (0344) 7360109E-Mail: [email protected]
IrelandOrigo Ltd.Unit 23 Magna DriveMagna Business ParkCity WestDublin 24Tel. Service: (01) 4666700Fax: (01) 4666888
Australia, New Zealand and Pacific IslandsRobert Bosch Australia Pty. Ltd.Power ToolsLocked Bag 66Clayton South VIC 3169Customer Contact CenterInside Australia:Phone: (01300) 307044Fax: (01300) 307045Inside New Zealand:Phone: (0800) 543353Fax: (0800) 428570Outside AU and NZ:Phone: +61 3 95415555www.bosch.com.au
Republic of South AfricaCustomer serviceHotline: (011) 6519600Gauteng – BSC Service Centre35 Roper Street, New CentreJohannesburgTel.: (011) 4939375Fax: (011) 4930126E-Mail: [email protected] – BSC Service CentreUnit E, Almar Centre143 Crompton StreetPinetownTel.: (031) 7012120Fax: (031) 7012446E-Mail: [email protected] Cape – BSC Service CentreDemocracy Way, Prosperity ParkMilnertonTel.: (021) 5512577Fax: (021) 5513223E-Mail: [email protected] HeadquartersMidrand, GautengTel.: (011) 6519600Fax: (011) 6519880E-Mail: [email protected]
DisposalThe machine, accessories and packaging should be sorted for environmental-friendly recycling.Do not dispose of power tools into household waste!Only for EC countries:
According to the European Directive 2012/19/EU for Waste Electrical and Elec-tronic Equipment and its implementation into national right, power tools that are no longer usable must be collected separately and disposed of in an environmentally cor-rect manner.
Subject to change without notice.
OBJ_BUCH-2247-001.book Page 15 Wednesday, July 22, 2015 3:01 PM
1 609 92A 0VX | (22.7.15) Bosch Power Tools
164 |
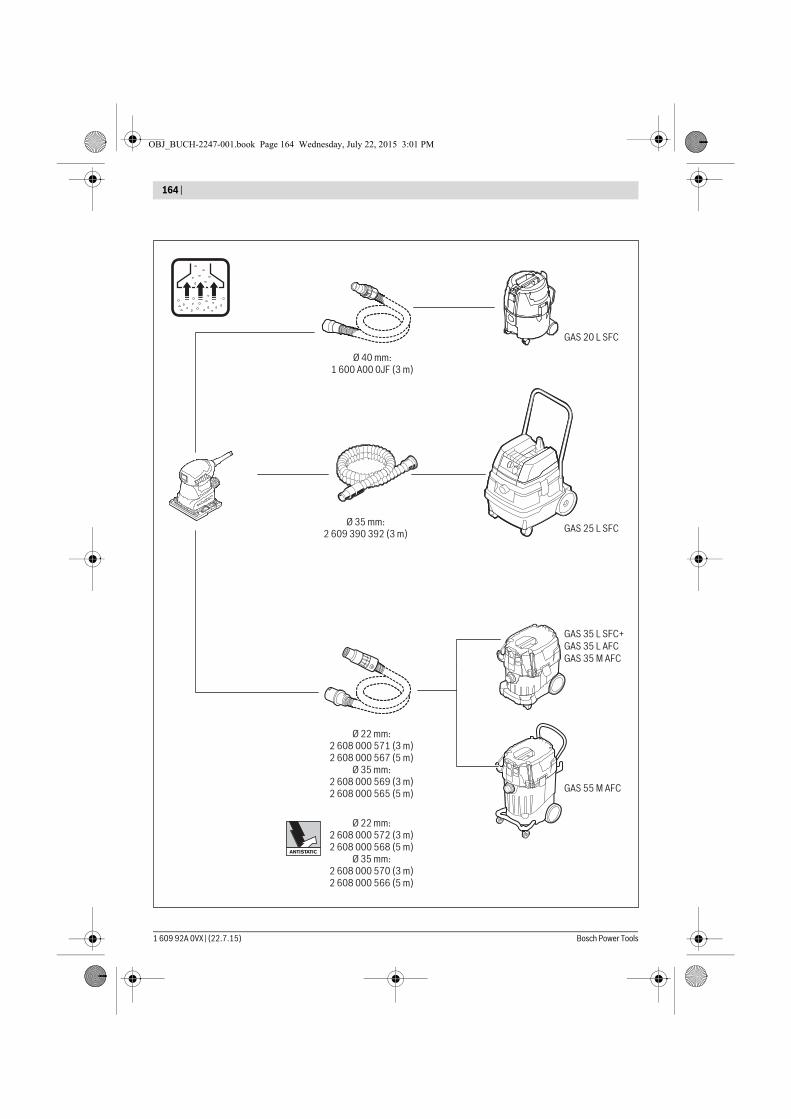
GAS 25 L SFCØ 35 mm:
2 609 390 392 (3 m)
Ø 40 mm:1 600 A00 0JF (3 m)
Ø 22 mm:2 608 000 572 (3 m)2 608 000 568 (5 m)
Ø 35 mm:2 608 000 570 (3 m)2 608 000 566 (5 m)
Ø 22 mm:2 608 000 571 (3 m)2 608 000 567 (5 m)
Ø 35 mm:2 608 000 569 (3 m)2 608 000 565 (5 m) GAS 55 M AFC
GAS 20 L SFC
GAS 35 L SFC+GAS 35 L AFCGAS 35 M AFC
OBJ_BUCH-2247-001.book Page 164 Wednesday, July 22, 2015 3:01 PM
| 165
Bosch Power Tools 1 609 92A 0VX | (12.4.16)
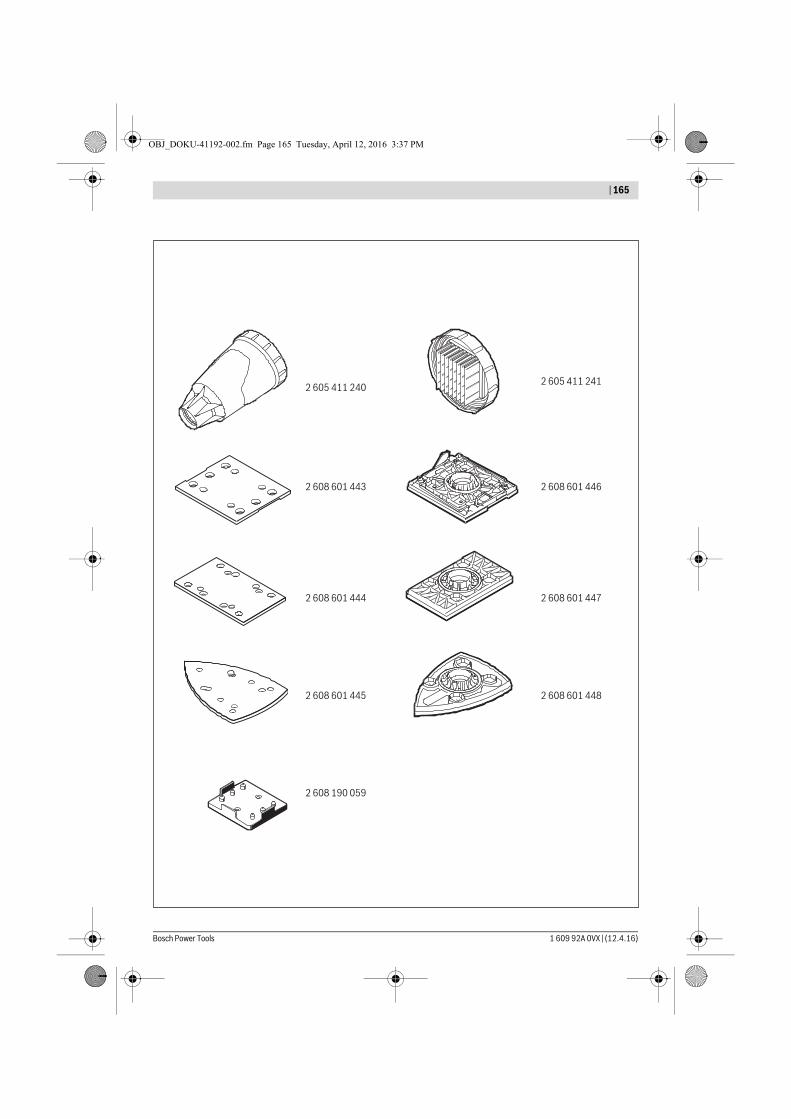
2 605 411 240
2 608 601 443
2 608 601 444
2 608 601 445
2 608 601 446
2 605 411 241
2 608 601 447
2 608 601 448
2 608 190 059
OBJ_DOKU-41192-002.fm Page 165 Tuesday, April 12, 2016 3:37 PM