guies curtes
TRANSCRIPT

7/23/2019 Guies curtes
http://slidepdf.com/reader/full/guies-curtes 1/15
CABLE MANAGEMENT
TECHNIQUES
EV3 and NXT cables are necessary, but alwaysseem to get in the way.
Tips for cable management:
Use the cable that is the most appropriate lengthfirst. In the EV3 Core Set you get the followinglength cables: 4 x 25 cm/10 in. cables, 2 x 35cm/14 in. cables, and 1 x 50 cm/20 in. cables.
Some cables will be too long. Wrap cablesaround beams to shorten them and keep themout of the way.
You can even gently knot cables to shorten them.
The cables can get in the way of the attachments,motors, etc. Secure cables by creating differentcable holders/guides out of LEGO. Here are someexamples:
Adding LEGO “cable guides” to the wires can hto keep them in place, identify what they are (usdifferent colors) and even keep them together (icase you want to quickly detach two or more at same time)
If you break the tip on the cables or you need exwires, you can buy replacements from LEGO:http://shop.lego.com/en-US/EV3-Cable-Pack-45514
Have another idea of how manage your cablesPlease share it with EV3Lessons.com.
“Those wires are always in the way! What do I do?”
By Droids Robotics, 2015

7/23/2019 Guies curtes
http://slidepdf.com/reader/full/guies-curtes 2/15
CABLE MANAGEMENT
PART 2
The cables on the LEGO MINDSTORMS can get in
the way of attachments and plugging and
unplugging motors/sensors. In this guide, FTC 8393
Giant Diencephalic BrainSTEM Robotics, an award-
winning former FLL Team from Pittsburgh, PA share
with us some simple, but very effective techniques
for cable management.
The Three
Fingers of
Death:
If you design a plug-in robot
where the brick comes out
of each chassis, you have tobe able to quickly unplug
and plug your cables. This technique keeps the
spacing between the wires correct at all times and
lets you press all three at the same time. Using
different colors lets you color code which wire goes
to which sensor or motor.
Gear Boxes: LEGO gear boxes can find a new use
as cable holders. Here, cables are fed through a
gear box piece. They are
spacious enough to hold
multiple cables.
Building Guide Rails: Building guide rails for long
EV3 wires helps to keep them out of the way and
always in the same spot.
Shorten Cables: When
cables are too long, you
can wrap them a few times around themselves or
around a beam.
By BrainSTEM Robotics and Droids Robotics, 20
Photos of actual builds by BrainSTEM Robotics
shared with permission.
7/23/2019 Guies curtes
http://slidepdf.com/reader/full/guies-curtes 3/15
COLOR SENSOR
SHIELDING
TECHNIQUES
In this guide, FTC 8393 Giant Diencephalic
BrainSTEM Robotics, an award-winning former FLL
Team from Pittsburgh, PA share with us some of
their building techniques.
What is Color Sensor Shielding
Shielding refers to surrounding your color sensors
with beams to prevent ambient light from
interfering with the color sensor’s readings. This is
especially valuable if you run your robot indrastically different light settings. For example you
might run the robot in a very sunny room once and
then have to run it in a very dark room later. The
EV3’s color sensors tolerate ambient light better
than NXT sensors, but they still work better with
shielding.
How do you shield sensors?
There are many ways to construct color sensor
shielding. You should use a technique that makessense for your robot design. The goal is simply to
make sure that no ambient (external) light enters
the color sensor.
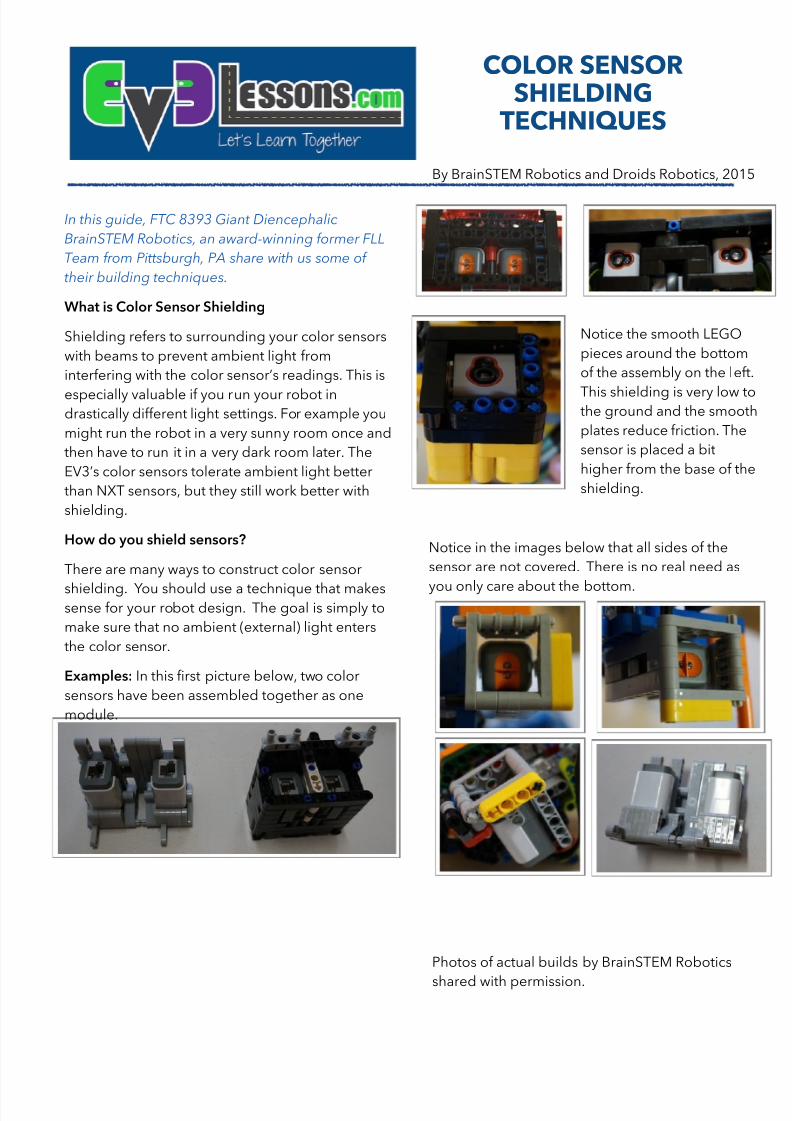
Examples: In this first picture below, two color
sensors have been assembled together as one
module.
Notice the smooth LEGO
pieces around the bottom
of the assembly on the le
This shielding is very low the ground and the smoo
plates reduce friction. The
sensor is placed a bit
higher from the base of t
shielding.
Notice in the images below that all sides of the
sensor are not covered. There is no real need as
you only care about the bottom.
By BrainSTEM Robotics and Droids Robotics, 20
Photos of actual builds by BrainSTEM Robotics
shared with permission.
7/23/2019 Guies curtes
http://slidepdf.com/reader/full/guies-curtes 4/15
NXT AND EV3:WORKING TOGETHER
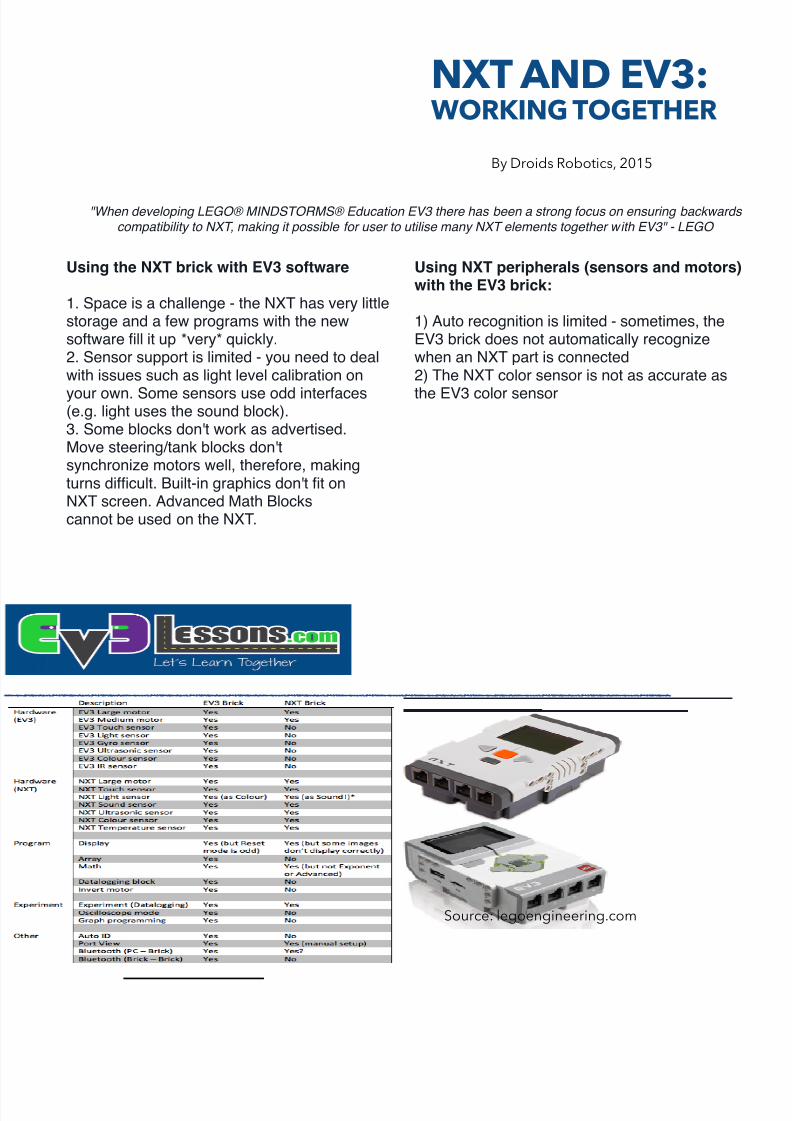
Using the NXT brick with EV3 software
1. Space is a challenge - the NXT has very littlestorage and a few programs with the newsoftware fill it up *very* quickly.2. Sensor support is limited - you need to dealwith issues such as light level calibration on
your own. Some sensors use odd interfaces(e.g. light uses the sound block).3. Some blocks don't work as advertised.Move steering/tank blocks don'tsynchronize motors well, therefore, makingturns difficult. Built-in graphics don't fit onNXT screen. Advanced Math Blockscannot be used on the NXT.
Using NXT peripherals (sensors and motors)with the EV3 brick:
1) Auto recognition is limited - sometimes, theEV3 brick does not automatically recognizewhen an NXT part is connected2) The NXT color sensor is not as accurate as
the EV3 color sensor
"When developing LEGO® MINDSTORMS® Education EV3 there has been a strong focus on ensuring backwardscompatibility to NXT, making it possible for user to utilise many NXT elements together with EV3" - LEGO
Source: legoengineering.com
By Droids Robotics, 2015

7/23/2019 Guies curtes
http://slidepdf.com/reader/full/guies-curtes 5/15
MY BLOCKS
What is a My Block?
My Blocks are a combination of one or more
blocks that you create that can be grouped into a
single block. Once
this custom block is
created, you can use
it in multiple
programs.
Every programming language has something like aMy Block (e.g. functions, procedures, or methods).
If you are looking to improve your programming
style, you should learn to use My Blocks.
My Blocks are great programming tools. When
used correctly, they can be very useful. They can
have inputs and outputs (parameters).
When should you use a My Block?
• When your robot is going to
repeat an action inside your
program
• When your code is repeated in
a different program
• To organize and simplify your code
What is a useful My Block?
Read below to learn what makes a useful My Blo
• Making very specific My Blocks will result in 10
of them (e.g. Move_2inches)
• Adding more inputs into a My Block might ma
them useful in more situations
• Having too many inputs could also make them
very hard to read/understand
Balance your needs and goals to figure out what
the best use for each task. Plan ahead as a team
decide what would make a good set of My Block
EV3Lessons.com has several My Blocks Lessons
Intermediate to get you started.
A note about My Blocks and multiple computer
If your team programs on different computers,
merging the code back is complicated when youuse My Blocks. Merging code results in multiple
copies of the same My Block being created. The
is, unfortunately, no simple solution that we know
My Block What does it do? Is it useful?
Move_2inches Moves the robot 2 inches • This My Block is not useful• You will use it again and
again (for 2 inch movements)• But what if you what to move
a different distance?
Move_Inches with inchesand power as inputs
You can enter the number of inches andthe power you want your robot to move
• This is a useful My Block• It has parameters you are
most likely to use and change
Move_Inches with inches,power, angle, coast/break,text to display, color toblink, etc.
You can pick numerous parameters(inputs) such as inches, power, angle,!
• Looks useful.• But will you ever use all the
inputs for a particularprogram?
By Droids Robotics, 2015
7/23/2019 Guies curtes
http://slidepdf.com/reader/full/guies-curtes 6/15
COLOR SENSOR:SHIELDING AND
CALIBRATION
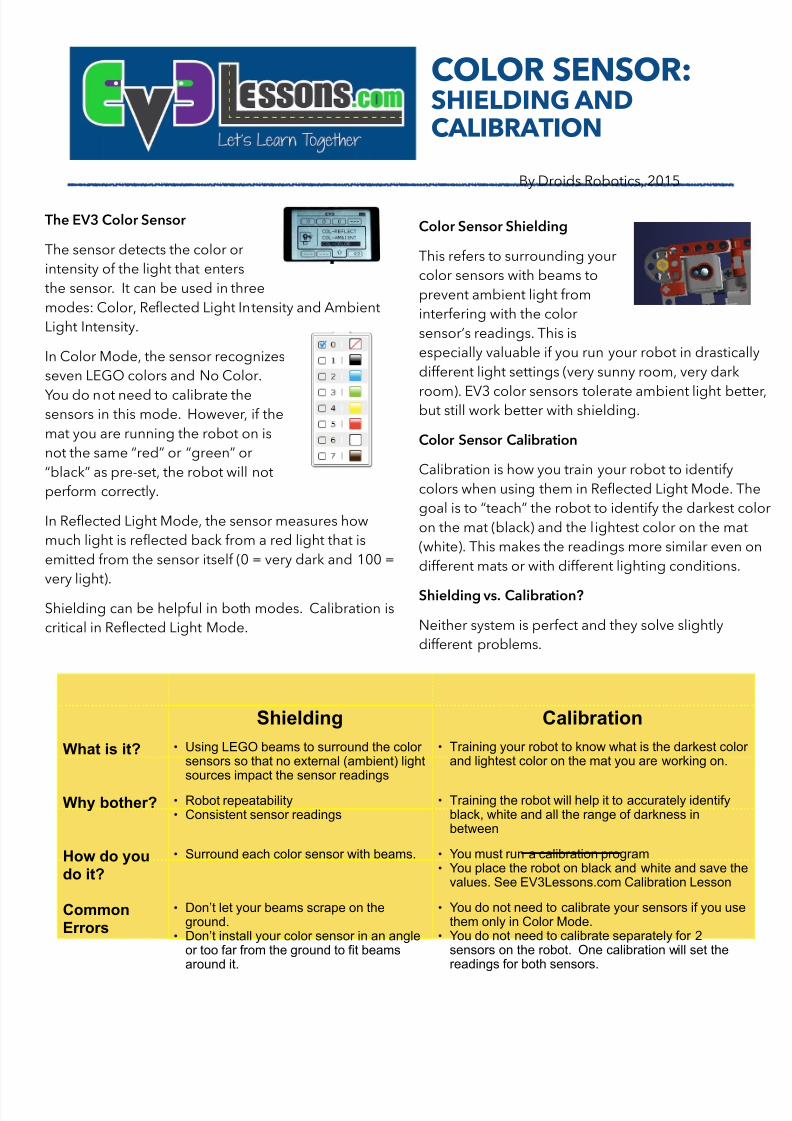
The EV3 Color Sensor
The sensor detects the color or
intensity of the light that enters
the sensor. It can be used in three
modes: Color, Reflected Light Intensity and Ambient
Light Intensity.
In Color Mode, the sensor recognizes
seven LEGO colors and No Color.
You do not need to calibrate thesensors in this mode. However, if the
mat you are running the robot on is
not the same “red” or “green” or
“black” as pre-set, the robot will not
perform correctly.
In Reflected Light Mode, the sensor measures how
much light is reflected back from a red light that is
emitted from the sensor itself (0 = very dark and 100 =
very light).
Shielding can be helpful in both modes. Calibration is
critical in Reflected Light Mode.
Color Sensor Shielding
This refers to surrounding your
color sensors with beams to
prevent ambient light from
interfering with the color
sensor’s readings. This is
especially valuable if you run your robot in drastica
different light settings (very sunny room, very dark
room). EV3 color sensors tolerate ambient light bebut still work better with shielding.
Color Sensor Calibration
Calibration is how you train your robot to identify
colors when using them in Reflected Light Mode. T
goal is to “teach” the robot to identify the darkest c
on the mat (black) and the lightest color on the ma
(white). This makes the readings more similar even
different mats or with different lighting conditions.
Shielding vs. Calibration?
Neither system is perfect and they solve slightly
different problems.
Shielding Calibration
What is it? • Using LEGO beams to surround the colorsensors so that no external (ambient) lightsources impact the sensor readings
• Training your robot to know what is the darkest coloand lightest color on the mat you are working on.
Why bother? • Robot repeatability• Consistent sensor readings
• Training the robot will help it to accurately identifyblack, white and all the range of darkness inbetween
How do youdo it?
• Surround each color sensor with beams. • You must run a calibration program• You place the robot on black and white and save th
values. See EV3Lessons.com Calibration Lesson
CommonErrors
• Don’t let your beams scrape on theground.
• Don’t install your color sensor in an angleor too far from the ground to fit beamsaround it.
• You do not need to calibrate your sensors if you usethem only in Color Mode.
• You do not need to calibrate separately for 2sensors on the robot. One calibration will set thereadings for both sensors.
By Droids Robotics, 2015
7/23/2019 Guies curtes
http://slidepdf.com/reader/full/guies-curtes 7/15
FLL ROBOT
BUILD GUIDE
Building a good competition robot involves a lot of
considerations. We often get asked if Droid Bot would
make a good FLL robot. Droid Bot was designed with
three purposes: 1) To use only the elements in the EV3
Core Kit, 2) Build a robot that could be used to complete
any of the lessons on EV3Lessons.com, and 3) Have
elements of solid building that students could learn from
and adapt for their own designs.
Droid Bot was not built for any year of
FLL or to complete any particular
mission, but it has elements worth
checking out. Take features you like
about Droid Bot and build your own.
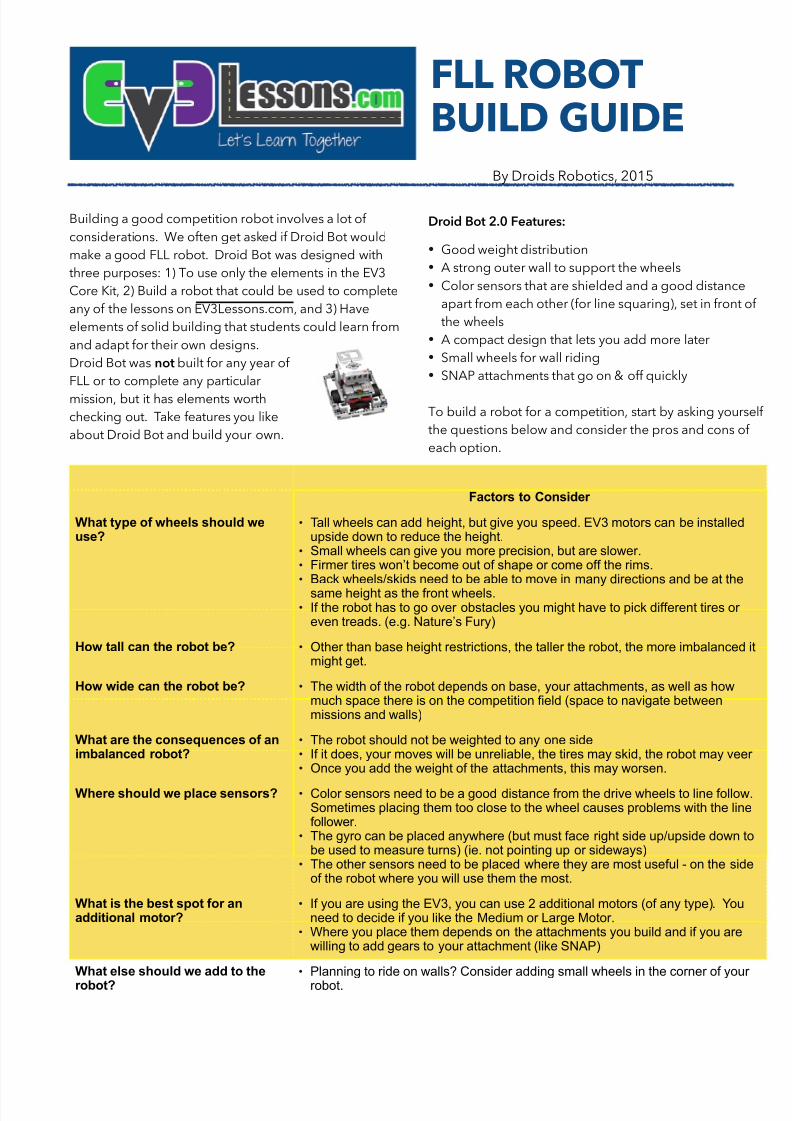
Droid Bot 2.0 Features:
• Good weight distribution
• A strong outer wall to support the wheels
• Color sensors that are shielded and a good distance
apart from each other (for line squaring), set in front
the wheels
• A compact design that lets you add more later
• Small wheels for wall riding
• SNAP attachments that go on & off quickly
To build a robot for a competition, start by asking you
the questions below and consider the pros and cons o
each option.
Factors to Consider
What type of wheels should weuse?
• Tall wheels can add height, but give you speed. EV3 motors can be installedupside down to reduce the height.
• Small wheels can give you more precision, but are slower.• Firmer tires won’t become out of shape or come off the rims.• Back wheels/skids need to be able to move in many directions and be at the
same height as the front wheels.• If the robot has to go over obstacles you might have to pick different tires or
even treads. (e.g. Nature’s Fury)
How tall can the robot be? • Other than base height restrictions, the taller the robot, the more imbalancedmight get.
How wide can the robot be? • The width of the robot depends on base, your attachments, as well as howmuch space there is on the competition field (space to navigate betweenmissions and walls)
What are the consequences of animbalanced robot?
• The robot should not be weighted to any one side• If it does, your moves will be unreliable, the tires may skid, the robot may ve• Once you add the weight of the attachments, this may worsen.
Where should we place sensors? • Color sensors need to be a good distance from the drive wheels to line followSometimes placing them too close to the wheel causes problems with the linfollower.
• The gyro can be placed anywhere (but must face right side up/upside down be used to measure turns) (ie. not pointing up or sideways)
• The other sensors need to be placed where they are most useful - on the sidof the robot where you will use them the most.
What is the best spot for anadditional motor?
• If you are using the EV3, you can use 2 additional motors (of any type). Youneed to decide if you like the Medium or Large Motor.
• Where you place them depends on the attachments you build and if you arewilling to add gears to your attachment (like SNAP)
What else should we add to the
robot?
• Planning to ride on walls? Consider adding small wheels in the corner of you
robot.
By Droids Robotics, 2015
7/23/2019 Guies curtes
http://slidepdf.com/reader/full/guies-curtes 8/15
FLL ROBOT GAME
STRATEGY
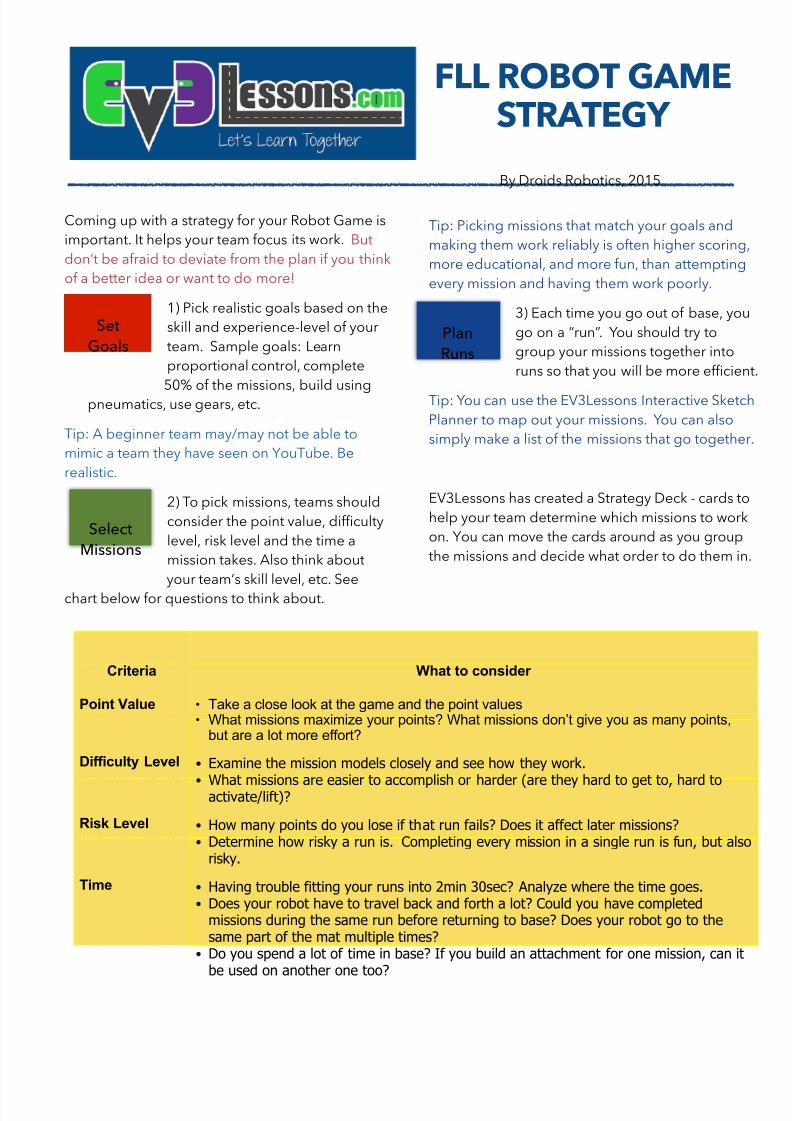
Coming up with a strategy for your Robot Game is
important. It helps your team focus its work. But
don’t be afraid to deviate from the plan if you think
of a better idea or want to do more!
1) Pick realistic goals based on the
skill and experience-level of your
team. Sample goals: Learn
proportional control, complete
50% of the missions, build usingpneumatics, use gears, etc.
Tip: A beginner team may/may not be able to
mimic a team they have seen on YouTube. Be
realistic.
2) To pick missions, teams should
consider the point value, difficulty
level, risk level and the time a
mission takes. Also think about
your team’s skill level, etc. See
chart below for questions to think about.
Tip: Picking missions that match your goals and
making them work reliably is often higher scoring
more educational, and more fun, than attempting
every mission and having them work poorly.
3) Each time you go out of base, yo
go on a “run”. You should try to
group your missions together into
runs so that you will be more efficie
Tip: You can use the EV3Lessons Interactive Sketc
Planner to map out your missions. You can also
simply make a list of the missions that go togethe
EV3Lessons has created a Strategy Deck - cards t
help your team determine which missions to wor
on. You can move the cards around as you group
the missions and decide what order to do them i
Criteria What to consider
Point Value • Take a close look at the game and the point values• What missions maximize your points? What missions don’t give you as many points,
but are a lot more effort?
Difficulty Level • Examine the mission models closely and see how they work.
• What missions are easier to accomplish or harder (are they hard to get to, hard toactivate/lift)?
Risk Level • How many points do you lose if that run fails? Does it affect later missions?• Determine how risky a run is. Completing every mission in a single run is fun, but als
risky.
Time • Having trouble fitting your runs into 2min 30sec? Analyze where the time goes.• Does your robot have to travel back and forth a lot? Could you have completed
missions during the same run before returning to base? Does your robot go to thesame part of the mat multiple times?
• Do you spend a lot of time in base? If you build an attachment for one mission, can itbe used on another one too?
By Droids Robotics, 2015
Set
Goals
Select
Missions
Plan
Runs
7/23/2019 Guies curtes
http://slidepdf.com/reader/full/guies-curtes 9/15
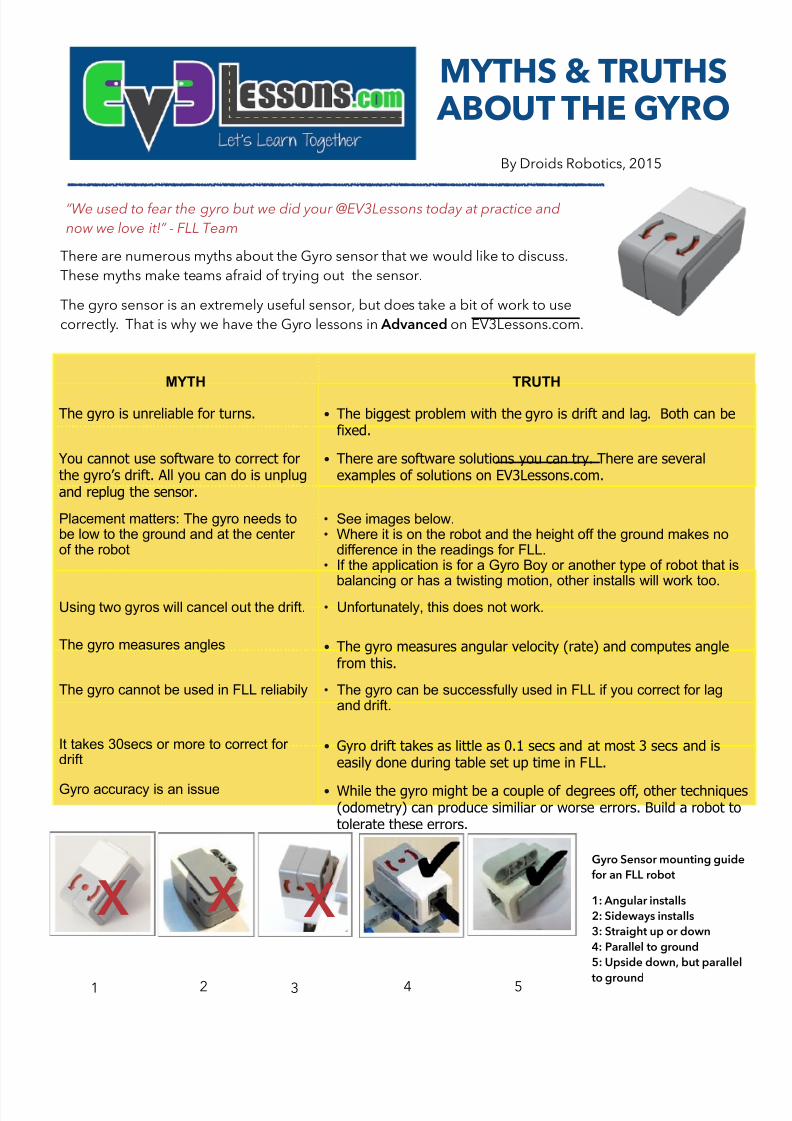
MYTHS & TRUTHS
ABOUT THE GYRO
MYTH TRUTH
The gyro is unreliable for turns. • The biggest problem with the gyro is drift and lag. Both can befixed.
You cannot use software to correct forthe gyro’s drift. All you can do is unplugand replug the sensor.
• There are software solutions you can try. There are severalexamples of solutions on EV3Lessons.com.
Placement matters: The gyro needs tobe low to the ground and at the centerof the robot
• See images below.• Where it is on the robot and the height off the ground makes no
difference in the readings for FLL.• If the application is for a Gyro Boy or another type of robot that is
balancing or has a twisting motion, other installs will work too.
Using two gyros will cancel out the drift. • Unfortunately, this does not work.
The gyro measures angles • The gyro measures angular velocity (rate) and computes anglefrom this.
The gyro cannot be used in FLL reliabily • The gyro can be successfully used in FLL if you correct for lagand drift.
It takes 30secs or more to correct fordrift
• Gyro drift takes as little as 0.1 secs and at most 3 secs and iseasily done during table set up time in FLL.
Gyro accuracy is an issue • While the gyro might be a couple of degrees off, other technique(odometry) can produce similiar or worse errors. Build a robot totolerate these errors.
“We used to fear the gyro but we did your @EV3Lessons today at practice and
now we love it!” - FLL Team
X XGyro Sensor mounting guide
for an FLL robot
1: Angular installs
2: Sideways installs
3: Straight up or down
4: Parallel to ground
5: Upside down, but paralle
to ground
By Droids Robotics, 2015
X
There are numerous myths about the Gyro sensor that we would like to discuss.
These myths make teams afraid of trying out the sensor.
The gyro sensor is an extremely useful sensor, but does take a bit of work to use
correctly. That is why we have the Gyro lessons in Advanced on EV3Lessons.com.
1 2 3 4 5
7/23/2019 Guies curtes
http://slidepdf.com/reader/full/guies-curtes 10/15
LEGO ORGANIZATION
SYSTEMS
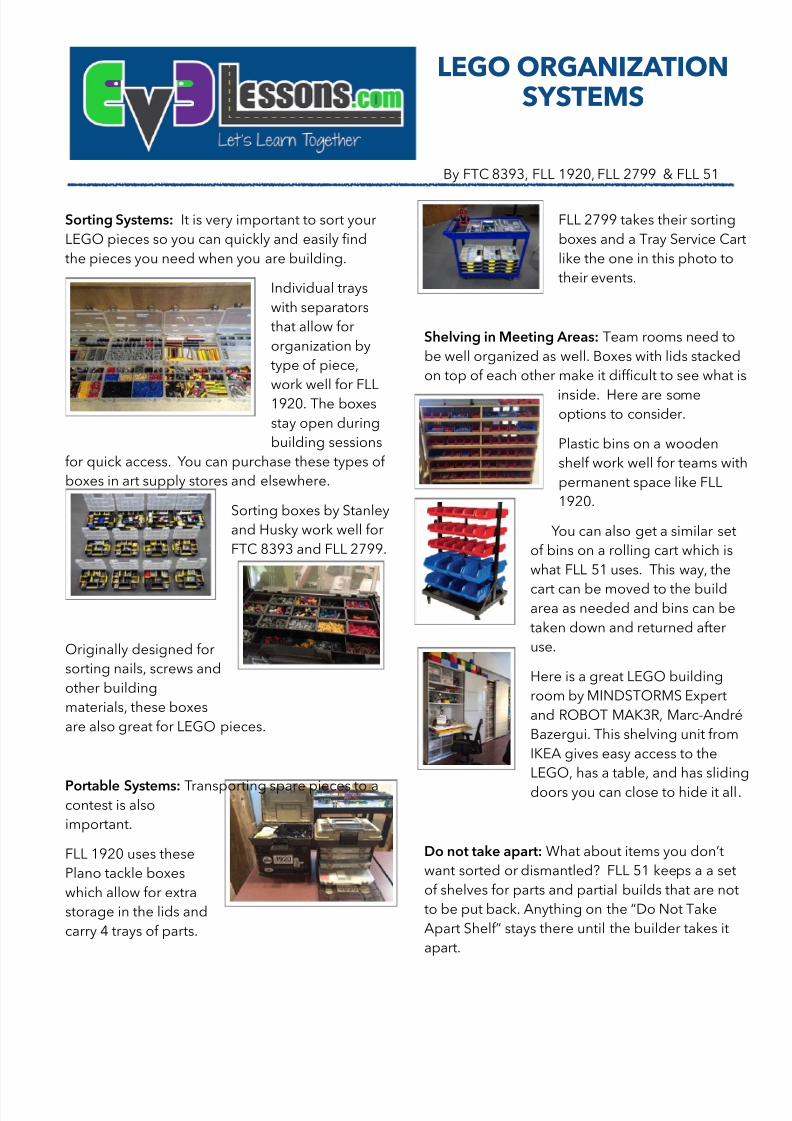
Sorting Systems: It is very important to sort your
LEGO pieces so you can quickly and easily find
the pieces you need when you are building.
Individual trays
with separators
that allow for
organization by
type of piece,
work well for FLL
1920. The boxes
stay open during
building sessions
for quick access. You can purchase these types of
boxes in art supply stores and elsewhere.
Sorting boxes by Stanley
and Husky work well for
FTC 8393 and FLL 2799.
Originally designed for
sorting nails, screws and
other building
materials, these boxes
are also great for LEGO pieces.
Portable Systems: Transporting spare pieces to acontest is also
important.
FLL 1920 uses these
Plano tackle boxes
which allow for extra
storage in the lids and
carry 4 trays of parts.
FLL 2799 takes their sorting
boxes and a Tray Service Car
like the one in this photo to
their events.
Shelving in Meeting Areas: Team rooms need to
be well organized as well. Boxes with lids stacked
on top of each other make it difficult to see what i
inside. Here are someoptions to consider.
Plastic bins on a wooden
shelf work well for teams wit
permanent space like FLL
1920.
You can also get a similar set
of bins on a rolling cart which is
what FLL 51 uses. This way, the
cart can be moved to the buildarea as needed and bins can be
taken down and returned after
use.
Here is a great LEGO building
room by MINDSTORMS Expert
and ROBOT MAK3R, Marc-André
Bazergui. This shelving unit from
IKEA gives easy access to the
LEGO, has a table, and has sliding
doors you can close to hide it all.
Do not take apart: What about items you don’t
want sorted or dismantled? FLL 51 keeps a a set
of shelves for parts and partial builds that are not
to be put back. Anything on the “Do Not Take
Apart Shelf” stays there until the builder takes it
apart.
By FTC 8393, FLL 1920, FLL 2799 & FLL 51
7/23/2019 Guies curtes
http://slidepdf.com/reader/full/guies-curtes 11/15
IMPROVING ROBOT
RELIABILITY
By Droids Robotics, 2015
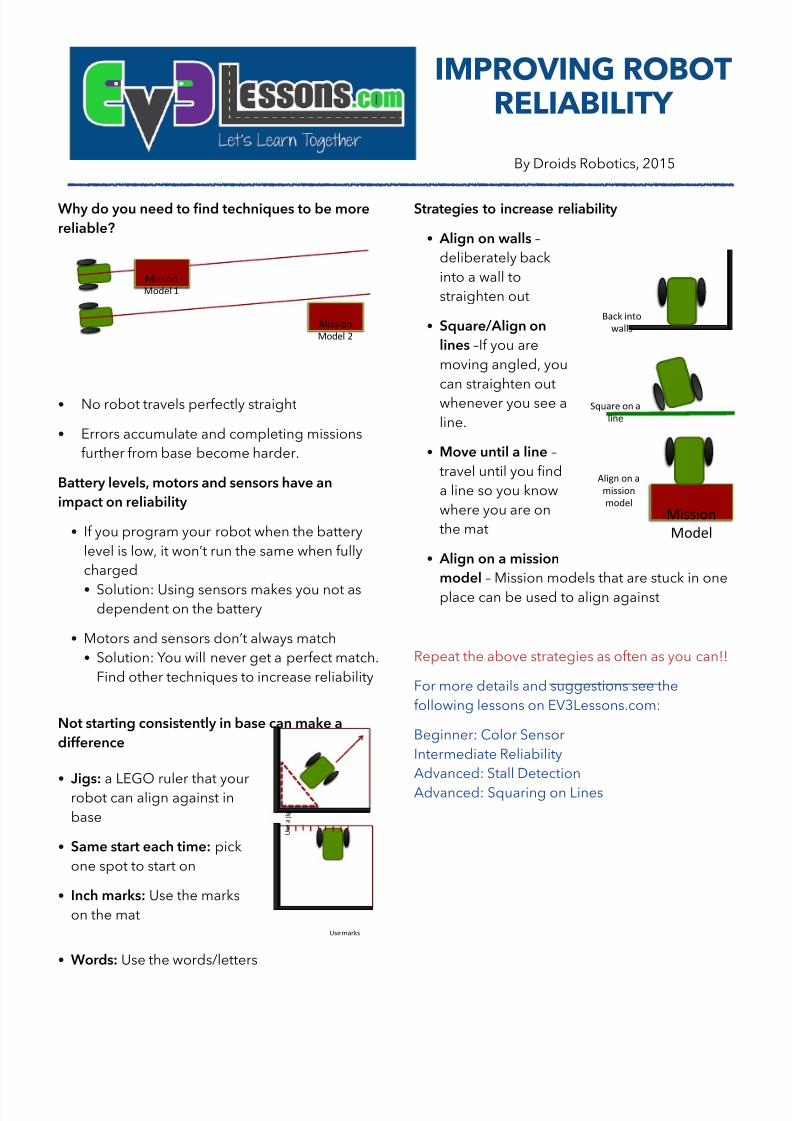
Why do you need to find techniques to be more
reliable?
• No robot travels perfectly straight
• Errors accumulate and completing missions
further from base become harder.
Battery levels, motors and sensors have an
impact on reliability
• If you program your robot when the battery
level is low, it won’t run the same when fully
charged
• Solution: Using sensors makes you not asdependent on the battery
• Motors and sensors don’t always match
• Solution: You will never get a perfect match.
Find other techniques to increase reliability
Not starting consistently in base can make a
difference
• Jigs: a LEGO ruler that yourrobot can align against in
base
• Same start each time: pick
one spot to start on
• Inch marks: Use the marks
on the mat
• Words: Use the words/letters
Strategies to increase reliability
• Align on walls –
deliberately back
into a wall to
straighten out
• Square/Align on
lines –If you are
moving angled, you
can straighten out
whenever you see a
line.
• Move until a line –
travel until you find
a line so you know
where you are on
the mat
• Align on a mission
model – Mission models that are stuck in one
place can be used to align against
Repeat the above strategies as often as you can!!
For more details and suggestions see the
following lessons on EV3Lessons.com:
Beginner: Color Sensor
Intermediate Reliability
Advanced: Stall Detection
Advanced: Squaring on Lines
! " #
% & ' (
!"# %&'("
!"##"$%
!$'() *
!"##"$%
!$'() +
!"##"$%
!$'()
*+,- "%.$
/+))#
012+3( $% +
)"%(
4)"5% $% +
6"##"$%
6$'()
7/23/2019 Guies curtes
http://slidepdf.com/reader/full/guies-curtes 12/15
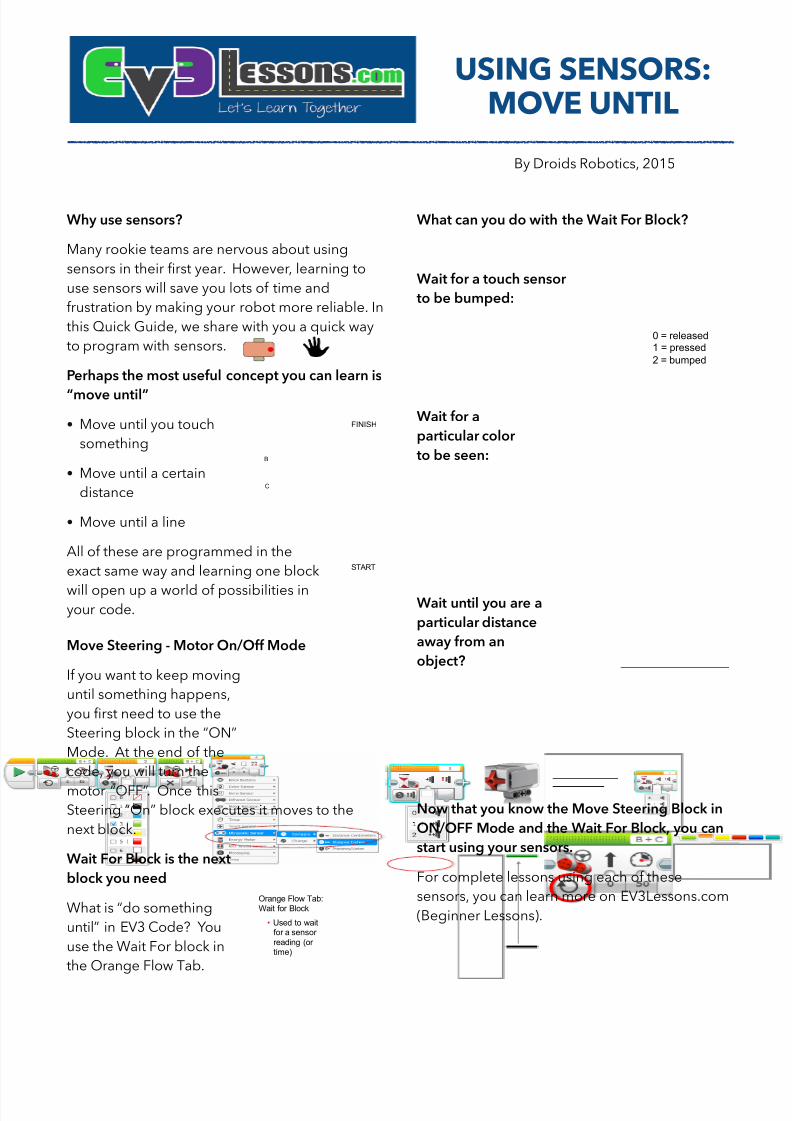
Why use sensors?
Many rookie teams are nervous about using
sensors in their first year. However, learning to
use sensors will save you lots of time and
frustration by making your robot more reliable. In
this Quick Guide, we share with you a quick way
to program with sensors.
Perhaps the most useful concept you can learn is
“move until”
• Move until you touch
something
• Move until a certain
distance
• Move until a line
All of these are programmed in the
exact same way and learning one block
will open up a world of possibilities inyour code.
Move Steering - Motor On/Off Mode
If you want to keep moving
until something happens,
you first need to use the
Steering block in the “ON”
Mode. At the end of the
code, you will turn the
motor “OFF”. Once this
Steering “On” block executes it moves to the
next block.
Wait For Block is the next
block you need
What is “do something
until” in EV3 Code? You
use the Wait For block in
the Orange Flow Tab.
What can you do with the Wait For Block?
Wait for a touch sensor
to be bumped:
Wait for a
particular color
to be seen:
Wait until you are a
particular distance
away from an
object?
Now that you know the Move Steering Block in
ON/OFF Mode and the Wait For Block, you can
start using your sensors.
For complete lessons using each of these
sensors, you can learn more on EV3Lessons.com
(Beginner Lessons).
USING SENSORS:
MOVE UNTIL
By Droids Robotics, 2015
B
C
0 = released
1 = pressed
2 = bumped
Orange Flow Tab:Wait for Block
• Used to waitfor a sensor
reading (ortime)
FINISH
START
7/23/2019 Guies curtes
http://slidepdf.com/reader/full/guies-curtes 13/15
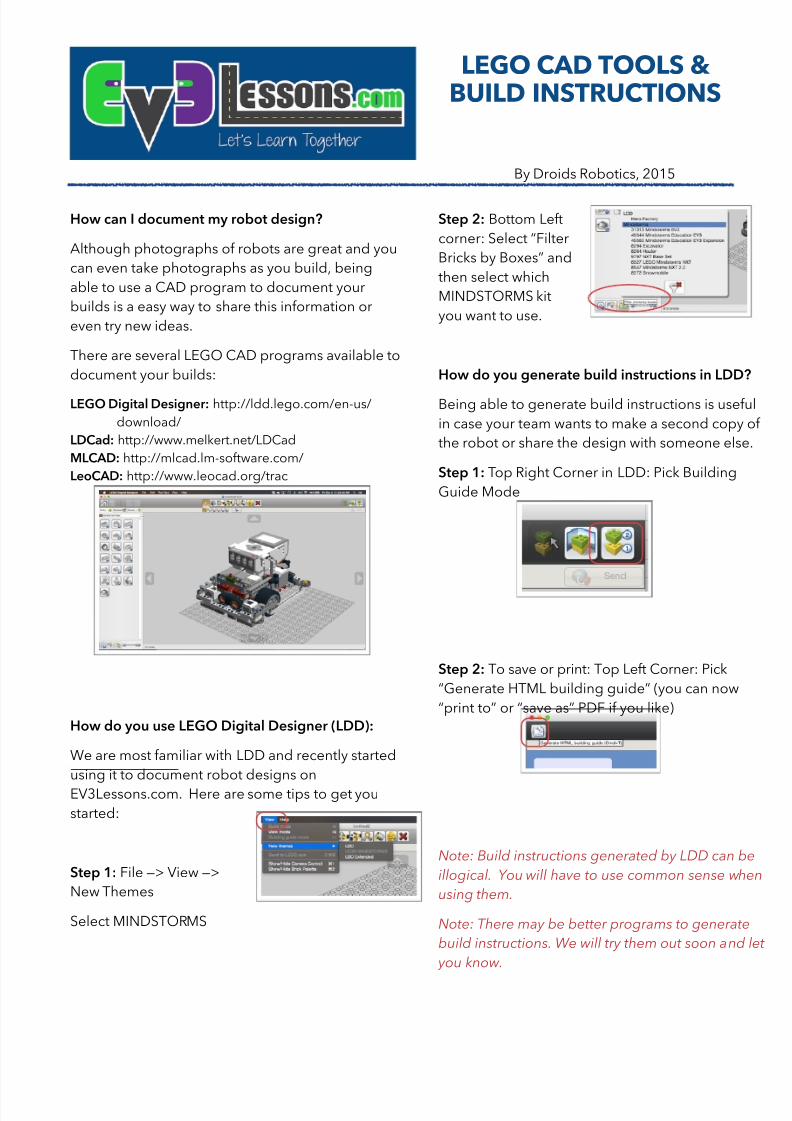
How can I document my robot design?
Although photographs of robots are great and you
can even take photographs as you build, being
able to use a CAD program to document your
builds is a easy way to share this information or
even try new ideas.
There are several LEGO CAD programs available to
document your builds:
LEGO Digital Designer: http://ldd.lego.com/en-us/
download/
LDCad: http://www.melkert.net/LDCad
MLCAD: http://mlcad.lm-software.com/
LeoCAD: http://www.leocad.org/trac
How do you use LEGO Digital Designer (LDD):
We are most familiar with LDD and recently started
using it to document robot designs on
EV3Lessons.com. Here are some tips to get you
started:
Step 1: File —> View —>
New Themes
Select MINDSTORMS
Step 2: Bottom Left
corner: Select “Filter
Bricks by Boxes” and
then select which
MINDSTORMS kit
you want to use.
How do you generate build instructions in LDD
Being able to generate build instructions is usef
in case your team wants to make a second copy
the robot or share the design with someone els
Step 1: Top Right Corner in LDD: Pick Building
Guide Mode
Step 2: To save or print: Top Left Corner: Pick
“Generate HTML building guide” (you can now
“print to” or “save as” PDF if you like)
Note: Build instructions generated by LDD can b
illogical. You will have to use common sense wh
using them.
Note: There may be better programs to generat
build instructions. We will try them out soon and
you know.
LEGO CAD TOOLS &
BUILD INSTRUCTIONS
By Droids Robotics, 2015
7/23/2019 Guies curtes
http://slidepdf.com/reader/full/guies-curtes 14/15
EV3 SOFTWARE:
EDU VS. HOME
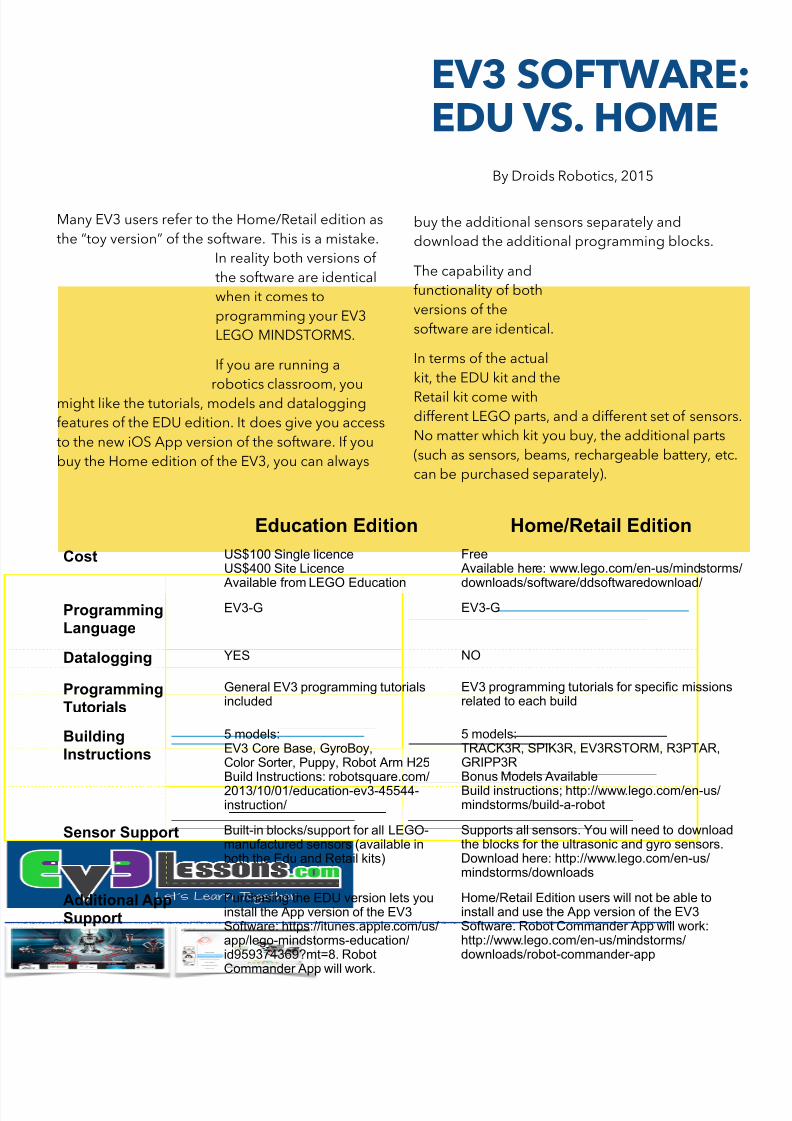
Many EV3 users refer to the Home/Retail edition as
the “toy version” of the software. This is a mistake.
In reality both versions of
the software are identical
when it comes to
programming your EV3
LEGO MINDSTORMS.
If you are running a
robotics classroom, you
might like the tutorials, models and datalogging
features of the EDU edition. It does give you access
to the new iOS App version of the software. If you
buy the Home edition of the EV3, you can always
buy the additional sensors separately and
download the additional programming blocks.
The capability and
functionality of both
versions of the
software are identical.
In terms of the actual
kit, the EDU kit and the
Retail kit come withdifferent LEGO parts, and a different set of sensors.
No matter which kit you buy, the additional parts
(such as sensors, beams, rechargeable battery, etc.
can be purchased separately).
Education Edition Home/Retail Edition
Cost US$100 Single licenceUS$400 Site Licence
Available from LEGO Education
Free Available here: www.lego.com/en-us/mindstorms/
downloads/software/ddsoftwaredownload/ProgrammingLanguage
EV3-G EV3-G
Datalogging YES NO
ProgrammingTutorials
General EV3 programming tutorialsincluded
EV3 programming tutorials for specific missionsrelated to each build
BuildingInstructions
5 models:EV3 Core Base, GyroBoy,Color Sorter, Puppy, Robot Arm H25Build Instructions: robotsquare.com/2013/10/01/education-ev3-45544-instruction/
5 models:TRACK3R, SPIK3R, EV3RSTORM, R3PTAR,GRIPP3RBonus Models AvailableBuild instructions; http://www.lego.com/en-us/mindstorms/build-a-robot
Sensor Support Built-in blocks/support for all LEGO-manufactured sensors (available inboth the Edu and Retail kits)
Supports all sensors. You will need to downloadthe blocks for the ultrasonic and gyro sensors.Download here: http://www.lego.com/en-us/mindstorms/downloads
Additional AppSupport
Purchasing the EDU version lets youinstall the App version of the EV3Software: https://itunes.apple.com/us/app/lego-mindstorms-education/id959374369?mt=8. RobotCommander App will work.
Home/Retail Edition users will not be able toinstall and use the App version of the EV3Software. Robot Commander App will work:http://www.lego.com/en-us/mindstorms/downloads/robot-commander-app
By Droids Robotics, 2015
7/23/2019 Guies curtes
http://slidepdf.com/reader/full/guies-curtes 15/15
USING LEGO GEARS
WITH YOUR EV3
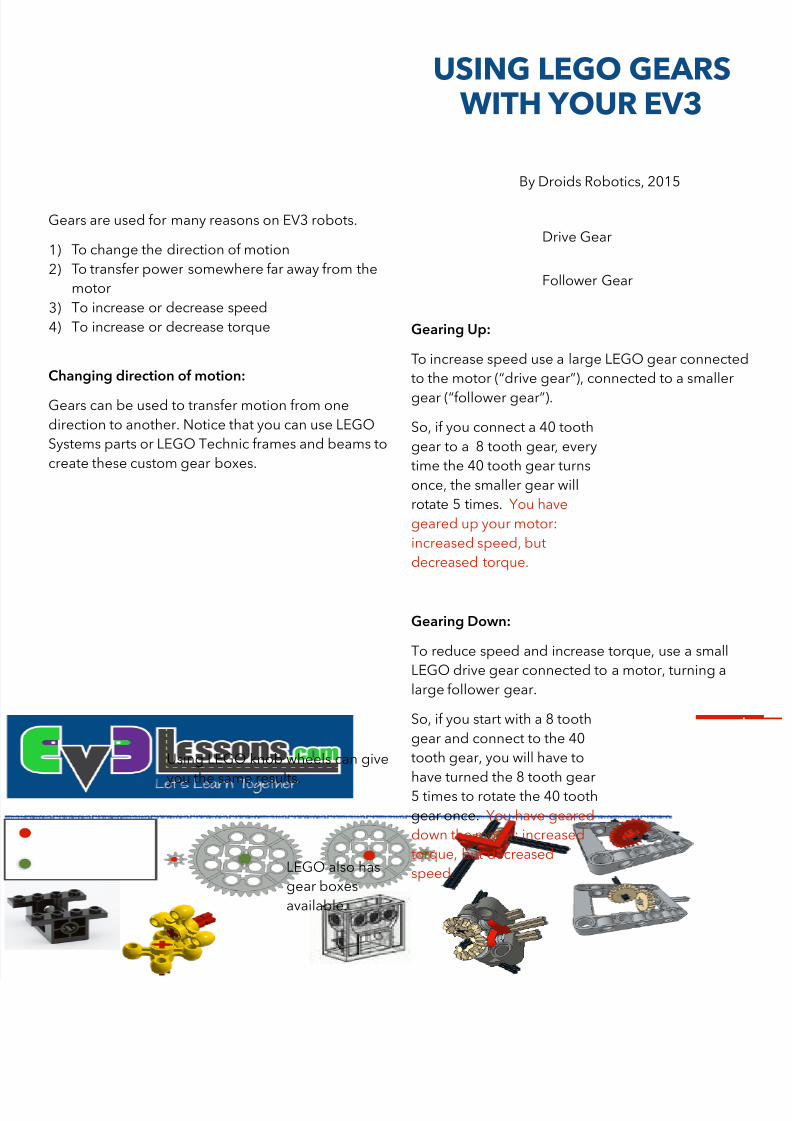
Gears are used for many reasons on EV3 robots.
1) To change the direction of motion
2) To transfer power somewhere far away from the
motor
3) To increase or decrease speed
4) To increase or decrease torque
Changing direction of motion:
Gears can be used to transfer motion from one
direction to another. Notice that you can use LEGO
Systems parts or LEGO Technic frames and beams to
create these custom gear boxes.
Using LEGO knob wheels can give
you the same results.
LEGO also has
gear boxes
available.
Gearing Up:
To increase speed use a large LEGO gear connecte
to the motor (“drive gear”), connected to a smaller
gear (“follower gear”).
So, if you connect a 40 tooth
gear to a 8 tooth gear, every
time the 40 tooth gear turns
once, the smaller gear will
rotate 5 times. You have
geared up your motor:
increased speed, but
decreased torque.
Gearing Down:
To reduce speed and increase torque, use a small
LEGO drive gear connected to a motor, turning a
large follower gear.
So, if you start with a 8 tooth
gear and connect to the 40
tooth gear, you will have to
have turned the 8 tooth gear
5 times to rotate the 40 tooth
gear once. You have geared
down the motor: increased
torque, but decreased
speed.
By Droids Robotics, 2015
Drive Gear
Follower Gear