cem200 55 qsg en ccr - philips · deslice la unidad en el salpicadero hasta que oiga un clic. 7...
TRANSCRIPT
Regi
ster
your
pro
duct
and g
et
support
at
CEM
200
EN
Quic
k S
tart
Guid
e
34
21a
bc
ef
ghd
L-CH R-CH
AMP
a
c b
ba c d
aa
bcd
ab
ef
cd
gh
i
b c d
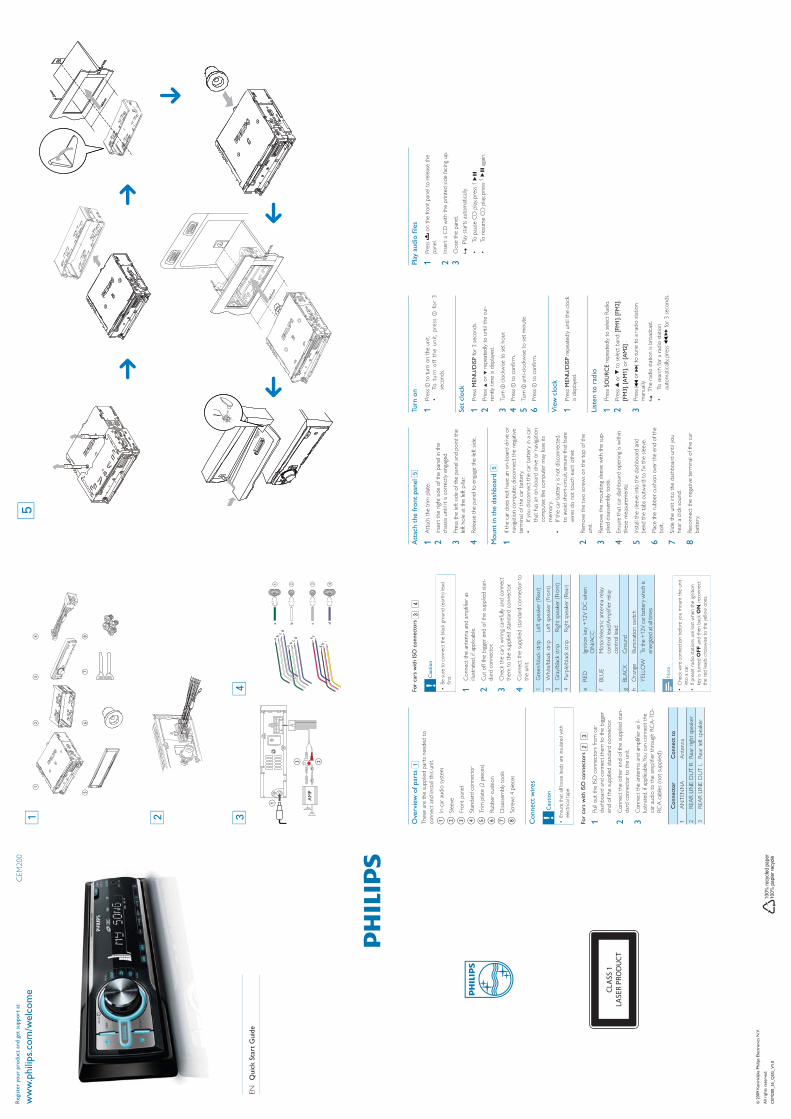
Ove
rvie
w of par
ts 1
These
are
the s
upplie
d p
arts
needed t
o
connect
and inst
all th
is u
nit.
aIn
-car
audio
sys
tem
bSle
eve
cFr
ont
pan
el
dSta
ndar
d c
onnect
or
eTrim
pla
te (
2 p
iece
s)
fR
ubber
cush
ion
gD
isas
sem
bly
tools
hScr
ew
s 4 p
iece
s
Connect
wir
es
Cau
tion
Ensu
re t
hat
all
loose
lead
s ar
e insu
late
d w
ith
ele
ctrica
l ta
pe.
For
cars
with ISO
connect
ors2
3
1Pull
out
the ISO
connect
ors
fro
m c
ar
das
hboar
d a
nd c
onnect
them
to t
he b
igge
r
end o
f th
e s
upplie
d s
tandar
d c
onnect
or.
2C
onnect
the o
ther
end o
f th
e s
upplie
d s
tan-
dar
d c
onnect
or
to t
he u
nit.
3-
lust
rate
d, i
f ap
plic
able
. You c
an c
onnect
the
Connect
or
Connect
to
1 2R
ear
rig
ht
speak
er
3R
ear
left s
peak
er
For
cars
with ISO
connect
ors
3 4
Cau
tion
Be s
ure
to c
onnect
the b
lack
gro
und (
ear
th)
lead
1ill
ust
rate
d, i
f ap
plic
able
.
2C
ut
off t
he b
igge
r end o
f th
e s
upplie
d s
tan-
dar
d c
onnect
or.
3C
heck
the c
ar’s w
irin
g ca
refu
lly a
nd c
onnect
them
to t
he s
upplie
d s
tandar
d c
onnect
or.
4C
onnect
the s
upplie
d s
tandar
d c
onnect
or
to
the u
nit.
1G
reen/b
lack
str
ip
2W
hite/b
lack
str
ip
3G
ray/
bla
ck s
trip
R
ight
speak
er
(Fro
nt)
4Purp
le/b
lack
str
ip
Rig
ht
speak
er
(Rear
)
eR
ED
Ignitio
n k
ey
+12V
DC
when
fM
oto
r/ele
ctric
ante
nna
rela
y
contr
ol le
ad
gG
round
hO
range
Illum
inat
ion s
witch
iTo
the
+12V
car
bat
tery
whi
ch is
ener
gize
d a
t all t
imes
Note
Check
wire c
onnect
ion b
efo
re y
ou m
ount
the u
nit
into
a c
ar.
If pre
set
radio
sta
tions
are lost
when t
he ign
itio
n
key
is t
urn
ed OFF
and t
hen b
ack ON
, reco
nnect
the r
ed lead
s cr
oss
wise t
o t
he y
ello
w o
nes.
Att
ach the fro
nt
pan
el 5
1 2In
sert
the r
ight
side o
f th
e p
anel in
the
chas
sis
until it is
corr
ect
ly e
nga
ged.
3Pre
ss t
he left s
ide o
f th
e p
anel an
d p
oin
t th
e
left h
ole
at
the left p
illar
.
4R
ele
ase t
he p
anel to
enga
ge t
he left s
ide.
Mount
in the d
ashboar
d 5
1If
the c
ar d
oes
not
hav
e a
n o
n-b
oar
d d
rive
or
nav
igat
ion c
om
pute
r, disco
nnect
the n
ega
tive
term
inal
of th
e c
ar b
atte
ry.
If yo
u d
isco
nnect
the c
ar b
atte
ry in a
car
that
has
an o
n-b
oar
d d
rive
or
nav
igat
ion
com
pute
r, th
e c
om
pute
r m
ay lose
its
mem
ory
.
If th
e c
ar b
atte
ry is
not
disco
nnect
ed,
to a
void
short
-circu
it, e
nsu
re t
hat
bar
e
wires
do n
ot
touch
eac
h o
ther.
2R
em
ove
the t
wo s
crew
s on t
he t
op o
f th
e
unit.
3R
em
ove
the m
ounting
sleeve
with t
he s
up-
plie
d d
isas
sem
bly
tools.
4Ensu
re t
hat
car
das
hboar
d o
penin
g is w
ithin
these
meas
ure
ments
:
5In
stal
l th
e s
leeve
into
the d
ashboar
d a
nd
6Pla
ce t
he r
ubber
cush
ion o
ver
the e
nd o
f th
e
bolt.
7Slid
e t
he u
nit into
the d
ashboar
d u
ntil yo
u
hear
a c
lick
sound.
8R
eco
nnect
the n
ega
tive
term
inal
of th
e c
ar
bat
tery
.
Turn
on
1Pre
ssz
to t
urn
on t
he u
nit.
To
turn
off
the u
nit
, p
ress
zfo
r 3
seco
nds.
Set
clock
1Pre
ssM
EN
U/D
ISP for
3 s
eco
nds.
2Pre
ss o
r r
epeat
edly
to u
ntil th
e c
ur-
rently
tim
e is
displa
yed.
3Tu
rn z
clo
ckw
ise t
o s
et
hour.
4Pre
ssz
5Tu
rn z
anti-c
lock
wise t
o s
et
min
ute
.
6Pre
ssz
Vie
w c
lock
1Pre
ssM
EN
U/D
ISP r
epeat
edly
until th
e c
lock
is d
ispla
yed.
Lis
ten t
o r
adio
1Pre
ssSO
UR
CE r
epeat
edly
to s
ele
ct R
adio
.
2Pre
ss3
or
4 t
o s
ele
ct b
and: [
FM
1],
[FM
2],
[FM
3],
[AM
1],
or
[AM
2]
.
3
Pre
ss o
r to
tune t
o a
rad
io s
tation
man
ual
ly.
The r
adio
sta
tion is
bro
adca
st.
»To
sear
ch for
a ra
dio
sta
tion
auto
mat
ical
ly, p
ress
/fo
r 3 s
eco
nds.
5
5mm
5mm
5mm
1Pre
sson t
he fro
nt
pan
el to
rele
ase t
he
pan
el.
2In
sert
a C
D w
ith t
he p
rinte
d s
ide fac
ing
up.
3C
lose
the p
anel.
Pla
y st
arts
auto
mat
ical
ly.
»To
pau
se C
D p
lay,
pre
ss 1
.
To r
esu
me C
D p
lay,
pre
ss 1
a
gain
.
© 2
009 K
onin
klij
ke Phili
ps
Ele
ctro
nic
s N
.V.
All
righ
ts r
ese
rved.
CEM
200_55_Q
SG_V
1.0

Regi
stre
su p
roduct
o y
obte
nga
asi
stenci
a en:
ESP
Guía
Ráp
ida
Desc
ripci
ón g
enera
l de las
pie
zas 1
Est
as s
on las
pie
zas
incl
uid
as n
ece
sarias
par
a
conect
ar e
inst
alar
est
a unid
ad.
aSiste
ma
de a
udio
par
a au
tom
óvi
l
bC
arca
sa d
e m
onta
je
cPan
el fr
onta
l
dC
onect
or
est
ándar
eEm
belle
cedor
fTo
pe d
e g
om
a
gH
err
amie
nta
s de d
esm
onta
je
h4 t
orn
illos
Cab
les
de c
onexió
n
Pre
cauci
ón
cinta
aisla
nte
.
Par
a au
tom
óvi
les
con c
onect
ore
s IS
O2
3
1
gran
de d
el co
nect
or
est
ándar
que s
e incl
uye
.
2est
ándar
incl
uid
o a
la
unid
ad.
3se
muest
ra e
n la
imag
en, s
i pro
cede. P
uede
conect
ar e
l sist
em
a de a
udio
del ve
híc
ulo
al
Conect
or
Conect
ar a
1 2
dere
cho
3
izquie
rdo
Par
a au
tom
óvi
les
sin c
onect
ore
s IS
O 3
4
Pre
cauci
ón
prim
er
luga
r.
1m
uest
ra e
n la
imag
en, s
i pro
cede.
2est
ándar
que s
e incl
uye
.
3C
om
pru
ebe c
uid
adosa
mente
el ca
ble
ado
del ve
híc
ulo
y c
onect
e los
cable
s al
conect
or
est
ándar
que s
e incl
uye
.
4C
onect
e e
l co
nect
or
est
ándar
incl
uid
o a
la
unid
ad.
1Ban
da
verd
e/n
egr
a
(post
erior)
2Ban
da
bla
nca
/negr
a
(fro
nta
l)
3Ban
da
gris/n
egr
a
(fro
nta
l)
4
negr
a
-
terior)
eR
OJO
fC
able
de c
ontr
ol del re
lé d
e la
ante
na
elé
ctrica
/del m
oto
r/C
able
-
cador
gN
EG
RO
hN
aran
jaC
ambio
de ilu
min
ació
n
i
V q
ue e
stá
alim
enta
da
en todo
mom
ento
Nota
monta
r la
unid
ad e
n e
l co
che.
Si se
pie
rden las
em
isora
s de r
adio
pre
sinto
niz
adas
cuan
do a
pag
a la
lla
ve d
e e
nce
ndid
o y
, luego
, cuan
do
la e
nci
ende d
e n
uevo
, vuelv
a a
conect
ar los
clav
es
rojo
s tr
ansv
ers
alm
ente
con los
amar
illos.
Colo
caci
ón d
el pan
el fr
onta
l 5
1C
olo
que e
l em
belle
cedor.
2In
sert
e e
l la
do d
ere
cho d
el pan
el en la
carc
asa
has
ta q
ue e
nca
je c
orr
ect
amente
.
3Pre
sione e
l la
do izq
uie
rdo d
el pan
el y
dirija
4Suelte e
l pan
el par
a unir e
l la
do izq
uie
rdo.
Monta
je e
n e
l sa
lpic
adero
5
1Si el ve
híc
ulo
no d
ispone d
e u
na
unid
ad
de a
bord
o o
de u
n e
quip
o d
e n
avega
ción,
desc
onect
e e
l te
rmin
al n
ega
tivo
de la
bat
ería.
Si desc
onect
a la
bat
ería
en u
n v
ehíc
ulo
que d
ispone d
e u
na
unid
ad d
e a
bord
o
o u
n e
quip
o d
e n
avega
ción, s
e p
uede
borr
ar la
mem
oria
del equip
o.
Si la
bat
ería
del ve
híc
ulo
no e
stá
cable
s pela
dos
no s
e t
oquen e
ntr
e
sí p
ara
evi
tar
que s
e p
roduzc
a un
cort
oci
rcuito.
2de la
unid
ad.
3-
ram
ienta
s de d
esm
onta
je incl
uid
as.
4In
stal
e la
carc
asa
en e
l sa
lpic
adero
y d
oble
las
5C
olo
que e
l to
pe d
e g
om
a in
cluid
o s
obre
el
6D
eslic
e la
unid
ad e
n e
l sa
lpic
adero
has
ta q
ue
oig
a un c
lic.
7Vuelv
a a
conect
ar e
l te
rmin
al n
ega
tivo
de la
bat
ería
del ve
híc
ulo
.
8Vuelv
a a
conect
ar e
l te
rmin
al n
ega
tivo
de la
bat
ería
del ve
híc
ulo
.
Ence
ndid
o
1Pulse
z p
ara
ence
nder
la u
nid
ad.
Par
a ap
agar
la
unid
ad, p
ulse z
dura
nte
3
segu
ndos.
Aju
ste d
el re
loj
1Pulse
MEN
U/D
ISP d
ura
nte
3 s
egu
ndos.
2Pulse
o
varias
vece
s has
ta q
ue s
e
muest
re la
hora
act
ual
.
3G
ire
zen e
l se
ntido d
e las
agu
jas
del re
loj
4Pulse
z
5G
ire
zen e
l se
ntido c
ontr
ario
a las
agu
jas
6Pulse
z
Cóm
o v
isual
izar
el re
loj
1Pulse
MEN
U/D
ISP v
aria
s ve
ces
has
ta q
ue s
e
muest
re e
l re
loj.
Cóm
o e
scuch
ar la
radio
1Pulse
SOU
RC
E r
epetidam
ente
has
ta
sele
ccio
nar
Rad
io (
Rad
io).
2Pulse
o
par
a se
lecc
ionar
la
ban
da: [
FM
1],
[FM
2],
[FM
3],
[AM
1],
o [
AM
2]
.
3
Pulse
o
par
a sinto
niz
ar u
na
em
isora
de r
adio
man
ual
mente
.
»Par
a busc
ar u
na
em
isora
de r
adio
de
form
a au
tom
átic
a, p
ulse
o
dura
nte
3 s
egu
ndos.
Repro
ducc
ión d
e a
rchiv
os
de a
udio
1Pulse
en e
l pan
el fr
onta
l par
a lib
era
r el
pan
el.
2In
sert
e un C
D c
on la
car
a im
pre
sa h
acia
arr
iba.
3C
ierr
e e
l pan
el.
»au
tom
átic
amente
.
Par
a hac
er
una
pau
sa e
n la
repro
ducc
ión d
e C
D, p
ulse 1
.
Par
a re
anudar
la
repro
ducc
ión d
e C
D,
pulse 1
de n
uevo
.
CEM
200
34
21a
bc
ef
ghd
L-CH R-CH
AMP
a
c b
ba c d
aa
bcd
ab
ef
cd
gh
i
b c d
5
5mm
5mm
5mm
© 2
009 K
onin
klij
ke Phili
ps
Ele
ctro
nic
s N
.V.
All
righ
ts r
ese
rved.
CEM
200_55_Q
SG_V
1.0

Regi
stre
seu p
roduto
e o
bte
nha
suport
e e
m:
PO
RG
uia
Ráp
ido
Vis
ão g
era
l das
peça
s 1
Est
as s
ão a
s peça
s fo
rneci
das
nece
ssár
ias
par
a
conect
ar e
inst
alar
o a
par
elh
o.
aSiste
ma
de á
udio
par
a ca
rros
b cPai
nel fr
onta
l
dC
onect
or
pad
rão
eM
old
ura
fSuport
e d
e b
orr
acha
gFe
rram
enta
s par
a desm
onta
gem
h4 p
araf
uso
s
Cuid
ado
Car
ros
com
conect
ore
s IS
O2
3
1R
etire
os
conect
ore
s IS
O d
o p
ainel do
conect
or
pad
rão forn
eci
do.
2pad
rão forn
eci
do a
o a
par
elh
o.
3a
ilust
raçã
o, s
e a
plic
ável.
Você
pode c
onect
ar
Conect
or
Conexão
com
1 2
direito
3
esq
uerd
o
Car
ros
sem
conect
ore
s IS
O 3
4
Cuid
ado
aterr
amento
(te
rra)
pre
to.
1a
ilust
raçã
o, s
e a
plic
ável.
2pad
rão forn
eci
do.
3 4ap
arelh
o.
1
(tra
seiro)
2
(fro
nta
l)
3
(fro
nta
l)
4
(tra
seiro
)
eC
hav
e d
e ign
ição
+12 V
DC
fFi
o d
e c
ontr
ole
do r
elé
da
ante
na
elé
tric
a/au
tom
átic
a/
Fio d
e c
ontr
ole
do r
elé
do
gPR
ETO
hin
terr
upto
r de ilu
min
ação
iPa
ra b
ater
ia d
e ca
rro d
e +
12 V
ativad
a in
inte
rrup
tam
ente
Nota
unid
ade n
o c
arro
.
Se r
ádio
s pré
-sin
toniz
adas
fore
m p
erd
idas
quan
do
Enca
ixar
o p
ainel fr
onta
l 5
1 2In
sira
o lad
o d
ireito d
o p
ainel no a
par
elh
o
3Pre
ssio
ne o
lad
o e
squerd
o d
o p
ainel e
aponte
o o
rifíc
io e
squerd
o n
a direçã
o d
a
colu
na
esq
uerd
a.
4 Inst
alar
no p
ainel 5
1Se o
car
ro n
ão t
iver
um
a unid
ade d
e
contr
ole
inte
rna
ou c
om
puta
dor
de b
ord
o,
desc
onect
e o
term
inal
nega
tivo
da
bat
eria
do c
arro
.
Se v
ocê
desc
onect
ar a
bat
eria
de
um
car
ro q
ue t
enha
um
a unid
ade d
e
contr
ole
inte
rna
ou c
om
puta
dor
de
bord
o, o
com
puta
dor
poderá
perd
er
a
mem
ória.
Se a
bat
eria
do c
arro
não
for
desc
onect
ada, p
ara
evi
tar
curt
o-c
ircu
ito,
dese
nca
pad
os
toca
ndo u
ns
nos
outr
os.
2R
etire
os
dois p
araf
uso
s na
par
te s
uperior
do a
par
elh
o.
3R
em
ova
o s
uport
e p
ara
inst
alaç
ão c
om
as
ferr
amenta
s par
a desm
onta
gem
forn
eci
das
.
4In
stal
e o
suport
e n
o p
ainel e d
obre
as
abas
5C
olo
que
o s
uport
e de
borr
acha
forn
ecid
o
6D
esliz
e o
apar
elh
o p
elo
pai
nel at
é o
uvi
r um
cliq
ue.
7R
eco
nect
e o
term
inal
nega
tivo
da
bat
eria
do
carr
o.
8R
eco
nect
e o
term
inal
nega
tivo
da
bat
eria
do
carr
o.
Lig
ar
1Pre
ssio
ne
zpar
a lig
ar o
apar
elh
o.
Par
a deslig
ar o
apar
elh
o, p
ress
ione z
por
3 s
egu
ndos.
Aju
star
o r
eló
gio
1Pre
ssio
ne
MEN
U/D
ISP p
or
3 s
egu
ndos.
2Pre
ssio
ne
ou
várias
veze
s at
é q
ue a
hora
3G
ire
zno s
entido h
orá
rio p
ara
ajust
ar a
s
hora
s.
4Pre
ssio
ne
z
5G
ire
zno s
entido a
nti-h
orá
rio p
ara
ajust
ar
os
min
uto
s.
6Pre
ssio
ne
z
Exib
ir o
reló
gio
1Pre
ssio
ne
MEN
U/D
ISP v
ária
s ve
zes
até q
ue
Ouvi
r rá
dio
1Pre
ssio
ne
SOU
RC
E v
ária
s ve
zes
par
a
sele
cionar
Rad
io.
2Pre
ssio
ne
ou
par
a se
leci
onar
a b
anda:
[FM
1],
[FM
2],
[FM
3],
[AM
1],
ou [
AM
2]
.
3
Pre
ssio
ne
ou
par
a sinto
niz
ar m
anual
-
mente
um
a est
ação
de r
ádio
.
»Par
a pesq
uisar
auto
mat
icam
ente
um
a
est
ação
de r
ádio
, pre
ssio
ne
ou
por
3 s
egu
ndos.
Repro
duzi
r ar
quiv
os
de á
udio
1Pre
ssio
ne
no p
ainel fr
onta
l par
a lib
erá
-lo.
2In
sira
um
CD
com
o lad
o im
pre
sso v
oltad
o
par
a ci
ma.
3Fe
che o
pai
nel.
»au
tom
atic
amente
.
Par
a pau
sar
a re
pro
duçã
o d
o C
D,
pre
ssio
ne 1
.
Par
a re
inic
iar
a re
pro
duçã
o d
o C
D,
pre
ssio
ne 1
n
ova
mente
.
CEM
200
34
21a
bc
ef
ghd
L-CH R-CH
AMP
a
c b
ba c d
aa
bcd
ab
ef
cd
gh
i
b c d
5
5mm
5mm
5mm
© 2
009 K
onin
klij
ke Phili
ps
Ele
ctro
nic
s N
.V.
All
righ
ts r
ese
rved.
CEM
200_55_Q
SG_V
1.0